Gigabyte X99 SOC A Closer Look
Hitting the shelves at an almost budget friendly price of $299 the Gigabyte X99-SOC Champion is a slimmed down version of its big Brother the Giga X99-SOC Force. Since the big Brother X99-SOC comes in at merely $40 dollars more that may be a factor on how well we like this board. I’ve checked around several different retailers and the Gigabyte X99-SOC Champion is sold out, gone, it’s a ghost. To get one you have to don a black outfit and ski mask and sneak into the Gigabyte OC lab and gank it. Before the Gigabyte X99-SOC Champion’s release it was breaking OC world records at CES that was with extreme cooling and world-class overclockers slugging down Monster and Red Bull in copious quantities. The capabilities for world records are there and the board should do well on less extreme cooling.
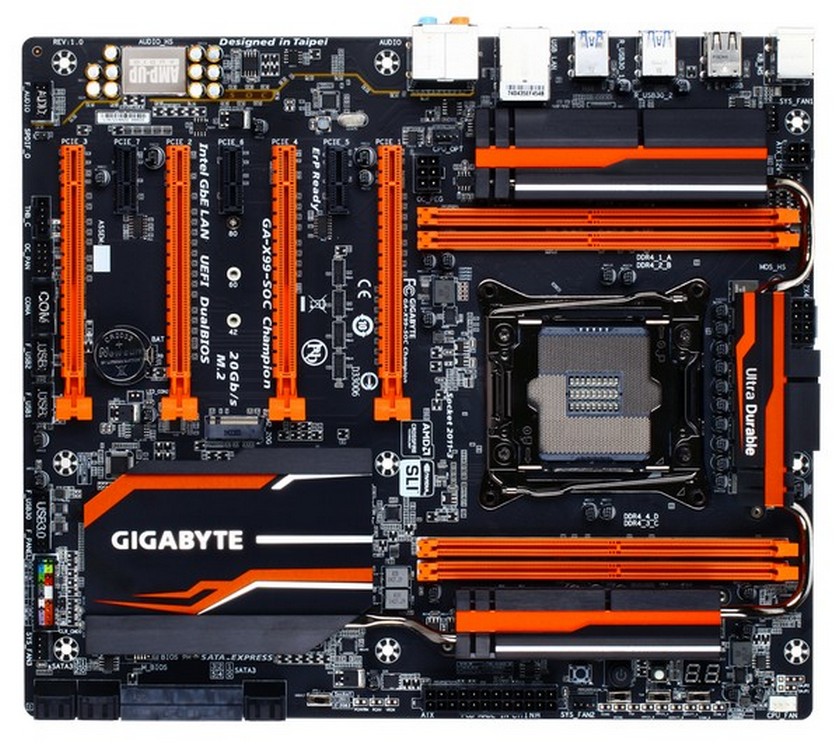
Before I even get started in the pictorial tour I’d like to say that covering all the features included in the Gigabyte X99-SOC Champion would be quite the chore if done individually. To cover just a few of the small, harder to point out in pictures, features an all-digital CPU power design from International Rectifier® which includes both 4th Generation digital PWM Controllers and industry-leading 3rd Generation PowIRstage® controllers,
Server Level Chokes by Cooper Bussmann providing: Server level reliability
- High current capacity
- New design reduces heat created by power loss and provides efficient power delivery to CPU VRM area
High Quality POSCAPs for CPU Power Delivery, POSCAP (Polymerized Organic Semiconductor Capacitor) is a high grade product which has better ripple current and dissipation factor characteristics which have lower impedance making it suitable for rigs with a high frequency switching power supply. International Rectifier has also developed the DirectFet which Gigabyte uses on its X99 boards providing better thermal properties than other MCM packages. Now let’s take a look at the 2011/2083 combination CPU socket everyone is talking about.
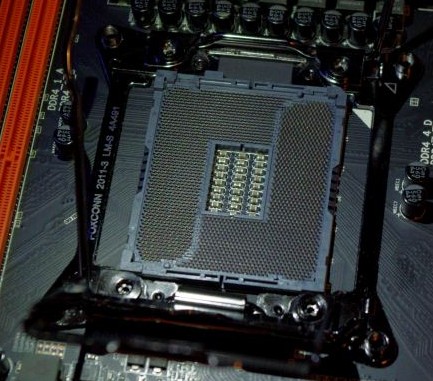
One of the most interesting features of the board is the CPU socket, while 2011v3 is the normal socket this board sports a 2011v3 compatible socket with 2083 pins and an on-motherboard switch that allows you to access a special 2083 pin mode that allows Bios settings to bypass FIVR and change internal CPU voltages not available on the standard 2011v3 socket. You should note that the 2083 setting is more applicable to extreme cooling, Dice, LN2, Liquid Helium and the likes, the water-cooling and air cooling overclocker isn’t likely to need the expanded capabilities. It’s better to have and not need expanded capabilities than need and not have them.
One of the differences compared to its big Brother the SOC Force is that the Gigabyte X99-SOC Champion only has 4 Dimm slots that may be an issue for some end users; personally I would like 32 Dimm slots but will usually settle for 8. Four DIMM slots is a squeaker for me, of course you know it’s got 4 when you buy it so it’s not much of a lick against the board. The PCIE slots are well spaced for Multi-GPU use. Some parts of the board look a little crowded but nothing the careful use of a stylus wouldn’t overcome. Most of the sockets on the Gigabyte X99-SOC have twice the Gold plating of competitors, and normal gold plating runs 5µ (5 Microns). Gigabyte uses 30µ on the CPU socket, DIMMS, and PCIE slots for better connectivity and corrosion prevention.
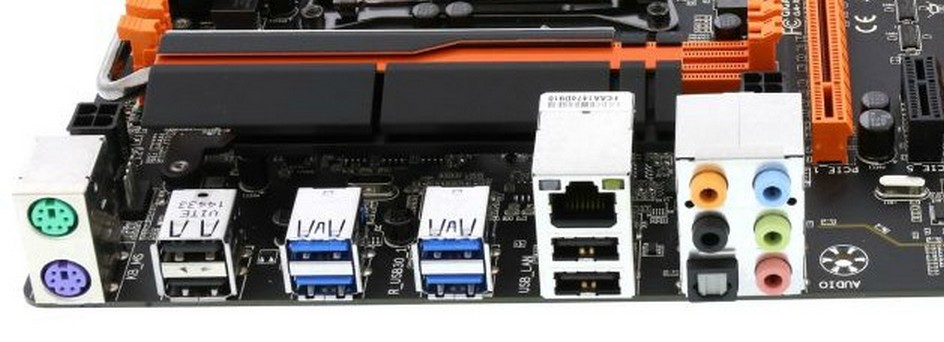
The I/O area of the Gigabyte X99-SOC is a bit sparse for my tastes, while the board has a plethora of USB 3.0 headers internally on the back we find four, those upgrading into an older chassis to save upgrade dollars might not have front panel USB 3.0 ports available. We also spot 4 USB 2.0 probably another money saving thing, USB 3.0 is backward compatible with USB 2.0 and it’s time all manufactures scrap the USB 2.0 ports completely and put all USB 3.0. You also get both PS2 keyboard and mouse connectors as many over clockers prefer to use a stripped down version of the operating system and don’t want to load USB drivers, I welcome this feature as when seriously diagnosing a build I prefer PS2 connectors. We see a single Gigabit LAN Connector and of course the Audio connectors for the 7.1 surround sound provided by the Realtek ALC1150 audio chip.
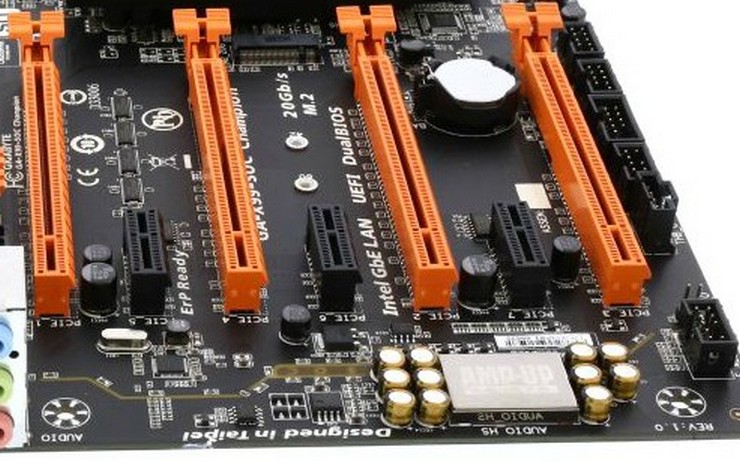
The PCIE layout is well designed and we aren’t seeing any show stoppers for Quad GPU usage but the last slot to the right here cramps right up on the bank of USB headers. I can see having one PCIE 1x slot and three seems a little excessive, they probably don’t cost much but one would suffice for most people and the money spent on providing a feature more people would covet (Wi-Fi comes to mind). The slots will provide 16x 16x, 16x 16x 8x, or 16x 8x 8x 8x and up to 320 GB/s bandwidth. At the risk of getting excessively wordy the PCIE design Gigabyte uses is an exclusive PCI design that utilizes 100% of all 40 lanes from the CPU when a 3 or 4 way GPU configurations is in place. You may ask why but when setting world records a full 40 lane PCIE setup is critical because many of the records involve a 4 GTX 980 setup to reach those sky high scores. Four way SLI is something not something a lot of end users can afford. If someone can afford 4 high end graphics cards that cost in excess of $2000 I would suspect they would choose the Gigabyte X99-SOC Force over the Champion variant but it’s nice to see Gigabyte included it in this less expensive SOC model.
While your eyes are on the board notice the safer screw holes Gigabyte is using. They have approximately twice the distance to any component of regular boards and provide a safe space buffer to prevent accidental grounding. Gigabyte stumbled on one of my pet peeves here; many times I’ve gone back to the screw collection (30 pounds) to dig out a smaller footprint screw for fear of tanking a board. The safer screw mounts are a small but welcome addition.

Here’s the bank of connectors snugged up against the fourth PCIE slot, with most enthusiast GPU’s being dual slot we would take exception to Quad GPU compatibility with wires scraping the GPU. That won’t be an issue for most as four GPU configurations are rare but it is worth mentioning.

Up by the Front panel connector (which is nicely color coded for easy installation) we find a USB 3.0 header and a four pin PWM fan controller. We would like to see an Easy connector that we can plug the wires into and then plug that into the front panel connector bank. It’s not a lot of fun leaning over a chassis with short wires and trying to hit the right posts even when color coded.
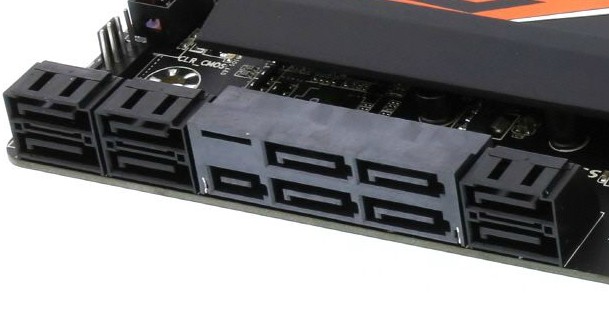
The drive connectors we find 6 Sata 6 GB/s connectors and two Sata Express 10GB/s. I searched the world over and didn’t find one Sata Express hard drive for sale and it’s nice to have the new Sata Express Standard available but with no drive availability we’ll just have to look at it and drool over non market ready prototype promises.
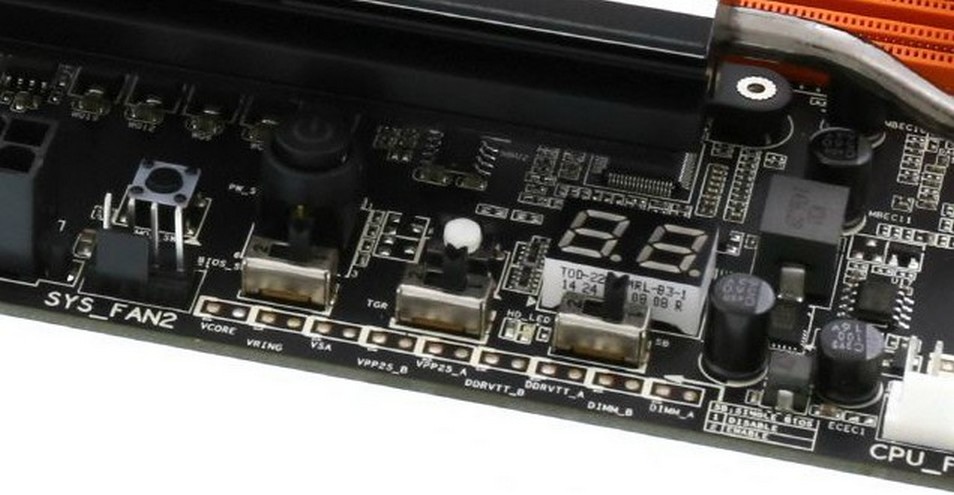
Here’s a look at the voltage measurement points, and dual digit debugger LED. No matter how I tried I couldn’t get as clear a photo as I wanted so I borrowed this one (Below) from the good people over at Gigabyte.
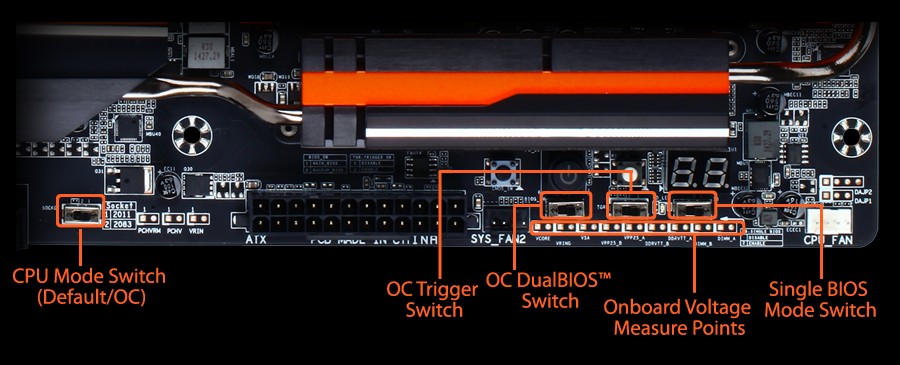
Far left is the culprit I couldn’t get in the photo clearly, the infamous 2011/2083 socket switch. For those wondering you flip the 2011/2083 then flip the OC trigger switch before you pour on the LN2. We’ve heard people calling both the LN2 switches. Over to the right we see (Left to right) OC Dual Bios Switch, OC Trigger switch (Wouldn’t it be sweet if it looked like a trigger), and the Single BIOS Mode Switch, below those are the voltage point measurement contact points. Hard to see and hard to reach in anything but an open chassis test bed situation are 3 buttons, one is a power button, and the other two are CMOS Reset and Restart, the small black and the small white one are what I was talking about using a stylus on, hard to reach hard to see and in a crucial area when overclocking a large finger might not have room to get in there and hit the buttons without a pen or stylus, I don’t recommend a screw driver when power is applied to the board, a plastic non-conductive stylus is your best bet (go large and spend the 99 cents for one).