Test Rig & Overclocking
Here at Bjorn3D we try to streamline the testing process to ensure fair and unbiased test results by removing variables such as excess drives, turning off of extra software such as the virus and malware scanner and clearing the cache and prefetch data. We also perform a clean install of Windows 10 Pro. This is all done to ensure that we can rule out any interference in the test results and allow you to get a better perception of the actual impact that the hardware makes. The only extra stuff installed are the utilities and drivers that are included with the board and before any testing we install the latest BIOS version. In addition to this we have the benchmarking software that is used for all the motherboard reviews here on Bjorn3D.
For testing we run each test three times and average the results to come up with the scores that are reported here. Should we encounter a score that is an outlier, we will then run the test again. Thus anomalous benchmarks that do not represent the true performance of the board are excluded.
| TEST RIG “MAXIMUS” | |
| Case Type | Fractal Define R5 |
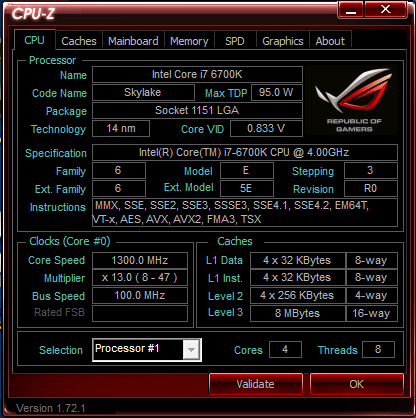
| CPU | Intel Core I7 6700K 4.0 – 4.2 Ghz |
| Motherboard | ASUS ROG Z170 MAXIMUS VIII GENE |
| RAM | Patriot Viper 4 Series DDR4 16GB (2 x 8GB) 2800MHz Kit |
| CPU Cooler | Enermax Liqtech 240 |
| Hard Drive | SanDisk Extreme Pro 240GB |
| GPU | EVGA GTX970 FTW 4GB |
| Case fans | 2 Fractal case fans |
| PSU | Fractal Edison M 750W |
| Mouse | Logitech G700 |
| Keyboard | Logitech G910 |
Overclocking
To be honest, there is more than one way to OC memory and this can be done separately or together. One can OC memory through changing the frequency within the BIOS and increasing the voltage. However, you need to be careful, because too much voltage can lead to damage. Another way to get better performance is through changing the CAS timings. When it comes to the timings, the lower the timing number the better.
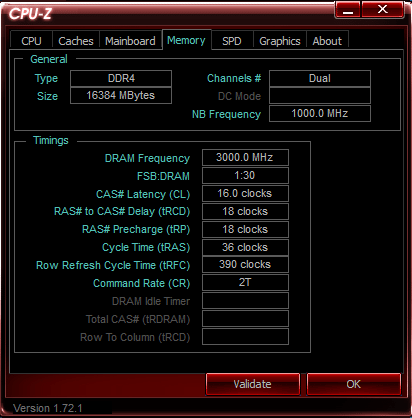
Using CPU-Z, we establish a baseline, showing the kit set to its stock settings using the XMP setting in order to show you it is running at its stock speed, voltage and CAS timings. This allows you to get a good feel at its already impressive speed before we attempt any overclocking.
We managed to reach a very stable overclock of 3000MHz, which is 200MHz higher than the stock speed. This was done at the stock timings and 1.325 volts. This gain was accomplished at reasonably safe voltages that will protect your RAM and the memory controller on the CPU from over voltage. This is important to remember, since the memory controller is located on the CPU with Skylake! Now the CPU was overclocked previously in the ASUS Maximus VIII GENE review, and we are still using the same settings with the CPU set to 4700MHz.


We attempted to achieve higher memory speeds, and while we achieved a higher speed, we felt the voltages were above what we would advise people to run on a daily basis, since damage to their system could occur. As a result, we went back to the quite reasonable and respectable 3000MHz, and at this speed this kit is plenty fast enough for anything you can throw at it!
 Bjorn3D.com Bjorn3d.com – Satisfying Your Daily Tech Cravings Since 1996


