Test Rig, Overclocking CPU, Memory & Thermal Readings
Testing we turn off any internet connection and reboot the machine to ensure Windows 10 pesky updates don’t skew numbers. Once rebooted we disable the internet open the task manager and wait about 10 minutes for any background tasks to finish. Once the CPU usage is at or below 1% we proceed with our tests. Each test is ran three times, we then average the three tests and report that score here. Should we run into any anomalous tests we toss the abortion test and run the test again.
| Test Rig “Quadzilla” |
|
| Case Type | |
| CPU | Intel Core I7 6700K 4.0 – 4.2GHz |
| Motherboard | |
| Ram | |
| CPU Cooler | EKWB L360 (EK-Kit L360) |
| Hard Drives | |
| Optical | Liteon DVD Burner |
| GPU | Asus Strix R9 390X Gaming 8G OC |
| Case Fans | 1 x 180mm Mosfet / CPU / Ram cooling fan 1 x 120mm PCI-E Cooling Fan |
| Docking Stations | None |
| Testing PSU | |
| Legacy | None |
| Mouse | |
| Keyboard | |
| Any Attempt Copy This System Configuration May Lead to Bankruptcy | |
Overclocking

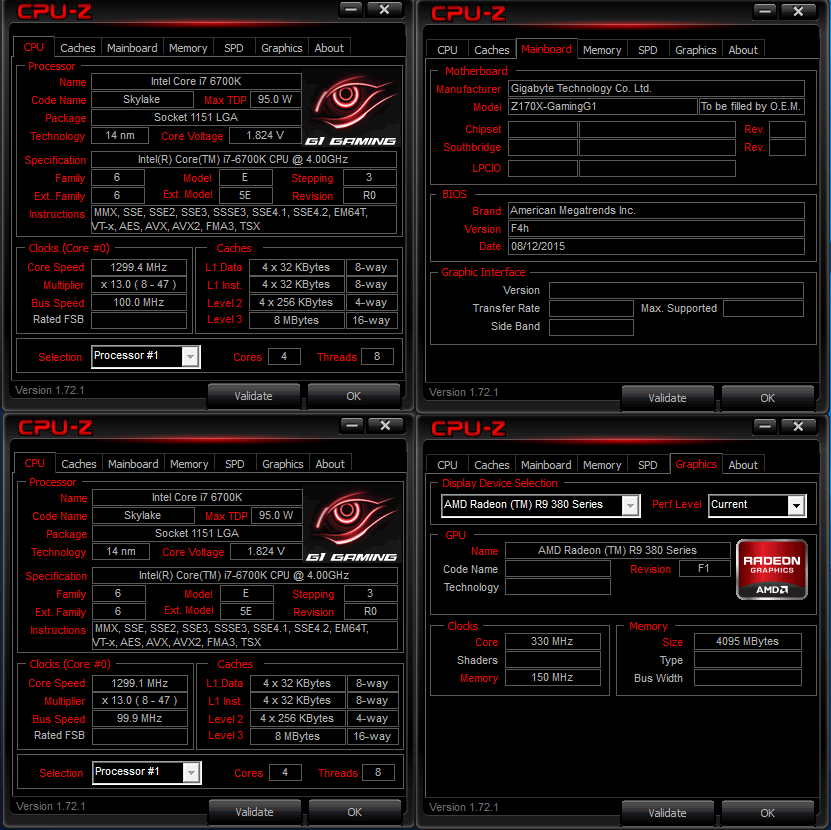
Here’s our CPU-Z system shot showing the Overclocked i7 6700k on the Gigabyte Z170x-Gaming G1.
We easily hit 4.8GHz on this monster board and we could tell the board has more to give but we were at the voltage limits (in BIOS) we had set. At 4.8GHz our chip requires 1.45V, a little higher than we like to go so we generally run it at 4.7GHz 1.42V as it seems we have a bit of a voltage hungry chip but a better than average OCer.
Memory Overclocking
We are using Kingston HyperX Fury 2666MHz at 15 17 17 35 and we wanted to go for the maximum productive overclock on the Gaming G1 to see how it handles memory.

We easily OCed the Ram to 2933MHz with the new more granular Ram OCing option. Pull down a ram multiplier slider and pick any speed you want in 33MHz increments on the GIGABYTE Gaming G1. The HyperX Fury 2666 kit may have a little more overhead but it’s the only kit we have in the lab currently so we have to be a little conservative until we get a backup kit.
Temperatures

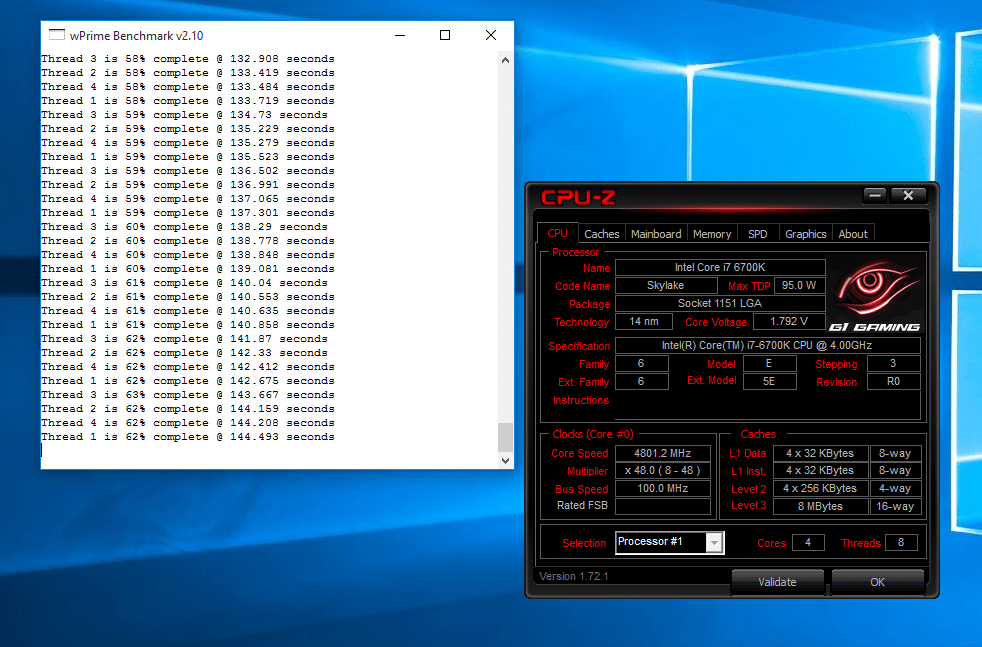
For Thermal readings I loaded and run WPrime 1024 then read the thermal load, Skylake reaches its thermal limit pretty quick when highly OC’d. Cool the machine down for 30 minutes at an idle then read the Idle temperatures. I repeat that same process three times then average the three runs and report those scores. An eye is kept out for anomalous runs, if an anomaly occurs I shut the machine down let it cool off, reboot and rerun the test.
We were running a EKWB EK-Kit L360 which is a beginners triple radiator kit with a 3/8″ bore hose and a pump that pushes 400L an hour, it’s a pretty effective cooling system and Skylake pushed the Triple Radiator to its limit.
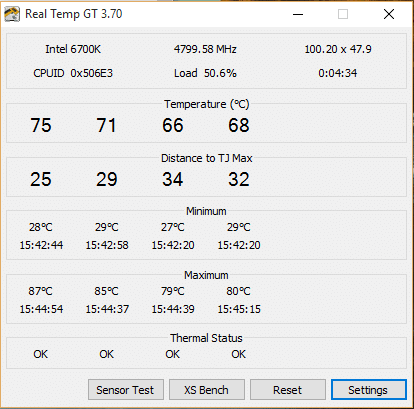
As you can see running at 4800Mhz things get a little toasty, we maxed out at 87C running WPrime on 8 threads 4 Cores. Keep in mind we are running a Triple Radiator EK-Kit L360 setup with 3 high pressure fans so you aren’t going to hit 4.8 with a $40 dollar air cooler.