Test Rig & OverClocking
We went pretty standard with our tests, Windows 10 Pro, we turned off the Virus Scanner and the MalWare program, removed excess drives on the machine and just left the Crucial MX100 SSD so no indexing would take place, We emptied Prefetch and the cache between tests. When we did a cold startup of the machines we allowed 10 minutes for Windows housekeeping to finish and give us all the processor cycles it could. We didn’t close a lot of host services or strip down the OS turning things off to get better numbers, We left it at turning off the scanners, clearing the caches and prefetch and ran the tests just like you would on your machine at home. All of the GIGABYTE Utilities were installed but no excess programs. Just Windows 10 Pro fully updated, the Utilities Drivers Disk and the Utilities that came with the motherboard. We of course installed the benchmarking software and it’s a fresh install of all software OS included.
We ran each Test 3 times and average those three runs to give you the scores we report here. Should we encounter a score that is inconsistent with the other two tests we trash it and go for a 4th benchmark run, no anomalous benchmarks are included here.
| Test Rig “Quadzilla” |
|
| Case Type | |
| CPU | Intel Core I7 6700K 4.0 – 4.2GHz |
| Motherboard | |
| Ram | |
| CPU Cooler | EKWB L360 (EK-Kit L360) |
| Hard Drives | |
| Optical | Liteon DVD Burner |
| GPU | Asus Strix R9 390X Gaming 8G OC |
| Case Fans | 1 x 180mm Mosfet / CPU / Ram cooling fan 1 x 120mm PCI-E Cooling Fan |
| Docking Stations | None |
| Testing PSU | |
| Legacy | None |
| Mouse | |
| Keyboard | |
| Any Attempt Copy This System Configuration May Lead to Bankruptcy | |
OverClocking The GIGABYTE Z170X Gaming 7

When we got the GIGABYTE Z170X bios was preproduction F2 and more or less just MIT BIOS and even at that the board wasn’t fully functional for us. We chose to wait on the UEFI BIOS. Some sites have reported that the GIGABYTE Z170X Gaming 7 only has MIT BIOS, they are incorrect, it has UEFI in 1024, UEFI in HD and MIT BIOS. After we received the F5a Bios the board was fully functional and we can give you the tried and true low down on the Motherboards functionality and performance.
We went to great lengths OCing the GIGABYTE Z170X Gaming. Things have changed a little on Z107X, the BCLK is no longer strapped to PCI-E and DMI. So instead of one large Voltage rail going in to the CPU you now have 3. Asus and GIGABYTE use Vcore for the processor core, then there’s VCCIO and System Agent and those are the three most important voltages for rudimentary normal everyday OCing. Things have also changed with the cache. cache frequency operates seperate from the Core speed of the CPU.
For instance the 6700K runs at 4.0GHz with a turbo to 4.2GHz so by default the cache runs at 4.1GHz. They recommend you set the cache at the same speed as your OC. Most boards use VCORE voltage to run the cache so no voltage adjustments are needed to up the cache speed. We played with the cache speeds keeping them at 4.1 and setting them equal to the CPU speed. Since the Cache shares voltage with the CPU you might not get as high an overclock upping the cache speed (shared voltage).
HOWEVER if the cache speed isn’t the same or close to the CPU speed you can limit your RAM overclock, we didn’t actually see much increase in performance upping the cache, but being a new platform we’ll continue to experiment with it and see what happens.
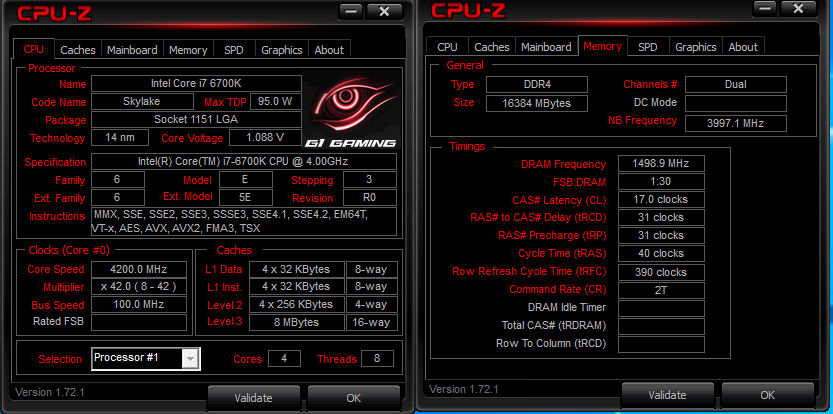
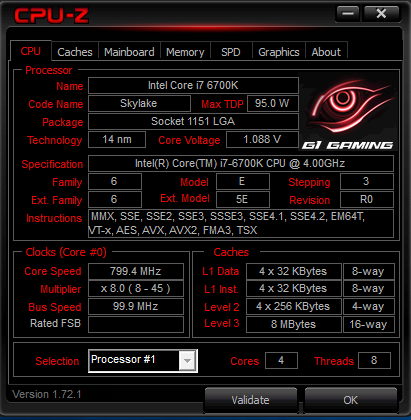
Here’s the stock CPU-Z shot showing 4200MHz and most of the testing on the GIGABYTE Z170X Gaming 7 we did with the same Kit of Kingston Ram we’ve used on every review, We do keep the Kit overclocked to 3000MHz on the reviews, the kit is capable of doing more than 3000MHz but it shows you the Ram OCing capabilities of the board and 3000MHz is kind of middle of the road on a platform that we’ve seen 3600MHz kits on.
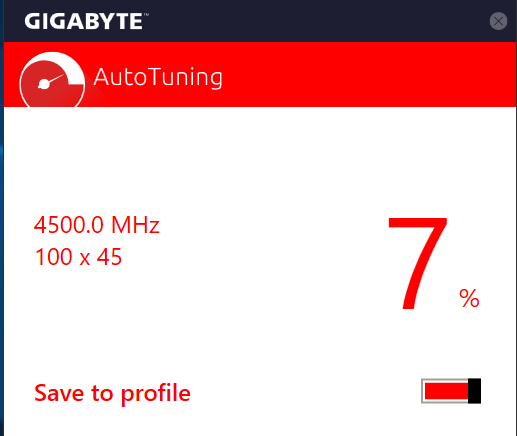
First we like to fire up the manufacturers auto overclocker and in this case it’s EasyTune. EasyTune cranked the CPU up to 4900MHz then threw the blue screen of death and when it came back hung up. So we paused and got the latest version of EasyTune from the GIGA website and it shot up to 4900MHz, blue screened and came back and reloaded. When it reloaded it told us 4500MHz was the EasyTune honey hole of overclocking. We weren’t convinced this was the Glory Road of overclocking so we went to Manual BIOS Tuning.
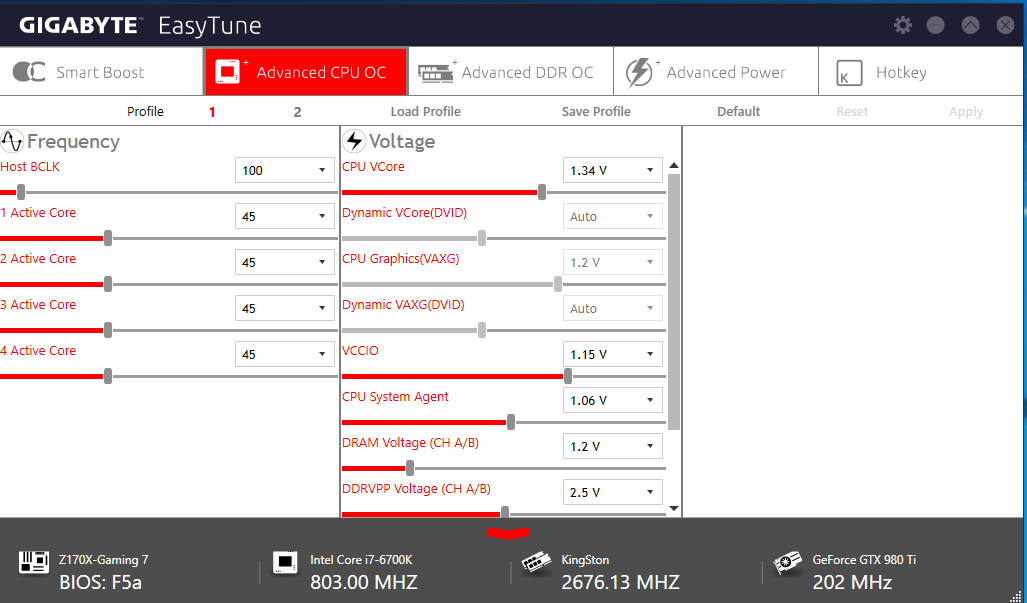
Here’s the settings on EasyTune for the 4500MHz and as you can see you have the standard OCing Settings and these settings should get you a safe 4.5GHz overclock on good quality AIR.
Here’s CPU-Z the top multiplier here is 45 and it’s the CPU-Z conformation shot. We have found it best to turn off all the C-State low power settngs on SkyLake but leave Turbo and SpeedStep on. That way you get a very fast ramp to MAX OC but you are conserving your CPU for longevity purposes. It’s the best of both worlds, nice 4500MHz OC there when you need it, but it drops speed when your playing Solitaire, We ran both with SpeedStep and Without and there was virtually no difference when the C-States were disabled.
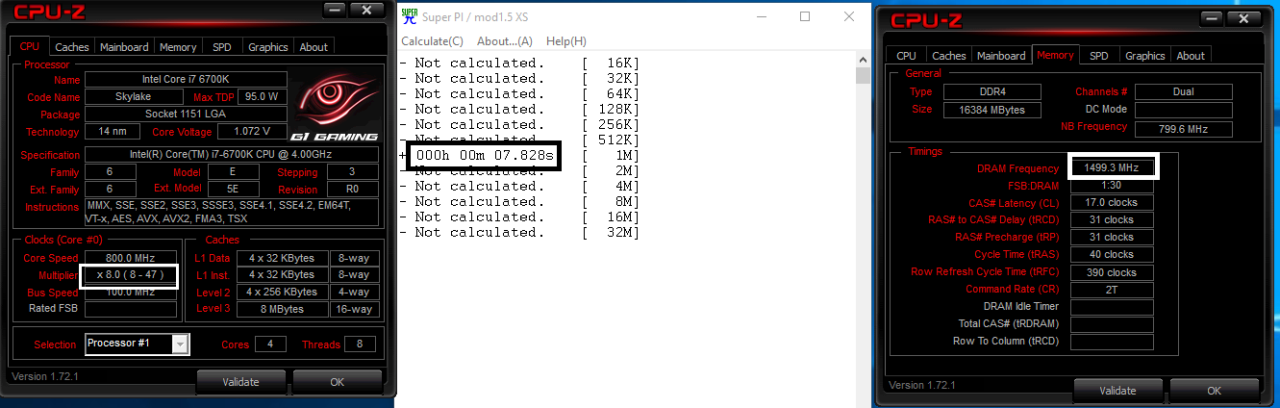
Now at 4700MHz with the Ram set to 3000MHz we turn in a CPU-Z time of 7.828 Seconds and everything looks stable at 4700MHz, Now don’t pay any attention to the CPU core voltage. We had CPU core voltage set to 1.4 in BIOS and were monitoring it on XTU Intels Extreme Tuning Utility. Yes it’s a very minor amount of overhead but if you thermal throttle and don’t know it your test is about as good as a dozen rotten eggs, you can throw the test results at people but they stink if you throttled. Well we are using the L360 EK-Kit triple radiator water cooling and we got zero throttling.
We were at Core 1.4v, VCCIO at 1.1v and System agent 1.1v, that’s probably a little high for our Ram settings but it gave us rock solid stability, If you go wild and get a 3400MHz kit of ram, make sure you have VCCIO and System Agent cranked up, You may also need to crank up the Uncore (Cache) multiplier so that it’s even with your OC speed. Hence if your OC is 4.7GHz you may need to increase Cache Speed to 4.7GHz to get the full potential out of your ram. VCORE and Cache voltages are both supplied by the VCORE setting in BIOS so you shouldn’t need to increase that. You may have to knock PCH up a little on uber high kits. We are still experimenting but these settings work best for us.

Here’s RealBench at Stock CPU of 4.0 – 4.2GHz and the Ram is at 3000MHz, This shows the stock CPU speed and gives you baseline scores of the CPU at stock on this motherboard.
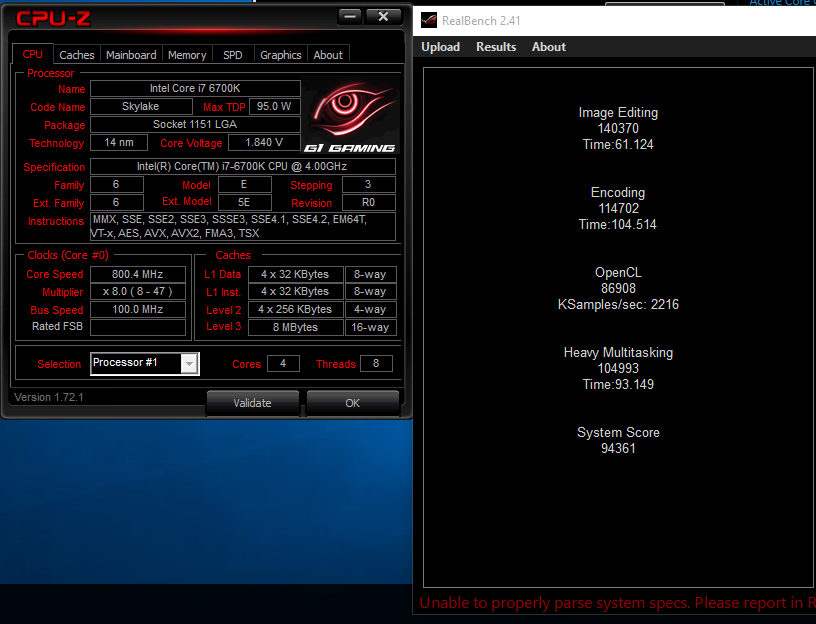
Here’s the RealBench at 4700MHz Core and Ram still at 3000MHz so the great boost in performance that we got is due to the CPU overclock and isolated to the CPU itself.
Now would we run at 4700MHz 24/7 for fun? No probably not 4.7GHz requires 1.4 – 1.42V which is the ragged edge of allowable voltages, For every day purposes 4500MHz looks pretty good and it’s at very little voltage increase and produces more manageable thermals. There’s always one guy who says you can always tell inexperienced OCer when they talk about longevity, then usually some comment about break out your DOOM game circa 1995 and play it.
We got it straight from the horse’s mouth in the Press material, on good Air cooling around 1.35v period and around 4.5GHz, on good watercooling 1.4 – 1.42v but 1.42v on great water cooling. So for the doubters, yes you can run at 4.7GHz at 1.42v but you are degrading the CPU faster and no longevity tables exist for CPU’s. It’s your CPU run it how you want but for everyday purposes 4.5GHz is plenty, leave 4.7GHz for benches and such; you don’t really need that last 200MHz for anything more than bragging and Glory Road runs.


Hey! Great Info. I just got one. Running on 360 Predator AIO.
You mention,
” We played with the cache speeds keeping them at 4.1 and setting them equal to the CPU speed. ”
Where on earth are you setting that in the BIOS? I can find nothing for cache speeds?!
Thanks for any clarification
I am wishing I had spent more and had gone with ASUS. Lots of weird power-related and graphics-related glitches with the Gaming 7. I think I finally solved the problem of the computer restarting itself every time I shut it down. Sometimes the machine turns itself off when it’s supposed to be in standby. I use the onboard graphics, and sometimes only one of my two monitors will display anything when coming out of standby, starting up, etc. You’d think getting basic power and display functions right would be important. Hopefully BIOS updates will solve some of these issue, but I’m not terribly optimistic about that happening.
The feature list is really nice, and I really wanted the native Thunderbolt support, but I wish I had chosen differently.
Excellent in depth review which made my mind up to by this motherboard over the Asus Hero motherboard… and yes I made the right decision… Excellent straight out of the box. The sound is exceptional with the Soundblaster 3d sound and the OP AMP feature. The intel based 3.1 USB controller also makes a difference. I have used a Samsung SM951 M.2 NVme SSD with is nothing short of incredible.
Looks are subjective but I liked the white and red theme. The metal shroud over the PCIE slots actually make a difference by keeping my Palit 1070 straight…no sag at all.
Overclocking was a breeze with 4.5 achieved without even trying… will go further later. Overall a well priced high spec z170x motherboard… I would recommend this to anyone who wants something a little different from Asus with a bit more value for the money..