Temperatures, Noise, Power, & Overclocking
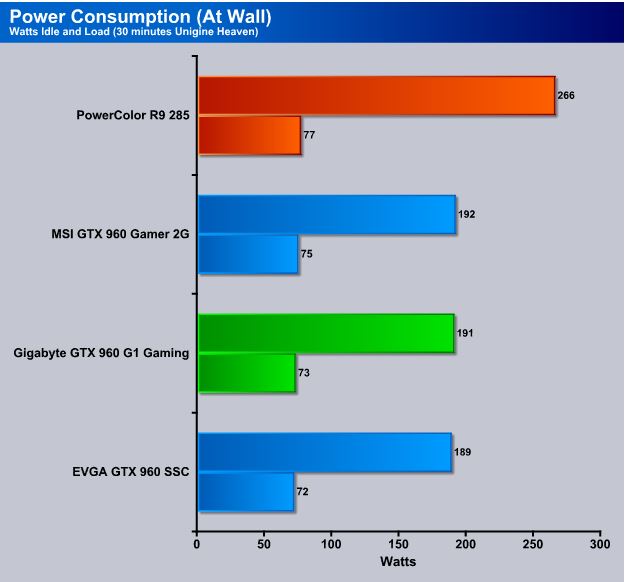
Power Consumption
We take power consumption at the wall using a Kill A Watt Power drain measurement device. We loaded Unigine Heaven and let it idle for 30 minutes and then recorded the idle temperature and power consumption, shut it down and let it cool for a half hour then repeated the test twice in this sequence. For the load, we ran Unigine Heaven looping for 30 minutes, let it cool down to the idle temps established in the previous test then looped it for 30 minutes, repeating the process a total of three times. Once completed, we take the three results from each test and average them giving us an aggregate average for each result. Killing two birds with one stone and getting power consumption and thermals all at once.
You will get higher draws on wattage if you are using a torture program like Furmark, but programs like that produce unrealistic numbers. Even when playing games, you don’t put a 100% load on the GPU all the time. There are peaks and valleys in GPU power consumption, and that represents more real-life numbers than 100% load all the time. Unless of course you are mining Bitcoins or Folding@home, in which case your landlord probably pays the utilities, and power consumption isn’t really a concern.
Temperatures
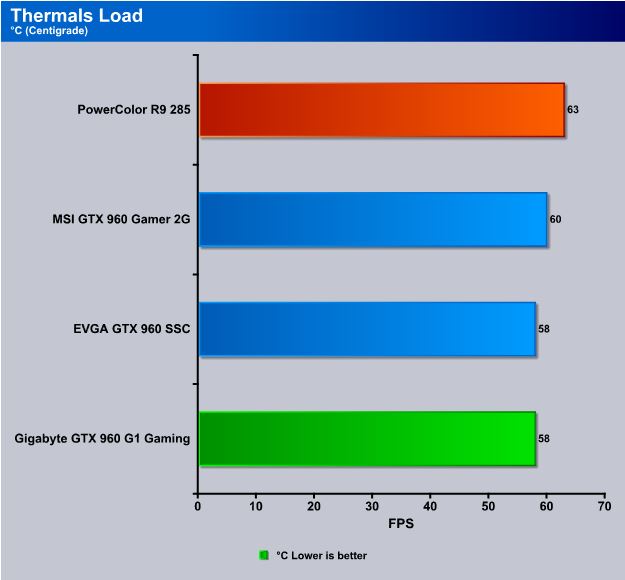
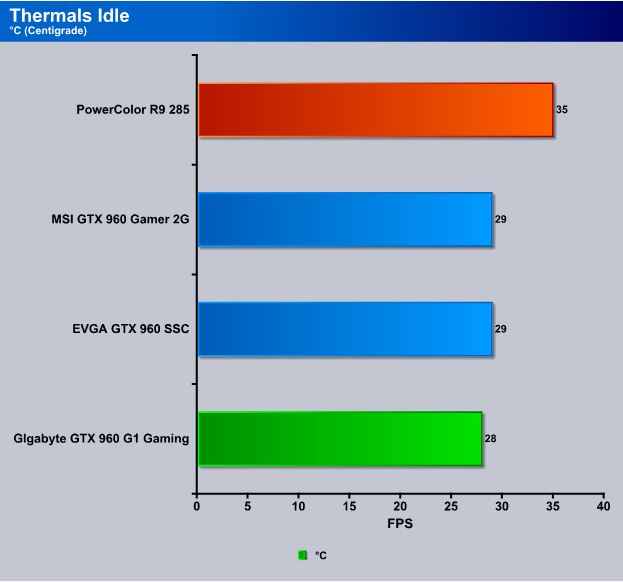
For thermal readings we looped Unigine Heaven for 30 minutes then read the thermal load, allowed the machine to cool down for 30 minutes at an idle then read the idle temperatures. We repeat that same process three times, then average the three runs and report those scores. We keep an eye out for anomalous runs, and if an anomaly occurs, we shut the machine down and let it cool off, reboot and rerun the test.
Thermally speaking, during Cinebench we topped out at 58°C but in a few applications we saw spikes at around 65°C. The spikes we saw were while using a very conservative fan profile, but by using OC Guru 2 we easily set a slightly more aggressive fan profile that dropped temps significantly but didn’t increase the audible noise level.
Keep in mind, that we are in the Sonoran Desert where the AC is usually kept at 78°F and your results may vary a little, but in this case usually a degree or two cooler. After 30 minutes of idle activity the Gigabyte GTX 960 G1 Gaming hit 28°C in a closed chassis with medium ventilation (CoolerMaster Silencio).
We all hate noisy or whiny fans that intrude on our gaming/computing time. We run several noise level tests: Complete idle, spiking load where the graphics load fluctuates between high and low load, and high load. The Silencio chassis is designed for silence, so we removed the ventilation panels, top panel and pulled the filters. Our decibel meter registers at 30 dBA. We generally record sound levels sitting next to the tower with the tower at floor shelf level. We put the decibel meter cose to where our ear would be and take measurements from there. To get a better idea of what the sound compares to, here is a scale of typical sound levels.
Typical
Sound Levels
| Jet takeoff (200 feet) | 120 dBA | |
| Construction Site | 110 dBA | |
| Shout (5 feet) | 100 dBA | |
| Heavy truck (50 feet) | 90 dBA | |
| Urban street | 80 dBA | |
| Automobile interior | 70 dBA | |
| Normal conversation (3 feet) | 60 dBA | |
| Office, classroom | 50 dBA | |
| Living room | 40 dBA | |
| Bedroom at night | 30 dBA | |
| Broadcast studio | 20 dBA | |
| Rustling leaves | 10 dBA |
At what we call head distance for the Gigabyte GTX 960 G1 Gaming the idle noise level was at 30 dBA and barely registering on the meter. Spiking the load it ranged between 30 and 37 dBA and at full load with fans set to 100%, we recorded a 40 dBA noise level. Even at 40 dBA the sound from the GPU was barely audible and in no way interfered with or intruded on the game play.
Overclocking
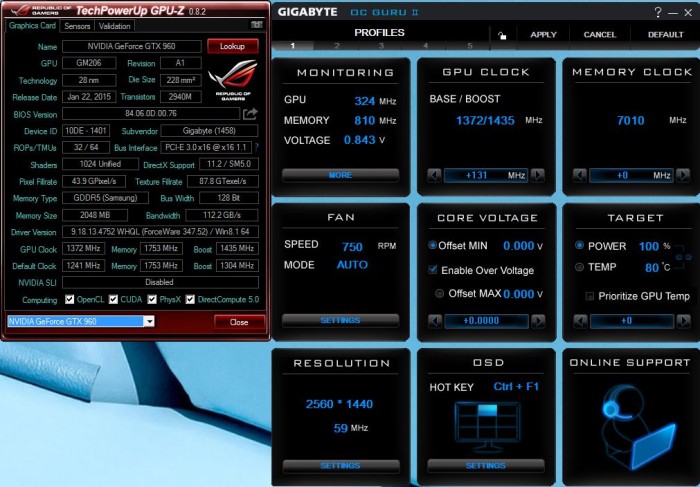
Overclocking the Maxwell series of GPU’s is different from GPU’s in the past. If you want to take a peek at our “Lets Talk Overclocking” page, we included it in this review for your convenience. We like to use a variety of tools for overclocking, however if the card’s vendor, in this case Gigabyte, has a provided OCing tool, we use that tool. We also use GPU-Z to verify that OC settings were applied to the GPU core, check thermal performance and core load. If need be, we will use another vendor’s tools to monitor a card’s thermal and core performance, but that’s just for confirmation.
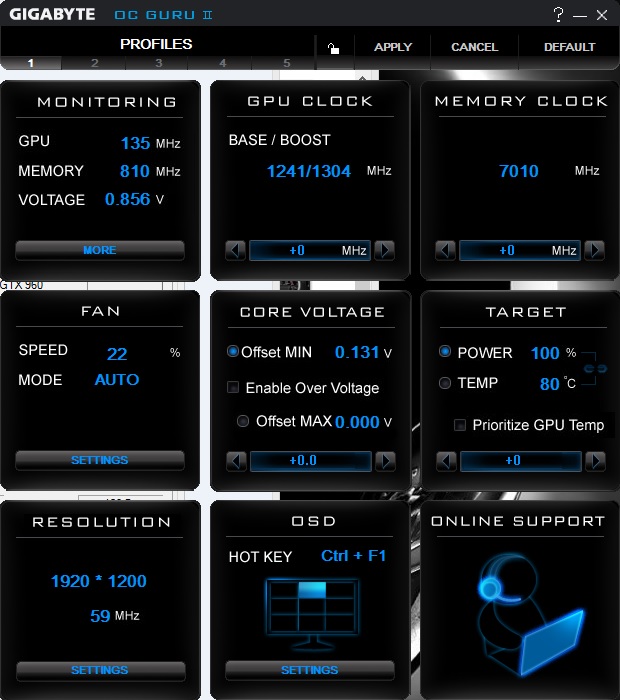
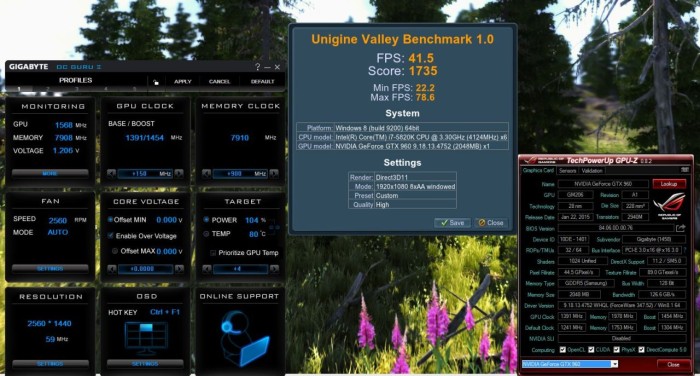
We used Gigabyte’s OC Guru 2 to overclock the GTX 960 G1 Gaming and GPU-Z for verification purposes and found that those two utilities were all we needed to accomplish good, solid overclocks. We tested the OC’s with Unigine Valley Benchmark 1.0 and ran that benchmark 14 or 15 times for each top OC we got to verify that there were no cracks in our OCing armor. Here’s a shot of the comprehensive OC Guru 2.
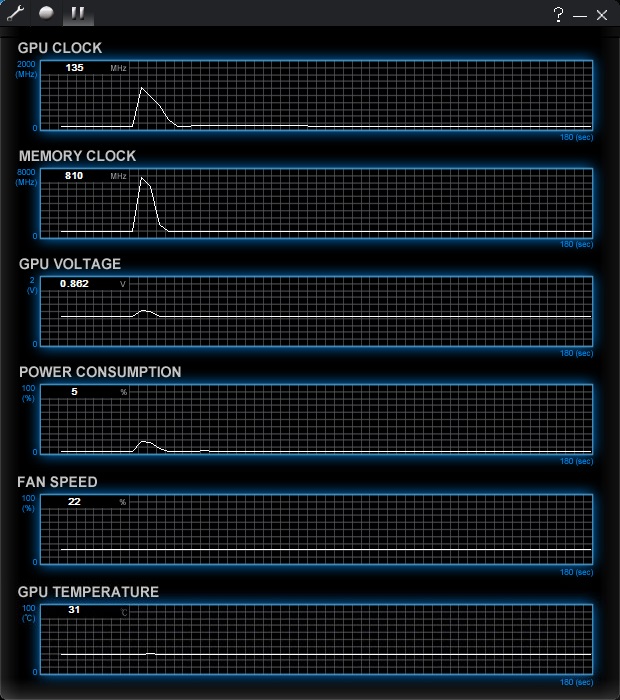
Then here’s a shot of the monitoring screen.
As you can see, all the tools you need except for a GPU stress test are included. Even with utilities that include a stress test, we generally go to Cinebench or another test like Unigine Valley. Tests like Furmark intentionally overheat the GPU and that hurts the OC performance so with Maxwell, torture tests are out.
Voltage doesn’t seem to do the GTX 960 class GPU’s much good when overclocking, so we do a non-voltage increase OC first and for that we got a 130 MHz core OC, which was rock solid in Cinebench and Unigine Valley 1.0. That was a simple matter of increasing the clock speed by 130 MHz, clicking “Apply”, and running the benchmarks.
If you just have to have that last 20 MHz of overclock to keep your sanity, we upped the target voltage to 104% and pushed the core to a 150 MHz OC, resulting in a 1391 MHz base clock and the boost clock was an insane 1568 MHz. We also managed a cool 900 MHz overclock for the GDDR5-memory from 7012 to 7908 MHz.
 Bjorn3D.com Bjorn3d.com – Satisfying Your Daily Tech Cravings Since 1996
