ASUS has some amazing Z77 offerings especially in the ROG lineup. We have already looked at the Maximus V Gene and the Maximus V Formula, both of which were amazing overclockers with loads of features. Today we have the Extreme variant which is the very top model for the ASUS ROG lineup. It carries many features such as the OCKey and VGA Hotwire. Keep reading to see exactly what this board offers!
Introduction – ASUS Maximus V Extreme

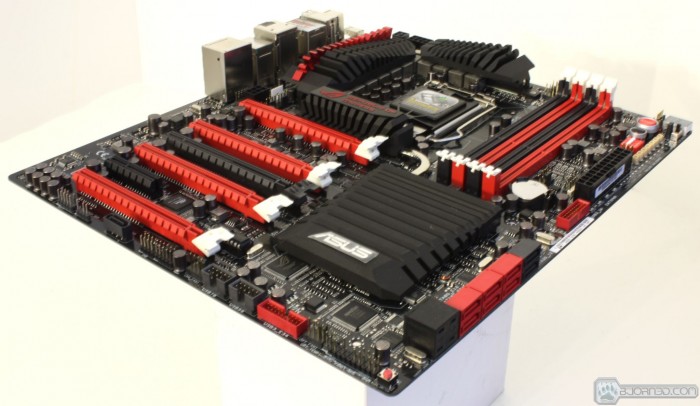
Today we are looking at the Maximus V Extreme, which is the daddy of the Z77 ROG lineup. The Maximus V Extreme not only offers many gaming features but also many features which are built around the whole idea of breaking world records. Some of the Overclocker centric features are the Extreme Engine DIGI+ VRM components, ROG OCKey, VGA Hotwire and the Subzero sense technology. All of these things come together to make one awesome and extreme board.
The Maximus V Extreme comes to market with a street price of $379.99 directly from Newegg at the time of writing. This is actually a pretty reasonable price for the features, so now let’s take a look at how it performs.
Key Features
APS (ASUS Premium Service)
ASUS Previously offered the APS service on ROG boards, but starting with the X79 series they have extended the service to cover much more of their X79 and Z77 models in the standard channel line. This is nice to see as the APS service allows an advanced replacement or a board to be shipped to the user which in turn means less down time for the end user. More on this service can be seen on the ASUS website HERE
Extreme Engine DIGI+ II
ASUS Has been known for some time for their DIGI+ solutions and on the ROG boards they have the Extreme Engine DIGI+ II designs.
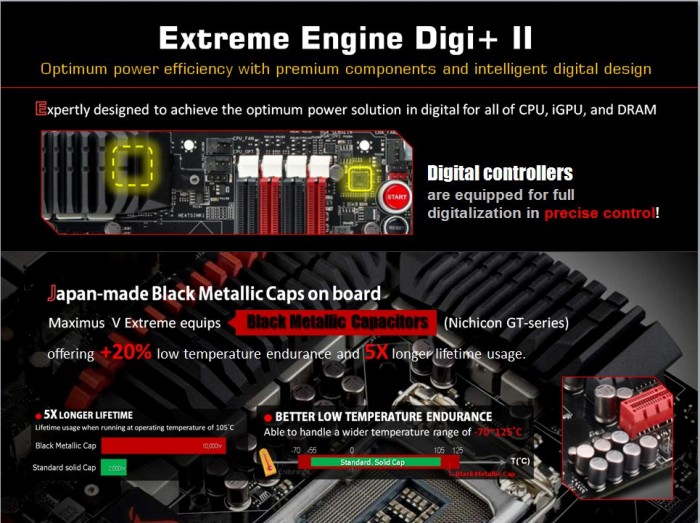
The Extreme engine DIGI+ II design is a direct implementation of the DIGI+ designs designed for optimum performance and efficiency to meet both the extreme gamers needs along with the extreme benchmarkers needs as well. If you have ever heard the term wretched excess, the extreme engine DIGI+ fits that description quite nicely. We all know that going excessive is not a bad thing but you must keep your goal in perspective, and ASUS did exactly that by building a super robust VRM, but also ensuring the DIGI+ controller can handle the extreme load of benchmarking while also meeting the needs of 24/7 use. This includes such features as demand based switching which throttles the VRM components so that load is shifted back and forth between VRM components so that no single component is in a constant loading state which will allow for much cooler and efficient operation. Also if the system jumps up to a fully loaded situation the controller can instantly transition to a high power state which kicks on all of the VRM components and ensures your system has the power it needs on tap. This kind of implementation also means that even under significant overclocks you can keep power saving features of the DIGI+ setup active and it will still throttle as seen necessary to keep power on tap but also allow power savings and efficiency in low load conditions. A note to this is that if pushing for extreme clocks the DIGI+ can be set for higher or extreme modes which will keep the VRM at a constant on state and full power will be delivered at all times which is necessary for those running in such scenarios such as LN2 benchmarking.
One important note for the Extreme Engine DIGI+ design is the components. Here we will look at specific components and what makes them special.
Special attention has been paid to the capacitor choice as they are very highly specd units. A standard capacitor is rated to handle operating temps of 105C at up to 2000hr, but the special black metallic Nichicon GT series caps are rated for up to 5x this time at up to 10,000hr’s at the same 105C operating temperatures. This is a huge advantage as it allows for a much higher threshold for long term usage along with the durability to handle the severe beating many users will dish out during overclocking expeditions.
Also worth noting is the fact that the Nichicon GT caps are rated for a wider thermal threshold which means that the operating temps it can handle is much better and it is even better at the extreme cold temperatures some extreme enthusiasts subject these boards to.
Windows 8 Ready
ASUS has been hard at work prepping for Windows 8, the new revolutionary OS from Microsoft. With this comes a new BIOS CAP file which is said to improve features and functionality integration for better compatibility with the new OS. Also other cool features are faster boot up times and optimized settings for a smoother Windows 8 working environment. We are sure the features available for this upgrade will scale larger as the OS matures and becomes available so keep a look at the ASUS site for updates found HERE
Thunderbolt
ASUS’ P8Z77-V Premium was the first to offer onboard Thunderbolt support which is fully certified by Intel. This may not seem like a very big deal, but this tells us that ASUS works very closely with Intel to get such a jump ahead on this offering. If ASUS works with Intel so closely for a add on component such as this it can only mean good things and great compatibility for the board as well as for the end user.
We will go deeper into the Thunderbolt technology a little later in the review but we can confirm it uses a full 10Gbps interconnect to ensure no bandwidth issues or slowdowns will be seen from the Thunderbolt interface. The Thunderbolt does carry both a data stream alongside a DisplayPort stream to ensure seamless integration of up to 6 devices in a daisy chain configuration along with a DisplayPort monitor at the end of the line all from a single connection on the board.
mPCI-E Combo Card (WiFi/BT 4.0 mPCI-E card included)
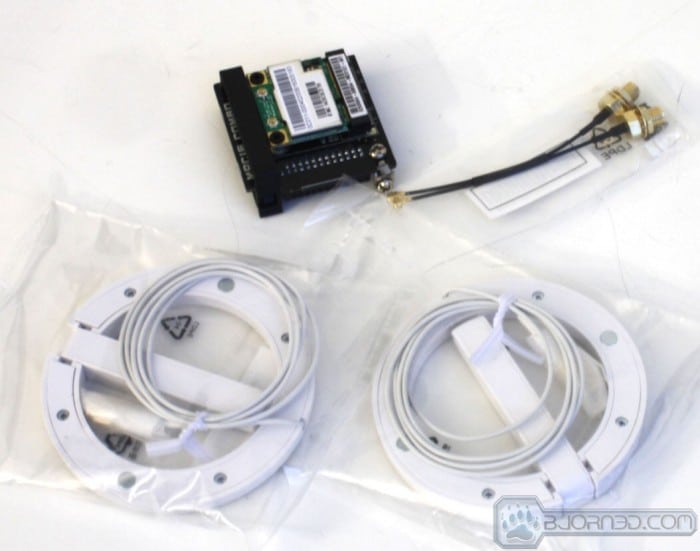
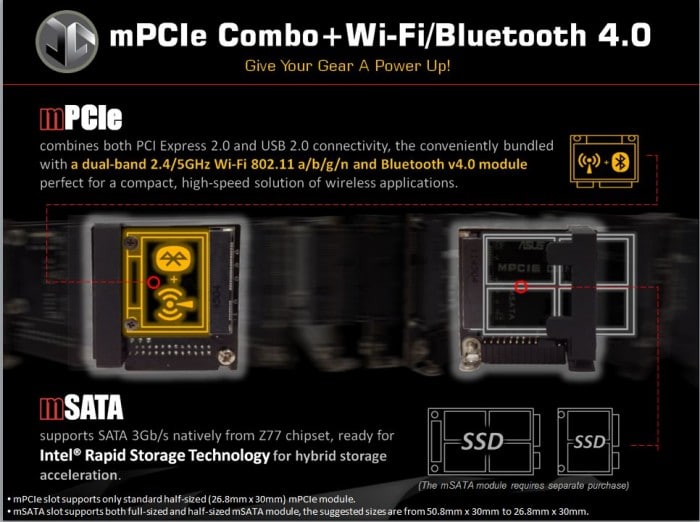
ASUS included a Mini PCI-E and mSATA card with the Maximus V Gene, but with the Formula they did one better. With the formula ASUS decided that just having the mPCI-E option wasnt enough and they wanted the board to have WiFi to add to its many items already on its unique features list. With that ASUS bundles a mPCI-E WiFi/BT4.0 modules preinstalled on the small card. This alone allow for WiFi function and basically for the most part wireless functionality for pretty much everything. Also with the included card a mSATA SSD can be installed with capacities up to 240GB which means a complete and almost wireless system can be installed with no storage devices even plugged into the onboard SATA ports. I like this as it allows for some amazing versatility as to how you want your system configured.
One important note on this is that even though the card supports and comes with the WiFi/BT4.0 card included the SSD can also be installed and used concurrently for the ultimate cable-less solution.
4 Way SLI Support
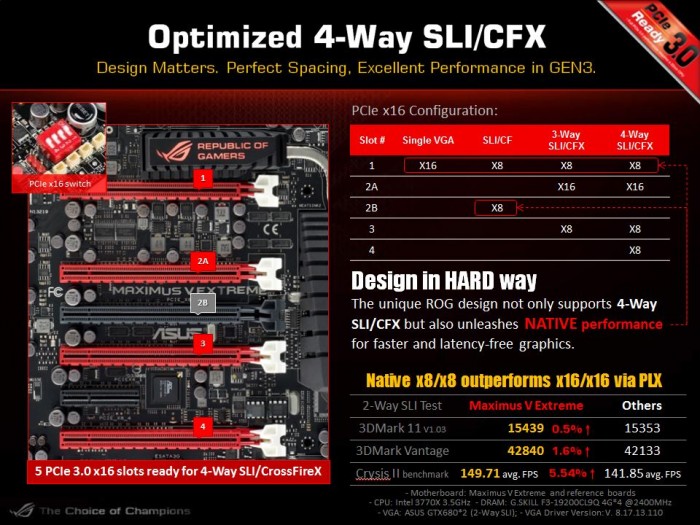
The Maximus V Extreme comes with four dual slot spaced PCI-E slots which run through the PLX bridge chip to allow for full PCI-E 3.0 to four cards at x8 bandwidth. ASUS also has a PLX bypass for native PCI-E performance in dual card configs by using the top #1 slot and the Black (2B) slot which allows direct PCI-E lanes from the CPU without any interaction with the PLX bridge. This can net you up to 5+% in gameplay which is really awesome for just a slot difference.
The good thing about this is that since this board is built for benching, it has full support for 4 way GPUs. This means that with a good high frequency CPU, we can see many multi card benchmarks getting nice results with this board.
GPU/DIMM POST
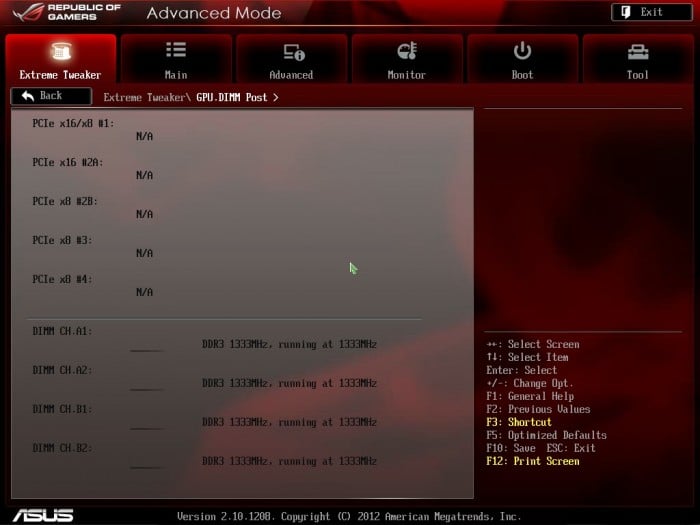
GPU/DIMM POST is one of those features whose benefit usually will be seen in the most stressful times like when something is not working. We actually wound up using this feature without intention on a previous ROG review, when a 32GB memory kit we were testing only showed up as 24GB. As we entered the BIOS after several attempts to fix the problem, we checked the GPU/DIMM POST and found that 2 modules were reading as “abnormal”. Powering the system off and resetting those DIMMs remedied the issue, but seeing that info directly in the firmware can save a lot of time when diagnosing errant behavior or instability; this kind of information being readily available is an invaluable asset to users. Additionally, the GPU POST option allows us to see the installed GPU’s in each slot, so that when benching LN2 or even on a liquid cooled gaming rig, the GPU POST screen can be checked to ensure identification of all installed cards is accomplished. See the BIOS Section for more info.
ROG OCKey
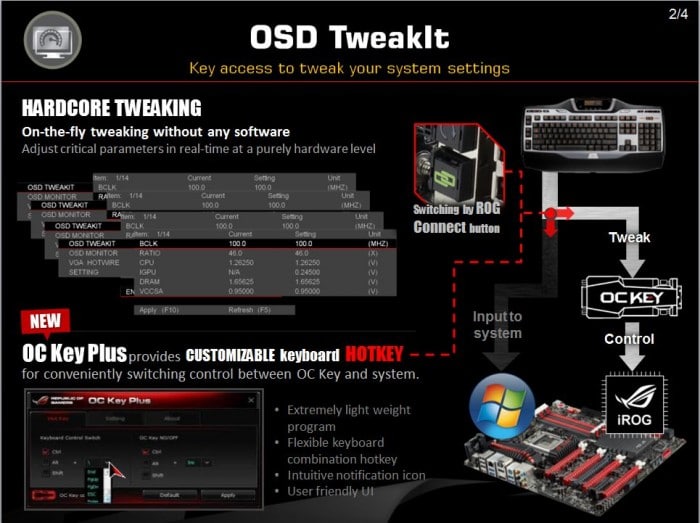
The ROG OCKey is something we have seen and even used before with the Rampage IV Extreme board. It is a very interesting device as it allows an overlay on the same screen as your OS or benchmark is running on, or even can be plugged into another screen entirely. Moreover, it also allows direct control and monitoring of the Maximus V Extreme during a benchmark run directly on the screen. Let’s take a look at some of the features of the OCKey below.
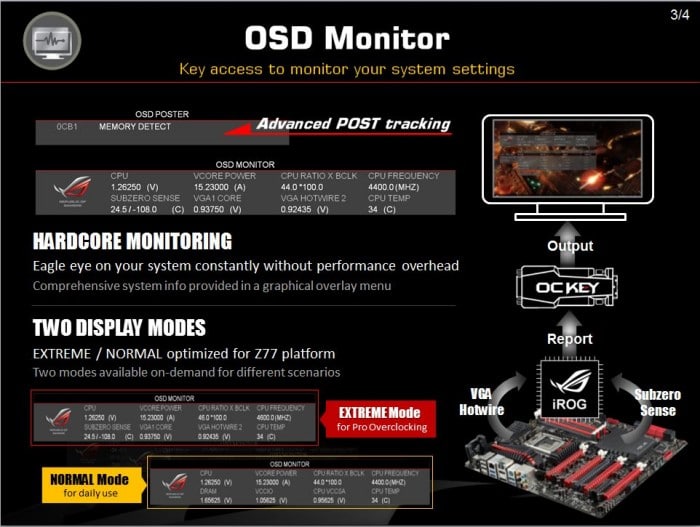
As you can see the OCKey is an intermediary device which can be plugged onto the output of the GPU then the display cable can be connected to the OCKey which will allow the visual monitoring and adjustment overlay directly on the benchmark screen. Before all of this kicks up into operation though there is an internal USB header conveniently placed near the rear IO section which also needs to be run to the OCKey so that we can effectively communicate with the PC. This can be quite beneficial as sometimes we do not have a separate system to utilize for the ROG connect overclocking or maybe don’t want to run the overclocking software and spend time in the OS messing with it. Also the ability to monitor with this means that you can see pot temperatures in real time via the Subzero sense as well.
For those who do not necessarily utilize the board for its hardcore benching aspect, the OCKey can still be of great benefit to you as it still can offer the OSD overlay monitoring and even post code strings for monitoring during initial posting of the system. In this way the ROG OCKey is a benching device that has some real pedestrian value as well.
Subzero Sense
The Subzero Sense feature is another that we have seen previously on the Rampage IV Extreme and is based solely on the needs of an extreme benchmarking enthusiast. The Subzero Sense feature is a collection of 2 K type probe connections on a block near the SATA portion of the motherboard. These are used to keep track of the pot or LN2 container temperature to ensure your running within desired temps to avoid cold bugs or issues. Normally, when running LN2 or any other kind of sub ambient cooling you would need a external thermometer of good quality to ensure you get very accurate subzero temperature readings. With the Subzero Sense feature you now have 2 ports to which you can install K probe connections to monitor 2 different devices temperatures which means you dont need to spend the cash for those expensive thermometers.
As you see above the cost of an external thermometer can be quite high so having these ports can save you from buying up to 2 of these devices, which is actually huge money saved. We did have a chance to test the accuracy on the Subzero sense ports and the accuracy was well within a degree of our Fluke thermometer which means this would be an excellent choice for a subzero benchmarker.
VGA Hotwire
The VGA Hotwire feature is a unique one as it allows for hardware level voltage modifications to your graphics cards. Previously in order to have hardware level control over your GPU voltage it would require specific trimmers of the correct resistance or something over then soldering it to correct points on the card so that you could fool the VRM of the card into giving it more voltage as needed for extreme overclocks. Well ASUS knows what its users need so they went ahead and integrated pin headers on the board so that the wires can be soldered onto the card then plugged directly into the board for hardware level voltage modification and monitoring without fumbling with external trimming devices.
As you see above there are also select card which come with plugs so that no solder is necessary for the hardware level monitoring via the VGA Hotwire feature. We recently experienced this on the ASUS MATRIX HD 7970 Platinum: in order to enable the voltage control the only thing that we needed was to short a small solder pad. This is much easier than soldering a bunch of leads to a card and hoping you don’t slip with the iron. Also it is important to note the advantage of VGA Hotwire as anyone who has ever benched with LN2 knows that the smoke can be quite full and can block vision of the components so adjusting the trimmers in such conditions can be difficult, and a single slip can cause death to your graphics card.
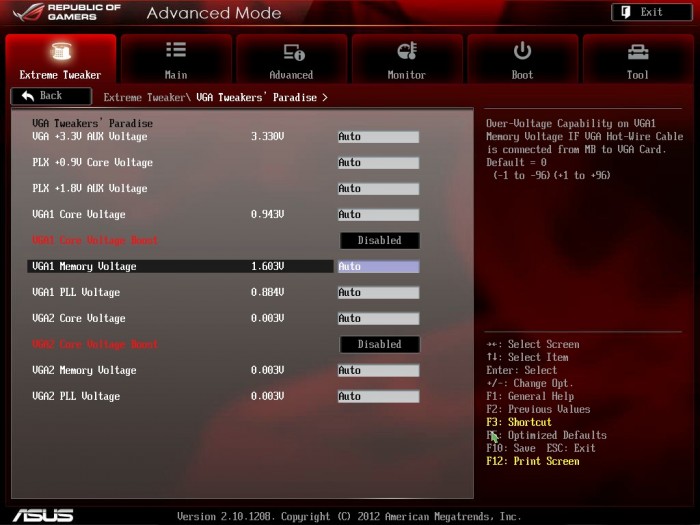
Here you can see we hooked up the ASUS MATRIX HD 7970 Platinum card to the VGA Hotwire points. The monitored voltages show up in the BIOS.
Lucidlogix Virtu MVP
ASUS, like all other manufacturers offers the Lucidlogix Virtu MVP support for their Z77 line which is a very interesting improvement over the previous Lucid Virtu we had used before. This version of Virtu MVP does all of the same functions that the original could do but is better optimized, and now adds some new 3D enhancement features to the mix that make for a very interesting possible implementation. Virtu MVP offers HyperPerformance which allows for rendering to be offloaded to the iGPU and in turn allows the discreet GPU to do the grunt work it was designed for while the iGPU does the light frame renders to ensure better fps as the frames are pre rendered in place and any duplicate frame is not rendered by the discreet GPU and is dropped by the discreet GPU to keep the discreet GPU processing only frames which are new or different than the previous.
Also included in the MVP package is Virtual Vsync which allows for the tear free quality of vsync display without being limited to the display refresh rate which ultimately will allow for smoother performance and playback. This is accomplished by the same methods as mentioned above by pre rendered frames and dropping partial rendered frames before they get to the discreet GPU to avoid from partial redraws which will cause the undesired tearing affect we have seen before.
Further in this review we will do some game testing to find what exactly we get from Virtu and if the performance is worth the hype.
ASUS GameFirst II
ASUS has pushed the GameFirst technology even further with its cFos software which now offers a EZ mode to allow even easier tweaking and adjust ability for all end users to increase online gameplay performance. The GameFirst II technology builds off of the ability to shape the network traffic to better control throughput and packet priority to ensure the program that needs maximum speed and reduced latency such as streaming HD video or simply online gaming is all at your fingertips.
The ASUS GameFirst II technology is very cool in the effects that it not only applies to the onboard NIC, but also can work with the included WiFi module to allow similar performance improvements via a wireless connection.
Included Software additions
One area that normally is not explored is the small added value components such as what I got with the Maximus V Extreme. Software which are full versions such as Kapersky Anti Virus and also Daemon Tools which can help on two fronts via Kapersky offering protection while the Daemon Tools offering gives a vast array of functionality. Features include those such as virtual drive mounting for quick and easy ISO loading without the need to burn a disc. These software which are rarely mentioned but come with the board are definite added value considerations as they are software you may otherwise have to purchase.
USB BIOS Flashback
ASUS offers the BIOS Flashback utility which is actually a multi-facet tool and has many capabilities which some may not be aware of. we have had many times where a motherboard did not support a CPU and a frantic search for a supported CPU just to flash the BIOS (ex. Gulftown CPU support on X58). ASUS has eliminated the worry of these kinds of issues by allowing the BIOS flashback procedure which does not require a CPU or memory to flash the BIOS. All that is needed in order to flash the BIOS is to have the desired firmware ROM file on a USB thumb drive and insert that into the ROG connect USB port.
Depressing the ROG Connect button for 5 seconds will start a flashing LED which indicates the firmware is being updated and once the update is complete the flashing will stop. It really is that easy and ensures no matter the condition the firmware can be flashed even if the newest CPU is not supported without the previously mentioned hunt for a compatible CPU.
This may seem like an odd feature but many may buy the newest and greatest CPU on the market while the board could have been shipped with the older firmware which in most cases would leave the user stuck without an option. We have found this useful quite a few times when after running a LN2 cooled system in unstable conditions, a BIOS had corrupted. With the BIOS flashback it was remedied as quickly as we could copy the ROM file from our laptop to the flash drive and get it flashing.
USB 3.0 Boost
Turbo USB is a new feature we have seen from ASUS as of recent and it allows for a speed increase from older USB 2.0 thumb drives or storage devices when the Turbo mode is enabled on that device through the ASUS AISUITE II software.
One thing that not many have publicized is the fact that this boost also supports a protocol names UASP which supports a much higher transmission rate via the Asmedia controller. ASUS included with the motherbard a Thermaltake BlacX 5G USB 3,0 capable external docking station along with a Corsair Force GT SSD to allow for testing of this feature. we went ahead and tested multiple different drives and combinations to see how the functions actually plays out in real world scenarios.
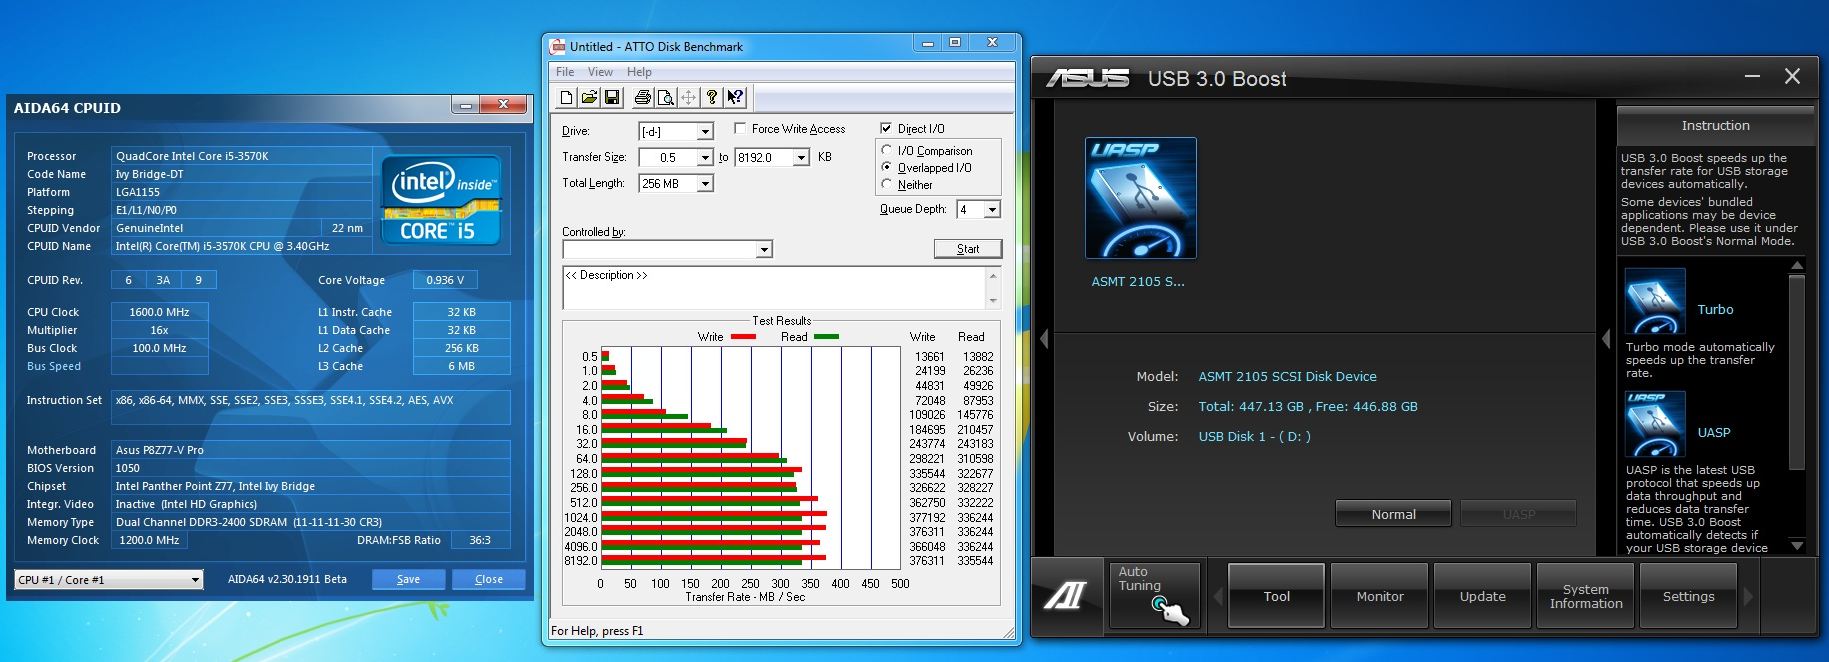
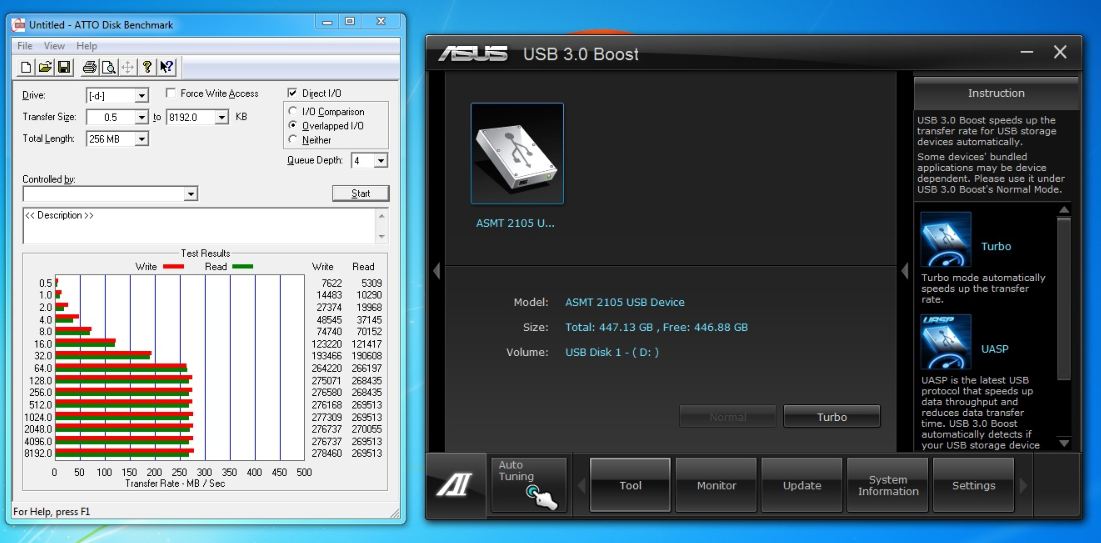
Here we see standard performance from the Asmedia controller under its “Normal mode” which is rather good and plenty fast for an external storage device
Here we see with the UASP mode enabled that the speed is increased massively by over 100MB/s throughput which put some serious speed into the equation.
Also with Z77 one of the features of the new inclusion of Intel native PCH USB 3.0 ports. With this ASUS has found a way to enable faster speed via the AISuite USB boost control for these ports as well. The Intel USB 3.0 does not support UASP protocol so only Turbo mode can be enabled as of this time.
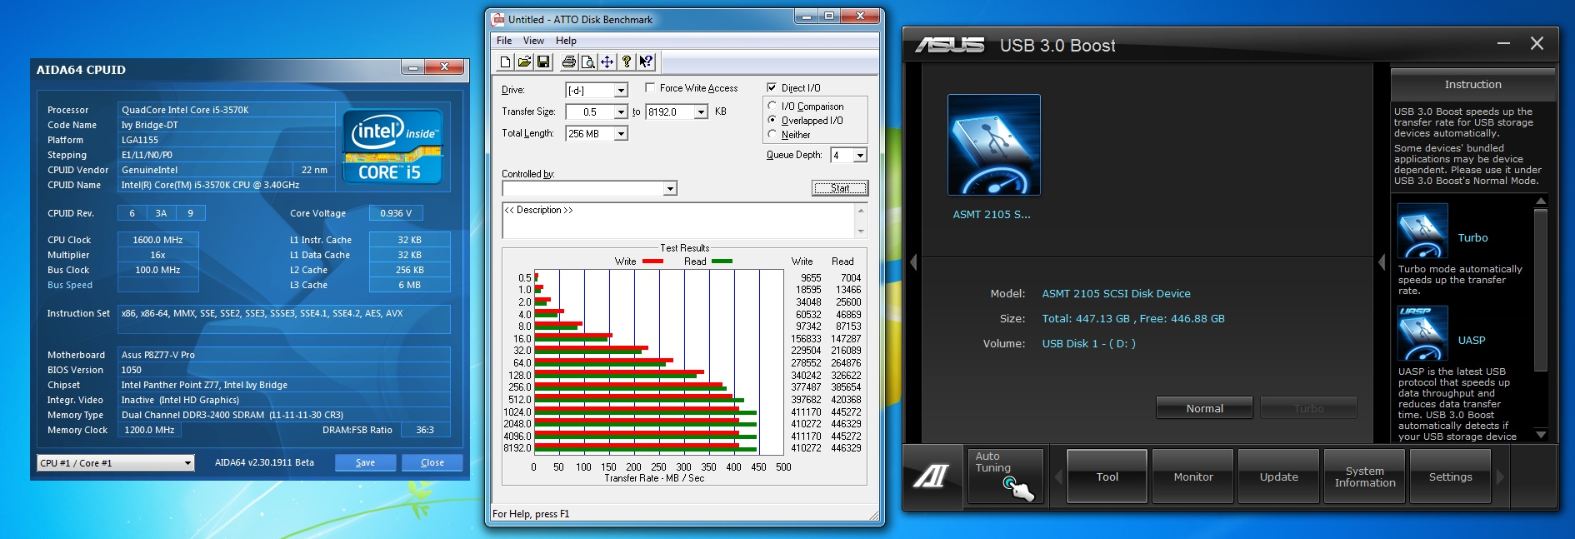
Here we have the stock results for the Intel controller and it is really good, so we definitely see the Intel inclusion of native USB3.0 support as being an advantage.
Here we have the result with turbo mode enabled which nets some very extreme results. This is very impressive and should be noted that with UASP support the results may improve even further.
Keep in mind that this is not just for external docks as any USB storage device can possibly be sped up via the USB 3.0 boost even USB2.0 thumb drives may grab a small advantage from being plugged into the USB3.0 port and having the boost enabled.
For more information please see the ASUS USB 3.0 Boost landing page here
Fan Xpert 2
ASUS has always had Fan Xpert technology as part of its AI Suite utility chest but its always been used for manual adjustments and profiling of the system fans.
The Fan Xpert 2 now comes with a automatic profiling system which we will attempt to demonstrate in the following steps. One thing to note on this is that ASUS Fan Xpert 2 supports full fan control via both 4 pin and 3 pin fan headers even though most ASUS boards now carry mostly 4 Pin headers.
Here is the main screen where you can select between custom fan profiles such as Silent which spins down all fans except the cpu cooling fan. then standard whish is standard throttled fans depending upon temperatures, and lastly we have the Turbo mode which throttles every fan up for maximum cooling when needed.
Pressing the “Fan Auto Tuning” button will start the motherboards intelligent learing process which we see below.
Here we see as the fans are proceeding through the automatic tune process. The fans are ramped to maximum then gradually ramped down to stopping at which point the motherboard knows where the stop and start point for every fan connected to the motherboard would be and this helps the motherboard better tune the system for an optimum airflow/noise ratio.
After the analysis is complete the fan Xpert screen moves to the next and final step which is where you select where each detected fan is on the chassis. if you are not sure you can always click the “Search” button to the right and the system will spin all fans down and it will spin the selected fan only up to maximum speed so that you can identify its position and even name it. This as well will help with the cooling setup and how the system throttles each fan independently.
 Bjorn3D.com Bjorn3d.com – Satisfying Your Daily Tech Cravings Since 1996










I like the Asus software suite. Now if only Gigabyte would take the hint…
I like the software suite as well, as it is laid out very well and ever program is centrally located and easy to find. This is one of the areas where many manufacturers need to pay attention and focus to improve the user experience.
Great review. The uEFI on this board is the best out at the moment and the possibilities with an IVY Bridge Chip are endless.