MSI has debuted their upcoming Z77A-GD65 board, supporting Socket 1155 processors. The board features PCIE 3.0, USB 3.0, and plenty of other features for overclocking. Check out the pictures for more info.
MSI Z77A-GD65: A preview
MSI previewed their Z77A-GD65 board at CES 2012 at a private meeting suite their upcoming motherboard for the LGA 1155. The board accommodates socket LGA 1155 processors which include the second generation of Core i7, i5, and i3 Sandy Bridge processors and the third generation Intel Core CPUs. This means that users will be able to pair it up with the board with current generation LGA 1155 processors like the Core i7 2600K and should have no problem with future processors that is using the same socket.

Aesthetically, the MSI Z77A-GD65 looks very pleasing to the eyes with MSI’s Military Class II components. The black and blue color scheme is pretty without going overboard. It gives users a sense of performance without being too flashy. Upon the first inspection of the MSI Z77-GD65, we can see that the MSI board is packed with ports and slots. The overall layout is pretty clean without major obstruction. MSI puts the ports that are most often accessed like the Easy Button 3 and voltage checkpoint connector near the edge of the board. The SATA ports and SuperSpeed USB 3.0 are all rotated at 90 degree angle for easy cable management.

low profile heatsink covers the MOSFET and PWM
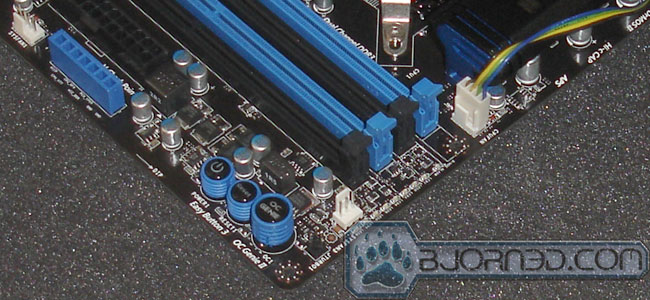
Over at the CPU corner, we see MSI places a low profile heatsink above the MOSFET and PWM. The board utilizes MSI’s own DrMOS II, Hi-C Cap, Super Ferrite Choke (SFC), and Solid CAP. Together these components ensure highest power efficiency, lower heat output, higher thermal stability, and lower ESR for longer component lifespan and higher overclocking potential.
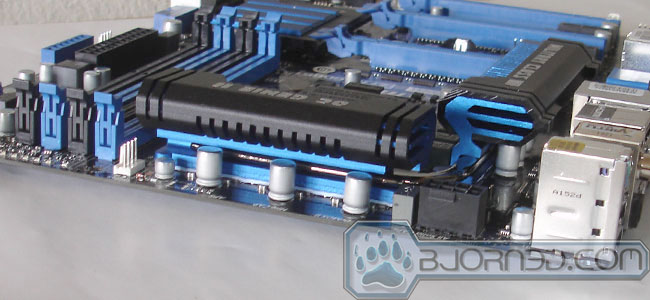
The heatsink covers the components at the top and left sides of the CPU and the two pieces of metals are interconnected by a heatpipe to conduct heat toward to rear of the case. The 8 pin auxiliary power connector sits at it usual upper corner close to the back I/Os and the 4-pin CPU fan connector is located just above the DIMM slot. The auxiliary and the CPU fan header is a tad bit closer to the heatsink and can be slightly hard to gain access to with the board installed in the system.


The board will come with extension cable that you can use to monitor your hardware voltages.
Moving toward the DIMM slots, we see four color coded DIMM slots for dual-channel DDR3 all the up to 2667MHz and up to 32GB capacity. Two additional 3 pin fan headers are located in this area. One is on the corner of the board (just above the DIMM slots) while the other one sits next to the main 24pin ATX power connector. MSI opted to put the main ATX power connector a little bit farther from the edge of the board and place the voltage checkpoint connector in front and closer to the edge of the board. The idea is that most people would rather want these checkpoints to be the most accessible, rather than the power connector. In addition, we see a handy power button, a reset button, and OC Genie button. The OC Genie Button is used to automatically overclock the processor.
Sitting above the DIMM slots is a series of 9 LEDs. The first LED is the DrMOS alarm while the rest eight LEDs are for the CPU power phase. There is a header labeled JTURBO1 that is designed for the MultiConnect Panel that fits into the 2.5” drive bay. The panel offers overclocking, USB ports for charging, and WiFi and Bluetooth connectivity.
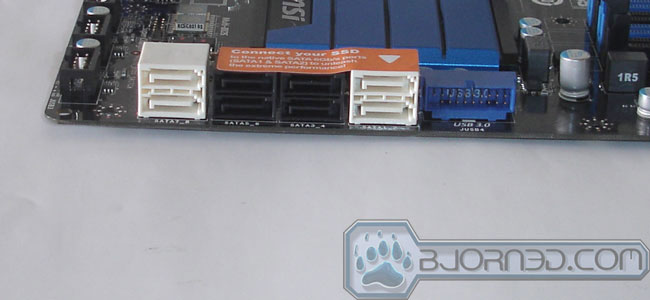
Toward the bottom right edge is the usual SATA ports. The MSI Z77A-GD65 comes with four SATA 6Gbps ports where two of them are controlled by the chipset and the two are controlled by the ASMedia ASM1061. Four additional SATA 3Gbps ports are found on the board courtesy of the chipset. The ports controlled by the Intel chipset will support AHCI/RAID0/1/5/10 and Intel Rapid Storage Technology. Sitting next to the SATA ports is the SuperSpeed USB 3.0 header. This is again controlled by the chipset.
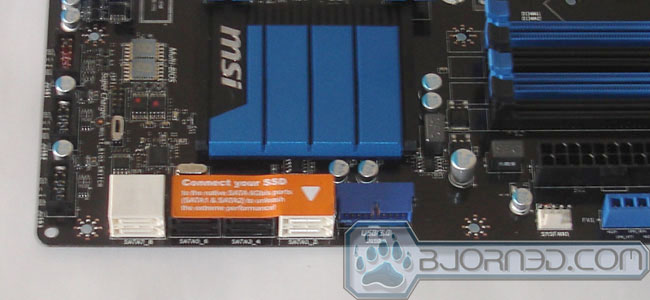
A very low profile heatsink covers the chipset and just south of it is where you will find the two digit LED Debug indicator. A little BIOS switch sits next to the debug indicator for switching between the two BIOSes. In the event that one BIOS is crashed, users can simply flip the switch and boot the system up and perform a recovery, as the board features the ability to automatically reflash the newer BIOS over the older one.
We would’ve actually preferred if MSI had placed the debug indicator closer to the power button near the top edge of the board as opposed to this location. It is easier to have these things in one area for easy access.
Along the bottom edge of the board is where the usual internal headers are located. Here we get three USB 2.0 headers, one FireWire header, two types front panel headers (a 7-pin and a 9-pin version), a Voice Genie Connector (JDLED3), a TPM Module connector (JTPM1), a 3-pin system fan, and the front panel audio. The audio is provided by the Realtek ALC898 high definition audio codec.

Fintek F7189AD Super I/O controller is used and the network is controlled by the Intel 82579V that provides 10/100/1000 fast Ethernet.
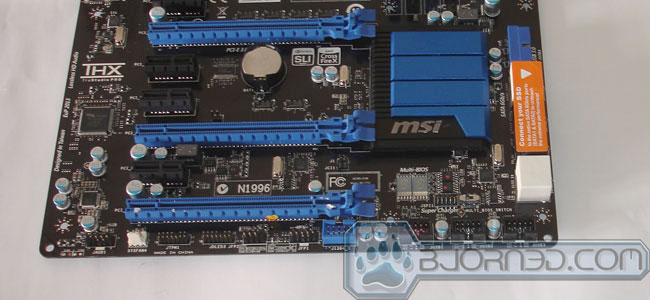
For expansion, the board comes with three PCI-E 3.0×16 slots and four PCI-E 2.0 x1 slot. Despite the fact that the three PCI-E x16 are physically x16 there are only 16 lanes available to be shared among the lanes. The board will support CrossFire and also SLI as indicated by the marking on the board.
The battery placement is a bit awkward for the Z77-GD65 as it is sitting next to the primary PCI-E x16 slot so if you are using card that takes up two slots, it would be necessary to remove the card before users can pop out the battery. Also, the Clear CMOS jumper is located in an awkward position just between the third PCI-E x1 and second PCI-E x16 slot. Luckily MSI includes a Clear CMOS button on the rear of the board, so the likelihood that users will need to access either one of these are pretty slim.
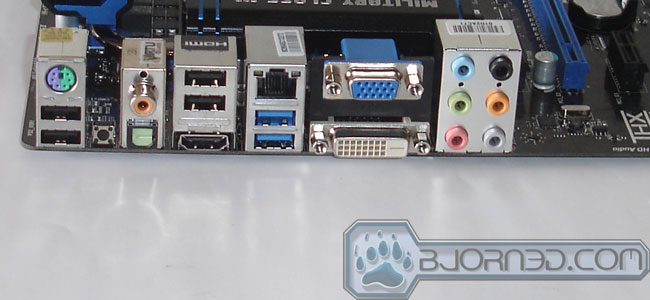
The rear I/O panel of the MSI Z77A-GD65 has the standard connectors. Here we get a PS2 keyboard and mouse combo port, four USB 2.0 ports, two USB 3.0 ports, a single Gigabit LAN port, the clear CMOS button, optical and coaxial SPDIF out, and the usual audio ports. For displays, we get HDMI, 15-pin D-sub VGA, DVI-D. Two of the three video ports can be used in conjunction for multi-displays.