Being among the luckiest people in the world we’re proud to bring you a preview of the Asus P7P55D Deluxe LGA 1156 motherboard. A feature packed Deluxe Asus board to drool over.
Asus P7P55D Deluxe Preview
There are times in reviewing that you will always remember, this is one of those times. A freshly minted yet to be released P55 LGA 1156 Lynnfield motherboard beckons and there are few feelings that can compare to holding a newly minted Asus Deluxe Motherboard for the first time. Knowing that the feature packed Asus board is safely tucked away awaiting a Core i5/i7 for LGA 1156 to arrive so you can make the newest offering from Intel scream for mercy. The Asus P7P55D Deluxe offers more than most enthusiasts will ever need, packed with a ton of Asus special features and a few extras even we didn’t expect.
Lets get right to this beautiful board. (This is directed to Juan at Asus; the firstborn child you requested, he’s on the way, it was worth the trade.)

The Asus P7P55D Deluxe arrived in a bright blue box with plenty of protection for the prize you’ll find inside. Proclaiming 16 + 3 Phase power that should allow for a Bclks (FSB) speed of approximately 245 your sure to have plenty of Bclks (FSB) speed on this board. Also shown (which we’ll save for a little later) a TurboV Remote and TurboV EVO. Gotta love Asus Deluxe boards, when Asus says Deluxe they mean Deluxe. Drool towels can be obtained from any passing family member dependent on availability.

Before we get started on the flap on the box yes that’s a dogs tail just past the end of the water cooled rig we have open for testing. It’s ok he feels left out if he doesn’t at least get into the action a little. The Asus P7P55D Deluxe has so many features that they couldn’t list them all on the outside of the box so they included a flap with more features listed.

They included one of our Asus favorites on the P7P55D Deluxe, Express Gate, without booting the OS you can access the internet in about 5 seconds. The built in Linux based OS puts the internet at your fingertips in a mere 5 seconds. You’ll also find a Picture manager, and instant messaging. You’ll also enjoy the EPU energy saving feature of the P7P55D Deluxe as well as the Asus Q-Design feature collection which provides easy ways to update the BIOS or back up your favorite settings. No need to short pins on this motherboard, you’ll find onboard power, reset and Clear CMOS buttons on this beauty.

Then you’ll get Turbo Evo which is an Auto Overclocking feature suitable for beginners and seasoned overclockers alike, Auto tuning intelligently pushes the systems fastest clock speed while still maintaining stability. Part of the auto tuning included stability testing. Even OCing beginners can achieve extreme yet stable overclocking results with Auto Tuning. While the software overclocking utilities we’ve seen in the past have fallen far short of the mark this setup is totally different and represents an evolution in Auto Tune Overclocking. The P7P55D Deluxe has a hardware chip that operates in a BIOS environment. It actually makes the changes to BIOS and while you can initiate those changes inside Windows the values are actually changed in BIOS so it’s not a software overclocker as such. There are software components but it’s a hardware based OC. Auto Tune Overclocking can also be initiated from within BIOS and it’s not just some funky algorythim taking a best guess stance. The system is tested for stability as the Auto Overclocker does it’s magic. Results from this new hardware based wonder have driven 2.8GHz chips to a stable 3.5GHz and while manually tuning a board will most likely result in a higher overclock this give the non-overclocking people a utility to use to gain some advantage from overclocking without extensive know how. We will of course test the Turbo Evo when the Core i5 CPU’s arrive.
A feature we’re seeing for the first time called T-Probe is a microchip that detects and balances power phase loading and temperature in real time, it optimizes the power phase functions allowing components to run at lower temps and extends their lifespan. Lower temperatures can also lead to higher overclocks.
Drive Xpert is a feature that offers to secure data on the hard drive or enhance hard drive performance without the hassle of complicated configuration.
Xtreme Design is a design philosophy that encompasses Turbo V, Turbo Key, Xtreme Phase, Anti-EMI, and StackCool 3+ features and we’ll cover those more when the board goes public and we have a new i5 setting on the board. For those of you wondering, there’s nothing like the smell of a freshly minted motherboard with a soon to be released CPU setting on the bench. If they made a coffee with that smell and flavor we’d never come up for air.

On the Back of the box you see a few features we’ve already covered and what’s that below the motherboard picture, a specifications list.

| CPU | LGA 1156 Socket for Intel Core I7/Core i5 Processors |
| Chipset | Intel P55 Express Chipset |
| Memory |
4x Dimm, Max 16GB, DDR3 2133(OC)/1600(OC)/1333/1066 Unbuffered Memory Dual Channel Memory Hyper Dimm Memory Support is subject to physical characteristics of the CPU |
| Expansion Slots |
2x PCI-E 2.0 Slots x16 (One at 16x or Two at 8x8x) 1x PCI-E 2.0 Slot x16 (At 4x, 2.5GT/s) 2x PCI-E 2.0 Slots 1x (2.5GT/s) |
| Multi GPU Support |
Nvidia Quad-GPUSLI ATI Quad-GPU CrossfireX |
| Storage |
Southbridge 6x Sata 3Gb/s Ports (Intel Matrix, RAID 1,0,5 and 10) JMicron JMB363 Sata & Pata Controller 1x UltraDMA 133/100 Pata (up to two drives) 1x Sata 3Gb/s (Black Port) JMicron JMB322 (Drive Xpert Technology) 2x Sata 3Gb/s (Navy Blue & Grey) Supports EZ Backup and Super Speed Functions* *Drive Xpert functions only available if drives are designated as Data Drives.
|
| LAN |
Dual Gigabit Lan Controllers Realtek 8112L/8110SC Gigabit Lan Controller featuring AI Net 2 |
| Audio |
VIA VT2020 10-Channel Hi Def Audio CODEC Absolute Pitch BD192/24 featuring ENVY HD DTS Surround Sensation UltraPC Supports Jack Detection, Multi Streaming, Front Panel Jack Retasking Coaxial/Optical S/PDIF at back I/O |
| IEE1394 (Firewire) | VIA 6308P Supports 2 ports one Rear I/O one Midboard |
| USB | 14 Ports 8 Back Panel 6 Midboard |
| Form Factor | ATX Form Factor 12×9.6 Inch (30.5cm x 24.4cm) |
You can check the image of the specifications panel we provided by clicking on it to double check the above tables specs. With the short notice to get the preview online and long hours we put in on it we might have had a mistake. If you find one notify us in the forum thread and we’ll make a correction.

Bear with us just one more shot after this and we’ll actually show you the board. We looked at some previews on other websites and found them woefully inadequate and would rather not do a preview than skip over as much as the other previews we’ve seen on the Asus P7P55D Deluxe.
Once you get the box open you get a glimpse of the more than adequate bundle included with the board.

Included in the bundle you’ll find:
- 1 – Manual
- 1 – Driver Disk (Not Pictured)
- 1 – SLI Bridge
- 1 – Asus Quick Connector set
- 1 – I/O Plate
- 1 – IDE Cable (UltraDMA 133/100/66)
- 1 – Expansion Bracket (USB 2.0 x 2, 1 E-Sata)
- 6 – Sata Cables
- 1 – TurboV Remote
P7P55D Deluxe Pictures & Impressions

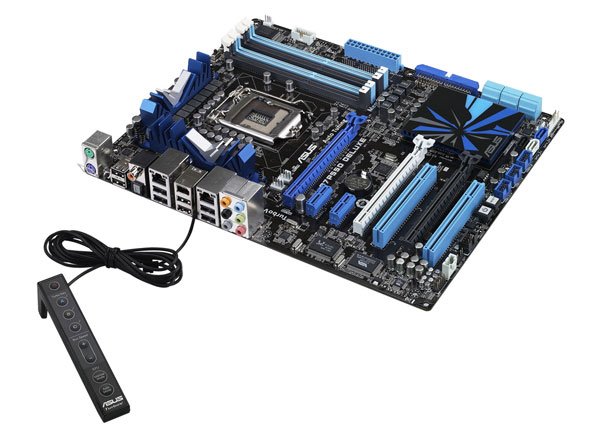
Taking a look at the board we see an excellent layout designed for SLI or Crossfire but also for those that prefer single GPU operation and prefer to still have lots of expansion options. Asus chose the VIA VT6308P chipset for
IEEE 1394a support (Firewire), and the VIA VT2020 (BD192/24 ENVY HD) 10-channel HD audio codec (8+2 Streaming) with support for DTS Surround Sensation. We find it a little odd that they chose to use Realtek 8112L/8110SC Gigabit LAN controllers for LAN operation including support for AI NET2 and not the native Intel Gigabit LAN. It seems like using the built in Intel P55 LAN would save a little money but possibly cut off AI Net 2 support.

Sandwiched between the COM1 and Mainboard power connector we see the MemOK button which will reset your memory to safe settings should you have one of those happy little overclocking accidents that tend to happen when you try and make a CPU scream for mercy. Notice also the DRAM LED indicator light a nice little feature to tell you about the operating condition of the memory.

Backing away from the board a little from the same angle you can see this board is geared for dual channel memory and DDR3 is required for the LGA 1156 core i5/i7. We might see variants later but all the boards we’ve see thus far require Dual Chanel DDR3. From what we are hearing you are going to need low voltage Dual Channel DDR3 foe LGA 1156. Intel has set a limit on Memory of 1.65v just like they did on I7 LGA 1366. Most DC DDR3 kits have a 1.5v SPD that will work. A lot of kits that offer higher speeds will have to be downclocked to accomidate the 1.65v limit. So if your getting ready for Core i5 we suggest you check that DDR3 before you order your CPU and Board.

The CPU area shows us 19 Ferrite chokes for the 16+3 phase power that should drive this board up a Bclk frequency of about 245 pretty easily. All solid Japanese capacitors were used and the CPU area looks like it will accommodate most modern CPU coolers without obstruction.

Sticking close to the ram banks for now we find a set of over volt switches. There’s an OV DRAM which will put you over the Intel 1.65v recommended limit, Asus is tempting us with that OV switch, the jury is out but we suspect with the board supporting up to 2133 MHz ram(OC) your going to need a tad more than 1.65v. You also see an OC IMC switch which should be Overvolt Integrated Memory Controller, boy Asus is really tempting us with this board, I know of at least one Bjorn3D reviewer that could cause some serious trouble with this beauty. He of course shall remain nameless (CoughDragoncough). Then we find an OV CPU switch and that confirms it, our un-named reviewer could defiantly make magic blue smoke with this beaut.

The cooling system around the CPU is a thing of beauty and it maximises the surface area of the heat sink for more efficient cooling. Notice the CPU power connector tucked away behind the sink. It might be a little tough to reach the power connector in that position.

Backing up and showing the CPU area with both heatsinks, the 19 count them 19 Ferrite chokes, bevvy of solid capacitors and those pretty heatsinks are enough to make any geeks mouth water.

Notice the CPU LED indicator light and the revision 1.06G, the Intel Core i5/i7 LGA 1156 isn’t even public yet but Asus has already revised the board. We suspect that has something to do with replacing the planned 6Gb/s Sata controller (A fault was found in the controller) with a 3Gb/s Sata controller. While we would have liked to have seen a solid 6Gb/s controller we’d much rather have a known functional Intel Matrix 3Gb/s controller than a faulty 6Gb/s controller. Good catch Asus.

Peeking at part of the connector side of the board we see the 6 mid-board USB ports, and the 3 upright Sata ports controlled by the two JMicron controllers. Two of those are primarily for Drive Xpert and in order to use the Drive Xpert functions those two drives will have to be designated as data drives.

Sliding down to the left of the mid-board USB ports you get a glimpse of he reset and power on buttons as well as the mid-board Firewire connector, SPDIF, Optical Drive sound connector, and front panel audio connector.
You’ve probably been scrolling for about a half hour so lets move on to the Pictures Continued page.
P7P55D Pictures & Impressions

Here’s a little better shot of the Power on and Reset buttons on the P7P55D Deluxe, most chassis will have room to reach the buttons and unlike previous models which had a PCI-E slot right up against the P7P55D Deluxe allows for a regular PCI slot next to them and most PCI cards won’t hang over the buttons making them hard to access.

We see six 90 degree Sata 3Gb/s ports controlled by the Intel Matrix controller which we have come to know and love. To the right of the Sata ports is the single Pata port controlled by a JMicron chip and is capable of supporting up to two PATA devices. Just to the left of the Sata ports is the Front panel connector and Asus included a QConnector set to make hooking up the front panel a snap.

The P7P55D Deluxe is a Thoroughbred in almost every way but then we come to the PCI-E slots. We realize and knew this was coming because the P55 Express chipset is for the mainstream LGA i5/i7 CPU’s but we we’re hoping for better than one 16x slot at full 16x speed. It’s not an issue for most end users because most people use a single GPU. Those adopting a dual GPU setup will have to live with 8x 8x speeds in dual GPU operation and most likely this is a concession to the limitation of the Intel P55 express chipset. We are hoping for variants that will provide at least 2 full 16x slots and a third with 8x for a ganged total of 16x 16x 8x with no down shifting for multiple GPU’s.
Offhand we would venture a guess that the first PCI-E 1x will be obscured by a dual slot cooler GPU, and if two Dual Slot GPU’s are used then the first PCI slot will be obscured as well. That’s a pretty good compromise as it will leave you with one PCI-E 1x, one PCI, and one PCI-E 4x. Single Dual slot GPU users will have a plethora of expansion options.

Looking back a little bit we’ve spotted fan headers all over this board, it might not mean a lot to some users but we tend to like a lot of fan headers on our boards.

Getting back into the CPU area a little bit when we first saw the CPU socket it looked a little funny. Then we realized that when you swing the release arm out the CPU hold down plate slides free of the single bolt you can see there on the left.

Here’s a little better shot of where Asus tucked the CPU power connector at. It might be a good idea to connect the CPU power connector on the way into the chassis. We usually mount the CPU and CPU cooler prior to installing the board and if you forget to plug the power connector in things might get a little tight.

We didn’t really have a reason for throwing in this shot we just like the Mosfet heatsinks.

The rear panel features the standard PS/2 mouse and keyboard ports, optical/coaxial S/PDIF out ports, eight USB 2.0 ports, dual Gigabit LAN ports, IEEE 1394a port, audio panel, and a Clear CMOS switch. You’ll also find a clear CMOS switch on the back of the TurboV Remote, no more reaching into the chassis after a little overclocking accident to clear CMOS.

Tucked away between the back panel and the mosfet heatsink you find the Turbo Controler Remote connector, we haven’t installed the board yet so we’re not sure how we are going to snake the remote around to the front of the chassis but one way or another we will manage to get it out in front. Are you kidding a remote, it has to be directly in front of us no more than 6 inches from our hand at any given time.

Notice the components up close and personal with the ram banks, that’s not going to be a problem they are a littler lower than the ram clips and the the memory slots feature ASUS’ Q-DIMM single latch technology that allows the video card to be placed along the edge of the memory slots without installation problems.

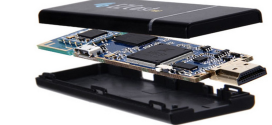
Then we have what is arguably the most interesting feature of the P7P55D Deluxe, the TurboV Remote. The Remote will allow you to OC to 3%, 7% or a preset profile you create. You can also increase the Bus Speed on the fly without having to reboot or go into BIOS. The Remote also allows you to turn on the EPU power saving function to Manual or Automatic mode. Noticeably missing from the remote is an emergency kill switch which we fear many end users might need because it appears this board can not only make the upcoming CPU’s beg for mercy, if they don’t beg hard enough it is fully capable of summarily executing them. Death by OCing, there are worse ways to go we guess.
Then finally we couldn’t help ourselves we just had to plug in the remote even if we don’t have a CPU for this beauty yet. If we thought it would do any good we would drive to the Intel headquarters and bang on the door and demand a CPU for this beast. If we could keep a straight face and wave the board above our heads we feel sure that any sane Intel employee would shower us with high end LGA 1156 i5/i7 CPU for just owning a board like this.
We seriously look forward to popping a CPU onto the Asus P7P55D Deluxe and seeing if we can crank it up high enough to make it pop off and run screaming. There has been some speculation around the lab that when the CPU sees the board it will simply scamper away, slide under the door and head for the hills. All we can tell the little critters is “Be afraid be very afraid” we put rubber shims on the bottom of the door and there’s no escaping your fate on the Asus P7P55D Deluxe.