It is time for a new version of Futuremark’s 3DMark benchmark. With a new rendering engine closer mimicking a ‘true’ game as well as tools for any serious benchmarkers, the chances are high that this will become the new standard for DX9 benchmarks.
Introduction
If there is one benchmark that has stood tall over the years, it is the 3DMark series from Futuremark. Ever since the release of 3DMark99 back in 1998, Futuremark has continued to provide us users (and reviewers) with a way to compare our video cards in a reproducible way. True, the benchmarks have been surrounded with some controversy the last few years, and many have questioned the use of synthetic benchmarks. The controversy hasnt changed the fact that the 3DMark programs have always been the benchmark to use when you want to brag: I got 11,000 in 3DMark03, what did you get? 8000? Hah, thats pretty good . (I rule!).
Today, we will be looking at Futuremark’s latest in video benchmarking: 3DMark05.
Bringing Your Video Card to Its Knees for the Last 6 Years
3DMark benchmarks have always been designed to get the most out of your video card.
From Futuremarks whitepaper:
3DMark99 concentrated on measuring fixed function vertex transformation and lighting, and multitexturing. 3DMark2000 added support for graphics hardware supporting transformation and lighting, and the complexity of the game tests was increased. 3DMark2001 increased the complexity of the fixed function game scenes to tens of thousands polygons per frame on average and also introduced shader technology. The scenes mainly used fixed function vertex and pixel processing, while shaders were used for special effects. There was skinning, morphing and massive amount of animated grass and leaves, all using 1.1 vertex shaders. Game test 4 presented the first higher level material using a 1.1 pixel shader. 3DMark03 concentrated on testing the 1.x and 2.0 shader model. Only one game test, meant for legacy systems, offered fixed function multitexturing, while the other three used pixel shaders for all materials. All vertex processing used vertex shaders, mainly of the 1.x model. The last game test presented the first vertex and pixel shaders of shader model 2, while the majority of the shaders in that test still were of the 1.x model. The scene complexity was raised to several hundred thousand polygons per frame on average.
Note that it wouldn’t have been a smart move by Futuremark to require a DirectX 9 video card for 3DMark03 since those cards still werent that common at that time. Today, things look different though. While there still are a lot of DX8.1 video cards out there, DX9 cards have been available for quite a long time. With 3DMark05, Futuremark has brought us the first benchmark that requires a DX9 based video card with support for at least Shader Model 2.0.
3DMark05 extensively uses Shader Model 2 and 3 for all vertex and pixel processing. You can also run all the compatible shaders with SM 2.0a and SM 2.0b.
So What Are Shaders?
Shaders are short programs for manipulating vertices and pixels in a Direct3D scene, and these can be efficiently executed on dedicated graphics hardware. There are two types of shaders: vertex shaders and pixel shaders. Shader Model 1 (SM1), which was introduced in DirectX 8, brought quite a huge leap forwards from fixed function vertex transformation and lighting to fully programmable vertex shaders, and from fixed function multitexturing to programmable pixel shaders. This makes it possible to perform character skinning on the graphics hardware. This has been possible before but only by the CPU.
Even though it was a major leap forward, SM1 was fairly limited. Each shader had to be very short and the operations available were limited. When SM1 was extended with pixel shader 1.4, more flexibility was added, but the shader usage in games was still fairly limited. One issue was that the shaders themselves had to be written in so-called shader language, which closely resembles CPU assembly code. This made it pretty hard to learn for less experienced programmers, which meant we still saw a limited use of shaders in games.
Things have changed with Shader Model 2.0. SM2 extended shaders greatly, offering both longer and more complex shaders and more operations to choose from. SM2 also added the ability to perform calculations using floating-point values compared to SM1 where you had to use fixed point calculations. DirectX 9 and SM2 also brought a Higher-Level Shader Language (HLSL). Instead of writing shaders in a low-level shader language, developers now could use HLSL, making it easier to write the shaders.
DirectX provides a compiler that compiles HLSL to the low-level shader language. DirectX also includes a number of shader profiles dedicated to different hardware architectures. This means that the developer now can write one HLSL shader and DirectX compiles it to the optimal shader language for the installed hardware. Neat, isnt it?
The available profiles in DirectX 9c are: the basic 2.0, 2a, 2b and 3.0. The 3.0 profile is actually a new Shader Model offering quite a large extension to SM2, including program control inside shaders.
As mentioned earlier, 3DMark05 uses Shader Model 2 and 3 and uses the highest compilation profile supported by your hardware. You still can force a lower profile if you want to compare the profiles.
Sources: Futuremark whitepaper, Beyond3d.com
3DMark05 Engine Overview
Earlier versions of 3DMark used the MAX-FX engine. This is a game engine that was also used in the game Max Payne. With 3DMark03, Futuremark moved in a different direction. Instead of continuing to use the game engine, they used a very lightweight DirectX wrapper as more work was transitioned to the API and graphics card with the introduction of the shader technology. The engine only had to load the artwork and the shader language shaders. Game tests 2 and 3 and the Ragtroll test used a more complex engine version for rendering dynamic stencil shadows. Futuremark caught a lot of flak for this move and many questioned how valid the score was since it no longer used a true game engine.
In 3DMark05, Futuremark has switched engines once more. The new rendering engine is a more game like engine that uses the CPU for preparing and optimizing the content to be rendered. The CPU though is only used for rendering related tasks, and nothing else is done on the CPU (like AI, etc.). According to Futuremark, this is how other game benchmarks also do it (like Doom 3s timedemo).
The engine in 3DMark05 dynamically builds shaders for each material in HLSL format. These shaders are then runtime compiled to best fit the installed hardware, or the user may manually set which compilation profile to use.
Another new thing is the way that the new rendering engine renders shadows. 3DMark05 uses depth shadow maps called perspective shadow maps (PSM). The implementation is actually a refinement of what is commonly known as PSM, since these have problems with certain angles of light in the simplest form. The scene is rendered from the direction of the light, as in projection shadow maps, but the depth of each texel in the shadowmap is also stored. This results in a shadow map implementation that has no need for object edge vertex selection, does not add the vertex load with shadow volume polygons and does not add fill load with the invisible but usually large and numerous shadow volume polygons. PSM (or this refined implementation) still offers a global lighting solution that projects shadows correctly, including self shadowing, and is suited for a wide range of different types of 3D scenes and lighting types.
The whitepaper on 3DMark05 from Futuremark contains a more detailed explanation, and I suggest that anyone interested should download it and read it.
The Game Tests
Just like 3DMark03, 3DMark05 contains a few game tests that together make up the 3DMark score. In 3DMark05 there are three different game tests. Screenshots from all game tests are available later in the article. The screenshots in this section are all from the whitepaper.
Game Test 1: Return to Proxycom
We visited Proxycom in 3DMark03. Now we are back. This time a cargo ship is attacked by pirates. While the benchmark only shows a small section of the story, the demo shows a lot more.

Materials. Most surfaces of the space ship interior are of a metal material doing a Blinn-Phong reflection. The exponent calculations are implemented to use lookups rather than calculating them mathematically.
Lighting. The numerous lights in the ceiling of the hangar are approximated with a directional light from above. This is generating dynamic shadows using a 2048×2048 resolution depth map. Additionally there are number of point lights filling the total lighting nicely, but these mostly dont add shadows to save some system load. The corridor has point lights throwing shadows, using a 512x512x6 cube depth map each, and some are masked and animated as the turning warning light at the end of the corridor. There are all in all 8 light sources in the game test level, two directional and the rest point lights.
Game Test 2: FireFly Forest
This is a pretty dark demo but nice nonetheless. You follow a firefly as it flies through the forest at night. The moon is nearly full and illuminates the forest with a bluish faint light.

This scene is an example of a smaller scale outdoor scene with rich vegetation. There are a lot of trees, all swaying in a light breeze. Each branch is swinging separately. On the ground, there is dense vegetation. It is dynamically distributed where needed, according to the camera movements. The level of detail is also dynamically altered depending on the distance of the camera. Another key interest in this game test is the lighting and dynamic shadow system.
Materials. The ground material is like the metals in game test 1, but with added diffuse, diffuse detail, normal and normal detail maps. The rock surfaces also have a specular map. The tree branches are also a modified metal material without a specular map and with a diffuse cube map and no bump mapping. The sky material does a procedural light scattering.
Lighting. The moonlight is directional, generating dynamic shadows using a 2048×2048 resolution depth map. The illuminating firefly is a masked point light, throwing shadows using a 512x512x6 cube depth map.
Game Test 3: Canyon Flight
This is actually my favorite. An airship is flying through a canyon where a large monster lives. After a brief battle, the ship manages to escape. Just as with first game test, the benchmark only shows a small part of a longer story, which can be seen in the demo mode.

This test gives an example of a large scale outdoor scene. The scene is fairly complex with large areas of water reflecting the high canyon walls. The water actually is one of the key points of interest in this scene. The water not only does realistic looking reflections and refractions, but it also has a depth fog, making the sea monster swimming under the airship actually look deep down in the water. The air in this scene also uses a volumetric fog, making distant cliffs of the canyon really look far away.
Materials. The rock surface of the canyon is one of the heavier materials in 3DMark05, filling up a PS2.0 shader almost to the last instruction when combined with the dynamic shadow rendering. The canyon material has two color maps, two normal maps and Lambertian diffuse shading. The water is also very complex, but is not just a surface material. The scene is rendered six times to get correct reflections and refractions, and shadows to those. The water is a further developed version of the water shader in 3DMark03, doing multiple reads from a normal map; reflection and refraction maps, plus per-pixel Fresnel. In 3DMark05 there is also a depth fog for making objects deeper look more blurred and darker. A R32F depth map is used for the depth fog.
Lighting. Since it is a sunny day, there is only one single directional light source – the sun. This scene is very challenging for dynamic shadows, because of the large area and the round shapes of the canyon walls. It is hard to get the 2048×2048 resolution depth map to be enough for this scene, even though it is used twice. It is used once for objects near the camera and another time for the rest of the scene. But the lighting and shadows all are dynamic, so a fast forward in time would show the light and shadows turning correctly as the day passes. Actually, the demo end credits show the HDR sun turn red when setting. The sky material does a procedural light scattering.
Calculating the Score
The formula for calculating the 3DMark05 score is:
3DMark05 score = (Game Test 1 * Game Test 2 * Game Test 3)^0.33 * 250
where the average FPS in each game test is used. A high-end system should get around 5,000 3DMarks when the benchmark is launched.
The Other Tests
CPU Test
Just like in 3DMark03, 3DMark05 has a CPU test. The CPU test runs game tests in low resolution using software vertex processing and disabled post-processing. This decreases the graphics card workload and makes the test result reflect above all the CPUs performance rendering 3D scenes and performing other 3D game related tasks, like performing matrix calculations. The CPU test also uses fixed frame rendering to further ensure the workload stays the same for all systems. In 3DMark05, an additional workload typical for the CPU in 3D games has been added. The CPU not only calculates the vertex shaders; it also continuously calculates the flight path of the air ship. The air ship actually flies the same path every time, in order to keep the workload the same between different systems, but the calculations are performed as if it would intelligently steer according to the canyon shape and other obstacles like the sea monster jumping up from the water.
Feature Tests Fill Rate
Just as earlier versions, 3DMark05 includes a fill rate test. The test has been changed a bit to minimize the influence of bandwidth.
Feature Tests Pixel Shader
One of the most complex materials in the game tests is the rock face shader of game test 3. This is separated to a feature test, showing the light moving on the rough surface. There are no real time shadows, only vertex lighting. There is also no water surface, only the rock face.
![]()
Feature Tests Vertex Shader
There are two different vertex shader tests in 3DMark05: One very simple, doing only very simple transformation and one light lighting. The other does a more complex vertex shading, such as waving a large number of grass straws.
Vertex Shader Simple. This test does simple transformation and single lighting on six high polygon sea monster models. Each sea monster has over one million vertices to transform and illuminate, so the total workload is quite substantial.

Vertex Shader Complex. This illuminates, and most importantly, transforms a large number of grass straws. Each straw is skinned and bent separately, more towards the tip of the straw, like real grass straws waving in the wind. The straws are waved according to a fractal noise calculated on the CPU, but it is highly optimized to decrease the influence of the CPU performance on the measurement. To minimize the influence of fill rate, the grass is kept at a distance from the camera.

Batch Size Tests
The batch size tests are new tests that havent been present in previous versions of 3Dmark.
The test renders a very simple scene very much un-optimized, targetting a weak spot in most graphics drivers available today. Graphics IHVs have for years educated game developers to render as large batches as possible. However, it would be beneficial if the rendering of smaller batches would be optimized too. This test has been requested ever since developing 3DMark2001, but for this 3DMark version more than one BDP member asked for it.
There are six runs of this test, where 128 meshes of 128×128 quads are drawn with 8, 32, 128, 512, 2048 and 32768 triangles per batch. The last two batch sizes should be considered an optimized one for most drivers today, but the smaller the batch sizes get, the slower the rendering will be.
Color change state changes were added between the rendering batches to make sure DirectX doesnt collapse the whole rendering into a single or very few batches.
The Options
As with previous versions, 3DMark05 offers a lot of settings for the benchmark run.
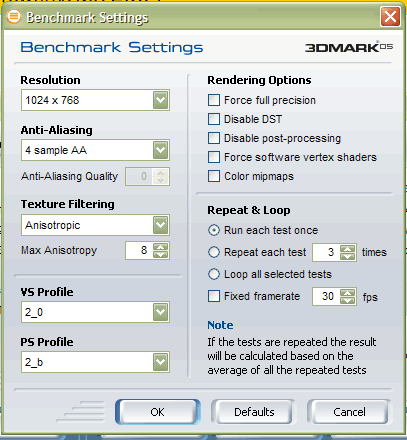
Most of the settings are pretty obvious, and I wont go through them all. A few things to note are:
– The default setting for Texture Filtering Modes is “Optimal.” This uses a mixture of bilinear and trilinear filtering, depending on what objects will benefit most from the higher quality textures.
– The benchmark allows partial (at least 16-bit) precision. Partial precision is allowed where it does not decrease the rendering quality. An image quality analysis was made during benchmark development, and it was pre-set which shaders may use partial precision. You can, however, force full precision (at least 24-bit).
Tools
Image Quality
As in 3Dmark03, you can specify any frame from the various benchmarks and save it as a bitmap (.bmp). You can also set the first and last frame and get all frames between saved to the computer.
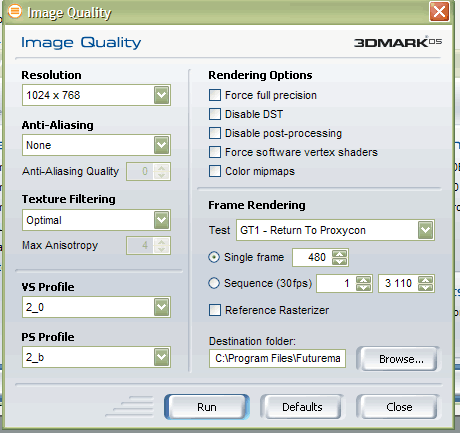
As expected, you can select from the same options as you could when setting up the benchmark.
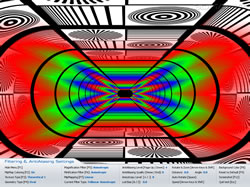
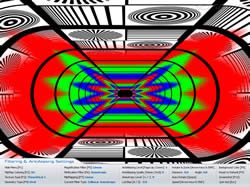
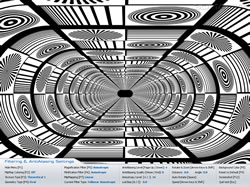
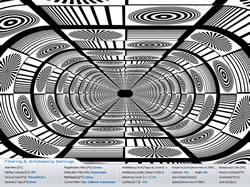
Texture Filtering and Anti-Aliasing Tool
This tool lets you play around with both AA and filtering methods to see how your card behaves. You can not only change a range of settings, but you can also move the camera as well as color mipmaps.
Graphs Benchmark Mode
The median frame rate often does not tell the whole story. Were there any big dips in the frame rate? In what situations does the card croak? The Graph Benchmark Mode in 3Dmark05 is there to help you find answers to these and other questions.
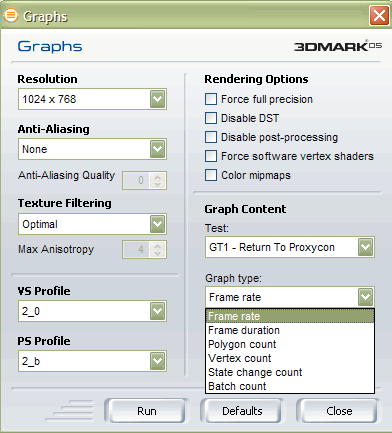
As with the other tools, you can set up the settings just as you did with the benchmarks. You can run the graphs on the 3 game tests, and you can select to record the following data:
Frame rate – the resulting average frame rate if all frames would be drawn as fast as this frame.
Frame duration – the time it took to draw this frame.
Polygon count – how many polygons were drawn in this frame.
Vertex count – how many vertices were drawn in this frame.
State change count – how many state changes were made when drawing this frame.
Batch count – how many drawing batches were executed when drawing this frame.
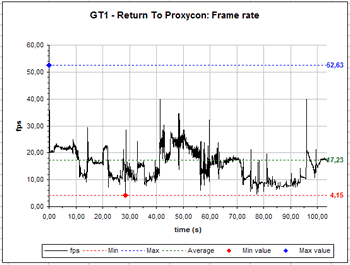
Example of a chart (MSI6800U 4xAA8xAF)
To use this tool, you need Microsoft Excel installed on your computer.
Showing Off Your Scores
Futuremark continues to offer Online ResultBrowser — the ORB. You will as usual be able to upload your scores and, if you want, share them with others. The ORB is also updated and will allow you to do more detailed searches. Unfortunately, the new ORB was not up while this article was written, so youll have to find out exactly how good it is yourself.
Benchmarks
Okay, weve talked a lot about how 3DMark05 works. Now it is time to put it to the test.
I happened to have a bunch of high-end video cards at home right in time for the release of 3DMark05, and I simply ran the default benchmark on them all. I also tested them with 4xAA and 8xAF. It was amazing to see these high-end cards being brought to their knees by 3DMark05.
System 1
Amd 64 3000+
MSI K8N Neo Platinum nForce3
1024 MB PC3200 DDR
Built-in Sound
2xSATA 36 GB 10k in RAID0
1xSATA 120 GB Maxtor
System 2
Intel 3.0 GHz P4 , 800 MHz FSB
PowerColor A350A-VF (ATI chipset)
512 MB Corsair PC4000 DDR
Built-in sound
1x 80 GB Maxtor IDE
The reason for only using 512 MB in the Intel rig is simply a matter of me not being able to afford more right now. I actually moved some memory over from my multimedia machine but since it is slower memory I ran into issues (crashes etc.) so I have to stay at 512 MB right now.
Video cards:
– HIS X800 XT
– HIS X800 Pro
– MSI 6800 Ultra
– AOpen 6800 Ultra
– Gainward 6800 GT Golden Edition (clocked at Ultra levels)
Just as with 3DMark03, this version requires approved drivers. The last few days have been pretty interesting as both NVIDIA and ATI have released new beta drivers that have been approved by Futuremark. The drivers for the ATI cards are the CATALYST 4.9 with the hotfix released a few days ago. For the NVIDIA cards, I am using Forceware 66.51 drivers. I turned off all optimizations in both the NVIDIA and the ATI drivers (including the new A.I feature). The NVIDIA cards were run with the SM3.0 profiles and the ATI cards with the SM2b profile. I also ran the NVIDIA cards with the SM2.0 and 2b profiles and the results were almost exactly the same so I decided not to clutter up the graphs.
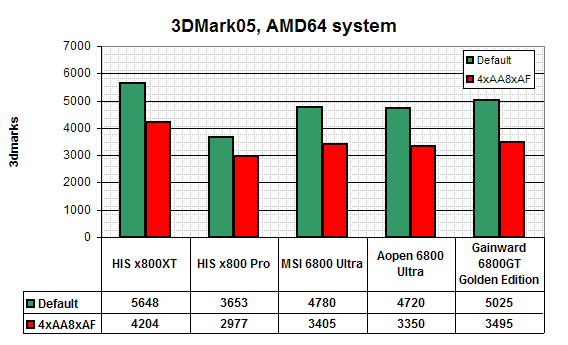
What should be noted here is that the X800 XT scored 4120 with the old CATALYST 4.9 drivers. The hotfix includes a bugfix for a memory allocation bug for all AGP RADEON products with 256MB of memory, and it definitely helped the scores. With the new drivers, the X800 XT beats the closest 6800 card by 12%. It’s cool to see that the Gainward 6800 GT Golden Edition manages to beat its big brother, the 6800 Ultra. Considering the card is similarly clocked as the Ultra, this is no surprise.
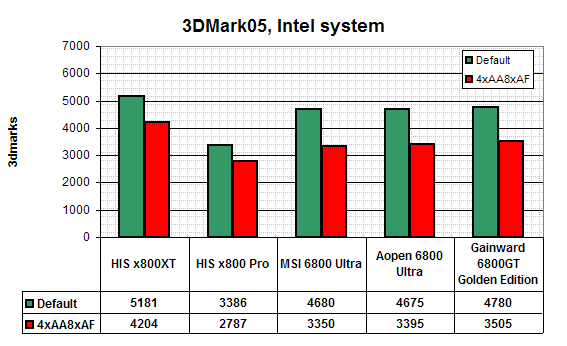
No big difference on the Intel system. Since it has less memory (512MB versus 1024MB), it is expected that it scores a bit lower than the AMD system. 3DMark05 is a video card benchmark, but the rest of the system is still important and will affect the score.
Image Quality Comparison
These images were taken on my HIS X800 XT and the MSI 6800 Ultra.
|
ATI |
ATI |
NVIDIA |
NVIDIA |
 |
 |
 |
 |
 |
 |
 |
 |
 |
 |
 |
 |
Click on the images for full size versions (1024×768)
Screenshots
In addition to the default frames in each game test that I took and displayed above, I took some more screenshots from various parts of the game tests.
|
ATI |
NVIDIA |
||
 |
 |
 |
 |
 |
 |
 |
 |
 |
 |
 |
 |
 |
 |
 |
 |
Click on the images for full size versions (1024×768)
Anti-aliasing and Texture Filtering
These images were taken on my HIS X800 XT and the MSI 6800 Ultra. I’ve tried to take screenshots with the same settings both for NVIDIA and ATI cards.
| ATI | NVIDIA |
|
|
|
|
|
|
|
|
|
|
|
|
|
|
|
|
|
|
|
|
|
|
|
|

Pricing and Requirements
3DMark05 will be available in several different forms.
- 3DMark05 (downlaod): Free (limited functionality)
- 3DMark05 Pro (download): $19.95
- 3DMark05 Pro (CD-ROM): $29.95
- 3DMark05 Business Edition (CD-ROM): $250.00
3DMark05 Pro will also give you access to the Pro Online ResultBrowser! The Pro ORB for 3DMark05 Pro includes a plethora of search parameters, MultiCompare, Dynamic Compare URLs, unlimited number of submits, unlimited number of published results and more..
The minimum requirement for running 3DMark05 are:
- DirectX 9 compatible graphics adapter with support for Pixel Shader 2.0 or later, and graphics memory of 128 MB or above.
- x86 compatible processor with SSE support, 2GHz or above
- 512 MB system memory or more.
- 1.5 GB of free hard disk space.
- Windows 2000 or XP operating system with the latest Service Packs and updates installed.
- DirectX 9.0c runtime installed with the latest updates.
- Microsoft Internet Explorer 6 installed, for some 3DMark functionality.
- Microsoft Excel 2000, 2003 or XP, for some 3DMark05 Pro functionality.
- Microsoft DirectX 9 Summer Update 2004 System Development Kit is required to run the image quality test using the reference rasterizer (3DMark05 Pro).
Conclusion
Any serious gamer should definitely get 3DMark05, preferably the Pro version. As always, Futuremark has created a neat, well packaged benchmark which will become the standard DirectX 9 benchmark until the next 3DMark comes out.
You can download 3DMark05 from any of the mirrors listed here: http://www.futuremark.com/download/?3dmark05.shtml
Let the bragging begin! I got 5648 marks with my HIS X800XT, what did you get?
(Thanks to Futuremark for providing us with material for this article and a full version of 3DMark05)