Software: QTS 4.2
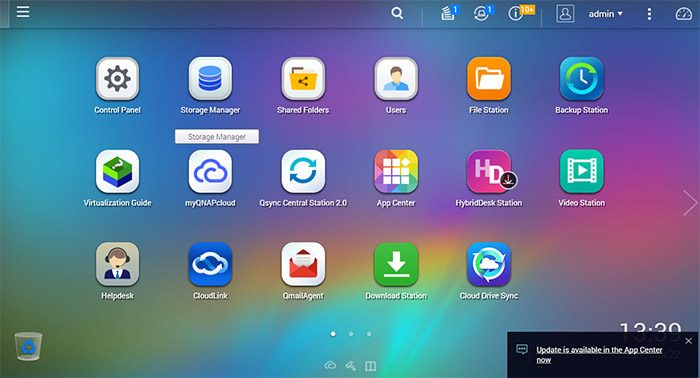
We had a rather extensive look at the QNAP’s latest QTS 4 with our review of the TVS-471, so we will suggest you to take look at our other review for more in depth look at the latest iteration of QTS. To sum it up, QNAP’s latest firmware offers a much modern design that offers plenty of features. The QTS has been improved quite a lot with the latest version where the NAS is much more responsive and easier to use. One thing we did notice with the TVS-682 is that navigating through the UI is more responsive than our TVS-471. This is rather surprising as the TVS-471’s Core i3-4150 is no slouch and we were not expecting to see the bump to the i3-6100 on the TVS-682 would actually make a noticeable performance boost. Granted the difference is not night and day but it is definitely something that is perceivable. The easiest way to illustrate the performance difference is with opening QNAP’s own Storage Manager, the TVS-471 takes just a hair longer to display the information than the TVS-682. Clearly, QNAP’s QTS loves faster internal hardware despite the fact that it works well even with lesser powerful internals and honestly, if we did not have both uni here, it may not be something that we will notice on day to day use.
–insert help desk
The latest QTS is 4.2 that adds a couple of new features added. One of the welcoming feature is the Helpdesk. Since NAS has gained quite a lot of features, knowing what to do with your device can be a daunting task. With Helpdesk, QNAP offers a one stop assistance as the Helpdesk aggregates QNAP’s help, online tutorial, and knowledge base. Helpdesk also provides a link to the compatibility list as well as download center. Going beyond the typical static support where users have to look up information or search for the array of FAQs, the Helpdesk also provides users with the ability to submit technical support to the QNAP’s customer service as well as submit suggestion and features to QNAP support team. Also, the Helpdesk offers remote access for troubleshooting. This is a great addition to the NAS that not only experience users would find it useful but also novice can get help on using and setting up their hardware.
Storage Manager with Qtier support for SSD caching
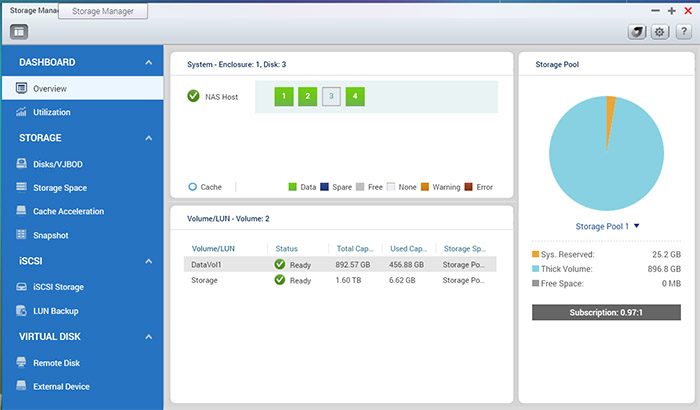
The Storage Manager has also been updated with additional feature such as Qtier technology and SSD caching. The TVS-x82 supports not just your typical hard drives (both 3.5 and 2.5’’ form factor) but also SSD and M.2 drives. Since the price of SSD are still relatively expensive compare to the HD per gigabyte of storage space, QNAP is aiming to ease the transition to the SSD and delivers the best of both worlds through SSD caching and Qtier storage, where users can enjoy high throughput from the SSD and the storage capacity offered by the traditional HD. The NAS’s primarily function is still a storage device, packing the unit with terabytes of SSD drive would put a huge burden financially for a small business or home users. Additionally, currently the largest SSD on the market is 4TB whereas mechanical drive is 2.5 times of that, at 10TB, so it is both economical and also practical to still use HD for the NAS.
The SSD caching is pretty self-explanatory as you would be using the SSD to temporarily hold the data before they are committed to the hard drive. Accessing data from SSD is much faster than the hard drive so you would gain the benefit of more responsive unit. QNAP implementation of the SSD Caching only applies to reading data so it will not help with writing data to the NAS. Data are simply copied to the SSD when a read command is issued and the system will check the SSD first to see if the data is located on the SSD before checking the hard drive. Two algorithm are employed:
- LRU (Default): Higher HIT rate, but requires more CPU resources. When the cache is full, LRU discards the least-used items first. As the system needs to track the cached data to ensure the algorithm always discards the least recently used data, it requires more CPU resources but provides a higher Hit rate.
- FIFO: Requires less CPU resources, but lower HIT rate. When the cache is full, FIFO discards the oldest data in cache. This reduces the HIT rate but does not require too much CPU resources.
The Qtier is the other technology from QNAP that is aimed to harvest the performance from SSD and the storage capacity of the HD. The Qtier breaks the storage into three categories: Ultra-high speed (flash based storage such as SSD), high speed (SAS drives), and capacity (SATA). With Qtier, we essentially combine the SSD and the hard drive as one storage device. When data is saved, it will be saved on either the SSD or the HD. QNAP’s own algorithm will migrate frequently used data to the SSD and less used data to the HD. A 12 Gb/s SAS controller is used to migrate the data across the devices. Unlike the SSD caching where data is always saved on the hard drive but only duplicated to the SSD to improve read IOs, Qtier will physically move the data from the HD to the SSD and any frequently used data will always be saved on the SSD while less frequently used data will be saved on the HD. Qtier improves both the read and write IOs for best performance for applications such as video editing that need to read and write the drives.
To use Qtier, a NAS must be running firmware 4.2 or above. Additionally, the NAS would need minimum of 8GB of RAM. The flash storage would also need to have minimum of storage capacity of 144GB in order to create a pool. While Qtier works with mix of SSD, SAS, and SATA HDs, it would offer best performance mixing SSD with other two storage device. We installed an SSD and hard drive to the NAS and checked the Qtier to created the pool. With the 240GB SSD, we noticed that after configured the Qtier without snapshot enabled, we were left with 150.72GB of storage as the system takes about 68.76GB of storage space.
The Qtier worked just as QNAP advertised. We filled the drives with data and left the NAS alone. Initially, we noticed that data are saved onto the SSD first before committed to the HD. After a few days, some of the data are moved to the HDD and if we left the NAS relatively idle for about a week, we noticed that data are being moved to the HDD, making the SSD ready to be used to write new and frequently used data. QNAP does not offer much configuration except the option to configure the schedule where the NAS would move less frequently used data to the storage drive while move the more frequent data to the ultra-fast drives. Ideally, you would want the NAS to do it maintenance while the NAS is not being used to minimize the performance impact. QNAP wants to make data management as simple as possible so that there is not much we can customize and there is no way to force a file to reside in either SSD or HDD.
Virtual JBOD (VJBOD)
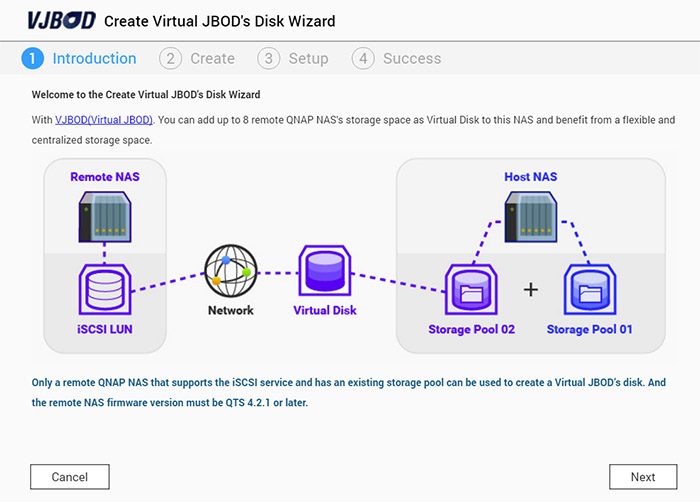
A new storage option is introduced with the latest firmware called the Virtual JBOD (VJBOD). The VJBOD is a software defined storage where users with multiple QNAP NAS can allocated storage from another NAS as iSCSI LUN. This allows the NAS to expand the storage without the need of replacing the hard drive or add an expansion unit. With this feature, any supported QNAP NAS devices no longer needs to be next to each other or connected via a single wire. As long as both units are on the same network, we can share the storage pool. This particular feature is quite useful though it is primarily reserved for the high-end enterprise and business oriented NAS from QNAP with iSCSI service that is running QTS 4.2.1 or higher. This make sense since typical home or small business users would most likely only have 1 QNAP NAS to store data but larger enterprise or business would be able to take advantage of what the VJBOD has to offer.
Obviously, the drawback with the VJBOD would be the network transfer speed. A single Gigabit Ethernet maxed out at 125 MB/s which is fast enough for a single hard drive but can be too slow for RAID or flash storage. Luckily QNAP NAS with multiple Ethernet port like the TVS-682 supports port-trunking so that network performance can be maximized as well as providing fail-safe traffic so that no data will be lost the event of a failed network connection. This feature would definitely benefit from 10GbE network where we are able to transfer data at 10 times the speed of the Gigabit Ethernet.
Currently, we can set up to eight remote QNAP NAS devices on a single host NAS. To setup the VJBOD, the remote NAS must have at least 154GB of free storage. Besides the network limitation mentioned above, the VJBOD also suffered performance penalty which according to QNAP’s own estimate, the random read and write performance may decrease by 20% to 30% compare to the host NAS due to data transmission between devices. QNAP recommends pair VJBOD with an SSD cache on host NAS to increase the storage pool performance. Additionally, the company recommends enable port-trunking to prevent any data loss. Another limitation with the VJOB is that it currently only supports single” RAID configuration. and cannot be used to create a system volume or expand other storage pools unless the Pool also consists of Virtual JBOD Disks that come from the same remote NAS and same Pool.
We did a quick test where we setup the TVS-471 as our host NAS and the TVS-682 as the remote VJBOD. The setup process is fairly straight forward that under the Storage Manager, we are able to configure the remote NAS by entering its host name or IP address or use the detect function in the wizard to find the remote NAS. Once we entered the administrator’s credential we are able to either create a new iSCCI LUN on the selected NAS or choose an existing iSCSI LUN. VJBOD even support host binding so that the particular iSCSI LUN can only be accessed by the host NAS. We did run into small issue while trying to create a LUN on the remote system where the setup process has no problem but it just will not finish. We ended up just create a LUN within the remote NAS and just select the LUN on the host NAS which has no issue mounting the LUN on our host system as VJBOD.
QNAP offers a couple of options to monitor the VJBOD. The latest firmware let us monitor which device has connected to the iSCSI LUN under the iSCSI Storage. The firmware also offers warning if an iSCSI connection is lost. Alternatively, QNAP’s Q’Center provides more comprehensive management tool for any NAS on the network.
We tested the performance by transferring a 2.57GB file to both the VJBOD and the host system internal drive from our PC. It took the VJBOD disk 34.30 seconds to finish the transfer whereas it took 26.63 seconds transferring the same file to the remote NAS’s own drive mapped to Windows Shared Drive. Transfer the same file to the NAS via ISCI command took 16.17 seconds. So, QNAP’s own estimate is no too far off from our own test.
The benefit of the VJBOD is not just let us expanding the storage on the host NAS via a remote NAS. It could also be used to transfer data between NAS devices. Essentially, what we can do is setup a VJBOD on one NAS, create a storage pool and load the data to the LUN. Afterwards, disconnect the drive from the Pool and the LUN. Then, on a secondary host NAS setup a connection to the existing VJBOD to the existing iSCSI LUN and select “Recover”. The secondary host NAS will then able to retrieve the disk’s data. The virtual disk’s storage pool, volume, snapshots, and relevant information will be available to the new host NAS. Clearly, the benefit with the VJBOD is the convenience of expanding storage and sharing data on the same network across multiple NAS devices at the expense of the performance and it is much better suited for 10GbE or 40GbE network infrastructure.
 Bjorn3D.com Bjorn3d.com – Satisfying Your Daily Tech Cravings Since 1996




Please discuss (or provide a link elsewhere) the use of antivirus products in conjunction with file attachments encountered by the qmail application you discuss in your article. Thanks.