Test Rig, Overclocking, And A Little SLI
The OS we use is Windows 10 Pro 64bit with all patches and updates applied. We also use the latest drivers available for the motherboard and any devices attached to the computer. We do not disable background tasks or tweak the OS or system in any way. We turn off drive indexing and daily defragging. We also turn off Prefetch and Superfetch. This is not an attempt to produce bigger benchmark numbers. Drive indexing and defragging can interfere with testing and produce confusing numbers. If a test were to be run while a drive was being indexed or defragged, and then the same test was later run when these processes were off, the two results would be contradictory and erroneous. As we cannot control when defragging and indexing occur precisely enough to guarantee that they won’t interfere with testing, we opt to disable the features entirely.
Prefetch tries to predict what users will load the next time they boot the machine by caching the relevant files and storing them for later use. We want to learn how the program runs without any of the files being cached, and we disable it so that each test run we do not have to clear pre-fetch to get accurate numbers. Lastly we disable Superfetch. Superfetch loads often-used programs into the memory. It is one of the reasons that Windows Vista occupies so much memory. Vista fills the memory in an attempt to predict what users will load. Having one test run with files cached, and another test run with the files un-cached would result in inaccurate numbers. Again, since we can’t control its timings so precisely, it we turn it off. Because these four features can potentially interfere with benchmarking, and are out of our control, we disable them. We do not disable anything else.
We ran each test a total of 3 times, and reported the average score from all three scores. Benchmark screenshots are of the median result. Anomalous results were discounted and the benchmarks were rerun.
| Test Rig “Roger” |
|
| Case Type | DIYPC Open Test Bench |
| CPU | Intel Core I7 6700K 4.0 – 4.2GHz |
| Motherboard | ASUS SABERTOOTH Z170 MARK 1 |
| Ram | Mushkin Redline 2666Mhz |
| CPU Cooler | Corsair H110i GTX |
| Hard Drives | Kingston 120GB SSD |
| Optical | none |
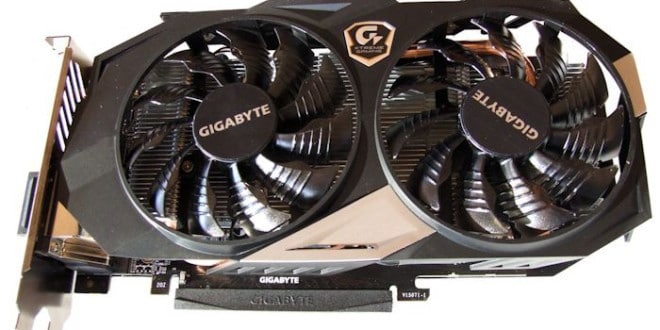
| GPU | GIGABYTE GTX 950 Xtreme Gaming |
| Case Fans | 1 x 180mm Mosfet / CPU / Ram cooling fan 1 x 120mm PCI-E Cooling Fan |
| Docking Stations | None |
| Testing PSU | SilverStone 1500W ST-1500 |
| Legacy | None |
| Mouse | Razer Diamondback Chroma |
| Keyboard | Razer Deathstalker Chroma |
| Any Attempt Copy This System Configuration May Lead to Pure Joy | |
 Overclocking
For overclocking we used the standard test system listed above and spent a couple of hours tuning and testing. This isn’t a complete bitter edge OC where we run the card so fast it completes benchmarks but rather we took the card to the ragged edge then backed it down 20MHz. It’s not a good idea and it’s not recommended to run a Video Card right out there on the edge of instability, find the fastest not artifacting OC then back down 10 or 20 MHz to ensure you will enjoy your video card for a long time to come.
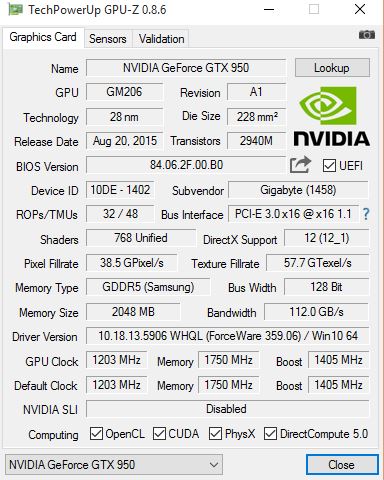
Here’s our stock picture of the GIGABYTE GTX 950 Xtreme Gaming 2GB showing the factory OC of 1203 with memory running at 1750 MHz, 7000 MHz effective.
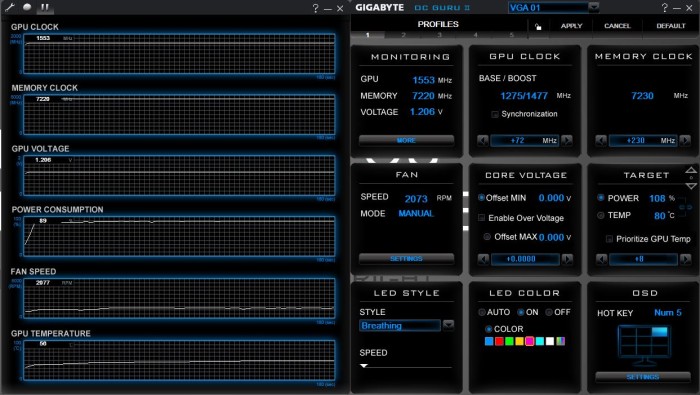
Using GIGABYTE’s OC Guru II to overclock we were able to reach a core OC of 1275 MHz with a boost of 1477-1553 MHz depending on load. Memory is able to handle a +230 Mhz increase and stay stable. We can push the GIGABYTE GTX 950 Xtreme Gaming 2GB further but for us this is a solid OC and doesn’t have our GPU running at the ragged edge. As usual we run a few benches and a light gaming session to check the integrity of the OC, all good here.
| Reference GTX 950 | GIGABYTE GTX 950 Xtreme Gaming 2GB | Achieved OC |
| Core Clock: 1026 MHz | Core Clock: 1203 MHz | Core Clock 1275 MHz |
| Boost Clock: 1190 MHz | Boost Clock: 1405 MHz | Boost Clock: 1477-1553 MHz |
| Memory (effective): 6600 MHz | Memory Clock: 7000 MHz | Memory Clock: 7460 MHz |
SLI
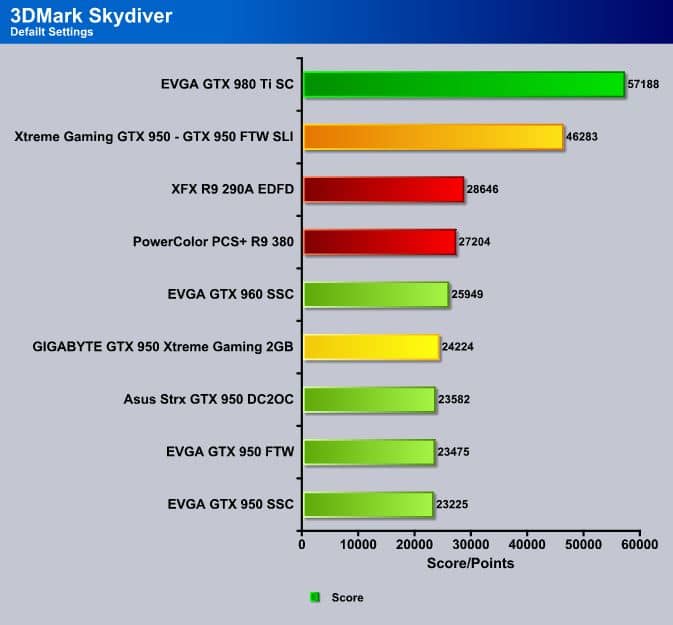
We brought together the GIGABYTE GTX 950 Xtreme Gaming 2GB and the EVGA GTX 950 FTW 2GB which are the most powerful GTX 950’s on the market out of the box and ran a few benches. We will include further SLI data in the future, for now we ended up on settling for 3DMark as it’s a good commonly accepted video benchmark.
3DMark Skydiver
3DMark Fire Strike
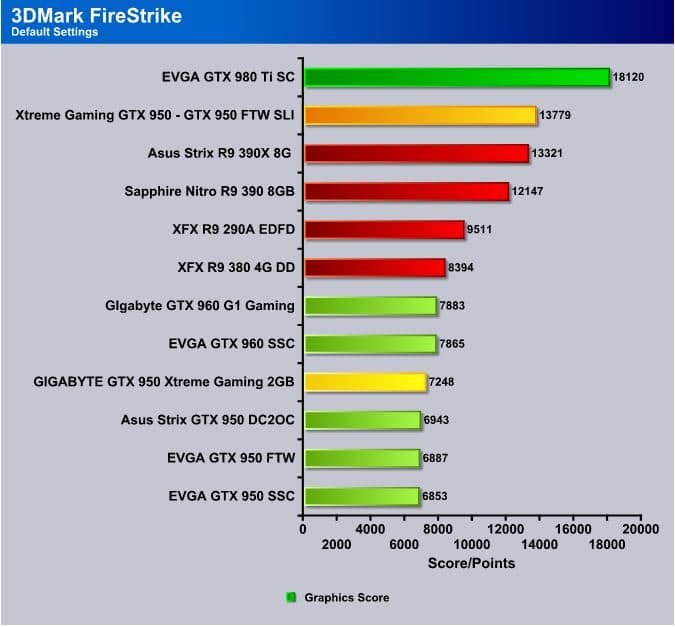
As you can see, two GTX 950’s in SLI are no laughing matter when it comes to performance. If you find yourself in the position to acquire two of these budget monsters for a good deal we say go for it and have fun crushing everything 1080p has to offer.
 Bjorn3D.com Bjorn3d.com – Satisfying Your Daily Tech Cravings Since 1996
