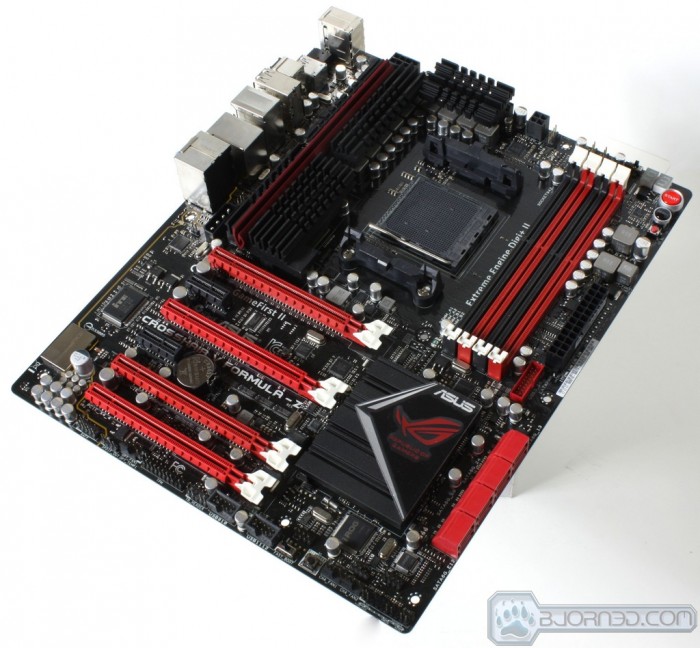
ASUS has been all the rage with its Z77 models, from the most basic to the more extravagant ROG series. Today we look at the AMD side of things with the new revision of the Crosshair V Formula.
Introduction – ASUS Crosshair V Formula-Z

We have not done many AMD boards as primarily most of the recent traffic has been Z77 so this should be a nice break to see an ROG board from the other side of the fence. The Crosshair is a highly featured gaming board with some LN2 benchmarking capability mixed in. The retail price for this board at time of writing is $229.99 at Newegg and this places it at the high side of AMD board pricing.
Key Features
APS (ASUS Premium Service)
ASUS Previously offered the APS service on ROG boards, but starting with the X79 series they have extended the service to cover much more than just their X79 models and even the standard channel line. This is nice to see as the APS service allows an advanced replacement or a board to be shipped to the user which in turn means less down time for the end user. More on this service can be seen on the ASUS website HERE
Windows 8 Ready
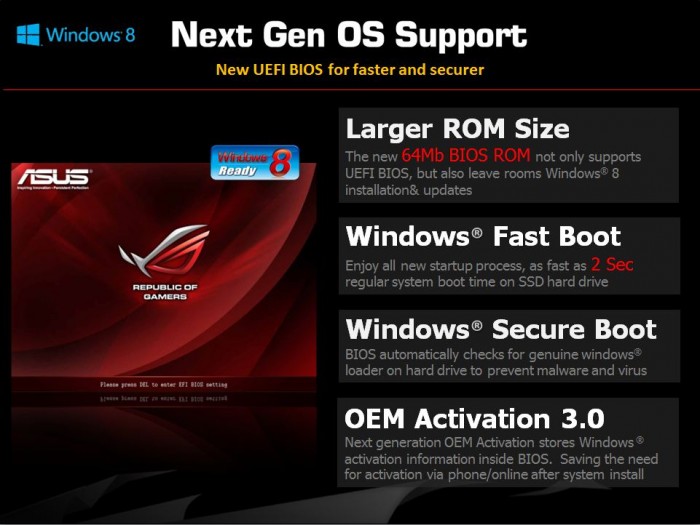
ASUS has been hard at work prepping for Windows 8, the new revolutionary OS from Microsoft. With this comes a new BIOS CAP file which is said to improve features and functionality integration for better compatibility with the new OS. Other cool features include faster boot up times and optimized settings for a smoother Windows 8 working environment. We’re sure the features available for this upgrade will scale larger as the OS matures and becomes available so keep a lookout at the ASUS site for updates found HERE
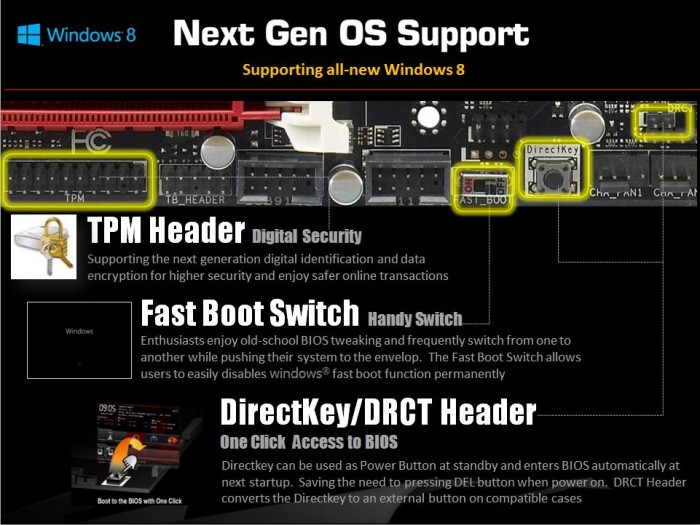
Here you can see that the Crosshair V Formula-Z is engineered with some key ingredients to make this ready and willing to take on some of the fast and secure boot features implemented in the new windows 8 OS. The direct Key button is very cool as there is no spamming the delete key anymore it simply takes you to the BIOS with a single press. Though this may be made for Windows 8, having a button that gets us directly into the BIOS is a very welcome addition. The fast boot switch really is what it says as it bypasses many normal boot options in order to give a super fast boot that almost takes you directly to the OS screen. The DRCT header allows a external switch mounted on the chassis to work with the same function as the DirectKey switch. Lastly is the TPM header which allows for very secure storage of passwords keys and other critical secure info to allow a much more secure working environment.
Other features not necessarily seen as plugs or interfaces on the board are seen above. This is all based around implementing Windows 8 for better performance, security and even smoother integration.
T Topology Memory Design
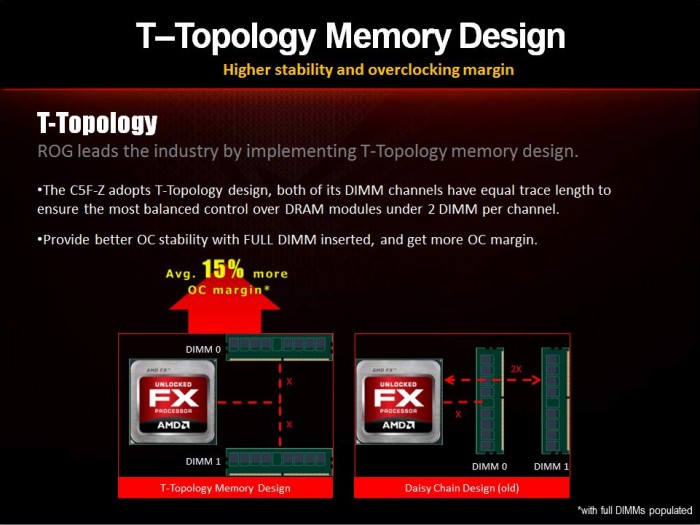
We have covered the T-Topology design at length previously and it has been implemented here now on the AMD side which means the possibility for better performance is now available for both sides equally. While present memory performance is very much limited by existing memory controllers I do believe as IMC’s improve at the rate they have been recently we could see some very strong performance from the T-Topology coming very soon.
The T-Topology design allows for equal length traces to the DIMM slots so that signals should in a sense be matched instead of the older designs where trace lengths could be slightly different causing signaling mis matches and this kind of thing could limit memory clocks when really pushing for the upper limit.
ASUS GameFirst II
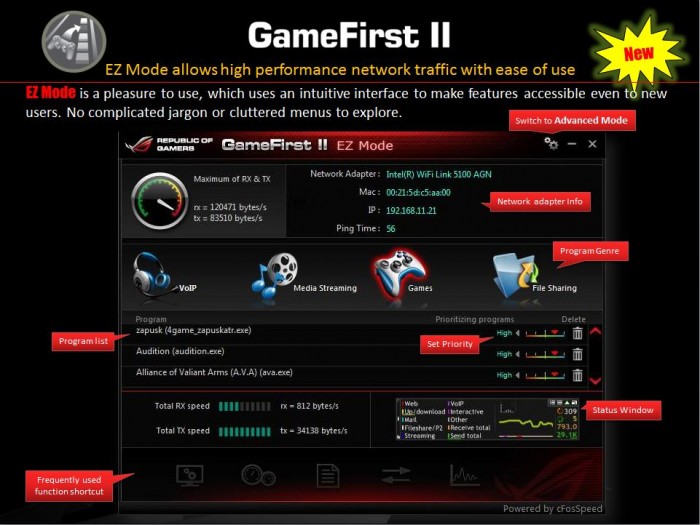
ASUS has pushed the GameFirst technology even further with its cFos software which now offers a EZ mode to allow even easier tweaking and adjust ability for all end users to increase online gameplay performance. The GameFirst II technology builds off of the ability to shape the network traffic to better control throughput and packet priority to ensure the program that needs maximum speed and reduced latency such as streaming HD video or simply online gaming is all at your fingertips.
This technology works with virtually any Network adapter which means if you decided to go wireless and install a WiFi card you can most likely control it and optimize the performance from the GameFirst II software. I have tested 3 different WiFi cards with the GameFirst II software and it worked without issue.
USB BIOS Flashback
ASUS offers the BIOS Flashback utility which is actually a multi-facet tool and has many capabilities which some may not be aware of. we have had many times where a motherboard did not support a CPU and a frantic search for a supported CPU just to flash the BIOS (ex. Gulftown CPU support on X58). ASUS has eliminated the worry of these kinds of issues by allowing the BIOS flashback procedure which does not require a CPU or memory to flash the BIOS. All that is needed in order to flash the BIOS is to have the desired firmware ROM file on a USB thumb drive and insert that into the ROG connect USB port.
Depressing the ROG Connect button for 5 seconds will start a flashing LED which indicates the firmware is being updated and once the update is complete the flashing will stop. It really is that easy and ensures no matter the condition the firmware can be flashed even if the newest CPU is not supported without the previously mentioned hunt for a compatible CPU.
This may seem like an odd feature but many may buy the newest and greatest CPU on the market while the board could have been shipped with the older firmware which in most cases would leave the user stuck without an option. As for our usage we have found this useful in quite a few experiences where running a LN2 cooled system not necessarily in the most stable conditions and a BIOS had gotten corrupt, but with the BIOS flashback it was remedied as quickly as we could copy the Rom file from our laptop to the flash drive and get it flashing.
USB 3.0 Boost
USB 3.0 Boost is a new feature we have seen from ASUS as of recent and it allows for a speed increase from older USB 2.0 thumb drives or storage devices when the Turbo mode is enabled on that device through the ASUS AISUITE II software.
One thing that not many have publicized is the fact that this boost also supports a protocol called UASP which supports a much higher transmission rate via the Asmedia controller. ASUS included with the Z77 motherboard some time ago a Thermaltake BlacX 5G USB 3.0 capable external docking station along with a Corsair Force GT SSD to allow for testing of this feature. we went ahead and tested multiple different drives and combinations to see how the functions actually plays out in real world scenarios.
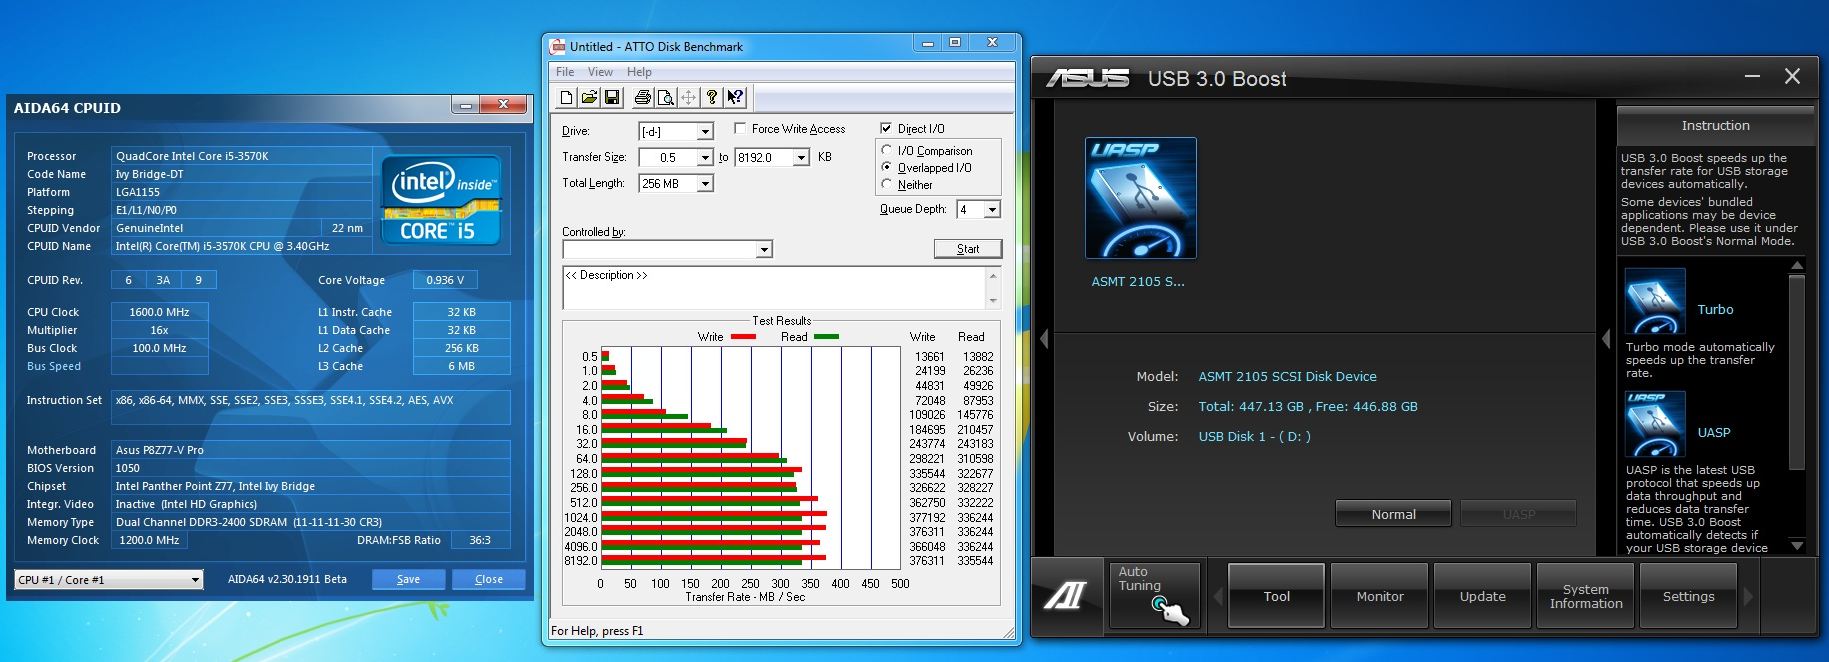
Below are representations of test runs on the ASMedia chipset which shows the USB 3.0 Boost in action.
Here we see standard performance from the Asmedia controller under its “Normal mode” which is rather good and plenty fast for an external storage device
Here we see with the UASP mode enabled that the speed is increased massively by over 100MB/s throughput which put some serious speed into the equation.
For more information please see the ASUS USB 3.0 Boost landing page here
Supreme FX III
SupremeFX III we have seen previously on the Maximus V Gene just not to long ago. It is a quite advanced audio solution for an integrated unit and as so it performs quite well when I had tested it previously.
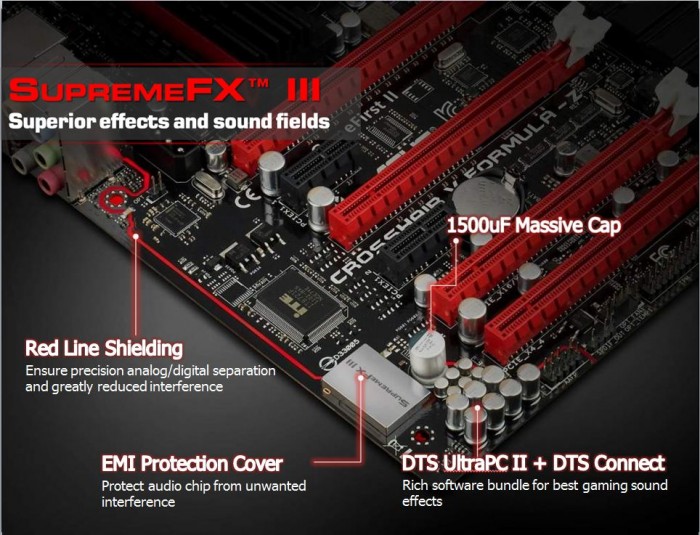
Here we see the basic overlay of the main components and features of the SupremeFX III audio module. Something we have seen before is the “red line” shielding which is an island in the PCB with blank PCB space separating the audio components from the rest of the board to ensure minimal interference from the digital board components getting into the Analog audio circuits. This blank PCB is also backlit by red LED’s to show off the red PCB separation line.
The EMI protection shield is a similar fogged aluminum appearance cover with the SupremeFX III logo marked into it.
Top quality caps are used in the SupremeFX III audio solution to allow for the cleanest possible audio from the onboard solution. These are all solid state caps on the separated island ensuring excellent and clean audio is all that reaches your speakers or gaming headset.
Overall from the caps to processor to red line shielding this is what we have seen before from SupremeFX III and it makes for a great experience whether your gaming, watching movies or even your favorite music while surfing the web.
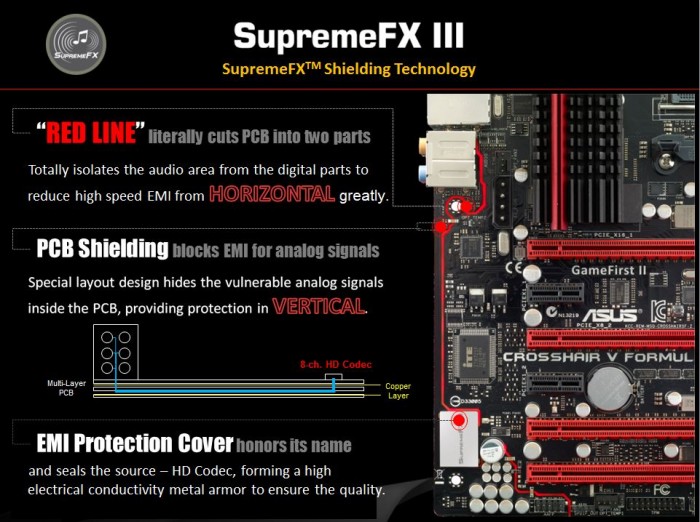
Here we see more detail covering the separation of the “red line” PCB as the audio solution has its own island of PCB. This effectively isolates the audio circuit from any sort of crosstalk or noise from the digital to analog circuits. Also illustrated is the PCB layer separation and how it works to ensure every possible step has been taken to ensure noise free audio.
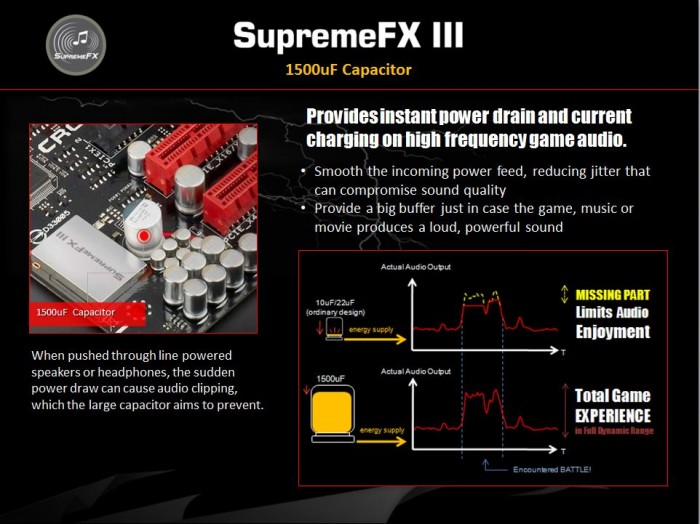
Here we see some detail about the high end caps and how they help bolster the audio for not just elimination of the peaky highs but to ensure bottomless low end as well. Also detailed here is the 1500uF main cap which is utilized to ensure that even in major audio peaks there is plenty of power on reserve to punch out the high quality audio.
Testing the SupremeFX III
There are many times when we have seen testing of onboard audio via very advanced measures and giving exact SNR or other very technical audio feedback. At the end of the day we will would rather test user experience, which is really the most important.
Movies
For movie testing we chose several titles that we enjoy but also have some louder sequences within them. Below is the list of the selected titles we used:
- Days of Thunder
- Black Hawk Down
- The Avengers
- The Dark Knight
All give a good range of audio sounds. The overall audio was very clean and just sounded great. The also audio volume from both high end gaming headsets and higher power speaker sets was a bit higher at the same software volume level than a standard motherboard Realtek audio solution.
Gaming
For gaming audio testing we tested multiple game titles to see how it reacted to both standard game audio and loud FPS explosions such as in Battlefield 3. The games used to test are listed below.
- Battlefield 3
- Dirt Showdown
- TES V: Skyrim
- Crysis 2
- Metro 2033
All in all we are impressed. Although we are no audiophiles, the communications during gameplay along with crispness of weapon fire all felt very clean and realistic to us. The explosions were loud and we actually felt a little more deepness or definition in the audio that switching to a standard chipset board such as my P8Z77-V Deluxe simply did not have. Overall we would say this audio solution is very strong and in my opinion does not disappoint.
Music playback
This is an area we are sure will be subjective from user to user. Overall the music quality was crisp and clear possibly a little tinny in our gaming headset but that could have just been the need for adjustment via some EQ settings. Overall the music was clear, and once again the volume setting required for the same or similar audio output was a bit lower than a standard solution.
Extreme Engine DIGI+ II
The DIGI+ solutions have been a mainstay on ASUS boards for some time now. For the ROG models the Extreme engine DIGI+ II solutions are selected from very top components to ensure overclockability and constant load performance is never a matter of compromise. We have covered the Extreme Engine DIGI+ II components many times previously and the same carries over with full digital DIGI+ controllers, solid state FP5K caps and top shelf MOSFET components.
The DIGI+ both standard and extreme utilize DIGI+ digital controllers which allow extreme voltage accuracy along with throttling of VRM components to allow for better thermals and overall power efficiency. Without over complicating it, the VRM components under lightly loaded situations can power units on or off freely which will allow switchable loading of the VRM components as they are turned on and off actively to better balance load and allow thermals that would otherwise be very difficult to pull off with a constant on or off configuration. Also the efficiency is greatly improved as lower thermals allow components to run more efficiently and also the switching allows unneeded components to not pull or use unnecessary power.
We will post numbers on loading and power capacity for the components as soon as we finish testing.
GPU/DIMM Post
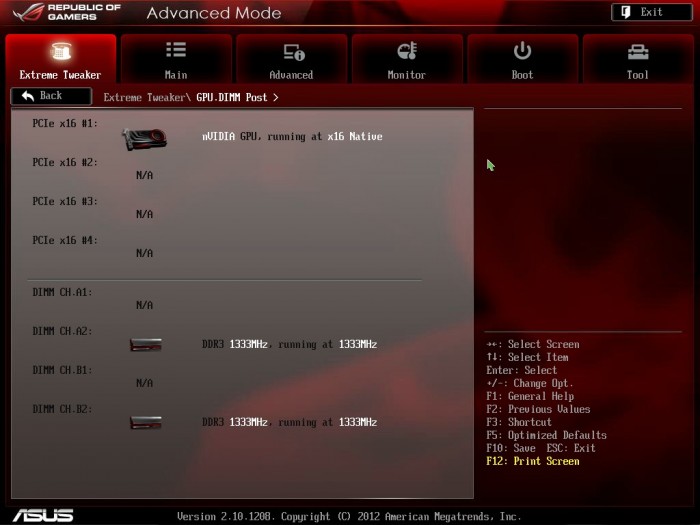
GPU/DIMM POST is one of those features whose benefit usually will be seen in the most stressful times like when something is not working. We actually wound up using this feature without intention on a previous ROG review, when a 32GB memory kit we were testing only showed up as 24GB. As we entered the BIOS after several attempts to fix the problem, we checked the GPU/DIMM POST and found that 2 modules were reading as “abnormal”. Powering the system off and resetting those DIMMs remedied the issue, but seeing that info directly in the firmware can save a lot of time when diagnosing errant behavior or instability; this kind of information being readily available is an invaluable asset to users. Additionally, the GPU POST option allows us to see the installed GPU’s in each slot, so that when benching LN2 or even on a liquid cooled gaming rig, the GPU POST screen can be checked to ensure identification of all installed cards is accomplished. See the BIOS Section for more info.
 Bjorn3D.com Bjorn3d.com – Satisfying Your Daily Tech Cravings Since 1996

