The GIGABYTE Z77X-UD3H includes a litany of features including USB 3.0, mSATA, and more. It would be a great addition to a mainstream Ivy Bridge system.
Introduction
Now that Ivy Bridge is finally out of the bag, it is time to start shopping if you are looking to upgrade from an older system. GIGABYTE has launched a total of ten Z77 boards with different features that we did a quick preview of a month ago. GIGABYTE used to have a greater separation of board features and ports but with the Z77 launch, they have simplified the differentiation. The latest Z77 boards from GIGABYTE all comes with four DIMM slots, the ability to run dual GPUs, and a plethora of USB ports. The ATX boards will also feature mSATA slot. Thus, when shopping for a board, the essentials are all there and you only have to decide whether extra ports or a better slot configuration is worth the extra money.
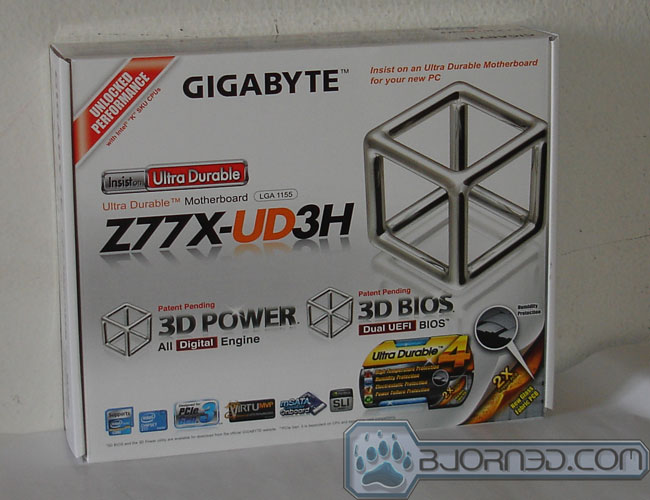
GIGABYTE sent us the GIGABYTE Z77X-UD3H for review. Retailed at $160, the UD3H is a mainstream Socket 1155 board. GIGABYTE has opted to use a white box as opposed to the flashy color that we are used to. This is a trend on many of GIGABYTE’s boards lately. As usual, there is plenty of marketing information can be found on the box, including GIGABYTE’s Ultra Durable 4, 3D Power, 3D BIOS with Dual UEFI BIOS, and many others.
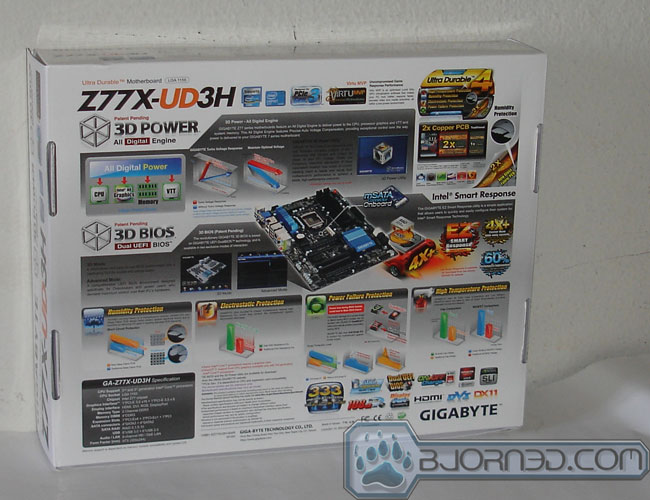
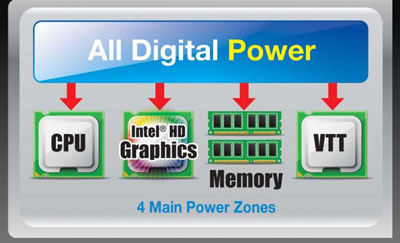
Flipping to the back of the box, we are greeted with a more detailed explanation of 3D Power. 3D Power is an all digital power delivery engine that supplies power to the CPU, processor graphics, VTT, and system memory. 3D Power features Precise Auto Voltage Compensation, which provides real-time monitoring and adjustment of voltages, phases and frequencies.
The 3D UEFI BIOS is the latest iteration of the UEFI BIOS from GIGABYTE that features two different interfaces: 3D Mode and Advanced Mode. We will talk more about this as we discuss the different options in the BIOS section.
GIGABYTE’s boards with “U” model are designed with the company’s latest Ultra Durable 4 technology. Designed to be endure in different environment, the board comes with humidity, electrostatic, power failure, and high temperature protection. According to GIGABYTE, the board is made with GIGABYTE’s new Glass Fabric PCB design that can protect against electrical short-circuiting due to humidity by reducing the space between the PCB filaments.
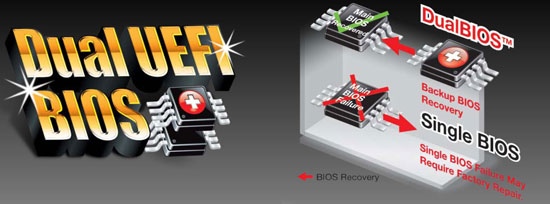
The board’s dual BIOS chip would also be quite useful in the event of a BIOS failure due to overclocking or power failure. The UD3H will automatically switched to the secondary BIOS and recover the corrupted main BIOS when the main BIOS is corrupted.
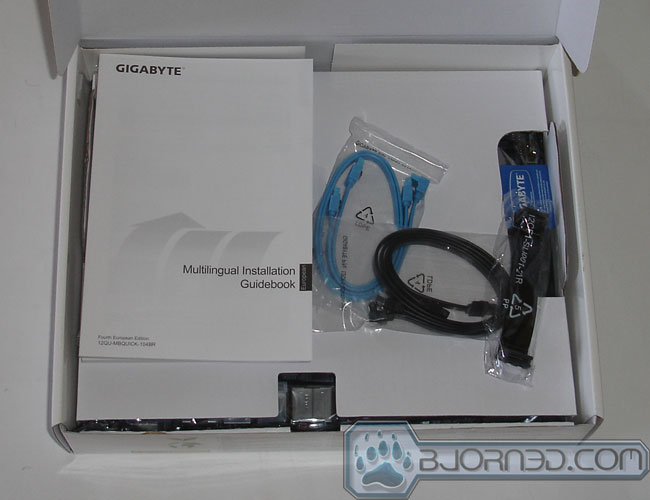
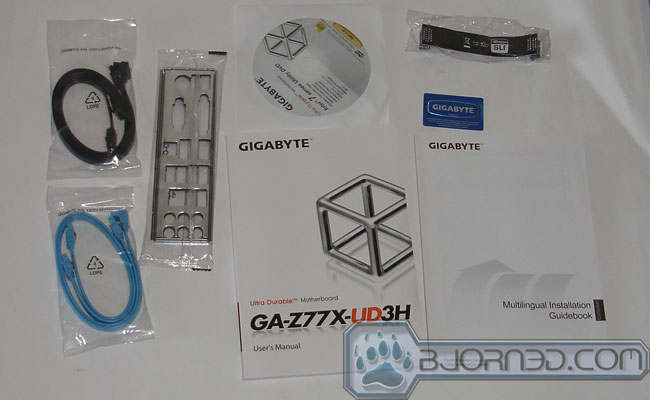
The UD3H is an entry-level Z77 board so it does not come with an extensive list of accessories. Inside the box are:
- Four SATA cables
- Rear I/O plate
- User’s manual
- Driver disk
- Multilingual installation guidebook
- Dual flexible SLI bridge
- Case bade sticker
Let’s have a closer look at the board’s layout.
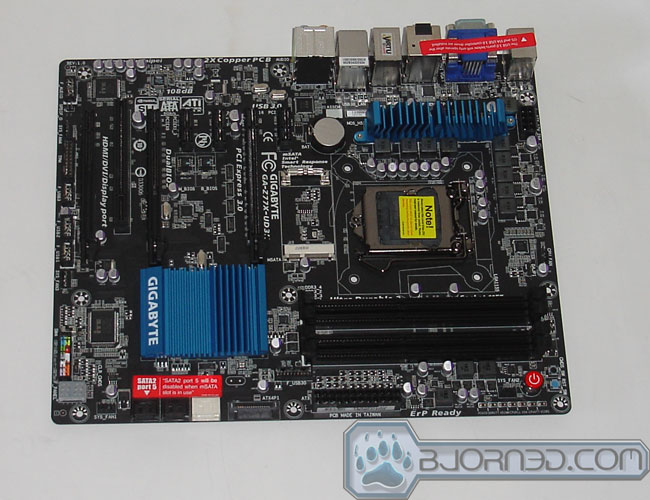
Overview of the GIGABYTE Z77X-UD3H
The UD3H is an ATX board with black PCB. With the exception of the two heatsinks, the board is pretty much all black. The board uses 6+2+1 power configuration where six phases go to the CPU main voltage (Vcore), two phases go to the memory controller, and one goes to the CPU VTT voltage (PCI Express and DMI interface). The voltage regulator is controlled by the IR3567A.
A very small and low profile heatsink sits above part of the PWM facing the rear of the board. The PWM facing the top of portion of the board is not cooled by a heatsink. Ivy Bridge’s overclocking is probably going to be limited by the CPU heat rather than power delivery, so the small size of the PWM heatsink should not pose an issue. The small heatsink actually makes the CPU area rather spacious for installing a large CPU heatsink.
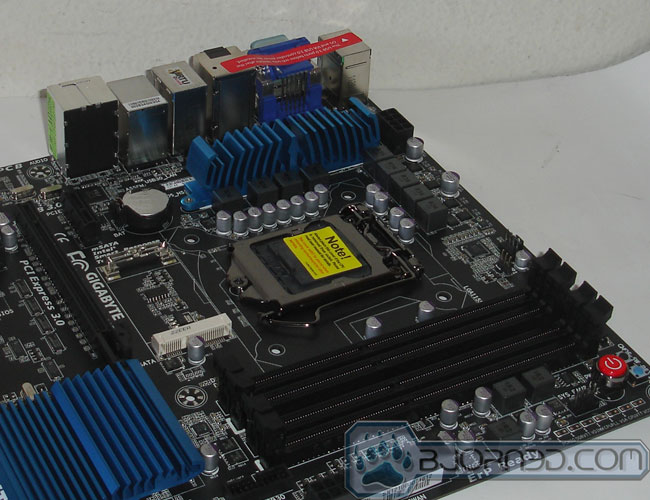
Next to the heatsink is where the CMOS battery is located. While this is rather unusual place, it should not be much of an issue with the built-in clear CMOS button on the rear I/O so it is unlikely that you would ever need to remove the battery.
Next to the CPU socket is where we can find the mSATA that has become one of the main feature in many of GIGABYTE’s Z77 board. The mSATA port hops along the Intel Z77 Chipset SATA controller. When it is used, one of the SATA ports (Port 5) will be disabled and it will only run at a SATA 3Gbps transfer rate. The mSATA is intended to be used for a cache drive and not for a storage drive. Thus, GIGABYTE did not route the 6Gbps port and instead reserved them for 2.5’’ drives. The mSATA sits right in front of the first PCI-E x1 slot but there is no need to worry about clearance issues since mSATA SSDs are not thick enough to block the slot from being used.
Moving along the front of the board we see four DIMM slots that are capable of supporting up to 32GB of DDR3 at speed 1066/1333/1600MHz and up to 2666MHz (OC). For some reason, GIGABYTE did not color coded the DIMM slots. For optimal performance, always run memory sticks at alternating slots for dual-channel configuration.
Just in front of the DIMM slots, we can see that GIGABYTE includes a handy power on/off button in a bright red color. Next to it, we find the reset and clear CMOS buttons, both very handy tools to have. There are also voltage contact points as well for measuring Vcore, CPU VTT, CPU PLL, DDR VTT, VDIMM, and PCHIO voltages values.
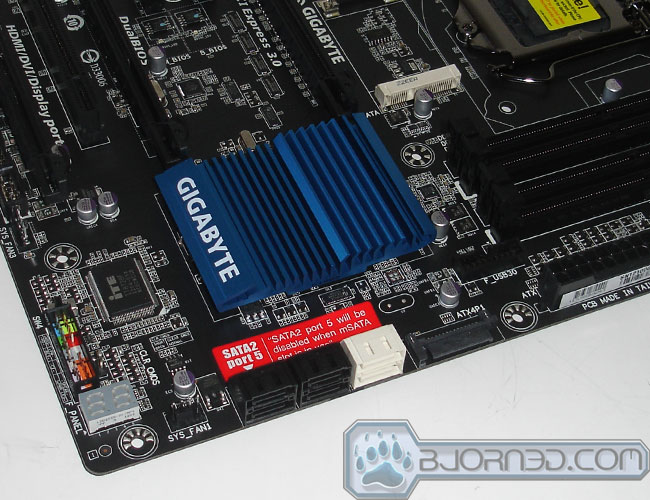
Moving along, we see the main ATX power connector and the SATA ports. There are no additional internal SATA ports on the board except the 6 ports from the Intel Z77 chipset. Two of the ports are SATA 6Gbps (white) and four are SATA 3Gbps (black). The board does come with eSATA ports courtesy of a Marvell 9171 controller but they are strictly for external use. Next to the SATA ports is a SATA port connector designed to provide additional juice to the PCI-E; GIGABYTE recommends that users attach a connector from the PSU for added power when running dual GPUs.
On the lower right hand corner is the handy LED debug code and the Clear CMOS jumper. We are very happy to see that GIGABYTE included the debug LED readout on the board though we do wish it had been placed on the upper corner next to the power button for easier access. Just next to the front panel header is the BIOS switch. This is a very handy tool to have so that the system can recover from a corrupted BIOS, such as might happen during overclocking or flashing. All you have to do is flip the switch to the secondary BIOS and you would be able to boot the PC up and recover the main BIOS.
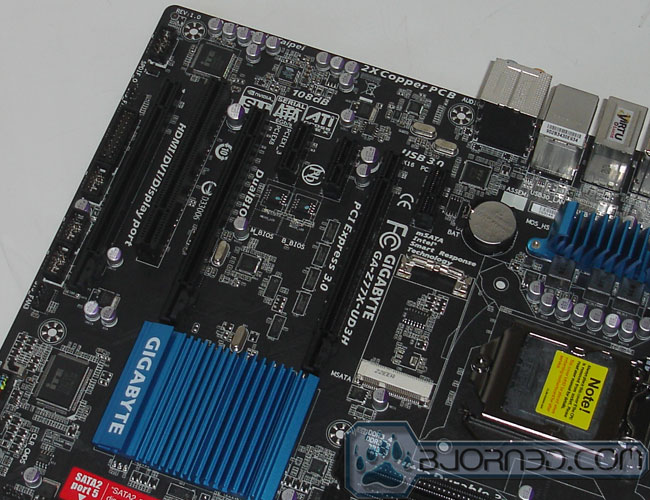
In terms of expansion, we get three PCI-E x 16, three PCI-E x1, and a PCI slot. The Z77 has a total of 20 PCI-E lanes, of which16 are available for dual GPU setups. The first and the second PCI-E are available for dual x8/x8 SLI or CrossFireX configuration. There is plenty of space between them for the triple cooler video cards. The three x1 slots share the bandwidth with the last PCI-E x16 slot. Though the last PCI-E x16 is physically x16, it only has x4 bandwidth. The first and second slots are based on the PCI-E 3.0 iteration while the rest of the PCI-E are PCI-E 2.0. Note that in order to use PCI-E 3.0, an Ivy Bridge CPU is needed. If you use Sandy Bridge, all slots will only run at PCI-E 2.0.
Along the edge of the board is where we find the pins for the internal headers. We have a USB 3.0 (sandwiched between the DIMM slots and the chipset heatsink). Additionally, over the bottom of the board from right to the left is where we find the usual front panel headers, three USB 2.0 header, TPM module, front panel audio, SPDIF header.
For cooling, we have a total of 5 fan headers on the UD3H. Two of them are located near to the top edge of the board around the DIMM slots where one is designed for the CPU fan. Three fan headers are located on the bottom section of the board. All five fan headers are 4-pin.
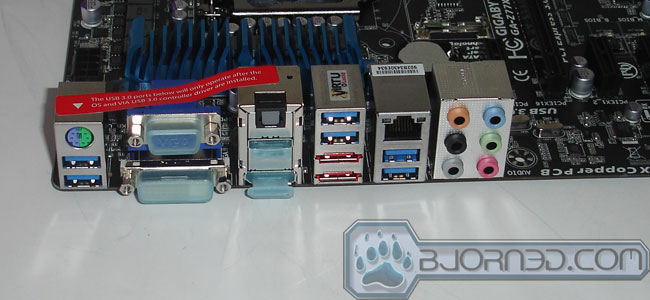
On the rear of the board, we have six USB 3.0 ports, of which four of them are controlled by the VIA VL800 and two are controlled by the chipset. Nowhere on the board or the manual can we find which port is controlled by which controller. After digging into Windows Device Manager, we found out that the bottom two ports are controlled by the Z77 chipset while the upper four ports are the VIA. The spacing of the USB ports is very nice as you can see that there are no ports next to each other so that they will block each other when you install two bulky USB flash drives.
We were a bit surprised to find that there are no USB 2.0 ports on the back. Personally, we would be happy to trade a couple of the USB 3.0 for USB 2.0 since the VIA controller would require the driver to be installed in Windows before they can be functional. Thus, during Windows installation, you would need to use the two Intel ports for input devices, which would not leave any ports available for a flash drive if you need to access it for driver installation. Our recommendation is use the PS/2 for your keyboard or mouse so you would have at least one free USB port available.
We do like the fact that every one of the USB ports has its own dedicated power fuse so that in the event that one of the ports fails, other ports will still be fully functional. All of the ports also support On/Off charge so that you can use anyone of them to charge your mobile devices such as smartphone and tablets even when the system is powered off.
Two eSATA ports and the usual 8-channel audio and SPDIF ports grace the back. The audio chip is controlled by the VIA VT2021. This is a rather unusual find as we are accustomed to seeing Realtek as the default audio chip on the motherboard. While it will be fine for basic audio listening, it will not provide you with the surround sound virtualization.
For the display, we get one DVI-D, one HDMI, and a display port. The maximum resolution for the DisplayPort is 2560×1600 while the other two will support up to 1920×1200. There is even a PS/2 for mouse and keyboard. A single Gigabit network is provided by the Atheros, another unusual controller that we often do not find on desktop boards. However, we have seen that the Atheros controller actually performs quite good compared to the Intel controller, so it’s a nice addition nonetheless and is better than Realtek that is often found on mainstream boards.
GIGABYTE DUALBIOS: 3D BIOS


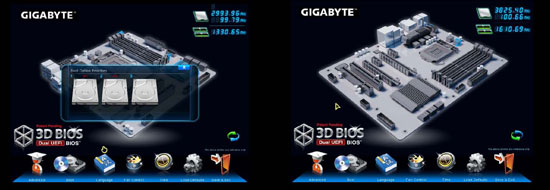
The GIGABYTE UEFI DualBIOS provides two different interfaces: 3D and text based. Unlike the traditional text based BIOS, the 3D BIOS has a visual picture of the motherboard where if you click on a particular components, it will brings a selection of options. For example, when we click on the CPU, we were able to adjust the CPU and memory frequencies and the voltage settings.On the bottom of the 3D BIOS is a set of additional options like the Boot order, Language, Fan Control, Time, and Load Default.
Most of the settings in the 3D BIOS uses slider to adjust most of the options. If you prefer to have a more precise control, you can also use keyboard’s left and right keys to move the slide. GIGABYTE provides the ability to rotate the motherboard so you can have a different perspective of the board.
The 3D BIOS certainly looks nice and worked out quite well. For the most part, interface is intuitive and the overall organization is good. We do like the fact that GIGABYTE chooses to make it simple to use where you are only greeted with the most common settings as oppose to a long list of options. Overall, the 3D BIOS interface is pretty snappy and the layout is easy to use. However, the same thing cannot be said with the text based BIOS in the Advanced Mode where users have more control over the motherboards.


We see the Advanced mode looks quite familiar where we have the menu options across the top and when a menu is selected, we are presented with additional settings. The mouse support in the Advanced mode is not as great as the 3D Mode. We can use the mouse to select an option but adjusting the setting often requires a keyboard input. Additionally, from time to time, we had to click on a setting a couple of times for the action to register.


GIGABYTE once again keeps the overclocking settings in the M.I.T (Motherboard Intelligent Tweaker) menu. Under here, we find the ability to adjust the CPU and memory frequencies as well as the system voltages. The “Current Status” is pretty useful where we get an overview of the CPU and memory information.
In terms of CPU overclocking, the UD3H has the ability to adjust the CPU/PCIe base clock from 80.00 to 133.33 in increments of 0.01, processor graphics clock can be adjusted from 400 to 3200, and the maximum CPU ratio to 63. The advanced core frequency provides the ability to fine-tune the processor’s Turbo Ratio depending on number of cores are active. The board provides the ability to adjust turbo power limit to 1200 watts and the core current up to 300 amps.
The X.M.P Profiles are supported by the UD3H but unfortunately, the board’s BIOS only shows it as Profile 1 or Profile 2 as oppose to the actual frequency which makes it a bit harder to know which one to pick from. Obviously, the board has the option to fine-tune the memory timings under the Advanced Memory Settings. All of the important settings like the CAS, tRCD, tRP, and tRAS are planced on the top of the setting. Additionally, there’s advanced timing control for those who wish to tweak the sub-timings for the memory and here is where GIGABYTE places the command rate, which is a little unusual as it is one timing that people often will adjust.


Three options are placed Under the Advanced Voltage Setting: 3D Power Control, CPU Core Voltage Control, and the DRAM Voltage control.
The 3D Power Control is we find the ability to adjust the PWM Phase control, VCore Voltage, Vcore, Graphics, and memory load-line calibration. There is also the ability to set the Vcore and memory voltage protection as well as Vcore, VTT, graphics, and memory current protection. The UD3H has six power phase control: Extreme Performance, High Performance, Performance, Balanced, Moderate Power, and Light Power. The power-saving levels are in the ascending order.
Two Voltage response options are available: Standard or Fast. There are five load-line calibrations (from highest to the lowest): Extreme, Turbo, High, Medium, Low, and Standard. The Vcore protection allows voltage adjustment from 150.0mV to 300.0mV. Five current protections are available liked the load-line calibration that ranges from low to Extreme.
The board also features PWM and memory thermal protection where users can set the maximum thermal threshold. We like the ability to set a thermal cap so that the hardware will not overheat when it is under extreme overclocking. Users have the ability to set the it either to 130.0C or 135.0C.


Under the PC Health Status, we find a quick overview of the system voltage, temperature and the fan speeds. Here is where we have the ability to adjust the fan fail warning and the fan control. The UD3H offers three modes of fan control: normal, silent, or manual. If it is set to manual, it provides the option to set the slope from 0.75 PWM/C to 2.5 PWM/C. When it is set to the lower value, the fan will be quieter and louder when it is set to the higher end of the range. The finer controller allows a the fan to ramp up or down depending on the temperature. While this is an improvement over previous fan control from GIGABYTE, we ultimately like to see the ability to adjust each fan individually.


System is pretty standard where we have the ability to adjust system clock and language. Here we also find the ability to enable or disable the SATA port and its hot plug. This seems to be slightly out of place. In fact, there appears to be a few places where items are being placed in a bit odd place.

Under BIOS Features is where GIGABYTE provides the boot priority. The board offers the ability to adjust the boot order up to three devices which should be plenty for most people. Interesting enough, GIGABYTE also places a couple settings for CPU features such as the Virtualization and Execute Disable Bit in here.

The Peripherals is where we have the option to disable almost every single ports and slots on the board. The board supports xHCI Pre-boot driver and xHCI Mode where it allows the USB 3.0 devices to work before boot into Windows and the drive is loaded. The Intel Z77 USB ports will support streaming for faster data transfer and the board’s BIOS has the ability to turn it on and off.
Here is where we also have the ability to adjust the initial display and to turn on/off the internal graphics in the Sandy Bridge and Ivy Bridge processors. The PCI-E slot configuration is where we have the ability to adjust the PCIE x4 configuration where we have the ability to set it to operate at x4 mode (which will disable other x1 slots) or set it to run at x1 mode.
Looks like GIGABYTE is no longer using their naming scheme when comes to the additional SATA controller. In the past GIGABYTE used GSATA for the third-party non-chipset SATA controller but this time, GIGABYTE uses the manufacturer’s name as oppose to GSATA and we can see the Marvell SATA is the controller. We like this because it makes looking for the most updated driver much easier.

Under Power Management, we can see that the board supports a wide range of automatic power on feature. We can see that it can be powered by pressing a keystroke, or we can set to power by a certain in in each day or a specific day of a month. The Power On by Keyboard unfortunately only works with the PS/2 keyboard and not the USB keyboard.
We also have the ability to enable or disable the internal graphics standby or deep standby mode for lower power consumption.

Lastly, under the Save and Exit, we have the ability to override the boot order and save up to four profiles. Here is where we can also load optimized defaults.
SOFTWARE AND FEATURES
3D Power


A new addition to the Z77 software bundle is the 3D Power. The software lets you interact with the motherboard’s voltage, frequency, and power phase setting. The interface is easy to use and the settings are exactly like what you saw in the BIOS. However, the software is quite laggy. When we click on a setting, it takes a few seconds for the option to appear on the screen. We hope GIGABYTE will be able to improve its performance in the future.
EasyTune 6
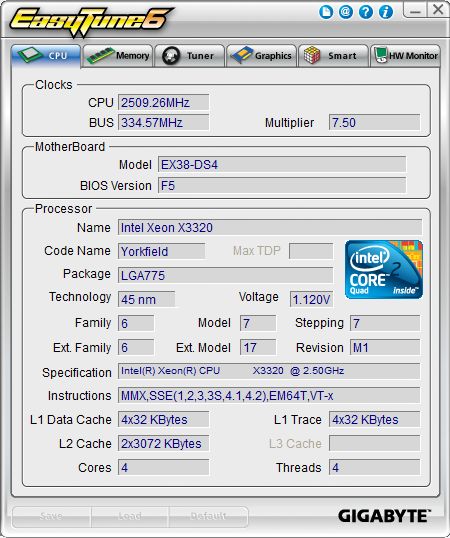
GIGABYTE has been including EasyTune for a long time for overclock. The tool also offers system information and hardware monitoring tool. The software really needs an upgrade as the interface is a bit old. However, we do appreciate the software’s small foot print and it’s non-intrusive interface.
New Digital power design
GIGABYTE has long been a proponent of the analog power design and as of recent have jumped aboard the digital train as newer platforms are requiring much more finite levels of control that are easier accomplished witha digital controller and the accuracy it provides. The Sniper M3 does not provide a multi tier digital solution like Asus but instead offers the digital control for the CPU and iGPU mainly which is not necessarily an issue but could impose limitations as to how far the board can clock and how well it can be tuned in for 24/7 overclocks.
GIGABYTE 3D BIOS
GIGABYTE has implemented the 3D BIOS on the X79 and this is GIGABYTEs form of a clickable UEFI GUI BIOS interface. The board image has been significantly improved and the interface smoothed out a little but we will discuss that more when it comes to the BIOS section.
Virtu MVP
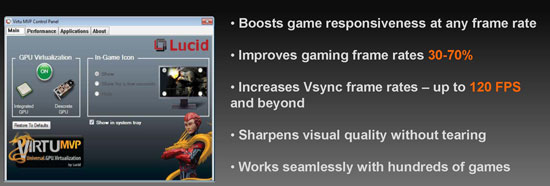
GIGABYTE has implemented like other board we have seen the inclusion of Virtu MVP which allows for a pairing of the iGPU and discreet cards for some really cool features such as Hyperformance which has frames pre rendered by the iGPU and removed some of the workload from the discreet GPU so it can do its job of delivering even higher framerates.
EZ Smart Response
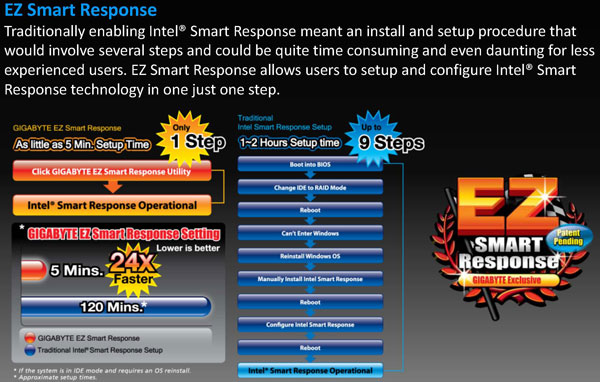
GIGABYTE aimed to simplify the process of setting up the Intel Smart Response by reducing a 9 step process into just 1 step. While we do not particularly feel that setting up Intel Smart Response too difficult, some people may find it useful to simply able to get the system up and running with 1 step as oppose to 9 steps.
mSATA Connector Onboard

Many of the current generation of GIGABYTE Z77 boards features onboard mSATA. This allows those who wish to use Intel Smart Respnose to use mSATA for caching as oppose to the 2.5” SSD.
GIGABYTE ON/Off charge
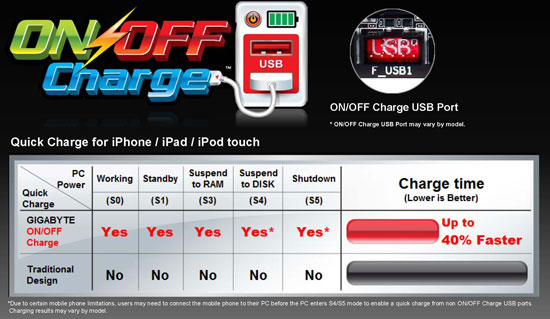

GIGABYTE does have a pretty cool feature in its ON/OFF charge which allows charging of even high load devices in all power modes even in power off (S5) mode. This may not seem like such a big deal until you need to charge your phone and realize your system is off, and without this feature you will power your system on and leave it on just to charge it, well with this feature its not necessary and you just have to plug in and charge no need to worry about system sleeping or being off.
Additionally, each USB port has its own fuse so that in the event that one port failure will not render other ports non-functional.
Ultra Durable 4

GIGABYTE has been promoting their Ultra Durable designs for some time now and now with the Ultra Durable 4 GIGABYTE has added even more features into an already impressive package. We can remember when the 2oz copper PCB was one of the big selling points; now it has added many more features such as the new Glass Fabric PCB, Thermal protection, Humidity protection, Electrostatic protection and Power Fault protection which all add up to a complete package of protections and features that should make for a solid and long lasting board.
Testing & Methodology
In the interests of thoroughness and accurate results, we run each test at least three times, and some tests more than that. We average the total of all the tests from each benchmark then report the average here. If we had any ambiguous results we left those out and ran the benchmark once again.
The OS we use is Windows 7 Pro 64bit with all patches and updates applied. We also use the latest drivers available for the motherboard and any devices attached to the computer. We do not disable background tasks or tweak the OS or system in any way. We turn off drive indexing and daily defragging. We also turn off Prefetch and Superfetch. This is not an attempt to produce bigger benchmark numbers. Drive indexing and defragging can interfere with testing and produce confusing numbers. If a test were to be run while a drive was being indexed or defragged, and then the same test was later run when these processes were off, the two results would be contradictory and erroneous. As we cannot control when defragging and indexing occur precisely enough to guarantee that they won’t interfere with testing, we opt to disable the features entirely.
Prefetch tries to predict what users will load the next time they boot the machine by caching the relevant files and storing them for later use. We want to learn how the program runs without any of the files being cached, and we disable it so that each test run we do not have to clear pre-fetch to get accurate numbers. Lastly we disable Superfetch. Superfetch loads often-used programs into the memory. It is one of the reasons that Windows occupies so much memory. Vista fills the memory in an attempt to predict what users will load. Having one test run with files cached, and another test run with the files un-cached would result in inaccurate numbers. Again, since we can’t control its timings so precisely, it we turn it off. Because these four features can potentially interfere with benchmarking, and and are out of our control, we disable them. We do not disable anything else.
Test Rig
| Test Rig | |
| Case | Cooler Master Storm Trooper |
| CPUs | Intel Core i7 3770K (Ivy Bridge – LGA 1155 -Z77) |
| Motherboards | Intel DZ77GA-GD65Gigabyte Z77X-UD3H |
| Ram | Kingston HyperX Gray 4 GB (2x2GB) |
| CPU Cooler | Zalman CNPS9900 Max |
| Hard Drives | Seagate Barracuda XT 3TB |
| SSD | 1x OCZ Vertex 3 240GB SATA III 6Gb/s SSD |
| Optical | ASUS DVD-Burner |
| GPU | 1x Gigabyte GeForce GTX580 SOC |
| PSU | Cooler Master Silent Pro Gold 1200W PSU |
| Mouse | Razer Imperator Battlefield 3 Edition |
| Keyboard | Razer Blackwidow Ultimate Battlefield 3 Edition |
Test Suite
We will use the following applications to test the performance of the Z77 Chipset (Motherboard, Processor).
| Benchmarks |
|---|
| PCMark 7 |
| 3DMark 11 |
| Cinebench R11.5 |
| SiSoft Sandra 2012b |
| X264HD |
| Truecrypt 7.1 |
| Unigine Heaven 2.5 |
| Metro 2033 |
Overclocking

The Ivy Bridge overclocking is limited by the heat output of the processor. In order to achieve 5+ GHz of speed, a watercooling is probably required. With air cooler, the processor should not have much issue getting to 4.5GHz if you choose one of the model with unlocked multiplier.
We were able to overclock our Core i7 3770K to 4.6GHz with Vcore set at 1.35V (which CPU reports as 1.320V). We choose to not running voltage higher than 1.35V because at higher voltage than 1.35V, the CPU heat output is simply too much for our Zalman CNPS9900 MAX to handle. We ran Prime95 torture test for at least 30 minutes and did not encounter any error or crash.
It is very easy to overclock with the UD3H as we simply have to increase the voltage and raised the multiplier without the need to tinker other settings in the BIOS.
Temperatures

The temperatures were recorded with RealTemp while running Prime95 for at least 15 minutes. The results were recorded carefully. After the results were recorded, we waited for 30 minutes before taking Idle temperature measurements. The results were as follows:
| Configuration | Idle Temperature CPU/Core (C) | Load Temp CPU/Core (C) | Motherboard Temperature Idle/Load (C) |
| Gigabyte Z77X-UD3H (4.6GHz) | 26/35 | 85/96 | 41/41 |
| Gigabyte Z77X-UD3H | 24/33 | 52/60 | 36/37 |
| Intel DZ77GA-70K | 36/33 | 37/65 | 40/40 |
At stock setting, we can see that the CPU runs cooler on the Gigabyte board (though the core temperature is the same). However, under load, we can see that the core temperature for the UD3H is 5C lower than the Intel DZ77GA-70K.
Power Consumption

The power consumption was tested while running Wprime 1024 for a few minutes at stock settings. The results were recorded carefully with a Kill-A-Watt power consumption measuring tool at the wall. After the results were recorded, we waited for yet another few minutes minutes before taking Idle power consumption measurements.
| Configuration | Power Consumption Idle | Power Consumption Load |
| Gigabyte Z77X-UD3H | 90 | 172 |
| Intel DZ77GA-70K | 87 | 167 |
| MSI Z77A-GD65 | 87 | 162 |
The UD3H’s power consumption is actually the highest of the bunch. The MSI Z77A-GD65 takes the award home for being the most power efficient board we have tested. The Gigabyte Z77X-UD3H consumes 3 more watts idle and 10 more watts load than the MSI board.
Sisoft Sandra 2012b
“SiSoftware Sandra (the System Analyzer, Diagnostic and Reporting Assistant) is an information & diagnostic utility. It should provide most of the information (including undocumented) you need to know about your hardware, software and other devices whether hardware or software. It works along the lines of other Windows utilities, however it tries to go beyond them and show you more of what’s really going on. Giving the user the ability to draw comparisons at both a high and low-level. You can get information about the CPU, chipset, video adapter, ports, printers, sound card, memory, network, Windows internals, AGP, PCI, PCI-X, PCIe (PCI Express), database, USB, USB2, 1394/Firewire, etc.”

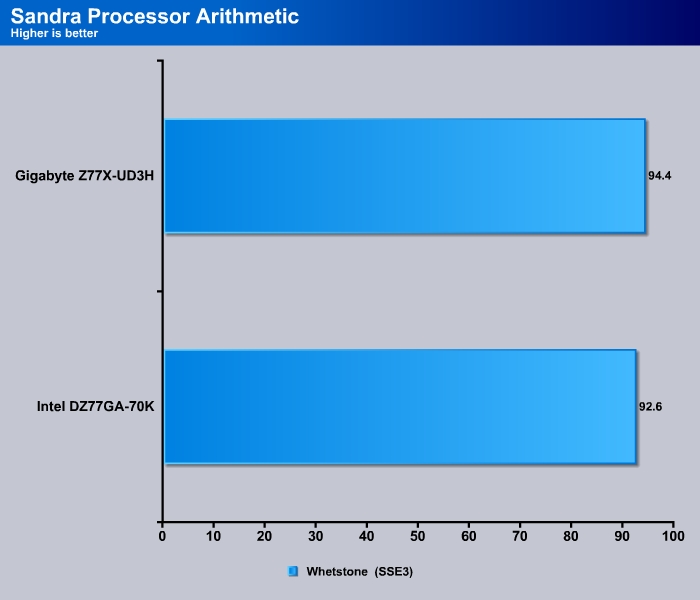
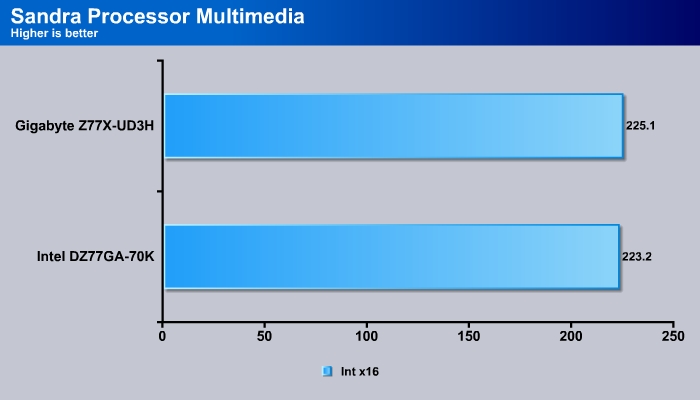
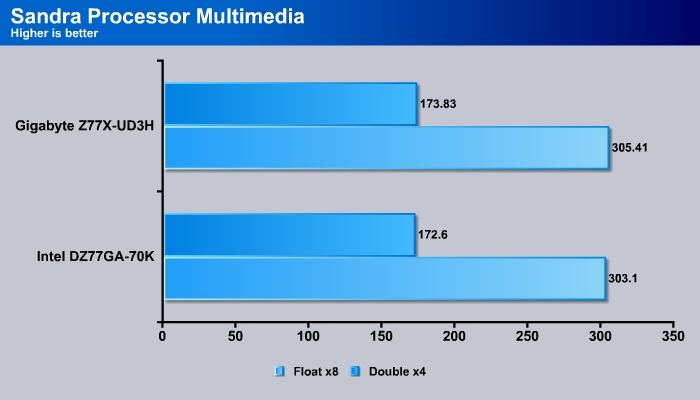
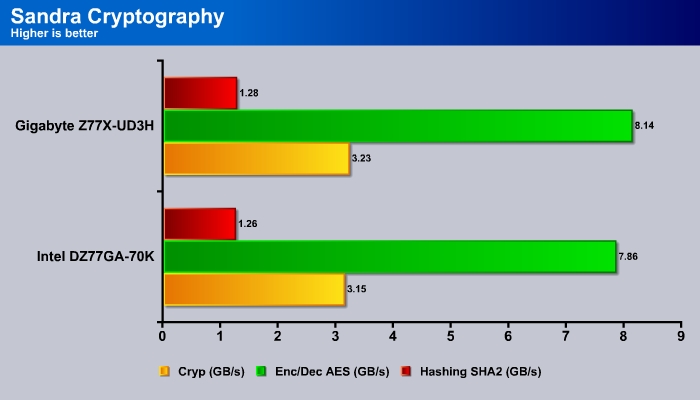
When we look at the CPU performance, there is virtually no difference between the Gigabyte UD3H and the Intel DZ77GA-70K. The Gigabyte Z77X-UD3H is slightly overclocked by default and hence it yields a slight higher score.
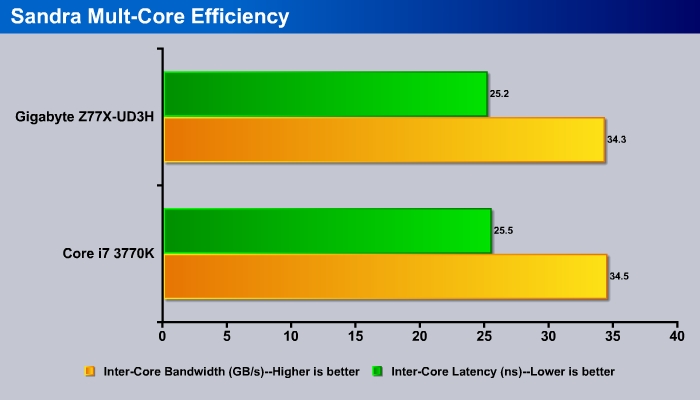
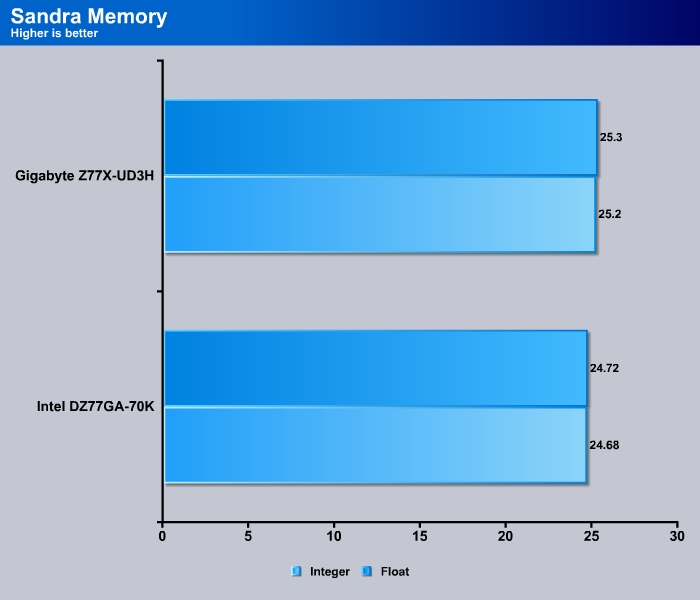
There is a very narrow margin where the UD3H’s memory performance is slightly faster than the Intel board.
X264HD

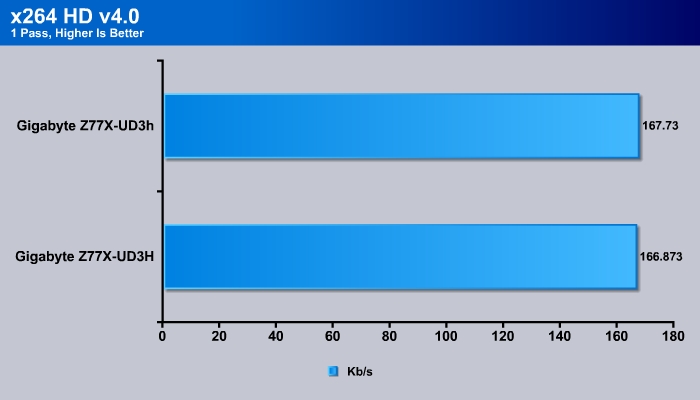

Thanks to the slight overclocking, the UD3H once again is about 1% faster than the Intel board.
Cinebench and R11.5
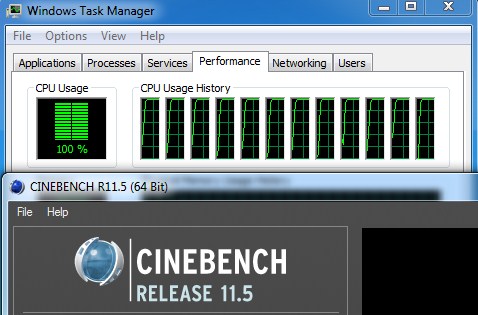
“CINEBENCH is a real-world test suite that assesses your computer’s performance capabilities. MAXON CINEBENCH is based on MAXON’s award-winning animation software, CINEMA 4D, which is used extensively by studios and production houses worldwide for 3D content creation. MAXON software has been used in blockbuster movies such as Spider-Man, Star Wars, The Chronicles of Narnia and many more. MAXON CINEBENCH runs several tests on your computer to measure the performance of the main processor and the graphics card under real world circumstances. The benchmark application makes use of up to 16 CPUs or CPU cores and is available for Windows (32-bit and 64-Bit) and Macintosh (PPC and Intel-based). The resulting values among different operating systems are 100% comparable and therefore very useful with regard to purchasing decision-making. It can also be used as a marketing tool for hardware vendors or simply to compare hardware among colleagues or friends.”
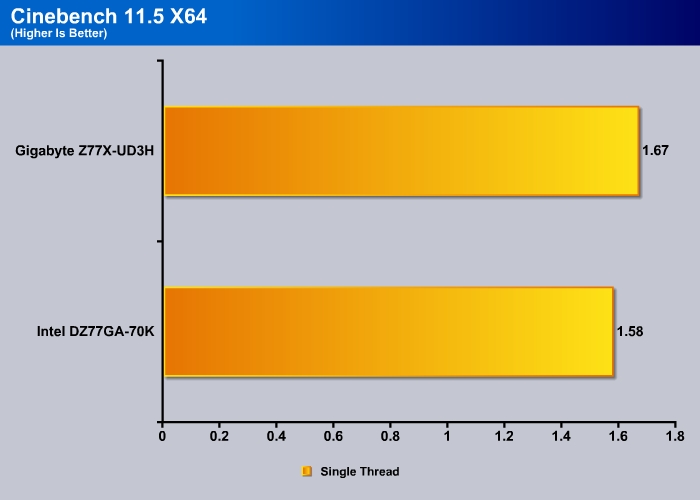
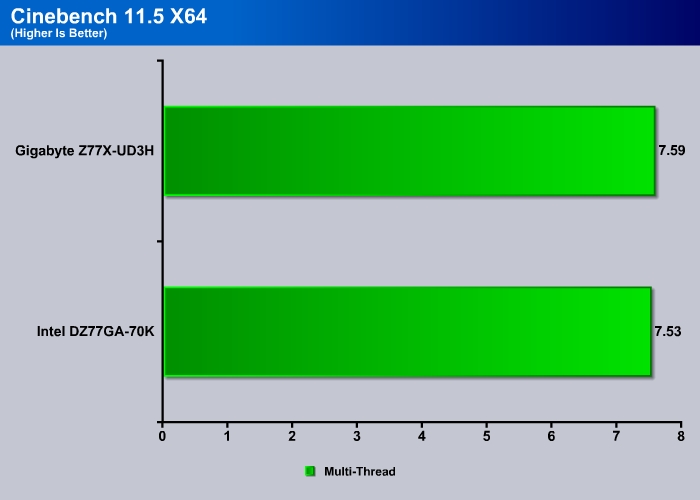
Cinebench shows just how the overclocking on the UD3H affect on the performance. With single thread, the UD3H is about 5% faster and with multi-thread, it is about 1% faster.
Truecrypt 7.1


When comes to data encryption, faster CPU should yield better result and as a result, we get slightly bump as well here.
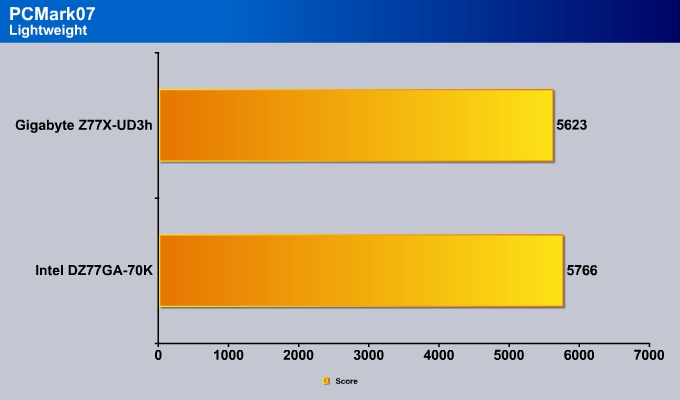
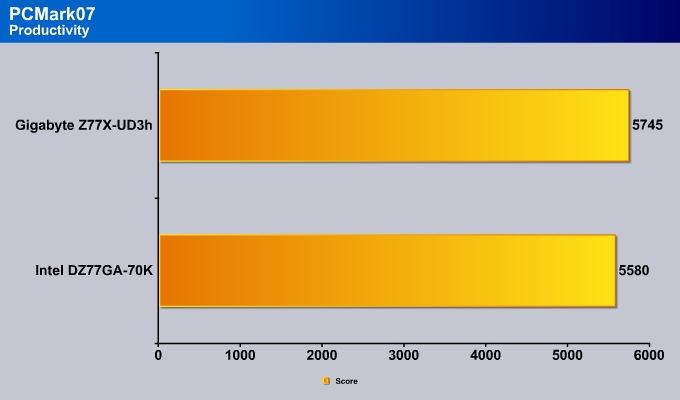
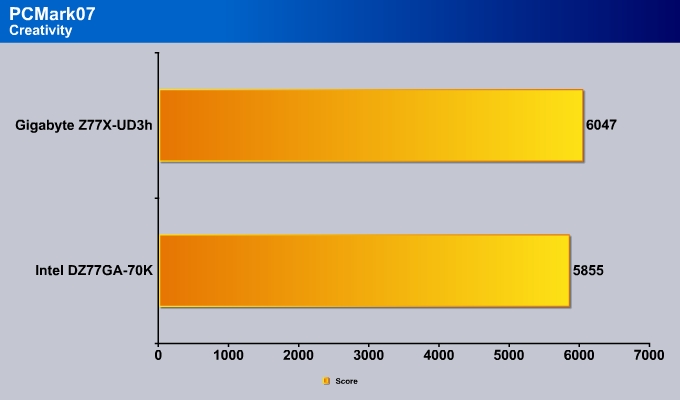
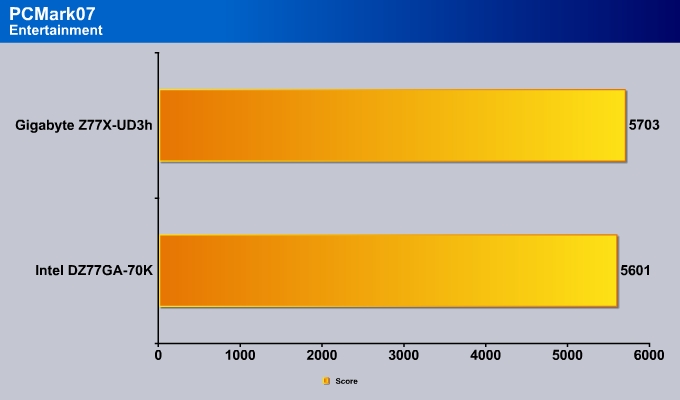
PCMARK 7
The latest benchmark Suite–PCMark 7, puts a greater stress on the system than the PCMark Vantage. Contrast to the PCMark Vantage, the latest edition stress type of workloads rather than individual tasks. It consists of Lightweight, Productivity, Productivity, Entertainment, Computation and Storage benchmark. Readers can refer to the PCMark 7 whitepaper for the detail list of applications and tests run for each suite.
PCMark 7 is not particularly heavy threaded and may not always stress the CPU’s full capability. However, it is nonetheless a good tool to get a sense of how a CPU performs in day to day tasks.
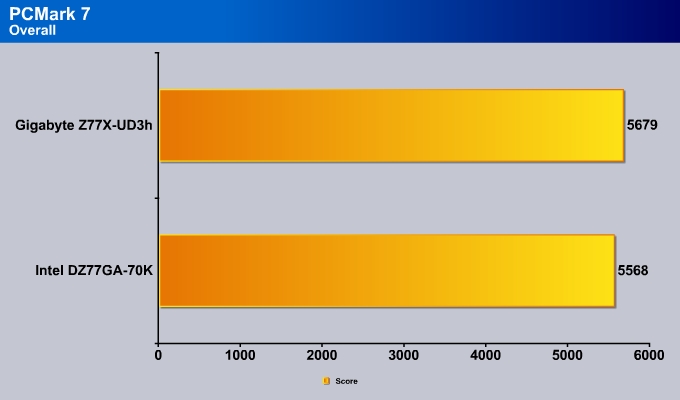
Overall, we can see that the UD3H has about 2~3% improvement over the Intel board.

3DMark 11
![]()
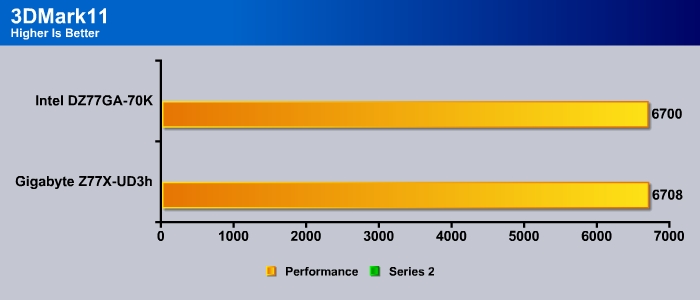
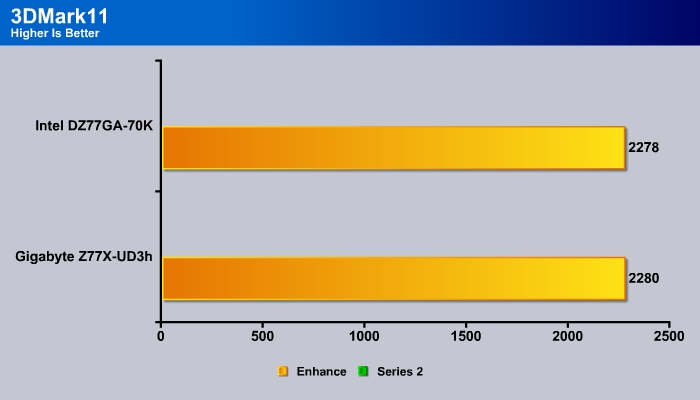
The slight overclocking on the UD3H is not going to be that much noticeable in gaming as we got 8 points in the 3DMark 11 Performance preset and 2 more points in the Extreme preset.
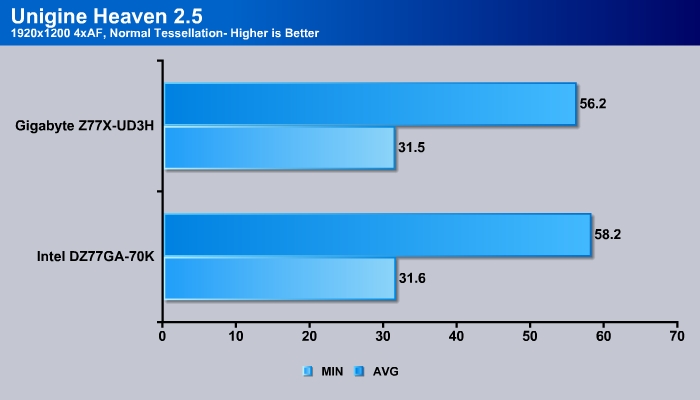
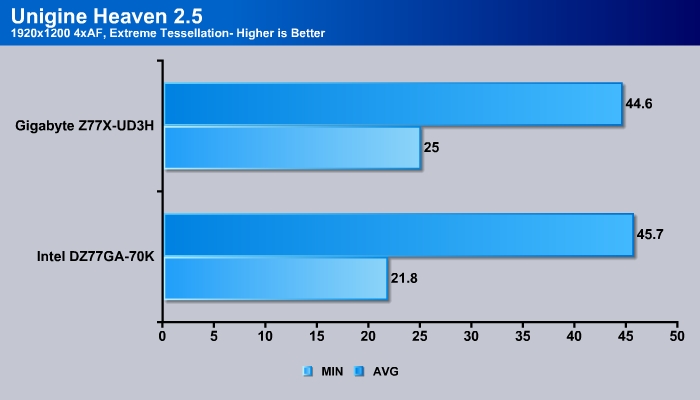
When we look at the actual gaming performance, we actually see the Gigabyte’s board to be a tad slower than the Intel board.
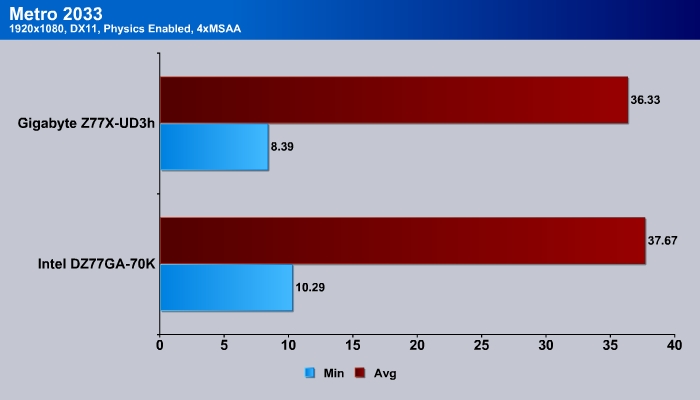
Not only that Unigene Heaven shows the same result but also the Metro 2033. The difference is still within the margin of error but it is nonetheless there.
STORAGE & Peripherals
SSD: SATA III
| READ | Sequential (MB/s) | 512 (MB/s) | 4K (MB/s) | 4K QD32 (MB/s) |
| Gigabyte Z77X-UD3H | 497.3 | 424.7 | 35.29 | 191.5 |
| Intel DZ77GA-77K | 491.2 | 430.5 | 34.08 | 196.5 |
| Write | Sequential (MB/S) | 512 (MB/s) | 4K (MB/s) | 4K QD32 (MB/s) |
| Gigabyte Z77X-UD3H | 227.9 | 237.8 | 85.18 | 239.5 |
| Intel DZ77GA-77K | 220.6 | 236.8 | 85.63 | 243.1 |
Since the UD3H uses Z77 chipset for the SATA ports, we do not expect much difference in terms of performance. The board has no additional internal SATA ports so this is as good as you can get.
USB 3.0
| READ | Sequential (MB/s) | 512 (MB/s) | 4K (MB/s) | 4K QD32 (MB/s) |
| Intel Z77 | 184.5 | 180.7 | 22.61 | 17.87 |
| VIA | 187.7 | 182.23 | 22.97 | 18.6 |
| Write | Sequential (MB/S) | 512 (MB/s) | 4K (MB/s) | 4K QD32 (MB/s) |
| Intel Z77 | 197.8 | 197.0 | 38.31 | 47.97 |
| VIA | 197.2 | 194.3 | 34.42 | 43.78 |
The secondary USB controller on the UD3H is provided by VIA, which we have not seen in the past. In terms of read, the VIA is a tad faster than the Intel controller but the difference is pretty small. However, its write performance is definitely slower, ~10% slower than the Intel controller.
CONCLUSION
Being a mainstream board, the GIGABYTE Z77X-UD3H is packed with some neat features that we often find on more expensive boards. Features such as onboard Clear CMOS button, Power On/Off button, onboard LED debug code, voltage contact points, and Dual BIOS are very useful tools for an overclocker. Even if you do not overclock, the buttons are a handy tool to have when comes to troubleshooting or building a new system.
The included mSATA port may not going to be as useful this time around as it does not come with the SSD pre-installed like the Z68XP-UD3-iSSD. Not including the SSD cuts the retail price of the board down and allows users to select their own drive capacity and model. Unfortunately, an mSATA drive is slightly more expensive than standard 2.5’’ SATA drives, so it maybe more cost beneficial to go with the SATA drive. In addition for ATX board, there are plenty of space for storage. Luckily, GIGABYTE does allow users to switch the ports so that you are not forced to use the mSATA.
The board comes with good mixture of ports and slots. It even includes a TMP for those who need it for security purposes. Though, the board lacks a FireWire port so if you need it, the UD3H is not for you. With 8 USB 3.0 and 6 USB 2.0, there are plenty of USB ports to go for all of your accessories. However, the VIA controller performance is noticeably slower than the Intel controller and the ports require drivers before they can be fully functional in Windows.
The 3D UEFI BIOS is refreshing and easy to navigate. However, the text based Advanced Mode still needs work to fix the lag and non-responsiveness that we saw as well as a greater mouse support. The Windows EasyTune 6, despite its small and non-intrusive foot-print, definitely needs an overhaul.
Overall, the Z77X-UD3H retailed at $150, and offers a very nice combination of features for its price.
| OUR VERDICT: GIGABYTE Z77X-UD3H | ||||||||||||||||
|
Good performance
Plenty of area around CPU for large heatsink
Plenty of USB ports
Onboard LED debug code
Onboard Power On/Off button and reset CMOS button
SLI and CrossFire Support
Onboard mSATA port
VIA USB controller performance is not the fastest
UEFI BIOS still need a bit work
Software needs improvements
 Summary: The GIGABYTE Z77X-UD3H offers a good mix of features for $150. If you are looking for a mainstream board for an Ivy Bridge build, this board might be a good fit. For its overall package, it earns the Bjorn3D Seal of Approval.