Swiftech’s new H20-320 Edge kit includes the best of their lineup with the Apogee XT Edge waterblock. Let’s see how it performs.
Introduction – Swiftech h20-320 edge HD

Swiftech has been in the enthusiast PC cooling market for over a decade now. Back in early 2000 they made their way into the enthusiast PC cooling market with the MC370 line of heatsinks, and have been an industry leader ever since. Swiftech has made many innovations in the world of PC watercooling which allows for better performance and easier installation. Today we are looking at the newest addition to their product line: the Swiftech H20-320 Edge HD kit. Some may remember back when we reviewed the H20-220 Edge kit; we saw impressive performance at that time so we can only imagine what they have in store this time around. The Edge HD kit is similar in design to the original Edge Kit with the exception that there have been some changes to the radiator to enhance compatibility along with a new waterblock design which we will cover further in the coming pages.
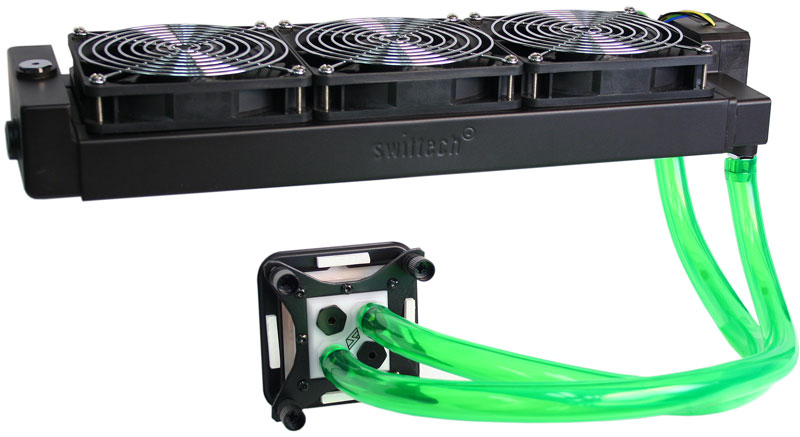
Here we can see the configuration as displayed on the Swiftech page albeit with green color tubing which was likely used to simulate the coolant in the lines since the tubing included in the kit is clear. This configuration shows what is in the package as for a CPU-only kit but the tubing is provided with plenty to ensure that if using a liquid cooled card or other components adding them to the loop should be as simple as connecting the hoses.
The following pages we will look into the components and performance of the Swiftech H20-320 Edge HD water cooling kit and does it justify the $269.95 MSRP.
Pump Specifications
| Motor Type |
Electronically commutated, brushless DC, spherical motor
|
|
Nominal voltage |
12 VDC |
| Operating voltage range |
9 to 13.4 VDC
|
|
Max. nominal power (@12 V) |
18 W |
| Max. nominal current (@12 V) |
1.5 A
|
|
Max. nominal head (@12 V) |
14.7 ft (4.4m) |
|
Max nom. discharge (@12V) |
~ 4.75 GPM (17.5 LPM) |
| Maximum pressure |
22 PSI (1.5 BAR)
|
| Temperature range |
Up to 140 °F (60 °C)
|
|
Electrical power connector |
Molex 4 pin |
| PWM + RPM Signals |
4-pin connector
|
| RoHS |
Compliant
|
|
Port thread standard |
G1/4 |
| MTBF |
50,000 Hours
|
The pump is PWM controlled which is cool as this means unless temps get really crazy the pump can slow down to a non audible speed unless absolutely necessary. The pump also has enough power it can push through a multitude of blocks to ensure it can cover the entire loop and not just a CPU only configuration.
Radiator Specifications
- 2-pass, single row construction
-
Brass body and tubes, louvered copper fins
-
POM pump housing
-
Optimized fin-density for maximum heat dissipation at low noise
-
Patent-pending integrated pump housing
-
M3.5 threaded fan and case-mounting holes
-
G1/4 threaded ports
-
Multi-port technology: (1) inlet port, and (3) outlet ports
-
High-durability acrylic paint finish
-
ROHS compliant
-
Dimensions:
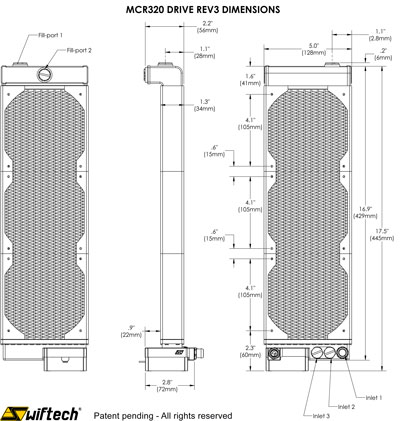
The radiator is part of the multi loop in one design with the single out and triple inputs this thing is ready to rock with whatever your system can put to it and then some. The only thing you gotta keep in mind is fitment not just for radiator length but also the extra width of the reservoir which means the fans need to be mounted to the radiator direct for clearance.
Waterblock Specifications:
-
Precision-machined polyacetal housing
-
Precision-machined copper base plate with 225 µm (0.009″) micro structures
-
Mirror finish mating surface with the CPU
-
Base plate dimensions: 60x60mm
-
G1/4 threaded ports
-
Multi-port technology: (1) inlet port and (3) outlet ports
-
Universal hold-down plate for socket 775, 1155, 1156, 1366, 2011
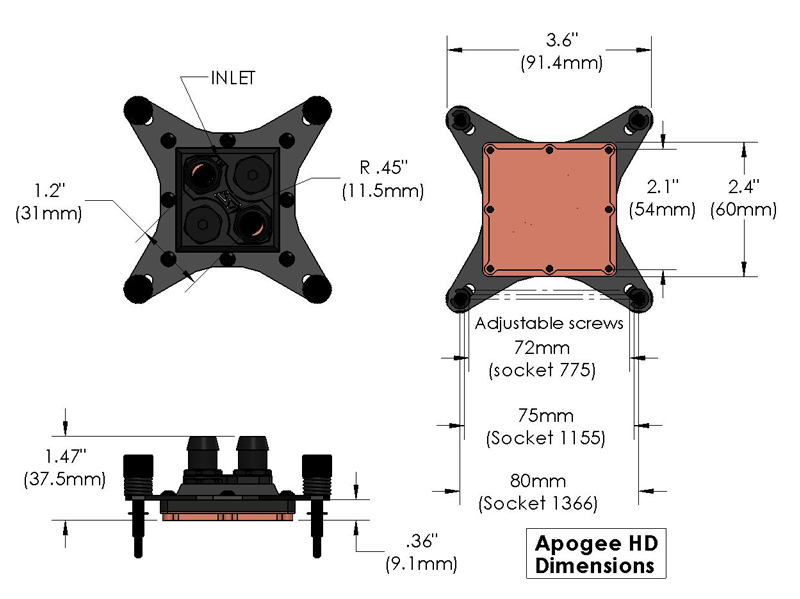
The block to say is a work of art doesnt really seem to do it justice as the design really is as unique as it is functional with the multi port outlet means no more figuring out which block is the last in line to get the warmest liquid.
Fan specifications
| Model | RDM1225S |
| Voltage | 6.0 ~ 13.8 VDC |
| Current | 0.23 A |
| Speed | 2000 RPM |
| Static Pressure | 3.5 mmH20 |
| Volume | 76.9 CFM |
| Noise | 38 db(A) |
| Bearing | sleeve |
| Connector | 3 Pin |
| Tach Output | Yes |
The fans are pretty standard fare and remind us alot of yate loon medium speed fans, as they are not too noisy but a triple pair of them at full tilt will be noticed so the included lower power adapters help keep them at a much more mellow tone. Also this is where the Cosmos II chassis fan controller would have been awesome as we could have controlled the fans right from the front panel.
Unboxing & first impressions


Now on another side of the packaging we can see the 2 available Edge HD kits that Swiftech offers: the H20-220 with a 2x120mm radiator, and the H20-320 which is similar in design but with a 3x120mm radiator. Here we also see the included accessory bundle listed as follows.
- MCR Drive 3×120 radiator
- Apogee HD Waterblock (mounting for Intel 775, 1155/1156, 1366 and 2011 mounting)
- Swiftech Radbox
- Clear Tubing (approx 6 ft)
- Installation paper manual
- Installation disc
- Fillport fitting
- Multiple option fan speed wiring
- 1/2L Bottle of premix HydrX coolant
- Multiple mounting hardware sets
With 6 feet of tubing included it is instantly clear that this kit is made to expand to whatever liquid cooled components we want to add, and also even other radiators if so desired. Also note the fan speed wires which are just fan connection cables that vary the voltage to the fan to give a slower speed and much lower noise output as well which is a welcome addition instead of needing a manual fan controller. The Radbox is a Swiftech mainstay as it allows external mounting of a radiator in such cases where internal mounting does not have sufficient room. Lastly, one change we saw which we really like is the premixed coolant offered now, as opposed to the previous kit, which contained a small bottle of coolant concentrate which had to be mixed with liquid. This inevitably would leave us questioning and hoping the water used was of upmost purity to avoid any sort of issues down the road, but with the premix now being included any worries are gone as there is Swiftech quality control over every aspect including the coolant.


Here we take a look at the newest block design by Swiftech. First off we notice that the block upper housing is white in color which is just one of the styling options offered by Swiftech to make this kit better match the users’ style. The Apogee HD waterblock is an entirely new design based on the principle of running multiple loops from a single system. The block inlet allows water in and there are 3 other ports to which either in a CPU only system can outlet back into the radiator to chill the water which has just transferred heat away from the CPU. However for systems in which multiple parts have waterblocks installed the other ports can have fittings replacing the plugs and tubing can run to those blocks then be returned to one of the 3 inlet fittings on the radiator. While we would like to claim that the block alone makes this possible, it also requires a radiator with just as many inlet ports available as there are outlets on the block. For this we will look at the radiator shortly.


Here we take a close look at the included mounting thumbscrew which is for the LGA2011 mounting and is of very high quality and feels solid. This definitely feels a lot less fragile than the previous generation hardware. There are marked improvements here, and it is a move in the right direction to ensure many mounts without issue (we have mounted this block close to 30 times now with barely a sign of wear). The bottom of the block is a thick copper cold plate which should help soak up heat from the CPU to be passed onto the flowing water.


The water has to go somewhere to cool off and that’s where the radiator comes into play. This unit has a very capable radiator for our task of keeping our review motherboard/CPU cool. The unit is very similar to what we saw in the previous review with the exception that it is a 360mm long radiator, one whole 120mm fan longer for even more heat load capacity. The unit uses a PWM controlled pump just like the previous one, with a reservoir at the other end which again is just like the previous generation. The radiator has not just the single feed and return but also 2 more ports capped off which can be used as mentioned before in conjunction with the multi outlet waterblock to allow return from multiple blocks at the same time. This allows the blocks to be connected to the radiator rather than daisy-chained, allowing each block to get similar temperature liquid rather than the last block in line getting the hottest.
One thing to note with this all in one radiator design is that it is meant to have the fans stacked onto the radiator directly, and therefore a chassis which needs the fans to be mounted above the top panel rather than stacking due to space concerns may have issues. We found this out the hard way with our Cosmos II chassis we planned to use for testing, so keep that in mind when selecting a chassis as there needs to be ample space between the top of the chassis and the top of the motherboard or there could be interference issues with motherboard removal or even RAM installation in extreme cases.


Click Image For a Larger One
With our kit we received a large tube of Swiftech TIM-MATE, which is Swiftech’s new thermal paste offering and from our testing so far it performs especially well. When asking Swiftech how they came up with the thermal paste they shared a bit of a back story with us:
“We had used Ceramique for close to 10 years and after awhile we noticed that the performance was simply not up to par with what was on the market currently and we had to make a move for the best. We moved to Ceramique 2 and we were not satisfied with the performance for that either so we moved to other brands of thermal paste such as PK1 which was an excellent paste and began shipping with that to ensure excellent performance. After seeing the performance of PK1 our focus became to beat it and we partnered with a thermal paste manufacturer and tried several formulations until we found one that did and we have been very happy with the results.”
When asked why they decided to make their own thermal paste they responded:
“We wanted a formulation adapted and formulated to our specific needs with performance that exceeds expectations all at a reasonable cost. It was long overdue simple as that!”
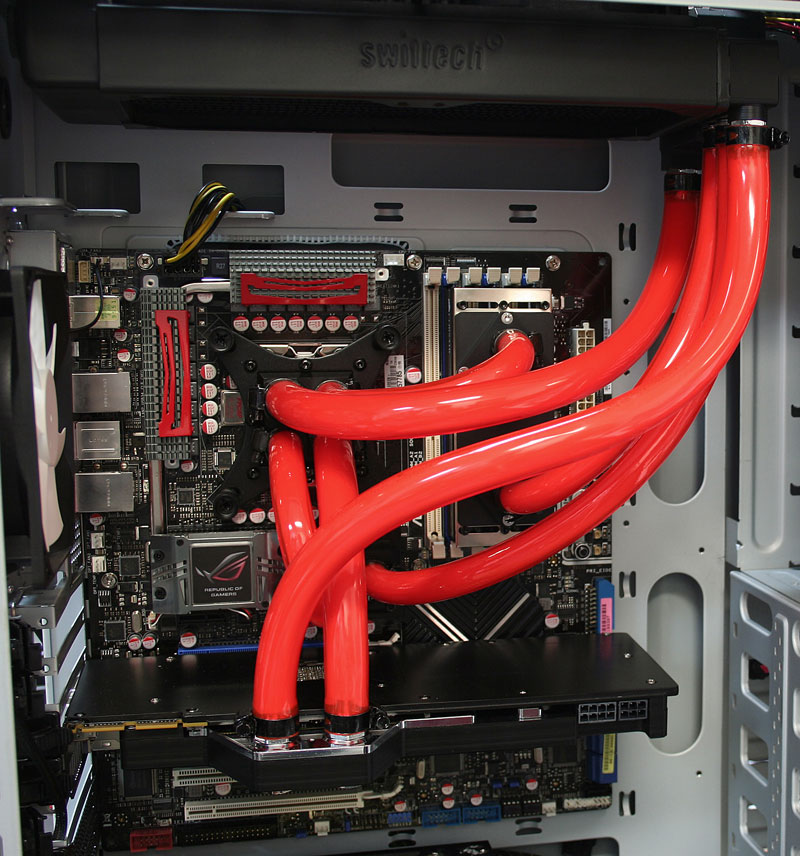
We did not have a multi block platform to test on presently so we figured we would show off Swiftech’s representation of the capabilities of the HD configuration and how many items can be cooled by the single configuration. The image alone is impressive and would make for an awesome looking gaming rig!
Testing & Methodology

Testing this cooling unit we will compare it to some of the top end air coolers we have for testing as well. This should provide a direct comparison to the performance you get for what you pay. The testing we will try to max load the CPU for an extended period to see how well it not only handles a load but ensure that the cooler does not heat soak or become overloaded during extended loading periods. Most of our previous testing was done at 4.8GHz on this chip so we decided to re-run the tests as many factors have likely changed and that could have a affect on the test and the performance result.
We really hope other manufacturers will soon get us some kits to review as well so we can have a real shootout here since so far these are the only high end liquid coolers we have seen come through. We are more than happy to put any liquid cooler head to head with these units given we can get our hands on them.
Test Rig
| Test Rig | |
| Case | Test bench |
| CPU |
Intel Core i7 2600K |
| Motherboard |
Gigabyte Z68X-U3H-B3 |
| Ram | 8GB Gskill (2x4GB) 2133MHz (9-11-10) |
| CPU Cooler |
Swiftech H20-320 Edge HD |
| Hard Drive | Western Digital Velociraptor 300GB |
| SSD |
Intel 510 series SATA III/6G 120GB |
| Optical | ASUS BD-Rom |
| GPU |
Nvidia GeForce GTX 580 SLI |
| Case Fans |
N/A |
| Additional Cards |
N/A |
| PSU |
Thermaltake Toughpower Grand 1200W |
| Mouse | Tt eSPORTS Black gaming mouse |
| Keyboard | Tt eSPORTS MEKA G1 Gaming Keyboard |
Testing Method
We do understand that linpack programs provide maximum heat output for thermal testing but we do not go that route as we have seen far too many component failures due to overstress situations and therefore we choose a more appropriate load such as video encoding, multiple back to back Cinebench runs or just full threaded Wprime runs to simulate full system load without the excess that can cause damage. We run a full spectrum of different real world programs that users would normally run and even productivity apps that keep the CPU at full tilt for long periods of time to ensure the loop and all coolers get a full heat soak and the highest temperature possible. The reason the test is done over a long duration is to ensure that we test performance when the temperature stays high, and not just at aberrant spikes.
Results

Here we see some scaling from the 3 air coolers we have to test from and we see at stock they are all keeping the CPU at manageable temps with a little variation caused from different efficiency levels of that design cooler. The liquid coolers are where the temps really start to drop as the liquid combo just does such a great job at evacuating the heat that it just scales the temps down by a much larger margin, and as we could expect by default the 360 radiator on the H20-320 definitely knocked more off of the 220 variant rather easy due to the larger radiator surface area.
Next we will put the fire to our chip and see how the coolers perform running full tilt at near 5GHz overclocks.
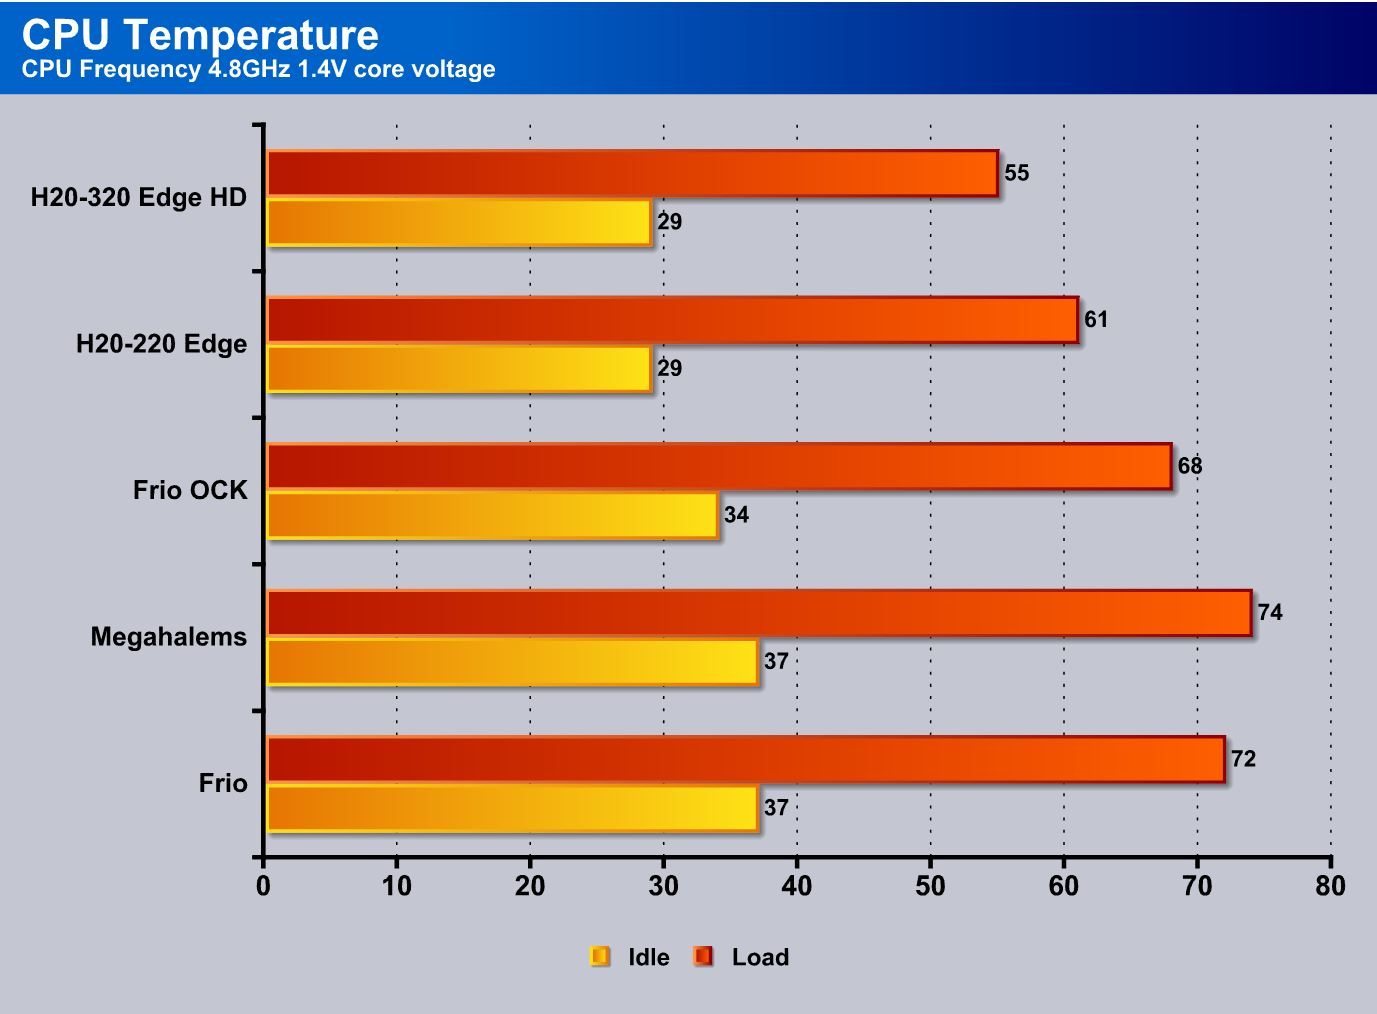
When overclocked the spread between coolers becomes more defined and the Liquid coolers definitely show their stuff as they take an even more commanding lead. What is very impressive is that the liquid cooling units kept the temps to well within what we consider 24/7 operating temps with normal usage testing. We do understand that with other stress test apps the temps will likely be higher and possibly high enough that these air coolers would be rendered unusable, but those are in essence stress test apps and we use our computers for work and gaming, not to run stress test apps every day so we try to test the coolers in the same way they would see the usage.
CONCLUSION
The Swiftech H20-320 Edge HD is everything it should be and a much easier to install unit than having separate components and trying to find where to mount them. Anyone who has ever installed a custom LCS knows that mounting reservoirs and pumps and all of the other ancillary components can be a real pain, and that is just one of the many things that makes users who are new to watercooling so apprehensive to try it. We have all seen the boutique level cases displayed that have all of the components perfectly positioned and every wire uni-sleeved to perfection, and while we know the H20-320 Edge HD kit won’t quite get us to that level it definitely adds some cool factor to the equation with a lot less work. The integration of pump, reservoir and radiator into one device makes it so much easier to install. The HD block can now be used as a splitter as well so that each liquid cooled component can get much more equal temperature liquid; this means that we will never have to prioritize hardware and choose which parts are on the tail end of the loop and receiving the warmest water, as they all will get similar water from their own separate outlet of the HD block.
Now for the other side of the coin. The option of mounting was a big hurdle as we figured with CoolerMaster’s newest and largest chassis, it would be no sweat to mount the Edge HD kit. However, we quickly found that while a single width radiator would be perfectly fine, the extra width added by the necessity to mount fans directly to the radiator made it impossible. If considering this kit, size will definitely need to be taken into account, and users will want to ensure that there is plenty of room above the motherboard or surrounding area for the thickness of radiator and fans if mounting internally (thickness of radiator and fans together is 59mm or 2.32″) .
Now while this fitment issue and the stacked fan requirement was kind of a negative for us, Swiftech does include the Radbox for situations like ours. Like most users though, we like our radiator mounted internally, and we must say that we are still using the kit and have omitted the case which should give a good idea of how nice it really is.
For new users apprehensive to enter the world of watercooling, Swiftech has the H20-320 Edge HD series which gives excellent performance, a much easier-to-install package, and much quicker and simpler component selection. We at Bjorn3D highly recommend this cooler for beginners all the way up to the most advanced enthusiasts for its performance, value and ease of use/installation.
| OUR VERDICT: Swiftech H20-320 Edge HD | ||||||||||||||||||
|
||||||||||||||||||
|
Summary: The Swiftech H20-320 Edge HD kit is about as close as we could think of to a winning recipe of performance, value and features to give the enthusiasts user an excellent liquid cooling experience. It earns the Bjorn3D Gold Bear Award. |


Thank you for sharing. Your post worth of reading. Waiting for new posts. buyincoins