Ever wonder how us reviewers take our pictures? Well lets step inside and see one way of doing this
Introduction
A lot of people believe that you have to have an enormous amount of lighting when taking pictures. Well, in all reality we really don’t need 1500 Watt bulbs. Granted, having an enormous amount of light does help out, but with today’s Digital Cameras, (DSLR specifically) we can use very little amounts of light to get picture perfect results. Sometimes, even a non-DSLR setup with proper shutter settings can give you equal or very similar results than the very light sensitive sensors new DSLR cameras come with.
Another area that really helps out in picture taking is the Post Production stage. Using a photo editing software package (e.g. Photoshop, Paint Shop Pro, etc.) can help enhance our images to their finest. Again, we do not need a 500+ USD program as a 100 USD program will still give you the results we are looking for, and with a simplified layout. Since there are so many different adjustments we can do with our DSLR camera’s, I am going to stick with the basics of lighting and using the white balance adjustment. The best way to learn your camera is to go out and start using it on anything and everything.
This article is about how different White Balances effects different types of frequencies of light. More specifically a 5500K light source to the everyday Soft White lights that we use in our homes everyday. I am also going to demonstrate how to compensate for the Soft White light bulbs to get that picture perfect picture. Then I’ll use a simple photo editing program to really make our subjects “Pop Out”.
The Camera I will be using is none other than my Canon Rebel XS EOS 10.1MP camera. It is recommended to have a DLSR type of camera for taking pictures and this is what this article is based upon. The only reason the Point and Shoot cameras were not included, was because of their limited abilities of adjusting the Shutter Speed & Aperture types of settings. You can use some of the tips suggested here for your pictures with those styles of cameras, but you will need at least a WB (White Balance setting with your camera).
- Sony Alpha DSLR-A550 SLR Digital Camera Kit w/ 18-55mm Lens – $949.00
- Sony Alpha DSLR-A700P Digital Camera Kit – $998.00
- Nikon D3000 10.2 MP Single-Lens Reflex DSLR Camera w/ 18-55mm – $544.68
- Sony A200W 2 lens DSLR Kit w/18-70mm and 75-300mm lenses – $684.89
Lights and Light FixTures
This part of the article is a quick run down on what I use for taking my pictures with.

This is one of two Umbrella lamps I use. Umbrella lamps are great for redirecting the light and softening the hard light source into a much softer, easier glow of the light.

I just went around the house and grabbed a few different types of lights that were laying around. Three of these lights throw off the same frequency of light while the other is actually a professional light bulb. Can You guess which one is the Professional light? If you guessed that the 5500K bulb (far right light) is the professional light, then you are correct. It gives off a true white light, and not the yellowish tint we get with standard light bulbs.

A standard Soft White incandescent light bulb we can find anywhere, such as Wall-Mart, K-Mart, etc.

This one is a standard Soft White compact fluorescent light. This one I believe to be 60 Watts total light output.

This fluorescent Soft White light has a light output of 75 Watts.

Now these are very handy when taking pictures. A regular shop lamp hood that you can get at any local hardware store or at Wal-Mart. This is an 8″ bell shop lamp.

Here is a little trick I found out, instead of leaving the internal portion of the bell a shiny aluminum, I painted it a flat white to better soften the the light.

A quick shot of the incandescent light bulb inside the bell shop lamp.
You can already get a feel that I don’t use an enormous amount of light when taking my pictures. At most I am using 350 Watts of total light output. The idea is to set the “Subject” in the right direction of your lights.
Bell Shop Lamps
These lamp fixtures can be purchased anywhere that sells shop lamps. As I stated in the previoius page, I painted the interior of my shop lights a flat white.

Above are my picture subjects that I used on the next two pages. They are simple little spring loaded clips. My reasoning for picking these was because they better demonstrate the importance of WB ( White Balance) and how different light frequencies effect our “Subjects”. The folded white square will be used for another purpose.

I am using the Shop lamps with the incandescent light bulbs installed. On the packaging these state “Soft White” but in reality they have a yellowish tint to them. The white sheet background I am using is no longer white, it is an off white. The shiny surface of the clips are not a true silver either. Also look at the shadow of the “Subjects”, It is a rather hard shadow and not a soft shadow.

I decided I needed to get blinded, so I took a picture of the incandescent light bulbs being used in the shop lamps.

Now I switched to the Fluorescent light bulbs (75 Watt total output 23 Watt actual usage), again, I still have that yellowish tint on my background and on my “Subjects”. But the shadow now is much softer than with the incandescent light bulbs.

Not exactly what I wanted to show you as I was hoping to get a better picture of the bulbs being used. I need to find that lens filter next time. Paying attention in between the lights themselves we can see more of whats behind the lamps, where previously I could not with the incandescent light bulbs.

Remember that white square sheet? Well I placed it over the lamps with the flourescent bulbs, NOTE DO NOT do this when using the incadescent light bulbs, as it can or will catch the sheet on fire. I still have a yellowish tint to the background, and the “Subjects still have a yellowish color to them, but this time I was able to filter some of the yellow out compared to previous attempts.

The sheets installed onto the lamps. Now this time it really softens up the overall light output.
White Balance Adjustments
|
Daylight WB |
Shade WB |
|
Cloudy WB |
Tungsten WB |
|
Fluorescent WB |
Flash WB |


All I am doing here is switching through the WB settings of my Canon Rebel XS EOS 10.1 MP camera. Notice that every setting I used changes how the “Subjects” and the background look? The only time I got a true representation of the “Subjects” and background was when I used the Tungsten WB setting as this added the much needed blue to the image.
Umbrella Lamps Plus 5500K Bulbs
To better demonstrate how well these light bulbs work I will be leaving the camera White Balance (WB) in auto unless otherwise stated. I will not be using the flash at all, I hate using the flash myself.

What the Umbrella Lamps look like with them fully opened and lit from the back side. These are not that big inside, but they do get the job done. I will be using two of these.

I was focusing on the light bulb itself, but as you can already see the 5500K bulbs produce a true white.

I am still going to use my clips as my “Subjects”, this picture is taken with just the two Umbrella Lamps while using the 5500K light bulbs. The WB was set to AUTO on the Canon EOS XS 10.1 MP. Notice how the white sheet is white? A little dingy currently but we can fix that later. Also notice the black tips of the clips are black not grayish? The shiny portion is shiny and silver.

An up close image to show you I was using the 5500K light bulbs, believe me, my eyes are hating me right now.
White Balance Adjusting
I am going to go through the White Balance adjustments on my camera to give you an idea of what happens when you get the wrong WB setting to the wrong light. Keep in mind the light bulbs in use are the 5500K frequency light. (sunlight)
|
Daylight WB |
Shade WB |
|
Cloudy WB |
Tungsten WB |
|
Fluorescent WB |
Flash WB |


Since I am using the 5500K lights in my Umbrella lamps we can see how the WB settings have a completely different effect on how they effect the “Subjects” and the background.

Mixing up the Bell Shop lights with the Umbrella Lamps. The Umbrella Lamps are still using the 5500K bulbs and the Bell Shop lights are using two 23 Watt fluorescent bulbs. WB was set back to AUTO on the camera. The Bell Shop lights overpower the umbrella lamps, as we can see more of a yellowish tint and we are not getting a true color representation of our subjects. Now what do I do to get rid of that yellowish tint on my background and on my subjects?

We will get back to that. Pay attention to the back two Bell Shop lights, even though they were painted over white, and are using a diffuser, I still get a yellowish tint from these lights. The Umbrella Lamps are still producing the true white light.
Tip: It is best to use the same frequency of light output from all of your lamps. This will keep the mixed frequencys of light from our picture. It is easier to adjust the camera for one specific light frequency then it is from several different light frequencies.
Lighting and Subjects

Since I do not have four 5500K light bulbs, I had to switch the Umbrella Lamps to the incandescent light bulbs. These are the same exact frequency as the two Shop Lamps I am using.

The camera is still in auto mode on the White Balance. I am not showing this picture for that reason however, the reason is look at how the light is all evenly matched as far as frequency output. This is what we need to make sure we have.

Another great tool to have for photography is a Tri-Pod. This will ensure our camera is perfectly still when we are taking pictures of our “Subjects”. Again the camera is still in AUTO Mode with the WB.

My favorite lens, it is a 28mm-200mm with a 72mm opening. I purchased a hood to help reduce the glare from my light sources.

Looking at the lens fully extended.

The lens that the Canon Rebel XS EOS camera came with. Again, if this happens to you, just follow the previous steps above. Sometimes, when taking pictures of dark “Subjects” on a light background, the light background gets blown out (overbright and indistinguishable). There is not much we can do but maybe reduce the amount of light coming from our light sources, increasing the shutter speed of our DSLR cameras, increasing the aperture of the camera, to decreasing the ISO. It is a good idea to take multiple shots of one “Subject” and try different settings.

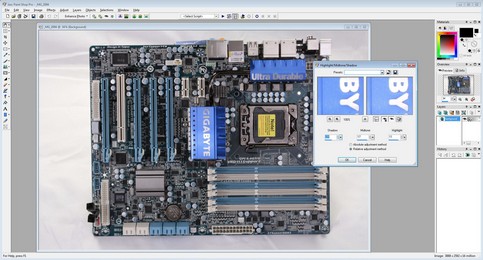
Since I am a computer reviewer, it would not seem right if I did not include a computer item in this article. This is a Gigabyte X58A-UD3R motherboard. The WB is still set to auto on the camera. It looks alright, but still has a yellowish tint to it.

Oops, I should make sure I am in focus next time. Different angle on the motherboard, as it still has that darn yellowish tint to it. Grr, this is irritating.

Let’s get up close and personal with the motherboard. Damn, still have that yellowish tint to it. The white almost looks white, but it’s just not quite white enough.

Lets kick the camera WB over to Tungsten and see how things fair, since Tungsten adds blue to the image and I had yellowish tint it only seem the proper thing to do. Now look at the motherboard and the background. Yep I made sure I was in focus this time, the motherboard is blue, and the background is white.

Let’s get up close and personal, Wow this is a big improvement over the previous image.
Sometimes it is not the amount of light, it is just a simple little adjustment of the WB (White Balance).
Low Light
Let’s reduce the amount of lights I used, from four to two light sources.

I stuck the 5500K light bulbs back into the Umbrella Lamps and set the cameras WB to Auto. I then took snapshots of the Gigabyte X58A-UD3R motherboard. Notice the two Shop Lamps are turned off, and all I am using are the Umbrella Lamps.

Even with the reduced amount of lights, the motherboard looks brightly lit up. It also helps to increase the length of time the shutter stays open to accommodate the change. This is where a Tri-Pod comes in handy.

Re-verification that the two Shop Lamps are turned off.

I switched out the light bulbs back to the Incandescent 100 Watt bulbs. The “Subject” still stays brightly lit up, but again since I am using an AUTO WB, my images takes on a yellowish tint.

Same set up and WB. but closer to the “Subject”.

Now it is time to turn off one Umbrella Lamp.

Despite a shadow on the left hand side of the “Subject”, it is still fairly lit up. Not exactly perfect, but with a slight adjustment of the “Subject” we could get this motherboard to be picture Perfect.

Getting an up close shot of the “Subject” using one light source.

Let’s kick the camera’s setting from WB over to Tungsten. Notice that the new WB cancels out the Yellow from the lights and gives us a more true color representation of the “Subject”.
Photo Editing
This page is about the other 75% of digital photography. That is photo editing our pictures to be perfect. I am using an affordable photo editing program. That program is Corel’s Paint Shop Pro. This program is easy to use and is very quick on making our pictures, picture perfect. These next images will have the original and the photo edited image, the left is original, the right is photo edited.
|
 |
|
 |
|
 |
|
 |
|
 |
As we can see from these images, there is a vast improvement over the original images that I took. Let’s see how I accomplished this in Paint Shop Pro.
Paint Shop Pro

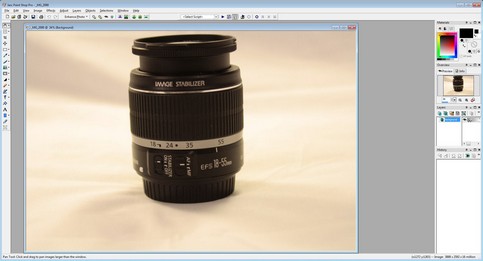
We need to have the image we are going to fix opened in Paint Shop Pro. These images are still at there original size of 10.1 MP. It helps if you have at least a dual core processor when manipulating images this large.
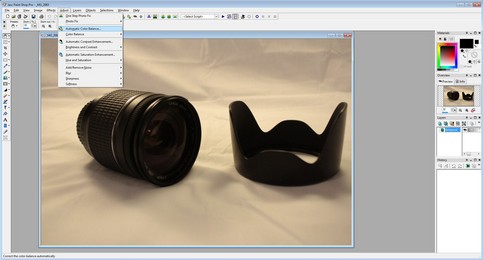
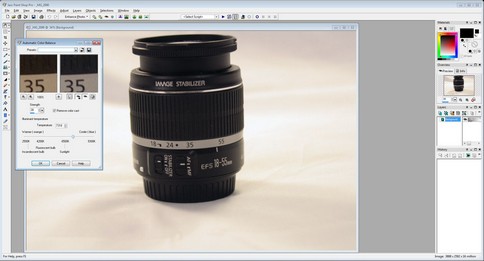
First up is the Color Balance adjustment. This is similar to our camera’s WB setting.
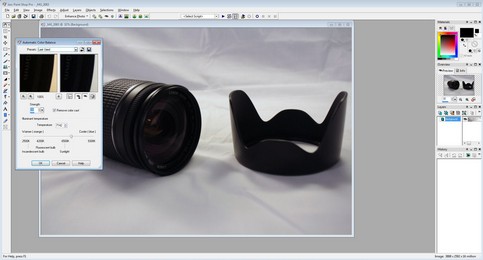
Notice since I adjusted the WB to a 7100K temperature of light, my picture now takes on a more true color representation. White is White, Black is Black now. Not every image will be the same, you will have to adjust the slider until you get your picture perfect.

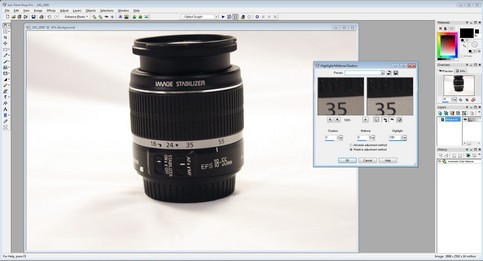
Next up is the Brightness and Contrast settings.

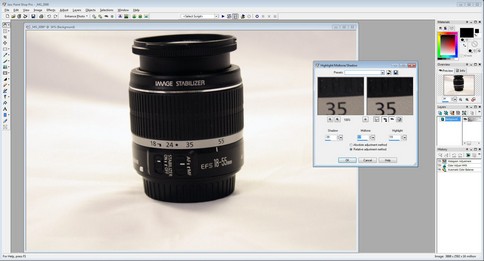
I am going to pick Shadow, Midtone, and Highlight for my adjustments.
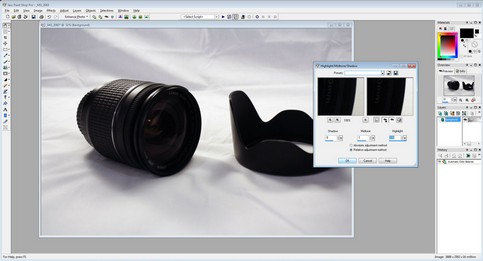
Shadow is the Black point of the image, Midtone is the Grey point, while Highlight does the White point. Notice how the camera lens now just jumps right out of the white background without darkening the “Subject” at the same time? Again this will take some adjusting, as it will be different on every image you need to fix.

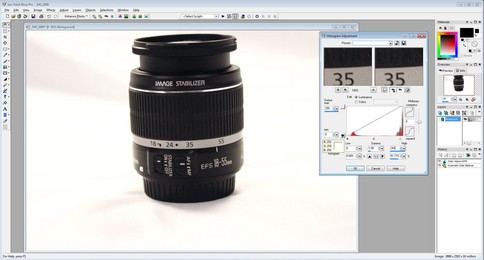
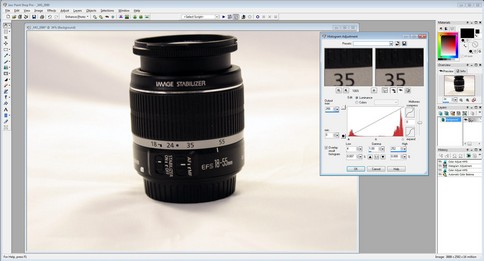
I wanted to add a bit more to the image, so I went back into the Brightness and Contrast adjustments, then I chose Histogram Adjustment. This is another unique adjuster, but it is not as refined as the previous adjustment I used.
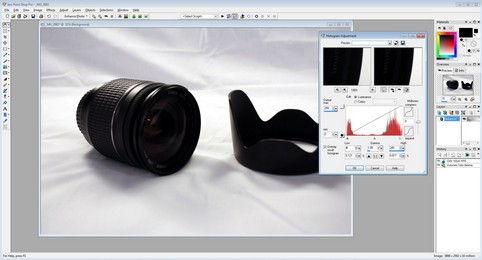
It did not take much to really get the image to really stand out. Again take your time and try different adjustments.
In this step I am going to adjust another image I took earlier, but this time I am not going to add any shadowing to it to show you what the difference will be if you don’t add or adjust the Black point of the image.
First up is to adjust the WB of the image to correctness.
Next up is adjusting the Shadow, Midtone, and Highlight. Look at the Shadow adjustment, I left this at 0, I did not go up or down with it. Already my background is overpowering the “Subject”
Let’s start up the Histogram Adjustment and adjust the White point a bit more. Now my background is truly white, but now it takes away from the “Subject” and now the “Subject” has a slight white overcast to it, or is slightly washed out.
Starting over, but this time I am going to add some Black point to the “Subject”.
Same thing with the Histogram Adjustment, I am going to reduce the amount of the White point, and add some Black point to the image. Now it seems to flow a bit more with the Background. Plus the “Subject” literally jumps out at you.
Sometimes only one adjustment is needed on our pictures. I need to add a bit more black point and adjust the mid tone a bit. Also I could have dropped the “Subject” ange down a bit more so it is not reflecting so much light back towards the camera. This is why we take multiple shots of one “Subject” at different angles.
Closing Statements
It does not take an enormous amount of light to take quality pictures. With the proper WB set, and the use of the correct Shutter/Aperture/ISO, along with a Tri-Pod, we can get our “Subjects” to stand out. Another area that allows us to improve our pictures is Post Production, or better known as Photo Editing. This portion of picture taking is where most of our time is spent with our images. We have a lot more adjustments accessible for us to use than what our cameras give us.
Unfortunately I could not go into detail of what the Shutter/Apature/ISO settings do, how they pertain to our cameras, and how they effect the overall outcome of our pictures. These particular settings are a bit more complicated and require a separate article to explain them in greater detail.
Most cameras today have a WB (White Balance) adjustment, whether it is a preset or something a bit more advanced, where we can hold up a white sheet of paper in our current lighting and take a snap shot of it and the camera adjusts itself automatically. A lot of times it is not the camera, or our lighting that causes our images to look off, but a simple WB setting is slightly off. The White Balance setting is just as important as the Shutter/Aperture/ISO of our camera’s, therefore it should be adjusted accordingly to our environment we find ourselves shooting in. A lot of times the Auto WB setting works perfectly, but as we have seen in this article, it does not always apply itself properly.
It takes a lot practice, and a lot of patience to get the results we are looking for in our pictures. It is a never-ending learning curve. The best thing I can tell you to do, is what my Professor of Photography told us when I first started college, “Take lots and lots of pictures, try different settings, and for heaven sakes TAKE YOUR TIME.”


