Introduction
Aluminum cases have been pretty popular for quite some time now, and their popularity isn’t going away any time soon. They are popular for numerous reasons: they’re much cooler looking than beige cases, they are easier to cut/mod than steel cases, they are very light, and they’re supposed to help keep your system temp down. This popularity is pushed along by the fact that more and more companies are offering aluminum cases, especially in the cheaper end of the market (as in $70-$90). One of the leaders in this area is SkyHawk. Don’t think that cheaper price means cheaper quality though. SkyHawk makes some good cases, and you don’t have to break the bank to get one. One of SkyHawk’s latest, the Jupiter case, is not only an economically priced case but also an innovative and unique case with its front colored temp/time/HDD activity display. SkyHawk even has a patent pending on this sucker, and they call it an LCD/light module. As cool as it is, I can understand why they are patenting it. Other companies will be copying it as soon as they can.
Specifications & Features
Specifications:
- Model No: PSR4609D7
- Material: 1.0 mm anodized Aluminum Alloy, resists dust & fingerprints
- Coating: Hardness scale 3, protection from scratches
- Front Jacks: USB version 2.0, Microphone, earphone, IEEE1394 (firewire)
- Fans: One front 80mm intake fan, one rear CPU blower with 80mm fan, one 60 mm rear exhaust fan
- Drive Bays: 4 x 5.25 (external), 2 x 3.5 (external), & 4 x 3.5 (internal)
- Expansion Slots: 7 slots
- Motherboard: ATX or Micro ATX
- Dimension: 7.9 (W) x 16.2 (H) x 19.3 (D)
- Options: Side cover with transparent window (Q-window), 300W/400W power supplies
Features:
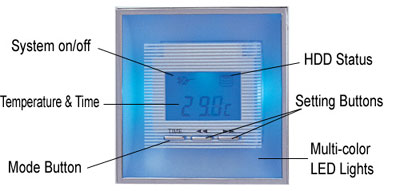
- LCD/Light Module: Always-on (even when system is off) power from VSB output. LCD displays time, temperature, and HDD/System-on/off status.
- Multi-Color Light: Auto mode – automatically changes colors every 2 seconds; Manual mode – manually choose and lock the colors.
- Temperature Sensor: 23 long wire sensor; can be placed anywhere in the enclosure.
- Chassis: All-Folded Edges to strengthen the structure and keep from cutting fingers.
- Bezel: Integrated Aluminum Stripe/film, Plexiglas, painted/plated plastic, and LCD/Light Module with style.
- Packing: Polyethylene (PE) foams, better protection from damage in shipping.
After taking a look at the specs and features, you can see this case has a great deal to offer. Plus, if you add the great looking Q-window (side panel with cool window mod – in the 4th picture below) like the review unit I received, you have a great looking and feature-rich case for around $90. Getting the Jupiter without the Q-window will cost you about $15 less. My first impressions of the Jupiter were quite positive. It was carefully packed into the custom box with what looked like specially made foam packaging. Over the front bezel was a piece of protective plastic to prevent scratching — a nice touch. It was very light and looked like a good quality case. The brushed aluminum on the side and top panels looks great, and the plastic front bezel is very well designed and looks good with the aluminum. I apologize if any of these pics are too dark or blurry.


I of course noticed the LCD/light panel immediately and was very interested in seeing how it looked lit up. The unit is programmed to stay on even after the system is turned off, which makes for a cool looking clock. 😉 You can choose from 7 different colors or let it rotate every 2 seconds between all the colors. The LCD/light module displays the temperature (in Celcius or Fahrenheit) of whatever part of your system you want since you can place the 23 long wire sensor anywhere inside the case, and it also shows the hard drive activity and indicates if the system is on or off. The basic functionality of the module is quite easy to figure out. I was able to set the clock and change colors without reading anything, but the directions are listed on a sheet included with the case.
Most users will appreciate the inclusion of front jacks, including 2 USB 2.0, 1 headphones, 1 microphone and 1 firewire. This seems to be popping up on a lot of new cases, and I hope the trend continues. Many of you probably already know this, but in case you don’t, please note that you must hook up the included wires correctly to your motherboard in order to use the front jacks. Your motherboard must also support such hook up. The included wires are already attached internally to the front of the bezel, and the motherboard connectors are similar to the system speaker, HDD LED and power LED connectors that you are probably already familiar with.
In the first pic below, you can see the very stylish power and reset buttons located to the left (reset) and the right (power) of the bottom 3.5″ bay. They are small rectangular silver buttons, which I think are a great alternative to the typical dull round buttons. In the second pic, you can see the front I/O jacks. There is a door that covers them up when you aren’t using them. It is very easy to open and close — another nice design touch. In the third and fourth pics, you can see the wires I mentioned in the previous paragraph. In the third picture, the bezel is removed and laying in front of the case. You can see how the wires are connected to the display unit. Additionally, you see the area where the front intake fan resides, which just happens to be right behind the display module. This may trouble some of you, and I have to admit it does make me wonder how effective the front fan can be with that in the way. The fourth pic shows some of the internal wires and shows how the front intake fan blows directly on the hard drive cage.


For those of you out there concerned about cooling (which I hope is most of you), you might like to see that the Jupiter comes with a CPU blower with an 80mm fan. I’ve never used one myself, so I’m not sure how much they actually help, but I think it’s a nice feature for those people wanting a little more cooling. I highly recommend adding on the Q-window if you have a little extra money. It looks great and can also help cool your system with its included clear fan.
![]()


Installation & Testing it Out
So, are you wondering how the Jupiter is when it comes to adding the PC guts and getting it all set up? Well, it was pretty easy and painless to work in thanks the folded edges and adequate space. There was just enough space in the case for me to comfortably work in it. Before adding any components, you’ll want to remove the CPU blower and get all those wires out of the way. Unfortunately, the Jupiter does not include a removable motherboard tray. This is only a big deal though if you really want the convenience that a mobo tray offers and if you swap out components frequently. Some of you may not even want one or care if you have one, so it just depends on the user if this is a significant issue or not. The thumbscrews and small pull handles make removing the side panels a very simple and quick task.
In the first pic below, you can see the case fully loaded up with components: a DVD-ROM, CDRW, floppy, PSU, mobo, 3 PCI cards, an AGP video card, CPU and hard drive. Do you like my cable spaghetti? I haven’t gotten around to learning cable management yet. :o) The second picture shows how it looks from the front with the drives installed. You may not be able to tell in this dark picture, but the beige drives don’t look too bad with this case for some reason. Something about the front bezel seems to help them look better than the similar beige drives in my Lian-Li PC-60USB case. This pic also shows you how great the LCD/light module looks. In the third pictuere, you see the back of the case after installation. If you look towards the bottom of the picture, you can see the pull handles I alluded to earlier. There are no indentions in the side panels so these handles are essential to removing the panels easily.


I noticed several strange or annoying things when installing my components in this case. First of all, I had to install the power supply upside down (you can see this in the picture above) because of where the screw holes are located. This wasn’t really an issue with the PSU I used, but it may be with yours if you have an Enermax or other brand with the extra fan on the bottom. It may still work fine if you have to flip it over, but I have my Enermax PSU in my Lian-Li case set up so that the 2nd fan is pointing down, and I wouldn’t want to switch it the other way. Secondly, the expansion slot covers have to be snapped off in order to install cards, which means once you take them off, they aren’t going back on. I really don’t like this type of set up, and I think SkyHawk actually has plans to make the covers removable/attachable by thumbscrews, but I’m not for sure. To make it up a little bit, SkyHawk has included two screw on slot covers. The third thing that I really didn’t like about this case was the I/O shield and its surrounding area. The included I/O shield if very cheap and flimsy, and I couldn’t quite get it to stick in the back panel as securely as I would have liked. Also, as I tried installing it, I noticed I was bending the thin metal that surrounds the I/O shield as I pushed the I/O shield into place. I think SkyHawk could include a little bit higher quality I/O shield and fasten the surrounding metal area down better or make it thicker metal.
Those are my main gripes about this case, and I can forget them rather quickly when I see how cool the Q-window and the LCD/light module are. The focus of the Jupiter though is obviously the LCD/light module, and it will definitely attract some attention at a LAN party or in your dorm room. With all the color choices, everyone should be able to find something they like, and the soft glow can function as a nice little night light to help you stop from killing yourself when you stumble off to the bathroom in the middle of the night. 🙂 Here you see all the different colors you can choose from.
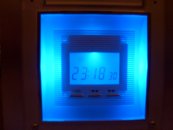
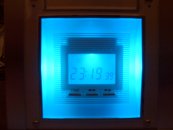
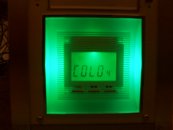
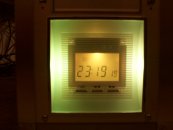
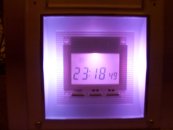
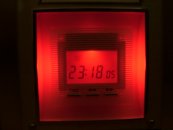

In my opinion, they all look great! I know I’ll be switching colors every time I think about it for the next couple months until I can decide my favorite. As I mentioned before, this module is very easy to use. Instructions are included to help you set it up correctly to your motherboard. Setting it up requires you to plug its main power directly into the motherboard’s main power connection. Then you plug your power supply’s main connection into the adapter (female connection just like the one on your mobo) that comes off of the module’s power connection. If that didn’t make sense, don’t worry the instructions show you what to do, and it’s easy to figure out.
Conclusion
SkyHawk definitely has a winner here with the Jupiter. It is a truly unique and very innovative case with a nice list of features. This is a great case for those of you wanting the modded look without having to do it yourself. The unique features and styling are similar to what a modder would do — an LCD display, colored lights and the optional Q-window. Plus, you can get it all for less than $100 if you find it at the right place — like Directron.com for instance where you can get it on sale right now for $82 with the Q-window. The actual retail price for the case is $85 without the Q-window, which retails for $15. For that price, you can’t go wrong with the Jupiter.
Of course, the Jupiter does have its flaws, but I haven’t seen a case yet that doesn’t. Some flaws are just strange, like the upside down PSU issue, while others are pretty annoying to me, such as the cheap I/O shield and the design of the expansion slot covers. One other thing that some people may not like is the fact that a power supply is not included. I personally don’t care and would rather pick out my own PSU anyway. Finally, I would like to see an aluminum front bezel instead of a plastic one, but this is what helps keep the cost of the case down so you can get it for less than the more expensive all-aluminum enclosures. It’s a tradeoff that you can live with. The Jupiter’s plastic bezel is very appealing though — one of the best I’ve seen. Plus, I think it matches the aluminum quite nicely and somehow helps make your beige drives look okay.
I recommend the SkyHawk Jupiter Case to anyone wanting a great looking, unique and economically priced aluminum case. I also highly recommend the Q-window to anyone who decides to purchase a PSR series SkyHawk enclosure. You won’t be disappointed.
Pros:
- Unique and cool looking
- LCD/light module is fun and innovative – you get system info when on, and you get a clock when your system is off
- Easy to work in
- Q-window is very stylish and helps with cooling
- Affordable!
- 3 fans included (plus one more if you have a Q-window)
Cons:
- Upside down PSU issue
- No PSU included (this is a con to some but not to everyone)
- Front intake fan blocked/limited by module in front of it
- Cheap I/O shield
- Expansion slot covers must be snapped off
For its great looks, innovative features and design, and affordable price, I am giving the SkyHawk Jupiter case an 8.5 and awarding it the Bjorn3d Seal of Approval.