Overview of the MSI Z87 Xpower

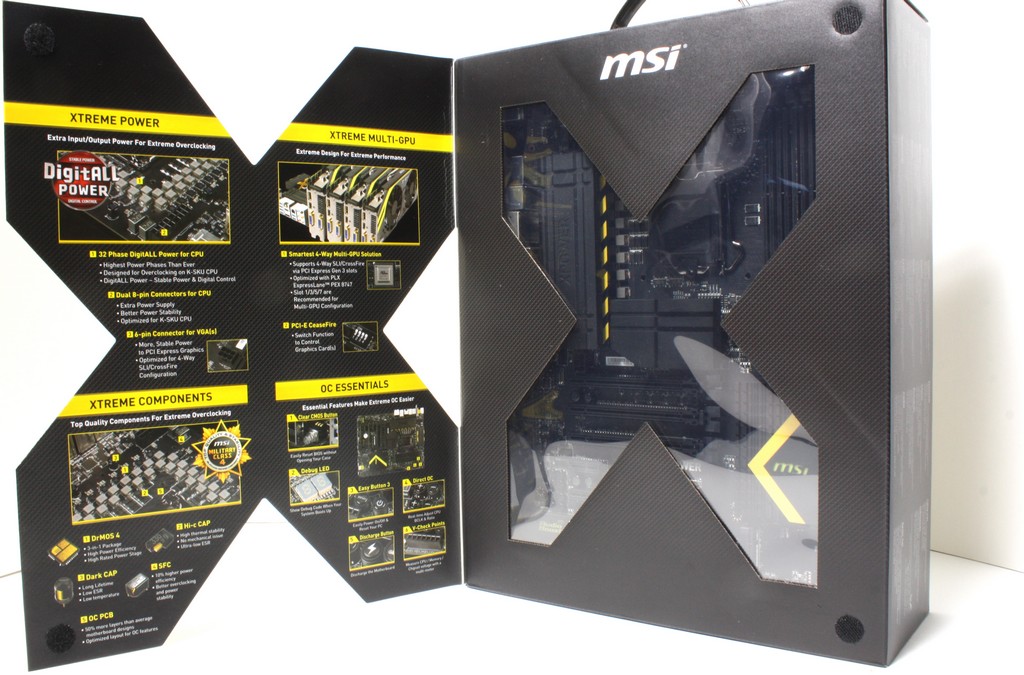
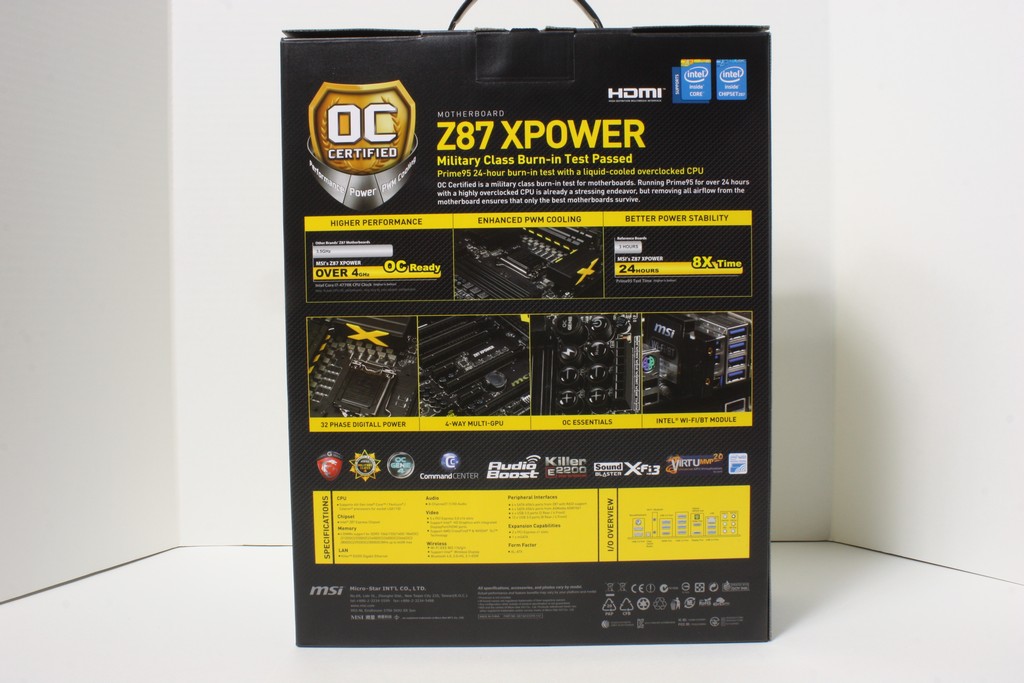
The packaging for the Xpower is quite cool with the front door of the box being a X and when flipped open you have an X shaped window that you can view the board. On the backside of the X shaped door you have some key feature data pinpointing the key benefits of their feature implementation and explaining what each feature offers as a benefit to the user. The rear of the box has a bit more in depth info and also specific spec based info to round out the packaging.
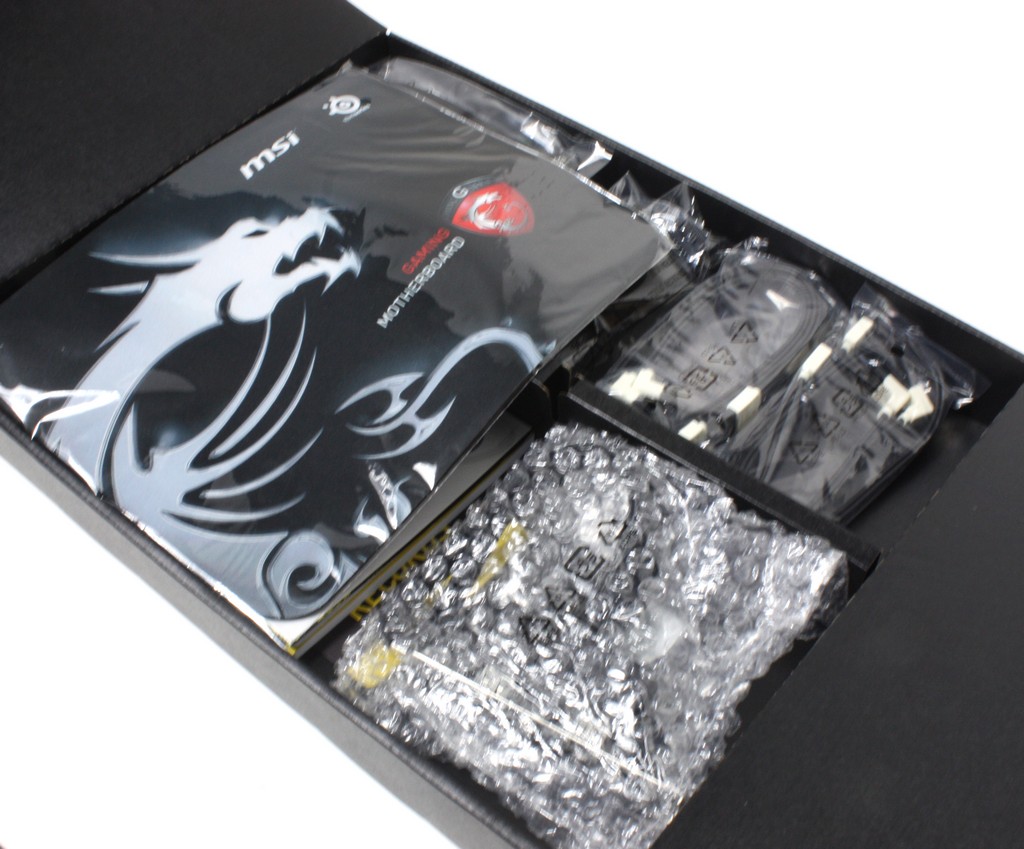

- User Manuals
- Installation Discs
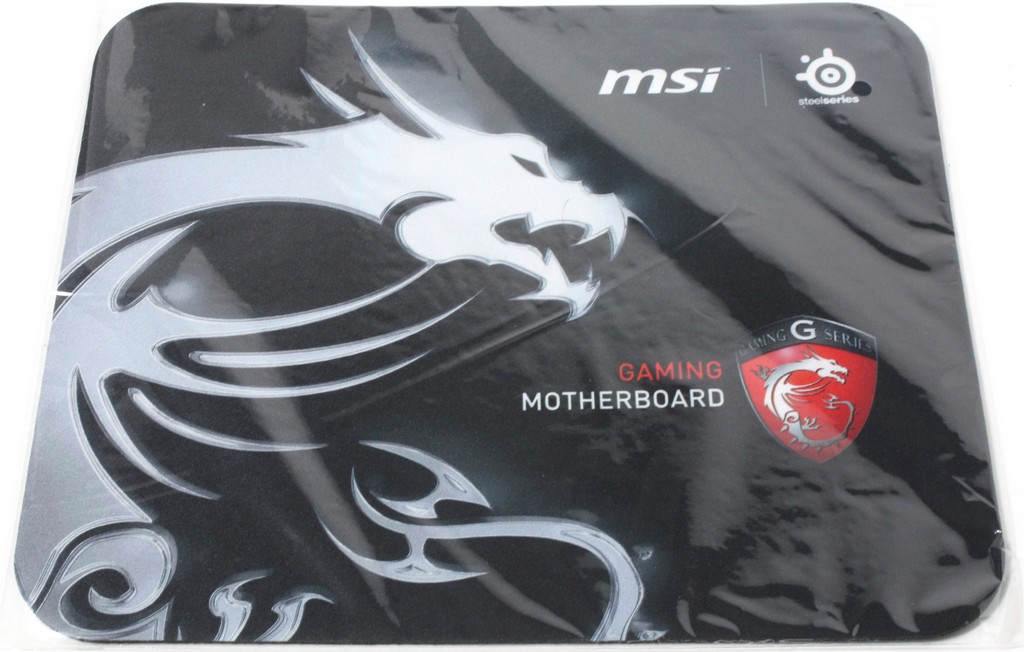
- MSI Gaming Mousepad
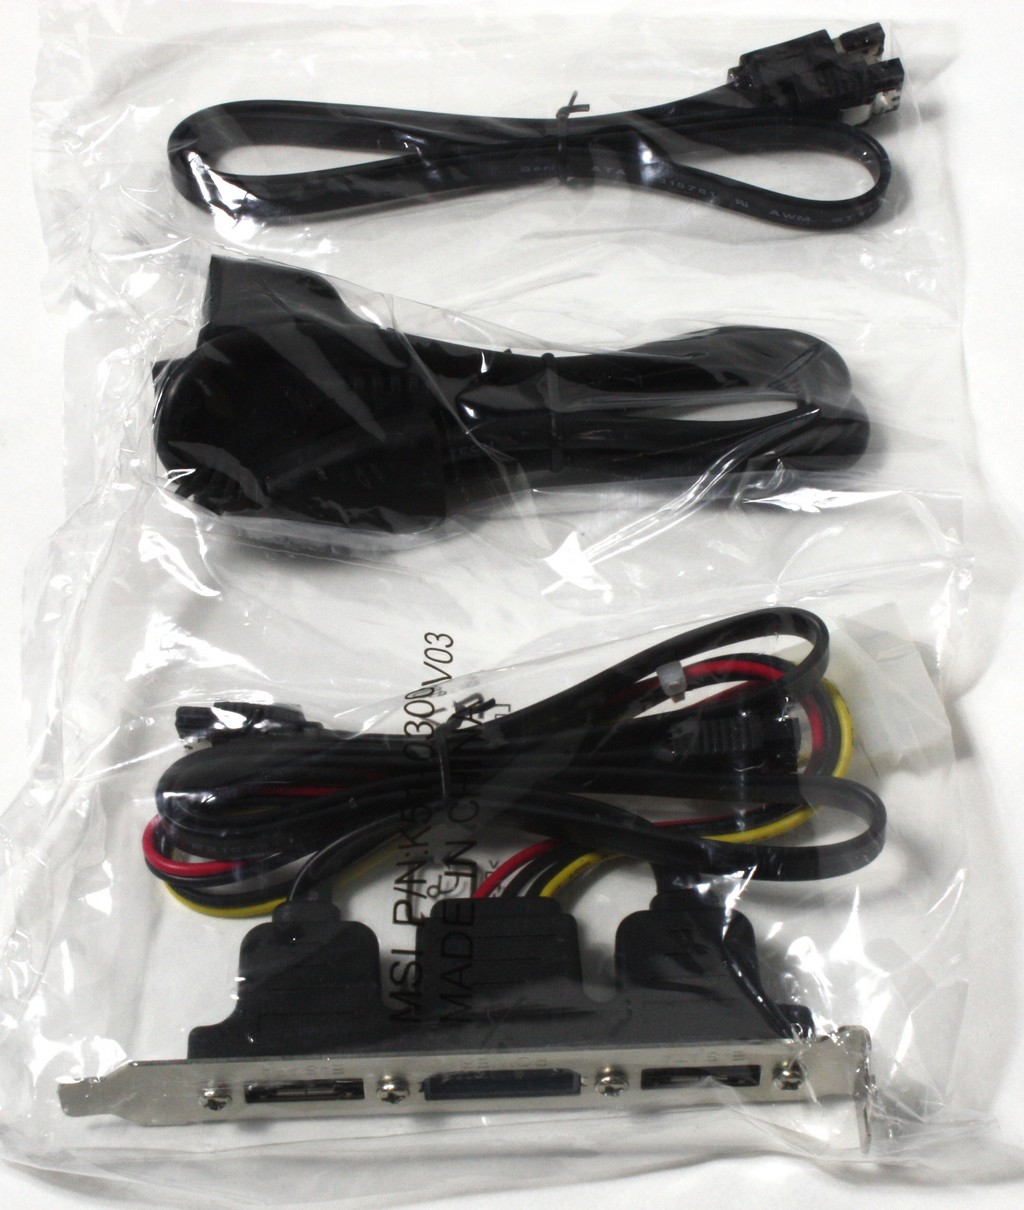
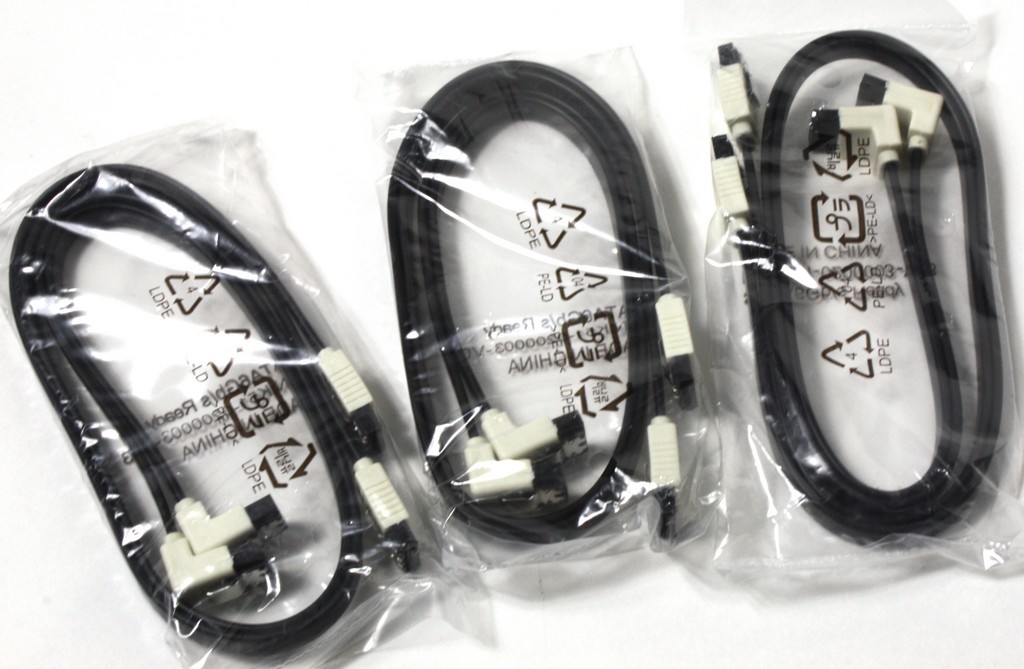
- SATA Cables
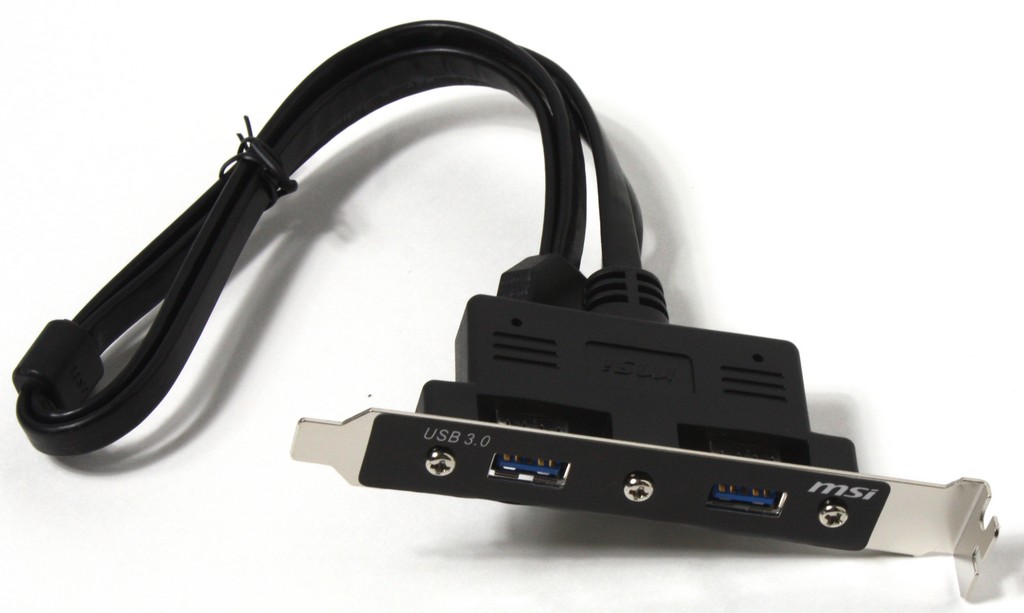
- Rear panel USB 3.0 breakout pod
- eSATA rear panel breakout pod
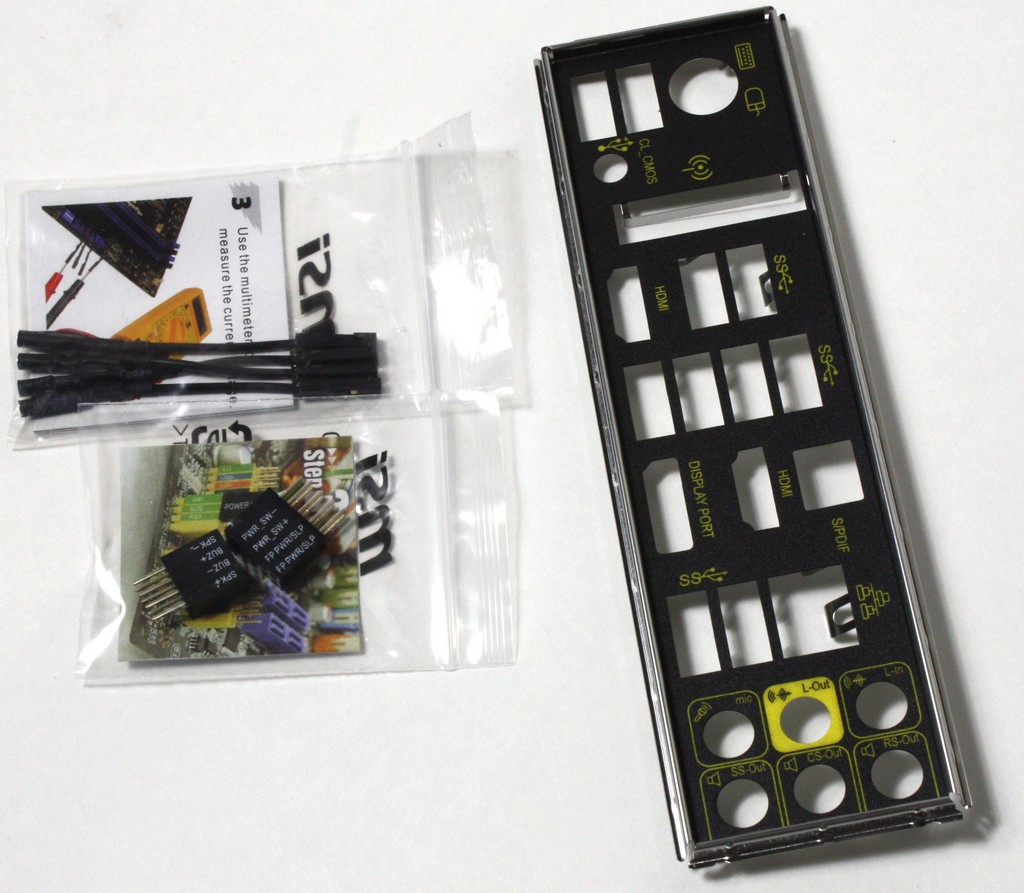
- Quick Connect Front Panel Connectors
- V-Check Point Leads
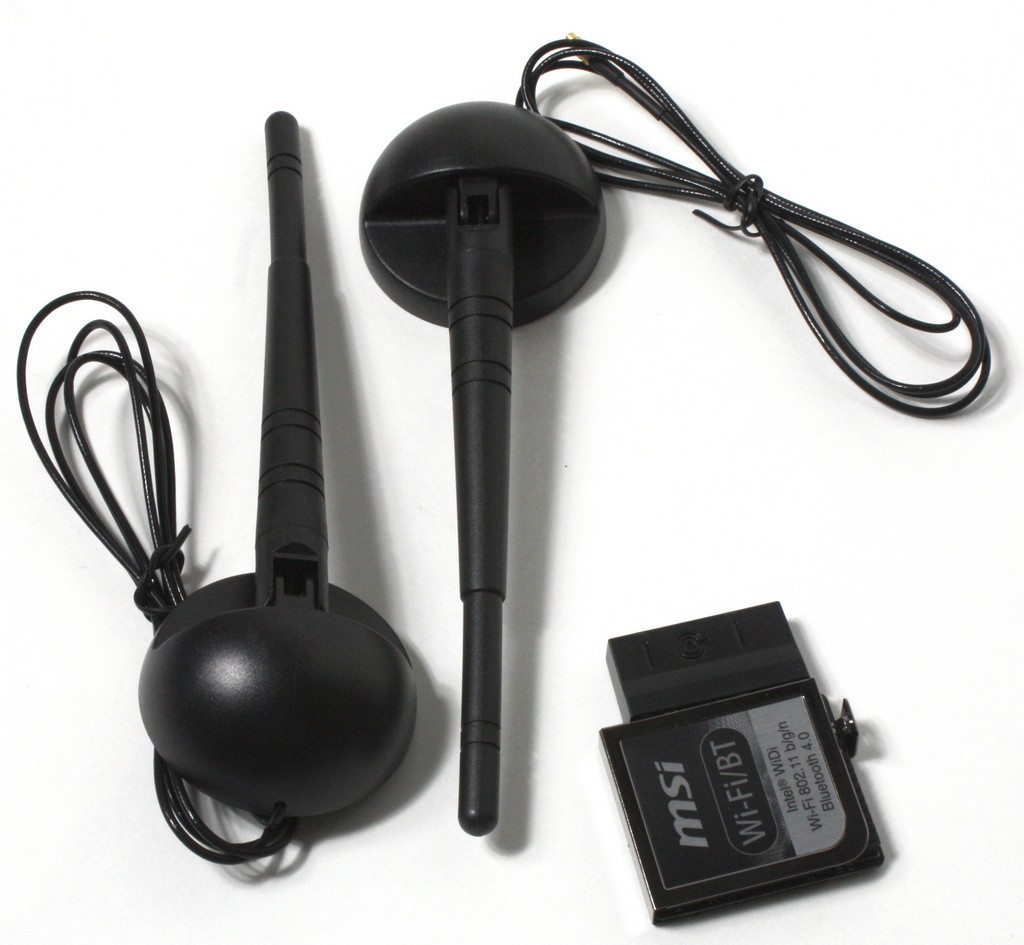
- WiFi/WiDi module
- 2x WiFi Antennae
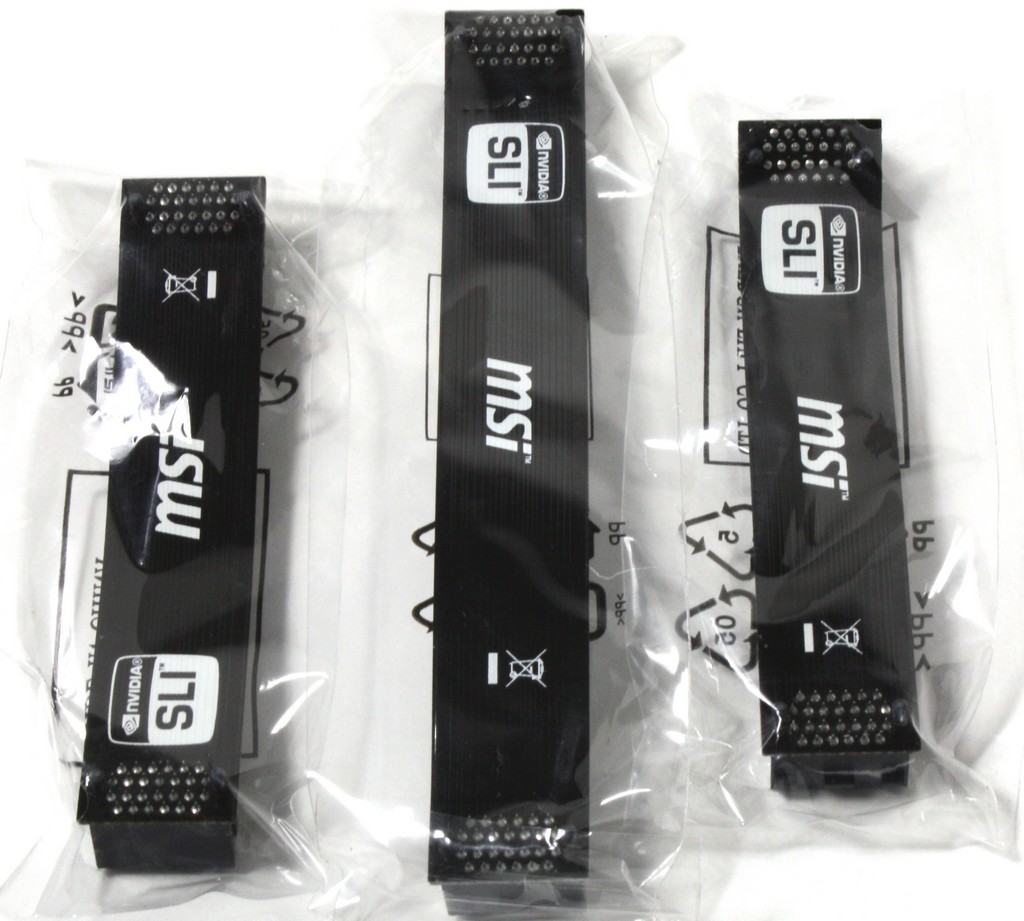
- SLI Ribbons (2x short, 1x large) for 2/3/4 Way SLI
- IO Shield
- MSI Gaming shield Case Badge Decal
This bundle will easily get the job done and get you up and running. The only thing we could think of needing would be a few more SATA cables as the board has 10 onboard SATA ports but only 6 SATA cables.

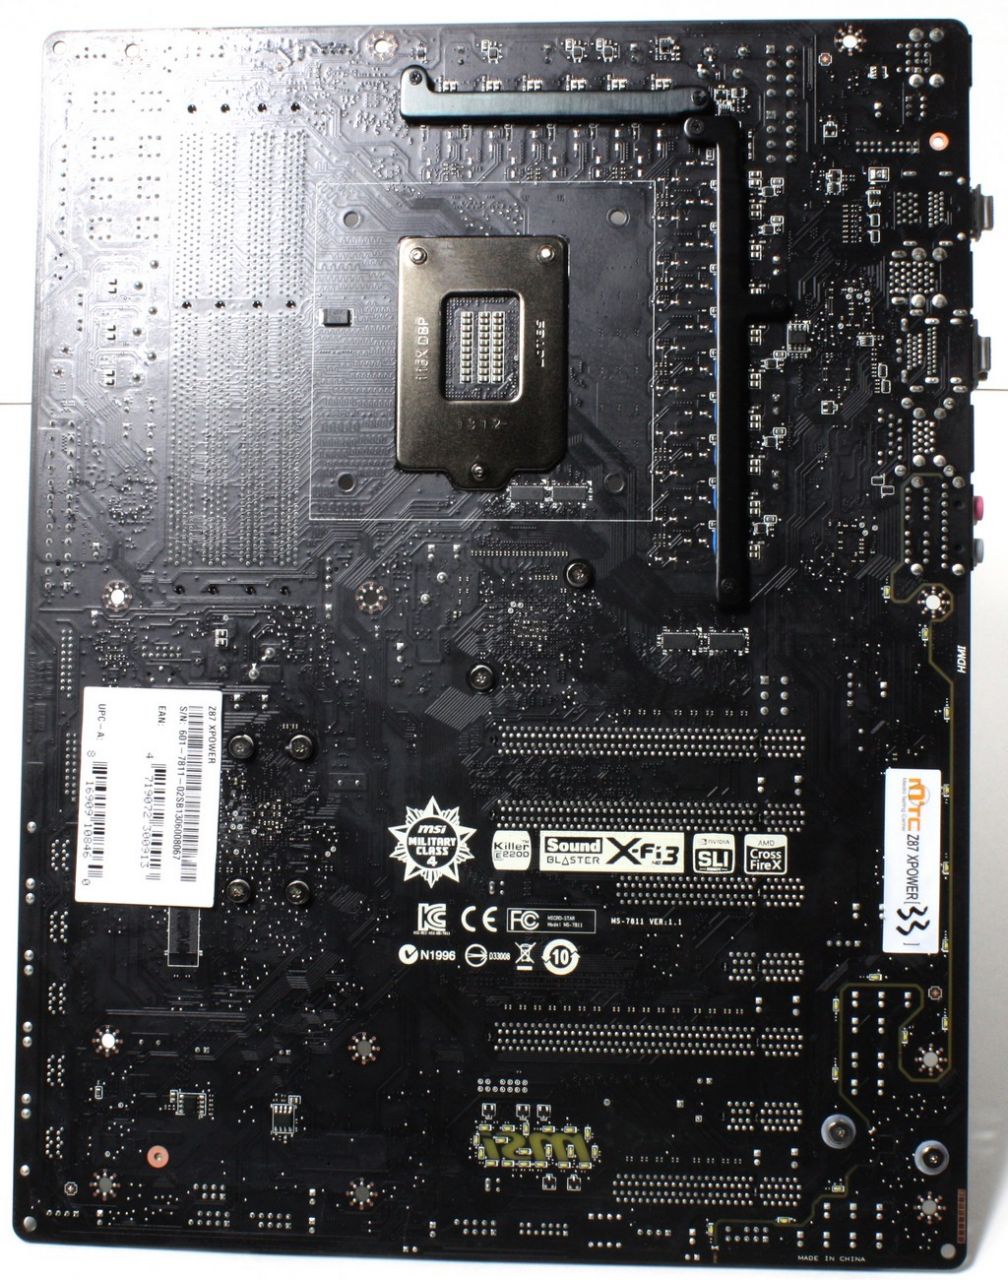
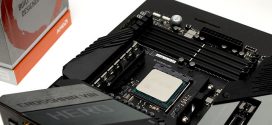
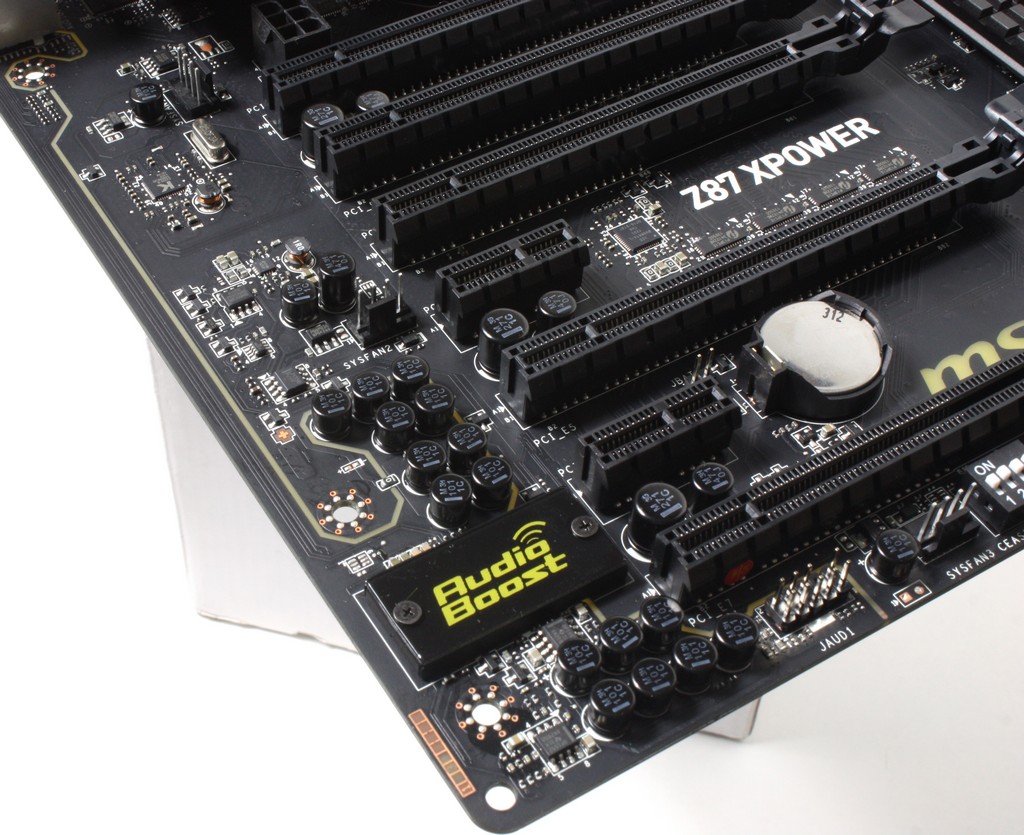
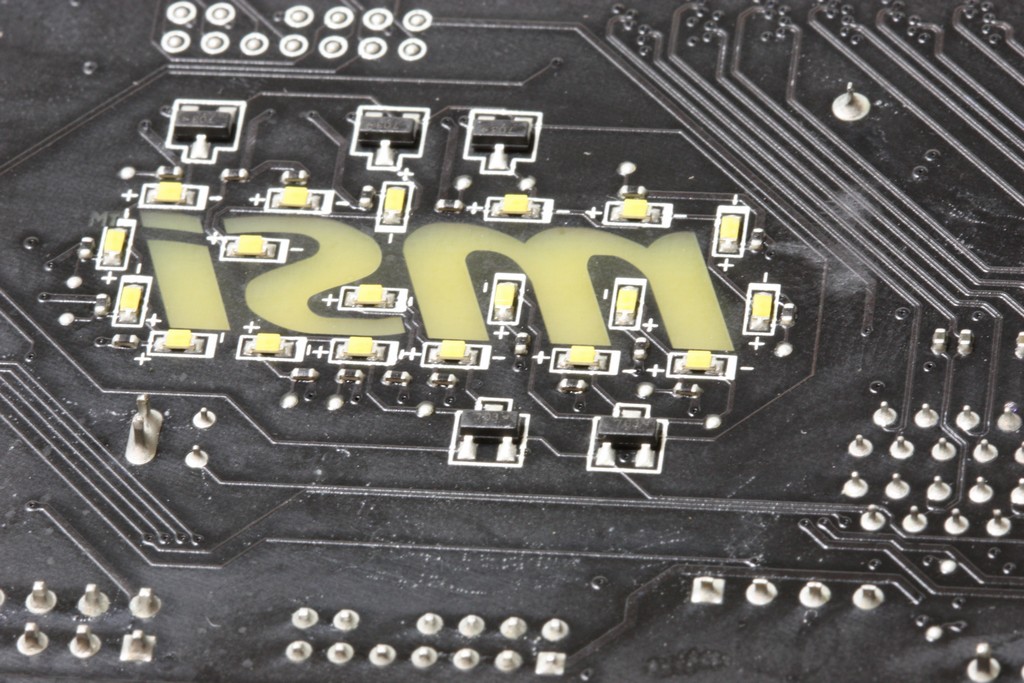
Here we see the complete board and you can see that mid board there is a larger heatsink area to cool the PLX Bridge used for the 4 Way compatibility. also near the 24 Pin ATX connector you will see dual USB 3.0 headers which is very nice as these new high speed ports are becoming much more prevalent and some high end chassis now have dual pairs of USB 3.0 ports as well. Notice that this board uses jet black caps which adds to the overall super dark theme from the Matte black PCB to the Matte black heatsinks, only the small yellow hints break this overall blacked out design. Don’t forget that there are some backlit areas of the PCB which are semi opaque but allow light through both in the MSI logo above the bottom slot but also the audio area where the PCB is separated similar to what we have seen in the ASUS SupremeFX designs.

Click Image For a Larger One
Click Image For a Larger One
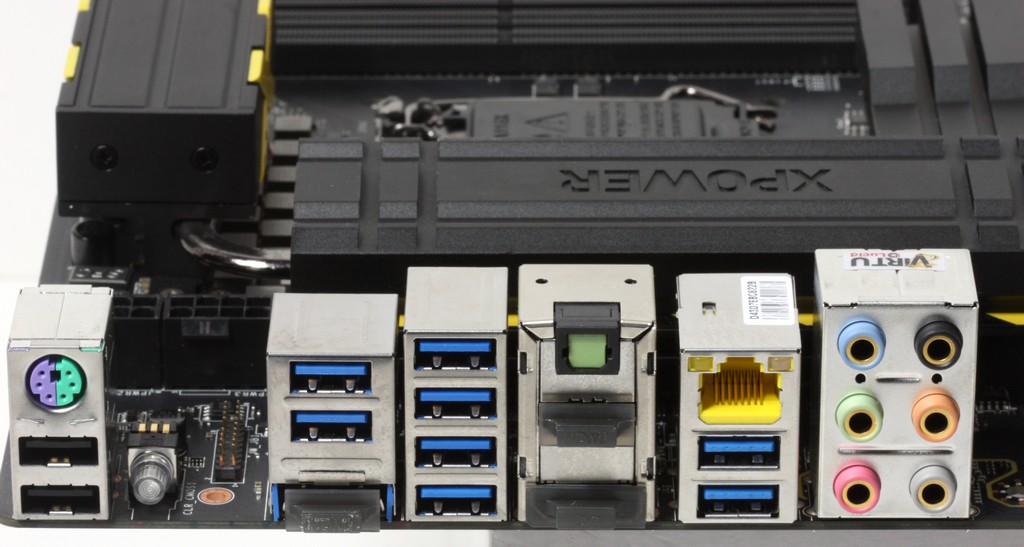
- PS2 combo keyboard/mouse port
- 2x USB 2.0 Ports
- WiFi/WiDi module pin header
- Clear CMOS Button
- Optical SPDIF connector
- 8x USB 3.0 ports
- Gigabit LAN port (Killer E2205)
- Displayport Connector
- 2x HDMI Ports
- up to 8 Channel HD audio via Realtek ALC1150
The connectivity array is very strong and with Dual HDMI you don’t have to worry about adapters if using dual HDMI displays which is nice as they are becoming far more common. also HDMI takes up far less space and therefore allows more USB 3.0 connectivity along with the WiFi/WiDi module which is another awesome addition to make this board top notch in terms of feature set.
Click Image For a Larger One
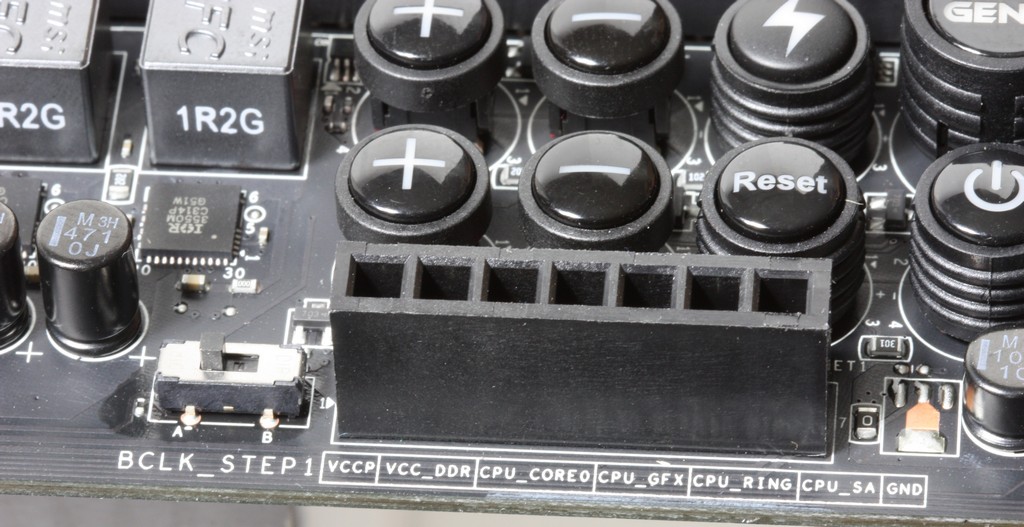
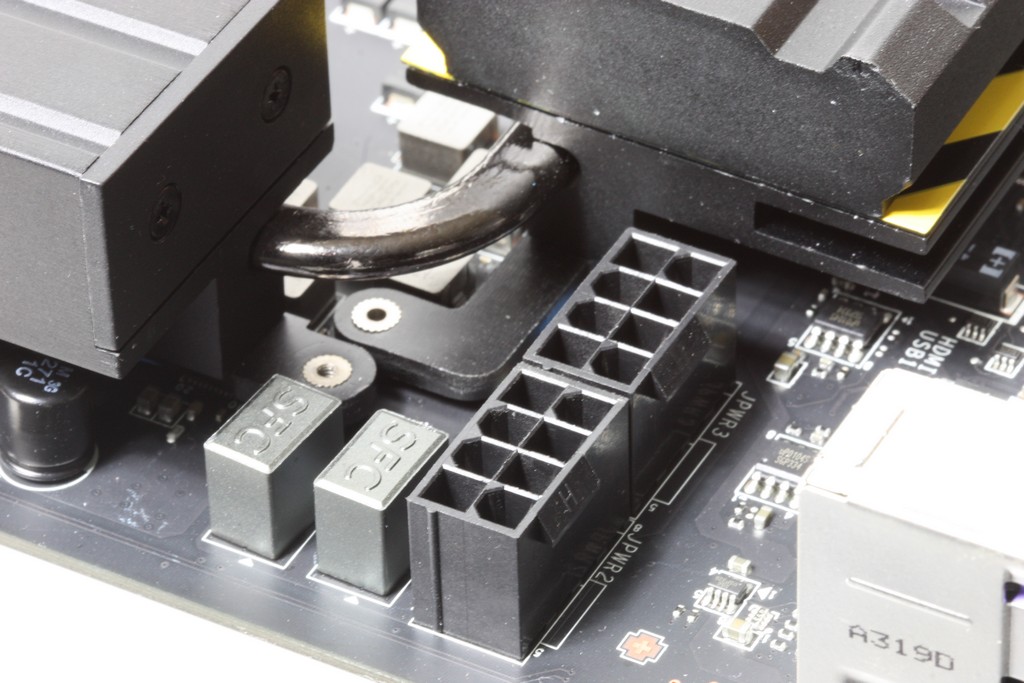
Moving to the far right near the 24 Pin ATX connector you can see the V-Check Point cables connector which is where you can take direct readings from the board for voltages which will give you some idea of how things are running and also help with diagnosis in the case problems arise.
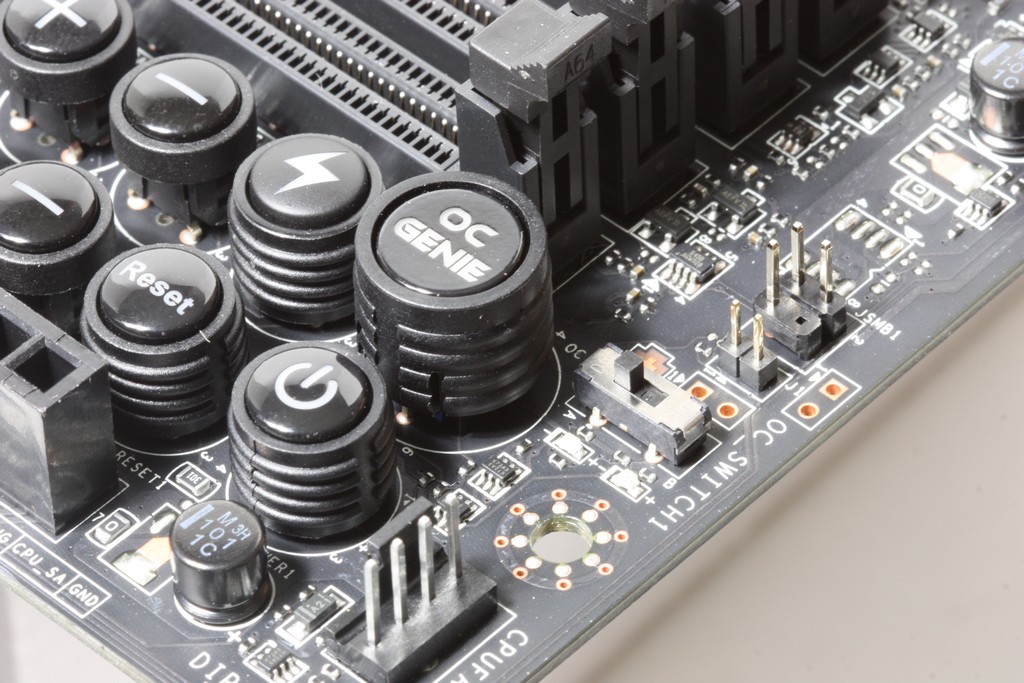
The control buttons are much more involved here as unlike the gaming series board we recently took a look at, this one has many direct Overclocking buttons. You have the OC Genie button which works as we previously talked about by providing a proven stable overclock to the system including the iGPU to give overall better gaming performance. There is also dual sets of +/- buttons which control both BCLK and CPU Multiplier control and even a switch to change the scaling from 1MHz on BCLK to 0.1MHz for even finer granularity when tuning.
The real star as we see it is this button with the lightning bolt which is called the “Discharge Button” and is basically a much deeper version of a Clear CMOS. It not only clears the BIOS settings but it even clears the training on the board which allows for clearing of the PCH and everything similar to what you get by removing the battery for several minutes to let the board clear. Some may ask why this even exists, but anyone who has ever benched subzero and had the board freak out knows that having that same capability by simply pressing a button for a few seconds knows this is a lifesaver so to speak. If you have a board sitting at extreme subzero, and you have to power it off, the whole board will begin to freeze up and frost over very fast. Letting the board sit there with the battery out is not an ideal solution.
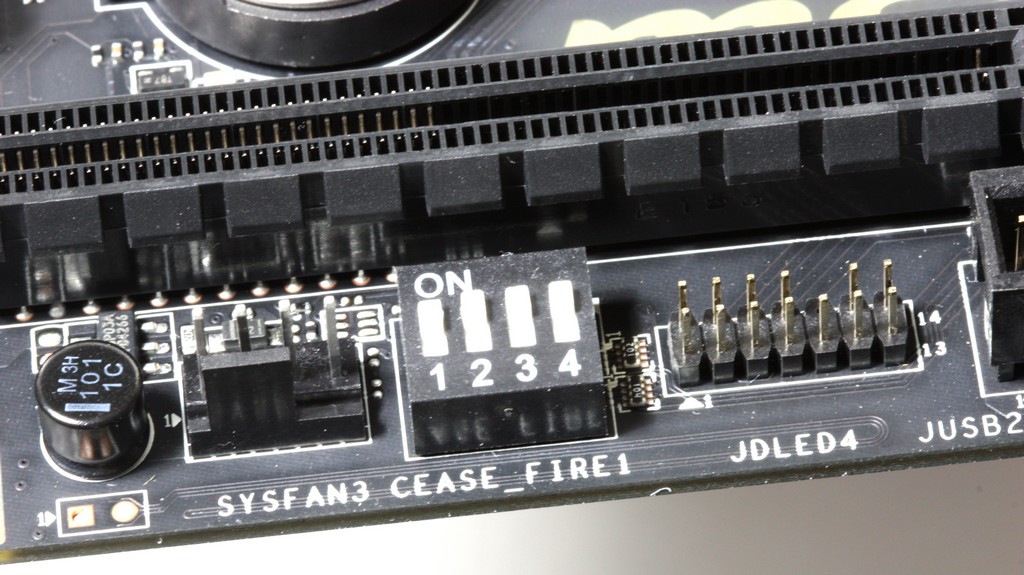
Here also you see the Cease Fire switches which are basically PCIe disable dip switches so that if you have a card act up you can disable slots one by one to find the one causing the issue, which is much easier than disassembling a 4 way setup (especially if the cards are liquid cooled) just to attempt diagnosis.
Click Image For a Larger One
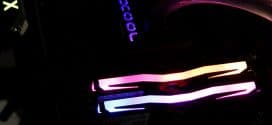
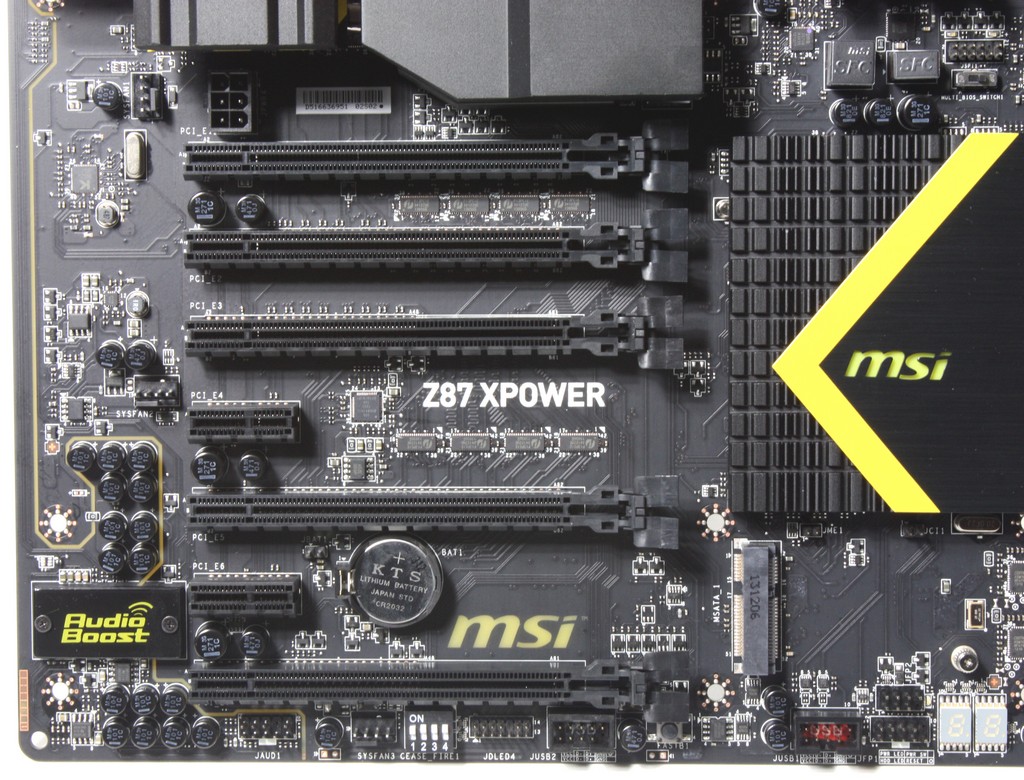
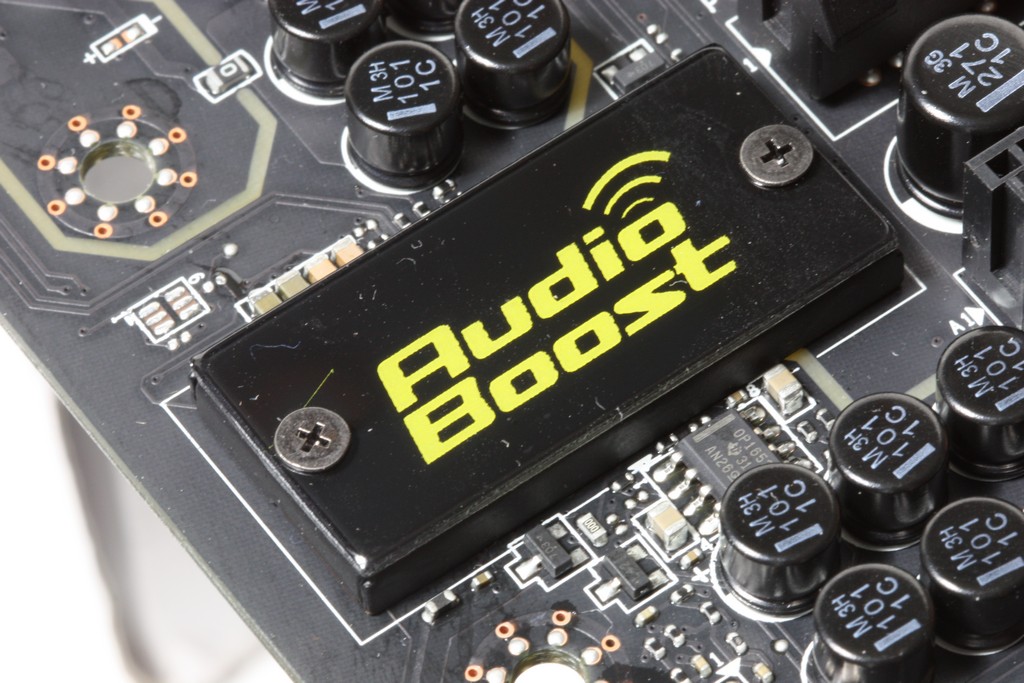
The audio boost audio solution has the PCB separation line in place which is backlit yellow to match the theme of the MSI Xpower overclocking series of boards, but more importantly what this highlights is the fact that the PCB area for audio is separated on its own island of PCB. This allows for less signal interference and better audio quality overall due to having the audio components on their own private paradise island on the side of the board. The yellow backlighting just adds some character and extra bling to the application.

Click Image For a Larger One
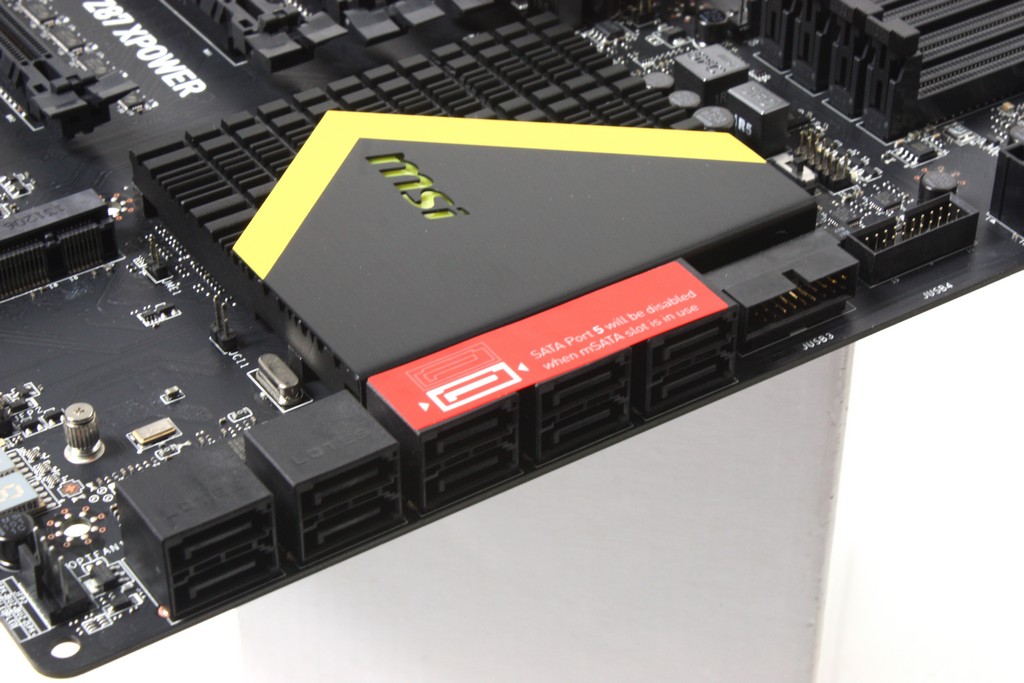
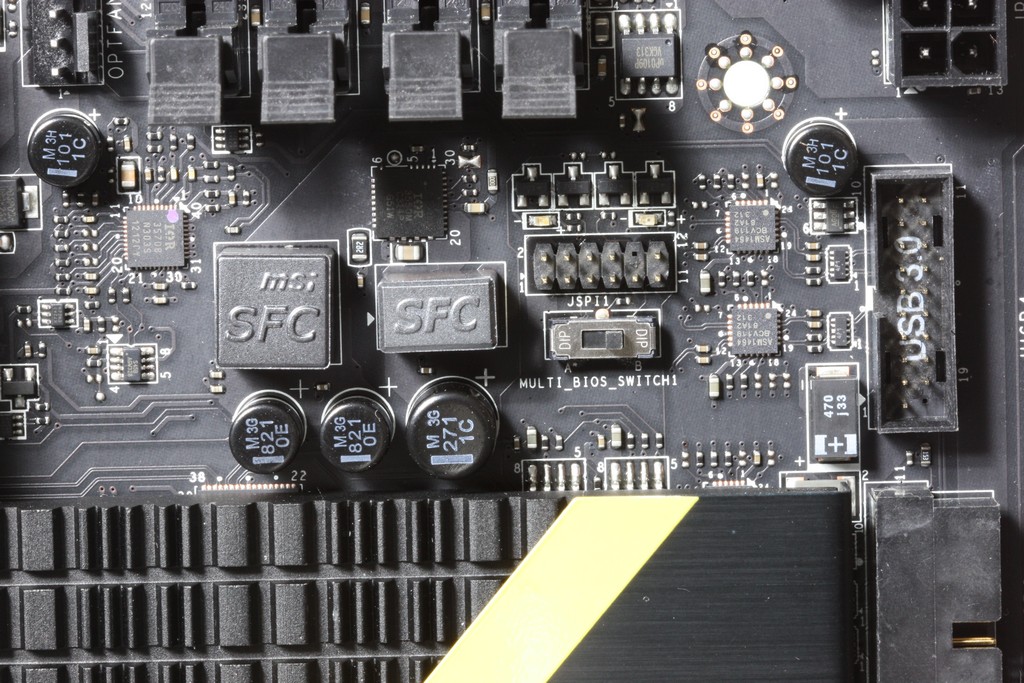
The mid board above the PCH sink you can see the BIOS switch which allows you to switch to one of the two fixed BIOS chips on the baord which allows for separate profiles or even one recovery BIOS while using the other for testing new BIOS and function. This also helps in case you corrupt a BIOS and the board becomes unbootable. You can switch to the other to boot, then switch back once booted and flash the problematic chip back to a functioning state.
Here is the WiFi/WiDi Module pin header on teh board which is used to allows the board to communicate with the module once installed. The module ships separately in the accessory pack likely to prevent damage during shipping. Also here you can see the gaming port array with PS2 combo port which is made to offer excellent performance for gaming peripherals with higher polling rate adjustability.


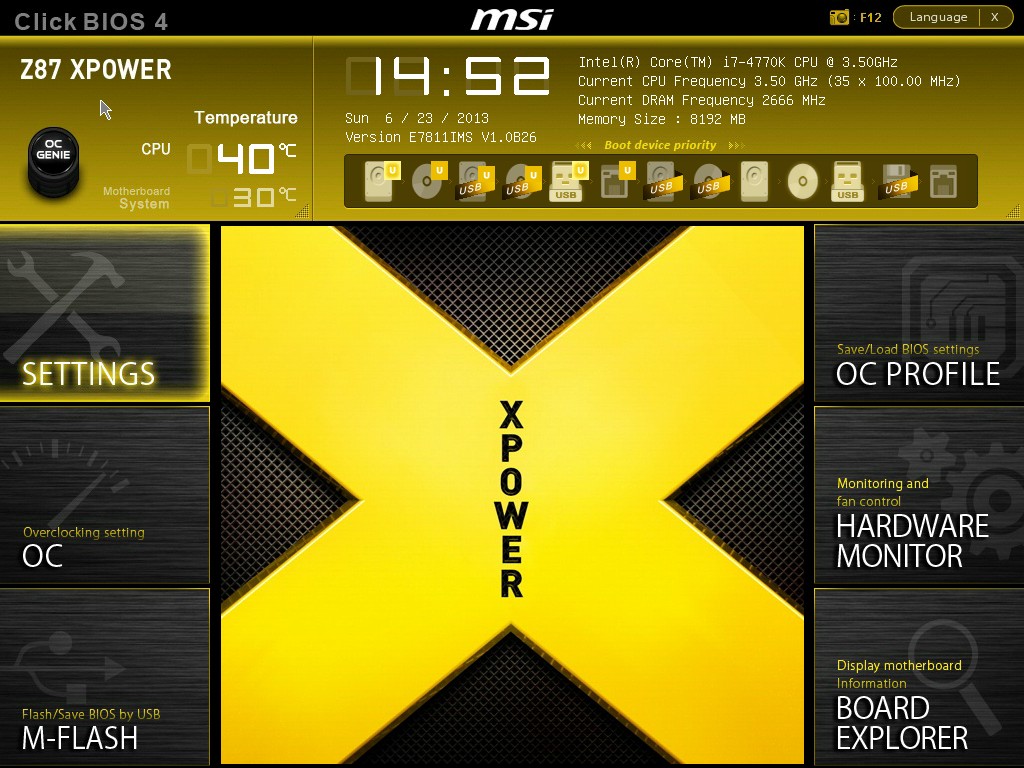
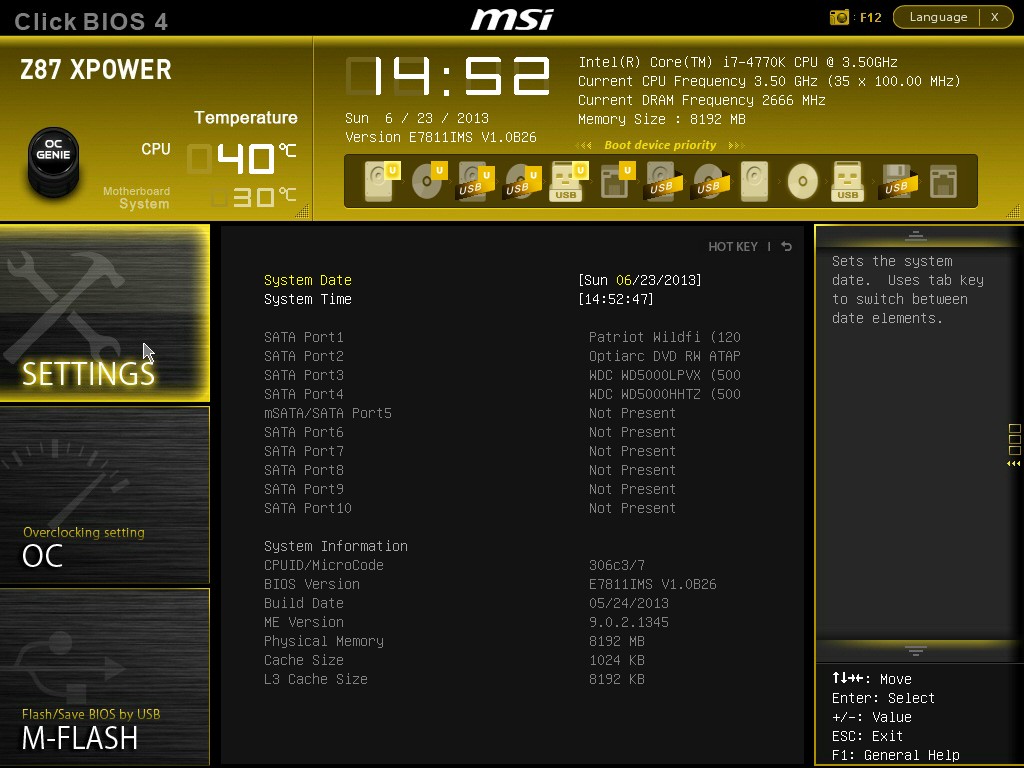
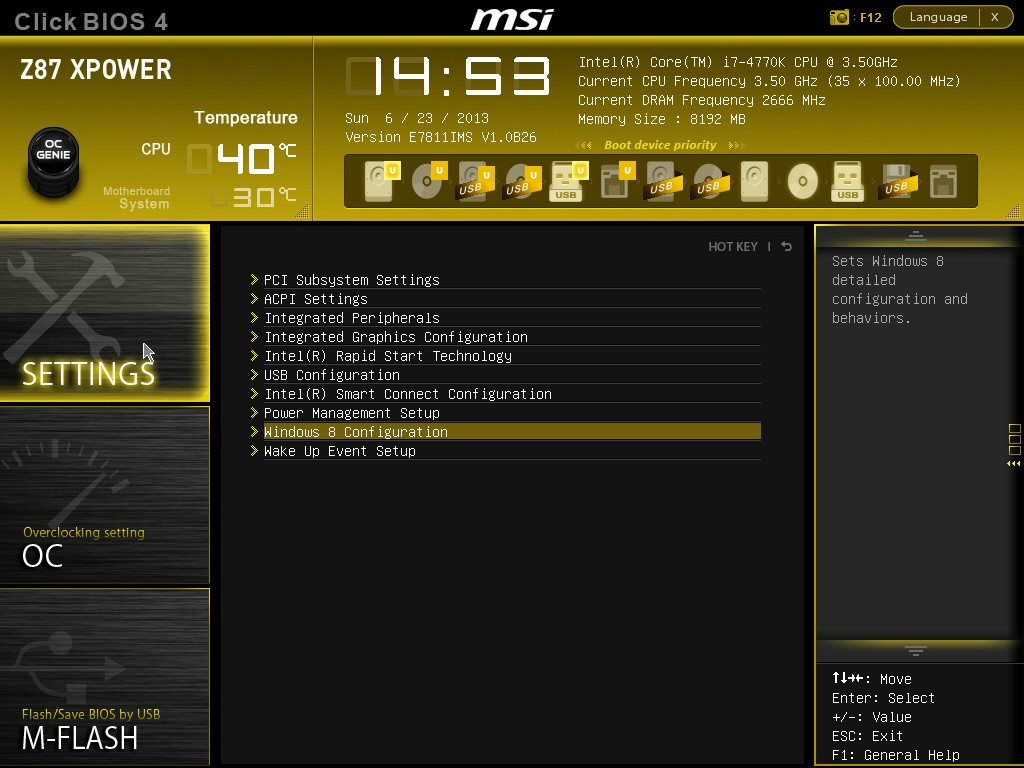
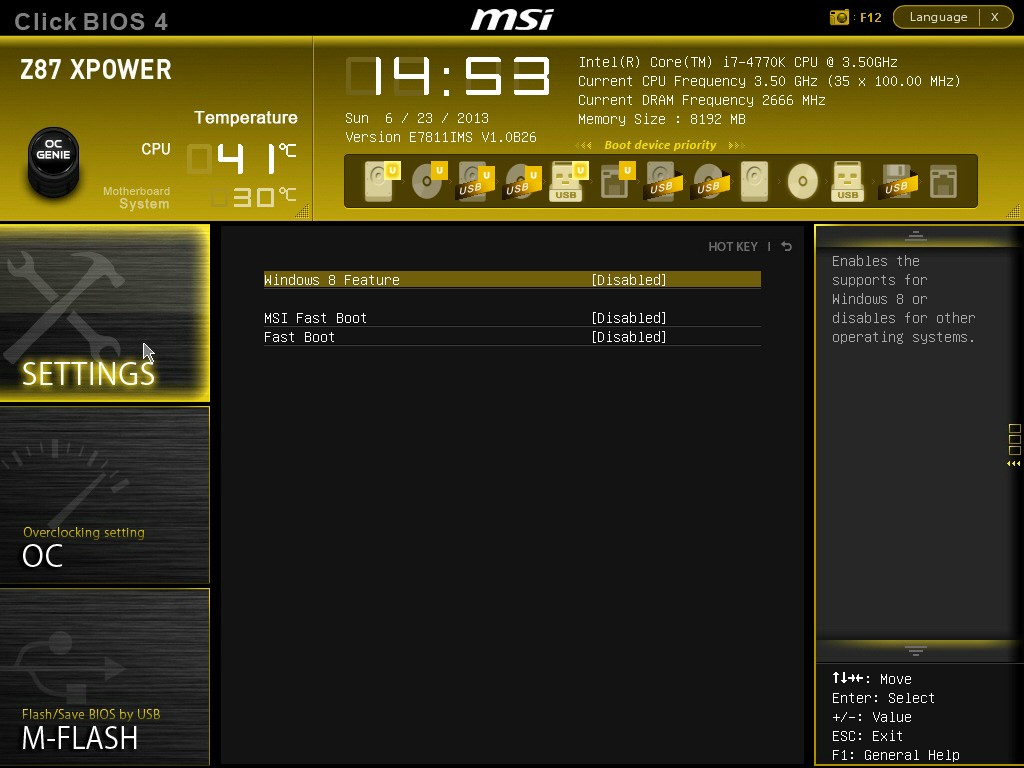
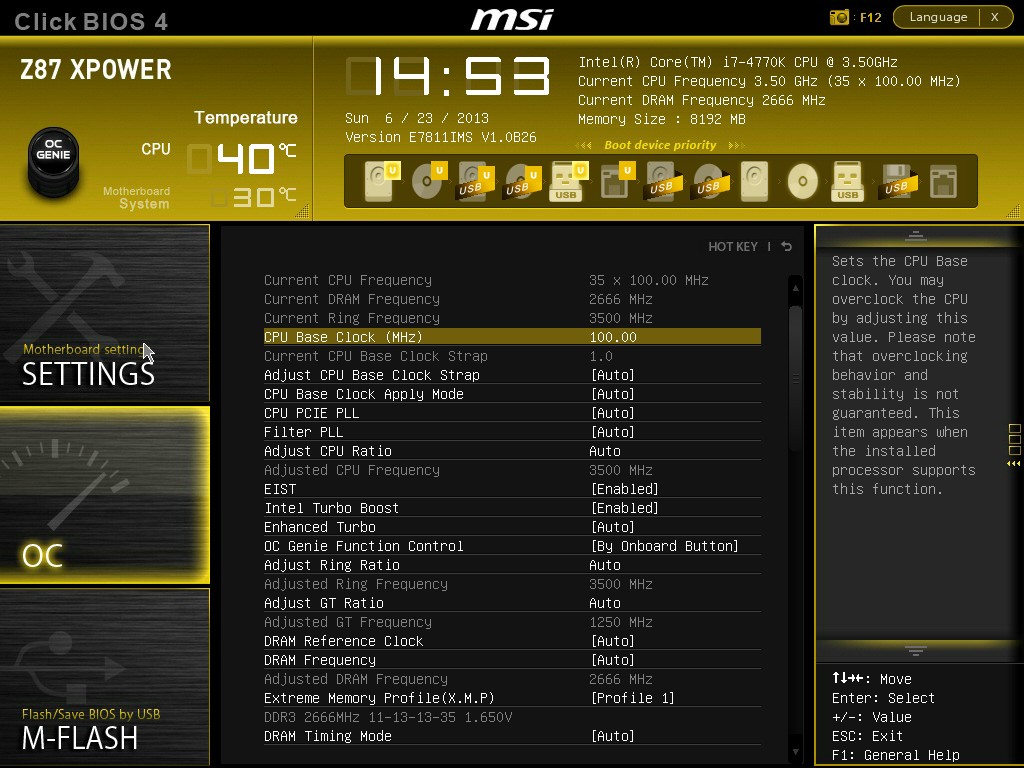
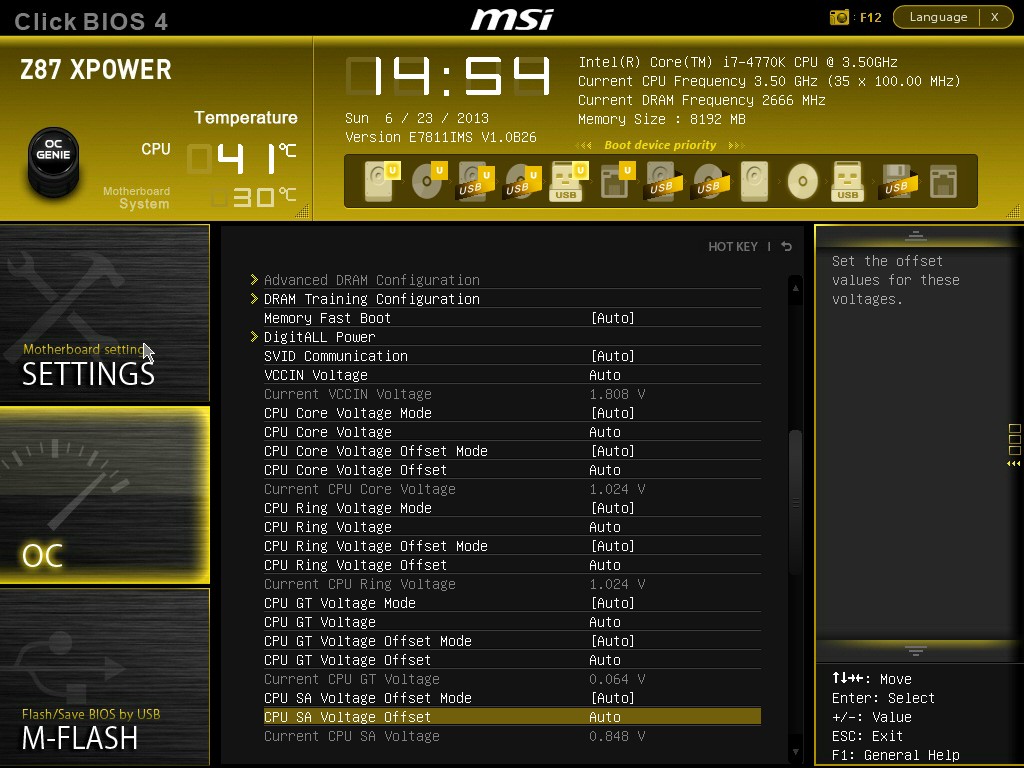
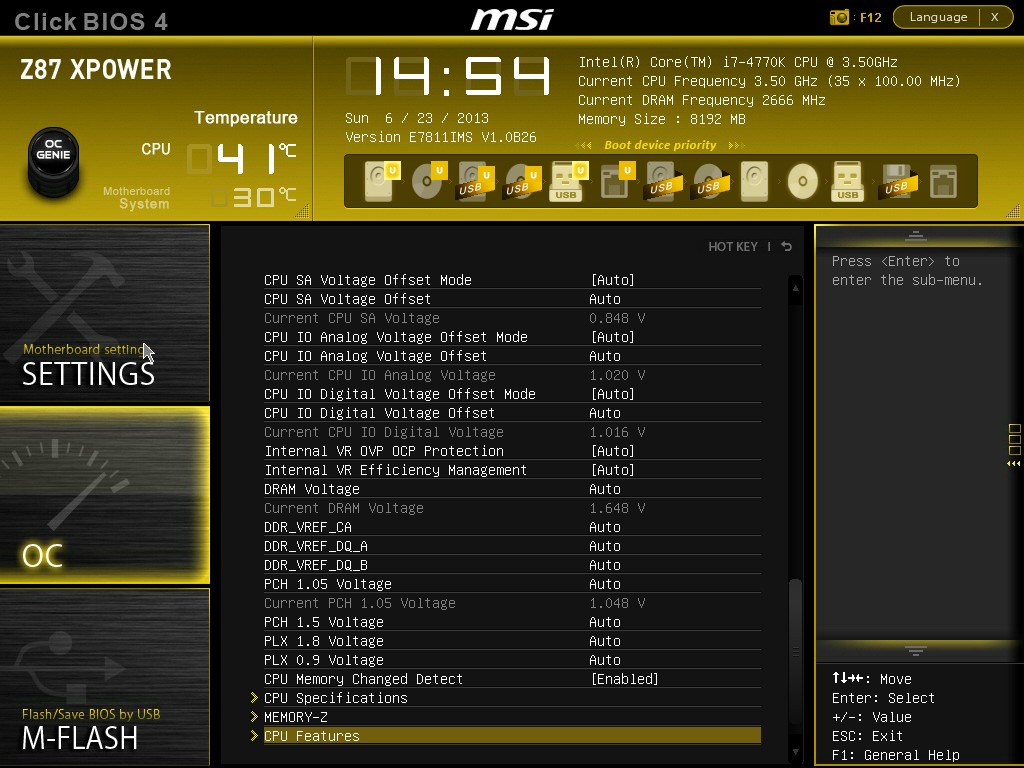
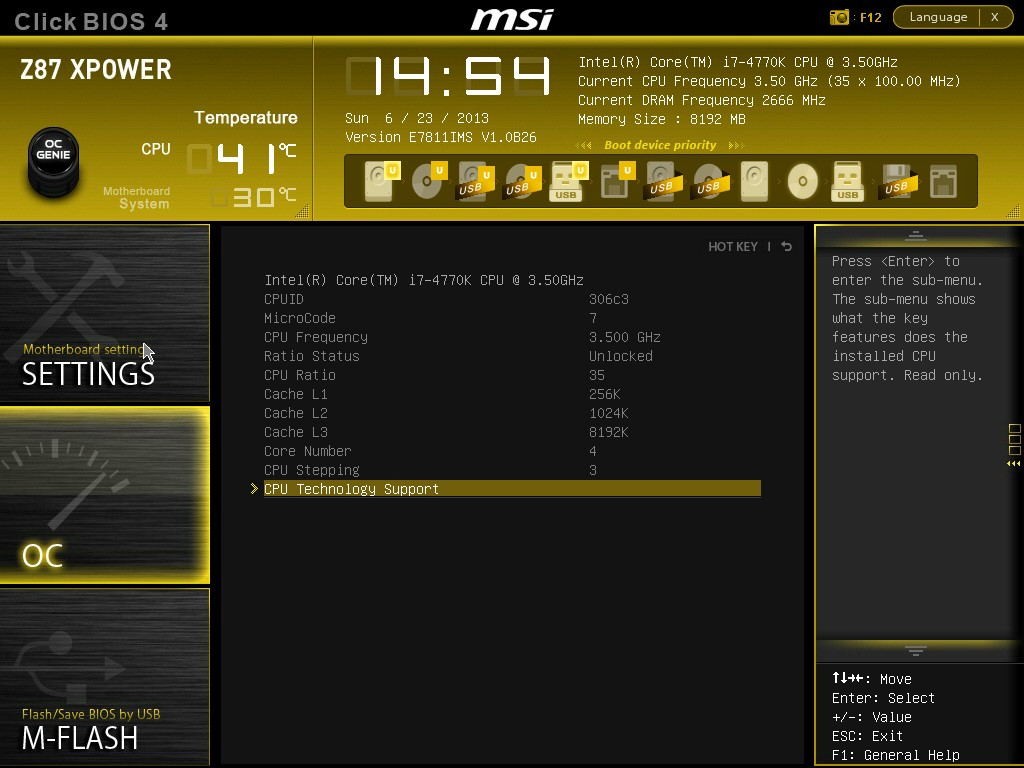
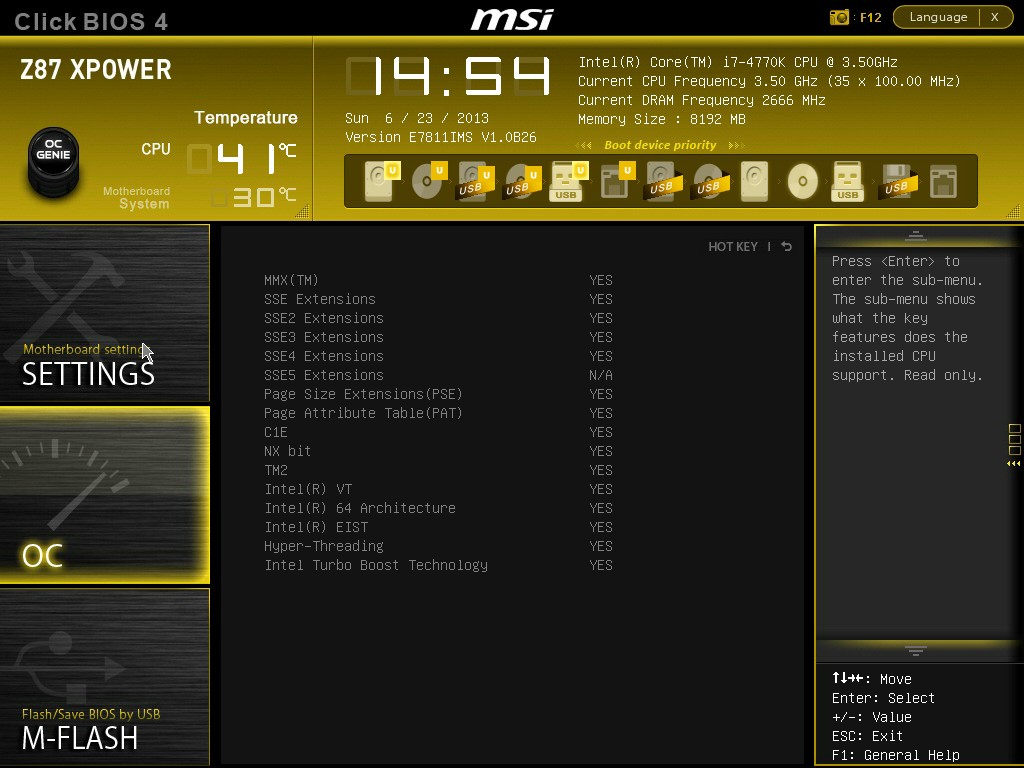
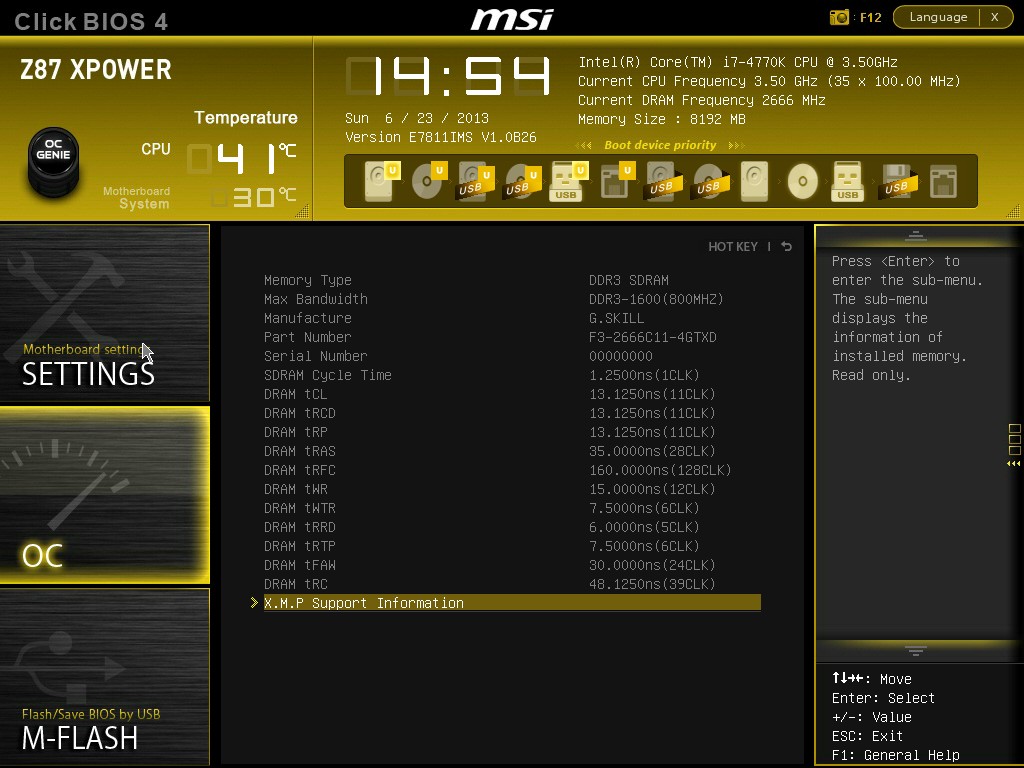
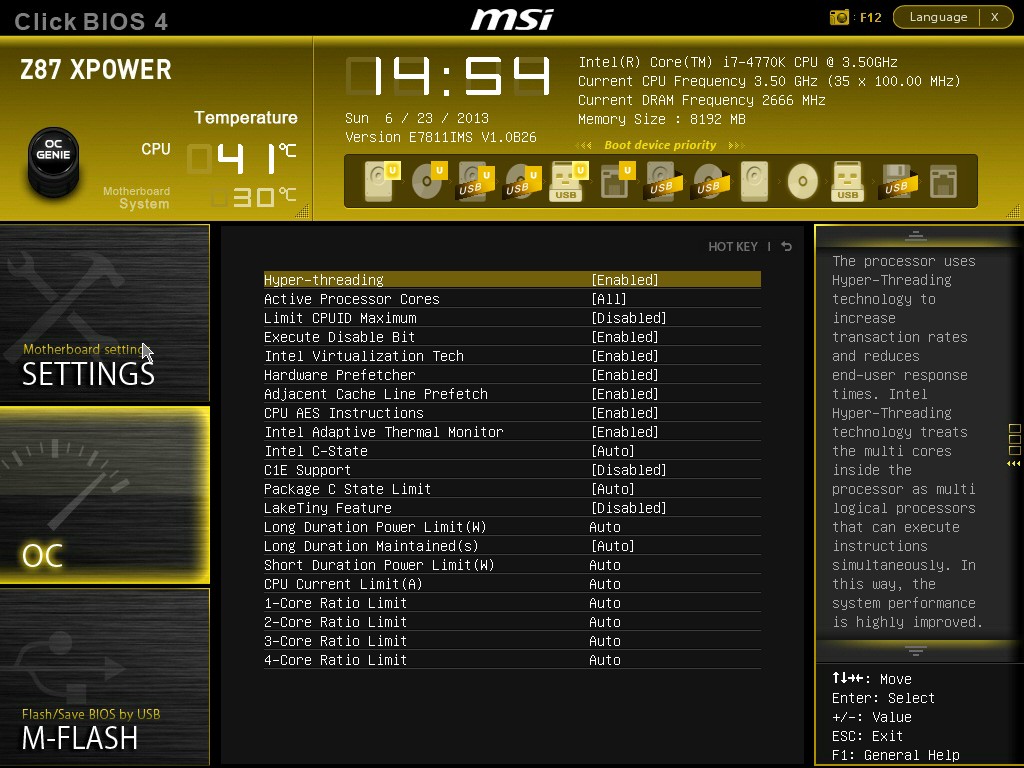
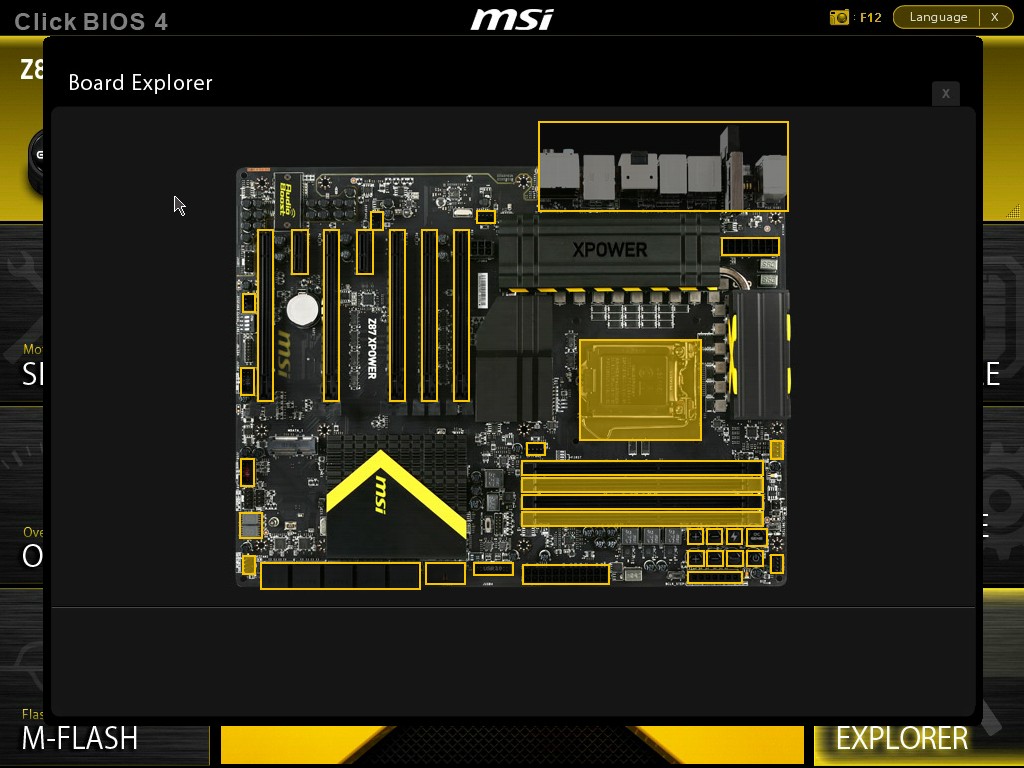
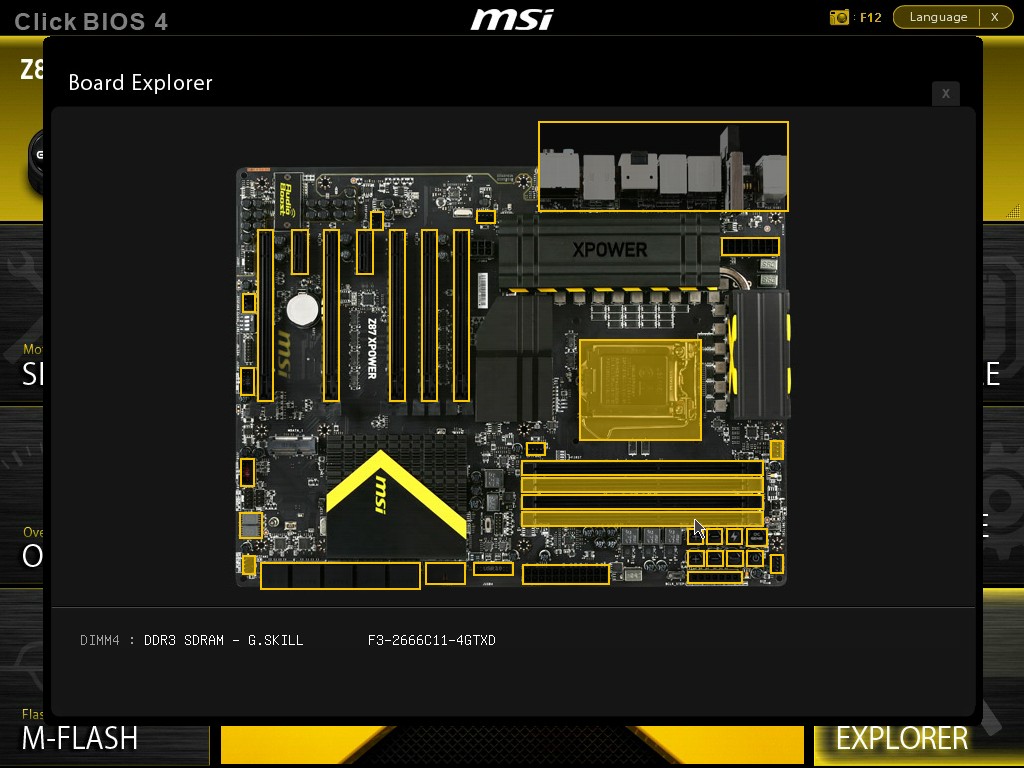
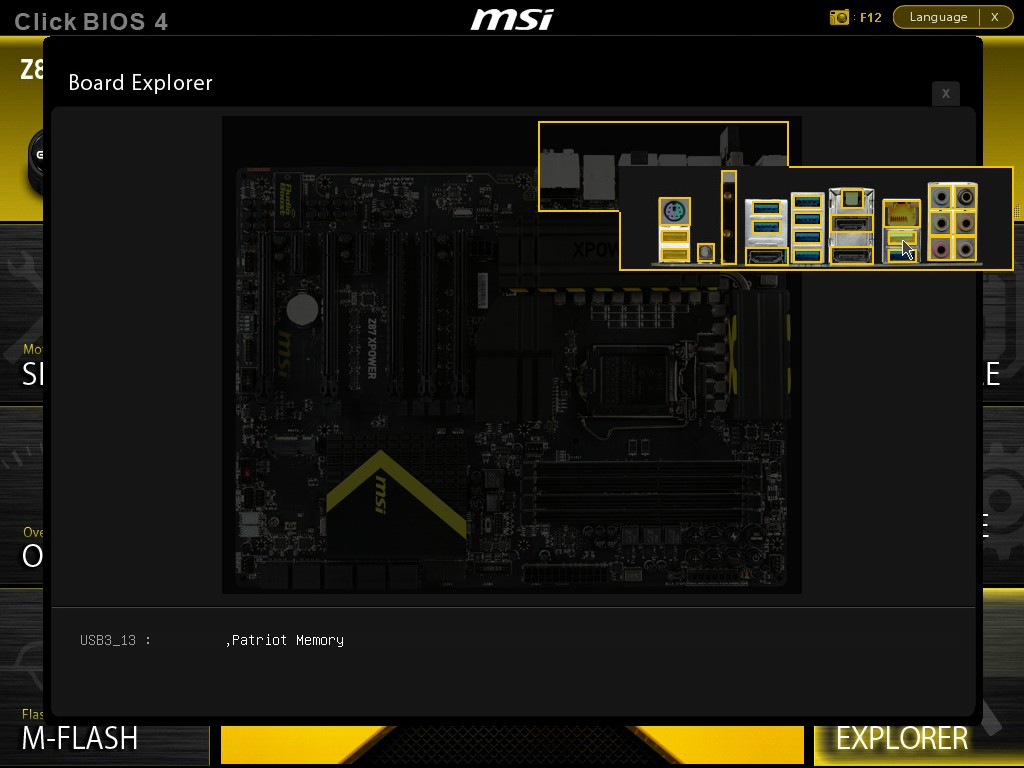
BIOS Overview
Click BIOS 4


Testing & Methodology
We’ve expanded our testing suite considerably since the X79 chipset release, and will continue to use the same methods for most of the motherboards and CPU’s we test. In the interests of thoroughness and accurate results, we run each test at least three times, and some tests more than that. We average the total of all the tests from each benchmark then report the average here.
The OS we use is Windows 7 Pro 64bit with all patches and updates applied. We also use the latest drivers available for the motherboard and any devices attached to the computer. We do not disable background tasks or tweak the OS or system in any way. We turn off drive indexing and daily defragging. We also turn off Prefetch and Superfetch. This is not an attempt to produce bigger benchmark numbers. Drive indexing and defragging can interfere with testing and produce confusing numbers. If a test were to be run while a drive was being indexed or defragged, and then the same test was later run when these processes were off, the two results would be contradictory and erroneous. As we cannot control when defragging and indexing occur precisely enough to guarantee that they won’t interfere with testing, we opt to disable the features entirely.
Prefetch tries to predict what users will load the next time they boot the machine by caching the relevant files and storing them for later use. We want to learn how the program runs without any of the files being cached, and we disable it so that each test run we do not have to clear pre-fetch to get accurate numbers. Lastly we disable Superfetch. Superfetch loads often-used programs into the memory. It is one of the reasons that Windows occupies so much memory. Vista fills the memory in an attempt to predict what users will load. Having one test run with files cached, and another test run with the files un-cached would result in inaccurate numbers. Again, since we can’t control its timings so precisely, it we turn it off. Because these four features can potentially interfere with benchmarking, and and are out of our control, we disable them. We do not disable anything else.
One thing to note is that we are revamping our testing method in order to better represent motherboard performance and offering to you guys the consumer. Also we want to make it an easier read for you without miles of endless charts. Please feel free to provide feedback on what you think as many benchmarks will be shuffled or removed completely.
Test Rig
| Test Rig | |
| Case | Open Test Bench |
| CPUs |
|
| Motherboards |
|
| Ram | GSkill TridentX 2666MHz |
| CPU Cooler | Swiftech 240mm rad custom loop |
| Hard Drives | Western Digital Velociraptor 1TB 10000RPM 6Gb/s Hard Drive |
| SSD | 1x Kingston HyperX 240GB SATA III 6Gb/s SSD |
| Optical | ASUS DVD-Burner |
| GPU | Intel iGPU or Nvidia GTX 680 |
| PSU | Thermaltake Toughpower XT 1475W Gold |
| Mouse | Tt eSPORTS Black Gaming Mouse |
| Keyboard | Tt eSPORTS Meka G1 Mechanical Gaming Keyboard |
Test Suite
We will use the following applications to test the performance of the Z87 Chipset (Motherboard, Processor).
| Benchmarks |
|---|
| SuperPi Mod 1.5 |
| Wprime 1.55 |
| PCMark 7 |
| 3DMark 11 |
| Cinebench R11.5 |
| SiSoft Sandra 2013 |
| X264HD |
| Truecrypt 7.1 |
| Unigine Heaven 4.0 |
| Metro 2033 |
| Batman Arkham City |
| Sniper Elite V2 |
PCmark 7

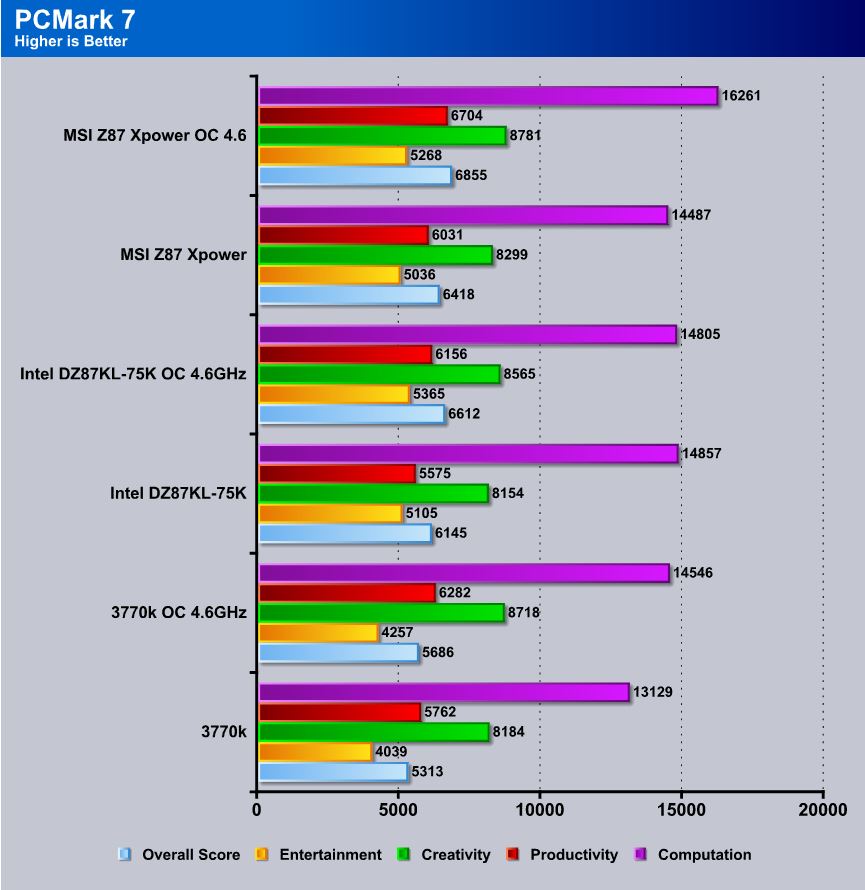
First up is PCMark and, just like the gaming series board this one seems to come alive when overclocked as it blows away the Intel board at computation with the same configuration.
3DMark 11
![]()
iGPU

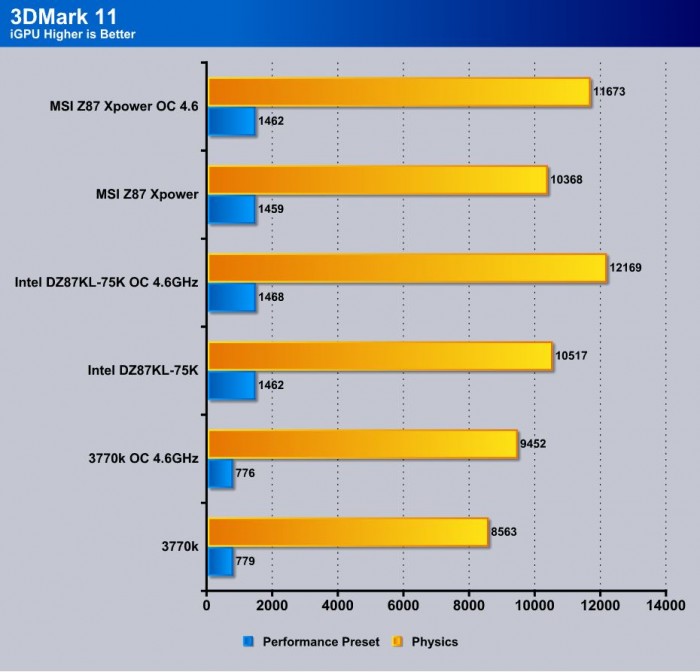
Here you can see that running 3DMark 11 with the iGPU gives similar results to what we have seen which with the HD4600 is still quite impressive.
Discrete GPU


Switching over to a discrete card, you can see that performance can improve on the Physics end which is rendered on the CPU. However, when it comes to overall discrete graphics performance, the gain is marginal as cards simply cannot reach the limit of the PCIe 3.0 controller on Ivy Bridge, let alone Haswell.
SuperPi
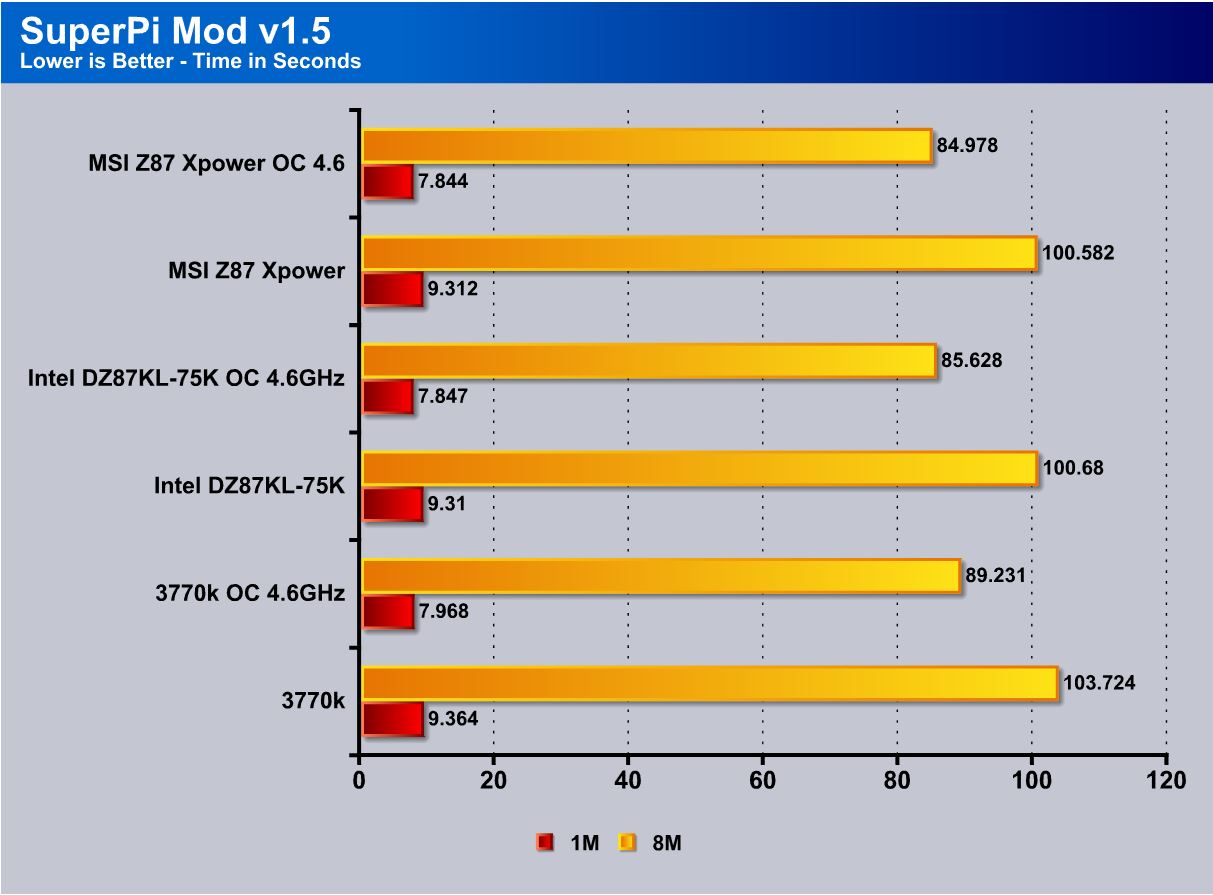
This tests single threaded perfomance and clock efficiency by processing digits of the number pi. Going from the previous gen Z77 to Z87 yields a nice efficiency jump clock for clock, and since we got this board post launch we think it had a bit more time to optimize things as this is one of the first boards to pull an all out win from the Intel board. We cannot really look down upon the early boards as to be fair they were still getting RC updates from Intel even close to launch. Only time will tell as the BIOS matures how much more performance you may see out of these Z87 boards but we am betting theer is still some room for more here.
Wprime

WPrime is similar to Superpi, but is multi core aware and you can set the core count. We used 8 threads to take advantage of the 4770K’s HyperThreading ability. Here you can see that the efficiency in multi core processing improves as you can see a pretty nice gain going from Z77 to Z87, and even more so when overclocked. We are quite excited to see what this platform can do as we get our hands on more boards to test real world performance.
On the Xpower this time the OC result is slightly behind the Intel board’s OC result but at stock it wipes the floor with the Intel board so this is kind of a mixed bag honestly.
Cinebench R11.5

“CINEBENCH is a real-world test suite that assesses your computer’s performance capabilities. MAXON CINEBENCH is based on MAXON’s award-winning animation software, CINEMA 4D, which is used extensively by studios and production houses worldwide for 3D content creation. MAXON software has been used in blockbuster movies such as Spider-Man, Star Wars, The Chronicles of Narnia and many more. MAXON CINEBENCH runs several tests on your computer to measure the performance of the main processor and the graphics card under real world circumstances. The benchmark application makes use of up to 16 CPUs or CPU cores and is available for Windows (32-bit and 64-Bit) and Macintosh (PPC and Intel-based). The resulting values among different operating systems are 100% comparable and therefore very useful with regard to purchasing decision-making. It can also be used as a marketing tool for hardware vendors or simply to compare hardware among colleagues or friends.”

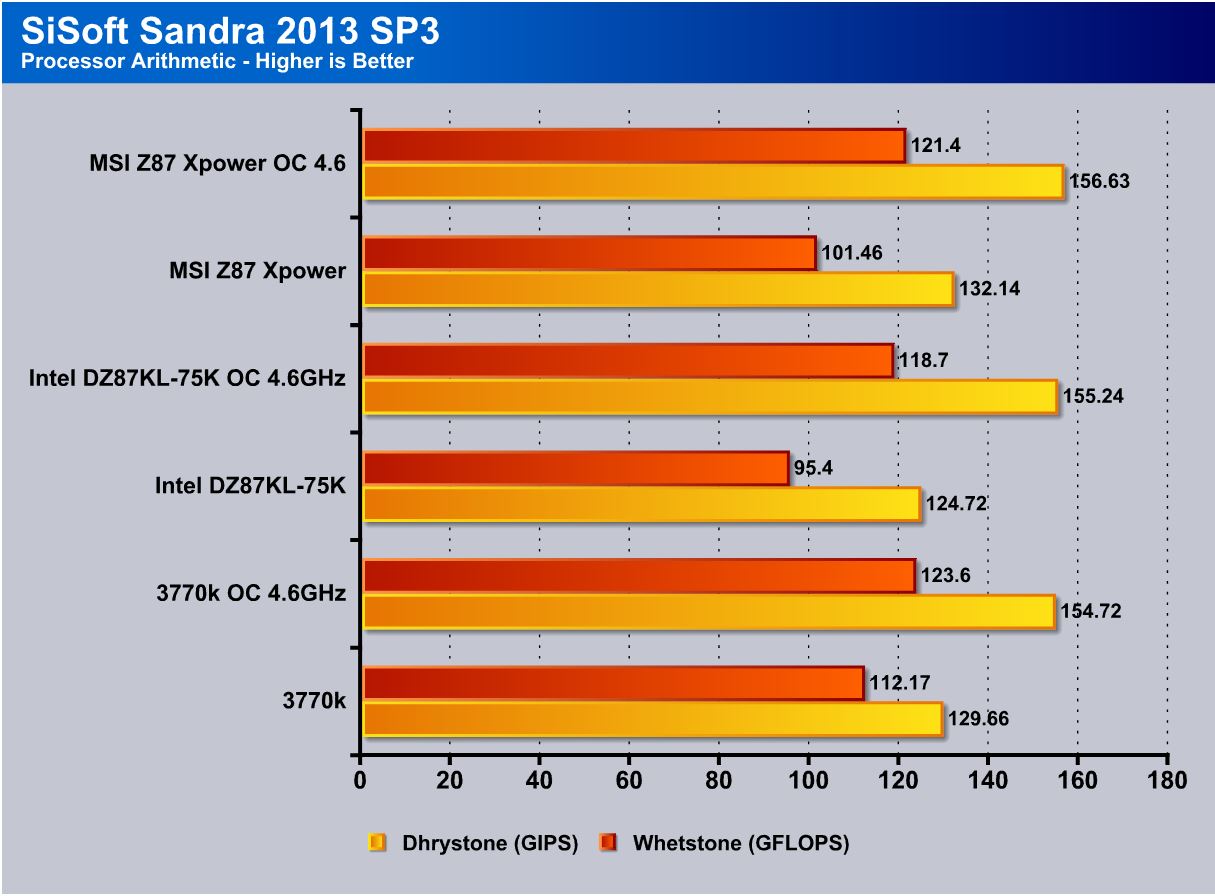
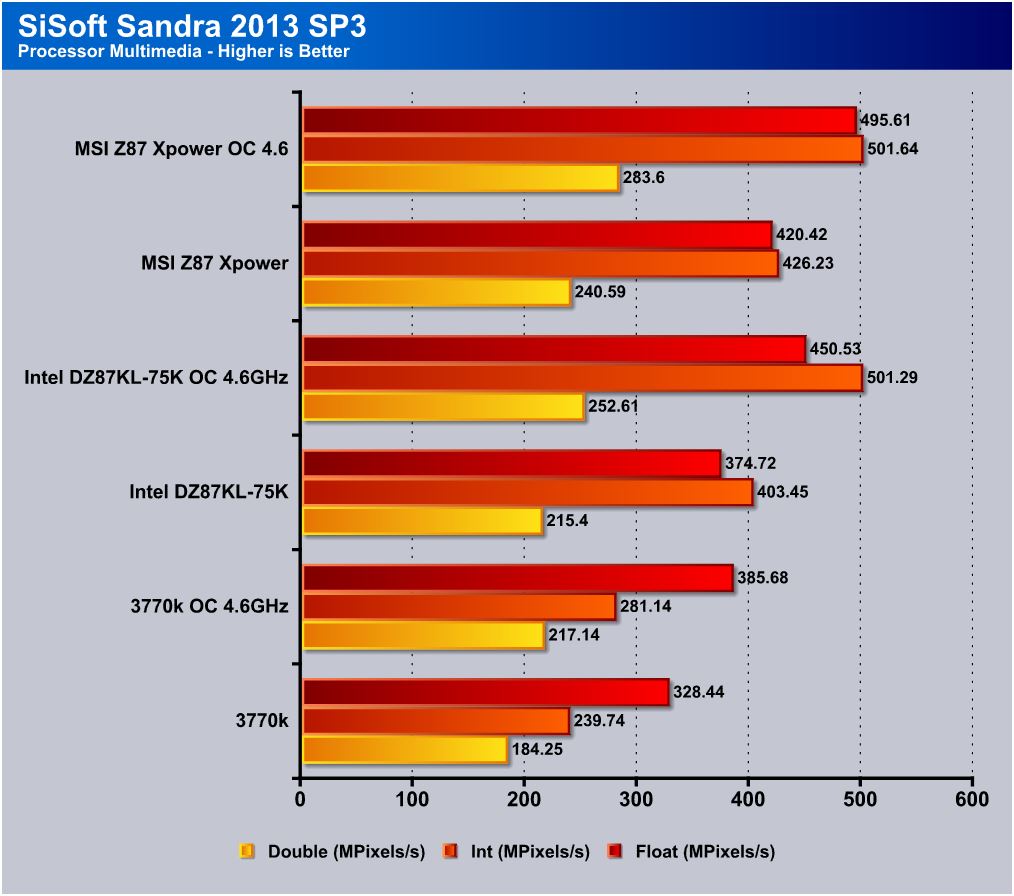
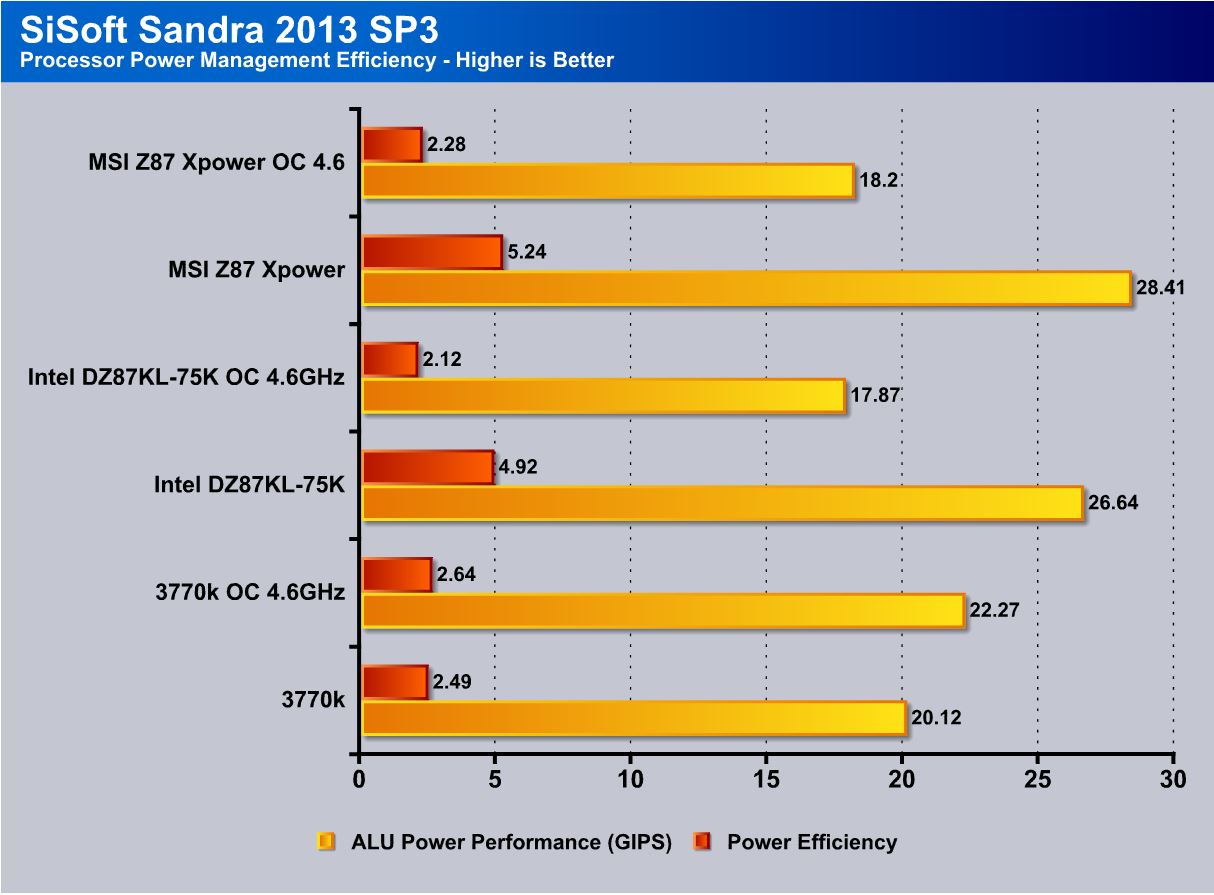
SiSoft Sandra 2013

“SiSoftware Sandra (the System Analyzer, Diagnostic and Reporting Assistant) is an information & diagnostic utility. It should provide most of the information (including undocumented) you need to know about your hardware, software and other devices whether hardware or software. It works along the lines of other Windows utilities, however it tries to go beyond them and show you more of what’s really going on. Giving the user the ability to draw comparisons at both a high and low-level. You can get information about the CPU, chipset, video adapter, ports, printers, sound card, memory, network, Windows internals, AGP, PCI, PCI-X, PCIe (PCI Express), database, USB, USB2, 1394/Firewire, etc.”
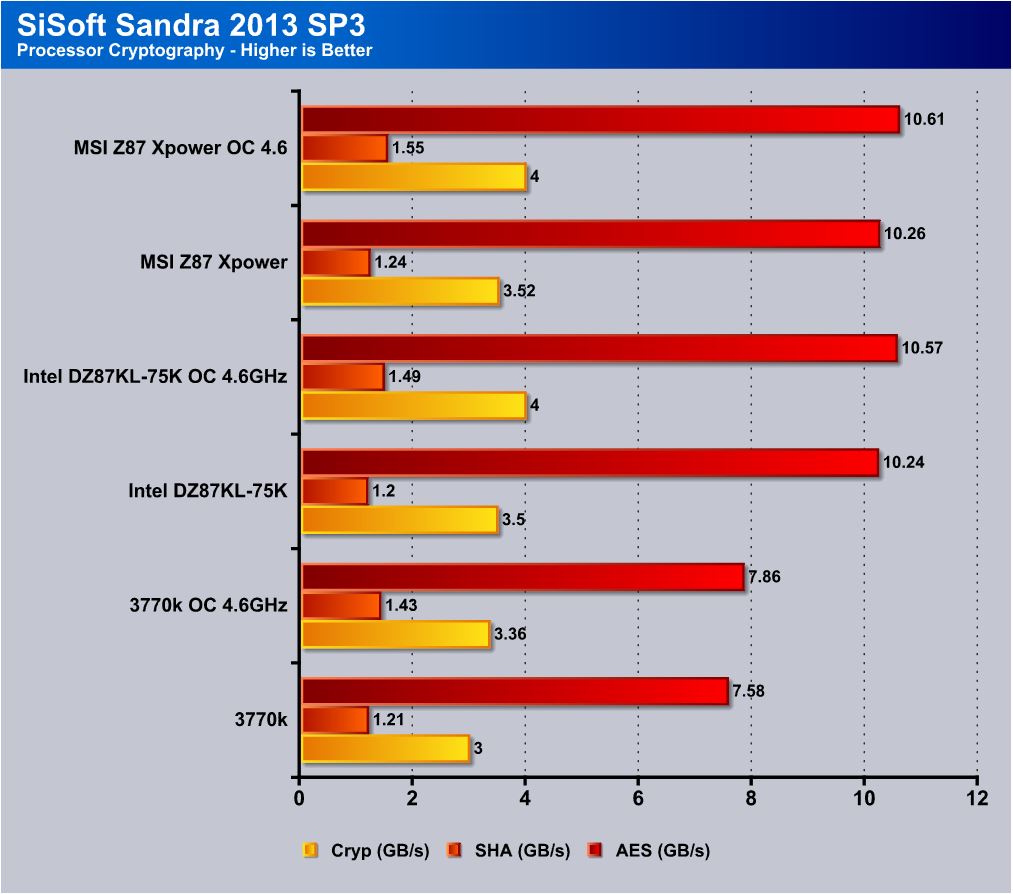


Click Images to Enlarge
Here with Sandra testing, you can see there is some give and take here. One area that surprised us was the AES encyption, which makes an absolutely huge leap going from Z77 to Z87.
Another interesting area we have seen has to do with the memory bandwidth. On the Intel board, a dual channel bandwidth can go into the 32GB/s range, whereas the competition is around 26-28GB/s. While this may not seem like much, that really is a very huge pipeline for data. Testing another Z77 model from two different manufacturers now reveals that the Intel board is the only one capable of pulling such a feat, which means they definitely have some special tweaks going on making for some very impressive memory capabilities.
The Xpower still sees a limit to memory bandwidth in the area of 27GB/s and with that it tells me that most board partners simply have not figured out how this has happened but these results would be very interesting should a board partner figure this out and make it possible on boards like the Xpower as im betting these benchmark results would be a bit different and not so close.
X264HD

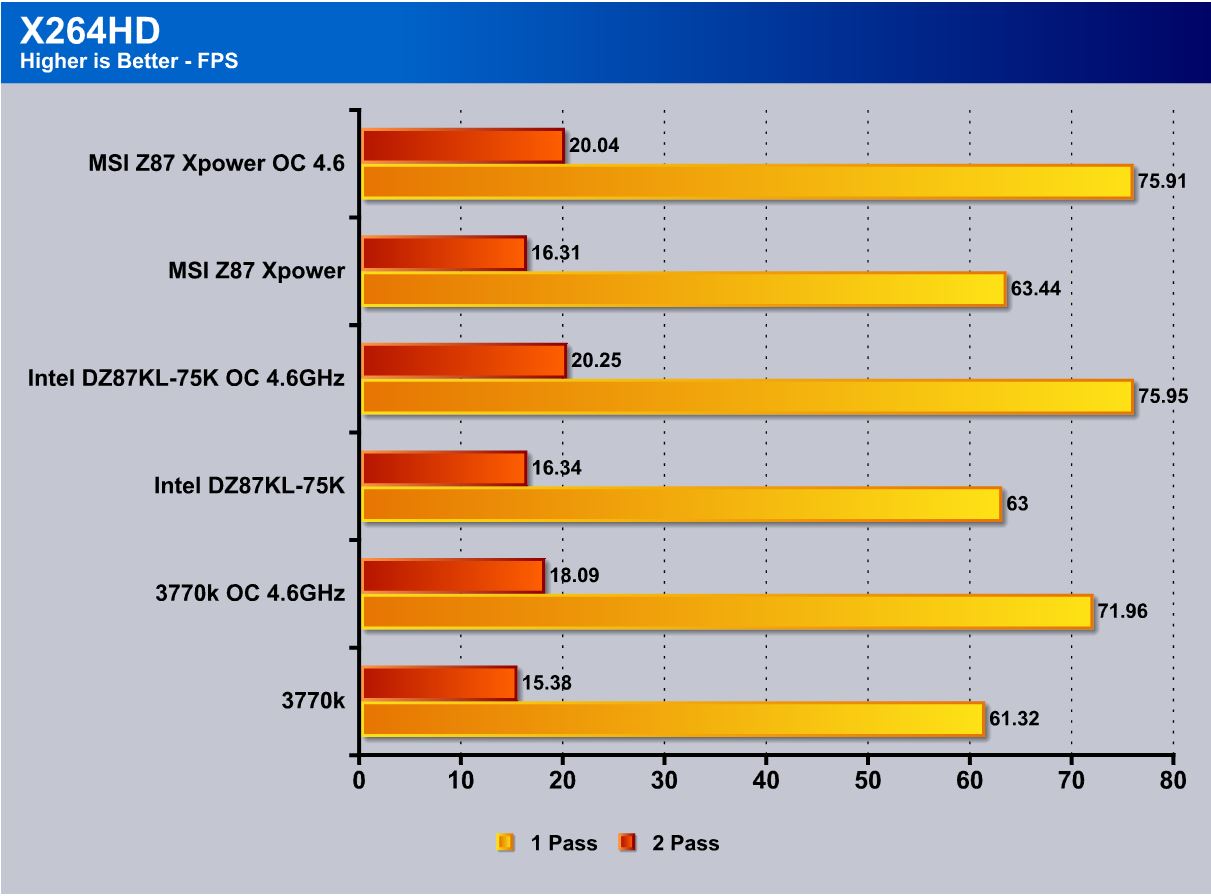
Transcoding has become more popular now and the latest Sandy Bridge processor added support for AVX instruction for faster video transcoding. With that you can see that going from Ivy Bridge to Haswell can net you some very good gains, especially a 2FPS gain on 2 Pass. This tells us that overall optimizations to the new platform are present and working very well. The Xpower does well here but still gets trimmed up a it by the Intel board which is about similar to what i have seen on the other boards.
Truecrypt 7.1

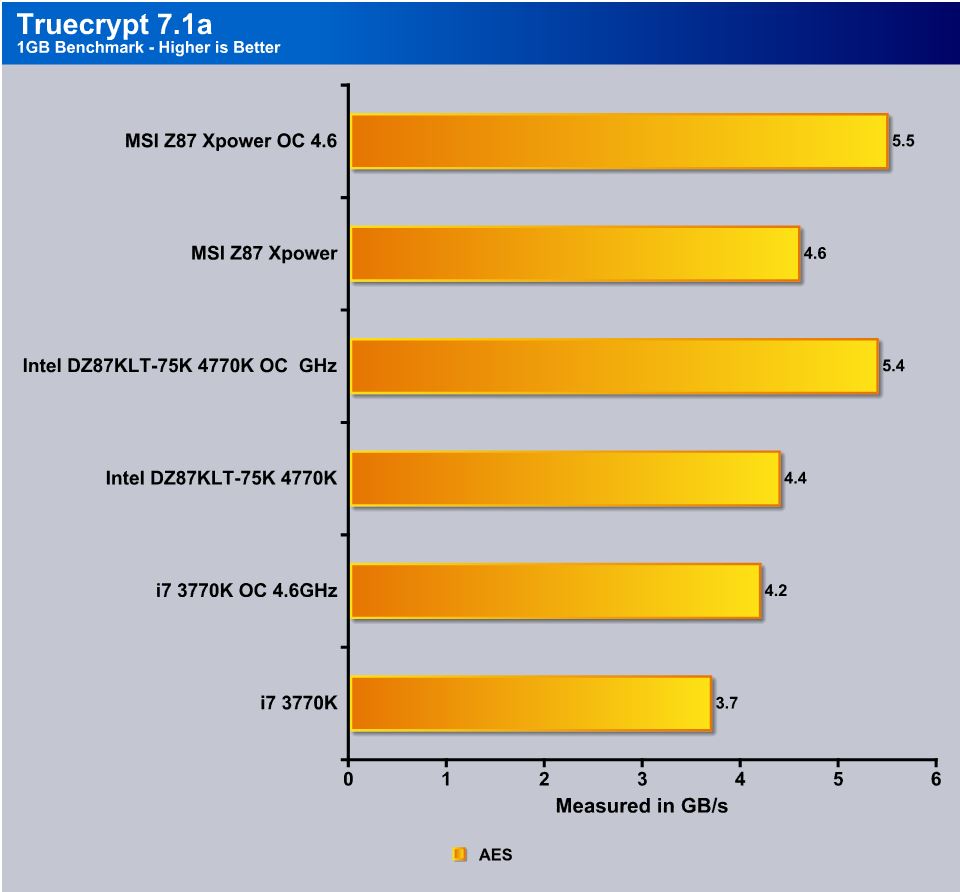
TrueCrypt is a real world application that gives a good indication of the true performance of our latest processor. Here the new Core i7 4770K puts some definite room between itself and the outgoing 3770K with over a 22% performance increase, which means in the same time you can get a lot more work done. Here with the Xpower you can see a nice little bump at stock but the lead narrows quite a bit at overclocked settings.
Unigine Heaven 2.5

Unigine Heaven is a benchmark program based on Unigine Corp’s latest engine, Unigine. The engine features DirectX 11, Hardware tessellation, DirectCompute, and Shader Model 5.0. All of these new technologies combined with the ability to run each card through the same exact test means this benchmark should be in our arsenal for a long time.
iGPU

The iGPU is not ideal for a 3D-heavy load like the Heaven benchmark. Nonetheless, to see a three FPS gain is quite huge for an integrated unit and tells us that with the right settings, the HD4600 could easily be used for gaming. This definitely lives up to what Intel is trying to accomplish, which is to make a solution that literally covers all of the bases in one shot. The Xpower sees marginal to no gain here as it is strictly riding on the iGPU which is gonna be similar across the board.
Discrete GPU
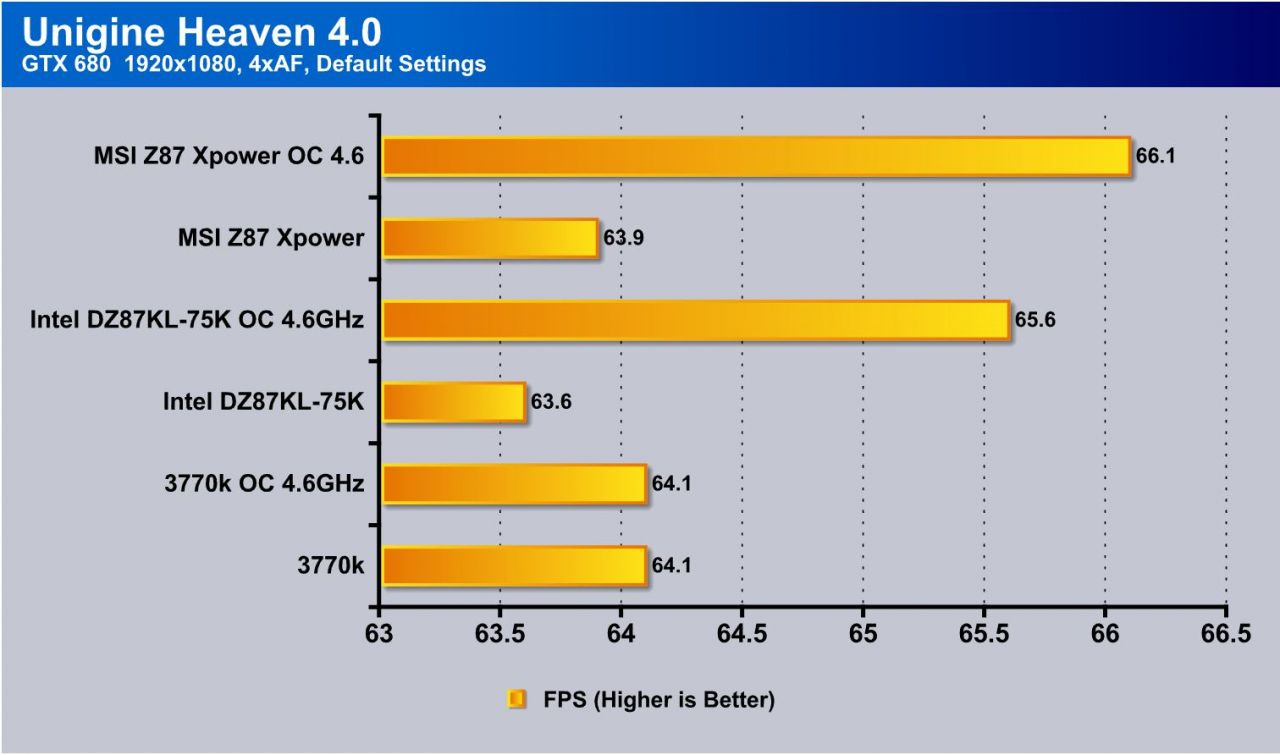
Unigine Heaven on a discrete GTX 680 gains about a single FPS, probably just due to the expanded performance with the overclock. For the most part, however, recent platforms are so efficient that there simply is no bottleneck for current gen card models. The Xpower gives a small advantage here but it is within the margin for error at less than a single FPS and is basically riding on the GPUs ability to perform.
Metro 2033
![]()
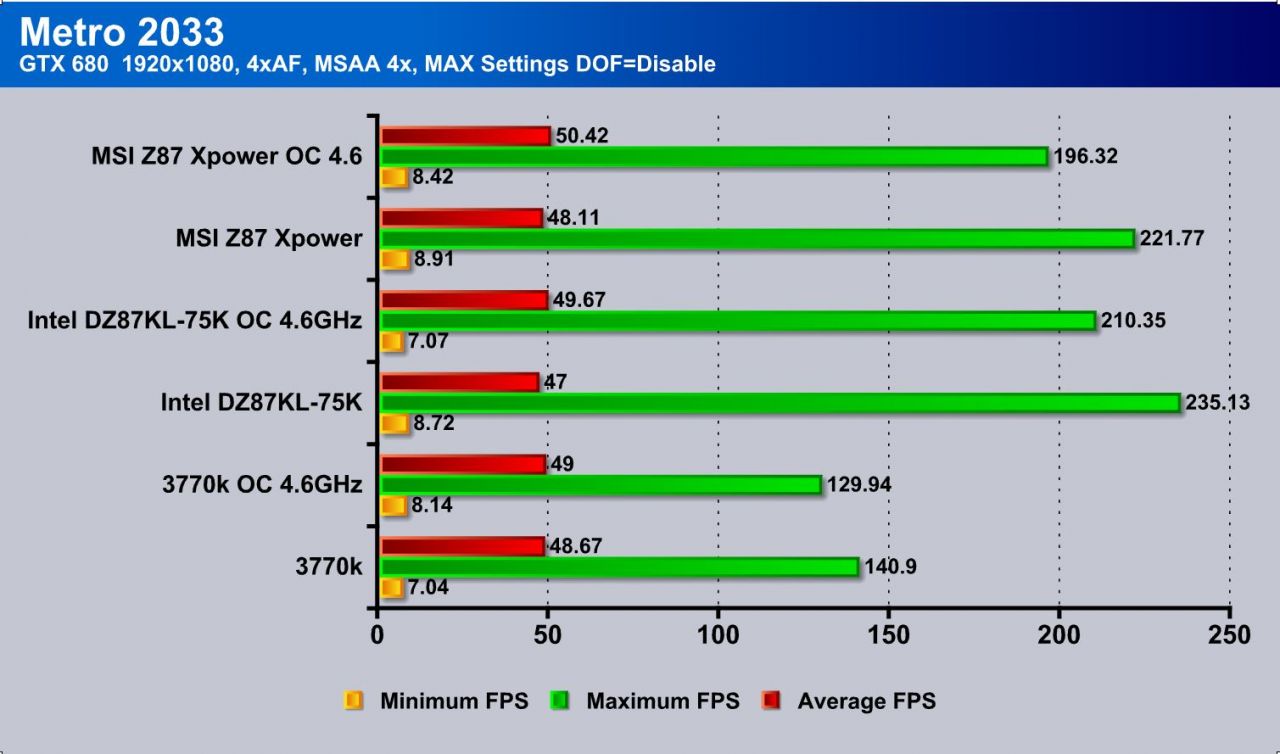
Metro 2033 this time around shows max FPS falling but overall averages higher as the Xpower appears to be able to sustain higher FPS results for longer without the peakiness sometimes you can see in a discreet setup so this means overall gameplay should be smoother here.
Batman Arkham City
iGPU

Batman Arkham City is a very pretty game with nice visuals and very cool overall effects. With good settings but no AA, we tested it on the iGPUs, and the minimum framerates are much higher. The iGPU also yields an average of over 30FPS which means the game would be rather playable, albeit with some occasional choppiness possible.
Discrete GPU
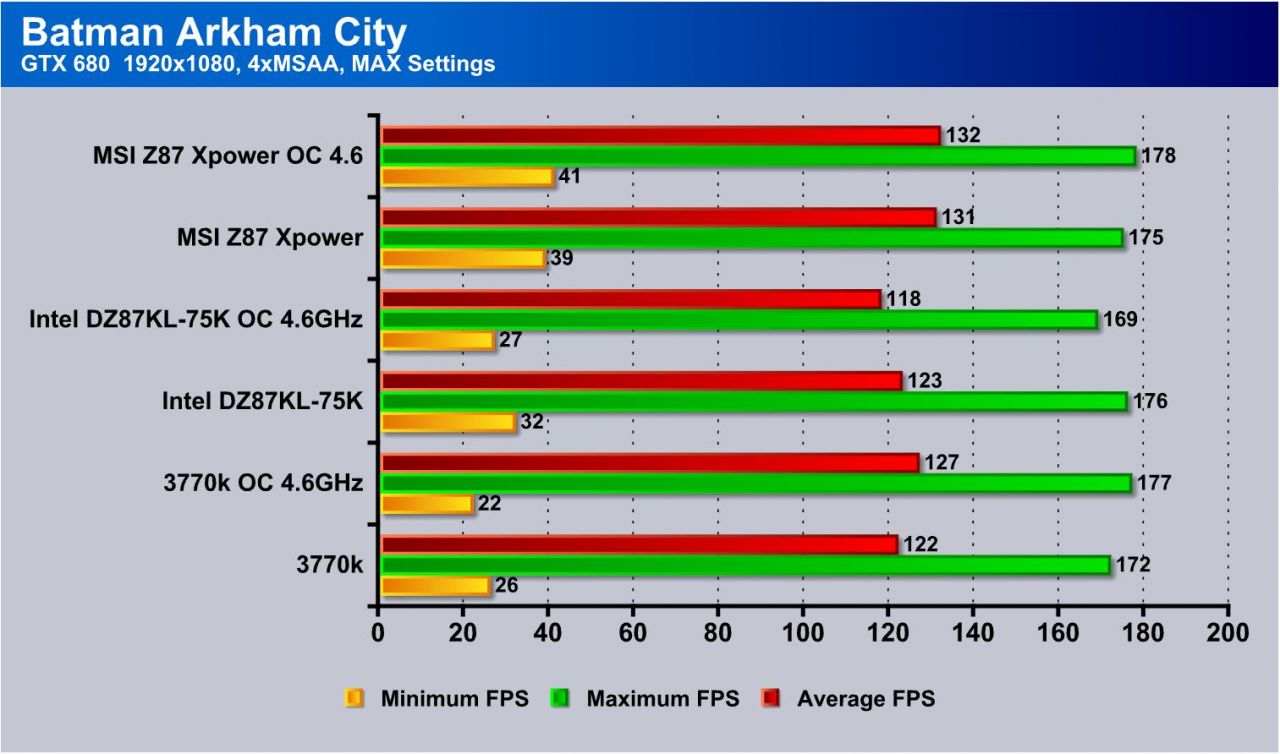
Discrete GPU results for the Xpower are very nice as the averages once again show a gain and yield what woudl be a much stronger result with better overall performance.
Sniper Elite V2
iGPU
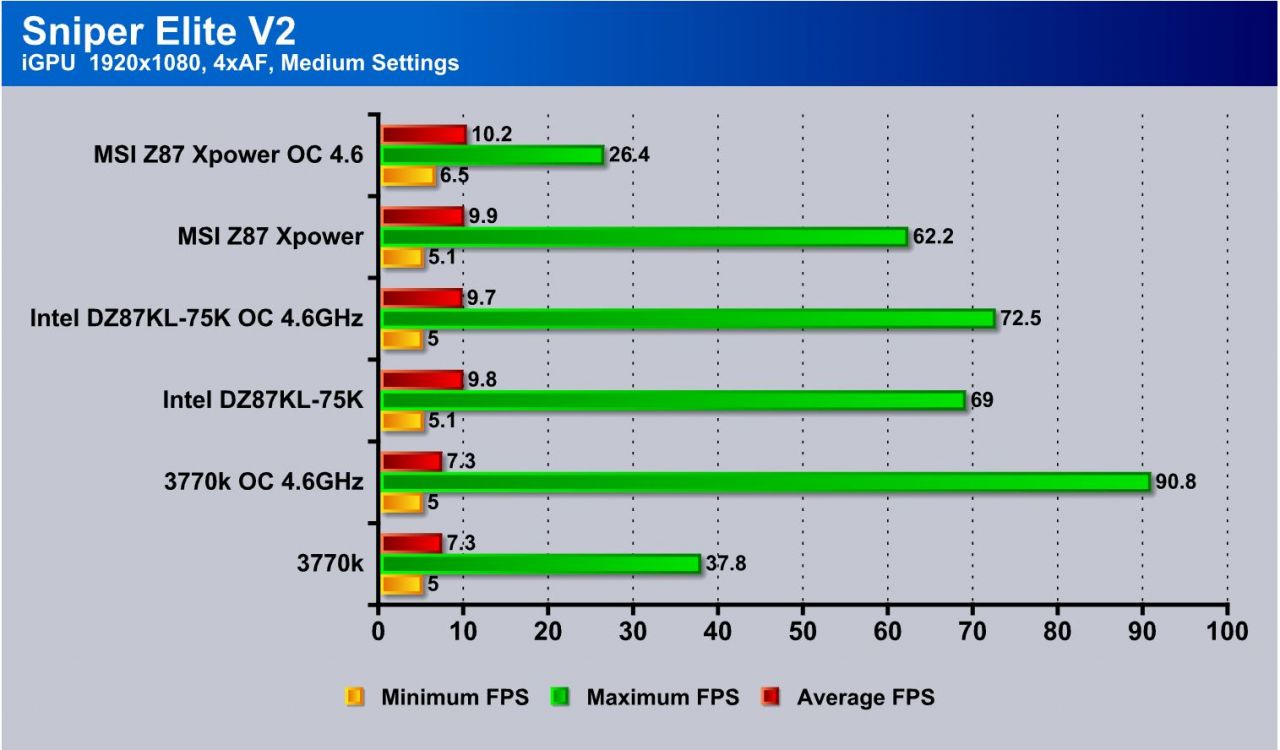
The HD4600 is impressive but we were interested to see taht in the overcklocked testing while the average was 0.1FPS higher the peak or max framerate was much more subdued. Seeing this result almost makes us feel like you are opening up the bus by overclocking which means you dont get the sudden spikes you normally may see where you get an average of 9FPS but 60FPS max.
Discrete GPU
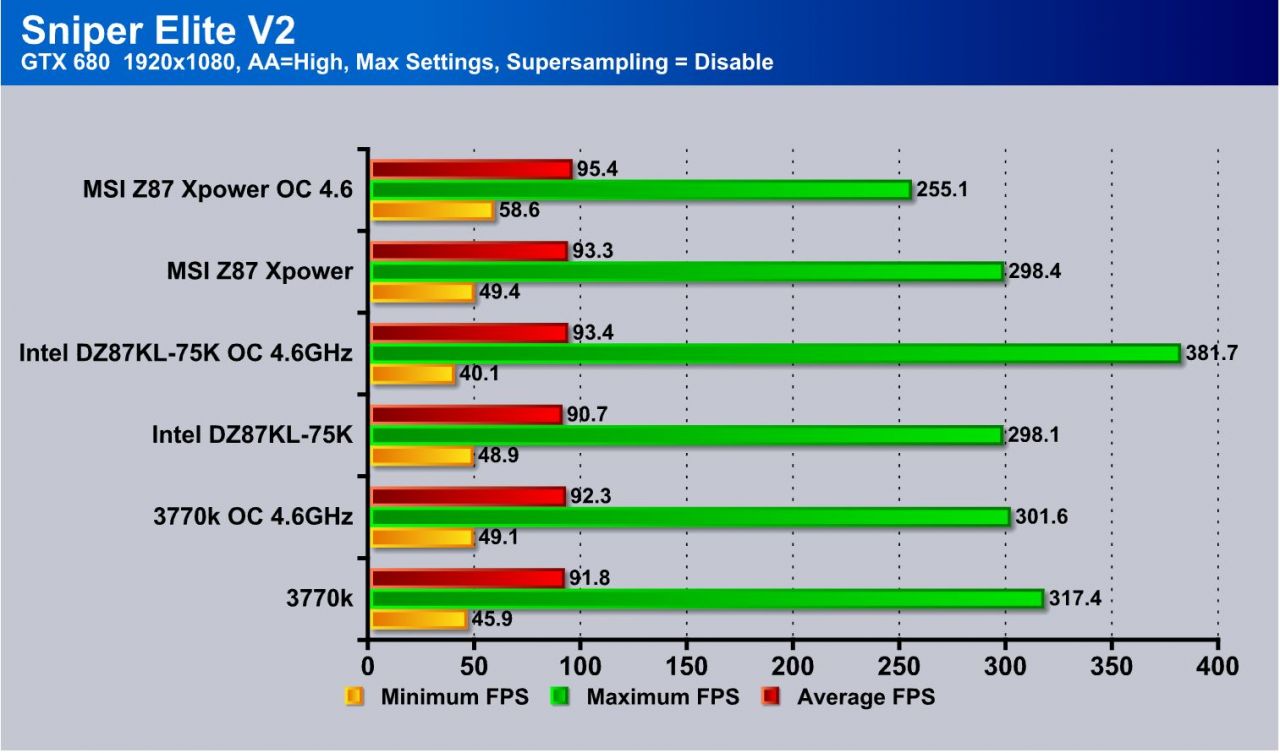
Once again we see a drop in max FPS but a gain in average which means that consistently the Xpower will have smoother results should you have a weaker discreet card since the 680 manages over 90FPS which means no choppiness is within sight anyways.
Our Final Thoughts
With this board, MSI intended to put out a board which could compete with the top dogs on the market, and the performance more than bears this out. The ability to run 4 way is very good and needed on such a board to ensure it can compete on benchmarking for every level. The ability to overclock on a hardware level directly from the onboard buttons is awesome and can help adjust for stability mid bench which is something that can always help. The Discharge button is an amazing feature and something I think holds very good promise for enthusiasts overclockers. The individual SLI ribbon cables is an awesome idea as running 3 or 4 way with a solid bridge can be trying as sometimes cards simply do not line up perfectly so having the flexible bridges give syou the ability to adjust cards according to spacing needs or howeevr you may need to adjust them you have a little room to work here.
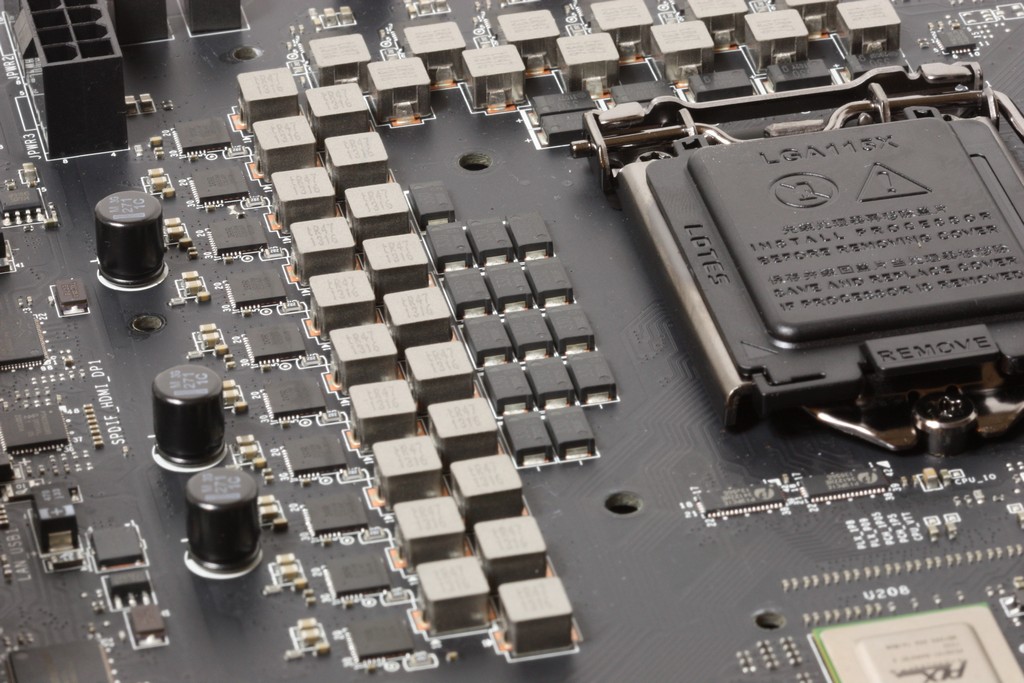
The enthusiasts socket layout means no component issues to deal with when insulating for extreme sessions as all of the components lay flat to the board. The huge VRM is both bad and good as it can easily supply massive power when necessary. However, we do question the need for such a huge VRM as we know that these chips are pulling less and less so such a large VRM may very well be adding cost when less may be able to do the same job. It has a “Go big or go home” feel to it, which sounds cool, but if it adds unnecessary cost, it may not be worth it.
Not everything is great and there are a few nits we must pick with this board. First of all–price: we are looking at a board that is easily 20-40 dollars more than equally equipped and some even higher equipped models. On the other hand, it does appear to perform better overall thus far. We also had issues with the XL-ATX form factor. This is inherently limiting as anyone looking to fit this in a chassis now has to be conscious of the large size to ensure that their chassis supports the board as it is simply huge.
The native PCIe lanes are only applied to a single slot so if benching a 2 Way card setup you have to run through the PLX Bridge which can induce some latency and while this is not a huge issue, when talking about benchmarking, you can see that one of the competitors have this setup. You can run dual cards with native PCIe in the Maximus VI Extreme model which means if put head to head you will get a little better PCIe performance from the two way on native lanes than with them running through the PLX.
The board also has a lack of WiFi AC support, which may seem like nit picking, but this is a top end board so we expected the new standard to be adopted here.
Overall this board feels a lot like driving a Ferrari to buy the groceries in terms of benching it on air or water. It will get the job done but it just feels a bit out of its element as this board was designed to be beaten on at subzero temps pushing for the max frequency possible.
We think in order to see the true potential of this board you really have to put its feet to the fire and get it cold, as Haswell runs hot enough that subzero is the only way to see its true potential. We really hope that we can get all of the extreme board together and we can put them all under the cold treatment to see just what the real performance is like by using them the way they were meant to be used.
| Pros | Cons |
|
4 Way SLI Support PCIe Disable Switches Backlit logos add cool look Killer E2205 WiFi/WiDi capable module and antennae included High end Audio Boost Solution V-Check Points Strong VRM with Military Class Components Sound Blaster Cinema Compatibility Gaming Device Ports New clean UEFI with some cool options Black caps look sweet mSATA for onboard SSD |
XL-ATX limits chassis compatibility No native PCIe lanes for 2 Way GPU Configuration No WiFi AC Support Cost is slightly higher than competitors |
Review Overview
Performance - 10
Value - 7.5
Quality - 9.5
Features - 9
Innovation - 9
9
The MSI Z87 Xpower has performance potential to top the charts, albeit at a price premium. For its excellent performance, it earns the Bjorn3D Golden Bear Award.