The Maximus IV Extreme lives up to its name, and is the premier ROG board for the P67 chipset. Find out how this beast performs in our testing.
Introduction – asus maximus iv extreme
 Today we’re taking a look at one of the best P67 powered motherboards. The ASUS Maximus IV Extreme is a top-of-the-line P67 offering for the ASUS Republic of Gamers (ROG) line. ROG offerings are always highly features with either newly introduced technologies or at the very least just about every option that normally can be placed on a board. Besides gamers, ROG has also built a strong following with enthusiasts and overclocker crowd. ASUS has tailored a lot of the options on the Maximus IV Extreme for better overclocking. Some of the included features include Bluetooth connectivity, ROG Connect for easier monitoring/control from a remote system, and a whole host of monitoring and overclocking features found right at the upper edge of the board to assist with any diagnosis or monitoring needed when pushing this board to the limit. Another feature of ROG boards is stylish design, and this board carries very elegant (yet aggressive) heatsinks to keep the appearance on par with the performance ASUS claims for this model.
In this review we will look at the features and differences that separate the Maximus IV Extreme from the rest of the pack, and whether those differences merit the $349.99 price tag.
features
Designed for the Future, the Next Revolution in Performance.
 The Republic of Gamers consists only the best of the best. We offer the best hardware engineering, the fastest performance, the most innovating ideas, and we welcome the best gamers to join in.
In the Republic of Gamers, mercy rules are only for the weak, and bragging rights means everything. We believe in making statements and we excel in competitions. If your character matches our trait, then join the elite club, make your presence felt, in the Republic of Gamers.
CPU Feature
LGA1155 socket for 2nd Generation Intel® Core™ i7/Core™ i5/Core™ i3 Processors
![]() This motherboard supports the latest Intel® Core™ i3/Core™ i5/Core™ i7 2nd generation processors in the LGA1155 package, with memory and PCI Express controllers integrated to support 2-channel (4 DIMM) DDR3 memory and 16 PCI Express 2.0 lanes. This provides great graphics performance. Intel® Core™ i3/Core™ i5/Core™ i7 2nd generation processors are among the most powerful and energy efficient CPUs in the world.
This motherboard supports the latest Intel® Core™ i3/Core™ i5/Core™ i7 2nd generation processors in the LGA1155 package, with memory and PCI Express controllers integrated to support 2-channel (4 DIMM) DDR3 memory and 16 PCI Express 2.0 lanes. This provides great graphics performance. Intel® Core™ i3/Core™ i5/Core™ i7 2nd generation processors are among the most powerful and energy efficient CPUs in the world.
Chipset Features
Intel® P67 Express Chipset
![]() The Intel® P67 Express is the latest single-chipset design to support new socket 1155 Intel® Core™ i3/Core™ i5/Core™ i7 2nd generation processors. It provides improved performance by utilizing serial point-to-point links, allowing increased bandwidth and stability. Additionally, the P67 provides 2 SATA 6Gb/s and 4 SATA 3Gb/s ports for faster data retrieval at double the bandwidth of current bus systems.
The Intel® P67 Express is the latest single-chipset design to support new socket 1155 Intel® Core™ i3/Core™ i5/Core™ i7 2nd generation processors. It provides improved performance by utilizing serial point-to-point links, allowing increased bandwidth and stability. Additionally, the P67 provides 2 SATA 6Gb/s and 4 SATA 3Gb/s ports for faster data retrieval at double the bandwidth of current bus systems.
Multi-GPU Technology
SLI/CrossFireX On-Demand
![]()
![]() Why choose when you can have both?
Why choose when you can have both?
SLI or CrossFireX? Fret no longer because with the ROG Maximus IV Extreme, you´ll be able to run both multi-GPU setups. The board features SLI/CrossFireX on Demand technology, supporting SLI or CrossFireX configuration. Whichever path you take, you can be assured of jaw-dropping graphics at a level previously unseen.
ROG Extreme OC Features
ROG CPU-Z
![]() Whole new design of CPU-Z
Whole new design of CPU-Z
ROG CPU-Z is a customized ROG version authorized by CPUID. It has the same functionality and credibility as the original version, with a unique design. Use the whole new look of ROG CPU-Z to truly report your CPU related information and your uniqueness.
BIOS Print
![]() One click, easily share your BIOS settings!
One click, easily share your BIOS settings!
ROG offers a whole new EFI BIOS feature to handle the demands of an overclocking experience. Maximus IV Extreme features ROG BIOS Print which allows users to easily share their BIOS settings to others with the press of a button. The days of using a camera to take BIOS screenshot are over.
GPU.DIMM Post
![]() Easily check the status of your graphics cards and memory in the BIOS!
Easily check the status of your graphics cards and memory in the BIOS!
Notice potential problems even before you enter the OS! Overclockers can save valuable minutes in detecting component failure under extreme conditions. With GPU.DIMM Post, quickly and easily check your graphics cards and memory DIMMs status in the BIOS, potentially keeping that record-breaking overclock!
ROG Connect
![]() Plug and Overclock – Tweak it the hardcore way!
Plug and Overclock – Tweak it the hardcore way!
Monitor the status of your desktop PC and tweak its parameters in real-time via a notebook—just like a race car engineer—with ROG Connect. ROG Connect links your main system to a notebook through a USB cable, allowing you to view real-time POST code and hardware status readouts on your notebook, as well as make on-the-fly parameter adjustments at a purely hardware level.
RC Bluetooth
![]() Smashes through all the barriers of conventional overclocking !
Smashes through all the barriers of conventional overclocking !
Still overclocking in old-fashioned way? Let RC Bluetooth bring you the whole new idea of how to do! Just simply push the button from the Back I/O on the RC Bluetooth card, overclockers can real-time monitor the desktop PC system status & tweak its parameters – such as voltages and frequency on the fly. When users want to use ordinary bluetooth functions, just simply push the button once again & enjoy all the wireless convenience brought from RC Bluetooth.
ROG iDirect
![]() Tune your PC from your iPhone or iPad now!
Tune your PC from your iPhone or iPad now!
Still overclocking your PC the old-fashioned way? Let ROG iDirect bring you a whole new tweaking experience right on your iPhone or iPad! Thanks to the Bluetooth card that comes with select ASUS ROG motherboards, you can monitor your PC and tweak parameters such as voltages and frequencies in real time wirelessly from your iPhone or iPad!
Extreme Engine Digi+
![]() Powerful combination of analog and digital design elements
Powerful combination of analog and digital design elements
Extreme Engine Digi+ equipped with high performance digital VRM design can easily achieve the ultimate performance with adjustable CPU PWM frequency. It expedites heat dissipation and achieves better electric conduction keeping critical components reliable. Now you’ll be able to push your spanking new Intel CPU to the limit, hitting benchmark scores that others only dream of. Extreme Engine Digi+ balances the need for voltage and the desire for rock solid performance to bring the ultimate user experience.
USB BIOS Flashback
![]() No worry of BIOS crash anytime!
No worry of BIOS crash anytime!
USB BIOS Flashback must be the most convenient way to flash BIOS ever! It allows overclockers to try their BIOS with the simplist way one can imagine. No need to enter the BIOS or the operating system, just plug the thumb drive into the ROG Connect port & push the ROG Connect button for 2 seconds, BIOS would be automatically flashed under standby power. It´s no doubt that USB BIOS Flashback gives overclockers the ultimate convenience!
ProbeIt
![]() Get all hands-on with hardware-based overclocking
Get all hands-on with hardware-based overclocking
ProbeIt takes the guesswork out of locating the motherboard’s measurement points, identifying them clearly in the form of 7 sets of detection points so you’ll know exactly where to get quick yet accurate readings using a multitester.
ROG Rich Bundled
3DMark® Vantage Advanced Edition
![]() The gamers´ benchmark
The gamers´ benchmark
3DMarkVantage is the new industry standard PC gaming performance benchmark from Futuremark, newly designed for Windows Vista and DirectX10. It includes two new graphics tests, two new CPU tests, several new feature tests, and support for the latest hardware. 3DMark® Vantage is based on a completely new rendering engine, developed specifically to take full advantage of DirectX10, the new graphics API from Microsoft.
Other Features
Dual Intel Gigabit LAN
 Experience the fast network connectivity!
The LAN solution from Intel has been long known to have a better throughput, lower CPU utilization as well as better stability. With the dual Intel Gigabit LAN solutions onboard, the ultimate network experience can therefore be delivered to its users like never before.
SATA 6Gb/s Support
![]() Experience the future of storage!
Experience the future of storage!
Supporting next-generation Serial ATA (SATA) storage interface, this motherboard delivers up to 6.0Gb/s data transfer rates. Additionally, get enhanced scalability, faster data retrieval, double the bandwidth of current bus systems.
USB 3.0 Support
![]() 10 (Front + Rear) true USB 3.0 support!
10 (Front + Rear) true USB 3.0 support!
Experience ultra-fast data transfers at 4.8Gbps with USB 3.0—the latest connectivity standard. Built to connect easily with next generation components and peripherals, USB 3.0 transfers data 10X faster and is also backward compatible with USB 2.0 components.
specifications
| CPU | Intel® Socket 1155 for 2nd Generation Core™ i7/Core™ i5/Core™ i3 Processors Supports Intel® 32 nm CPU Supports Intel® Turbo Boost Technology 2.0 * The Intel® Turbo Boost Technology 2.0 support depends on the CPU types. * Refer to www.asus.com for CPU support list |
| Chipset | Intel® P67(B3) |
| Memory | 4 x DIMM, Max. 32GB, DDR3 2200(O.C.)/2133(O.C.)/1866(O.C.)/1600/1333 Hz Non-ECC, Un-buffered Memory Dual Channel Memory Architecture Supports Intel® Extreme Memory Profile (XMP) * According to Intel® SPEC, the Max. 32GB memory capacity can be supported with DIMMs of 8GB (or above). ASUS will update QVL once the DIMMs are available on the market. * Refer to www.asus.com or user manual for the Memory QVL (Qualified Vendors Lists). * Due to CPU behavior, DDR3 2200/2000/1800 MHz memory module will run at DDR3 2133/1866/1600 MHz frequency as default. |
| Multi-GPU Support | Supports NVIDIA® 3-Way SLI™ Technology Supports AMD CrossFireX™ Technology |
| Expansion Slots | 4 x PCIe 2.0 x16 (x16 or dual x8 or x8, x16, x16) 1 x PCIe 2.0 x4 1 x PCIe 2.0 x1 |
| Storage | Intel® P67(B3) chipset : *1 2 x SATA 6Gb/s port(s), red 4 x SATA 3Gb/s port(s), gray Support Raid 0, 1, 5, 10 Marvell® PCIe 9182 controller : *1 2 x SATA 6Gb/s port(s), red JMicron® JMB362 controller : 2 x eSATA 3Gb/s port(s), red |
| LAN | Intel®, 2 x Gigabit LAN Controller(s) |
| Bluetooth | Bluetooth V2.1+EDR RC Bluetooth On/Off Switch |
| Audio | Realtek® ALC 889 8-Channel High Definition Audio CODEC – Supports : Jack-detection, Multi-streaming, Front Panel Jack-retasking Audio Feature : – Blu-ray audio layer Content Protection – Optical S/PDIF out port(s) at back panel |
| USB Ports | Intel® P67(B3) chipset : 9 x USB 2.0 port(s) (1 at back panel, black, 8 at mid-board) NEC® USB 3.0 controller : 2 x USB 3.0 port(s) (2 at back panel, red) NEC® USB 3.0 controller : *2 8 x USB 3.0 port(s) (6 at back panel, red, 2 at mid-board) |
| Overclocking Features | ROG Connect *3 RC Bluetooth *3 ROG iDirect *3 Extreme Engine Digi+ : – 8 -phase CPU power design – 3 -phase Memory power design – ML Caps on CPU respectively ROG Extreme OC kit : – LN2 Mode – PCIe x16 Lane Switch – Debug LED – Q Reset ProbeIt UEFI BIOS features : – ROG BIOS Print – GPU.DIMM Post – CPU Socket Monitor iROG Extreme Tweaker Loadline Calibration USB BIOS Flashback Overclocking Protection : – COP EX (Component Overheat Protection – EX) – Voltiminder LED – ASUS C.P.R.(CPU Parameter Recall) |
| Special Features | ASUS TurboV EVO : – CPU Level Up ASUS Exclusive Features : – MemOK! – Onboard Button : Power/Reset/Clr CMOS (at back IO) ASUS Quiet Thermal Solution : – ASUS Q-Fan Plus – ASUS Fan Xpert ASUS EZ DIY : – ASUS Q-Shield – ASUS O.C. Profile – ASUS CrashFree BIOS 3 – ASUS EZ Flash 2 – ASUS MyLogo 2 ASUS Q-Design : – ASUS Q-LED (CPU, DRAM, VGA, Boot Device LED) – ASUS Q-Slot – ASUS Q-DIMM – ASUS Q-Connector |
| Back I/O Ports | 1 x PS/2 keyboard/mouse combo port(s) 1 x eSATA 3Gb/s 2 x LAN (RJ45) port(s) 8 x USB 3.0 1 x USB 2.0 (white port can be switched to ROG Connect) 1 x Optical S/PDIF out 6 x Audio jack(s) 1 x Clear CMOS button(s) 1 x ROG Connect On/ Off switch(es) 1 x RC Bluetooth switch(es) |
| Internal I/O Ports | 1 x USB 3.0 connector(s) support(s) additional 2 USB 3.0 port(s) 4 x USB 2.0 connector(s) support(s) additional 8 USB 2.0 port(s) 4 x SATA 6Gb/s connector(s) 4 x SATA 3Gb/s connector(s) 1 x CPU Fan connector(s) 3 x Chassis Fan connector(s) 1 x Power Fan connector(s) 3 x Optional Fan connector(s) 1 x S/PDIF out header(s) 1 x 24-pin EATX Power connector(s) 1 x 8-pin ATX 12V Power connector(s) 1 x Front panel audio connector(s) (AAFP) 1 x System panel(s) 8 x ProbeIt Measurement Points 3 x Thermal sensor connector(s) 1 x En/Dis-able Clr CMOS header(s) 1 x RC Bluetooth header(s) 1 x LN2 Mode header(s) 1 x Q Reset switch(es) 2 x EZ Plug connector(s) (4-pin Molex power connector) 1 x Power-on button(s) 1 x Reset button(s) 1 x Go Button(s) 1 x BIOS Switch button(s) 1 x ROG light connector(s) |
| Accessories | User’s manual ROG Exclusive Feature Guide I/O Shield 2 x SATA 3Gb/s cable(s) 2 x SATA 6Gb/s cable(s) 1 x 3-Way SLI bridge(s) 1 x SLI bridge(s) 1 x CrossFire cable(s) 1 x Q-connector(s) (2 in 1) 1 x 2-port USB 2.0 module(s) 1 x ROG Connect cable(s) 1 x ProbeIt cable set(s) 1 x Thermal sensor cable pack(s) 1 x Cable ties pack(s) 1 x ROG theme label(s) 1 x 12 in 1 ROG Cable Label(s) 1 x RC Bluetooth card(s) |
| BIOS | 32 Mb Flash ROM , EFI AMI BIOS, PnP, DMI2.0, WfM2.0, SM BIOS 2.5, ACPI2.0a Multi-Language BIOS |
| Manageability | WfM 2.0,DMI 2.0,WOL by PME,WOR by PME,PXE |
| Support Disc | Drivers ASUS AI Suite II ROG CPU-Z 3DMark Vantage Kaspersky® Anti-Virus 1-year license |
| Form Factor | Extended ATX Form Factor 12 inch x 10.6 inch ( 30.5 cm x 26.9 cm ) |
| Note | *1: Due to the Windows XP/ Vista limitation, the RAID array with the total capacity over 2TB cannot be set as a boot disk. A RAID array over 2TB can only be set as a data disk only. *2: With 2 x VIA SuperSpeed USB hub controllers. *3: For using ROG Connect, RC Bluetooth, and ROG iDirect, please refer to Software Compatible List. |
Software Overview

ASUS updated their whole software bundle and put all major applications, including PC Probe, Turbo V Evo, Fan Xpert, and Update software for the BIOS, into the AI Suite II. This makes it very easy to set up everything because there is no need to run several applications at once. The one application has all the features users will ever need.
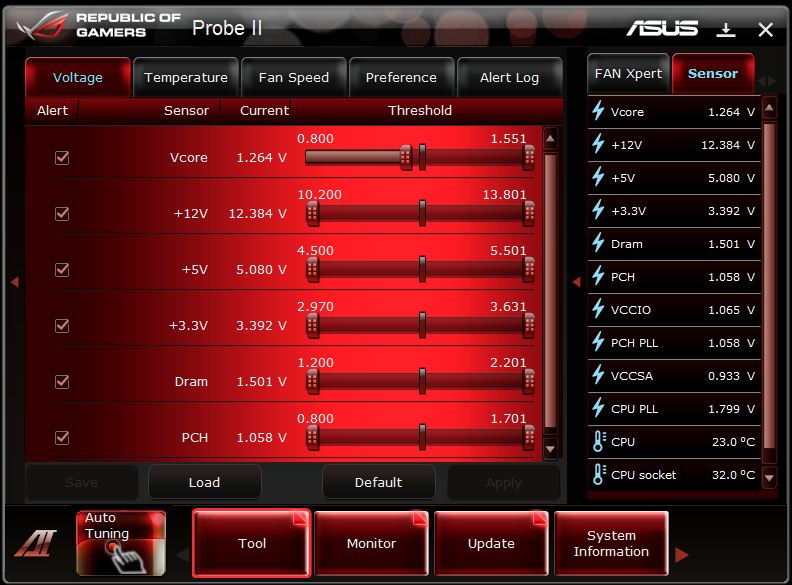
Probe II is an excellent application to monitor computer voltages, fan speeds, and temperatures. Probe II also gives users the option to monitor voltages and temperatures in the event of a sudden change in voltage or temperature values.

The temperature section allows users to set up alerts if certain parts of the system get too hot. Two optional temperatures can be set up for certain components that users wish to monitor. While users running components at stock speeds may not require temperature monitoring, this is a great feature for overclockers that want to make sure their components run cool enough even during the hot days. Because high temperatures could render the PC unstable, Probe II could warn users when temperatures get too high.

Probe II also includes an alerts log where all the alerts and updates are reported. This feature helps users understand problems that might have occurred while they were away.
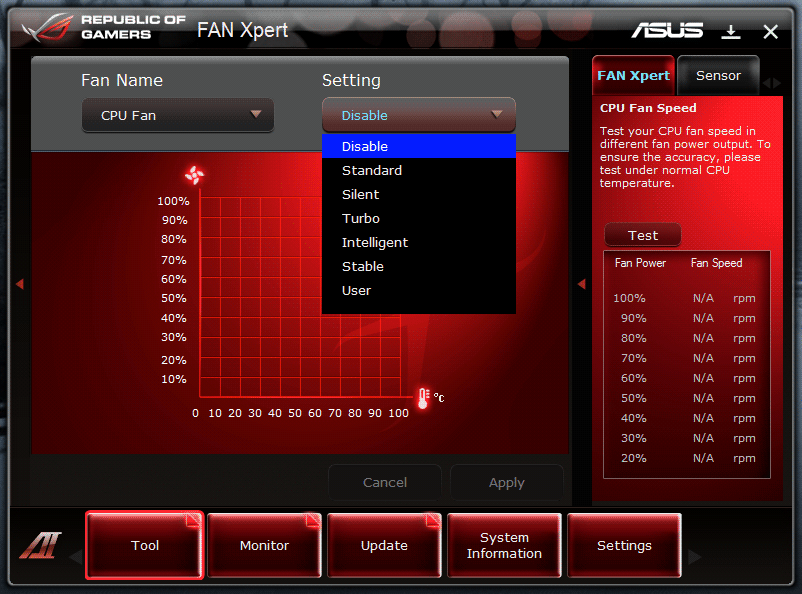
Fan Xpert helps users control the fans in their system. Since all the fan headers on the ASUS Maximus IV Extreme are PWM 4-pin headers, the RPM of each fan can be easily read and controlled by the BIOS and Fan Xpert. Think of it as a fan controller built into the motherboard that can be programmed to change the speed of the fans under different conditions. The drop down menu in the picture shows 6 different settings.
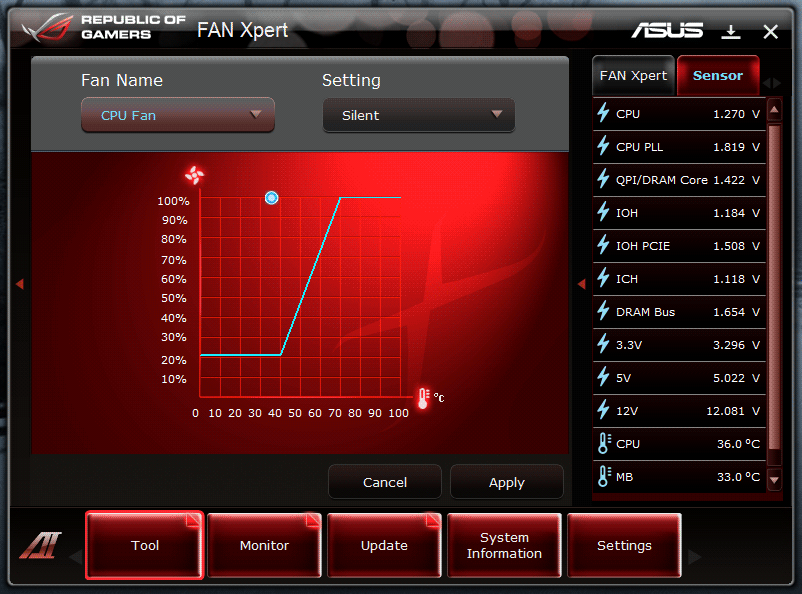
This is the Silent Preset, which is automatically set to run the fans at 20% till the temperatures on the CPU rise to 40C. As the temperature rises from 40C to 70C, the fan percentage rises at a constant slope of about 27% per 10 degrees Celsius. The fan speed can easily be programmable once the setting is changed to the User preset.
The benefit of combining all the applications into one is that in the event there is an incorrect setting in Fan Xpert and the temperatures on the hardware rise too much, users can quickly change the settings and see the temperatures change real-time on the side.
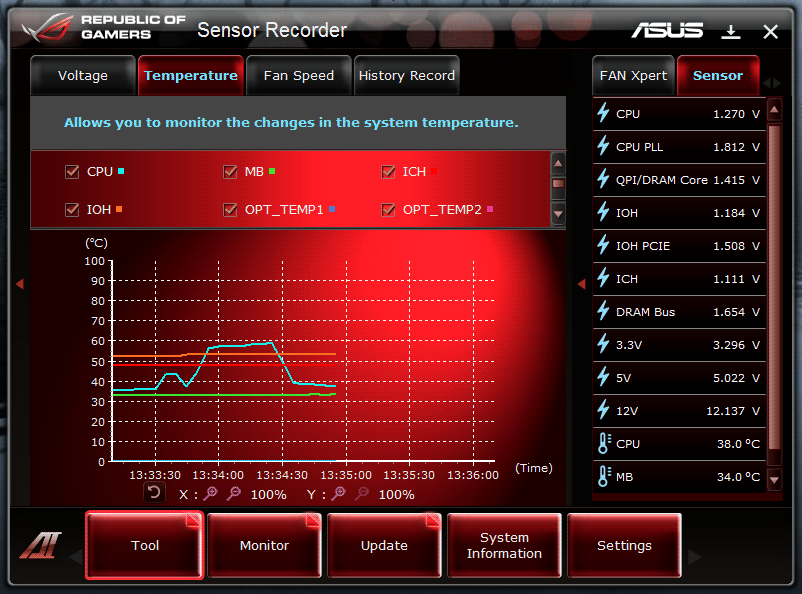
The beauty of Sensor Recorder is that users can record voltage, temperature, and fan speed information real-time and let the application graph everything. This can help in situations when users are benchmarking their system, or playing a video game, but would also like to know if the voltages, temperatures, and fan speeds are within acceptable ranges.
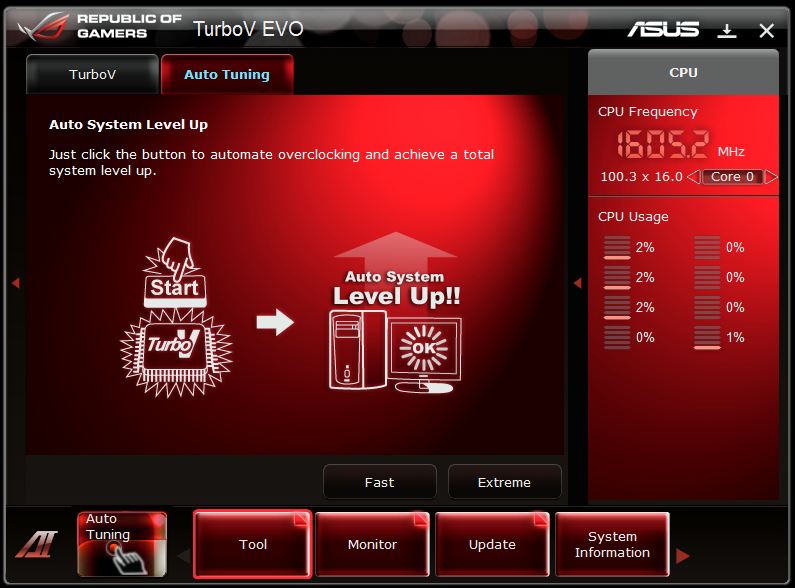
The TurboV EVO software allows the user to manually or automatically overclock their PC within Windows using three separate configurations: Manual, Easy Mode and Auto Tuning. Before we go into these configurations, we would like to mention that TurboV EVO is a true hardware
In manual mode the software allows users to set the BLCK frequency, and change all voltages including the PLL, CHA DATA, CHB DATA, PCH, CHA CTRL and CHB CTRL voltages.
One thing to note is that when pressing the “Auto Tuning” button it takes us to the CPU Level up which will automatically overclock our system to a level we specify.
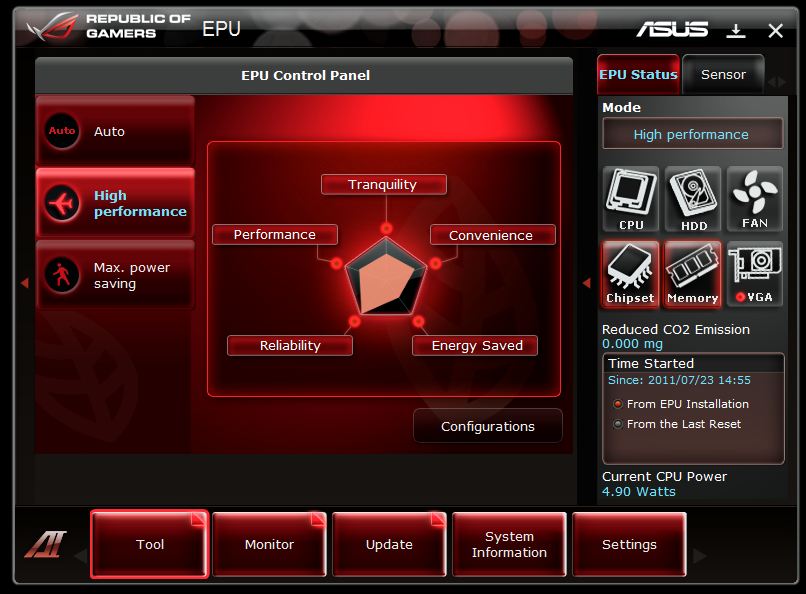
The EPU allows for tuning to best suit users’ needs, along with a graph showing how the current settings correlate to convenience, energy savings, reliability and performance. This allows for the user to better tune their system to meet their specific needs.
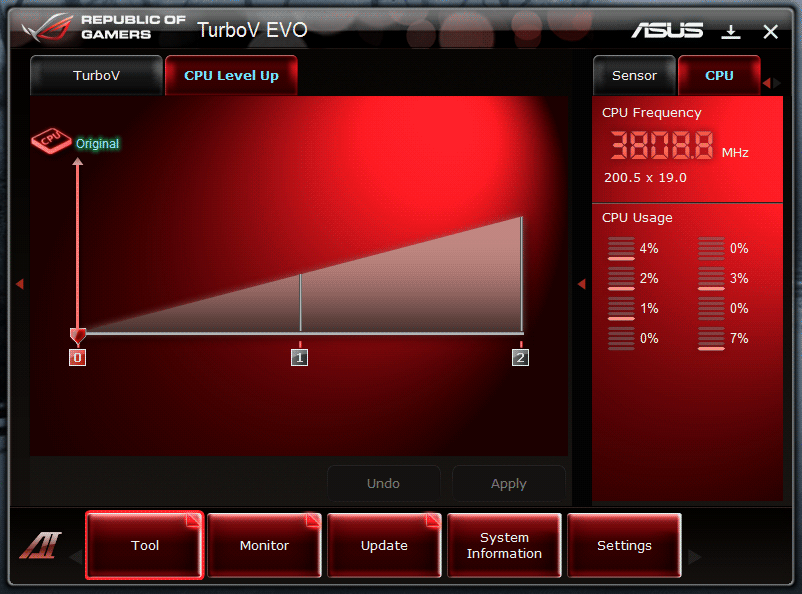
CPU Level Up helps users overclock their systems in an extremely easy way. There are two presets already included, but the CPU used determines how far users can overclock. For the Intel Core i7-2600K, we have options for 4.2GHz and 4.6 GHz.

Here we see the Digi+ VRM settings, which allows users to change VRM settings while in the OS. It allows users access to settings as advanced as load-line calibration. This sort of adjustability is usually reserved for the BIOS only, but the ASUS software offers this advanced accessibility within the OS.


The ASUS Update allows the user to quickly download and flash the latest BIOS to the BIOS chip. Since the ASUS Maximus IV Extreme comes with two separate BIOS chips, the BIOS chip being used at the time will be flashed. The other BIOS chip will stay intact with the old BIOS, and can be used at later times if there are any BIOS failures. When doing the update procedures, users can also add their own booting image. By default the ASUS Republic of Gamers animated boot screen is played every single time the system turns on. If users wish to change that, they can easily do so through the Update section while updating the BIOS. They do not have to update your BIOS to change the boot image.


Click Image For a Larger One
The system information panel shows users the most recent system specifications and settings. It’s very similar to CPU-Z.
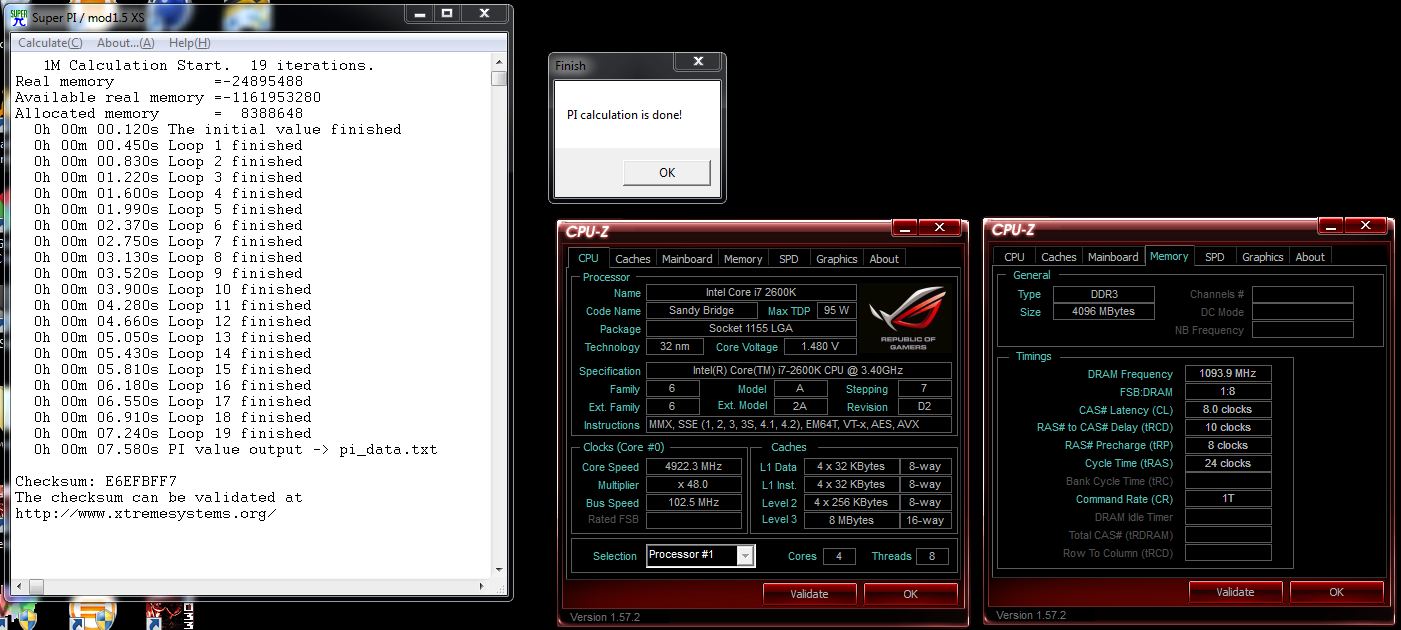
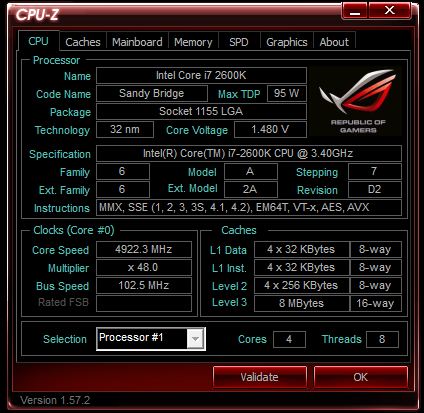
Speaking of CPU-Z, ASUS even offers a custom ROG version of CPU-Z with the AI Suite II software. Here we can see the amazing capability of the Sandy Bridge architecture, as we are running 4922MHz CPU and 2186 MHz memory at CAS 8, and the memory controller is not even cold.


Click Image For a Larger One
Finally, the Settings panel allows users to customize the AI Suite II control panel. Users can change colors, contrast, brightness, saturation, and more. It also lets users enable and disable several applications in AI Suite II.
ROG Connect
ASUS includes the ROG Connect utility with all their ROG boards. This allows connection of a remote computer via USB (with an included USB cable), which allows not only remote monitoring, but remote control of ROG boards from the separate connected system.
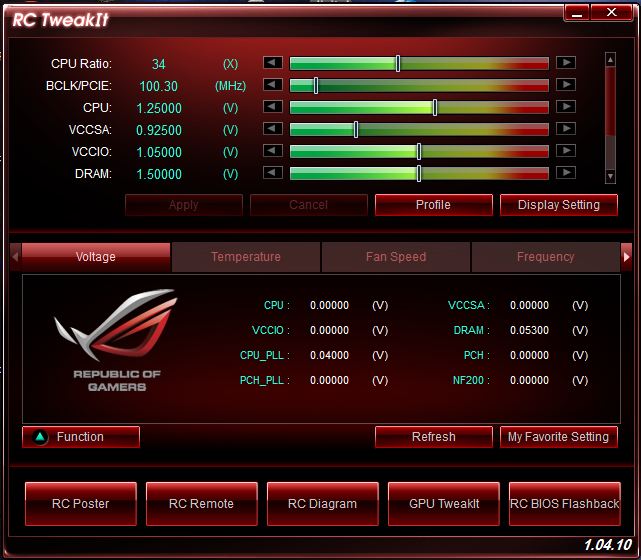
Here we have the main screen. This is RC TweakIt, which allows adjustment of all of the main voltages along with monitoring of voltages, temperatures, frequencies, and fan speeds on the remote system. This is our home screen and all menus we see from here will be accessed via this main screen to start.
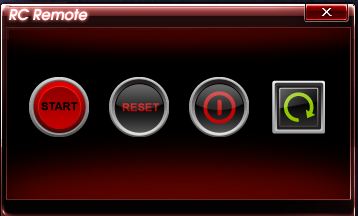
Here we have the RC Remote which allows a few key functions such as:
- Power on
- System reset
- Power Off
- Clear CMOS

This kind of message will be displayed to ensure no unintended operations or shutdowns occur because of an accidental click.
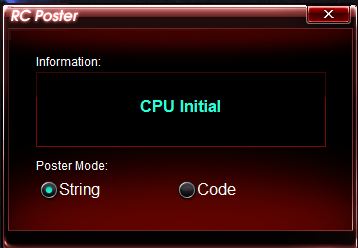
During POST, with a system connected, we see this display which tells us which point in the POST process we are at presently. This will help greatly when overclocking, in the event we suddenly run into a POST issue.

Here we have the RC diagram tool which allows remote monitoring of many sensors for fan speed, voltage/amperage, or temps to ensure our system is running well. We were very interested in the amperage of the CPU, which gives us a very good indication of the low power cycles were able to achieve during idle or even light web surfing activity to .
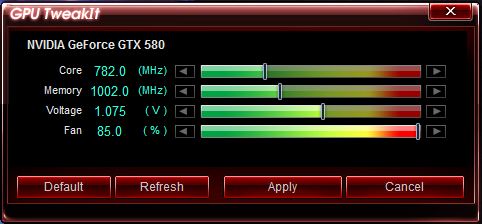
Here we see the GPU TweakIt option, which allows remote control of our ASUS GTX 580 Matrix Platinum. This program allows frequency, voltage, and fan speed changes. This could be helpful while benchmarking
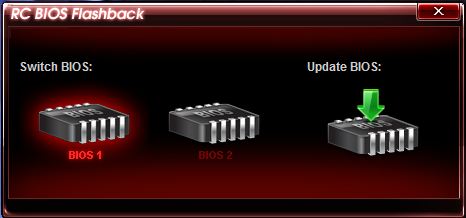
Lastly, we have the RC BIOS Flashback utility. This is very interesting, as we can initiate BIOS switching along with flashing of each BIOS from the connected system.
Overview of the maximus IV extreme


The packaging is very well made, with a flip open front. Once flipped over, we can see many of the most important specs and details listed on the rear side of the packaging. This has become pretty standard fare for spec listings. The flip open front is something that some manufacturers have adopted, though usually it is used for the higher end products. In this case when flipping open the front flap we see more in depth specs and information such as key features like the ROG Connect, Bluetooth and BIOS Flashback along with a look through the plastic front cover directly at the Maximus IV Extreme.


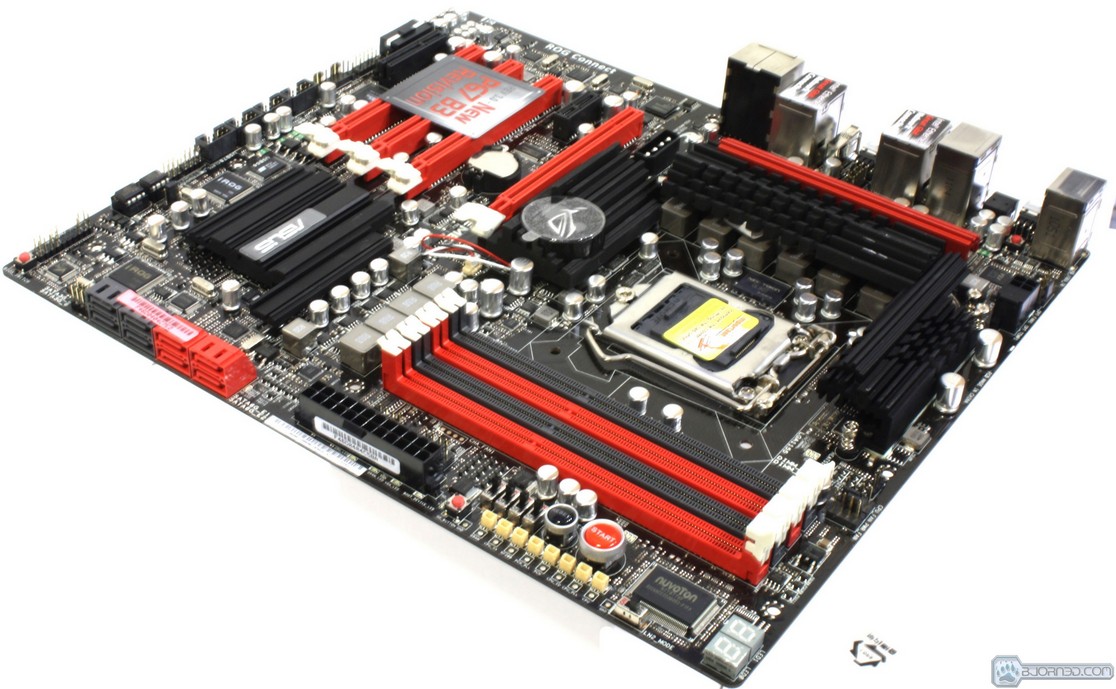
Here we can see the motherboard enclosure removed from the box. Safely encased in plastic and cardboard, we see that no matter the shipping condition, the board should arrive to the buyer in decent shape. Once removed from the packaging we see the board and initial overview of the layout. The first thing we notice is the upper right area where most of the board functions and OC work can take place (similar to the OC ZONE on the Rampage III Black Edition). Also, we notice that the heatpipe cooler design is similar to that seen on older boards, with a North Bridge and South Bridge chipset. This board still runs just the P67 PCH, but in the traditional location of the North Bridge is a NF200 chip to ensure there are enough lanes to run 3-way SLI. Also, we notice a total of 8 SATA ports and we also notice that there are 2 Molex connections to provide additional power to the board. One weird thing we noticed is that the USB 3.0 header is placed up in between the Vreg cooling and the I/O, which means wires would have to be stretched across the board to be connected. This does not seem ideal, and so many manufacturers are placing these ports at the board’s edge, greatly helping with cable management.


- 8x USB 3.0 ports
- Clear CMOS switch
- Optical SPDIF port
- 2x eSATA
- 2x Intel Gigabit ethernet ports
- Bluetooth header
- ROG Connect Button
- ROG Connect USB port
- Realtek 8 Channel HD audio


Click Image For a Larger One
- IO Shield
- SATA cables
- Bluetooth adapter
- CrossFire Bridge
- 2 Way SLI Bridge
- 3 Way SLI Bridge
- Users Manual
- USB bracket
- 3 optional temperature probes
- USB cable for ROG connect
- Easy connect front panel connectors
- ProbeIt Volt meter quick connections
A Closer Look at the maximus IV extreme


The Maximus IV Extreme has all kinds of toys to help with overclocking and error diagnosis. First, the upper right portion has the DIMM slots and the Power, Reset, and Go buttons. The Go button allows users to switch between overclocking profiles. Here, we have the PCI-E disable switches which can disable individual PCI-E slots, helping to diagnose a bad card in an SLI/CrossFireX setup. Continuing the usability area, we have the ProbeIt section which uses included adapters to convert the small white dots we see into voltage metering points on the board. This will be a huge advantage to the extreme benchmarking crowd as it eliminates the need to solder a Molex connector to key points just to create readable points for a probe. Another welcome addition to the diagnosis section are the error LEDs. These LEDs will display a two-digit IRQ code. In the event the system fails to boot properly, users can just refer to the manual and look up the code displayed to find out what the problem is. Lastly, we have the multi step boot LED’s next to the 24-Pin main ATX power connector which light up in succession to signify where the board is in the POST process. In the event of a component failure, the corresponding LED will light up, signifying what is causing POST errors.
Next we can see the CPU VRM section, which utilizes well recognized Proadlizer capacitors to help feed power to the CPU. As we move away from the VRM toward the I/O, we see an overhead view of the I/O panel connectors, including the dual Intel Gigabit LAN connections, and also a 12-pin connection between the two Ethernet ports. This connector is used to add a Bluetooth adapter to the board. We have before and after pictures of the installation above. Additionally, the red connector behind the audio ports is the USB 3.0 header. Native USB 3.0 support is good to see on this board, though the header is in a very inconvenient and hard to reach location.


Click Image For a Larger One
Here we get a clear look at some of the IC’s that control the functions of the I/O. From left to right we have the Realtek ALC 889 controlling the 8 channel HD audio, a JMicron JMB362 controlling the 2x eSATA 3Gb/s, and the Intel Network IC controlling the LAN ports. Next we see the lower left edge of the board which houses one of the two Molex connections that supply the board with extra power to ensure that no matter how hard we push the system, power should not become an issue. As we move toward the right we see the S/PDIF pin header, and below that, a front panel audio connector. In the middle of the board we can see the other onboard Molex power connection.
Above the 4-pin PWM fan headers we find a PLX chip which we’re sure is used to bridge the PCI-E to the needed components. As we move on we see the ROG chips which are surely used for controls of the special ROG features included on the board. We see allso the USB headers and the Clear CMOS jumper. We also see the dual removable BIOS chips, which allow for independent testing of 2 totally separate BIOS systems on separate chips. At the edge of the board are the front panel connections and also the Switch BIOS button.


BIOS
Extreme Tweaker


Click Image To Enlarge
Here we see some of the settings within the Extreme Tweaker menu, including the CPU Level Up, which allows automatic overclocking of our Core i7-2600K to as high as 4.6GHz. This is a very ambitious overclock for this feature, as these chips can run as high as 4.8-5GHz, depending on the chip.
The Ai Overclock tuner allows for set up of one of 3 options (Auto, Manual, and XMP), which means we can run at auto or default settings. Manual allows for fully manual configuration of every setting, and XMP loads the Intel XMP profiles flashed onto the RAM, automatically configuring the memory to run at the specified performance settings.


Click Image To Enlarge
Next we have the the Turbo Ratio option which can be set so that the Turbo Ratio will adjust depending on the number of cores loaded, or will run at a user-defined setting no matter how many cores are loaded. Further down the list, we come across the memory frequency setting, which is basically just setting the frequency of the IMC to allow for faster memory speed and higher memory bandwidth. Lastly we have the DRAM timing control menu which allows settings of the memory timings and subtimings with a great amount of detail.


Click Image To Enlarge
Here we see the other half of the memory subtimings settings that allow for a large amount of adjustability and tweaking to improve performance. As we move on we get to the GPU/DIMM POST screen, which allows users to see the detected and running cards in the PCI-E slots, and also any DIMMs installed into the system. This allows for quick diagnosis in the case of a malfunctioning card in a multi card configuration. Then we move to the CPU performance screen which allows settings related to CPU multiplier along with power limits for the processor.


Click Image To Enlarge
The next option in the Extreme Tweaker menu is the DIGI+ VRM settings which shows multiple settings to fine tune the power circuits of the motherboard and allow better overclocking and stability. The first setting we see is the VCORE PWM mode which has 2 settings (T.Probe or Extreme). T.Probe sets the PWM for an automatic control which automatically balances load between all of the MOSFETs so that no one transistor will be overloaded. This balances thermal output from the MOSFETs, leading to longer component lifespan.
The third picture above shows the main screen, which displays the motherboard and general CPU information, along with time and date settings, and passwords.


Click Image To Enlarge
Here we see the advanced screen which allows for a lot of the advanced board options, such as integrated devices and other options to help tweak the board the way we want it. The first option is a CPU configuration which shows a lot of detailed CPU information and has many options, including advanced CPU power saving, along with other feature controls including hyperthreading and active core count controls.


Click Image To Enlarge
Here we see the SATA settings configuration. SATA ports can be set for legacy IDE mode, AHCI or RAID mode, but IDE is default. Another nice feature of this page is it shows the drive name/ID connected to each port. The next section has to do with USB support. This is where we can set the USB port configuration, including legacy mode, along with detection of presently installed USB devices. Next we move to the onboard devices configuration which allows disabling of onboard devices, which in some cases can lower the system load resulting in more stable overclocks.


Click Image To Enlarge
Here we have the APM (Advanced Power Management) settings, which deal with stand by, suspend, and other power saving settings. Now we move to the iROG setting, which allows monitoring of iROG information and activity time. Lastly, we have the ROG Connect setting, which allows enabling or disabling of the ROG connect service, along with whether ROG Connect should display a POST string or a POST code.


Click Image To Enlarge
Here we see the LED control which allows enabling or disabling of LED’s fitted to the board. Now we move to the monitor tab which holds all of the sub-menus to monitor voltage and temperatures. First up we see the voltage monitoring page which shows all of the voltages in real time. Note that the NF200 voltage is at 0.000V–since we have a single card installed, the NF200 chip is not powered. This should help lower power consumption as extra power will not be used unnecessarily to power the unused chip, and the heat load will also be significantly reduced.


Click Image To Enlarge
Here we have the Temperature Monitoring menu. This is especially important as temperature monitoring is very critical to ensure component life and stability. Next up is the fan speed monitoring, which allows active monitoring of fans or any other PWM device such as a liquid cooling pump. This will help warn us before an overheat if a component was to fail and no longer provide an RPM signal. Then we have the fan speed controls so that we can actively tweak and configure fan outputs to match our need for quiet or high performance.


Click Image To Enlarge
The Boot Settings tab holds many options including boot order, along with settings that affect the boot-up experience for the motherboard. The last tab we have the tools. This has many tools, from the profile options to the BIOS flashing tool labeled “ASUS EZ FLASH 2”, which allows simple BIOS flashing from within the BIOS. Here we can see the EZ Flash 2 screen as it looks at our thumb drive. Even though there is no BIOS image saved on the drive, we can see where we have saved bench images, which means we can navigate folders to find a BIOS image if needed. This flashing method is much nicer than others which require a boot disk or a Windows flash utility (which is often prone to instability) to flash the BIOS.


Click Image To Enlarge
Next we have the ASUS SPD information tool which allows us to review the SPD profile for any installed DIMMs. Following that, the OC Profile option gives us full control for up to 8 profiles, so that there should be plenty of space to save our known overclock settings. Then we have the Go Button Profile which allows us to configure a specific preset profile that can be preset to enable at the press of the GO button on the board.


Click Image To Enlarge
Here is one of the final options–the BIOS flashback allows users to flash the BIOS over from another chip to the affected unit in the case of a bad or failed flash. Then we have the exit screen which includes the standard fare of options, along with a few new ones such as launching an EFI shell.
Overclocking

The P67 chipset does not allow for a large amount of BCLK overclocking. Therefore in order to achieve maximum performance we chose a 2600K which has an unlocked multiplier to ensure the motherboard is not a limiting factor and the limit should be the CPU itself. One thing to note is the chip we have on hand is about average and walls at 48x multiplier, and therefore overclocking represented here is not the full extent of the board’s capabilities. We will be retesting this with a 56x multiplier chip as soon as it arrives.
We started by just pushing the BCLK up some until we experienced a crash, which was at a surprising 108MHz. We then went back to stock BCLK and tried raising the multiplier just to see how well the board clocked without a lot of tweaking. We were pleasantly surprised to see 4.9GHz perfectly rock stable with minimal tweaking, and just a little bump in BCLK, all in under 10 minutes. This board can run a system at 4.5+ GHz with little to no effort.
We are quite certain that with more cooling power and a better chip, this board would do even better. In future LN2 runs, we’ll confirm whether this is true, but for our water cooled testing, we decided to stick around 4.9GHz as it was easily achievable on non-exotic cooling and with little tweaking, which means most anyone should be able to reproduce our results. One object of note when overclocking–the 1866MHz divider was definitely problematic, and just to be sure it wasn’t a memory issue, we tested with 2 different model DIMMs, which both reacted the same way. The 2133MHz and 1600MHz dividers worked fine with both sets of DIMMs, but as soon as 1866MHz was selected, the system would crash.
Important note: Overclocking can cause component failure. Please exercise caution when attempting any level of overclock on system components.
Temperatures

The temperatures were recorded with Realtemp while running Wprime 1024 right before the end of the 5th run. The results were recorded carefully. After the results were recorded, we waited for 30 minutes before taking Idle temperature measurements. The results were as follows:
| CPU Temperatures | Temperature (Idle/Load) |
| Maximus IV Extreme OC (4.9GHz) | 37C/71C |
| Maximus IV Extreme | 31C/56C |
| Chipset Temperatures | Temperature (Idle/Load) |
| Maximus IV Extreme OC (4.9GHz) | 41C/56C |
| Maximus IV Extreme | 33C/47C |
We found water cooling would be a much better solution to keep temperatures lower to avoid long term component damage. The 240mm radiator in the Swiftech Edge H20-220 kit handled the near 5GHz overclock with very acceptable temperatures under a very heavy load.
Power Consumption

The power consumption was tested while running Wprime 1024 for a few minutes at stock settings. The results were recorded carefully with a Kill-A-Watt power consumption measuring tool at the wall. After the results were recorded, we waited for yet another few minutes minutes before taking Idle power consumption measurements.
| Configuration | Power Consumption (Idle/Load) |
| Maximus IV Extreme (4.9GHz) | 163W/275W |
| Maximus IV Extreme | 120W/177W |
The power consumption is not with GPU usage. This is with CPU/system loading but nothing graphically intensive in order to provide the most accurate results by not ramping up the GPU, which will pull significantly more power.
Testing & Methodology

We’ve expanded our testing suite considerably since the P67 chipset release, and will continue to use the same methods for most of the motherboards and CPU’s we test. In the interests of thoroughness and accurate results, we run each test at least three times, and some tests more than that. We average the total of all the tests from each benchmark then report the average here.
The OS we use is Windows 7 Pro 64bit with all patches and updates applied. We also use the latest drivers available for the motherboard and any devices attached to the computer. We do not disable background tasks or tweak the OS or system in any way. We turn off drive indexing and daily defragging. We also turn off Prefetch and Superfetch. This is not an attempt to produce bigger benchmark numbers. Drive indexing and defragging can interfere with testing and produce confusing numbers. If a test were to be run while a drive was being indexed or defragged, and then the same test was later run when these processes were off, the two results would be contradictory and erroneous. As we cannot control when defragging and indexing occur precisely enough to guarantee that they won’t interfere with testing, we opt to disable the features entirely.
Prefetch tries to predict what users will load the next time they boot the machine by caching the relevant files and storing them for later use. We want to learn how the program runs without any of the files being cached, and we disable it so that each test run we do not have to clear pre-fetch to get accurate numbers. Lastly we disable Superfetch. Superfetch loads often-used programs into the memory. It is one of the reasons that Windows occupies so much memory. Vista fills the memory in an attempt to predict what users will load. Having one test run with files cached, and another test run with the files un-cached would result in inaccurate numbers. Again, since we can’t control its timings so precisely, it we turn it off. Because these four features can potentially interfere with benchmarking, and and are out of our control, we disable them. We do not disable anything else.
Test Rig
| Test Rig | |
| Case | Thermaltake Level 10 GT |
| CPU |
Intel Core i7-2600K |
| Motherboard | ASUS Maximus IV Extreme |
| Ram | 4GB Corsair GTX3 2400MHz CL 9 (9-11-9-27) |
| CPU Cooler |
Swiftech H20-220 Edge |
| Hard Drive | Western Digital Velociraptor 300GB |
| SSD |
Intel 510 series SATA III 120GB |
| Optical | ASUS BD-ROM |
| GPU |
ASUS GTX 580 Matrix Platinum |
| Case Fans |
Front (intake): 200 x 200 x 20 mm ColorShift Fan x 1 (600~800RPM, 13~15dBA) Rear (exhaust): 140 x 140 x 25 mm Turbo Fan (1000PRM, 16 dBA) Top (exhaust): 200 x 200 x 30 mm ColorShift Fan (600~800RPM, 13~15dBA) Side (intake): 200 x 200 x 30 ColorShift Fan (600~800RPM), 13~15dBA) |
| Additional Cards |
N/A |
| PSU |
Thermaltake Toughpower Grand 1200W |
| Mouse | Thermaltake esports Black gaming mouse |
| Keyboard | Thermaltake Meka G1 mechanical gaming keyboard |


Here we see the rig ready to bench. For the benchmarks we are using the ASUS GTX 580 Matrix Platinum, so graphics should be more than handled by this 3 slot monster. The card’s LED changes color under load, which is pretty cool.
Test Suite
We will use the following applications to test the performance of the Motherboard. Benchmarks
| Benchmarks |
|---|
| PCMark Vantage |
| Heaven benchmark |
| Cinebench R10 |
| Cinebench R11.5 |
| 3DMark 11 |
| 3DMark Vantage |
| Wprime |
| SuperPi |
| Crysis Warhead |
| Just Cause 2 |
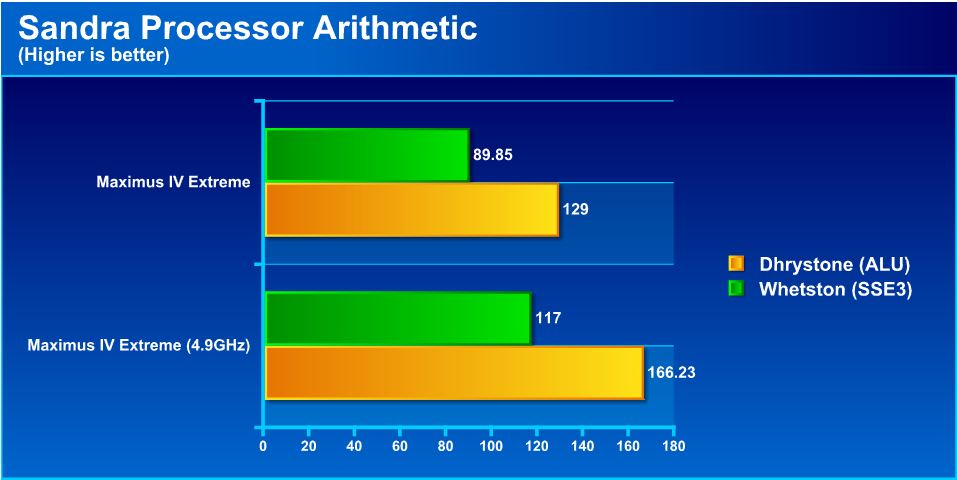
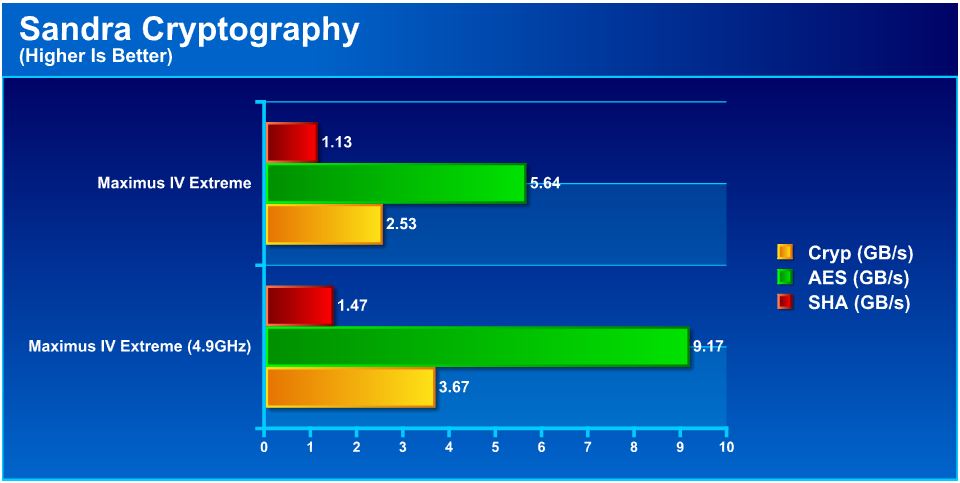
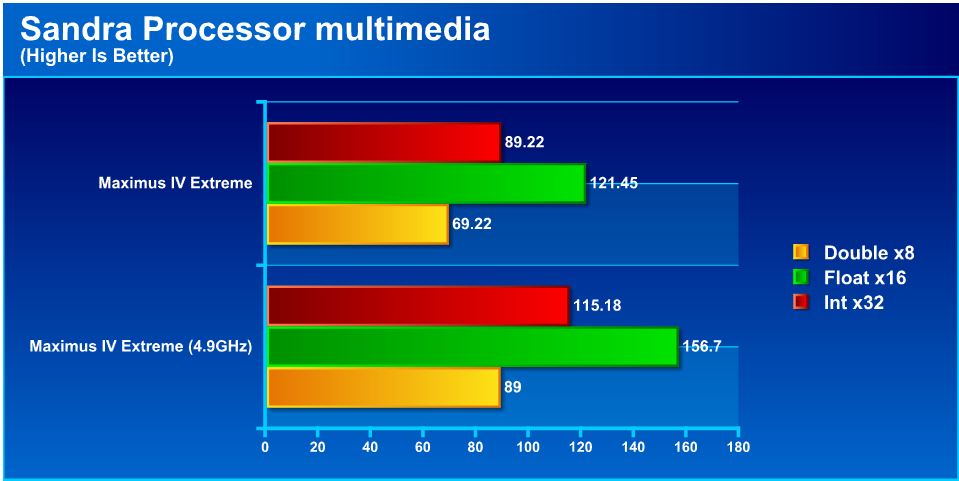
SiSoft sandra 2011

“SiSoftware Sandra (the System Analyzer, Diagnostic and Reporting Assistant) is an information & diagnostic utility. It should provide most of the information (including undocumented) you need to know about your hardware, software and other devices whether hardware or software. It works along the lines of other Windows utilities, however it tries to go beyond them and show you more of what’s really going on. Giving the user the ability to draw comparisons at both a high and low-level. You can get information about the CPU, chipset, video adapter, ports, printers, sound card, memory, network, Windows internals, AGP, PCI, PCI-X, PCIe (PCI Express), database, USB, USB2, 1394/Firewire, etc.”

Here we see that although overclocking the CPU is great for benchmarks, it can also make a huge difference for anyone running CPU-bound apps for business or productivity. With a rock stable overclock, rendering times or number-crunch times can drop dramatically, meaning faster results and better productivity.
PCMARK VANTAGE
PCMark Vantage is the latest system benchmark tool from Futuremark. The benchmark consists of tests such as application launches, file searches, web browsing, video playback, photo editing, and gaming.
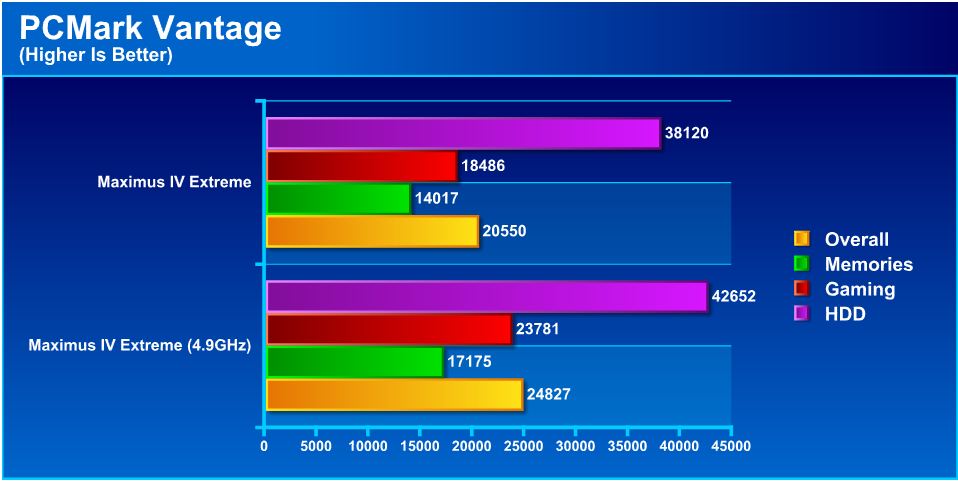
Here we see similar attributes continuing. The Maximus IV Extreme with 2600K–both at stock (3.4GHz) and at 4.9GHz–is really netting some nice increases, even exceeding the i7 980x in some cases. This is especially amazing considering that the i7 980x is three times as expensive as the 2600K, and is made for raw power.
Wprime
Wprime is a processor heavy multithreaded benchmark at which it crunches numbers of a specific data set and gives the end user an output time which can then be used as a guage to compare system performance.
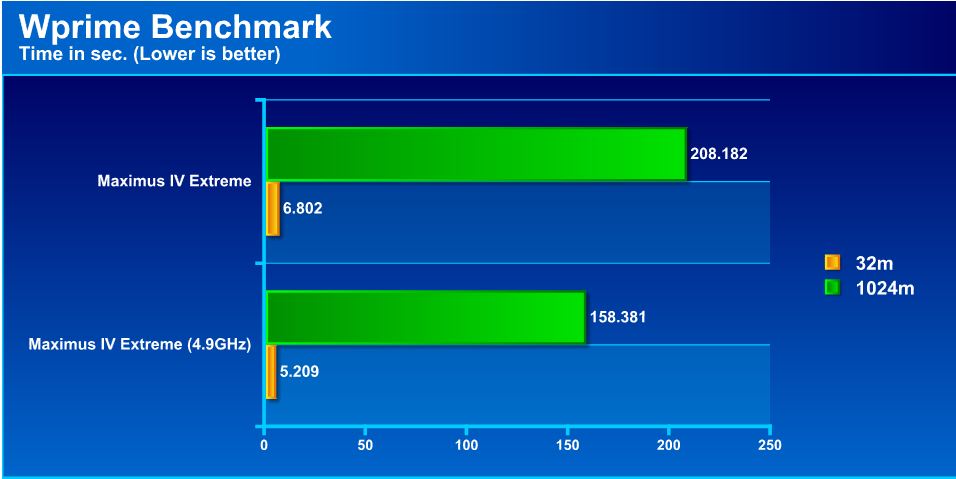
As we see once again that higher clockspeeds combined with multithreading allow for some very impressive results, cutting work time by almost 25% on the long duration test.
Superpi
SuperPi is a single threaded benchmark which measures efficiency and is heavily influenced by architectural changes as much as it is by clockspeeds.
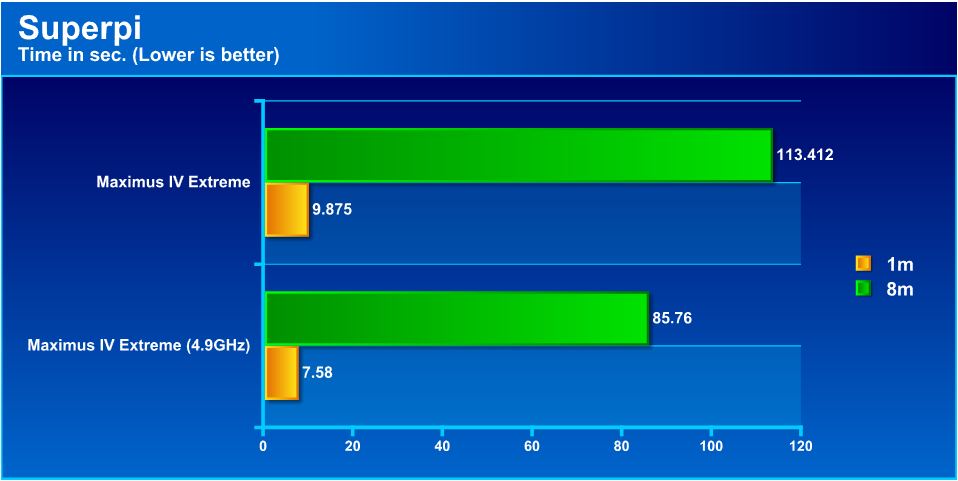
SuperPi is a much older benchmark, and some may argue its obsolescence, but with some newer processors scoring poorly in this test, it is always good to include it. This test does not factor in cores or threads, only performance, and the 2600K on the Maximus IV Extreme definitely delivers.
CINEBENCH R10 AND R11.5
“CINEBENCH is a real-world test suite that assesses your computer’s performance capabilities. MAXON CINEBENCH is based on MAXON’s award-winning animation software, CINEMA 4D, which is used extensively by studios and production houses worldwide for 3D content creation. MAXON software has been used in blockbuster movies such as Spider-Man, Star Wars, The Chronicles of Narnia and many more. MAXON CINEBENCH runs several tests on your computer to measure the performance of the main processor and the graphics card under real world circumstances. The benchmark application makes use of up to 16 CPUs or CPU cores and is available for Windows (32-bit and 64-Bit) and Macintosh (PPC and Intel-based). The resulting values among different operating systems are 100% comparable and therefore very useful with regard to purchasing decision-making. It can also be used as a marketing tool for hardware vendors or simply to compare hardware among colleagues or friends.”
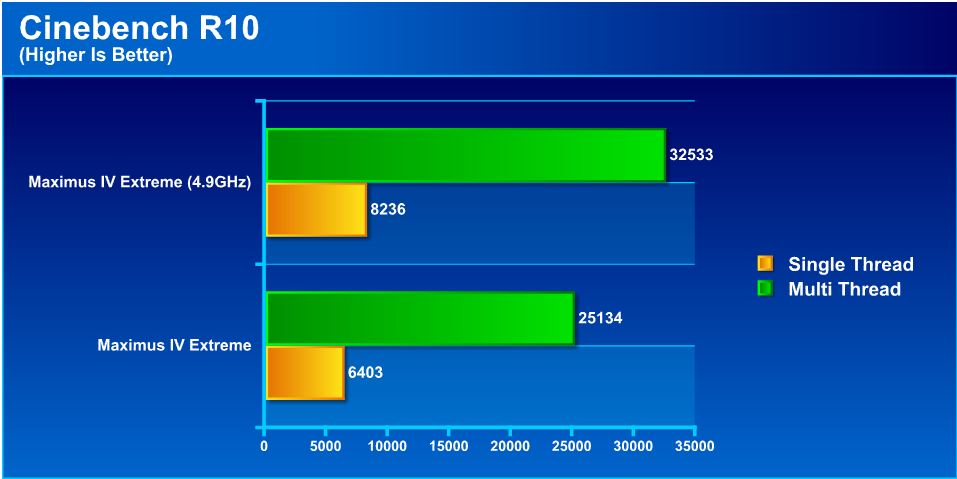
Cinebench takes rendering on our CPU and just pounds it to see how it performs. We were quite impressed as the overclock held fine over multiple passes and pumped out similar results every run showing the stability and efficiency of a proven platform at its best. Next we will look at the newer version of Cinebench and how it fares.
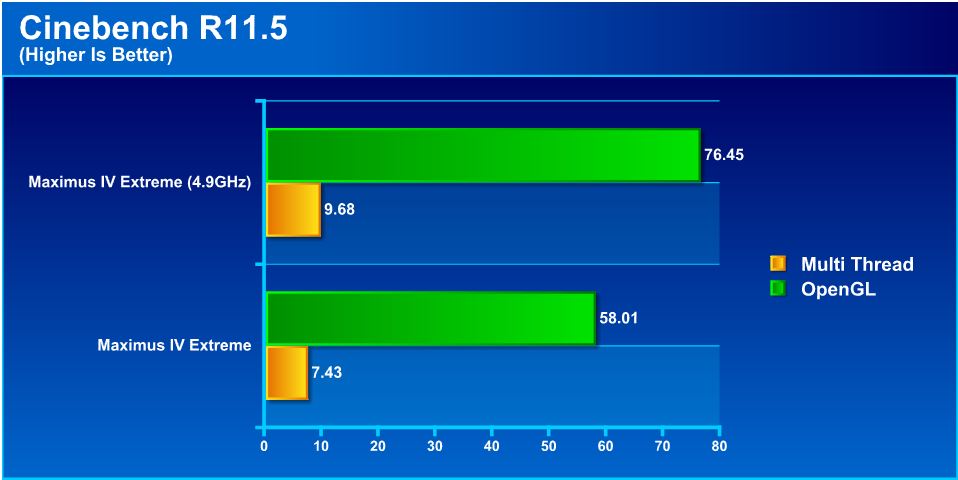
Cinebench 11.5 returned similar and impressive results as over multiple passes the system did not even flinch as we ran the test back to back again and again trying to find any instabilities or deviations it just kept going and giving quite impressive results.
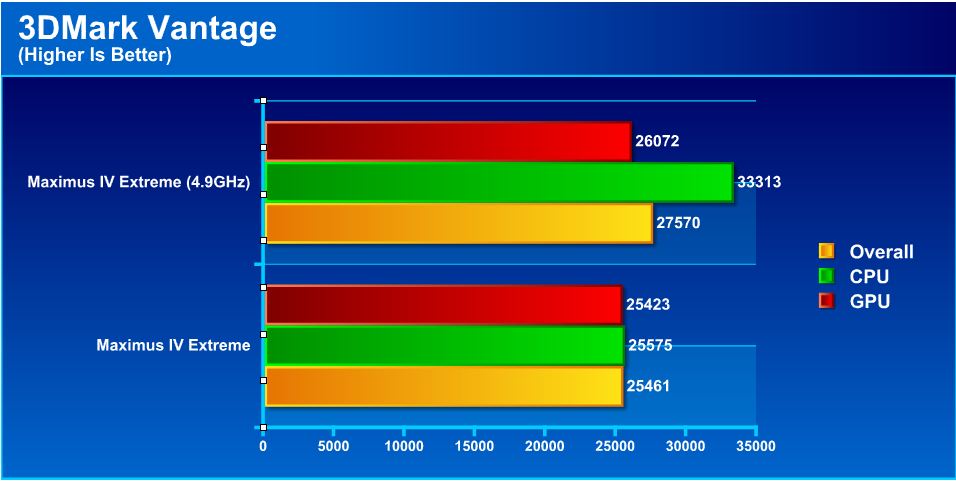
3DMARK VANTAGE

For complete information on 3DMark Vantage Please follow this Link:
www.futuremark.com/benchmarks/3dmarkvantage/features/
The newest video benchmark from the gang at Futuremark. This utility is still a synthetic benchmark, but one that more closely reflects real world gaming performance. While it is not a perfect replacement for actual game benchmarks, it has its uses. We tested our cards at the ‘Performance’ setting.
3DMARK 11
![]()
3DMark 11 is the newest in futuremark’s suite of benchmarking utilities. Its a fully capable DirectX11 benchmark which also stresses and analyzes the system performance as a whole to simulate a heavy rendering environment such as a high end game or other app the end user may run. This benchmark was run with Performance settings 5 times and all runs were averaged for the result below.

3DMark Vantage and 3DMark 11 both showed a increase in graphics performance, but the new architecture is obviously very efficient. Graphics does not appear to need any significant CPU speed increase, as graphics performance increase is marginal, meaning the graphics card is the bottleneck at higher settings.
Crysis Warhead

Crysis Warhead is the much anticipated standalone expansion to Crysis, featuring an updated CryENGINE™ 2 with better optimization. It was one of the most anticipated titles of 2008.
We ran Warhead using gamer’s setting at resolution of 1920X1080 and DirectX 10. We tested 15xQ AA setting.
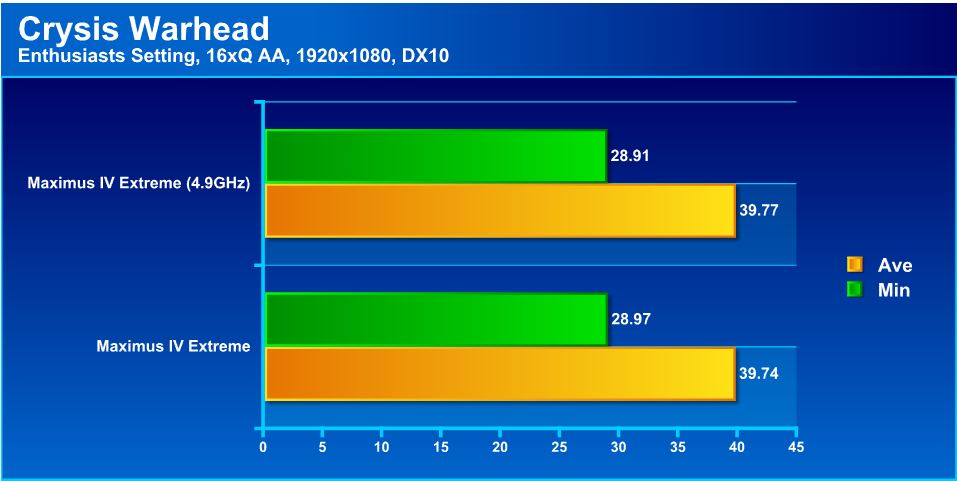
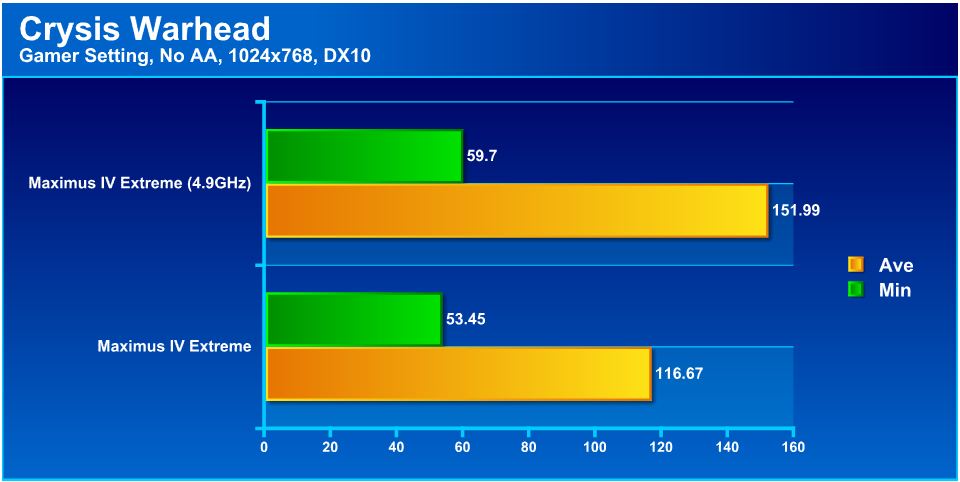
The scores are fairly similar here, showing that the game is (obviously) much more GPU-bound. The increase in clockspeed really didn’t do much, and the difference in average FPS is barely noticeable.
just cause 2

Just Cause 2 has been out for almost a year now, but instead of running lower resolution tests, we were also interested in checking out what to expect at higher resolutions where graphics performance might get in the way. This will give a great example to those people playing games at much higher resolutions.
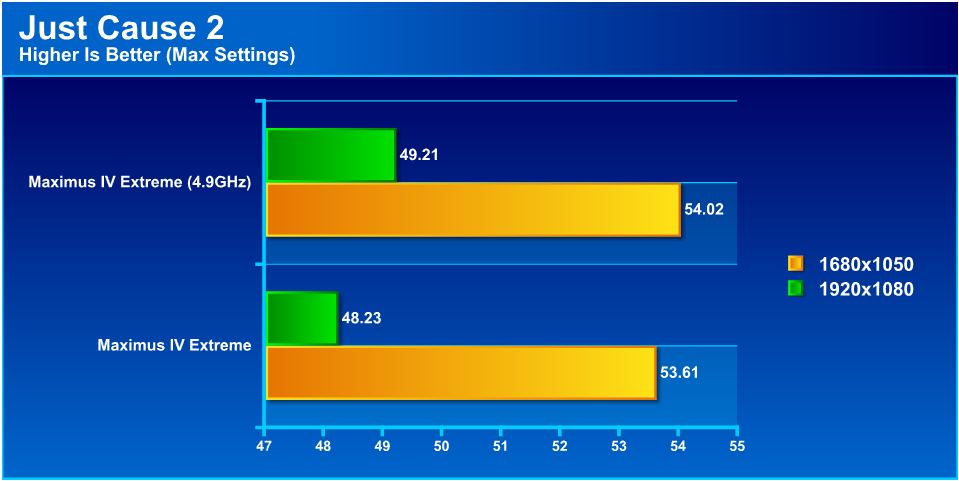
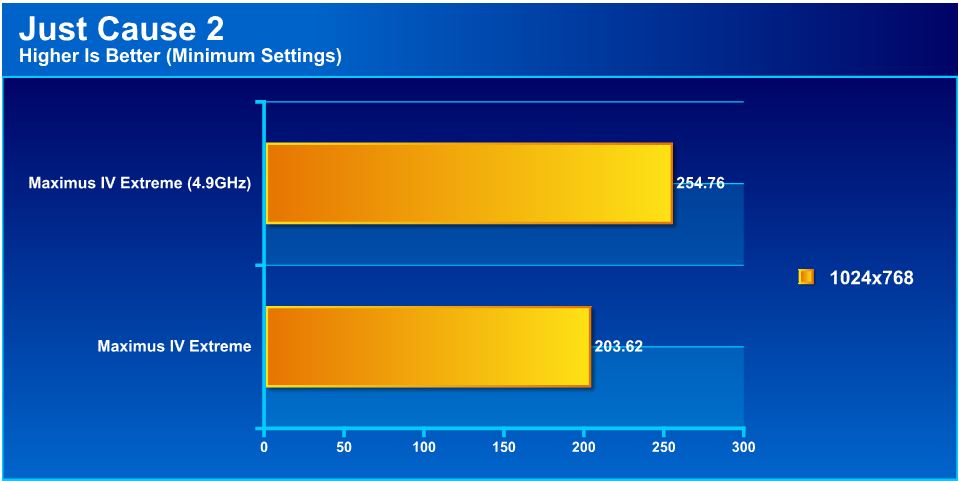
We decided to run the systems at both max settings and also at minimum settings, just to see how the games scale when the graphics card is not a bottleneck to the performance. Here we see under maximum graphics, the card is obviously the bottleneck, and a multi card setup would likely net much more favorable results, as the overclock seemed to give very little in return by way of FPS. However taking the test down to minimum settings, the graphics card is no longer the bottleneck, and the system has a chance to deliver a decent FPS increase because of the overclock.
Metro 2033

Metro 2033 is very hard on the graphics card similar to how Crysis used to be the benchmark for every card when it first had come out. This tests the card very heavily and if overclocking will help with better FPS or gameplay this should tell us.
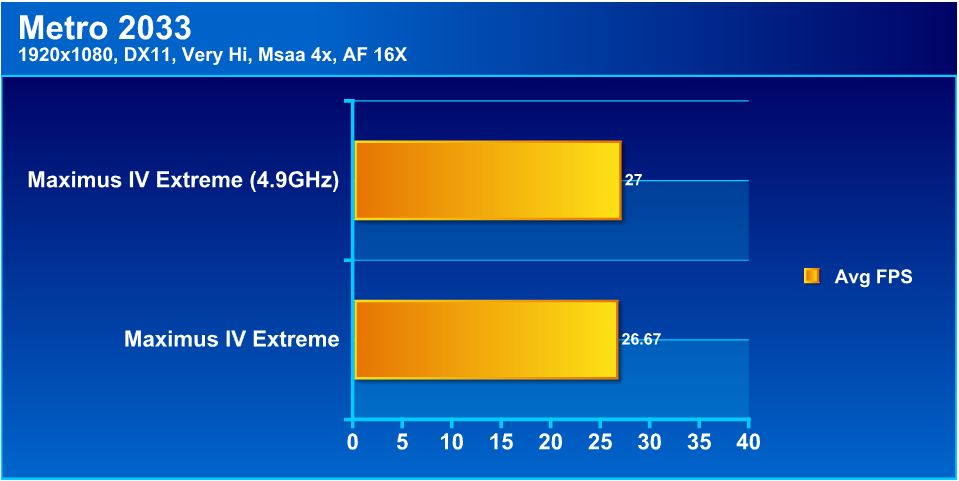
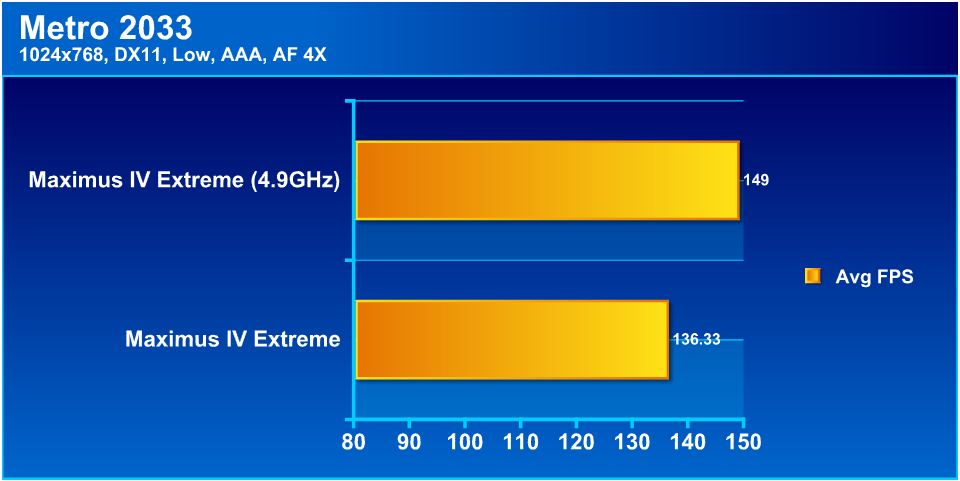
We witnessed similar results in the Metro 2033 benchmark. This game is somewhat like Crysis was when it first debuted–no single card can run it at maximum settings. We did see similarly that the overclock did very little for the maxed out test, but it gains some ground when at minimum settings. The net FPS increase in this game is smaller than in other games because even minimum settings for Metro 2033 are considerably taxing.
Unigine Heaven 2.5
Unigine Heaven is a benchmark program based on Unigine Corp’s latest engine, Unigine. The engine features DirectX 11, Hardware tessellation, DirectCompute, and Shader Model 5.0. All of these new technologies combined with the ability to run each card through the same exact test means this benchmark should be in our arsenal for a long time.
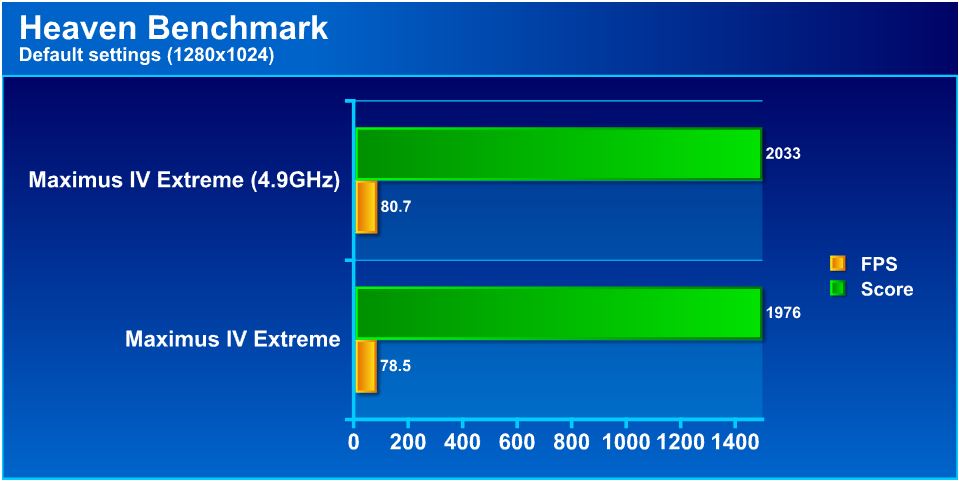
Unigine Heaven at default settings with a quite low resolution still loads the card heavily enough to show that the system bus is in no way a bottleneck, as we net about a 2 FPS gain from the 1.5GHz overclock.
CONCLUSION
The Maximus IV Extreme is an excellent board and performs very well with many pluses that cannot be denied. The board overclocks within the blink of an eye, though most P67/Z68 boards do as well–this is an architectural benefit. This leaves all board makers in a stalemate of sorts as their only option is to offer better features, which is what the Republic of Gamers line is known for. The price makes it a somewhat difficult decision as the GIGABYTE GA-P67A-UD7 costs $60.00 less. Though the ASUS Maximus IV Extreme has the edge in the UEFI interface, ROG Connect and Bluetooth, these are not necessarily worth the extra money, as many users will not even need the Bluetooth connectivity or ROG Connect. For those who do, however, the features are there, along with a great layout, excellent overclocker support, and regular BIOS updates.
For anyone looking to build the best P67 system, this is the board to choose, as it has every connectivity option with the exception of WiFi. It also a full range of options to allow adjustability to the hilt to make sure it can be tweaked any way the user wants it.
| OUR VERDICT: ASUS Maximus IV Extreme | ||||||||||||||||||
|
||||||||||||||||||
| Summary: The ASUS Maximus IV Extreme is an excellent board for the enthusiast user, and a great value as it has every performance option available. For its great performance and thorough features, it earns the Bjorn3D Silver Bear Award. |