Bjorn3D.com going to be looking at two aftermarket GPU coolers, and compare them up against the Sapphire 5870 Vapor X cooler. The results will surprise you.
Introduction
The old argument of why would you need to replace the heatsink on your video card, is a long and perilous argument. There are still people out there that thinks that they should not have to purchase an aftermarket GPU cooler for their video card(s). Granted if you spend 300+ on a video card that the stock cooler should perform well enough for normal perfect conditions. But in this day and age, not everything is a perfect condition. Not to mention that these newer video cards run hotter and are having a larger work load placed upon them, so the old thought the stock heatsink should be enough just does not cut it.
You go out and purchase a 200+ on a CPU and immediately you purchase a 60+ on a heatsink that will ensure your CPU does not get hot. Well you should also consider the video card to be fitted with a aftermarket heatsink as well. Today we at Bjorn3d.com going to be looking at three different types of GPU heatsinks. One of these heatsinks is a stock aftermarket cooler, the Vapor X from Sapphire. We are also going to be looking at a new heatsink contender in the market of heatsinks, that company is GELID. Too finally going to look at another heatsink from a manufacturer that is well renowned as being one of the best, Zalman.

We at Bjorn3D.com going to pit all three of these heatsinks against one another in some of the most grueling ambient temperatures I can think of, 23°C is the ambient temperature of where I tested these heatsinks. Also going to be using a very well known chassis for cooling, the SilverStone Raven RV-02. And finally answer the question is it best to purchase a aftermarket GPU cooler along with your VGA purchase.
Testing Methodology
|
Test Setup &Testing Methodology “YAR” |
|
| CPU | AMD 1055T Hex Core CPU @ 4GHz |
| Motherboard | Gigabyte 890FXA-UD7 |
| Case | SilverStone Raven RV-02 |
| Memory | Crucial 1600 |
| Video Card | Sapphire 5870 Vapor X (BIOS Modded) |
| Hard Drives | 2 x 160 Gig WD in RAID 0, 1 WD 500 Gig HDD back up |
| CDRom Drive | Lite On DVD bruner |
| Power Supply | SilverStone 850Watt PSU |
| CPU Speeds Used | 4 GHz |
| Operating System Used | Microsoft Windows 7 |
| Video Card Cooler |
Zalman, GELID, Vapor X |
| CPU Cooler |
Zalman CNPS9900 |
Like always there has to be rules in place before I go right into testing these air coolers. First rule I am going to put into play is that the video card will not go beyond a 70°C +/- a few of degrees. I feel that a video card will last longer and provide years of gaming if we as computer users keep it below this target temperature. Another rule I am going to put into play is installation, considering these are air coolers on a video card there will be some difficulty, the areas I am going to look at more specifically, is the memory/VRM’s heatsinks get used and installed. I will also look into how the GPU cooler gets mounted on to the video card. To keep my results as accurate as possible I will be using the same exact thermal paste on each GPU cooler used. I will allow a 24 hour settling in time on each GPU cooler. I will be using Fur Mark during the settling in time only. For the record temperature runs we will be playing Alien Vs Predator for one hour per GPU cooler; then allowed the video card to idle for 30 minutes to get our idle temperatures.
I will be including separate pages for both of the Zalman GPU cooler and the Gelid GPU Cooler on both Overview, and Installation. This will give me the necessary tools to properly rate these two coolers. For the tear down portion of the Sapphire 5870 Vapor X video card, please visit this review HERE. The ambient temperature of my parents house is hovering around the 23°C range, this video card will be tested in a SilverStone RV-02 chassis review can be found HERE. I also should mention that this 5870 video card has been BIOS modded to allow me more overclockability with this video card.
Zalman VF3000A Part 1
Overview

Like always Zalman goes the extra mile on making eye catching packages. Zalman also ensures us that we know exactly what their products will work on what, this model is compatible for ATIs 58xx series of video cards.

Here what we will get with the VF3000A GPU cooler, we get a really nice looking GPU cooler (but aren’t all of Zalman’s coolers nice looking). Zalman very own fan mate to help control the amount of noise coming from our fans, we get some memory/VRM heatsinks, and mounting hardware. We do get an installation manual with our purchase, but it wandered off on me.

Let’s give a good look over at the VF3000A GPU cooler shall we. Looking at the blades of the 92mm fans that Zalman uses, have a ribbed look to them. I cannot find much information about the fan design themselves on Zalmans Website, just that these are designed to reduce fan harmonics while increasing fan air pressure.

This GPU cooler is not exactly small, the use of this GPU cooler will use up two additional PCI expansion ports. So if you are planning on using two of these GPU coolers make sure you have at least two PCI expansion ports between each video card.


Zalman incorporates five 6mm heatpipes to evenly distribute the heat generated by the GPU core across the entire fin array.


Looking at how Zalman uses the heat pipes on the VF3000A GPU cooler. The heatsink is in two parts, front part, and a rear part. The front portion of the GPU cooler (the end that faces the front of the chassis) gets three 6mm heatpipes, while the rear portion of the heatsink gets only to 6mm heatpipes. A fairly interesting design actually. As we can see the fin array is spaced evenly enough to allow ample amount of airflow while giving us the best thermal dissipation.


Everyone of these 6mm heatpipes are individual.

Zalman has always gone the extra mile to ensure the bases of their coolers are perfect. This GPU coolers base is also perfect mirror.
Zalman VF3000A Part 2
Installation

Now it is time for us to mount the VF3000A GPU cooler onto the 5870 video card. First things is first we need to thoroughly clean the video card, I used rubbing alcohol for this task as it easy to use and dries fast. We need to hit all of the major components of the video card, VRMS, GPU core, and the memory. There is a lone VRM off towards the rear of the video card that also needs to be cleaned, it is up by last Crossfire bridge interconnect, and right behind the upper last memory module. The pieces of paper you see in the DVI connectors (backside), during my Eyefinity endeavors with this video card, these pins kept pushing the upper DVI-D pins back. By putting these pieces of paper in between the pins, keeps them from getting pushed back.

next step is for us to locate the little stand offs for the GPU cooler.

Then screw them into the respected holes for our video card. Make sure you thread in the short side into the base of the GPU cooler.

Do this to all of the mounting holes for the GPU cooler. Since I am putting this on a 5870 video card I need to make sure I use the center holes.

Time for the test fits, I placed a small drop of thermal paste directly onto the core of the GPU.

Line up the mounting holes to the studs of the GPU cooler then press and hold for thirty seconds.

The GPU cooler is properly hitting the GPU core. I will have to add a bit more thermal paste when I do a final assembly.

Always reconfirm what you have on the core of the video card you get on the heatsink.

Time for me to install the VRM heatsinks and memory heatsinks. These use thermal tape to stay on the video card components. Remove the protective cover then place on the memory heatsinks.

Like so, now during this portion of installation, I kept running into a minor issue. If you look at the most rear ward heatsink (biggest one) you will see that it is slightly blackened, this was caused by me. Reason for that was because even though I thoroughly cleaned my video card, that heatsink would not stay in place. This heatsink and a couple of other memory heatsinks kept falling off, so I heated the trouble maker heatsinks up to see if I can get them to stay in place. Well I was able to fix a couple of the trouble maker memory heatsinks, but the memory/VRM heatsink would not stay in place. So I scrapped the idea of trying to get it to fit correctly.

I located another smaller heatsink from another GPU cooler, and used it instead. Now I am happy, it stayed in place.

Time for me to fully install the GPU cooler directly to the video card. Locate the four black nuts and the springs.

Put the springs on the video card over the protruding studs, then tighten the nuts down over the springs. I use a X-cross pattern when I tighten the GPU heatsink.

Do this two more times and tighten down snugly.

And there we have it, all finished up. This cooler sure does look sexy looking. I had another small minor issue regarding the use of this cooler, the rear ward fan kept hitting the fan shroud. It was a small adjustment to make to stop the fan blades from hitting the shroud, it is not enough of a problem to dock this GPU cooler, it should be mentioned.
GELID Solutions ICY VISION Part 1
Overview

Time for us to look over the GELID Solutions GPU heatsink. Gelid chooses to use a bit more subtle look for their product. But GELID Solutions does provide us with more than enough information about this GPU cooler on what it capabilities, also what this GPU heatsink fits onto.

What we get with this GPU cooler, initial thought was, OMG that is a lot of stuff in such a small package. We get the GPU cooler, some several different heatsinks for the memory, VRMs, and the mosfets for different types of video cards. un like most of the memory/VRM/mosfet heatsinks were they have pre-applied thermal tape, GELID Solutions gives us another small bag of pre-cut thermal pads. We get the mounting hardware for both Nvidia and ATI types of video cards. A mounting plate, and some protective self stick isolator washers.

Hmm, this GPU cooler looks awfully similar to Zalmans VF3000A cooler. Looking at the fan blades of what GELID Solutions uses, as we can tell these are open framed, may want to be careful when reaching into your case when the computer is on.

GELID Solutions, does things a bit different then Zalman. This is where the major differences are is how GELID designs the heat pipes and the fin array. GELID Solutions use two individual fin arrays to help keep our GPU cool.

Similar to the Zalman VF3000A cooler, GELID Solutions also uses a total of five 6mm heatpipes to wick heat away from the GPU core. Three of these heatpipes go to front side of the fin array. The fin array is spaced apart to allow plenty of airflow, and also give us plenty of cooling capacity.

Two more heatpipes make their way to the rearward fin array. Now instead of having the heatpipes come from opposite directions (Zalman VF3000A) GELID Solutions has them coming from one side of the base of the GPU cooler.


Looking at both ends of the ICY Vision GPU cooler.

This is where I feel that GELID could have done better, I feel that the base could have been lapped a bit more, and be a bit more of a mirror.
GELID Solutions ICY VISION Part 2
Installation

Lets install the Icy Vision onto the 5870 video card. Starting off we will need to locate the mounting plate. You will see four holes on each corner of the mounting plate, the ones I need to use for the 5870 are the two that are close together but the farthest mounting holes from the center.

GELID Solutions includes two different types of these studs, one has a long HEX shank that one is for Nvidia type of video cards. The other has a short HEX shank on it, that will be used for ATI types of cards.

Make sure you put the short side of the stud in through the mounting plate. Sorry for the blurred picture.

Locate one small round nut and thread that over the stud. Tighten these down snugly, a screw driver will be needed to tighten these down.

Locate the four chamfered small screws, place the mounting plate directly to the heatsink, make sure your holes line up, then tighten the plate down to the cooler. DO NOT OVER TIGHTEN these screws, otherwise you can strip the threads of the GPU cooler.

Oops, I should clean the card a bit better next time. Up next is the forward VRMs heatsink. We do get a thermal pad to be used on the heatsink.

For ATI cards, we need to locate the long thin heatsink, this is for the VRMs. remove the protective film on both sides of the thermal pad then insert that into the recessed part of the heatsink.

Next up locate the self sticking black isolator washers. Remove two of them, and place them on the holes that will be used on the VRMs on the back side of the video card.

Like so.

Locate these two stud like screws. It will have a flat top on the two screws.

Then place the VRM heatsink on the front VRMs, and press down a bit this will kind of hold it into place while we put the little screws in.

Insert one screw from the GPU side of the video card in through the holes to where it protrudes from the back side of the video card.

Last but not least, locate two round nuts and springs and place them over each stud from the VRM heatsink. Tighten these down carefully, ATI uses Silicone based VRMs, and if the heatsink is too tight you can damage the VRMs.

What it should look like once installed.

Now it is time for the cooler to be test fitted. I placed a small drop of thermal paste over the core of the video card.

Then align the holes of the GPU cooler to the video card hold the two together for thirty seconds then separate them.

Thermal paste dispersion looks really good.

Verifying what I got on the GPU core I get on the GPU coolers base.

Locate the four round nuts and screws, and place them over the protruding studs from the GPU cooler. tighten these down in a X pattern and snuggly. If you your video card does not have the isolator washer over the GPU core mounting holes you might want to use some of the ones that came with this GPU cooler.


Now a unique thing I liked about the Icy Vision cooler was how the fans get hooked up. The fans from the cooler can be plugged directly into the video cards fan plug. No matter what these fans will run at full speed, so the BIOS does not control the fan speeds.

What the Icy Vision looks like fully installed.
The Results
Just a reminder, I will be sticking too a rather tight temperature limitation of 70°C +/- on the Sapphire 5870 Vapor X video card (BIOS modded). I like to try and keep my video cards temperatures below this point at all times. I am going to use the same exact thermal paste on all GPU coolers tested, this way my results will be as accurate as possible I can make them. That thermal paste I used for this review was GELID Solutions GC Xtreme.
I like to try to keep things as fair as possible when testing computer components, so I ran the Sapphire Vapor X fan at Auto (allowed the VGA adjust the fan speed) and then ramped the fan speed to 100%. Since the two aftermarket coolers (Zalman, GELID Solutions) ran the fans at full speed.
Default 5870 Clock speeds 850MHz Core/1250MHz Memory
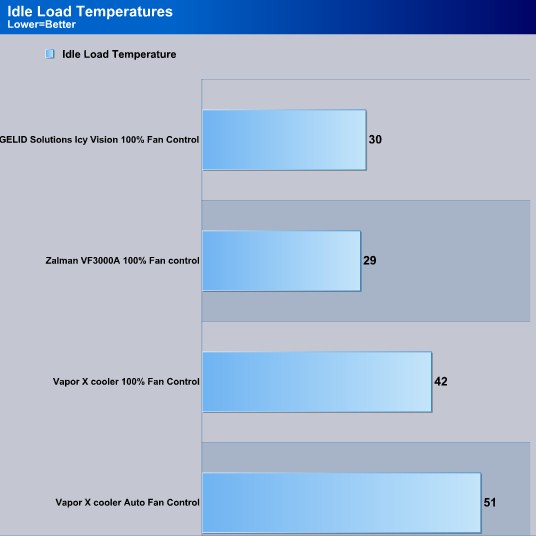
Comparing the three air coolers to one another, we can already tell the two after market coolers Zalman and GELID Solutions GPU air coolers clearly decimate the Sapphire Vapor X air cooler. Even with the fan at 100% on the Vapor X cooler could remotly keep up. Lets see how these three air coolers handle once the video card is brought up to full load.
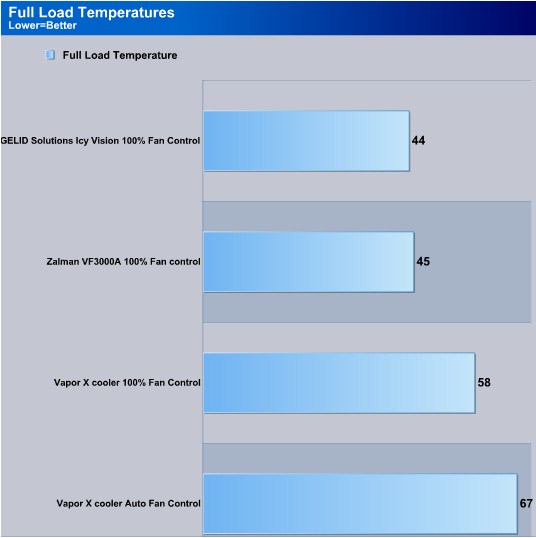
Well both of the aftermarket coolers manage to keep up with one another. While the Vapor X aircooler is getting real close to my temperature limitation of 70°C while using auto mode on the fan speed.
Overclocked 5870
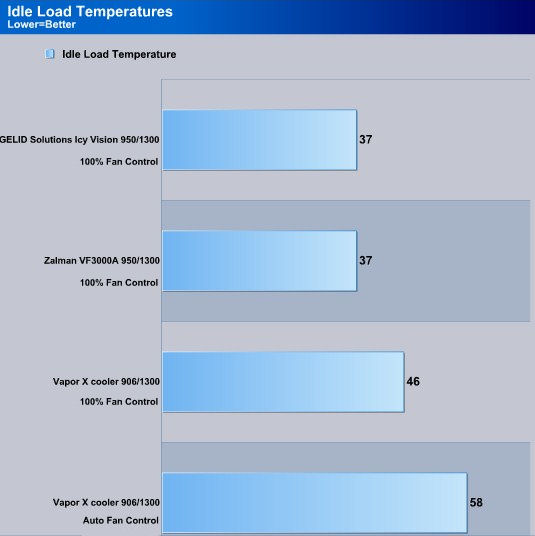
This is where the pedal hits the metal, I let the full load temperatures determine the clock speeds of the 5870 video card. Both of the after market solutions clearly crush the Vapor X cooler, not only in temperatures but in all out GPU core frequencies.
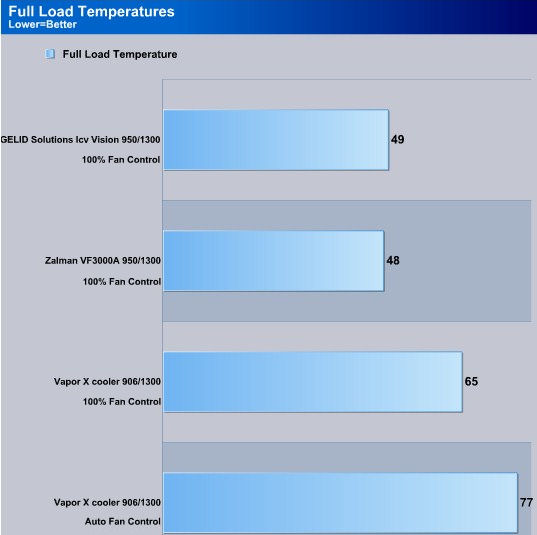
Here are the actual results of my full load testing of the new founded GPU core frequencies. The default Vapor X air cooler went way and above my thermal limit or 70°C +/-. By ramping up the fan speed to 100%, I was able to bring down the temperatures quite a bit, but at a cost of noise. The two aftermarket solutions again decimate the Vapor X by leaps and bounds. It is kind of hard to determine what cooler is better, especially when both are performing identical to one another.
During the usage of these two wonderful GPU coolers, I did not notice any excessive noise coming from the fans. prior to hooking these GPU coolers up to the video card, I would run them off my computer to see how much air they produced, also to see how loud they were. For being only a foot away from me, I could barely hear them. My nine 120mm 80 CFM fans was drowning out the sound from these two GPU coolers. Once they were installed into my dads chassis the SIlverstone Raven RV-02, the Zalman CNPS9900 CPU cooler quickly drowned out the GPU coolers fans.
Conclusions
When purchasing our video cards, we should also look at alternative coolers for these components just like we do with our CPU’s. In most cases the video card costs a lot more then our CPUs do, and most people still think that a stock heatsink for our 300+ video card should stay cool no matter what. Even while using a good stock aftermarket cooler (the Vapor X cooler) the 5870 could not even remotly keep up with the aftermarket cooling solutions from Zalman, or GELID Solutions. What do these performance numbers actually mean? By running the video card cooler, we have a greater flexibility of our ambient temperatures, we have a greater control of our video card temperatures, which by running the video card cooler our video card will last longer. The side effect of running a video card cooler is we have a greater overclockability. There are few out there that has a mind set of, “My video card has a life time warranty, so why should I care?” Well you should care, because it takes time to RMA a computer component, and during this time you cannot use your computer, because your video card is absent. So while you are waiting for your video card to come back from RMA, your buddies are tearing up the battlefield without you.
Now back to the review of the two GPU coolers in this review, temperature wise these two aftermarket coolers are evenly matched. Price wise, again they are evenly matched at 55 USD. Which to me is a fair price for such good GPU coolers. Now which brings me to installation for my grading. Zalman VF3000A cooler was a lot easier GPU cooler to install compared to the GELID Solutions Icy Vision. But there is that issue regarding the memory/VRM heatsink not wanting to stay on. Which I ended up having to use another VRM heatsink to review this GPU cooler. You do what you got to do, to get the job done.
Compatibility wise, it appears the VF3000A can fit a Nvidia based video card (based on visual look) but it is not mentioned on the instruction manual, or at Zalman’s web site. This video card cooler is specifically designed for the ATI 58xx series video cards. The Icy Vision from GELID Solutions, can be fitted to both ATI and Nvidia based video cards.
| OUR VERDICT: GELID Solutions Icy Vision | ||||||||||||||||||
|
||||||||||||||||||
| Summary: The Icy Vision is exactly what the doctor ordered for our video cards to keep them temperatures down. |

| OUR VERDICT: Zalman VF3000A | ||||||||||||||||||
|
||||||||||||||||||
| Summary: If you are looking for a GPU cooler that looks good, and cools well; then the Zalman VF3000A is a perfect candidate for your cooling needs. |


