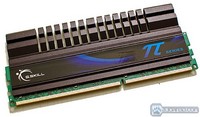
CAS Latency 6, 2000MHz of raw DDR3 speed, and a fan to keep things cool, we review G.Skill’s PIS Series 4GB memory kit.
Introduction
Since the launch of the LGA 1156 socket from Intel, memory manufacturers have been releasing memory kits targeted directly at the new platform. These kits market themselves as being specifically engineered for i5/i7 CPUs so its easy to buy one kit over another for the sake of comfort. The truth is, hardware enthusiast care more about performance than “engineered” compatibility.
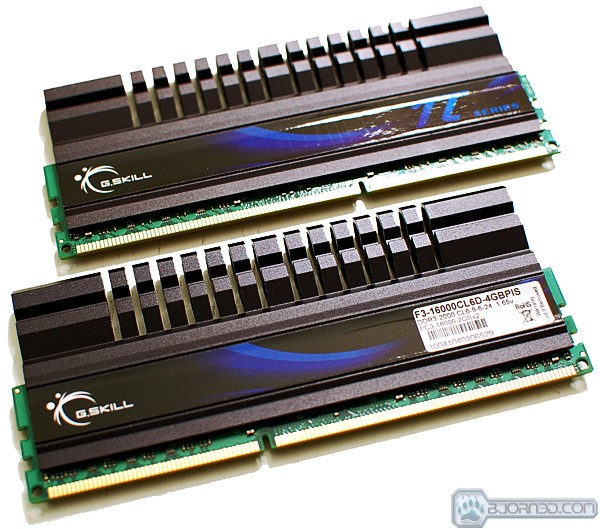
G.SKILL has been making affordable memory DIMM’s since 1989 and if you’ve built a computer within the past 2-3 years, you more than likely know exactly who G.SKILL is. It’s hard to look passed G.SKILL’s value line of memory especially if you’re on a budget, but what about the hardcore enthusiast? With their PI Series line of memory, G.SKILL has been known to offer high frequency compatible memory at decent pricing. This DDR3, 2000MHz, 4GB dual channel kit we received from G.SKILL is no exception. With 6-9-6-24 2N timings and 2000MHz of frequency to play with, we were very eager to see what this PI Series kit was capable of.
| Memory Kits | Price |
| G.SKILL PIS Series 4GB 2000MHz (F3-16000CL6D-4GBPIS) | $199.99 |
| G.SKILL Ripjaws 4GB 2000MHz (F3-16000CL9D-4GBRH) | $134.99 |
Specifications
- Kit Number/Model: F3-16000CL6D-4GBPIS
- Timings: 6-9-6-24 2N
- Capacity: 4GB (2x2GB)
- Voltage: 1.65v
- Frequency: 1600MHz (PC3-16000)
- Type: DDR3 Non-ECC
- Pins: 240
- Warranty: Lifetime
- Specifically designed and engineered for Intel’s P55 chipset
Pictures & Impressions
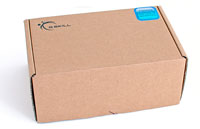
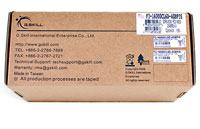
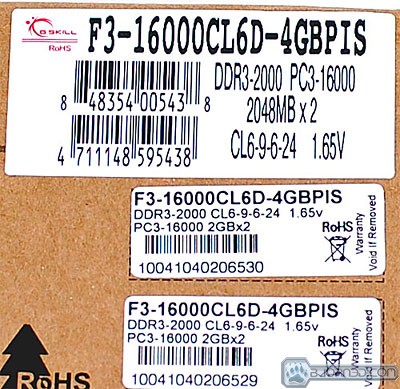
G.SKILL packaged this 4GB kit in a thick cardboard box that came with additional cardboard within for added protection. The box itself has a blue sticker stating the kit was “Engineered Specifically for Intel Core i7 860/870 CPUs”. In other words, this kit was designed with Intel’s P55 chipset in mind. On the backside of the box there are stickers that describe the model, timings, and frequency of the memory. Below is a close up shot of the stickers.
Just like the specifications state, this kit is 4GB, 2000MHz frequency, and has 6-9-6-24 2N timings. We were instantly intrigued by the low CAS latency of 6, but the tRCD timing of 9 left us scratching our heads especially since the tRP timing is 6 following suit with the CAS latency. We can’t help but wish this kit was rated at 6-6-6-24 instead of 6-9-6-24. Either or, the overall specifications of this kit is something to be desired especially if you happen to be an overclocking enthusiast. After evaluating the box and getting a feel for the packaging, we went ahead and unboxed the contents.
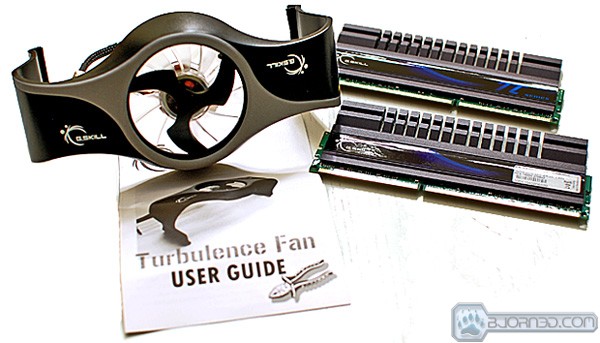
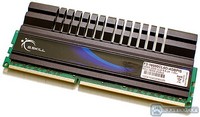
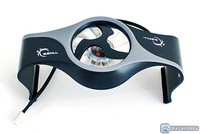
This 2000MHz kit comes with a fan and heat spreaders that help keep the DIMMs cool. Along with the hardware, you also get a manual that has an install guide for both the DIMMs and the fan as well as warranty information for the fan itself which has a 1 year warranty opposed to the DIMM’s lifetime warranty.
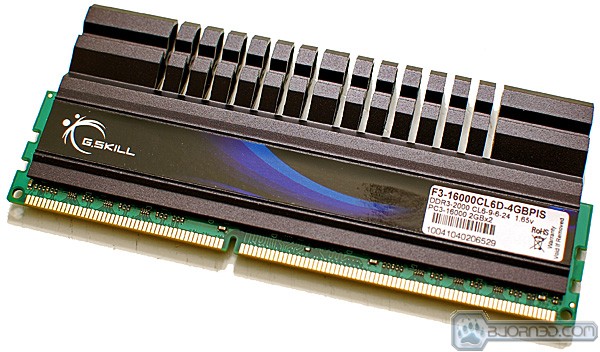
The DIMMs also come stickied up with specifications labels for your convenience. The heatspreaders are certainly not low profile, but they are definitely attractive and functional. The extra cooling surface the heatspreaders provide will reduce the DIMM temperatures but the downside to tall heatspreaders is the problem they impose when installing tower design heatsinks. Before buying this kit or any memory kit with tall heatspreaders, make sure your cooling setup can accommodate them. The last thing you want to do is buy a premium memory kit that you can’t use because you have a behemoth heatsink.
The fan provided with this is kit is 11MM in size and pushes 7.75CFM moving at 3,200RPM. This is enough air flow to keep the DIMMs cool without creating a ton of noise. To add to the blue themed stickers on the DIMMs, the fan also lights up blue when it is powered by a 3-pin fan header.
Testing Methodology
|
We’ve expanded our testing suite considerably for P55 and will continue to use the same tests across most of the motherboards and CPU’s we test. We run each test a total of at least three times minimum, some tests we run more than 3 times. We average the total of all the tests from each benchmark then report the average here. The OS we use is Vista Ultimate 64bit with all patches and updates applied. We also use the latest drivers available for the motherboard and any devices attached to the computer. We don’t disable a bunch of background tasks or particularly tweak the OS or system for bigger numbers. We do turn off drive indexing and daily defragging. We also turn off Prefetch and Superfetch. This is not an attempt to produce bigger benchmark numbers. Drive indexing and defragging can interfere with testing in that one test might occur without defragging going on and the next test defragging might be active, the same thing goes for drive indexing. We can’t control when defragging and indexing occur precisely enough to guarantee that they won’t interfere with testing, so we turn them off. Prefetch tries to predict what you will load the next time you boot the machine. We disable it because we want to know how the program runs without any of the files being cached, otherwise each test run we’d have to clear pre-fetch to get accurate numbers. Lastly we disable Superfetch, Superfetch loads often used programs into memory and is one of the reasons people consider Vista to be such a memory hog. Vista fills the memory in an attempt to predict what you will load. Having one test run with files cached, and another test run with the files being un-cached would result in skewed numbers. Again since we can’t control it we turn it off. Other than those 4 things which can potentially interfere with benchmarking, and do so out of our control, we leave everything else running. |
| Test Rig “i5_alive” |
|
| Case Type | NZXT Tempest |
| CPU | Core i5 750 |
| Motherboard |
ASUS P7P55D Deluxe |
| Tested RAM |
G.SKILL PIS DDR3 2000MHz 4GB Kit |
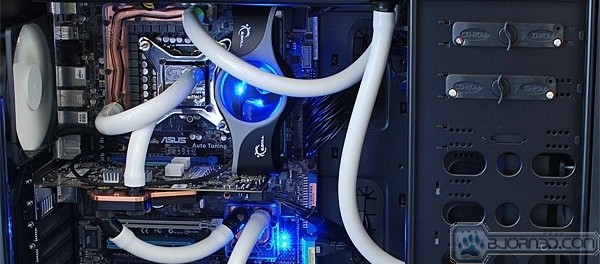
| CPU Cooler | Custom Water Setup |
| Hard Drives | Seagate 320GB 7,200RPM |
| Optical | ASUS DVD R/W |
| GPU(s) | XFX 5770 1GB |
| Case Fans | 120mm (Front & Rear), 140mm x 2 (Top) |
| PSU | Corsair HX 650W |
| Mouse | Microsoft Wheel Mouse Optical |
| Keyboard | Logitech Illuminated |
| *** Any attempt copy this system configuration may lead to awesomeness. |
|
|
Software Used |
| Everest Ultimate v5.0 |
| SiSoft SANDRA XII Professional SP2 |
| Super PI |
| Intel Burn Test v2.4 |
| CPUID CPU-Z v1.53.1 |
To test the G.SKILL memory thoroughly, we run the memory through benchmarks to ensure stability and proper function. Everest Ultimate, SiSoft Sandra, Super PI, and Intel Burn Test will be used to stress both the system and the memory to test for stability and also result reporting. To monitor frequencies and timings, we use CPUID’s CPU-Z.
Memory Timings Explained
Memory timings can be very confusing so it is only right that we explain them before reporting results during a review. Let’s start off with the numbers you usually see on a memory DIMM’s sticker, the timings. Memory timings are what ultimately decide how far a memory DIMM will overclock and perform. The lower number(s) the timings are, the better they will overclock. A 9-9-9-24 rated timing kit is a common timing on affordable DDR3 memory kits. Anything below those common timings will result in a higher price tag due to faster performance. So what do those numbers really mean? First, we need to explain what numbers relate and correspond to.
There are four main timings that heavily effect memory performance:
CAS Latency (tCL), RAS to CAS Delay (tRCD), Row Precharge Time (tRP), and RAS Active Time (tRAS).
To point out these values, we are going to use the now common DDR3 1600MHz, 9-9-9-24 timings.
CAS Latency Time (tCL) 9-9-9-24
CAS stands for Column Address Strobe. Latency is the amount of time taken to respond. The lower the CAS Latency value is the faster the memory controller and modules communicate. The memory controller talks to individual modules on the DIMM’s requesting data in cycles.
RAS to CAS Delay Time (tRCD) 9-9-9-24
RAS stands for Row Address Strobe and CAS stands for Column Address Strobe. The RAS to CAS Delay value is the amount of time in cycles it takes to do a task requested by the memory controller.
Row Precharge Time (tRP) 9-9-9-24
The Row Precharge value is the amount of time in cycles needed for the Row Address Strobe (RAS) to collect before another row can be utilized. This acts almost like a queue in a sense.
RAS Active Time (tRAS) 9-9-9-24
RAS stands for Row Address Strobe. RAS Active Time is the amount of time in cycles of a row being occupied by Row Precharge (tRP) and unoccupied.
The lower the value for each timing, the faster the memory modules can work together and report back whatever was requested from the memory controller/processor.
Let’s move on to overclocking.
First Boot
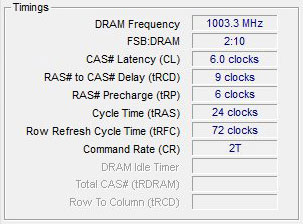
Before getting into overclocking, we wanted to see how things looked with all default settings. The timings were set to their rated timings and the memory voltage was set to 1.65v (per the specifications). Below is what CPU-Z reported on the first boot up.
Fortunately for us, we did have a motherboard that was on G.SKILL’s qualified listing for this particular kit which was reflected as everything booted up and worked as it should. We kept our already stable 4.0GHz CPU frequency and now had a equally fast CAS latency 6 memory kit running at 2000MHz. Things were snappy as usual and the 2000MHz kit was in full effect at its rated timings of 6-9-6-24 at 1.65v. We did have to increase the Integrated Memory Controller (IMC) voltage to maintain 100% stability but this was expected due to the 2000MHz frequency.
Rated Timing Overclock
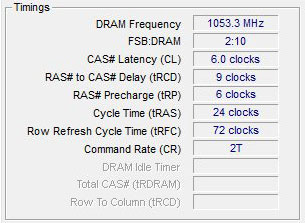
After verifying the DIMMs were stable at their rated timings and frequency, we went forth with overclocking. We kept both the voltage and timings at their rated values to really find out what this kit was capable of. We increased only the Base Clock (BCLK) and when it was all said and done we met our max frequency of 2100MHz, 100MHz over default.
Considering the already insanely high frequency the G.SKILL PIS kit delivers, we weren’t expecting to get much further at rated timings and voltage of 1.65v. To get more out of this kit we were forced to push the BCLK passed 200. To put it bluntly, pushing the BCLK passed 205 with stability is no easy task. It involves voltage tweaking and CPU multiplier tweaking to keep the CPU, IMC, and memory happy.
Without changing any voltages from our original boot up, we reached a BCLK of 210 which put the memory at 2100MHz, 100MHz over default. Dropping the CPU multiplier to 19x allowed us to keep the same overall voltages and still have a 4.0GHz CPU frequency. We tried pushing the kit further but with a tight CAS latency of 6, we hit the wall pretty quick. Considering the BCLK required, 2100MHz DDR3 memory at 6-9-6-24 timings is nothing to laugh at.
Relaxed Timing Overclock
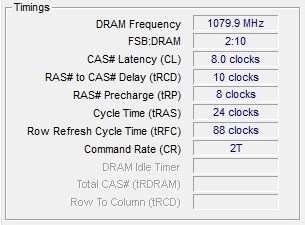
To achieve the maximum stable memory overclock we loosened the timings to 8-10-8-24 which allowed us to reach 2160MHz on the memory. Hitting 2160MHz required using a 216 BCLK and a CPU multiplier of 18x which put the CPU at 3.8GHz.
To confirm stability we ran an array of tests consisting of Intel Burn Test, Everest, SiSoft Sandra, and general use. With the CPU at 3.8GHz and the memory at a very high 2160MHz, we were more than pleased with the end result. We would have liked to have seen a higher relaxed timing overclock but theres not much room to play with when you have a 2000MHz starting frequency. We could easily degrade the value of this kit and relax the timings beyond useful but whats the point of high frequency RAM thats slow to respond? The key to overclocking memory is using reasonable timings with a high frequency. Keeping that in mind, we feel that we have reached that goal on our test setup.
Everest Ultimate

“EVEREST Ultimate Edition is an industry leading system diagnostics and benchmarking solution for enthusiasts PC users, based on the award-winning EVEREST Technology. During system optimizations and tweaking it provides essential system and overclock information, advanced hardware monitoring and diagnostics capabilities to check the effects of the applied settings. CPU, FPU and memory benchmarks are available to measure the actual system performance and compare it to previous states or other systems. Furthermore, complete software, operating system and security information makes EVEREST Ultimate Edition a comprehensive system diagnostics tool that offers a total of 100 pages of information about your PC.”
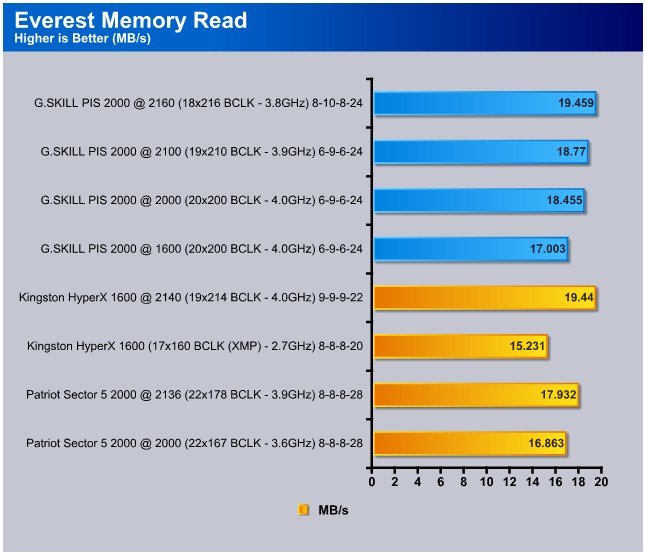
In the Everest Memory Read test, CAS latency timings proved to be the deciding factor. At 3.8GHz CPU with 2160MHz memory, the G.SKILL PIS kit was able to pull ahead of the Kingston HyperX kit at 4.0GHz CPU and 2140MHz thanks to the tighter timings. Even at 1600MHz, the G.SKILL kit beat out the Patriot Sector 5 kit at 2000MHz. Lower timings obviously played a huge role in the read test.
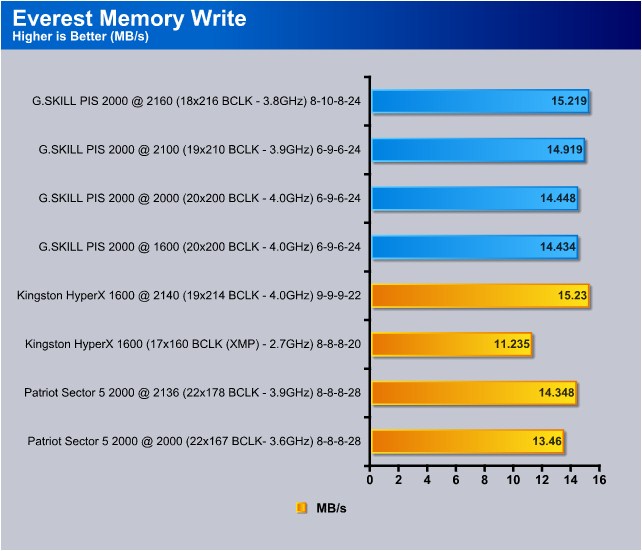
In the Everest Memory Write test, Kingston’s HyperX kit at 2160MHz was able to squeak passed the G.SKILL PIS kit by .011 MB/s. The 4.0GHz CPU frequency may have lent a helping hand. Either or, the G.SKILL kit with it’s 8-10-8-24 timings is right on the HyperX’s heels despite the CPU disadvantage.
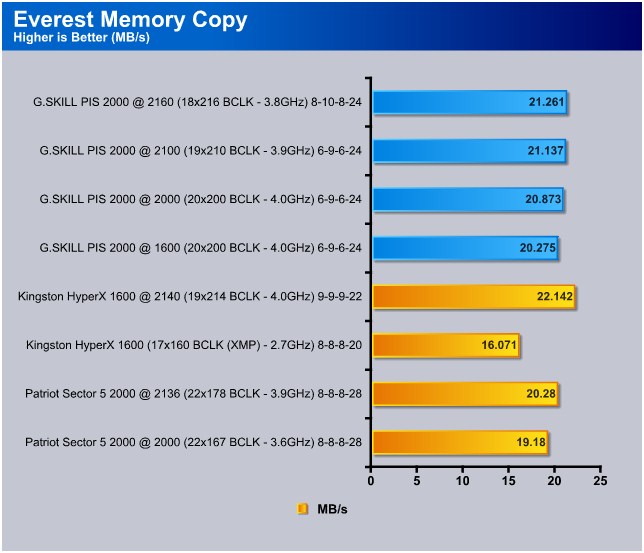
In the Everest Memory Copy test, Kingston’s HyperX takes lead by almost 1 MB/s. This test seemed to favor CPU frequency and tRCD timing more than raw memory frequency. At rated timings the G.SKILL PIS kit put up great numbers, almost beating the Patriot Sector 5 kit at when clocked 1600MHz. At the rated 2000MHz, the G.SKILL kit easily passes Patriots kit.
Sisoft Sandra
“SiSoftware Sandra (the System Analyser, Diagnostic and Reporting Assistant) is an information & diagnostic utility. It should provide most of the information (including undocumented) you need to know about your hardware, software and other devices whether hardware or software. It works along the lines of other Windows utilities, however it tries to go beyond them and show you more of what’s really going on. Giving the user the ability to draw comparisons at both a high and low-level. You can get information about the CPU, chipset, video adapter, ports, printers, sound card, memory, network, Windows internals, AGP, PCI, PCI-X, PCIe (PCI Express), database, USB, USB2, 1394/Firewire, etc.”
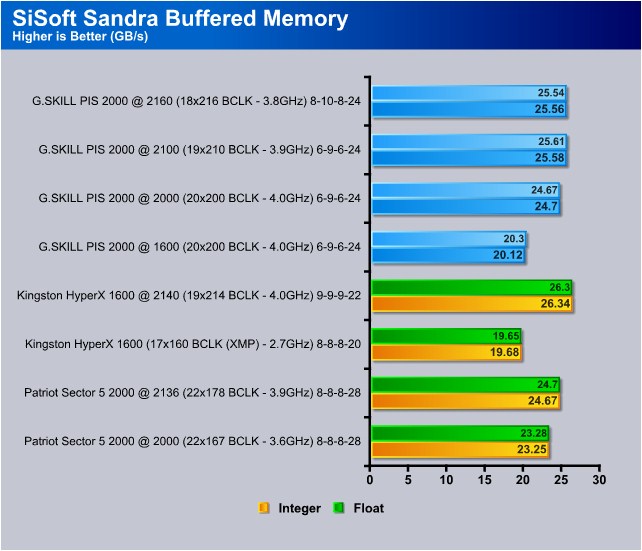
In the SiSoft Sandra Buffered Memory test, Kingston’s HyperX kit takes the lead in both the Integer and Float results. This test seems to respond well to both high memory and CPU frequencies. At a very close second is the G.SKILL PIS kit trailing by only 0.76 GB/s in the Integer test and 0.78 GB/s in the Float test. Memory timings didn’t seem to play a big role in this benchmark considering the results of the G.SKILL kit at 6-9-6-24 and 3.9GHz in comparison to the 8-10-8-24 timing 3.8GHz configuration. The Patriot Sector 5 kit did manage to keep up with the G.SKILL kit when at 3.9GHz CPU and 8-8-8-28 timings, but that is only due to Sandra’s Buffered Memory test liking higher frequency over tighter timings.
Super Pi

“Super PI is the “Gold standard” for many when it comes to judging system performance. We ran 1 Meg and 2 Meg calculations, again running each test three times and reporting the average of the results.”

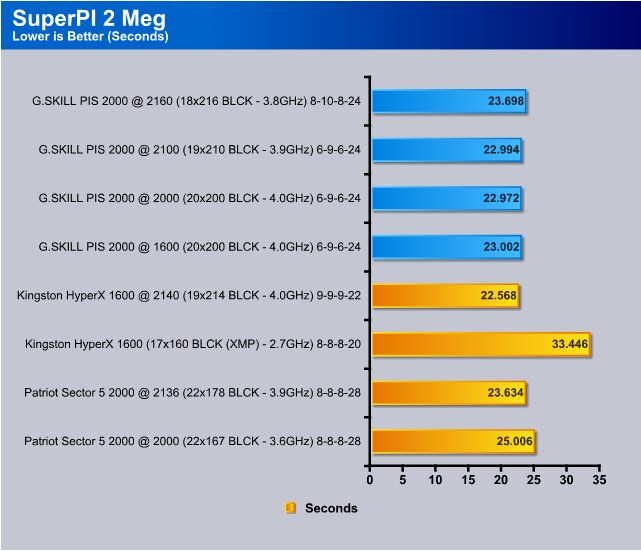
When higher CPU frequency is involved it usually shows when running Super PI benchmarks. Usually the higher clocked CPU frequency will attain the lowest time. Surprisingly in this comparison, that wasn’t the case. With a CPU frequency of 4.0GHz, a memory frequency of 2000MHz, and 6-9-6-24 timings, we were expecting the G.SKILL PIS kit to pull ahead of the HyperX kit but that didn’t happen. Despite having 9-9-9-22 timings, Kingston’s HyperX kit at 2140MHz and 4.0GHz CPU frequency beat out the G.SKILL kit at 2160MHz and 2000MHz. This trend continued in the 2 Meg test as well, ahead by almost a full second. Not only did the HyperX kit take a lead, the Patriot kit was stepping on the podium as well. In both the 1 and 2 Meg tests, the Patriot kit beat out the G.SKILL kit despite having a lower CPU and memory frequency. Fortunately for the G.SKILL PIS kit, Super PI has marginal weight on overall memory performance and capability.
Utilizing this kit to its fullest potential will take tweaking and knowledge beyond the everyday user and the reward does come at a hefty price tag. At $199+ shipping this kit is no bargain. There is no doubt that you are getting high quality memory with accessories to boot, but the performance gained does not match the dollars spent. Even at 1600MHz, a full 400MHz under rated speeds, the tRC timing could not be lowered one value. This was unfortunate because having a kit capable of 1600MHz at 6-6-6-24 timings would have been something to shout about. This kit liked it timings just the way they were, 6-9-6-24. No ifs, ands, or buts about it.
Overclocking the G.SKILL PIS kit will again be up to the end users knowledge since the BCLK will have to be pushed passed the common 205 BCLK wall. We were able to push this kit to 2100MHz at rated timings but anything passed that and the G.SKILL PIS kit refused to play. We had to rub and massage the timings, memory controller voltage and even the CPU voltage to find the sweet spot so this is something only experienced users should embark on. Overall, this is a high grade kit with high performance. The only downfall is the limited overclockability and required user knowledge to ensure the kit runs as it was designed.
| OUR VERDICT: G.SKILL PIS 2000MHz 4GB Kit | ||||||||||||||||||
|
||||||||||||||||||
| Summary: The G.SKILL PIS 2000MHz CL6 4GB kit is for enthusiasts with an extended budget and thorough product knowledge. We recommend G.SKILL’s value line to get the happy medium in the price per performance ratio unless you are a well informed enthusiast. |
| Memory Kits | Price |
| G.SKILL PIS Series 4GB 2000MHz (F3-16000CL6D-4GBPIS) | $199.99 |
| G.SKILL Ripjaws 4GB 2000MHz (F3-16000CL9D-4GBRH) | $134.99 |
 Bjorn3D.com Bjorn3d.com – Satisfying Your Daily Tech Cravings Since 1996
