ASUS has brought to us another ROG series motherboard. And proving once again do not under estimate the GENE series motherboards size. Dynamite comes in small packages.
Introduction
Earlier this year (2009) ASUS introduced a motherboard that has all of the capabilities, and features that only the full sized counterparts had. These motherboards were all based upon the micro-ATX standard design, during my time using these micro ATX motherboards these little “Bad Boys” quickly became known as the “Mini Monsters” around these parts. In short not only did they keep up with there full sized brethren, they were able to out clock and in some cases out perform full sized motherboards.
These motherboards were known as the ROG (Rebuplic Of Gamers) series GENE, they still carried their bigger brothers name ie. Rampage II, Maximus II. Today ASUS, adds another one of these “Mini Monters” to their line up. I am proud to bring you ladies/gents another ROG GENE motherboard, the ASUS Maximus III GENE.
This time the Maximus III GENE motherboard is based on the ever popular (and cheaper) Intel Socket 1156 CPU. With my past experiences with the previous GENE motherboards that I personally played with, I have high hopes for this little motherboard. I got a feeling I will not be disappointed. Lets break out “Minor Me” and throw in my ever cranking Intel Core i5 750 CPU, in the Maximus III GENE and find out exactly how far I can crank the CPU.
Hope you are ready for a big list of motherboard specifications and the unique features that ASUS packed into this micro ATX mothebroard.
Specifications
| CPU | Intel® Socket 1156 Core™ i7 Processor/Core™ i5 Processor Supports Intel® Turbo Boost Technology * Refer to www.asus.com for Intel CPU support list |
| Chipset | Intel® P55 Express Chipset |
| Memory | 4 x DIMM, Max. 16 GB, DDR3 2133(O.C.)*/2000(O.C.)/1600/1333/1066 Non-ECC,Un-buffered Memory Dual Channel memory architecture * Hyper DIMM support is subject to the physical characteristics of individual CPUs. **Supports Intel® Extreme Memory Profile (XMP) *** Please refer to www.asus.com or user manual for the Memory QVL(Qualified Vendors Lists). |
| Expansion Slots | 2 x PCIe 2.0 x16 (support single at x16 or dual at x8/x8 mode) 1 x PCIe x4 1 x PCI 2.2 |
| Multi-GPU Support | Supports NVIDIA® Quad-GPU SLI™ Technology / ATI® Quad-GPU CrossFireX™ Technology |
| Storage | Intel® P55 Express Chipset built-in 6 xSATA 3.0 Gb/s ports Intel Matrix Storage Technology Support RAID 0,1,5,10 JMicron® JMB363 SATA controller |
| LAN | Gigabit LAN controller featuring AI NET2 GameFirst |
| Audio | SupremeFX X-Fi built-in – 8-channel High Definition Audio CODEC – EAX® Advanced™ HD 4.0 – X-Fi CMSS®-3D – X-Fi Crystalizer™ – Creative ALchemy – Blu-ray support – Supports Optical S/PDIF out port on rear |
| IEEE 1394 | 2 x 1394a ports (1 port at back I/O, 1 port onboard) |
| USB | 14 USB 2.0/1.1 ports (5 ports at mid-board, 9 ports at back panel) |
| ASUS Unique Features | MemOK! MemPerfect ProbeIt Onboard Switches: Power / Reset / Clr CMOS (at rear) ASUS Q-LED (CPU, DRAM, VGA, Boot Device LED) ASUS Q-Connector ASUS Q-Slot ASUS Q-DIMM ASUS EPU ASUS Fan Xpert ASUS MyLogo3 ASUS EZ Flash 2 ASUS CrashFree BIOS 3 |
| Overclocking Features | CPU Power Design – 8-phase CPU power – 2-phase VTT power – 2-phase Memory power ROG Connect CPU Level Up iROG Extreme Tweaker Loadline Calibration Intelligent overclocking tools: – ASUS TurboV EVO – O.C. Profile Overclocking Protection: – COP EX (Component Overheat Protection – EX) – Voltiminder LED – ASUS C.P.R.(CPU Parameter Recall) |
| Back Panel I/O Ports | 1 x External SATA 1 x S/PDIF Out (Optical) 1 x IEEE 1394a 1 x LAN(RJ45) port 9 x USB 2.0/1.1 1 x PS/2 Keyboard port (purple) 1 x Clr CMOS switch 1 x ROG Connect On/Off switch 8-channel Audio I/O with gold-plated jack |
| Internal I/O Connectors | 3 x USB connectors supports additional 5 USB 2.0 ports (1 port reserved for ROG Connect at rear) 1 x IEEE 1394a connector 7 x SATA connectors (one is from JMicron® 363 (black)) 5 x Fan connectors: 1 x CPU / 2 x Chassis / 2 x Optional 1 x SPDIF out header 1 x CD audio in 1 x Front panel audio connector 2 x thermal sensor connectors 1 x 24-pin ATX Power connector 1 x 8-pin ATX 12V Power connector 1 x En/Dis-able Clr CMOS header 5 x ProbeIt measurement points 1 x Go Button System panel connector |
| BIOS | 16 Mb Flash ROM , AMI BIOS, PnP, DMI2.0, WfM2.0, SM BIOS 2.4, ACPI2.0a Multi-Language BIOS |
| Manageability | WOL by PME,WOR by PME,PXE |
| Accessories | User’s manual 1 x I/O Shield 1 x ROG Connect Cable 1 x ROG Cable Labels (12 in 1) 1 x SLI Cable 1 x 2-in-1 ASUS Q-Connector Kit 3 x 2-in-1 SATA signal cables 1 x Cable Ties 1 x ROG Theme Label |
| Support Disc | Support DVD: – Drivers and applications Sound Blaster X-Fi Utility ROG GameFirst Utility ASUS TurboV EVO Utility ASUS PC Probe II ASUS Update ASUS AI Suite Kaspersky® Anti-Virus |
| Form Factor | uATX Form Factor 9.6 inch x 9.6 inch ( 24.4 cm x 24.4 cm ) |
Features
CPU Features
Supports Intel® Processors in the LGA1156 Package
![]()
![]() This motherboard supports the latest Intel® Lynnfield processors in LGA1156 package, which as memory and PCI Express controller integrated to support 2-channel (4 DIMMs) DDR3 memory and 16 PCI Express 2.0 lanes, providing great graphics performance. Intel® Lynnfield processor is one of the most powerful and energy efficient CPU in the world.
This motherboard supports the latest Intel® Lynnfield processors in LGA1156 package, which as memory and PCI Express controller integrated to support 2-channel (4 DIMMs) DDR3 memory and 16 PCI Express 2.0 lanes, providing great graphics performance. Intel® Lynnfield processor is one of the most powerful and energy efficient CPU in the world.
Chipset Features
Intel® P55 Chipset
![]() The Intel® P55 Express Chipset is the latest one-chipset design to support the latest 1156 socket Intel® Lynnfield processors. Intel P55 provides improved performance by utilizing serial point-to-point links, allowing increased bandwidth and stability.
The Intel® P55 Express Chipset is the latest one-chipset design to support the latest 1156 socket Intel® Lynnfield processors. Intel P55 provides improved performance by utilizing serial point-to-point links, allowing increased bandwidth and stability.
PCIe 2.0
![]() Double Speed; Double Bandwidth
Double Speed; Double Bandwidth
This motherboard supports the latest PCIe 2.0 devices for double speed and bandwidth which enhances system performance.
Multi-GPU Technology
SLI/CrossFireX On-Demand
![]()
![]() Why choose when you can have both?
Why choose when you can have both?
SLI or CrossFireX? Fret no longer because with the ROG Maximus III GENE, you´ll be able to run both multi-GPU setups. The board features SLI/CrossFireX on Demand technology, supporting SLI or CrossFireX configuration. Whichever path you take, you can be assured of jaw-dropping graphics at a level previously unseen.
Memory Feature
Dual-Channel, DDR3 2133(O.C.) MHz Support
![]() The motherboard supports DDR3 memory that features data transfer rates of 2133(O.C.)/2000(O.C.)/1800(O.C.)/1600/1333/1066 MHz to meet the higher bandwidth requirements of the latest operation system, 3D graphics, multimedia, and Internet applications. The dual-channel DDR3 architecture double the bandwidth of your system memory to boost system performance.
The motherboard supports DDR3 memory that features data transfer rates of 2133(O.C.)/2000(O.C.)/1800(O.C.)/1600/1333/1066 MHz to meet the higher bandwidth requirements of the latest operation system, 3D graphics, multimedia, and Internet applications. The dual-channel DDR3 architecture double the bandwidth of your system memory to boost system performance.
ROG Exclusive Features
ROG Connect
 Plug and Overclock – Tweak it the hardcore way!
Monitor the status of your desktop PC and tweak its parameters in real-time via a notebook—just like a race car engineer—with ROG Connect. ROG Connect links your main system to a notebook through a USB cable, allowing you to view real-time POST code and hardware status readouts on your notebook, as well as make on-the-fly parameter adjustments at a purely hardware level.
MemPerfect
 Optimize your memory without lifting a finger!
Why risk crippling your system with poorly tuned memory? Now, with ROG´s exclusive MemPerfect optimizing your memory performance is a simple matter of selecting the frequency you desire, and letting MemPerfect do the rest! MemPerfect quickly checks your memory settings for errors and automatically fixes them—ensuring system stability and maximum efficiency.
iROG
 Intelligent multiple control at hand
The iROG is a special IC which enables several ROG highlitghted functions that gives users full disposal of the motherboard at any stage! This design allows advanced user control and management to be processed purely at a hardware level. iROG greatly increases fun during overclocking for PC enthusiasts and it offers system maintainence and management with more control and efficiency.
MemOK!
 Any memory is A-OK!
Memory compatibility is among the top concerns when it comes to computer upgrades. Worry no more, MemOK! is the fastest memory booting solution today. This remarkable memory rescue tool requires nothing but a push of a button to patch memory issues and get your system up and running in no time. The technology is able to determine failsafe settings that can dramatically improve system booting success.
ProbeIt
 Get all hands-on with hardware-based overclocking
ProbeIt takes the guesswork out of locating the motherboard´s measurement points, identifying them clearly in the form of 5 sets of detection points so you´ll know exactly where to get quick yet accurate readings using a multitester.
COP EX
 Maximum OC with confidence with burn proof protection to chipsets and CPU!
The COP EX allows overclockers to increase chipset voltages without the worries of overheating. It can also be used to monitor and save an overheating CPU. The COP EX allows more freedom and less constraint for maximum performance achievement.
GameFirst
 The speed you need to pwn
Low Internet latency allows you to frag more, and get fragged less. That´s why ROG has introduced GameFirst, a feature that manages the flow of traffic according to your needs so that you can still listen to online music, download and upload files, and engage in Internet chats without sacrificing the low ping times you need to pwn your opponents.
CPU Level Up
A Simple click for instant upgrade Ever wish that you could have a more expansive CPU? Upgrade your CPU at no additional cost with ROG´s CPU Level Up! Simply pick the processor you wanted to OC to, and the motherboard will do the rest!
See the new CPU speed and enjoy that performance instantly. Overclocking is never as easy as this.
Extreme Tweaker
 One stop performance tuning shop
Extreme Tweakers is the one stop shop to fine-tune your system to optimal performance. No matter if you´re looking for frequency adjustment, over-voltage options, or memory timing settings, they´re all here!
Voltiminder LED
 Friendly reminder on Voltage Settings
In the pursuit of extreme performance, overvoltage adjustment is critical but risky. Acting as the “red zone” of a tachometer, the Voltiminder LED displays the voltage status for CPU, PCH, and Memory in a intuitive color-coded fashion. The voltiminder LED allows quick voltage monitoring for overclockers.
Loadline Calibration
 Optimal power boost for extreme CPU overclocking!
Maintaining ample voltage support for the CPU is critical during overclocking. The Loadline Calibration ensures stable and optimal CPU voltage under heavy loading. It helps overclockers enjoy the motherboard´s ultimate OC capabilities and benchmark scores.
ASUS EPU-6 Engine
 System Level Energy Saving
The new ASUS EPU – the world´s first power saving engine, has been upgraded to a new 6 engine version, which provides total system power savings by detecting current PC loadings and intelligently moderating power in real-time. With auto phase switching for components (which includes the CPU, VGA card, memory, chipset, hard drives and CPU cooler/system fans), the EPU automatically provides the most appropriate power usage via intelligent acceleration and overclocking – helping save power and money.
Sound with Clarity
SupremeFX X-Fi built-in

 Listen with absolute HD
Play in extreme fidelity !
SupremeFX X-Fi delivers an excellent high definition audio experience to the gamers of ROG. The SupremeFX X-Fi features unique audio innovations for gamers to spot enemies in 3D environment during game play. SupremeFX X-Fi combines the technological quality design of SupremeFX and sound effect technology from Creative Labs to offer games exceptional game sound with absolute quality.
Noise Filter
![]() Eliminate background noise while recording
Eliminate background noise while recording
This feature detects repetitive and stationary noises like computer fans, air conditioners, and other background noises then eliminates it in the incoming audio stream while recording.
ROG EZ DIY Features
Onboard Switch
 No more shorting pins or moving jumpers
With an easy press during overclock, this exclusive onboard switch allows gamer to effortlessly fine-tune the performance without having to short the pins or moving jumpers!
ASUS Q-Connector
 Make connections quick and accurate
The Q-Connector allows you to connect or disconnect chassis front panel cables in one easy step with one complete module. This unique adapter eliminates the trouble of plugging in one cable at a time, making connection quick and accurate.
Rich Software Bundled
Kaspersky® Anti-Virus
![]() The best protection from viruses and spyware
The best protection from viruses and spyware
Kaspersky® Anti-Virus Personal offers premium antivirus protection for individual users and home offices. It is based on advanced antivirus technologies. The product incorporates the Kaspersky® Anti-Virus engine, which is renowned for malicious program detection rates that are among the industry´s highest.
Packaging

The packaging of the ASUS Maximus III GENE motherboard looks identical to the last three GENE motherboards. But this time ASUS has a windows 7 ready sticker on this one. Like most other P55 chipset motherboards this motherboard supports ATI Crossfire and Nvidia SLI Multi GPU configuration.

Opening up the packages top lid. This part of the box gives us the advanced features of the Maximus III GENE motherboard.

On the inner side of the lid of the packaging is more features this motherboard supports. The Memory OK button been renamed to the Go Button. This helps the motherboard reconfigure itself in case there is a memory compatibility problem.

How ASUS packaged up the motherboard inside of the box. Again identical to how the other two GENE series motherboards are packaged up.

I removed the motherboard box tray to see what comes bundled with the Maximus III GENE.

Everything that is bundled with the ASUS Maximus III GENE. We get an instruction booklet (driver disc inside of the manual), A large ROG sticker, SLI ribbon, an rear IO back plate cover, front IO quick connectors (this makes organizing these plugs into a much simpler design. An USB cable? (have to look this one over.) A bag of wire ties, and finally six SATA cables. What no LED Poster? That’s odd, the last two GENE motherboards had a LED poster included.

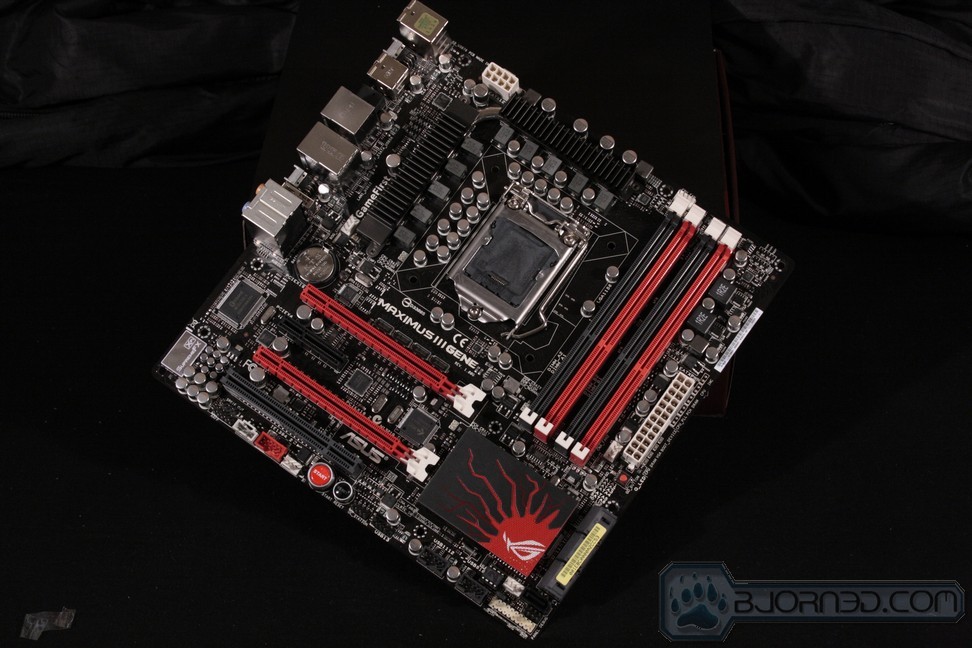
Finally the motherboard out side in all its glory, this motherboard is one sexy motherboard. Just giving this motherboard a quick look over, it appears that there is plenty of room around the CPU socket area, the PCI-E ports are in the correct spot, overall so far a nice an clean layout.
Overview

Starting off on where the EPS CPU power plug is at. ASUS moved this power port a little bit towards the edge of the motherboard, instead of placing it directly behind the rear IO ports, you still may have some issues reaching this port once it is in a chassis, but it should not be that rough like it used to be to gain access to this power plug (be chassis specific). The GENE motherboard uses a 10 phase power distribution for the CPU, then right behind the chokes are two heat sinks that keep the power mosfets cool during our heavy overclocking adventures. Near the bottom left hand corner we see fan header #1, counting as I see them.

Moving our way down the backside of the motherboard. ASUS uses two PCI-E x16 ports (long red ports) separated by a x4 PCI-E port. The two PCI-E 16 ports will run x16 x 1 or while in multi GPU mode these will be reduced to a 2 x 8×8 configuration, Fallowed by a single PCI port. in the far corner we can see the Supreme X-FI controller chip cover. Right above the first PCI-E 16x port is the Clear CMOS battery, this is in a good spot to get access to. Now turn our attention down toward the bottom edge of the Maximus III GENE motherboard, ASUS places the front IO audio header towards the back end of the motherboard, fallowed by a onboard audio header jack, a 1394 fire wire jack, then we can see fan header #2. The big red button you see is the onboard on/off button. Even if I had two video cards on the this motherboard access to this should be real easy.

Now lets move down towards the PCH (P55) chipset. Starting up toward the upper corner we see the onboard power button and the onboard reset button. moving our way down we can make out an overclocking station port, I have no idea what this port is for because this control was not included. fallowed by three front USB headers, then finally the front IO on/off reset switches, power/HDD LED header. Right above the front IO header is fan connector #3. ASUS even changed the PCH heatsink, I kinda like this new style heatsink design just to bad it be covered up by the first video card. Then right below the PCH chipset are the 180° SATA ports. there is a single 90° SATA port between the 180° ports and the front IO header. Oops, I forgot about fan header #4 that is right below the memory DIMMs.

Looking at the DIMM ports of the Maximus III GENE motherboard, since the 1156 socket CPUs only support dual channel, ASUS only includes 4 memory DIMMs. We can see the main 24 pin power plug, then right above the memory DIMMs is fan header #5. Now what are those little solder pads for I wonder?

The Go button (or Memory OK switch) is located just before the main 24pin motherboard power plug. After thumbing my way through the instruction manual, I found out these solder pads are indeed real time voltage check points. May wanna be careful with the multimeter probes with these, because they do sit really close to one another. Finally I can stick my probes into something, lol.

Looking over the CPU socket area, there does not seem to be any major obstacles in this area, so the use of large CPU coolers should be ok.

Like the other GENE motherboards ASUS includes an LED warning system for when we start cranking the voltages of our components. These light up the same color as the other GENE motherboards (green good, amber High, red crazy) this is the location of the CPU warning LEDs. If you look right below the power mosfet heat sink we can see the OP temp 1 probe hook up, for if you have an extra temp probe to hook up to this motherboard, I did not see any other temperature probe hook ups.

The PCH LED warning system is located right above the PCH heatsink.

The memory warning LEDs are located right above the first DIMM memory port.

Time to look at the rear IO ports of the Maximus III GENE. Starting off on our right then moving left, ASUS gotten rid of the two PS2 ports and replaced it with the single PS2 port with two USB header. Now this is definitely an welcome sight, while most P55 based chipset motherboards dropped the rear clear CMOS button ASUS kept this as standard on their motherboards. Then we are greeted with 2 more USB header, an Audio Opticle out, fallowed by a power USB/1394 Firewire/E-SATA header, 1 Ethernet with two more USB header. What fallows next is a rather strange looking button with a sideways USB port, hmm I wonder what this is for? Then finally the eight channel audio ports.

Looking more closely to this strange new button on the rear IO ports, this is an ROG connect from what I read from the manual, it will allow you to connect to this motherboard remotely to monitor various functions.

The PCH heatsink, now I thought this needed to be pointed out. The heatsink that ASUS used is not the standard everyday fin design, instead ASUS used a block of aluminum as a heat sink. Not saying it is bad, just odd, because during my use of the Maximus II GENE motherboard not once did the PCH get even warm.
Extras
 |
 |
 |
|
 |
 |

Just various pictures of the ASUS Maximus III GENE motherboard.
INSTALLATION

I just had to get another picture of the Maximus III GENE motherboard all naked like before installation.

Like always I start off with the retention plate. This is how I prep the retention plate prior to installing the water block, I will always use a retention plate on my CPU coolers.
 |
 |
Installed the retention plate onto the motherboard.

Now since the retention is in, it is time to start securing it.

First up is the neopreme washers to protect the Maximus III GENE motherboard surface.

From the steel nuts I am about to use to fully lock down the retention plate to the motherboard. This will ensure that the retention plate and motherboard are one unit, also keep the Maximus III GENE from being bowed once the water block gets placed.

Time for the CPU to get placed onto the motherboard.

Bingo, the polished Intel Core i5 7509 CPU is in and ready to get a work out.

Memory installation as always, is easy to install onto ASUS boards, ever since ASUS went with a metal spring clip on one side and actual locks on the opposite side.

Line up the notches and slides, then press down. Easy as pie.

All done.

Now it is time for chassis installation, since I am using a Raven RV02 chassis, the board will be mounted somewhat different from what you are used too.

Time for the Modified Danger Den MC TDX water block.

I use neoprene washers on the block top as well to help protect the top, from the brass thumb nuts.

Well since one of my neoprene washers wandered off, (I think it gotten scared, you wuss of a washer get back here, lol) So I found a steel one for use in its place.

Just placing the brass thumb nuts on to the water block to secure it properly.

What the motherboard looks like once installed. The video card I used is a EVGA 275GTX.

I almost forgot about the voltage check points. Hooray, I get to use my multimeter.

Time to start sticking these somewhere on the ASUS Maximus III GENE motherboard. Does it really mater where? If you want to kill a perfectly good motherboard, then I guess it doesn’t.

For me I need to keep the ASUS Maximus III GENE board alive. So starting off on the ground probe I will not be placing this no where near the motherboards ground points. Mainly because the pads on where you check the voltages at, to me anyways, are way to close for comfort.

Instead, I will find a unused molex power plug.

Then stick the ground probe into one of the two ground wires of it. Molex power plugs have two grounds in the center of the plug, a ground is a ground no matter where it comes from.

Now its time to start using the positive probe. See it is so much easier doing it this way, then having to hold two probes and at the same time while also trying to read the multi meter.

The positive lead on the pad is designated by a square looking pad, or by a thick white line on one side of the check point. If you do the checking like I did, and you manage to check to ground point you will just end up with a 0 on your multi meter and nothing will happen to the motherboard.
The BIOS Part 1
These BIOS screen shots are only here to give you what the BIOS of the Maximus III GENE motherboard is laid out. I will not be going into great detail of the BIOS itself as most are self explanatory.
 |
 |
 |
 |
 |
 |
 |
 |
 |
 |
 |
 |
 |
 |
 |
 |
 |
 |
 |
 |
 |
 |
 |
 |
 |
 |
 |
 |
 |
 |

I skipped over the Overclocking bit of the BIOS itself that will be posted on the next page. The rest of the BIOS is pretty much the standard lay out we have all grown accustomed to from ASUS. ASUS does an exellent job on grouping up the BIOS itself into sub catagories, for the user to easily access a peticular setting. Anyone should not have a problem on navigating the BIOS at all. ASUS also includes a save profile page where we can save all of our specific motherboard adjustments, this makes loading and saving these profiles effortlessly.
The BIOS Part DEUX
Once again no real need to go into an all in depth overview of the BIOS but I will explain some of these adjustments if it is needed. This is the first BIOS page you come to once you enter the BIOS, this is also where we can tweak the Maximus III GENE to its absolute maximum capabilities.
 |
 |
 |
 |

Once again I am not disappointed by ASUS BIOS adjustments, there are plenty of adjustments also ASUS does a great job on giving us the current settings that are being used, for us to better fine tune the motherboard. ASUS also gives us an ability to up scale our CPU’s (designated CPU core speeds) set the XMP profile of our memory, gives us a boat load of memory timing adjustments, to finally giving us users a fairly fine tuning on our voltages. The only area I thin ASUS could have done better was the BIOS warning colors on the memory, in order to get the proper performance out of our memory we need to be at 1.65 volts, the BIOS gives us a Yellow warning on the memory once it is set to 1.64 volts. oh I should mention that so far out of five different P55 motherboards I still don’t have a 1.65 memory voltage setting. I think ASUS and other manufacturers should include the 1.65 voltage setting, considering our memory runs at 1.65 volts (as it makes only sense to have this setting).
Testing Methodology
| Test Setup &Testing Methodology | |
| CPU | Intel Core i5 750 Lapped |
| Motherboard | GIGABYTE P55-UD4, ASUS MaximusIII GENE |
| Case | SIlverStone Raven RV-02 |
| Memory | GSkill RipJaw |
| Video Card’s | EVGA 275GTX |
| Hard Drives | Patriot SSD 128 Gig |
| CDRom Drive | Lite On Blue Ray |
| Power Supply | Seasonic 850W |
| CPU Speeds Used | 2.66GHz, 4.2GHz |
| Operating System Used | Microsoft Windows 7 Retail |
| Video Card Cooler |
Stock cooled |
| CPU Cooler |
Modified Danger Den MC-TDX custom water cooled |
The above components were used for testing the ASUS Maximus III GENE motherboard. I ran each program a minimum of three times to ensure accurate results and to make stability was present through out testing. This is going to be a “Battle of the Micro’s” type of testing. The only other motherboard I will be comparing the Maximus III GENE against is the ever trusted Gigabyte P55M-UD4 motherboard. The Programs used and their respected testing ways will be listed below. Default testing I did not use the memory XMP profile at all instead I used the default 133 BCLK with a memory divider of 10 while using the default CPU multiplier of 20. Using this setting will ensure that I get a solid base line of performance (absolute minimum). All other settings were set to auto on both motherboards. Only the Maximus III GENE will be overclocked through out testing, as this is just for you to get an idea on how the performance is related once the CPU gets cranked.
Programs Used through out testing.
- AutoMKV: A 426 meg AVI file was converted to an MKV type of file. Time it took to convert this movie was measured. MultiThreaded.
- Blender: Rendering of an Squirrel, time it took to render the image was recorded. MultiThreaded
- Excell Monte: Time it took to fully calculate a specific set of numbers. MultiThreaded
- Excell Number Crunch: Time it took to complete a fixed set of calculations. MultiThreaded
- POV Ray: Time it took to render 2 still images @ 1280×1024 00,3aa resolution, also to render two animation images @ the same resolution. MultiThreaded
- Win RAR: Time it took to compress 5 TIFF files totaling 350 megs into 1 zip file. Normal compression. MultiThreaded
- Everest: Memory Read, Write, Copy, & Latency, CPU Queen, FPU Julia were used for testing. MultiThreaded
- SiSoft: Arithimetic, Multimedia, & memory was used for testing. MultiThreaded
- wPrime: Time it took to complete 32 million calcualtion of PI, and 1024 Million calculation. MultiThreaded
- 3DMark Vantage: No Physx, default Performance run. MultiThreaded
- Unigine Heaven: 1920×1080 No AA
- World In Conflict: 1920×1080 No AA
- Far Cry 2: 1920×1080 No AA
- 3DMark06: Default run. MultiThreaded
Overclocking
Overclocking the Maximus III GENE motherboard was just as easy as previous P55 based motherboards. After doing my initial install of Windows 7 retail, I ran all of my default motherboard benchmarks, I normally overclock the motherboard as soon as it gets put into the chassis and powered up, I started to overclock the motherboard. At first I tried the included software in Windows 7 to see exactly how far it would take the CPU, it would stop at around 3.5ish GHz. Not bad of an overclock for being software based. I then entered BIOS and tried out the CPU upscale, the max the BIOS would go to was 3.6GHz. Again not bad of an overclock if you are new to overclocking and don’t want to mess with the complications of the BIOS. Myself, since I sleep faster then 3.6GHz and I know for a fact the Core i5 750 CPU can do better, I wanted to do some real overclocking. So like any red blooded half crazed lunatic “Mad Scientist” I wanted to see exactly how far I could push the Core i5 750 CPU and how far the Maximus III GENE motherboard will go. So starting off lightly, I set the CPU multiplier to 9, dropped the memory divider to 6 upped the PCH to 1.2 volts manually set the CPU volts to 1.35, memory volts to 1.64.
Then I set the BCLK to 250. Needless to say, that did not go over to well, so I dropped the BCLK to 220, again the motherboard decided it was not going to post. If one is going to overclock lets see exactly how far right out of the gate, if I am going out, I am going to go out in style. I set the BCLK to a reasonable 210 BCLK, the Maximus III GENE motherboard posted right up. Rebooted the computer, re-entered BIOS set the BCLK to 212, again I was greeted with a no post. Dropped the BCLK to 210, then upped the memory divider to 10, CPU multiplier to 20, adjusted voltages accordingly. The Maximus III GENE motherboard posted right up but Windows 7 refused to load (BSOD). After fiddling with a few settings, I came to find out the memory did not peticularly liked being ran at 2100MHz with 10-10-10-30 timings. So dropped the memory divider from 10 to 8 (reducing the memory overall memory frequency), and now I was greeted with a Happy Windows 7 desktop (or was it because I was happy that it loaded?) My CPU is now at a 4.2GHz, ran some quick benchmarks, I had stability (first time I ever been able to use the 20 multiplier on the Core i5 750 CPU with a high BCLK, Nice!)

Overclocked Maximus III GENE motherboard.
Let The Battle Begin
In the blue corner we have the champion, the GIGABYTE P55M-UD4 with 12 phase CPU power distribution weighing in at a pound. And in the red corner the challenger, weighing in around 1 pound as well, with a 10 phase CPU power distribution we have the ASUS Maximus III GENE. The rules are simple, when the bell rings, come out fighting. Ding, Ding, Ding, Ding!!!! Lets get ready to RUMBLE!!!! The things we reviewers do, to keep us entertained.
AutoMKV
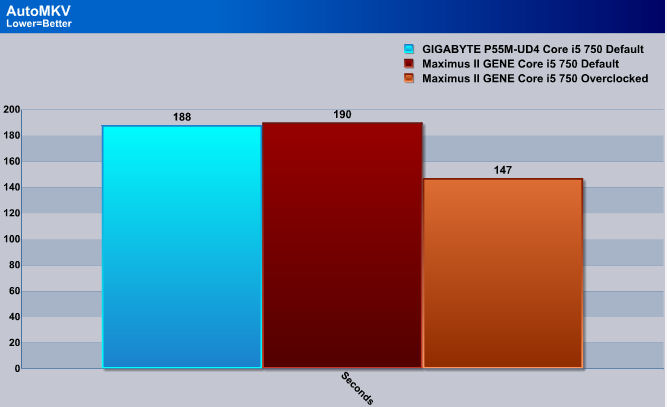
Well to start things with AutoMKV, between both of these two motherboards. They both converted this short movie almost identical in performance only being seperated by a mere 2 seconds.
Blender
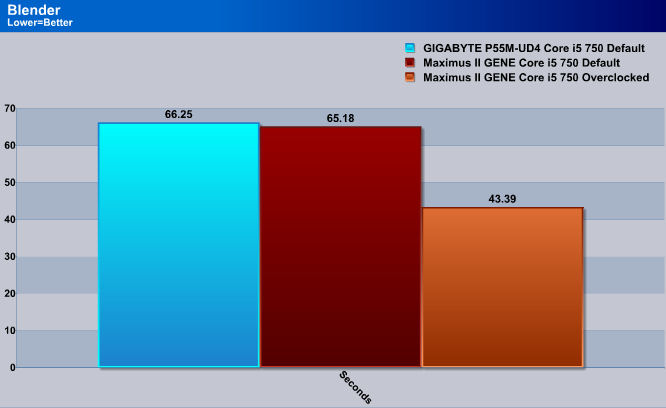
Rendering with Blender, again shows us that these two motherboards are about evenly matched. We see a lot more of a gain once the CPU starts to get overclocked.
Excel
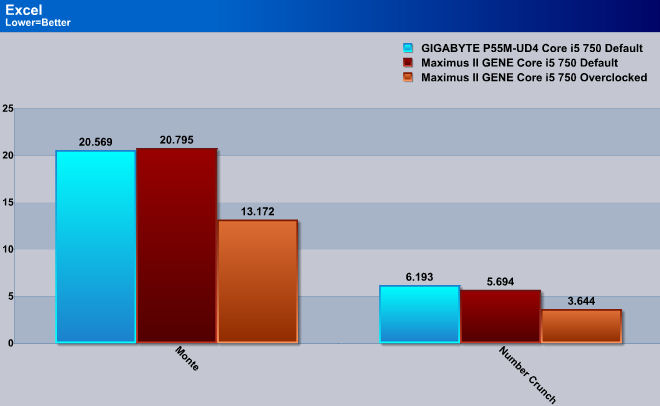
Excell is just re-interating what we seen with the first two benchmarks. There’s no real concern able difference between the two motherboards tested in terms of performance while in a default state.
Pov ray
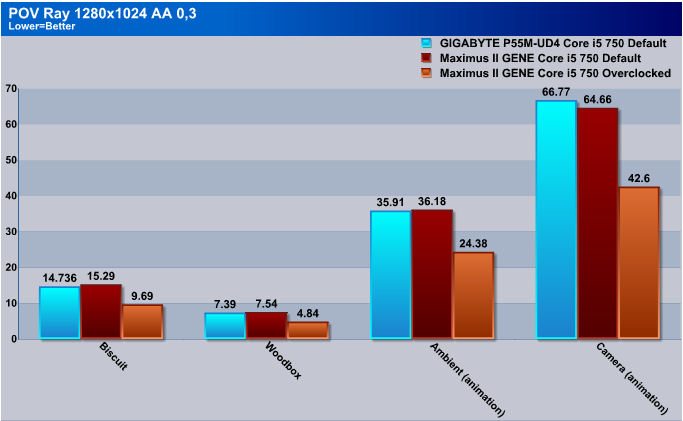
Boy I got a feeling this pattern is going to roughly the same through out the rest of our testing session. The only time we seen a significant different in rendering times was during the Camera animation, when the Maximus III GENE lead the P55M-UD4 motherboard by a little more then 2 seconds.
win rar
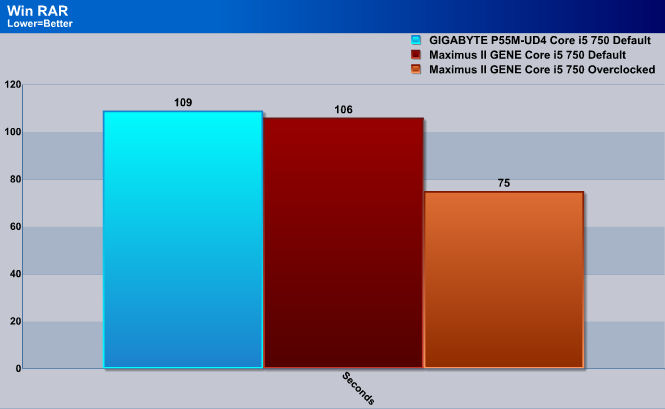
Now we start to see a small difference between the two motherboards tested. And again the Maximus III GENE takes a win by almost 3 seconds.
wprime
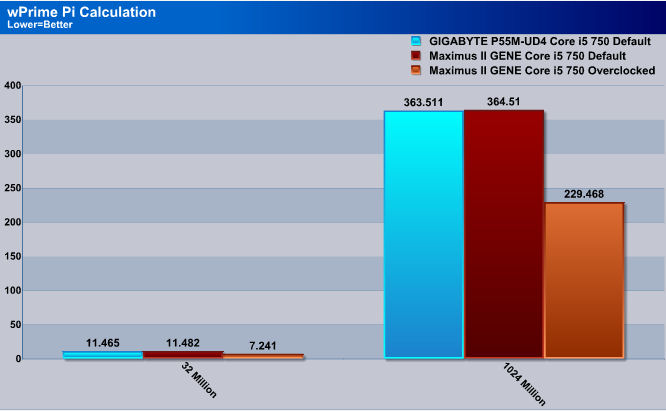
Dead even once again.
Sisoft
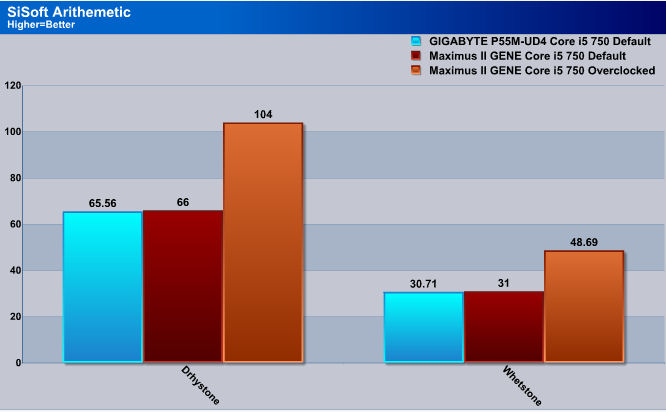
SiSoft is giving us pretty much the same pattern with most of the other benchmarks. Almost identical in performance.
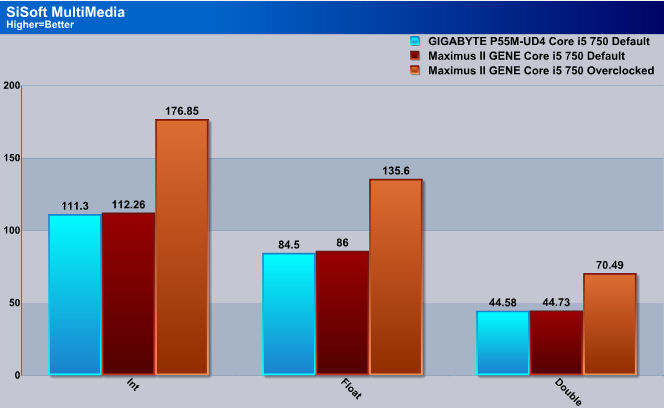
MultiMedia testing reconfirms the performance of the similar P55 motherboards.
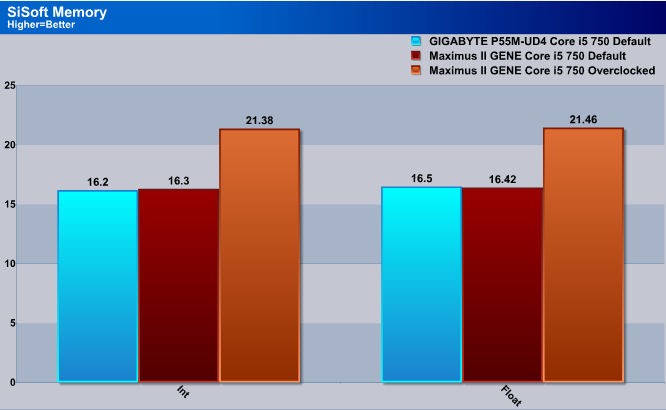
Memory Bandwidth is also Identicle.
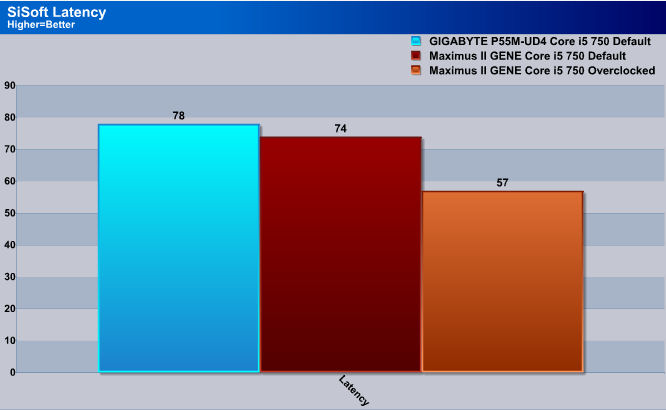
Now we see something a bit different. During the latency testing the Maximus III GENE was able to have a slightly lower latency by 4ns when dealing with the memory.
everest
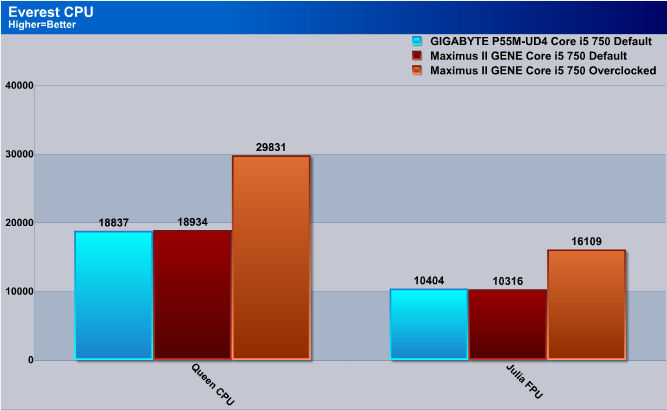
Same performance between the two motherboards.
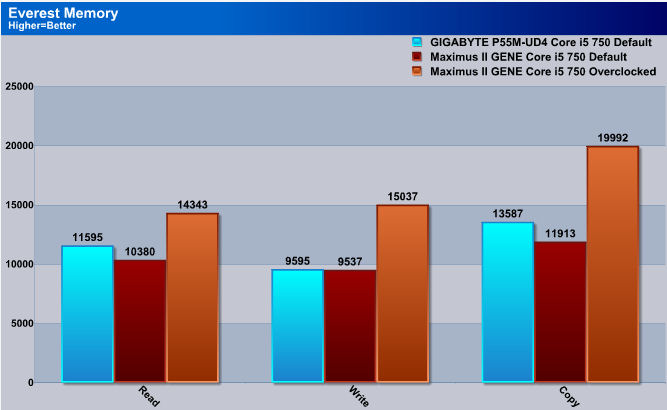
The GIGABYTE P55M-UD4 does have teeth after all, it was able to out perform the Maximus III GENE in both of the Read and Copy portions of testing.
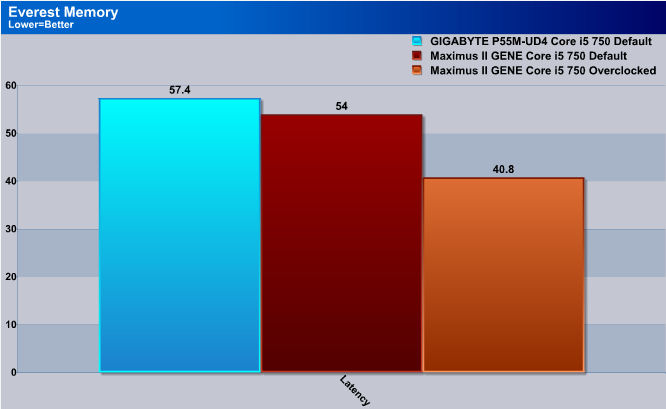
But again I myself would rather have a lower latency on my memory vs having a higher memory bandwidth. I like things to snap to attention.
Let The Games Begin
3DMark Vantage
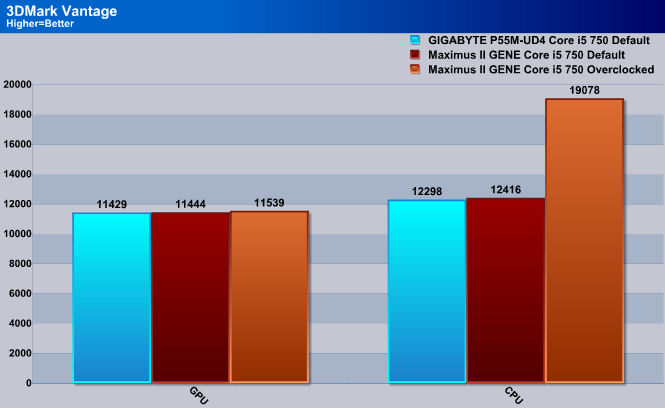
Here is that same performance pattern we seen in a lot of benchmarks.
3DMark06
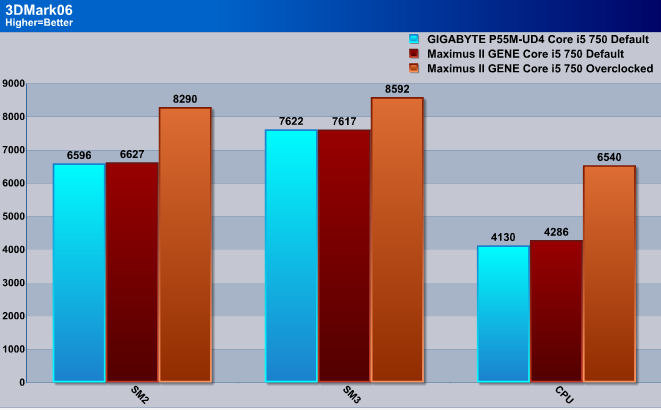
The Maximus III GENE manages to pull a small win when it came to the CPU testing during 3DMark06 testing.
Far Cry 2
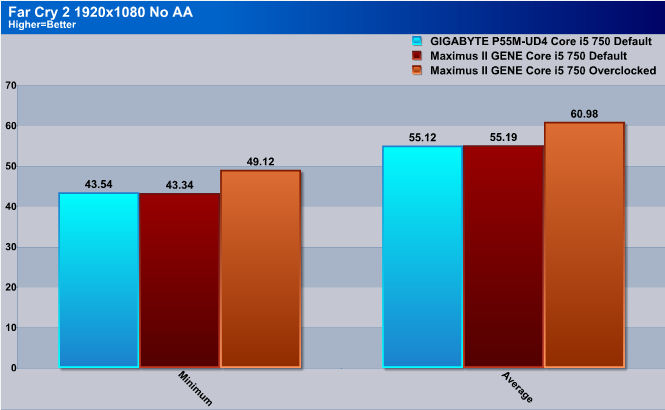
Identical performance between the two motherboards.
World In Conflict
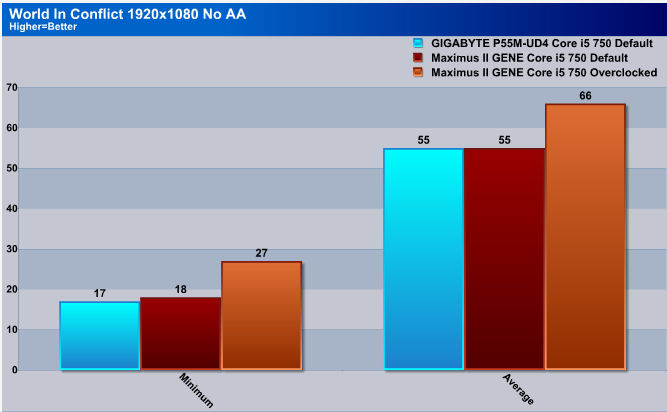
World In Conflict again reconfirms the same performance levels during our gaming sequence.
Unigine Heaven
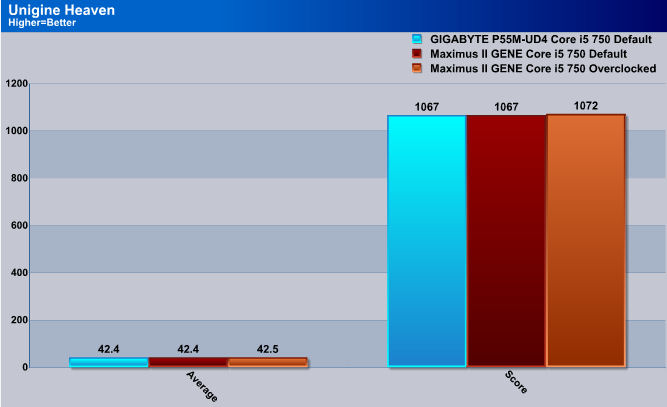
Heaven was the same performance no matter where the CPU was at in frequency.
COnclusions
Through out testing we can see that most P55 motherboards will performa almost identical with one another. With a few exceptions, which we have to ask ourselves, what separates one motherboard from another? The answer is features and capabilities, and or layout. This is where the Maximus III GENE has loads of, features and capabilities (layout is a standard micro ATX). Being able to check voltages on major components on the motherboard, having one of the few P55 based motherboards that uses a rear ward clear CMOS button, being able to access to the on board power/reset buttons, including Creatives very own X-FI sound system, by moving the EPS CPU power button to a spot where accessibility is easier, to finally giving us users the ability to hook up a lap top (or another computer) to diagnose the Maximus III GENE motherboard.
Capabilities fall with in what I personally like to fully and thoroughly test out, is overclocking. Again I need to mention this is so far the only motherboard I been able to sustain a 20 multiplier past a BCLK/FSB (Base Clock, FSB for some you old schoolers) of 200. Another feature that is chipset specific (any P55 based motherboard can do this) that I like personally, is the ability to move from one multi GPU manufacturer to another with out having to buy another specific motherboard to handle either ATI crossfire or Nvidia SLI.
Having a price point on or around the 200 USD mark, makes this a little on the high side, but again looking at the amount of features and shear capabilities you get with this motherboard makes it worth every penny.
| OUR VERDICT: ASUS Maximus III GENE |
||||||||||||||||||
|
||||||||||||||||||
|
Summary: ASUS has always shown their dedication to their motherboards, and they continue this dedication with the introduction of the Maximuss III GENE |


Man, reading about these “Mini Monsters” really takes me back. The Maximus III GENE was such a beast for its size back in the day. I specifically remember being impressed by the point you made about it out-clocking its full-sized brethren; it really proved that mATX didn’t have to mean “budget” or “compromised” just because the PCB was smaller.
I actually ended up repurposing a similar ROG board for a compact home server project a few years ago. Since I was squeezing it into a non-standard chassis, I spent ages hunting down various server accessories and multifarious multi-mounts https://serverorbit.com/server-accessories/multifarious/multi-accessories to get the cooling and internal layout just right. It’s funny how those high-end gaming features, like the 8-phase power design, ended up being great for system stability in a 24/7 server environment, even if that wasn’t the original intent. It’s a testament to how well-built these GENE boards actually were.
Do you think modern mATX boards still hold that same “Mini Monster” reputation, or has the focus shifted almost entirely to Mini-ITX for small form factor enthusiasts now?