Picking an affordable 1156 socket motherboard that performs may have just gotten easier. Meet Gigabyte’s GA-P55-UD4P. A mid-range motherboard that performs beyond its price.
Introduction
When building a computer there are many motherboard manufacturers to choose from, Gigabyte is definitely a company you should have on your list. For as long as I can remember, Gigabyte has built quality motherboards that get the job done. From both sides of the spectrum, Gigabyte has motherboards that will do the simplest of things to being overclocking beasts.

With the new LGA 1156 platform, Gigabyte introduced five new motherboards; the P55 UD3L, P55-UD3R, P55-UD4P, P55-UD5, and the P55-UD6. The P55-UD3L is the least expensive costing $124 USD and the UD6 is the most expensive costing $249 USD. Coming right in the middle of the pack is the P55-UD4P, costing $169 USD. Gigabyte has given every potential buyer a quality choice depending on their budget and we are very proud to report that the Gigabyte GA-P55-UD6 we reviewed previously performed valiantly. We were given the opportunity to evaluate the P55-UD4P and we are very anxious to see how it stacks up against its siblings.
Features
- Leading quality standard of Ultra Durable™ 3 technology with 2oz copper PCB design
- Innovative Smart 6 technology for Smarter PC management
- Support Intel® Core™ i7/ Core™ i5 processors with LGA 1156 socket
- New Dynamic Energy Saver™ 2 technology enables best energy efficiency
-
Support both ATI CrossFireX and NVIDIA SLI for ultimate graphics performance
-
Smart TPM provides 2048 bits key via Bluetooth cellphone
-
Smart DualLAN with Intelligent LAN port auto-switching
-
XHD technology accelerating hard drive performance with ease
-
AutoGreen technology Greening your PC via Bluetooth cellphon
-
Patented GIGABYTE DualBIOS™ technology delivering highest level failure protection
-
Supports Dolby Home Theater audio to create a stunning surround sound listening experience
-
The Precision OV provides more precision voltage control for system
-
Compatible with Windows 7 to deliver the best operation experience
-
Smart 6 “A Smarter way for PC system Management
– Smart QuickBoot: No more waiting for the PC to Boot Up
– Smart QuickBoost: One-Click Overclocking
– Smart Recovery: Reverse time for you
– Smart DualBIOS: Smart personal reminder
– Smart Recorder: Your PC’s Watch Dog
– Smart TimeLock: Time Controller for the PC
Specifications
CPU
- Support for an Intel® Core™ i7 series processor/Intel® Core™ i5 series processor in the LGA1156 package (Go to GIGABYTE’s website for the latest CPU support list.)
Chipset
- Intel® P55 Express Chipset
Memory
- 4 x 1.5V DDR3 DIMM sockets supporting up to 16 GB of system memory
- Dual channel memory architecture
- Support for DDR3 2200/1333/1066/800 MHz memory modules
- Support for non-ECC memory modules
- Support for Extreme Memory Profile (XMP) memory modules
Audio
- Realtek ALC889A codec
- High Definition Audio
- 2/4/5.1/7.1-channel
- Support for Dolby® Home Theater
- Support for S/PDIF In/Out
- Support for CD In
LAN
- 2 x RTL8111D chips (10/100/1000 Mbit)
- Support for Teaming
- Support for Smart Dual LAN
Expansion Slots
- 1 x PCI Express x16 slot, running at x16 (PCIEX16)
- 1 x PCI Express x16 slot, running at x8 (PCIEX8) (The PCIEX16 and PCIEX8 slots conforms to PCI Express 2.0 standard.)
- 3 x PCI Express x1 slots
- 2 x PCI slots
Multi-Graphics Technology
- Support for ATI CrossFireX™/NVIDIA SLI technology
Storage Interface
- Intel® P55 Express Chipset
- GIGABYTE SATA2 chip
- JMB362 SATA2 chip
- iTE IT8720 chip
– 6 x SATA 3Gb/s connectors (SATA2_0, SATA2_1, SATA2_2, SATA2_3, SATA2_4, SATA2_5) supporting up to 6 SATA 3Gb/s devices
– Support for SATA RAID 0, RAID 1, RAID 5, and RAID 10
– 1 x IDE connector supporting ATA-133/100/66/33 and up to 2 IDE devices
– 2 x SATA 3Gb/s connectors (GSATA2_0, GSATA2_1) supporting up to 2 SATA 3Gb/s devices
– Support for SATA RAID 0, RAID 1, and JBOD
– 2 x eSATA 3Gb/s connectors on the back panel supporting up to 2 SATA 3Gb/s devices
– Support for SATA RAID 0, RAID 1, and JBOD
– 1 x floppy disk drive connector supporting up to 1 floppy disk drive
USB
- Integrated in the Chipset
- Up to 14 USB 2.0/1.1 ports (10 on the back panel, 4 via the USB brackets connected to the internal USB headers)
IEEE 1394
- T.I. TSB43AB23 chip
- Up to 3 IEEE 1394a ports (2 on the back panel, 1 via the IEEE 1394a bracket connected to the internal IEEE 1394a header)
Internal I/O Connectors
- 1 x 24-pin ATX main power connector
- 1 x 8-pin ATX 12V power connector
- 1 x floppy disk drive connector
- 1 x IDE connector
- 8 x SATA 3Gb/s connectors
- 1 x CPU fan header
- 2 x system fan headers
- 1 x power fan header
- 1 x PCH chip fan header
- 1 x front panel header
- 1 x front panel audio header
- 1 x CD In connector
- 1 x S/PDIF In header
- 1 x S/PDIF Out header
- 2 x USB 2.0/1.1 headers
- 1 x IEEE 1394a header
- 1 x serial port header
- 1 x parallel port header
- 1 x clearing CMOS jumper
Back Panel Connectors
- 1 x PS/2 keyboard or PS/2 mouse port
- 1 x coaxial S/PDIF Out connector
- 1 x optical S/PDIF Out connector
- 2 x IEEE 1394a ports
- 10 x USB 2.0/1.1 ports
- 2 x eSATA 3Gb/s ports
- 2 x RJ-45 ports
- 6 x audio jacks (Center/Subwoofer Speaker Out/Rear Speaker Out/ Side Speaker Out/Line In/Line Out/Microphone)
I/O Controller
- iTE IT8720 chip
H/W Monitoring
- System voltage detection
- CPU/System temperature detection
- CPU/System/Power fan speed detection
- CPU overheating warning
- CPU/System/Power fan fail warning
- CPU/System fan speed control
BIOS
- 2 x 16 Mbit flash
- Use of licensed AWARD BIOS
- Support for DualBIOS™
- PnP 1.0a, DMI 2.0, SM BIOS 2.4, ACPI 1.0b
Unique Features
- Support for @BIOS
- Support for Q-Flash
- Support for Xpress BIOS Rescue
- Support for Download Center
- Support for Xpress Install
- Support for Xpress Recovery2
- Support for EasyTune
- Support for Dynamic Energy Saver™ 2
- Support TPM
- Support for Smart 6™
- Support for Q-Share
Bundle Software
- Norton Internet Security (OEM version)
Operating System
- Support for Microsoft® Windows 7/Vista/XP
Form Factor
- ATX Form Factor; 30.5cm x 24.4cm
Remark
- Due to different Linux support condition provided by chipset vendors, please download Linux driver from chipset vendors’ website or 3rd party website.
- Due to most hardware/software vendors no longer offer support for Win9X/ME. If some vendors still has Win9X/ME drivers available, we will publish on website.
Note
- TPM function is optional due to different regional policy
Considering the cost of the UD4P, you are getting what we would expect to see in a $170 motherboard. Theres no fancy debug LED’s, no onboard power or reset buttons, and no easy way to clear the CMOS. This board has all the essentials but only the essentials.
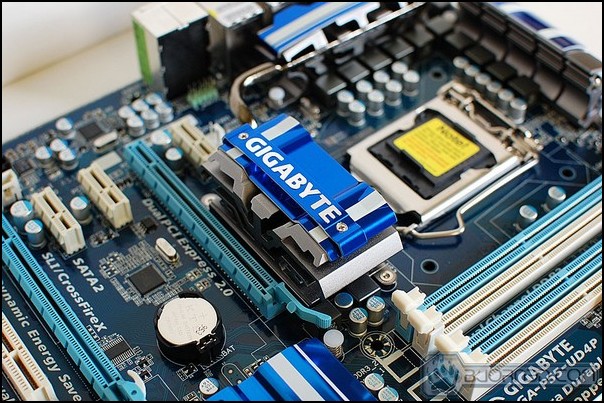
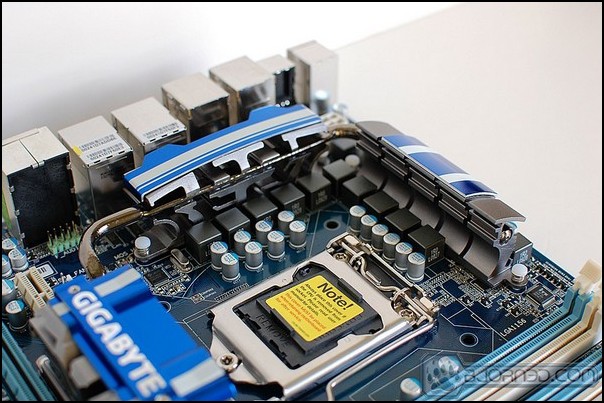
Gigabyte did put the extra MOSFET heatsink on the UD4P which looks almost like a Northbridge heatsink. But don’t be fooled, the LGA 1156 platform motherboards have no Northbridge due to it being on the CPU. Gigabyte kept things nostalgic, but at least its functional and gives an overall positive addition to a featured motherboard.
Gigabyte Special Features
With the UD4P, Gigabyte has bundled plenty of useful features and software. Dynamic Energy Saver 2 to help manage power usage, Auto Green for automatic power state changing, Ultra Durable 3 for longevity, and Smart 6 for system management.
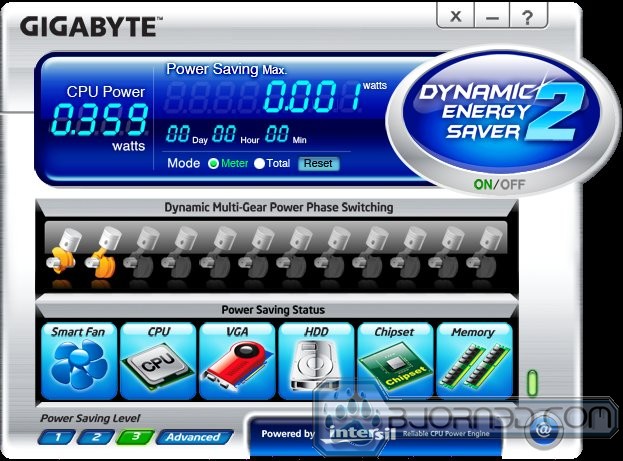
With Dynamic Energy Saver 2 you can monitor power usage and change between three level’s to fine tune usage.
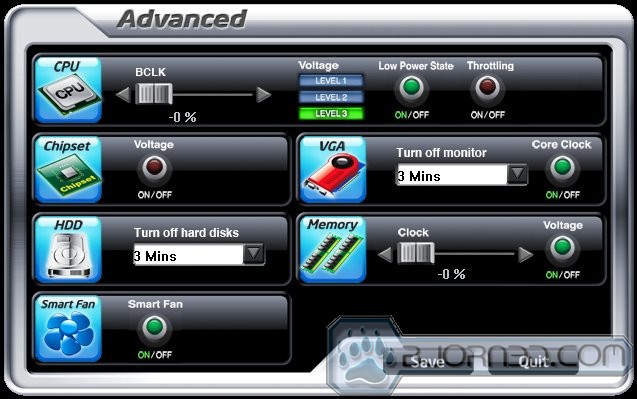
The advanced tab allows you to really fine tune settings to your preferences. The advanced area allows you to regulate the CPU, chipset, hard drive, fans, video card and memory voltages. Overall, this application works very well and we recommend it to anyone who has an interest in keeping power usage to a minimum.
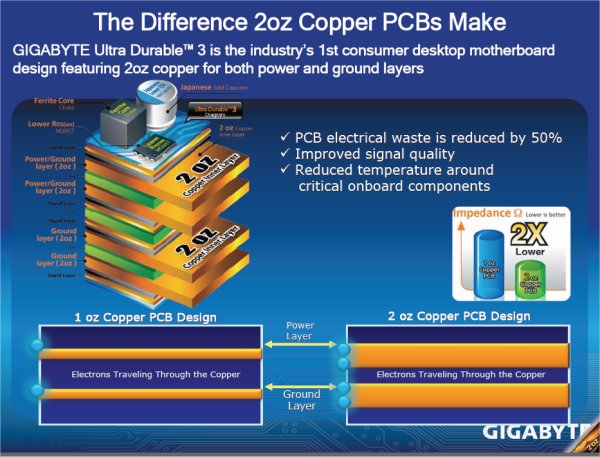
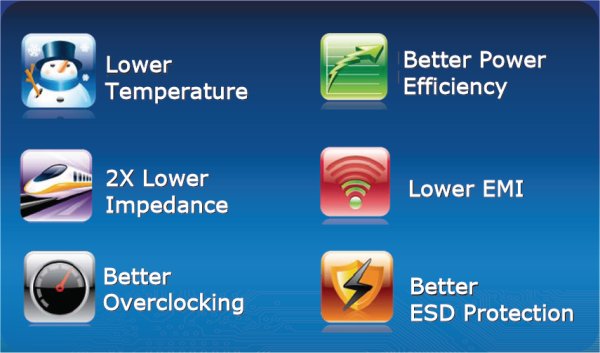
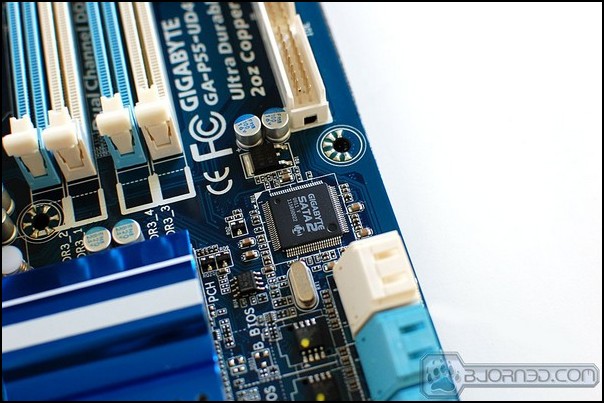
Thanks to Gigabyte’s 2oz’s of copper on the PCB, waste is reduced by a massive 50%, signal quality is improved, overall motherboard temperature is reduced, electrostatic discharge protection is improved, and overclocking is improved. There is no flaw with having a PCB backed with 2oz’s of copper.
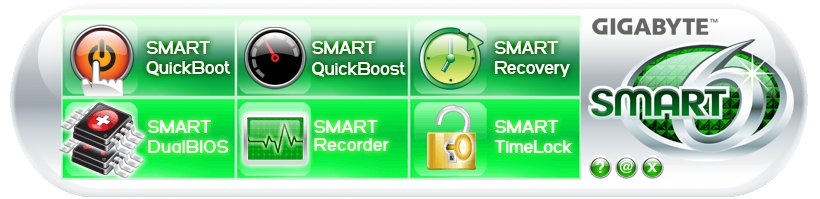
Gigabyte’ Smart 6 suite allows you to better manage your system thanks to six very useful utilities; Smart QuickBoot, Smart QuickBoost, Smart Recovery, Smart DualBIOS, Smart Recorder, and Smart TimeLock.
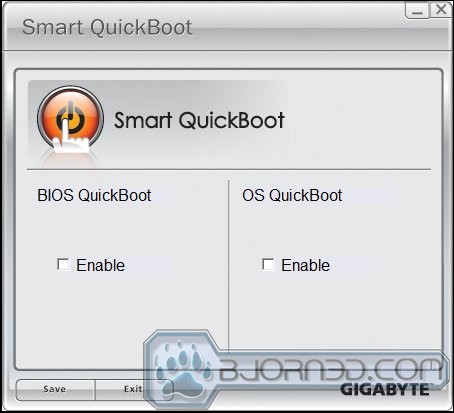
Smart QuickBoot bypasses BIOS checks during boot up resulting in a much faster boot time. By using a sleep state, QuickBoot completely skips the normal checks the BIOS does during a boot up and is able to quickly restore the computer from a sleep state. In other words, it utilizes the sleep mode feature.
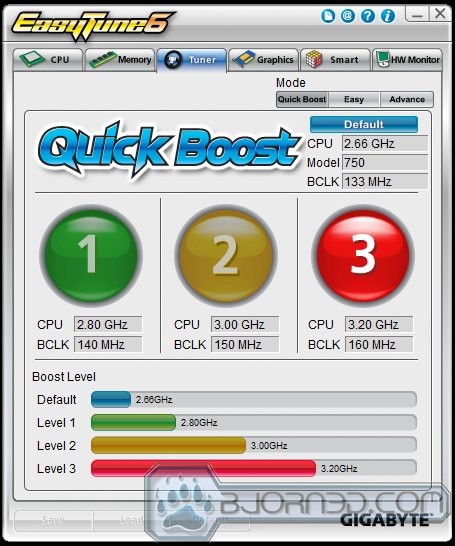
Smart QuickBoost is a utility that allows you to quickly overclock your computer from a GUI. By choosing one of three level’s, the UD4P will adjust itself automatically upon a reboot.
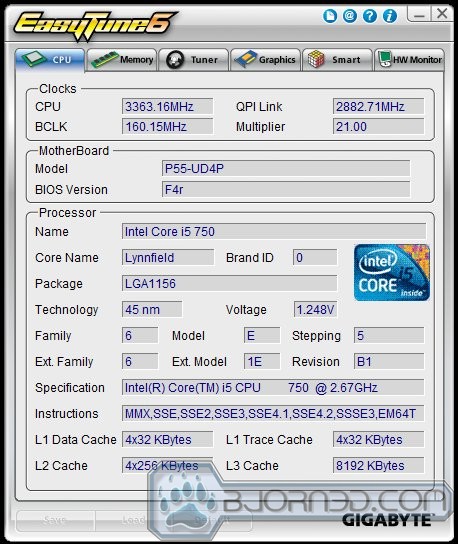
We happily overclock our i5 750 from 2.66GHz to 3.36GHz (thanks to Turbo Boost) using the QuickBoost utility and it worked without any issues. This utility makes overclocking the computer very easy and we do recommend trying this feature out if you have the UD4P or any board from Gigabyte’s P55 series lineup.
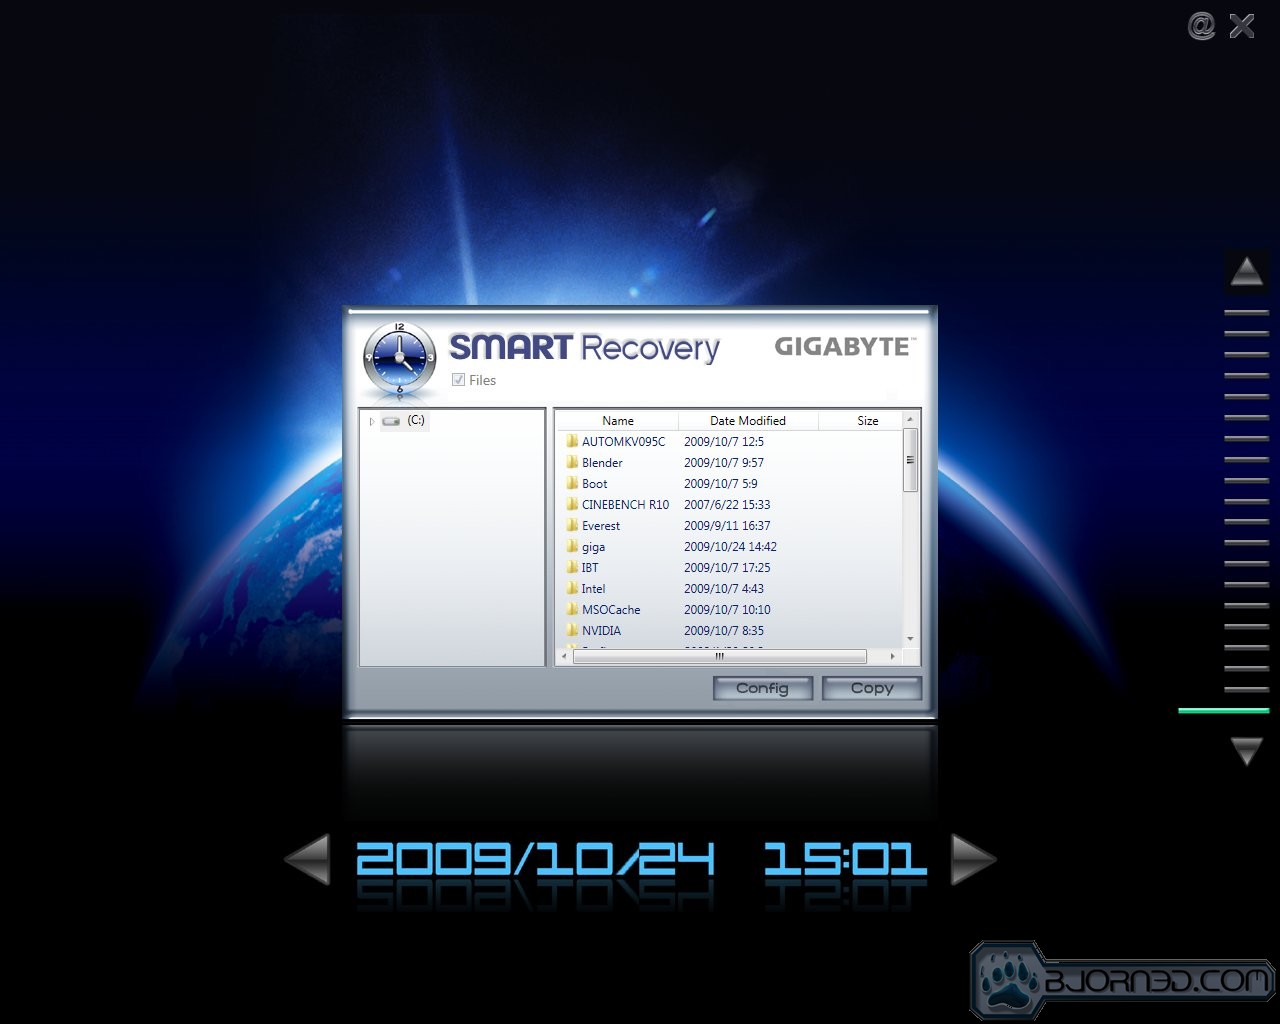
Very similar to Microsoft’s System Restore but with advanced options, Smart Recovery allow you to restore your operating system to a certain state depending on when backups were last created or configured. If you like fine tuning how restore points are created, then you will definitely like Smart Recovery.
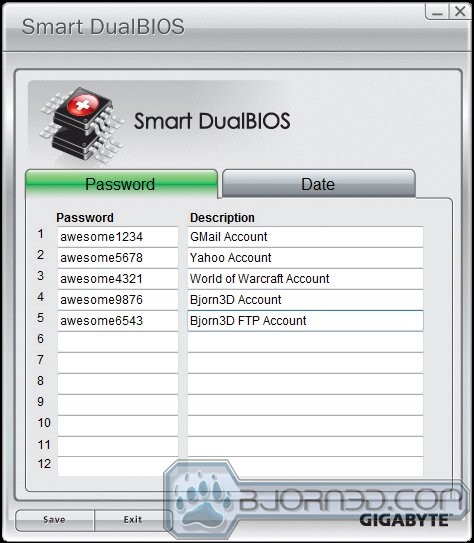
Smart DualBIOS is a very neat feature that stores account information within the UD4P’s BIOS. If for some reason your hard drive decides to die and you don’t recall your login information, you can simply pull up the DualBIOS utility and retrieve your login information. This is a safe of a feature that we find very useful.

Smart Recorder keeps track of when the computer has been turned on and off and also if files have changed. If you have classified information on your computer or if you’re a parent wanting to keep tabs on computer use, Smart Recorder can be a very handy utility. Smart Recorder displays the time of shutdown including the date. The file monitoring portion keeps track of files that have changed. Either it be a file name change or deletion, it keeps track of it. This also serves a nice role when tracking virus activity.

Smart TimeLock allows you to limit the amount of time the computer can used and when it can be used. This is a wonderful utility to keep computer use to a minimum on a shared computer. No more hogging and no more late night computer use binges. Because TimeLock is utilized at the BIOS level, there is no easy way to get around the TimeLock utility. The only real way requires the use of a password. Parents will find the TimeLock feature very useful and roommates may as well.
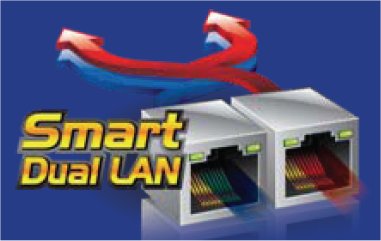
Smart Dual LAN is simply two network chips on a single motherboard. By today’s standard, this is a very common feature, but what sets Gigabyte’s Smart Dual LAN apart from the crowd is the seamless transition that occurs between the chips if one of the network chips happens to fail.

By teaming the LAN ports the UD4P can increase network speed greatly by utilizing two network connections combined into one. Very cool feature if you happen to be a network junkie wanting the fastest transfer rates possible.
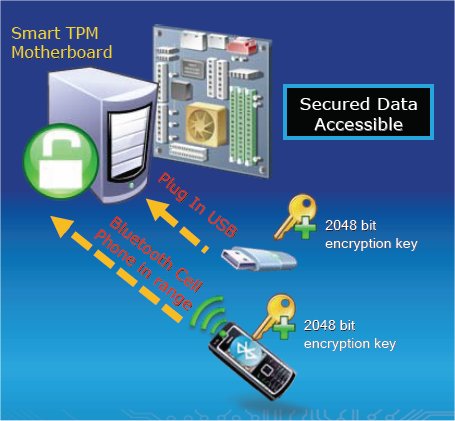
The UD4P is a Smart TPM motherboard which means it has a TPM (Trusted Platform Module) chip installed. The TPM chip provides seamless 2048 Bit encryption for a portion of your hard drive to secure your sensitive files. Two methods of keying the security system are provided. You can use a USB thumb drive which has to be physically inserted in the machine to access the encrypted partition but then to secure the partition you have to remove the thumb drive everytime you leave the computer. Another method of keying the encryption chip is by a Bluetooth enabled phone. In the case, you can use the phone for the key. Proximity of the phone to the computer is the method of unlocking the encryption. Simply by having your phone close to the computer unlocks the encryption. We would suggest having a USB key ready for use, then use the phone for the encryption key. That way if you break your phone, or forget to bring it to work, you have both methods available for accessing the encrypted files.
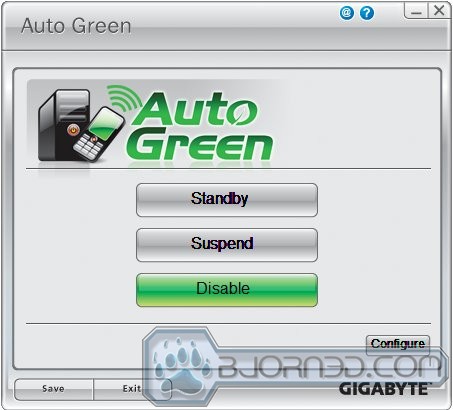
With Auto Green you can also use your Bluetooth phone to set lower power states when away from the computer. This feature helps keep a low amount of power usage when the computer is not being used. Once you return and have your Bluetooth phone within range, the computer will go back to its normal power usage setting. Green lovers should really appreciate this feature, every little Green feature helps. Lets move on to the UD4P’s BIOS.
BIOS
Because there are so many menus and sub-menus in today’s BIOS’, we are going to focus on the key points of the UD4P’s BIOS.
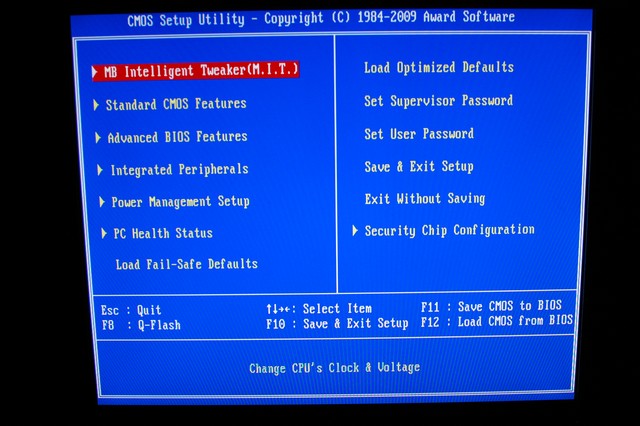
When first entering the UD4P’s BIOS you can see that Gigabyte is using the Award BIOS. The Award BIOS is also used on the rest of Gigabyte’s P55 lineup. The main screen has basic BIOS menus but one menu is the “special” menu. The M.I.T. menu is where all of the overclocking is handled. Instead of waiting, lets move straight to the M.I.T. menu.
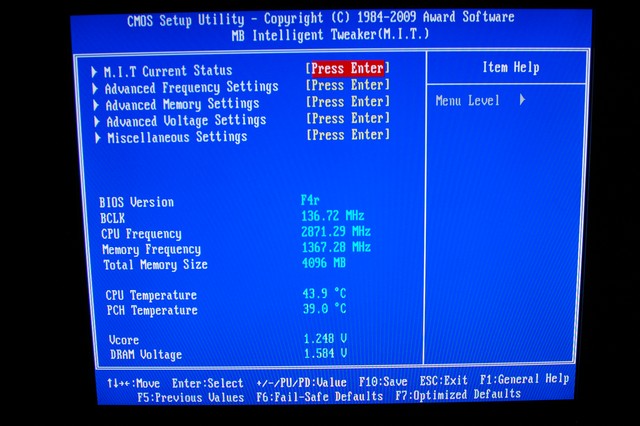
The M.I.T. menu allows you to change the CPU and memory frequencies as well as the voltages associated. There are multiple settings for CPU frequencies, memory, and voltages.
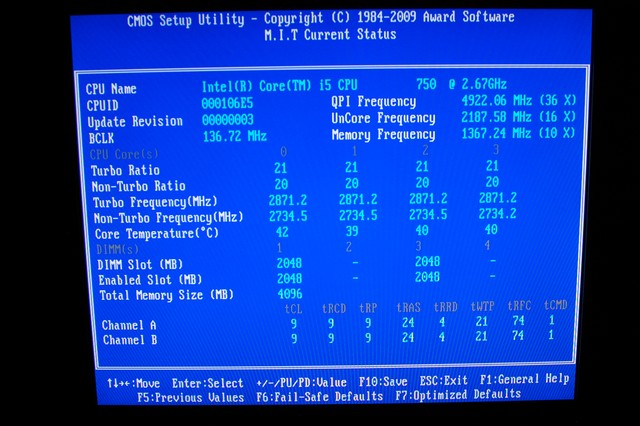
The M.I.T. Current Status menu displays the CPU frequency and settings, memory frequency and timings per DIMM slot, as well as the QPI and UnCore frequencies. This menu is useful when fine tuning your settings.
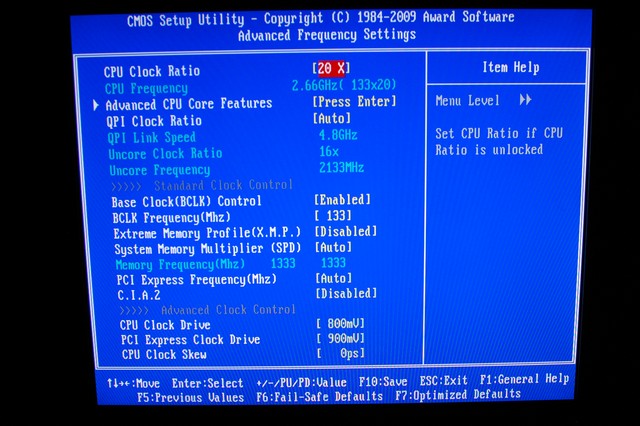
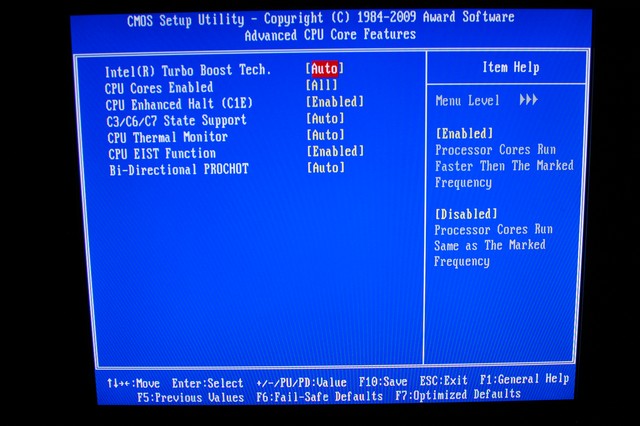
In the Advanced Frequency Settings menu you can change the CPU multiplier, QPI Ratio, adjust the BLCK, toggle Turbo Boost, and also play with C-State’s.
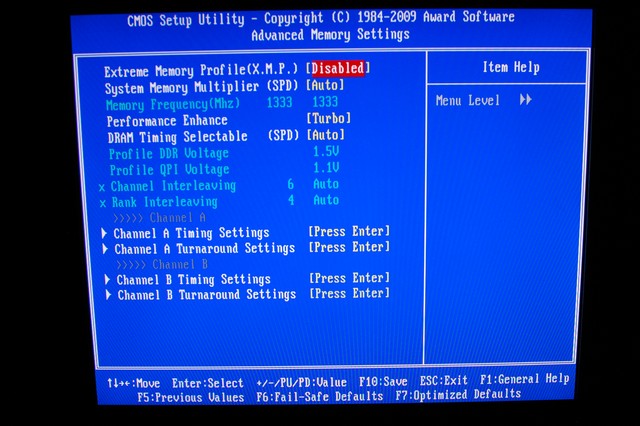
Within the Advanced Memory Settings sub-menu, you can toggle X.M.P. profiles if your memory supports it, change the memory multiplier, and also manually enter the memory timings. So far the UD4P’ BIOS has everything needed to manually fine tune your overclock to the fullest, including adjusting voltages.
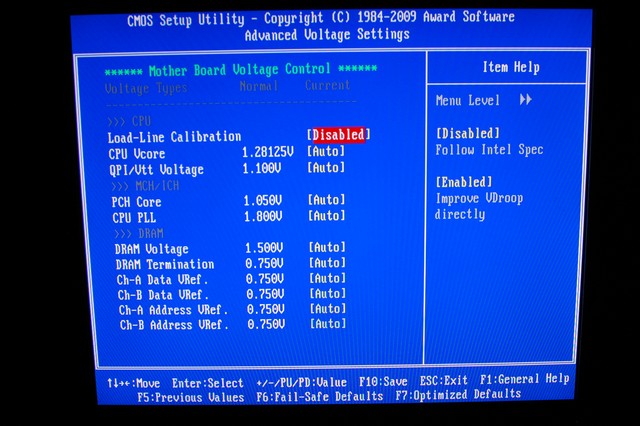
Within Advanced Voltage Settings menu we were able to adjust almost every voltage possible. CPU Vcore, QPI/VTT, DRAM, PCH, and PLL. During our overclocking session we left PLL untouched but did utilize the other options with success. If for some reason you are experiencing vdroop (irregular voltage variation), enabling Load-Line Calibration should help resolve the issue.
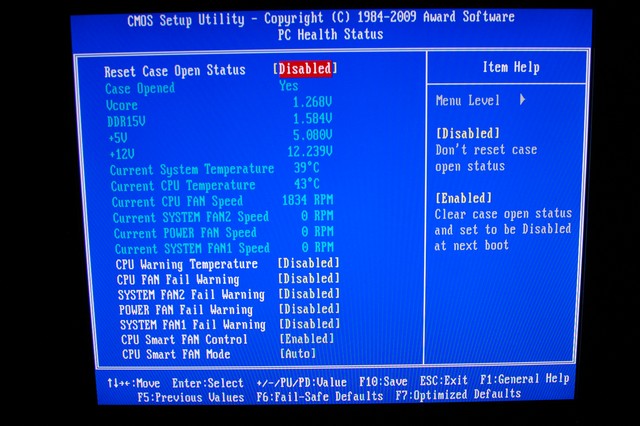
Within the PC Health Status menu you can view current voltages used and temperatures. You can also toggle options for temperature warnings and fan warnings.
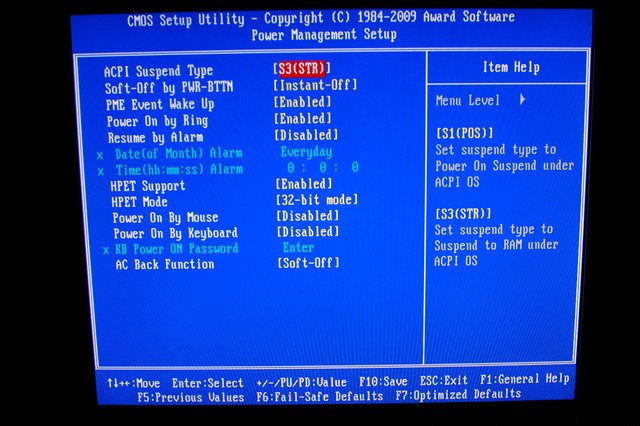
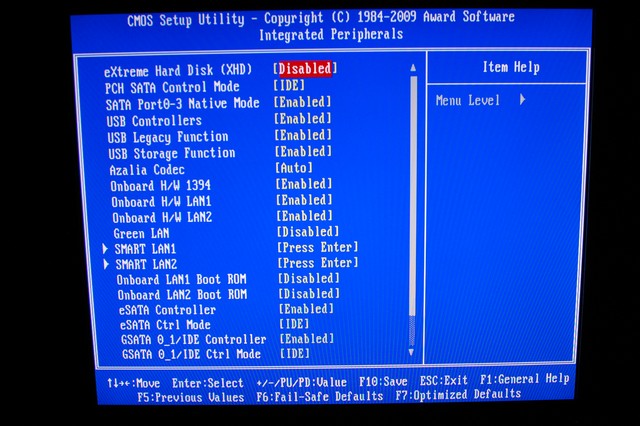
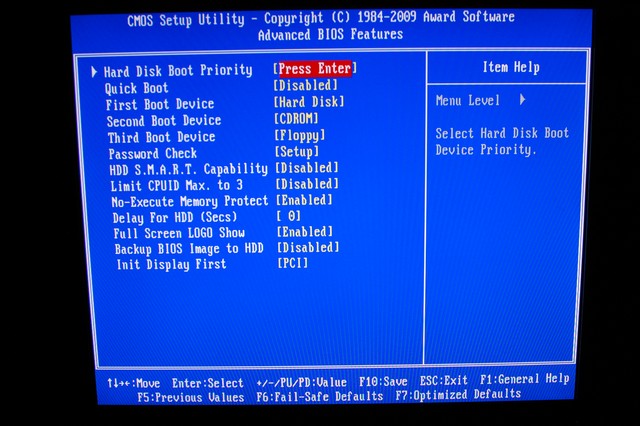
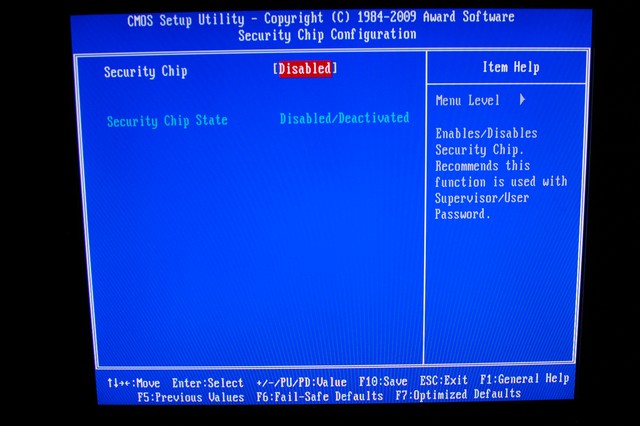
In these next four screenshots you can see the other basic menu’s for power management, peripherals, advanced features, and security chip configuration.
Although basic, the UD4P’s BIOS has all the features needed to overclock and keep things maintained. A powerful yet light BIOS. Lets move on to packaging and check out the UD4P itself.
Pictures & Impressions


The UD4P comes in the same Gigabyte box that we are used to seeing; a mostly white colored box with features listed all over. On the front, two superior features are listed (Ultra Durable 3 and Smart 6) and on the back the rest of the features are listed.

Once the box was opened we were greeted with accessories and manuals.

Only the bare essentials are bundled with UD4P. The UD4P comes with four SATA cables (two of which are right angle), an IDE cable for legacy drives, a SLI bridge, rear I/O shield, Dolby sticker, manual’s and a driver/utility DVD.


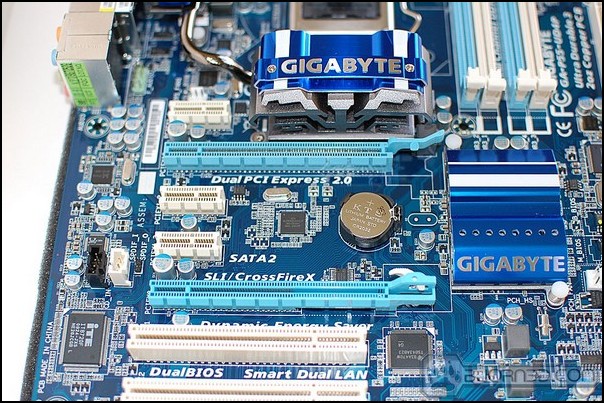
The Gigabyte P55 series boards all share similar looks. The PCB color, slot colors, and even the heatsink colors are similar throughout the Gigabyte P55 lineup. The major differences are heatsink sizes, ferrite choke count, and a few onboard features. Overall, the boards look very similar. One thing that stood out at us was the additional heatsink that resides in the traditional Northbridge location. If your not familiar with where the Northbridge normally resides, it is to the left of the first PCI-E slot in the 2nd picture.
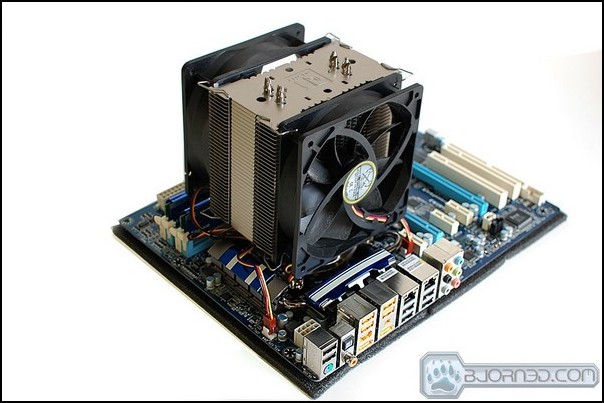
Being a 1156 motherboard, there is no Northbridge on the motherboard anywhere. The Northbridge, PCI-Express controller, and memory controller have all been moved on die to the CPU. So what is under that heatsink? The answer is simple, nothing. The purpose of this heatsink is to help the other heatsinks disburse the heat produced by the VRM’s. Although the CPU area is crowded by multIple VRM heatsinks, we had no issues fitting the Noctua NH-U12P with two 120mm fans. As long as normal heatspreaders are used on the memory, the majority of tower designed heatsinks will fit without issues.
Looking at the first picture you can tell Gigabyte wanted to keep the UD4P as cool as possible. Three heatsink’s to help cool the VRM’s and 10 power phases to help distribute power. Above the 8 SATA ports (two white ones are GSATA for RAID & JBOD) is where the PCH controller resides under the blue heatsink. To the right there are four DIMM slots, and below the DIMM slots there is a IDE header, and a 24-pin power header.
Looking at the second picture you can see the rear I/O area which has 10 USB 2.0 ports, a dual PS/2 mouse and keyboard port, S/PDIF coaxial and optical audio ports, two firewire ports, two eSATA ports, two RJ45 ports, and 6 audio jacks. Above the PS/2 and two USB ports is where the 8-pin CPU power resides. To the right there is a PCI-E 1x, PCI-E 16x, PCI-E 1x, PCI-E 1x, PCI-E 16x, and two PCI slots for expansion cards. To the far right is where the rest of the headers reside. I will focus on that area shortly, lets go over the rest of the board first.


The first picture gives you an alternative view of the board. We really like the racing stripe look on the heatsinks. The second picture displays the underside of the UD4P. Unfortunately, Gigabyte used push pins for the majority of the heatsinks. Only the PCH heatsink has actual screws. We prefer screws since they can be re-tightened and allow easy removal of a heatsink if needed. Push pins tend to wear out overtime and become a pain to deal with and can easily break.

On the right end of the UD4P is where the majority of the headers reside. There is a COM port header, Floppy header, IDE header, Firewire header, two USB 2.0 front panel headers, and front panel header.
Aside from the push pins, the UD4P has a decent layout and there wasn’t much for us to complain about. We would have liked to see onboard power and reset buttons, as well as debug LED’s, but being a mid-ranged board you can’t have it all. Now that you’ve seen the UD4P, I’m sure you are wondering how it performs. Lets move on to the overclocking results.
CPU-Z & Overclocking
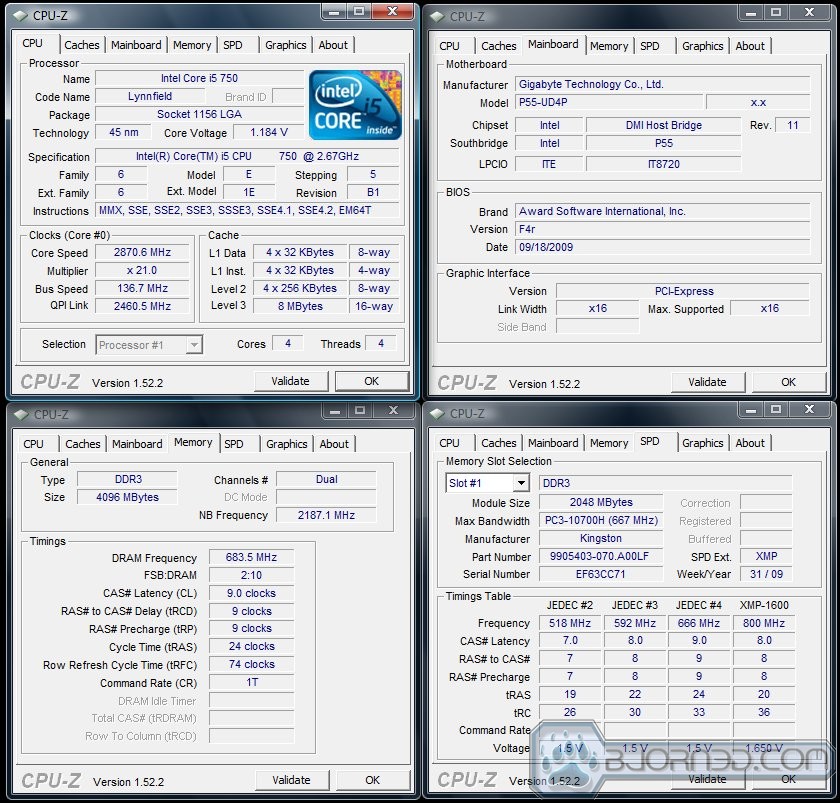
Before doing any adjustments for overclocking, we wanted to see how things looked with all default settings. By default, the GA-P55-UD4P has Turbo Boost, SpeedStep and C1E enabled. To get an accurate reading of the actual CPU frequency, we taxed the CPU using Intel Burn Test. Intel Burn Test is a linpack based stability testing application that has no issues putting a CPU at full load. Here is a screen shot of how things looked with all default settings.
Quick Boost Overclocking
BIOS Overclocking
Now that we tested Quick Boost, we wanted to see how far we could take it while keeping the system usable for 24/7 use. This means keeping voltages within recommended ranges and making sure temperatures weren’t an issue. Overclocking manually through the BIOS, the UD4P was able to reach a massive overclock of 1,406MHz!
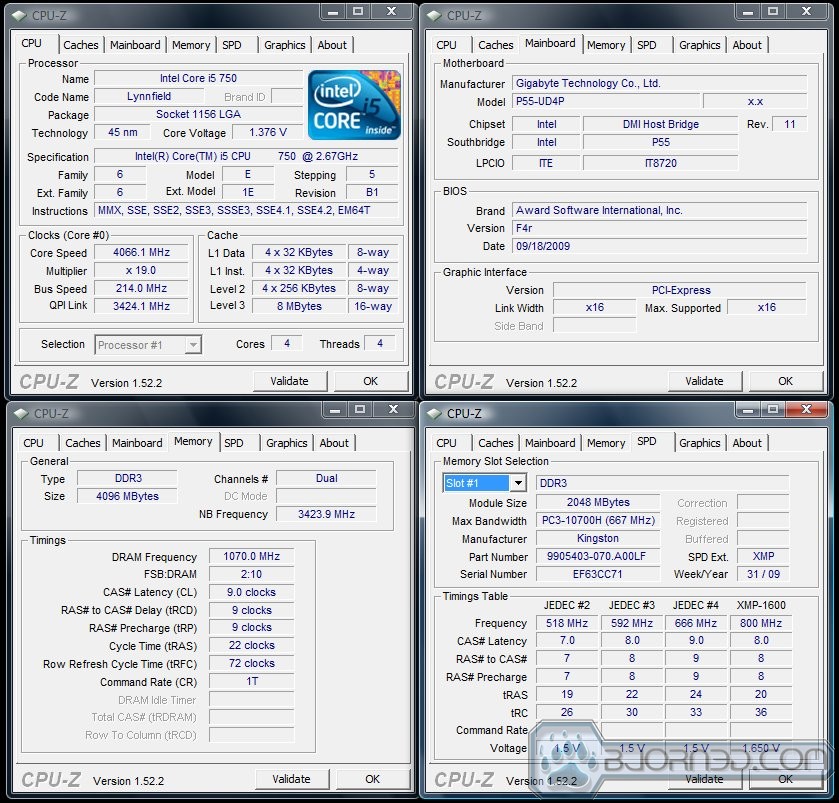
At Bjorn3D, we like to achieve the max overclock in every area while keeping the system usable for daily use. That means pushing the CPU, BLCK, and memory to their most stable limits. Not only did we take the i5 750 2.66GHz CPU to 4.06GHz, we also pushed the Kingston HyperX 4GB 1600MHz memory kit to 2140MHz while keeping the voltage at 1.64v, under the max voltage of 1.65v. To confirm everything was stable, we ran Intel Burn Test yet again, and it passed without any issues.
Max Achievable Overclock
Before closing up the overclocking shop, we wanted to see just how far the UD4P would go. We already know our i5 750 is capable of 4.35GHz, so we wanted to see if the UD4P could achieve the 4.35Ghz overclock. Unfortunately, it wasn’t able to.
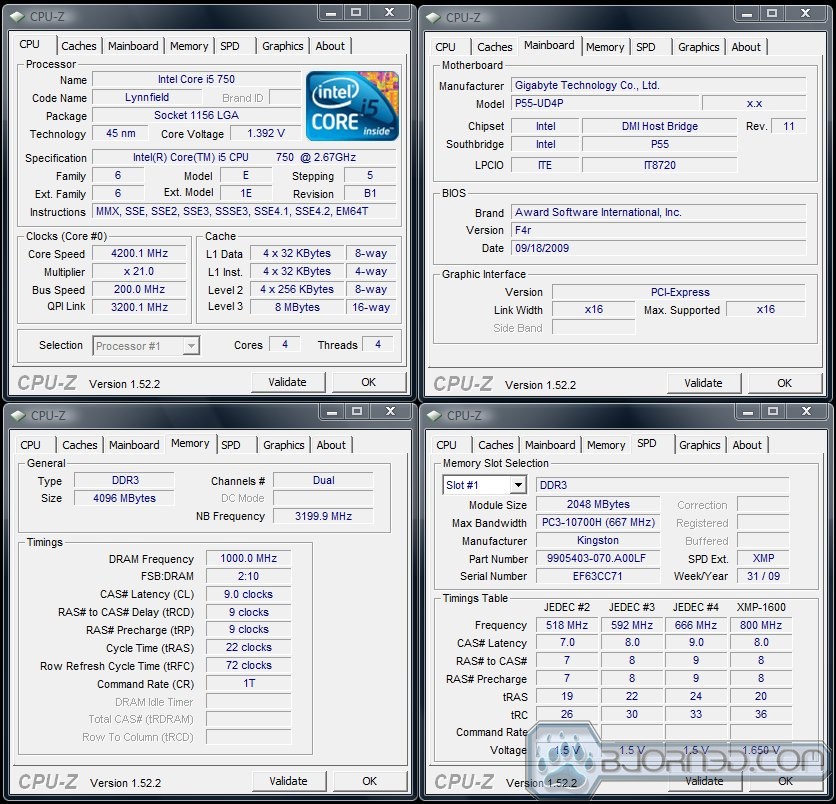
The max that we were able to reach on the UD4P was 4.2GHz, a 1,540Mhz overclock. Although we weren’t able to reach 4.35GHz, 4.2GHz is nothing to laugh at. For being a mid-ranged board, the UD4P overclocked very well and certainly has enough features that would allow for higher clocks. In this case, voltage options weren’t the limiting factor, heat was. With a better cooling solution we have no doubt that the UD4P could maintain a higher stable overclock and a higher max bootable overclock. We are more than satisfied with our 4.06GHz stable overclock and 4.2GHz max achievable overclock.
Being a mid-ranged board, we didn’t think the UD4P would achieve the overclocks it did. Then we sat back and looked at Gigabyte’s recent history. We were reminded that Gigabyte has had no issue releasing affordable boards that overclock. When the LGA 1366 platform launched, Gigabyte’s GA-EX58-UD3R was the cheapest X58 board available. Being the cheapest X58 board at launch, the UD3R was overlooked simply because of its price. With its competitors going for $50+ more at the least, buyers were wary but also uneducated on what to expect from a “cheap” Gigabyte motherboard. To make a long story short, the UD3R had no problem keeping up with premium motherboards. Value seems to be a priority with Gigabyte, we like value.
Testing & Methodology
We’ve expanded our testing suite considerably for P55 and will continue to use the same tests across most of the motherboards and CPU’s we test. We run each test a total of at least three times minimum, some tests we run more than 3 times. We average the total of all the tests from each benchmark then report the average here.
The OS we use is Vista Ultimate 64bit with all patches and updates applied. We also use the latest drivers available for the motherboard and any devices attached to the computer. We don’t disable a bunch of background tasks or particularly tweak the OS or system for bigger numbers. We do turn off drive indexing and daily defragging. We also turn off Prefetch and Superfetch. This is not an attempt to produce bigger benchmark numbers. Drive indexing and defragging can interfere with testing in that one test might occur without defragging going on and the next test defragging might be active, the same thing goes for drive indexing. We can’t control when defragging and indexing occur precisely enough to guarantee that they won’t interfere with testing, so we turn them off.
Prefetch tries to predict what you will load the next time you boot the machine. We disable it because we want to know how the program runs without any of the files being cached, otherwise each test run we’d have to clear pre-fetch to get accurate numbers. Lastly we disable Superfetch, Superfetch loads often used programs into memory and is one of the reasons people consider Vista to be such a memory hog. Vista fills the memory in an attempt to predict what you will load. Having one test run with files cached, and another test run with the files being un-cached would result in skewed numbers. Again since we can’t control it we turn it off. Other than those 4 things which can potentially interfere with benchmarking, and do so out of our control, we leave everything else running.
Test Rig
| Test Rig “Station_i5” |
|
| Case Type | Custom made tech station |
| CPU | Intel Core i5 750 |
| Motherboard |
Gigabyte P55-UD4P |
| RAM | Kingston HyperX DC DDR3 1600MHz 2x2GB Kit |
| CPU Cooler | Noctua NH-U12P with two Scythe 120mm fans |
| Hard Drives | Western Digital Raptor 74GB 10,000RPM |
| Optical | Samsung DVD R/W |
| GPU(s) | ASUS 9600GSO 512MB |
| Case Fans | 120mm Fan cooling the mosfet CPU area |
| Docking Stations | None |
| Testing PSU | Thermaltake Tough Power 850W |
| Legacy | None |
| Mouse | Microsoft Wireless Notebook Laser Mouse 7000 |
| Keyboard | Logitech Deluxe 250 USB Keyboard |
| Gaming Ear Buds |
Senheisser HD-485 |
| Speakers | Creative 2.1 |
| *** Any attempt copy this system configuration may lead to awesomeness. |
|
Test Suite
|
Benchmarks |
|
Excel 2007 |
|
Blender |
|
SiSoft SANDRA XII Professional SP2 |
|
Everest Ultimate Edition v. 5.0 |
|
AutoMKV |
|
Cinebench R10 64 bit |
|
WinRar v. 3.71 |
|
POVRay |
|
Pro Show Gold |
Everest Ultimate

“EVEREST Ultimate Edition is an industry leading system diagnostics and benchmarking solution for enthusiasts PC users, based on the award-winning EVEREST Technology. During system optimizations and tweaking it provides essential system and overclock information, advanced hardware monitoring and diagnostics capabilities to check the effects of the applied settings. CPU, FPU and memory benchmarks are available to measure the actual system performance and compare it to previous states or other systems. Furthermore, complete software, operating system and security information makes EVEREST Ultimate Edition a comprehensive system diagnostics tool that offers a total of 100 pages of information about your PC.”
CPU AES
This integer benchmark measures CPU performance using AES (a.k.a. Rijndael) data encryption. It utilizes Vincent Rijmen, Antoon Bosselaers and Paulo Barreto’s public domain C code in ECB mode.
CPU AES test uses only the basic x86 instructions, the test consumes 48 MB memory, and it is Hyper Threading, multi-processor (SMP) and multi-core (CMP) aware.
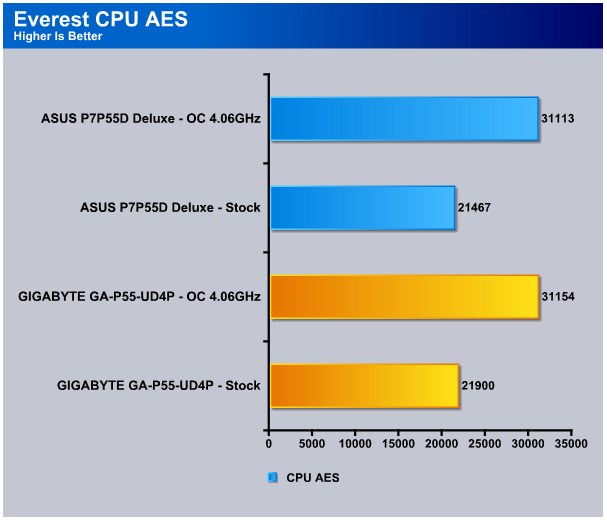
Despite being clocked at the same stock and overclocked speeds on both the CPU and memory, the GA-P55-UD4P edges out against the P7P55D Deluxe in the AES bench.
CPU PhotoWorxx
This integer benchmark performs different common tasks used during digital photo processing.
It performs the following tasks on a very large RGB image:
• Fill
• Flip
• Rotate90R (rotate 90 degrees CW)
• Rotate90L (rotate 90 degrees CCW)
• Random (fill the image with random colored pixels)
• RGB2BW (color to black & white conversion)
• Difference
• Crop
This benchmark stresses the integer arithmetic and multiplication execution units of the CPU and also the memory subsystem.
CPU PhotoWorxx test uses only the basic x86 instructions, and it is Hyper Threading, multi-processor (SMP) and multi-core (CMP) aware.
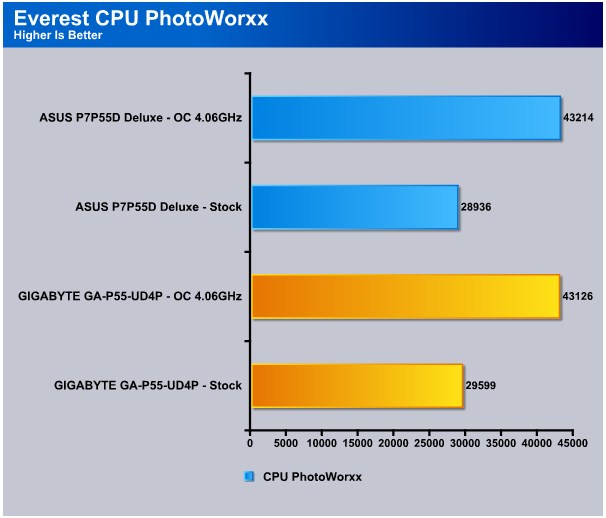
In PhotoWorxx we see similar results. Again the UD4P outscores the P7P55D Deluxe.
CPU Queen
This simple integer benchmark focuses on the branch prediction capabilities and the misprediction penalties of the CPU. It finds the solutions for the classic “Queens problem” on a 10 by 10 sized chessboard.
CPU Queen test uses integer MMX, SSE2 and SSSE3 optimizations. It consumes less than 1 MB system memory and it is Hyper Threading, multi-processor (SMP) and multi-core (CMP) aware.

Again we see the same story in the CPU Queen bench. The UD4P is ahead in both stock and overclocked frequencies by a comfortable margin. We are starting to think Gigabyte put steroids on the UD4P’s chipset.
CPU ZLib
This integer benchmark measures combined CPU and memory subsystem performance through the public ZLib compression library Version 1.2.3 (www.zlib.net).
CPU ZLib test uses only the basic x86 instructions, and it is Hyper Threading, multi-processor (SMP) and multi-core (CMP) aware.
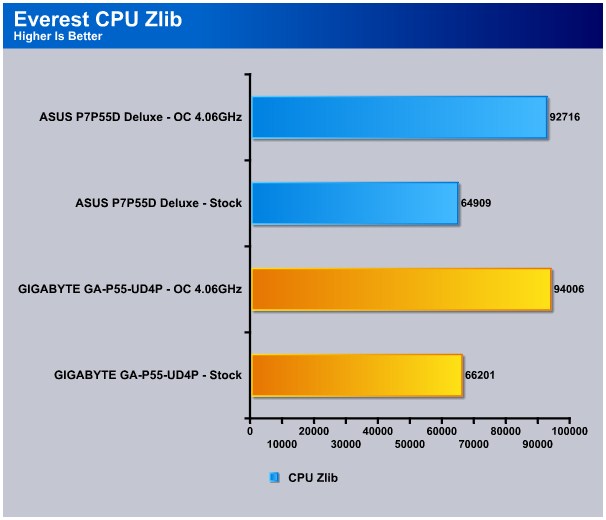
The UD4P continues its mysterious winning streak with the ZLib bench, pulling ahead by 1290 points in the overclocked category.
Everest Memory
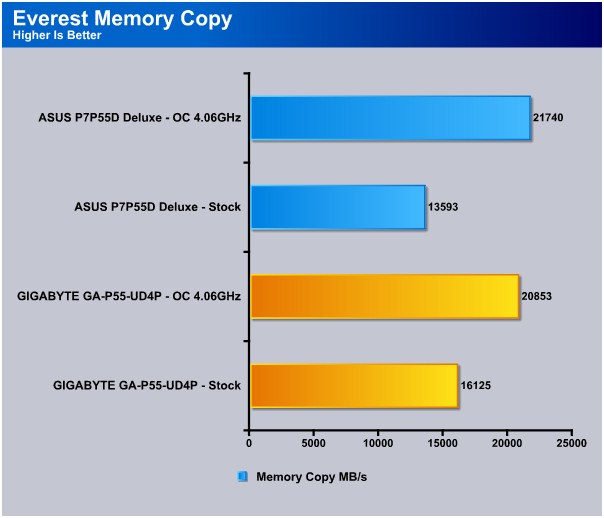
At default CPU and memory clocks we see a big 2532 point difference with the UD4P clearly the winner. When overclocked, the P7P55D Deluxe manages to pull ahead.
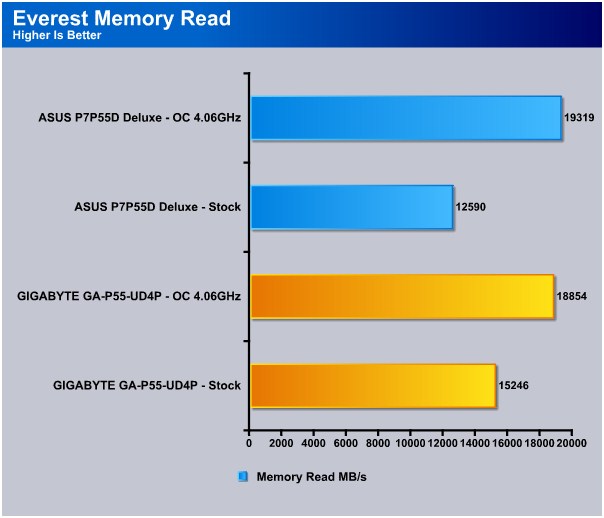
In the read test the UD4P wins with ease at stock clocks but once overclocked the P7P55D Deluxe pulls ahead again. The Kingston HyperX 4GB kit seems to play along well with the ASUS board once frequencies are turned up.

Again the UD4P trumps the P7P55D Deluxe’s memory write speed at stock clocks, but once overclocked we see a much closer result with the UD4P barely pulling ahead by 3 points.
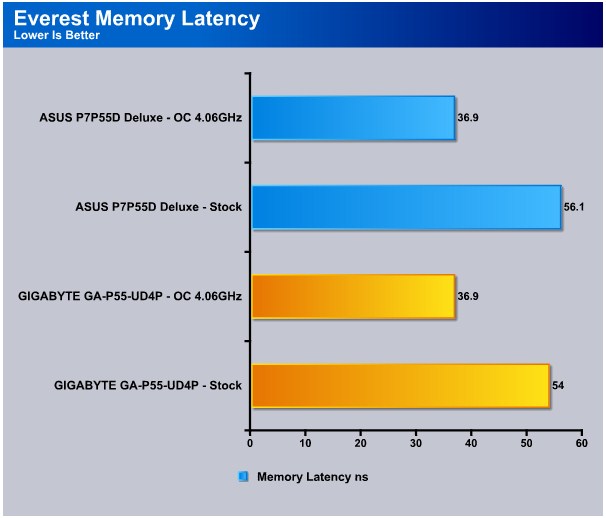
In the latency bench the UD4P shows a lower latency at stock clocks but once the frequencies are turned up both boards report the same latency.
The lower memory latency on the UD4P at stock clocks may explain why the UD4P was able to beat the P7P55D Deluxe in the stock memory benches. The CPU related benches however, don’t make too much sense. Same clocks, same hardware used, yet the UDP4 manages to win every Everest CPU related bench, odd. Lets see how things look in Cinebench and WinRAR.
Cinebench

“CINEBENCH is a real-world test suite that assesses your computer’s performance capabilities. MAXON CINEBENCH is based on MAXON’s award-winning animation software, CINEMA 4D, which is used extensively by studios and production houses worldwide for 3D content creation. MAXON software has been used in blockbuster movies such as Spider-Man, Star Wars, The Chronicles of Narnia and many more. MAXON CINEBENCH runs several tests on your computer to measure the performance of the main processor and the graphics card under real world circumstances. The benchmark application makes use of up to 16 CPUs or CPU cores and is available for Windows (32-bit and 64-Bit) and Macintosh (PPC and Intel-based). The resulting values among different operating systems are 100% comparable and therefore very useful with regard to purchasing decision-making. It can also be used as a marketing tool for hardware vendors or simply to compare hardware among colleagues or friends.”
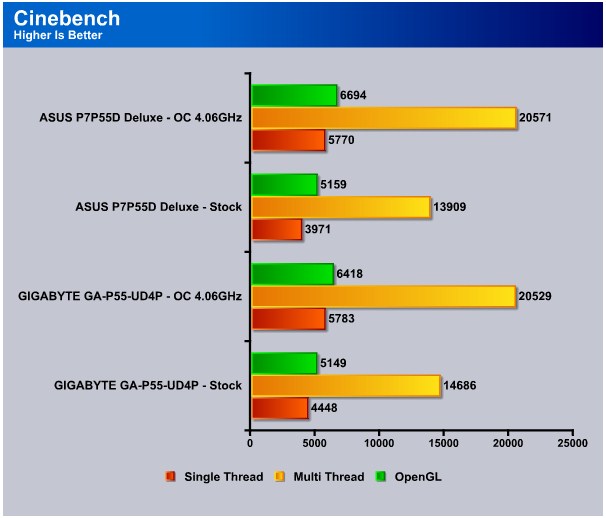
In Cinebench the same story is continued with the UD4P clearing winning at stock speeds. Once the speed is increased, we see a much closer result with the P7P55D Deluxe winning the multi-threaded bench.
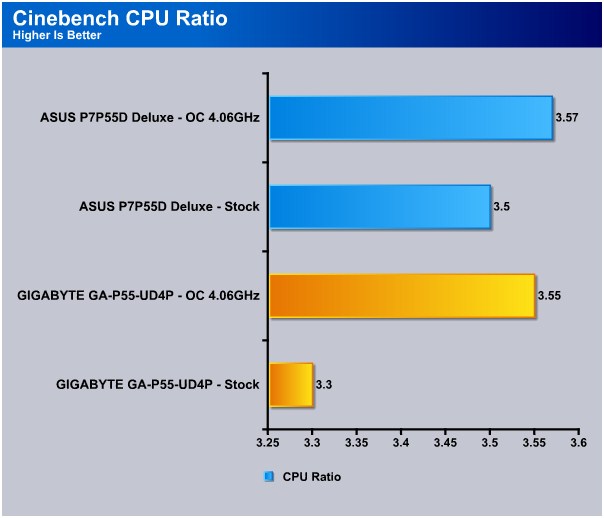
Looking at the Cinebench ratio result, we were left puzzled. With the P7P55D Deluxe pulling out higher ratio’s at default and overclocked speeds, we don’t get how the UD4P is managing to pull ahead in the majority of the testing, must be the UD4P’s chipset protein dose.
WinRar v. 3.71

This module in WinRar generates random data, which contains specially introduced redundancy, increasing the load to both the processor and memory. Data is then passed through RAR compression and decompression algorithms, and the output of the decompression algorithm is compared to the source data. If any differences are found, WinRar then reports “Errors found – Yes” in the command window. WinRar displays a size of processed data and compression speed, current and resulting, in kilobytes per second.
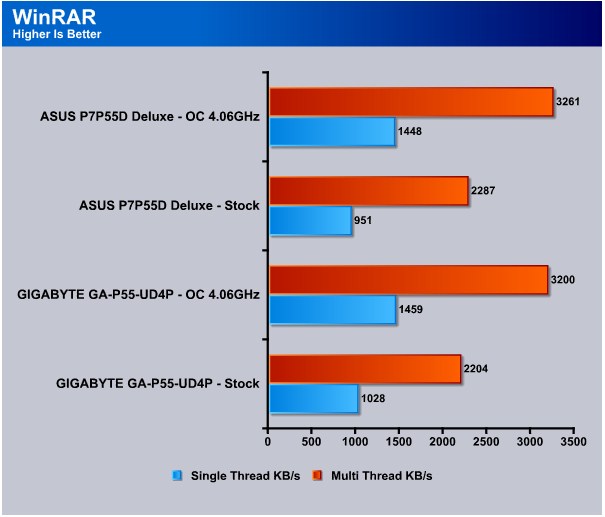
At stock speeds the P7P55D Deluxe trails behind the UD4P by 77 KB/s in the single-thread bench but manages to take a 83 KB/s lead in the multi-threaded bench. Once things are overclocked the P7P55D Deluxe maintains its lead and pulls ahead 61 KB/s in the multi-threaded bench.
WinRAR Workload
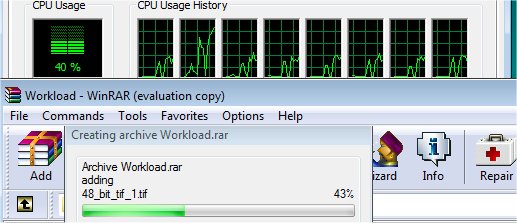
The WinRAR workload test we bypass the built in benchmark and throw 5 large .tif images at WinRAR then compress them and record the compression time. Total workload is about 350MB or 70+ MB per TIF image. The real life compression test of a group of large image files should give us a more realistic idea of how the CPU’s perform than the built in benchmark.
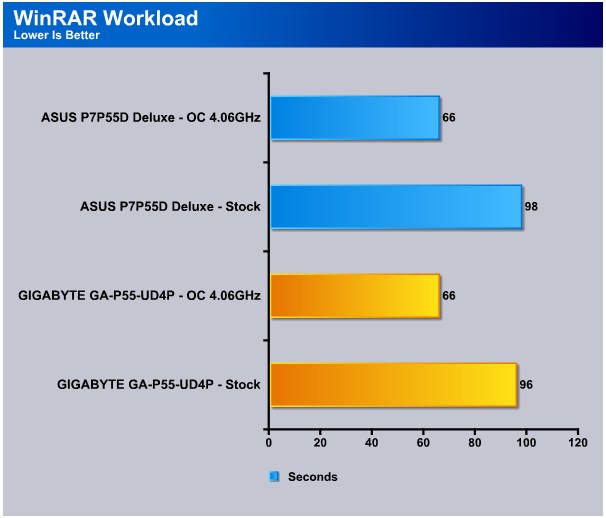
In the Workload bench the P7P55D Deluxe is two seconds slower than the UD4P at stock speeds but both manage to complete the archive in 66 seconds once overclocked.
In Cinebench and WinRAR the P7P55D Deluxe manages to take the lead on the UD4P once frequencies are turned up. At stock speeds the UD4P still maintains the crown, on to more testing.
Sisoft Sandra
“SiSoftware Sandra (the System Analyser, Diagnostic and Reporting Assistant) is an information & diagnostic utility. It should provide most of the information (including undocumented) you need to know about your hardware, software and other devices whether hardware or software. It works along the lines of other Windows utilities, however it tries to go beyond them and show you more of what’s really going on. Giving the user the ability to draw comparisons at both a high and low-level. You can get information about the CPU, chipset, video adapter, ports, printers, sound card, memory, network, Windows internals, AGP, PCI, PCI-X, PCIe (PCI Express), database, USB, USB2, 1394/Firewire, etc.”
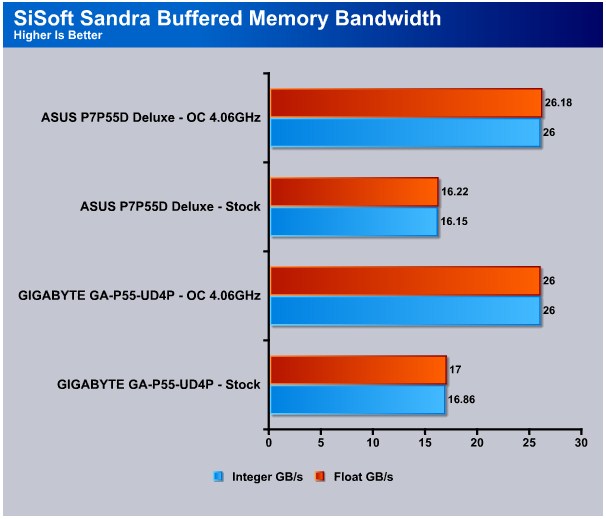
The same trend continues with the UD4P beating out the P7P55D Deluxe in Sandra’s SiSoft buffered memory test at stock speeds. With the speeds increased the P7P55D Deluxe barely wins.
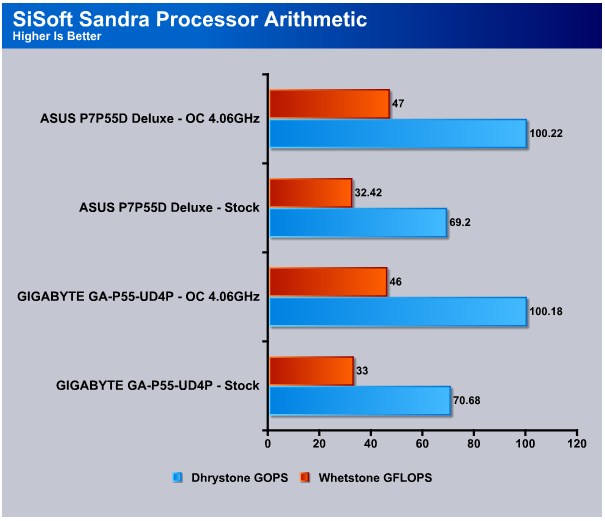
In the processor arithmetic test the P7P55D Deluxe maintains its overclocked lead barely beating out the UD4P. So far it seems like the P7P55D Deluxe has the slight edge when overclocked despite both boards using the same exact BLCK, multiplier, memory timings and memory clocks.
POV-Ray 3.7 Beta 25

The Persistence of Vision Ray-Tracer was developed from DKBTrace 2.12 (written by David K. Buck and Aaron A. Collins) by a bunch of people (called the POV-Team) in their spare time. It is a high-quality, totally free tool for creating stunning three-dimensional graphics. It is available in official versions for Windows, Mac OS/Mac OS X and i86 Linux. The POV-Ray package includes detailed instructions on using the ray-tracer and creating scenes. Many stunning scenes are included with POV-Ray so you can start creating images immediately when you get the package. These scenes can be modified so you do not have to start from scratch. In addition to the pre-defined scenes, a large library of pre-defined shapes and materials is provided. You can include these shapes and materials in your own scenes by just including the library file name at the top of your scene file, and by using the shape or material name in your scene. Since this is free software feel free to download this version and try it out on your own.
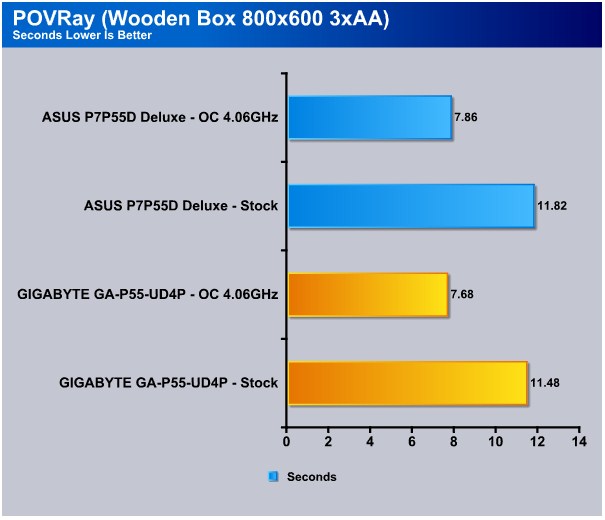
We see a surprising comeback from the UD4P at stock and overclocked speeds as it beats out the P7P55D Deluxe in the POV-Ray Wooden Box rendering. Theres no doubt that performance between two P55 chipset boards should be close, but the difference we are seeing at stock clocks is big enough to raise a question, What is causing the big gap at default speeds? The answer is simple.
By default, C-State’s is enabled on the P7P55D Deluxe and disabled on the UD4P. C-State’s improves power consumption but decreases performance as a side effect. This explains the score differences at stock speeds, which is why the UD4P manages to take the lead in the majority of the stock clocked benchmarks. On to more benching.
Microsoft Excel 2007
Monte Carlo Black-Scholes Option Pricing Test
Microsoft Excel is the widely known and the most used spreadsheet application for the manipulation and calculation for number crunching. With Excel, you can analyze and share information on a small scale or the largest scale you can imagine. We’ve seen spreadsheets in every day use that contain literally tens of thousands of numbers and hundreds of equations. Bjorn3D uses two tests in Excel to determine CPU and Motherboard performance.

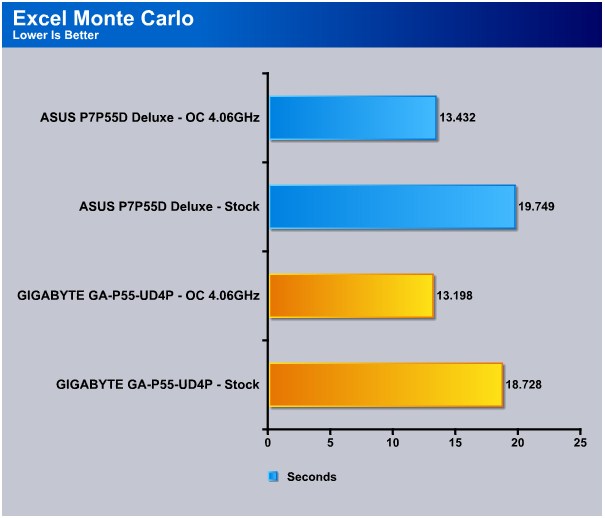
In the Excel Monte Carlo bench the UD4P beats out the P7P55D Deluxe at both stock and overclocked speeds winning the stock bench at almost a full second. The UD4P has got something special that the P7P55D Deluxe is obviously lacking, its gotta be the chipset protein I was talking about earlier.
Big Number Crunch
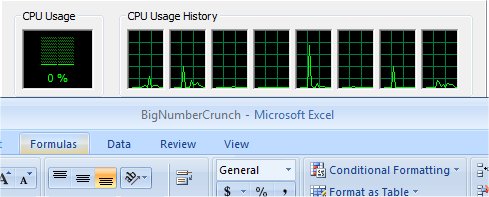
This workload is from a 6.2 MB spreadsheet and executes about 28,000 sets of calculations. It uses the most common calculations in Excel, addition, subtraction, division, rounding and Square Root. It also analyzes statistical functions such as Min, Max Median, and Average. The calculations are done after the spreadsheet with a large data set is updated with new values and must recalculate a large number of data points.
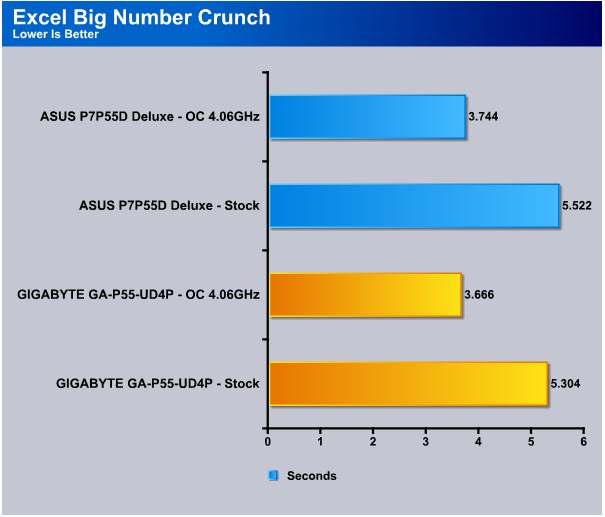
In the Excel Big Number Crunch bench the UD4P pulls out another lead by 0.1 seconds when overclocked and 0.2 seconds at stock speeds.
Photodex ProShow Gold 3.2
ProShow Gold allows you to combine videos and photos and music to create slide shows, depending on the end user results can be spectacular. The application allows the end user to share photos and memories with friends in a unique and spectacular way, the different formats supported are, DVD, PC and Web. Still Photos are brought to life by adding motion effects. Supported effects include, Pan, Zoom, and rotate. You can also add captions and over 280 transition effects.

The workload we use consists of 29 high resolution images in JPG format and converts them to MPEG2 wide-screen DVD quality. The end result is a 3 minute 9 second video file in slide show format. The images are in 3872×2592 resolution and have a combined total size of about 170 MB.

In the Pro Show Gold bench we see the UD4P show the P7P55D Deluxe how videos should be encoded. Beating the P7P55D Deluxe by huge 9 seconds at stock speeds and 7 seconds when overclocked, the UD4P has a giant lead when it comes to encoding videos.
What exactly is causing the P7P55D Deluxe to literally lag behind? 7 seconds is a lot of time when you have the same exact settings and chipset’s battling each other. Clearly the UD4P is comfortably ahead in the Pro Show Gold benchmark.
AutoMKV 0.95c
AutoMKV is an application aiming for easy media conversion between various media formats using various third party codecs. With improved internet speed and enhanced computing power, more users are interested in encoding to different media formats for their various multimedia needs. With AutoMKV and x264 codec, a freeware H.264 encoder, users can easily create media files. For more information and to obtain AutoMKV 0.95c and AviSynth* 2.5.7, please visit (http://forum.doom9.org/showthread.php?t=134478). We create a media file using AutoMKV and x264 codec. The input file used in the document is a raw 416 MB 720×480 DV file and the output is a 253MB H.264 media file.

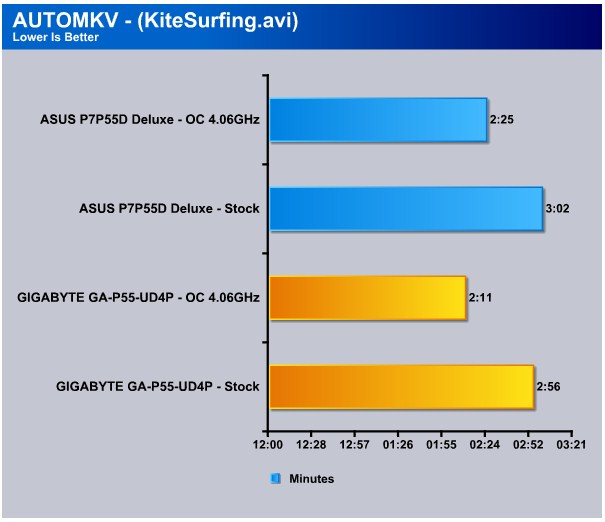
In the AutoMKV Kite Surfing bench we see a the same result we saw in the Pro Show Gold bench, the P7P55D Deluxe simply getting walloped. Beating the P7P55D Deluxe by 6 seconds at stock speeds and a massive 14 seconds when overclocked, the UD4P is clearly the better encoding board from what these benches report.
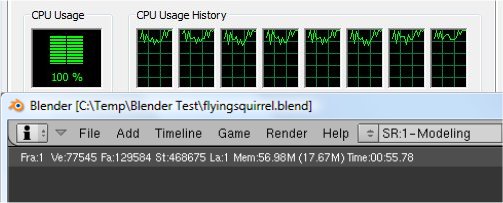
Blender
Blender is a free open source 3D content creation suite that is available for various operating systems. The application is popular among many independent animation studios and game makers. For more information, please visit http://www.blender.org/.
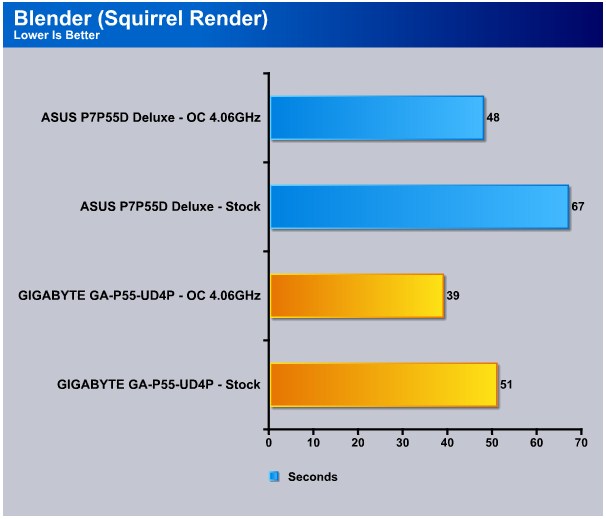
In Blender we see the same result we saw in the AutoMKV bench. The UD4P is the clear winner beating the P7P55D Deluxe by a humongous 16 seconds at stock speeds and 9 seconds when overclocked. Lets move on to the conclusion.
Conclusion
Equally competing against ASUS’ $219 USD P7P55D Deluxe, Gigabyte’s GA-P55-UD4P motherboard shows its value with an asking price of $169 USD. With both boards achieving a max stable overclock of 4.06GHz, you would be a fool not to consider the UD4P if you happen to be a budget overclocker.
The biggest thing that will separate motherboards nowadays are features. In the past, quality was the biggest factor, but things have changed. Motherboard manufactures have really stepped up R&D and quality testing which is why a mid-ranged motherboard can keep up with a premium motherboard. Features like the Smart6 suite (Smart Time Lock, Smart Quick Boot, Smart Quick Boost, etc.), Ultra Durable 3, Dynamic Energy Saver 2, and Auto Green combined with the overclocking features, make Gigabyte’s GA-P55-UD4P one hell of a bargain.
| OUR VERDICT: Gigabyte GA-P55-UD4P | ||||||||||||||||||
|
||||||||||||||||||
| Summary: The Gigabyte GA-P55-UD4P is an affordable board that is overclocker friendly, easy to use, and comes with a ton of useful features and software. With an asking price of $169 USD, the UD4P should be on every budget-minded enthusiast’s shopping list. |


