GIGABYTE has proven once again that not only are they a force to be reckoned with when it comes to their motherboards, they also porven that micro ATX motherboards can performjust as well as their big brother counterparts.
Introduction
Micro ATX motherboards are becoming more and more popular with gamers and overclockers alike. One can’t really blame them either. These boards are smaller, reducing the need to use large chassis to house them which in turns makes these types of computers a lot more portable. A lot of times the Micro ATX motherboards will have all of the features their full sized brothers have, and that includes overclocking capabilities.
Up until last year the thought of using a micro ATX motherboard was like scraping the bottom of the barrel. Especially if that computer had high end computer components. Nowadays with all of the options and features we get with micro ATX motherboards, even I wouldn’t hesitate on throwing one in my computer.
GIGABYTE has joined the ranks of manufacturers that produce a micro ATX motherboard that performs very well, and has the capability of overclocking. Lets step into the world of the Gigabyte P55M-UD4 MATX motherboard and see whats makes this motherboard tick.
Specifications
| Specification | GA-P55M-UD4 |
|---|---|
| CPU |
1. Support for an Intel® Core™ i7 series processor/Intel® Core™ i5 series processor in the LGA1156 package (Go to GIGABYTE’s website for the latest CPU support list.) 2. L3 cache varies with CPU |
| Chipset |
1. 4 x 1.5V DDR3 DIMM sockets supporting up to 16 GB of system memory 2. Dual channel memory architecture 3. Support for DDR3 2200/1333/1066/800 MHz memory modules 4. Support for non-ECC memory modules 5. Support for Extreme Memory Profile (XMP) memory modules (Go to GIGABYTE’s website for the latest memory support list.) |
| Audio |
1. Realtek ALC889A codec 2. High Definition Audio 3. 2/4/5.1/7.1-channel 4. Support for Dolby® Home Theater 5. Support for S/PDIF In/Out 6. Support for CD In |
| LAN |
1. Realtek ALC889A codec 2. High Definition Audio 3. 2/4/5.1/7.1-channel 4. Support for Dolby® Home Theater 5. Support for S/PDIF In/Out 6. Support for CD In |
| Expansion Slots |
1. 1 x PCI Express x16 slot, running at x16 (PCIEX16) 2. 1 x PCI Express x16 slot, running at x8 (PCIEX8) (The PCIEX16 and PCIEX8 slots conform to PCI Express 2.0 standard.) 3. 1 x PCI Express x4 slot 4. 1 x PCI slot |
| Multi-Graphics Technology |
Support for ATI CrossFireX™/NVIDIA SLI technology (The PCIEX16 and PCIEX8 slots only.) |
| Storage Interface |
Intel® P55 Express Chipset: 1. 5 x SATA 3Gb/s connectors (SATA2_0, SATA2_1, SATA2_2, SATA2_3, SATA2_4) supporting up to 5 SATA 3Gb/s devices 2. 1 x eSATA 3Gb/s connector (eSATA/USB Combo) on the back panel supporting up to 1 SATA 3Gb/s device 3. Support for SATA RAID 0, RAID 1, RAID 5, and RAID 10 GIGABYTE SATA2 chip: 1. 1 x IDE connector supporting ATA-133/100/66/33 and up to 2 IDE devices 2. 2 x SATA 3Gb/s connectors (GSATA2_0, GSATA2_1) supporting up to 2 SATA 3Gb/s devices 3. Support for SATA RAID 0, RAID 1, and JBOD iTE IT8720 chip: 1. 1 x floppy disk drive connector supporting up to 1 floppy disk drive |
| USB |
1. Integrated in the Chipset 2. Up to 14 USB 2.0/1.1 ports (10 on the back panel, including 1 eSATA/USB Combo, 4 via the USB brackets connected to the internal USB headers) |
| IEEE 1394 |
1. T.I. TSB43AB23 chip 2. Up to 2 IEEE 1394a ports (1 on the back panel, 1 via the IEEE 1394a bracket connected to the internal IEEE 1394a header) |
| Internal I/O Connectors |
1. 1 x 24-pin ATX main power connector 2. 1 x 8-pin ATX 12V power connector 3. 1 x floppy disk drive connector 4. 1 x IDE connector 5. 7 x SATA 3Gb/s connectors 6. 1 x CPU fan header 7. 2 x system fan headers 8. 1 x power fan header 9. 1 x front panel header 10. 1 x front panel audio header 11. 1 x CD In connector 12. 1 x S/PDIF In header 13. 1 x S/PDIF Out header 14. 2 x USB 2.0/1.1 headers 15. 1 x IEEE 1394a header 16. 1 x power button 17. 1 x clearing CMOS button 18. 1 x reset button |
| Back Panel Connectors |
1. 1 x PS/2 keyboard or PS/2 mouse port 2. 1 x coaxial S/PDIF Out connector 3. 1 x optical S/PDIF Out connector 4. 9 x USB 2.0/1.1 ports 5. 1 x eSATA/USB Combo connector 6. 1 x IEEE 1394a port 7. 1 x RJ-45 port 8. 6 x audio jacks (Center/Subwoofer Speaker Out/Rear Speaker Out/ Side Speaker Out/Line In/Line Out/Microphone) |
| I/O Controller | iTE IT8720 chip |
| H/W Monitoring |
1. System voltage detection 2. CPU/System temperature detection 3. CPU/System/Power fan speed detection 4. CPU overheating warning 5. CPU/System/Power fan fail warning 6. CPU/System fan speed control |
| BIOS |
1. 2 x 16 Mbit flash 2. Use of licensed AWARD BIOS 3. Support for DualBIOS™ 4. PnP 1.0a, DMI 2.0, SM BIOS 2.4, ACPI 1.0b |
| Unique Features |
1. Support for @BIOS 2. Support for Q-Flash 3. Support for Xpress BIOS Rescue 4. Support for Download Center 5. Support for Xpress Install 6. Support for Xpress Recovery2 7. Support for EasyTune 8. Support for Dynamic Energy Saver™ 2 9. Support for Smart 6™ 10. Support for Q-Share |
| Bundle Software | Norton Internet Security (OEM version) |
| Operating System | Support for Microsoft® Windows 7/Vista/XP |
| Form Factor | Micro ATX Form Factor; 24.4cm x 24.4cm |
| Remark |
1. Due to different Linux support conditions provided by chipset vendors, please download Linux drivers from the chipset vendors website or 3rd party website.2. Due to most hardware/software vendors no longer offering support for Win9X/ME. If some vendors still have Win9X/ME drivers available, we will publish them on the website. |
Features
| Ultra Durable 3
|
||||||||||||||
| Benefits of 2 oz Copper PCB
• Cooler than traditional motherboards |
||||||||||||||
| Smart 6- A Smarter way for PC system Management GIGABYTE Smart 6™ is designed with user-friendliness in mind, and offers a combination of 6 innovative software utilities that provide easier and smarter PC system management. Smart 6™ allows you to speed up system performance, reduce boot-up time, manage a secure platform and recover previous system settings easily with a click of the mouse button.
|
||||||||||||||
| Windows® 7 WHQL Certified The motherboard has obtained WHQL (Windows Hardware Quality Labs) certification for Windows 7 from Microsoft® for an Intel-based motherboard, setting the standard for future Windows 7 certified motherboards…more |
||||||||||||||
 |
Dynamic Energy Saver™ 2 GIGABYTE Dynamic Energy Saver™ 2 incorporates a host of intelligent features that use a proprietary hardware and software design to considerably enhance PC system energy efficiency, Reduce power consumption and deliver optimized auto-phase-switching for the CPU, Memory, Chipset, VGA, HDD, and fans with a simple click of button. |
|||||||||||||
| Intel® Core i7/ Core i5 LGA 1156 Processors
The Intel brand new computing architecture based on the innovation of micro-architecture transforms 3-chip solutions to a 2-chip platform. The next generation Intel® Core™ i7/ Core™ i5 processors with LGA1156 package integrate graphics and memory controller to support dual channel DDR3 memory. Supporting Intel Turbo Boost technology and Hyper-Threading Technology, Intel® Core™ i7/ Core™ i5 processors provide the overwhelming performance with optimized power efficiency. |
||||||||||||||
 |
DDR3 2200+ Support P55M-UD4 support Intel Core™ i7/ Core™ i5 processors delivering native support for DDR3 memory up to 2200+MHz by the enhanced design of GIGABYTE, Intel Core™ i7/ Core™ i5 processors feature the memory controller integrated directly into the processor die, rather than as part of the Northbridge as in previous generations, allowing for faster memory performance. * Please refer “Memory Support List” for memory support information |
|||||||||||||
 |
eSATA/USB combo eSATAUSB combo ports provides significant convenience by supporting eSATA and USB devices in one port, and requires no additional power source when connecting eSATA devices through the applicable cable. |
|||||||||||||
 |
XHD (eXtreme HardDrive)-Accelerating hard drive performance with ease Accelerating system performance is made easy with the user friendly GIGABYTE eXtreme Hard Drive (X.H.D). GIGABYTE eXtreme Hard Drive (X.H.D) provides a quick and easy way to boost your hard drive performance simply by adding another hard drive. |
|||||||||||||
 |
AutoGreen- Greening your PC via Bluetooth cellphone AutoGreen technology can automatically save power for you simply by your bluetooth cell phone when you are away from your computer |
|||||||||||||
| Multi-display support with ATI CrossFireX and NVIDIA SLI™ P55-UD5 supporting both ATI CrossFireX and NVIDIA SLI™ delivers the ultimate in graphics performance for gaming enthusiasts who demand the highest frame rates without compromising on resolution.
|
||||||||||||||
 |
Thermal Design Inspired by the performance and sleek lines of today’s modern racing vehicles, GIGABYTE’s stylish thermal solution is designed for extreme performance and ultra coolness |
|||||||||||||
 |
Dolby Home Theater Support Delivers vivid surround sound for music, movies, and games, using two to eight speakers or any set of headphones |
|||||||||||||
 |
Norton™ Internet Security Fast, comprehensive, and up-to-the-minute protection against online threats. It safeguards your computer, identity, and home network without slowing you down. It sets a new standard for speed and makes online shopping, banking, and browsing safer and more convenient than ever. |
|||||||||||||


Packaging

Lets take a peek at how GIGABYTE packaged the P55M-UD4 motherboard. The box that GIGABYTE used is both colorful and very informative. As with all current GIGABYTE motherboards, this motherboard supports Ultra Durable 3. Ultra Durable 3 adds 2Oz’s of copper into the PCB of the motherboard, Ferrite Core chokes, all Japanese solid capacitors, and lower RDS MOSFET’s.

This is what we get with the P55M-UD4 motherboard. There is not much that is included in the packaging, just the bare minimum.
- Four SATA cables
- One IDE ribbon
- A rear IO cover Plate
- Instruction manuals
- A Driver disk
- Then finally we get an SLI ribbon

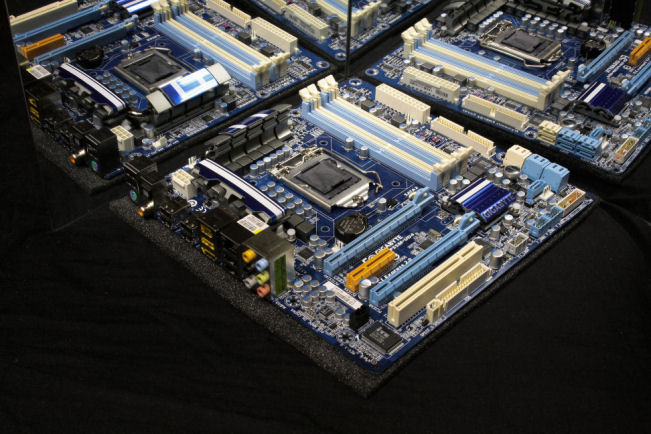
The P55M-UD4 motherboard outside of its packaging just before we start the overview.

Looking at the backside of the motherboard.
Overview

Looking at the Rear IO ports of the P55M-UD4 motherboard. Once again GIGABYTE only adds one PS2 port for those still using PS2 mice or keyboards with two USB ports on top. Moving to our right, we see a dual type Audio Optical ports, and four more USB headers. A Firewire, USB, eSATA header, fallowed by a ethernet, with two more USB headers. Then finally the 8 port analog audio outputs.

Turning our attention over to the SATA connectors, these are 180°, no matter how long our video cards get we can still use all of these. Notice there are two SATA connectors in white and only four in blue. The two white SATA connectors are controlled by GIGABYTE’s GSATA, the blue SATAs are controlled naively by the PCH (P55 Chipset).

Turning our camera 90° upwards so we can see how this section of the motherboard has been laid out. To the left of the SATA ports on the far edge, we can see the front IO header. Right above the front IO header are two more front USB headers. Moving to the right, we can see the PCH heatsink that GIGABYTE used. This heatsink looks cool with the racing stripe design. Directly below the PCH are two micro switches. The blue button is the onboard reset button, the black one is the clear CMOS button. These are in a rather strange and difficult spot. Being directly below the PCI-E ports, gaining access to these while a video card is installed will be next to impossible. The power button is fairly large in size, but again, this button is right below the video card slot on the motherboard. To the right of the onboard power button is the G-SATA 2 controller.

Up close shot of the on board Power/reset and clear CMOS buttons. Nestled right above the 180° SATA ports is another 90° SATA port, if you plan on using two video cards gaining access to this SATA port will be next to impossible.

Moving over to the memory DIMMs. Since the 1156 CPU’s only support dual channel memory, GIGABYTE only included four memory DIMMs. Right below the DIMMs is the dual BIOS chip design that GIGABYTE has been using on all of their motherboards for as long as I can remember. The placement of the 24 pin main power connector is in a good spot, gaining access to this should be easy. Then to the left of the main power connector is the ever ancient IDE port. To the far right hand side, right below the memory DIMMs is a LED CPU phase power indicator.


Better close up of the Dual BIOS chips and the LED CPU phase power indicators.

Moving up towards the CPU socket, we can see the CPU socket area is fairly clear of large obstacles. Counting up the chokes that GIGABYTE used, we can see the CPU gets a 14 Phase Power. Right above the first PCI-E port we can see the CMOS battery.

Looking right behind the rear IO ports, The EPS CPU power plug is still in a difficult spot and is now crowded by the CPU’s power MOSFET’s heatsinks.

Finally looking at the last corner of this motherboard we can see that either Nvidia’s SLI or ATI’s Crossfire can be used, NOTE: When using Multi GPU configurations your PCI-E bandwidth will be reduced to an x8 X 2. In between the two PCI-E x16 ports is one PCI-E x4 port, on the far end of the P55M-UD4 motherboard is the PCI port. While we are looking at the far edge of the motherboard, GIGABYTE included the ever ancient Floppy Drive port.
Extra’s
These are here for you to get a look at the quality GIGABYTE put into the P55M-UD4 motherboard.
|
|
|
|
|
|
|
|
|


As we can see this is a M-ATX style of motherboard, things are a bit more crowded. Considering GIGABYTE packed so much onto this little motherboard, I’d say they did a fairly good job on its layout.
Installation

The GIGABYTE P55M-UD4 motherboard all ready to be installed into the chassis. The Prolimatech Mega Shadow heatsink looks huge on this motherboard.

In this slightly blurry picture, we can see the onboard Power button lights up.

We are using a XFX HD4870X2 video card in the first PCI-E video card slot and the Power button is already being covered by the dual slot cooler the card uses.

Once both video cards were installed on the motherboard, none of the on board buttons were accessible. At least we know this motherboard can support two video cards.
BIOS PART One
|
|
|
|
|
|
|
|
|


The BIOS that the P55M-UD4 uses is pretty well laid out and simple enough for anyone to use.
|
|
|
|
|
|


GIGABYTE does allow you to save your personal motherboard settings. This is easily done by pressing the F11 key in the main portion of the BIOS. This will bring up a profiles saving page. To load up your personal BIOS settings just press the F12 button in the main BIOS screen.
BIOS PART TWO
|
|
|
|
|
|
|
|
|
|
|
|
|
|
|
|
|
|
|
|
|
|
|
|


The M.I.T. portion of the BIOS is where we make all of our overclocking settings and/or minor tweaks for the motherboard. This portion of the BIOS is segregated into sub-menus. This will keep the clutter of the multiple BIOS adjustments to a minimum and in their respected areas. The only issue we had with this BIOS was entering the M.I.T. Current Status page, and I could not exit out of it. I had to hit the reset button ( I learned to stay out of that page). The voltage settings are fine enough for us to make small minor adjustments with ease. GIGABYTE also does well by giving us the current settings as well as what the new settings will have, ie Volts, BCLK, or frequency.
TESTING METHODOLOGY
| Test Setup &Testing Methodology | |
| CPU | Intel Core i5 750 @ 2.66GHz, 3.99GHz |
| Motherboard | GIGABYTE P55-UD4, MSI P55-GD65 |
| Case | SIlverStone Raven RV-02 |
| Memory | GSkill RipJaw |
| Video Card’s | XFX 4870X2, HIS 4870 |
| Hard Drives | Patriot SSD 128 Gig |
| CDRom Drive | Lite On Blue Ray |
| Power Supply | Seasonic 850W |
| CPU Speeds Used | 2660 MHz, 3990MHz, 4028MHz |
| Operating System Used | Microsoft Windows Vista 64 |
| Video Card Cooler |
Stock cooled |
| CPU Cooler |
Prolimatech Mega Shadow |
For testing the GIGABYTE P55M-UD4 motherboard, I ran the below listed programs 3 times to ensure that stability & consistency was present throughout testing. I will be using Windows Vista 64 bit as the operating system installed onto the Patriot Torqx SSD across all tested motherboards. I let the motherboard determine the optimal settings to use during the default CPU speeds of 2.66GHz (133×20).
List of programs
- SiSoft Arithmetic, Multi-Media, Multi-Core Efficiency, Memory Bandwdith, Latency
- Everest Memory Read, Write, Copy, Latency, CPU Queen, FPU Julia
- POV Ray Standard Renderings Buiscuit, Wood Box, Animation Renderings GLSNG, Float, Multi Threaded
- Cine Bench Core x1, Core x4/8 (will use amount of threads possible CPU dependant), OpenGl, Multi Threaded
- wPrime 32 Million, 1024 Million Calculations Multi Threaded
- Crystal Disk Bencmark HDD Benchmark
- WinRar Benchmark Compressed up to 500 MBs Wrote time it took and final result, Multi-Threaded
- Bibble 5 Used a 4 GBs SD card Converted 116 Canon RAW 10.1MP (Mega Pixel) images to 10.1MP JPG format, Time it took to complete all images plus the time it took per image will be recorded Multi Threaded
- 3DMark Vantage 1280 x 1024 Performance run
- World In Conflict 1920 x 1080 Max Visual Quality 4xAA/16xAF
- Last Remnant 1920 x 1080 Max Visual Quality
- Far Cry 2 1920 x 1080 Max Visual Quality 4xAA
Pretty much the standard runs we used with a couple of extras thrown in for good measure.
Overclocking
Overclocking the GIGABYTE P55M-UD4 motherboard was not a disappointment. As always, I left the motherboard at its default clock speeds to install Windows Vista 64. After getting all my drivers installed and everything else squared away, it was time for overclocking. I already had an idea on how to overclock the Core i5 750 CPU previously on the MSI P55-GD65 motherboard. Keeping the settings in mind that I used on that motherboard, I went ahead and used the same ones on the GIGABYTE P55M-UD4. I set the BLCK to 210, CPU multiplier to 19, and set all other voltages to where I needed them at. The motherboard posted right up, had no issues running at this new CPU/BCLK speed. Not to mention, after I ran SiSoft I noticed that the memory was running at its rated default speed of 2000MHz without any ill effects.
I continued my battery of benchmarks until I was satisfied that I had stability. I re-entered BIOS, and set the BCLK to 225. This did not go over to well. After fiddling with voltages, timings, and various other settings I gave up and reverted back to 210 BCLK, then upped BCLK up by 1. Stability was present, so I continued upping the BLCK up until this motherboard would no longer run Windows properly. I gained an extra 1 BCLK after upping it 1 from 210 BCLK. Settling out with 212 BCLK on this motherboard. I was happy with my new found CPU speed of 4028 MHz. (considering I am on air cooling I felt this was a pretty good stopping point.)
For some odd reason, I found by utilizing the 20 multiplier on the CPU (which is default) stability was lost past 190 BCLK (FSB) on any motherboard. By dropping the CPU multiplier to 19 I achieved better stability, and was able to go higher on the BCLK (FSB) which I prefer doing anyway.

Overclocked P55M-UD4.
POV RAY

The Persistence of Vision Ray-Tracer was developed from DKBTrace 2.12 (written by David K. Buck and Aaron A. Collins) by a bunch of people (called the POV-Team) in their spare time. It is a high-quality, totally free tool for creating stunning three-dimensional graphics. It is available in official versions for Windows, Mac OS/Mac OS X and i86 Linux. The POV-Ray package includes detailed instructions on using the ray-tracer and creating scenes. Many stunning scenes are included with POV-Ray so you can start creating images immediately when you get the package. These scenes can be modified so you do not have to start from scratch. In addition to the pre-defined scenes, a large library of pre-defined shapes and materials is provided. You can include these shapes and materials in your own scenes by just including the library file name at the top of your scene file, and by using the shape or material name in your scene. Since this is free software feel free to download this version and try it out on your own.
Some of you might have seen version 3.6 of POV-Ray, the biggest difference between 3.6 and 3.7 Beta 25 is SMP (symmetric multiprocessing) support, which means that POV-Ray can take advantage of as many cores as your CPU has. On Single vs Dual CPU systems the speed almost doubles.

On the POV Ray test, we can see the two P55 based motherboards perform identical. Adding that extra GHz to the CPU allowed the Core i5 750 to render the scenes faster.
CINEBENCH

“CINEBENCH is a real-world test suite that assesses your computer’s performance capabilities. MAXON CINEBENCH is based on MAXON’s award-winning animation software, CINEMA 4D, which is used extensively by studios and production houses worldwide for 3D content creation. MAXON software has been used in blockbuster movies such as Spider-Man, Star Wars, The Chronicles of Narnia and many more. MAXON CINEBENCH runs several tests on your computer to measure the performance of the main processor and the graphics card under real world circumstances. The benchmark application makes use of up to 16 CPUs or CPU cores and is available for Windows (32-bit and 64-Bit) and Macintosh (PPC and Intel-based). The resulting values among different operating systems are 100% comparable and therefore very useful with regard to purchasing decision-making. It can also be used as a marketing tool for hardware vendors or simply to compare hardware among colleagues or friends.”
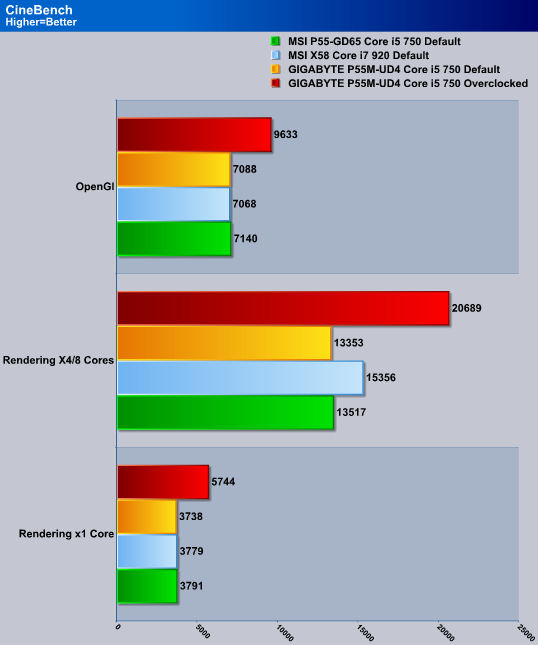
During CineBench rendering testing on the single core and OpenGL testing the Core i5 750 CPU kept up with the Core i7 920 CPU while maintaining the default CPU core speed.
WPRIME
wPrime is a benchmarking application designed to use a highly multithreaded approach to calculating the square-roots of large amounts of numbers (up to 32 billion)

wPrime is repeating this same pattern that we’ve seen with the last two benchmarks. The two P55 based machines perform identical to one another.
SISOFT
“SiSoftware Sandra (the System Analyzer, Diagnostic and Reporting Assistant) is an information & diagnostic utility. It should provide most of the information (including undocumented) you need to know about your hardware, software and other devices whether hardware or software. It works along the lines of other Windows utilities, however it tries to go beyond them and show you more of what’s really going on. Giving the user the ability to draw comparisons at both a high and low-level. You can get information about the CPU, chipset, video adapter, ports, printers, sound card, memory, network, Windows internals, AGP, PCI, PCI-X, PCIe (PCI Express), database, USB, USB2, 1394/Firewire, etc.”
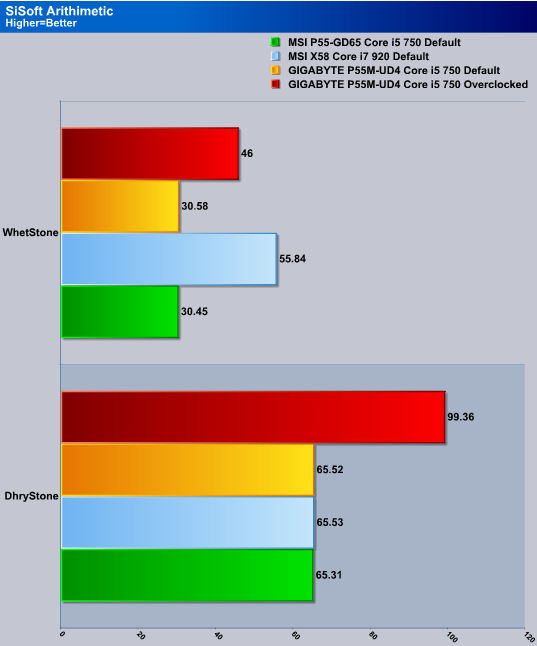
In SiSoft testing, during the Dhrystone portion the P55 motherboards and the X58 motherboard performed identical, while using a default CPU speed. Obviously Whetstone is utilizing all 8 threads on the Core i7 920 CPU thanks to Hyper Threading.
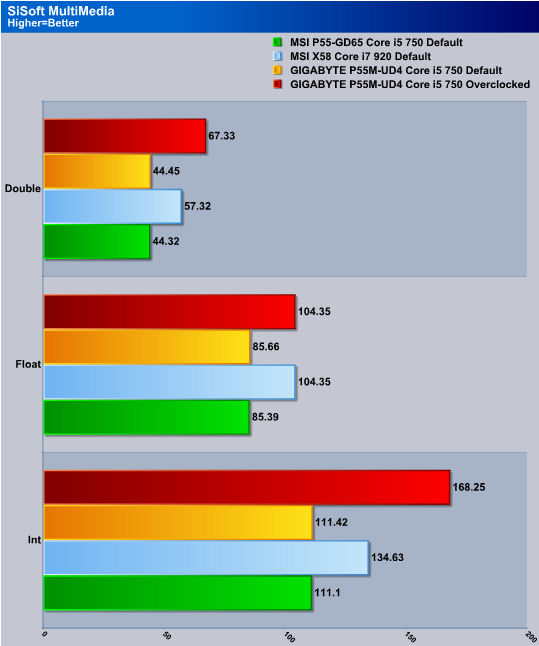
In multimedia testing in SiSoft, again both the P55 motherboards are very close in performance. It is hard to declare a winner.
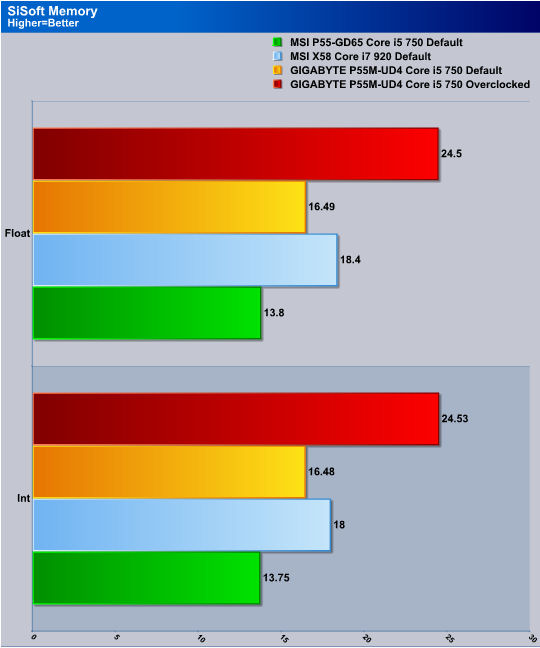
Where things start to differ between the two P55 motherboards is how they handle the memory. The MSI P55-GD65 motherboard has issues regarding the x10 memory divider. I had to run the memory at x8 bringing the memory from 1333MHz to 1066MHz. The GIGABYTE P55M-UD4 motherboard could run the memory at a x10 memory divider bringing the speed to 1333 while at a default CPU BCLK and overall frequency speed of 2.66GHz.
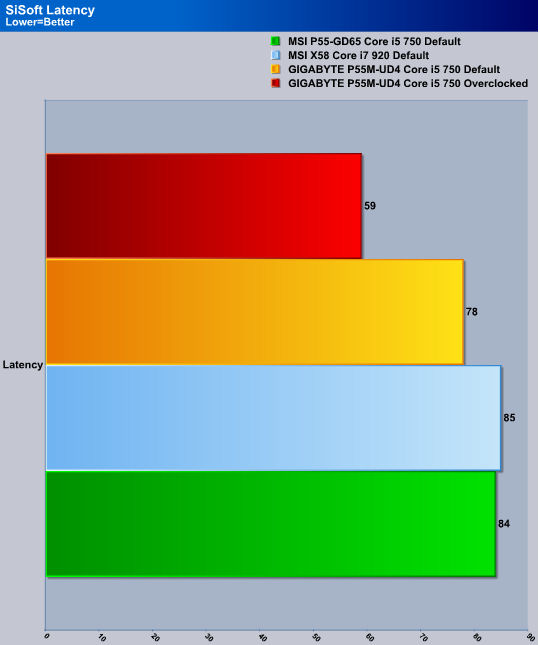
The higher memory frequency obtained obtains the lower overall latency.
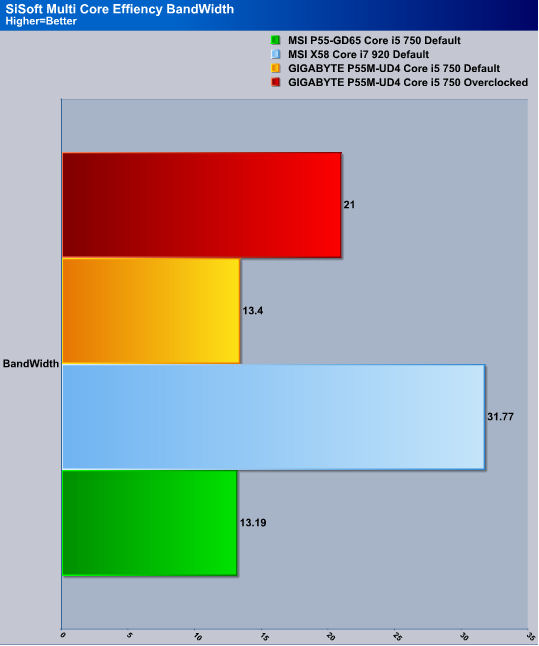
Neither one of the P55 motherboards with the Core i5 750 CPU could keep up with the shear raw power of the Core i7 920 CPU.
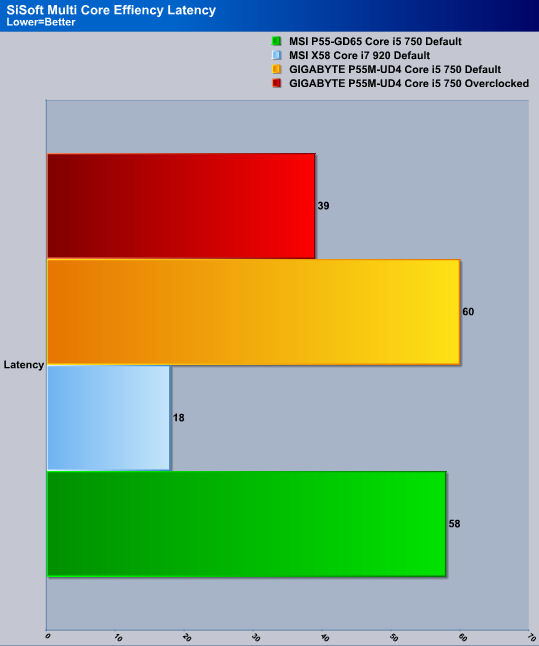
Once again the Core i7 920 CPU decimates the P55 motherboards with the Core i5 750 CPU.
EVEREST

“EVEREST Ultimate Edition is an industry leading system diagnostics and benchmarking solution for enthusiasts PC users, based on the award-winning EVEREST Technology. During system optimizations and tweaking it provides essential system and overclock information, advanced hardware monitoring and diagnostics capabilities to check the effects of the applied settings. CPU, FPU and memory benchmarks are available to measure the actual system performance and compare it to previous states or other systems. Furthermore, complete software, operating system and security information makes EVEREST Ultimate Edition a comprehensive system diagnostics tool that offers a total of 100 pages of information about your PC.”

Since the GIGABYTE P55-UD4 motherboard can utilize a higher memory frequency, it is only natural for it to out perform its competition. What got me a little confused was that the GIGABYTE P55M-UD4 motherboard beats the tri-channel capabilities of the Core i7 920 CPU.
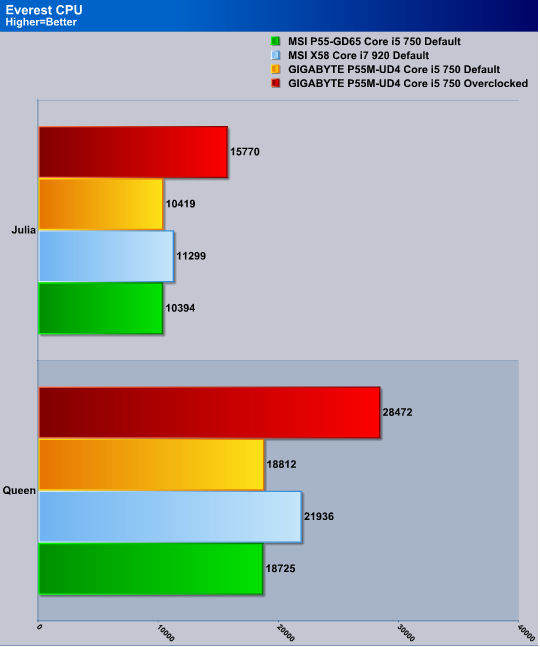
Both P55 motherboards perform identical in Everest CPU testing. Everest prefers to have a higher CPU core speed over threads.

The motherboard with the highest memory speed also has the lowest latency.
BIBBLE 5
Bibble 5 is a real world conversion program that allows us users to convert our RAW image formats to JPG image formats with out sacrificing visual quality. What makes this program stand out from the other RAW image converters is the fact this program will utilize all available threads for the conversion process. A fast CPU and having a multiple threaded CPU makes this tasking even faster.
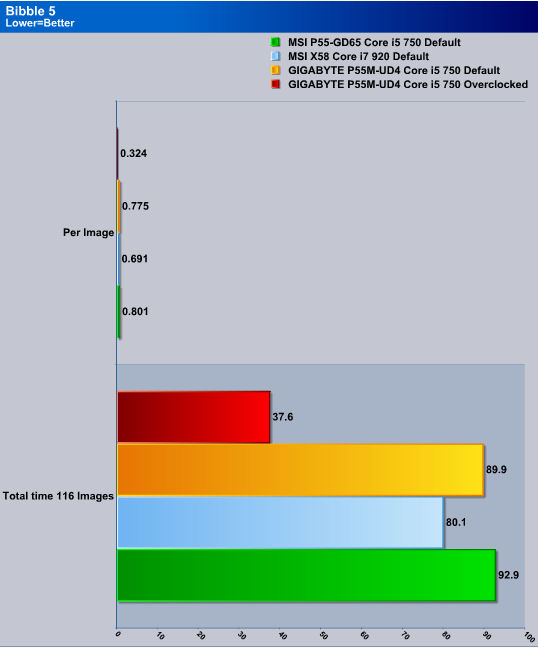
Bibble 5 Testing proves that having a higher CPU core speed is preferred over thread count. The subsystem of the GIGABYTE P55M-UD4 motherboard does help reduce the time it to convert the images from RAW format to JPG format.
WIN RAR

This module in WinRar generates random data, which contains specially introduced redundancy, increasing the load to both the processor and memory. Data is then passed through RAR compression and decompression algorithms, and the output of the decompression algorithm is compared to the source data. If any differences are found, WinRar then reports “Errors found – Yes” in the command window. WinRar displays a size of processed data and compression speed, current and resulting, in kilobytes per second.
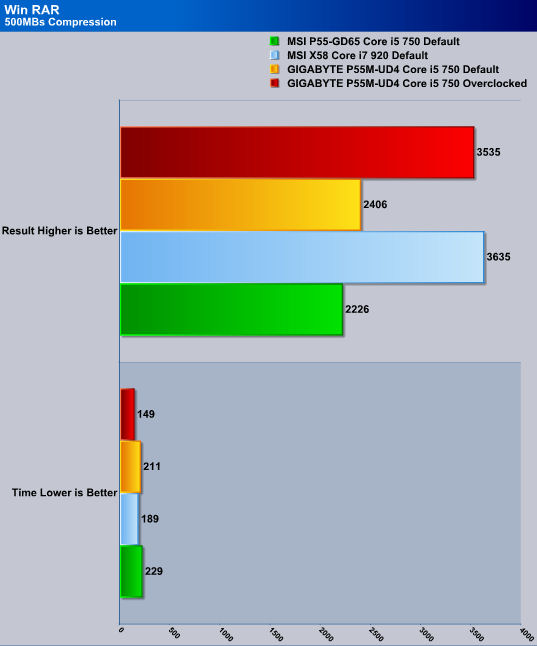
Win RAR likes to have high memory frequency and memory bandwidth along with a fast CPU.
CrystalDisk

I ran the Patriot SSD on the GSATA 2 controller instead of using the native PCH. As we can see, the GSATA 2 controller does have a slight performance gain over the PCH and the ICH10R chipset.
3DMark Vantage

Currently, there is a lot of controversy surrounding NVIDIA’s use of a PhysX driver for its 9800 GTX and GTX 200 series cards, thereby putting the ATI brand at a disadvantage. Whereby installing the PhysX driver, 3DMark Vantage uses the GPU to perform PhysX calculations during a CPU test, and this is where things get a bit gray. If you look at the Driver Approval Policy for 3DMark Vantage it states; “Based on the specification and design of the ![]()
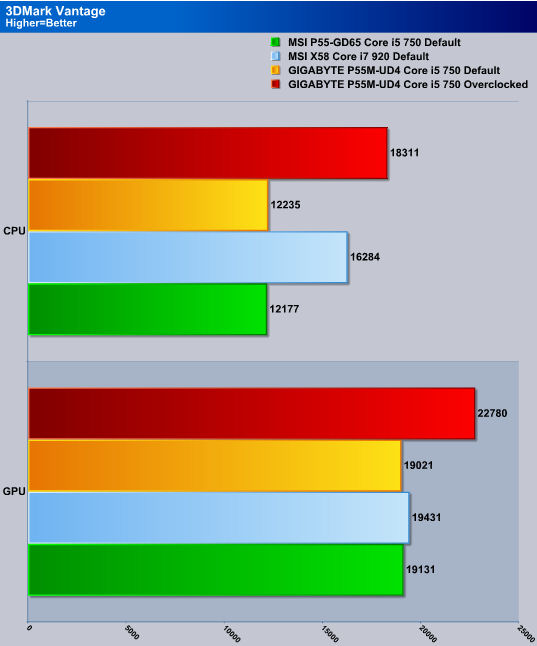
In the video benchmarking portion of 3DMark Vantage, all motherboards and CPU’s performed identically while using a default CPU speed of 2.66GHz. In the CPU testing, 3DMark Vantage prefers to have more threads at its disposal for physics calculations.
WORLD IN CONFLICT

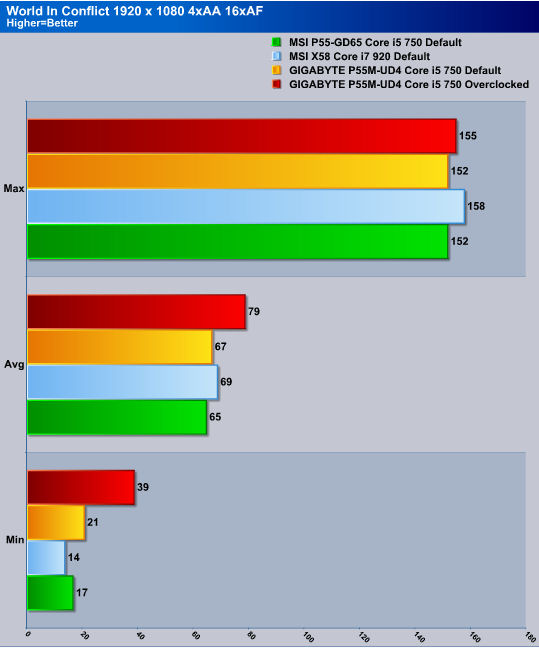
The GIGABYTE P55M-UD4 motherboard was the only motherboard to get a frame rate above 20 on the minimum in World In Conflict.
FAR CRY 2

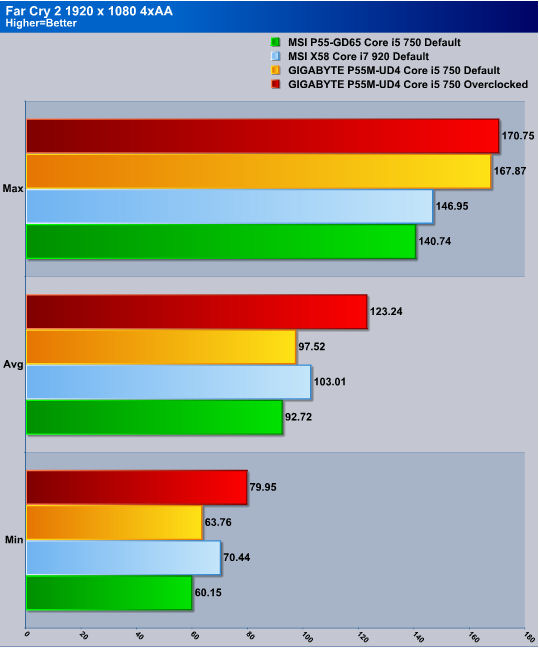
Far Cry 2 starts to show us a different story. Having a high core speed and/or a lot of threads does make a significant difference since this game uses a lot of physics calculations on the CPU.
LAST REMNANT
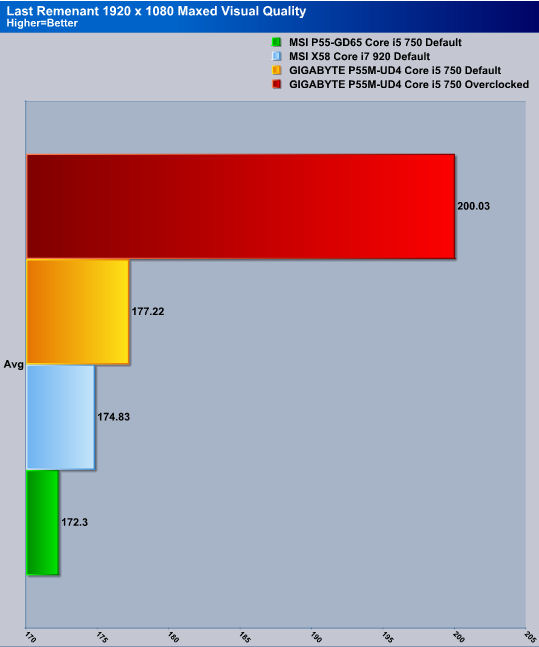
Last Remnant testing shows that having a high core CPU speed is preferred over thread count.
Conclusions
Once again I found myself tormenting a perfectly good motherboard right off the bat. Now that I think about it, am I ever nice to anything I get? Things that make you go hmmm… The GIGABYTE P55M-UD4 motherboard did not once hesitate in performance or overclocking, well at least not until I started hitting the 210 BCLK range. But considering this is Intel’s smallest 1156 socket CPU, I believe this to be a pretty good little overclocker. Not once did this little motherboard hiccup while at the 212 BCLK. I also really liked the fact I was able to use an actual working memory divider to bring up the 2000MHz memory to 2000MHz+.
Looking around the web for a pricing of this motherboard I found this motherboard around the 150 USD mark. Now some may think this is a slightly high price, others will say this sits in a perfect price point. For a motherboard that has no apparent issues (at least not that I encountered) right out of the gate with a working memory divider I will have to say it is a fair price.
| OUR VERDICT: GIGABYTE P55M-UD4 |
||||||||||||||||||
|
||||||||||||||||||
| Summary: The GIGABYTE P55M-UD4 shows that Micro ATX motherboard are again a force to be reckoned with. These motherboards are no longer meant for the OEM type builders and can accommodate even the most grueling overclocker. |


