Just when you thought that the older socket 775 CPU motherboards came to an end ASUS, breeds new life into this CPU socket type.
INTRODUCTION
Since the introduction of Intel’s new Core i7 CPU’s, we were all amazed at its performance it offered us. At the same time we were all shocked at the cost it would cost us to upgrade to this newer standard, ranging anywhere from 800-1200 USD at a minimum. With the cost of this new CPU standard in mind, lot of people decided to hold on to there Intel socket 775 platforms, which still proven to be a good solid platform for gaming and anything we saw fit for the use of our computers with out the large expense of moving to a entirely new CPU socket and motherboards, including memory.
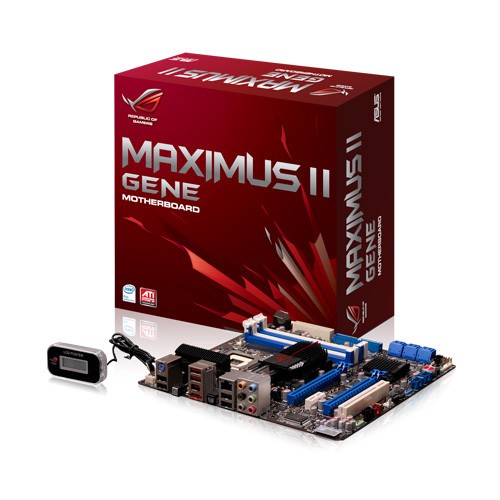
With all of this in mind, it is good to see manufacturers like ASUS still working hard on improving the Intel socket 775 CPU’s. Like its bigger brother the ASUS Rampage II GENE motherboard, the Asus Maximus II GENE motherboard is a micro ATX form factor, but with a couple of difference’s, the Maximus II GENE motherboard supports the Intel socket 775 CPU’s, dual channel DDR2 memory, and it uses the P45 Eaglelake chipset, paired up with a ICH10R south bridge, with a few extra’s added we seen with the Rampage II GENE motherboard.
About ASUS
Origin of ASUS
ASUS comes from the last four letters of Pegasus, the winged horse in Greek mythology that represents the inspiration of art and learning. ASUS embodies the strength, creative spirit and purity symbolized by this regal and agile mythical creature, soaring to new heights of quality and innovation with each product it introduces to the market.

|
|||||||||||
 |
|||||||||||
Imagine innovations that simplify our lives and enable us to realize our full potential. It is technologies’ responsibility to accommodate us, not the other way around, because all devices should perform and communicate seamlessly anytime, anywhere. ASUS thrives to become an integrated 3C solution provider (Computer, Communications, Consumer electronics). |
|||||||||||
As a major player of the IT industry, ASUS has established its corporate mission: Provide innovative IT solutions that empower people and businesses reaching their full potential. The philosophy of ASUS product development is to do the fundamentals well first before moving forward. Started with computer components such as motherboards, graphic cards, and optical storage devices, ASUS now has now over 16 product lines, including desktop barebone systems, servers, notebooks, handhelds, network devices, broadband communications, LCD monitors, TVs, wireless applications, and CPT (chassis, power supply and thermal) products. |
|||||||||||
|
|||||||||||
|
PACKAGING

I need to start somewhere, so lets start at the front of the packaging of the Maximus II GENE motherboard. If you read my previous review of the Asus Rampage II GENE motherboard (which can be found HERE), we notice that ASUS used a similar color scheme of the box itself.

Turning the box over to one of the sides.

Turned the package over 90°. I did not take all four sides of the box itself as it is the same thing.

The backside of the box. ASUS gives us general support, as far as memory, CPU, PCI-E type, also the chipset the Maximus II GENE uses. NOTE: This motherboard uses an Intel P45 chipset and does not support Nvidia SLI, only nativly supports ATI’s crossfire X.


Turning the package back over to front side, and open the lid. ASUS gives us a bit more information about the Maximus II GENE.


Looking towards the bottom half of the lid, Like its bigger brother the ASUS Rampage II GENE, this motherboard uses Creative Supreme X-FI sound system.

Finally we get to see the motheroard.

Removing the motherboard and its box carrier we get to the bottom of the box, this has all of the extra contents we will need to use this motherboard in our computers.

All of the boxes contents laid out. Starting up on the top, is the Maximus II GENE, right, IDE ribbon, LCD poster, and the rear IO cover. Downwards, is a ROG ( Republic Of Gamers) sticker, to the left is 4 90° SATA cables, Installation manual and driver disk. Ops, i forgot about the little plastic bag below the sicker, this an extension for USB’s and the front IO power/reset buttons, and the HDD/power LED’s.
OVERVIEW

This is one cool little device. Sometimes it is the small things that makes products stand out from one another. I absolutely loved this LCD Poster on the Rampage II GENE motherboard, it pleases me to see ASUS included this unique little device in the Maximus II GENE motherboard.


This is the rear IO plate.

Lets look at the rear IO ports that is on the Maximus II GENE motherboard. Looks identical to the Rampage II GENE rear IO ports. Starting from the far left then working right, we have one PS2 port with two USB’s right below. The clear CMOS button is all by itself, then another header that has two USB ports, one 1394 fire wire port, with a E-SATA port. Moving right still, we have the optical audio port, A ethernet with two USB ports in a header, and finally the eight channel onboard audio ports.

Moving over to where the six SATA ports are located at, ASUS still continues to use the 180° ports here, these are native to the ICH10R southbridge. By keeping at 180° makes getting to these ports a lot easier when using long video cards. and one standard 90° SATA port (Jmicron controlled).

Lets move over the memory ports,the memory type that is used on the Maximus II GENE is DDR2, not to be confused with DDR3 memory types. Once again ASUS used a single sided manual locking device on the memory. Instead of having six memory ports like the Rampage II GENE, the Maximus II GENE motherboard only supports four. Right below the memory ports, is the twenty four pin main power plug, the IDE port (JMICRON controller), and finally the CMOS battery. Again just like its bigger brother the Rampage II GENE this motherboard placed the CMOS battery in an upright position. Now this is strange, ASUS moved the memory OK button from near the on board power/reset buttons (Rampage II GENE) to near the memory ports, well this will make getting access to this button a whole lot easier.

Moving back to where the southbridge is, to the left of the southbridge and on the edge of the mother board is the onboard power/reset buttons. We also see fan headers number one, two (counting them as I see em, not by there actual numbering)

An up close picture of the memory OK switch.

The CPU socket, and the cover ASUS used to help protect the pins form getting bent during packaging, and transporting.

Well ASUS still hasn’t placed the EPS CPU power plug in a good spot. This is gonna be a challenge to get to this power plug once this motherboard is in the chassis. Just like its bigger brother the Rampage II GENE this motherboard board uses an eight phase power system for the CPU, with the same style of heat sink for the power mosfets. To the far left of the picture is fan header number three.

Pretty much an identical layout as the Rampage II GENE motherbaord as far as the PCI-E ports. But instead of fully supporting a 2 X 16x, the P45 Eaglelake chipset only supports 1 X 16x or 2 X 8x PCI-E. to the far edge is fan header number four, right above the fan header is the front 1394 firewire header, and the front IO audio headers.

Up close shot of the OPT Temp sensors that the Maximus II GENE uses. These are for that extra temperature monitoring you may wanna do with this motherboard. There are a total of two of these extra sensor headers, but ASUS did not include any temperature probes. the OPT Temp 2 header is located, right below the bottom PCI port.

The onboard power/reset buttons.

This motherboard uses also a LED type of warning system to warn you if you going to crazy on voltages. This is for the memory voltages. Green = normal, Amber = high, Red = Crazy.

The northbridge’s LED’s warning system. Located right below the northbridge

The meaning of each light on the northbridge LED’s warning.

Here is the second OPT Temp header. Located right behind the rear audio ports header.

The CPU’s LED’s warning lights. Located near the EPS CPU power plug.

The final picture of the motherboard. The front USB headers are located just above the onboard power/reset buttons.
 |
 |
 |
 |
 |
 |
 |
 |
 |
|
 |
 |
Extra pictures for you to get a better view of ASUS quality.
INSTALLATION
Since we gone over the packaging, and the overview of the Maximus II GENE motherboard. It is time to install this motherboard and give it a good work out. On with the show…..

I gotten the motherboard installed into the chassis, and ran into the same issue I had with the Rampage II GENE. The LCD poster plug, is really close to the rear IO cover and made getting to this plug difficult. Not to mention the EPS CPU power plug. Four small wires (LCD Poster) a lot easier to bend then eight thicker wires (EPS CPU power plug).

Got the CPU cooler installed, the video card in, HDD’s all hooked up (along with the DVD burner) and power supply in and hooked up time for a quick look through and then its time to hit the power button.


Quick look over.

Power hooked up, and all of the extras we need (mouse, keyboard etc.). It is time to hit the power button.

The flash of the camera kind bled out the on board HDD activity light as well as the Amber light on the memory. Shhhh, don’t say nothing.

The onbaord power/reset buttons light up too.

Hehehe, despite my CPU frequency my CPU light is green….
BIOS PART 1
There are lot of BIOS shots, so I am not going to go into great detail of the BIOS just a hit and miss.
 |
 |
 |
The Main portion of the BIOS.
 |
 |
 |
 |
 |
 |
 |
 |
The Advanced portion of the BIOS

The LCD Poster setting that is inside of the Advanced settings portion of the BIOS
 |
 |
 |
 |
 |
 |
 |
 |
 |
 |
 |
 |
I set the LCD Poster to scroll through the temperatures of the motherboard. This is what it looks like.
 |
 |
 |
|
 |
 |
 |
 |
Power portion of the BIOS.
 |
 |
 |
|
 |
 |
Boot potion of the BIOS
 |
 |
 |
 |
Tools portion of the BIOS, this is where we can save our overclocking profiles. ASUS also allowed us to save up to a staggering of eight different profiles.

Exit page. I dont think I need to mention anything here.
BIOS PART 2
Once again no real need to go into great detail of the BIOS, as ASUS did an excellent job allready, by giving us the default values and the current values.
 |
 |
 |
 |
 |
|
 |
 |
ASUS did an outstanding job on the BIOS itself. ASUS made darn sure you understood the settings you were making, what the default values were, as well as what is the current values are. This way we have a lot more control and know how much to adjust that particular adjustment by.
TESTING METHODOLOGY
| Test Setup &Testing Methodology | |
| CPU | Lapped Q6600 |
| Motherboard | Asus Maximus II GENE, Abit IX38 |
| Case | Antec Nine Hundred Two |
| Memory | Crucial Balistx |
| Video Card’s | Sapphire HD4770 |
| Hard Drives | 2x Western digital 160 (Raid 0), 1 Western Digital 500 Gig |
| CDRom Drive | Lite On Sata1 DVD Burner |
| Power Supply | Seventeam 850watt |
| Type Of Coolers Used | Zalman CNPS9900 |
| CPU Speeds Used | 2.4, 3.6GHz |
| Operating System Used | Microsoft Windows Vista 64Bit |
| Type of Software Used During Testing | 3DMark06, 3DMark Vantage, Far Cry 2, SiSoft, Everest, POV Ray, wPrime, Super PI, CineBench |
For testing purposes I ran each benchmark a minimum of three runs per, to make sure consistency and that there were no erroneous readings were present, as well as stability was present through out testing. The comparison motherboard I used was none other then my old Abit IX38 motherboard, this motherboard was used at default CPU speeds (2.4 GHz) and is for reference only. The ASUS Maximus II GENE was tested in default CPU speeds, and as well as overclocked state of 3.6GHz. Since the “Ground rules” have been set, lets get on with the overclocking portion of the review.
OVERCLOCKING
If ASUS makes overclocking any easier I swear there motherboards will be doing this task by themselves soon. I started off lightly (I havnt messed with a Q6600 CPU in a few months so I did not want it crying home to mommy just yet.) with a mere 333FSB and a 9 multiplier. Reinstalled Windows Vista 64Bit, installed of my drivers i needed and all of the programs I will be using to torture the Maximus II GENE, I rebooted the computer re-entered the BIOS and set the FSB to 400 FSB x 9 multi, and adjusted all of the voltages, the best I could remember, rebooted the computer, let the OS load up, and ran a couple quick benchmarks checking for stability, and called it a night, It only took me about 45 mins to overclock the CPU from 2.4GHz, to 3.6 GHz (remember I installed Vista 64). This is in my pops rig, I let him burn it in a day or two, before I torture the motherboard with the benchmarking programs.
CPU-Z Default speed

Oops, I need to remember to drop the CPU volts after overclocking for default CPU speeds. Tells you I never run my CPU’s STOCK.

Overclocked ASUS Maximus II GENE motherboard.
SISOFT
“SiSoftware Sandra (the System ANalyser, Diagnostic and Reporting Assistant) is an information & diagnostic utility. It should provide most of the information (including undocumented) you need to know about your hardware, software and other devices whether hardware or software. It works along the lines of other Windows utilities, however it tries to go beyond them and show you more of what’s really going on. Giving the user the ability to draw comparisons at both a high and low-level. You can get information about the CPU, chipset, video adapter, ports, printers, sound card, memory, network, Windows internals, AGP, PCI, PCI-X, PCIe (PCI Express), database, USB, USB2, 1394/Firewire, etc.”
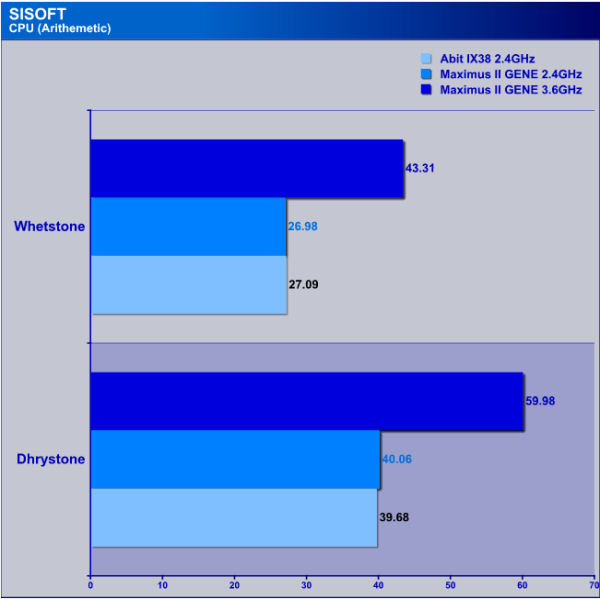
Higher=Better
Starting off on an all time favorite benchmarking program, SiSoft. During the Arithemetic CPU testing it is really hard to which one is in the lead, both motherboards performed on par with one another, during Default CPU speeds of 2.4GHz. The ASUS Maximus II GENE does really good holding it self up to an enthusiast chipset the X38.
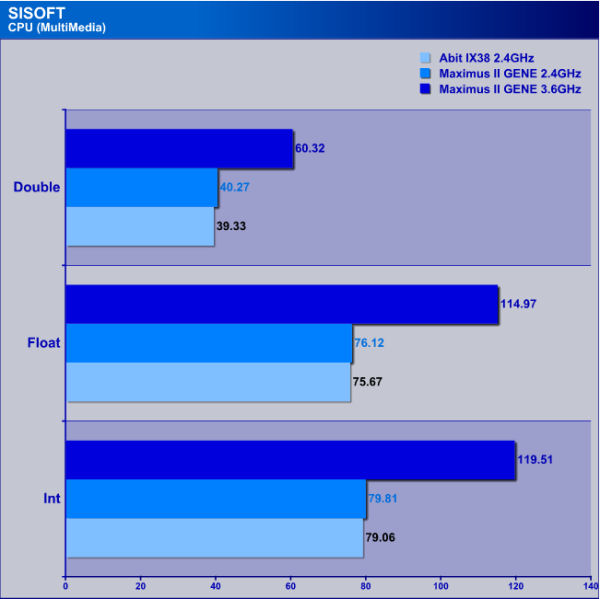
Higher=Better
During Multimedia we start to see signs of life coming from the Maximus II GENE motherboard. Granted the gain is minor, it is enough to tell the Maximus II GENE is no slouch when it comes to all out performance.
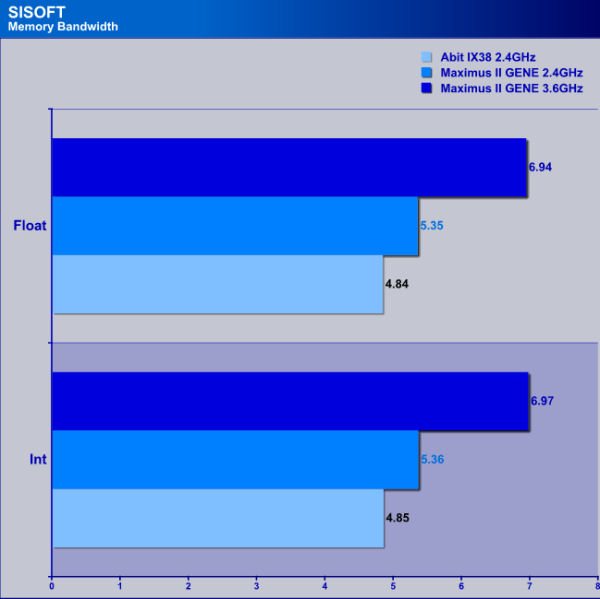
Higher=Better
Memory bandwidth testing the Abit IX38 motherboard did not stand a chance. Both motherboards used the same memory speed of 800MHz while at a default CPU speed of 2.4GHz.
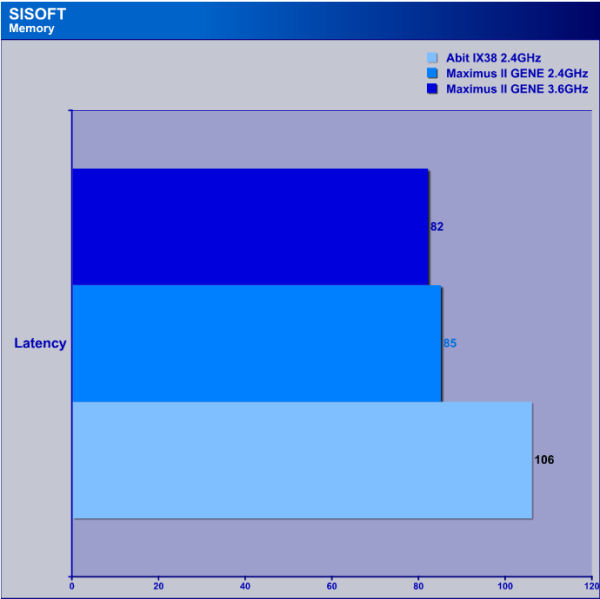
Lower=Better
Latency testing just re-iterates what we seen with the memory bandwidth testing. The ASUS Maximus II GENE motherboard dominated this scene as well.
EVEREST
“EVEREST Ultimate Edition is an industry leading system diagnostics and benchmarking solution for enthusiasts PC users, based on the award-winning EVEREST Technology. During system optimizations and tweaking it provides essential system and overclock information, advanced hardware monitoring and diagnostics capabilities to check the effects of the applied settings. CPU, FPU and memory benchmarks are available to measure the actual system performance and compare it to previous states or other systems. Furthermore, complete software, operating system and security information makes EVEREST Ultimate Edition a comprehensive system diagnostics tool that offers a total of 100 pages of information about your PC.”
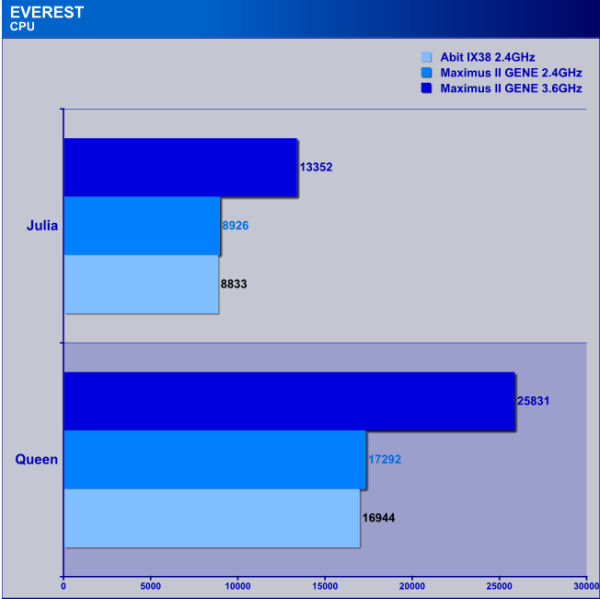
Higher=Better
Once I kicked up Everest testing, the Maximus II GENE motherboard still held onto its small performance lead, and not showing any signs of letting up this lead.
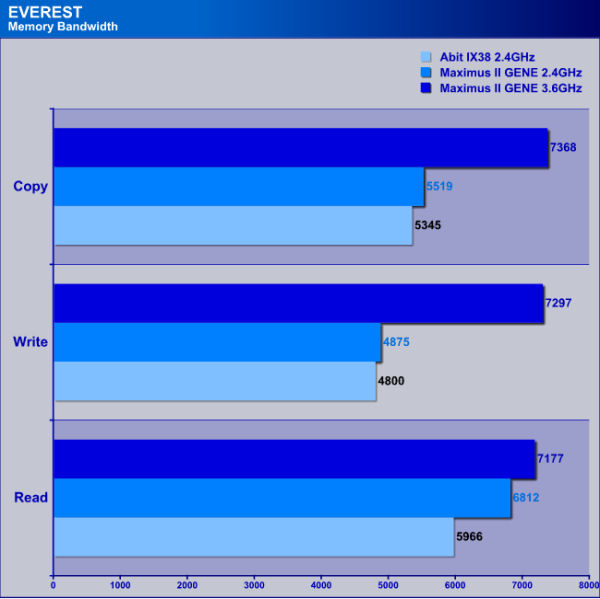
Higher=Better
During the memory testing with Everest, the Maximus II GENE really starts to shine. The only place the Abit IX38 motherboard came even close was during the write portion of testing.
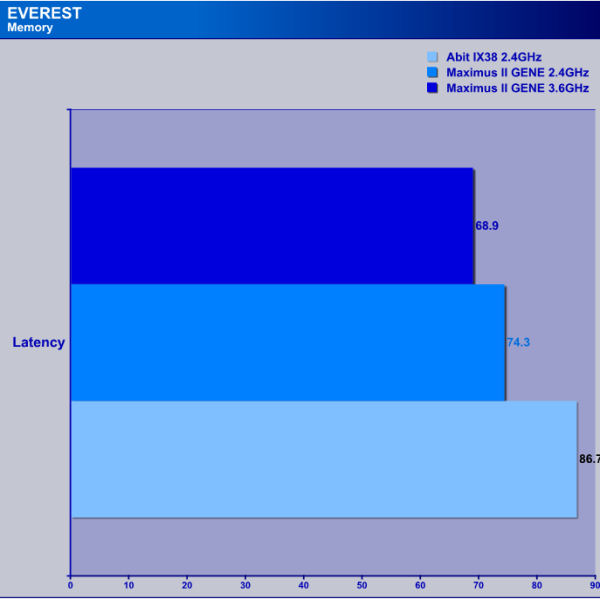
Lower=Better
Nothing new here, the better the motherboards handled the memory in bandwidth the lower the latencies became. Almost so low the Maximus II GENE motherboard knocked the Abit IX38 motherboard off the chart completely.
WPRIME
wPrime is a benchmarking application designed to use a highly multithreaded approach to calculating the square-roots of large amounts of numbers (up to 32 billion)
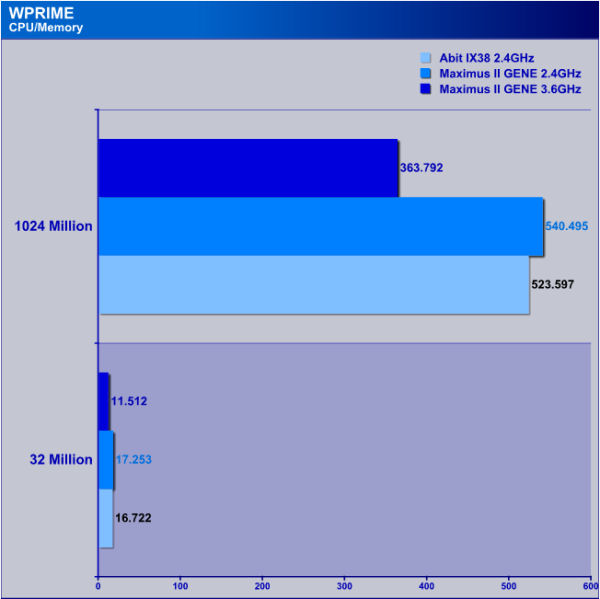
Lower=Better
Now this is a shock, The Abit IX38 motherboard beat out the ASUS Maximus II GENE motherboard.
CINEBENCH
CINEBENCH runs several tests on your computer to measure the performance of the main processor and the graphics card under real world circumstances. The benchmark application makes use of up to 16 CPUs

or CPU core.
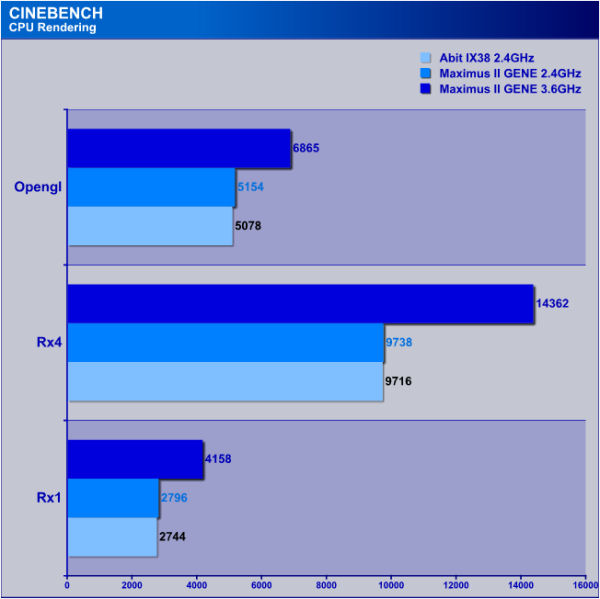
Higher=Better
The Abit IX38 motherboard trying hard to keep with the ASUS Maximus II GENE, but just doesn’t have enough oomph behind it.
SUPER PI
Super Pi is a program that calculates pi to a specified number of digits after the decimal point up to a maximum of 32 million. The Gauss-Legendre algorithm which is a windows version of a program used by Yasumasa Kanada in 1995 to compute Pi to 232 digits.
Super Pi is used by many overclockers to test performance and stability of their systems. In this community, Super Pi has become the standard for providing benchmarks to compare pi calculation times and demonstrate their overclocking skills. The program can be used to also test the stability of a particular overclocking speed. If a computer can calculate PI to the 32 millionth place after the decimal without a mistake, it is considered moderately stable in terms of RAM and CPU performance. More intensive CPU and RAM tests include calculations that run for hours instead of minutes and better test system stress levels.
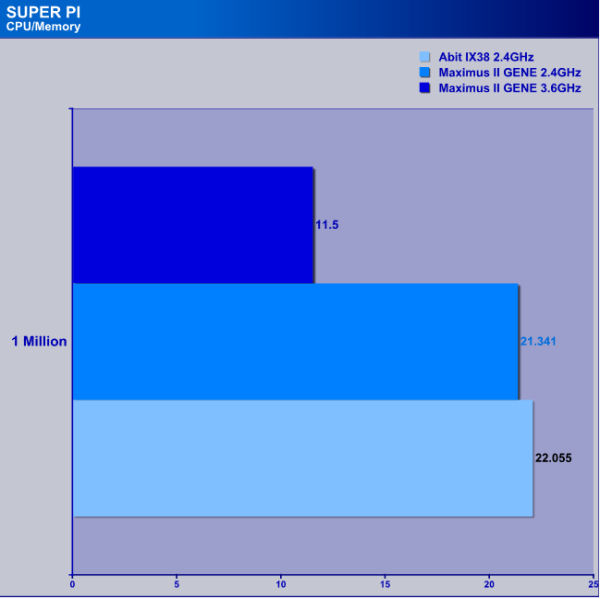
The Maximus II GENE motherboard, may have lost to the Abit IX38 in wPrime testing. In Super PI testing the Maximus II GENE re-asserts its dominance.
POV RAY
The Persistence of Vision Raytracer is a high-quality, totally free tool for creating stunning three-dimensional graphics. It is available in official versions for Windows, Mac OS/Mac OS X and i86 Linux. The source code is available for those wanting to do their own ports.

Lower=Better
Both motherboards performed as well as expected, for having a older Q6600 CPU. The only place the Maximus showed its power is in the animation, camera testing.
3DMARK VANTAGE

The newest video benchmark from the gang at Futuremark. This utility is still a synthetic benchmark, but one that more closely reflects real world gaming performance. While it is not a perfect replacement for actual game benchmarks, it has its uses. We tested our cards at the ‘Performance’ setting.
Currently, there is a lot of controversy surrounding NVIDIA’s use of a PhysX driver for its 9800 GTX and GTX 200 series cards, thereby putting the ATI brand at a disadvantage. Whereby installing the PyhsX driver, 3DMark Vantage uses the GPU to perform PhysX calculations during a CPU test, and this is where things get a bit gray. If you look at the Driver Approval Policy for 3DMark Vantage it states; “Based on the specification and design of the CPU tests, GPU make, type or driver version may not have a significant effect on the results of either of the CPU tests as indicated in Section 7.3 of the 3DMark Vantage specification and white paper
.” Did NVIDIA cheat by having the GPU handle the PhysX calculations or are they perfectly within their right since they own Ageia and all their IP? I think this point will quickly become moot once Futuremark releases an update to the test.

Score to close to one another to determine a clear winner. As with any 3DMARK benchmarking the moons alignment to the sun and other planets will affect these scores….
3DMARK06

3DMark06 developed by Futuremark, is a synthetic benchmark used for universal testing of all graphics solutions. 3DMark06 features HDR rendering, complex HDR post processing, dynamic soft shadows for all objects, water shader with HDR refraction, HDR reflection, depth fog and Gerstner wave functions, realistic sky model with cloud blending, and approximately 5.4 million triangles and 8.8 million vertices; to name just a few. The measurement unit “3DMark” is intended to give a normalized mean for comparing different GPU/VPUs. It has been accepted as both a standard and a mandatory benchmark throughout the gaming world for measuring performance.

Like we seen in 3DMark Vantage testing these scores are to close to one another.
FAR CRY 2

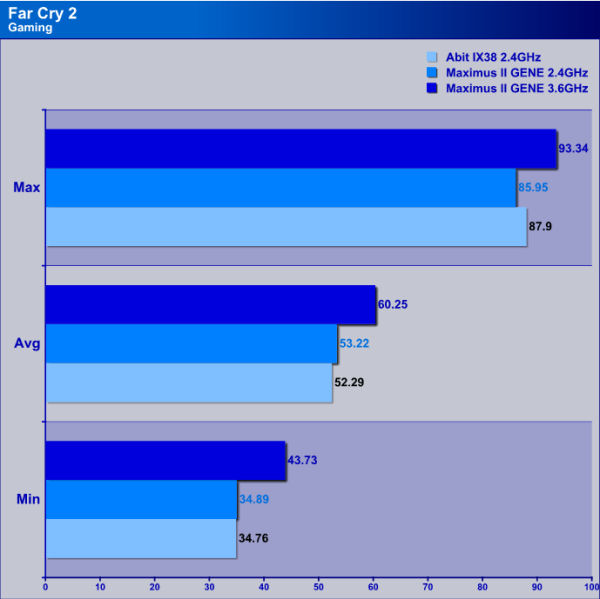
Higher=Better, Resolution set @ 1680×1050
Far Cry 2 gaming testing both motherboards performed admirably. This type of testing is all on the video card and the CPU has little influence on how the video card performs in higher resolutions such as 1680×1050.
HAWX

The story begins in the year 2012. As the era of the nation–state draws quickly to a close, the rules of warfare evolve even more rapidly. More and more nations become increasingly dependent on private military companies (PMCs), elite mercenaries with a lax view of the law. The Reykjavik Accords further legitimize their existence by authorizing their right to serve in every aspect of military operations. While the benefits of such PMCs are apparent, growing concerns surrounding giving them too much power begin to mount.
Tom Clancy‘s HAWX is the first air combat game set in the world–renowned Tom Clancy‘s video game universe. Cutting–edge technology, devastating firepower, and intense dogfights bestow this new title a deserving place in the prestigious Tom Clancy franchise. Soon, flying at Mach 3 becomes a right, not a privilege.
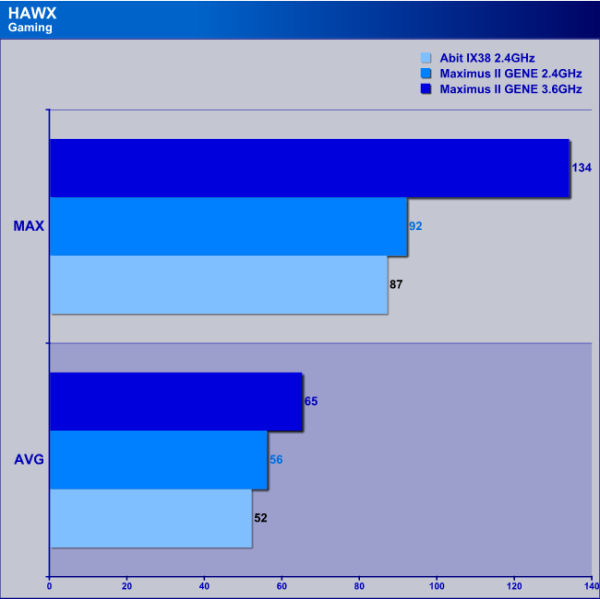
Higher=Better, Resolution set @ 1680×1050
In Hawx testing the ASUS Maximus II GENE motherboard starts to influence how the video card performs.
CONCLUSIONS
As I mentioned earlier it is good to see that a manufacturer is still improving on an all ready proven chipset. This motherboard is geared for those who still wanting to keep there existing socket 775 Intel CPU’s, or for those who are looking to upgrade there current systems but cannot afford the high price tag of Core i7 CPU’s. While at the same time not sacrifice performance. The Maximus II GENE motherboard fits this bill perfectly, this motherboard gives users of the Intel 775 socket CPU, a chance to upgrade there aging motherboards, to a newer more feature rich motherboard, that normally only comes with the most newest, & fastest chipsets.
The Maximus II GENE has so many of the same features of the Rampage II GENE it was really hard to distinguish the two apart. besides the memory type, and CPU socket. That in itself deserves some credit because ASUS still continued to combine quality, and there attention to detail on the much older, and still widely used CPU the socket 775.
The only real complaints I have with the Maximus II GENE motherboard, One is the placement of the EPS CPU power plug, having it in the upper left hand corner of the motherboard makes getting access to this plug a complete headache when we are using large CPU coolers, and while the motherboard is in the chassis. Not all chassis have a rear CPU cut out to remove the CPU cooler while it is in the chassis. The last thing is really only minor, the placement of the PCI-E/PCI ports, I would prefer to have the PCI-E x1/4 up on top then put the PCI-E x16 as second, PCI as third finally putting the last PCI-E x16 port at the bottom of the motherboard, this would allow them users with a PCI-E x1/4 sounds cards use on this motherboard.
At the time of this review, I was unable to find a price point for this great motherboard. So I will base my final scoring on its ability of overclocking, features, and the quality of this motherboard. I will also base this review on the target people this motherboard is intended for.
- Performance 9
- Value 0
- Quality 9
- Warranty 9
- Features 9.5
- Innovation 9.5
Pros:
+Decent layout, everything was labeled well, and finding out where things were and where things went was easily found.
+good overclockability
+Loads of features that only more expensive, top end motherboards get.
Cons:
–EPS CPU power plug still in a difficult position
–PCI expansion slots could be moved around a bit better (personal preference)
Because the Maximus has so many features, and performed very well, I give it a Final Score: 9 out of 10 and the Bjorn3D Golden Bear Award.


