We have all been staggered by the raw power of Nvidia’s 295GTX video card. Now, let’s heat things up when we at Bjorn3D stick a water block on this video card.
INTRODUCTION
When Nvidia introduced the 295GTX video card, we were all amazed at its shear raw power this video card had. It quickly took the top performance spot in gaming and in benchmarking.
So, it was nothing for us users to overclock this powerful video card to gain a little bit more performance, but as always the stock cooler provided just enough cooling to keep the video cool during normal or mild overclocking stages. When we started really cranking things up a few notches, the air cooler just was not cutting it. Not to mention the way Nvidia designed the original air cooler. It would dump half of the hot air this video card produced back into the chassis, causing our other components to get a little warmer than normal. Also, the way Nvidia designed this powerful video card, by sandwiching two video cards over a central cooler, made using any kind of after market cooler an absolute impossibility.
It is only natural for some of us to venture into alternative coolers like water blocks. Danger Den has been delivering water cooling products for as long as I can remember, as they make water blocks for all kinds of different video cards CPU’s and motherboards. I am going to show you this new water block that Danger Den brought to us. This water block fits the Nvidia 295GTX video card.
About Danger Den
Danger Den is a company headquartered in Astoria, Oregon. Their primary market is PC enthusiasts that are into liquid-cooling their systems. To this end, they have delivered and they have happy customers all around the world. When I first began looking into watercooling my system, Danger Den was a name that came up on every forum in every discussion I could find. The reason is simple. They have earned a reputation as a company that offers quality products at a fair price and excellent customer service. They also offer several computer cases that are comprised of all acrylic, with the watercooling system in mind. They offer waterblocks for everything from CPU’s to GPU’s, even motherboard chipsets. They continue to research and produce new products for the latest computer equipment. I believe Danger Den will be around for some time to come.
SPECIFICATIONS
Danger Den – GTX295
The DD-GTX295 is designed to provide maximum cooling for the NVIDIA GeForce GTX295 Video Cards
New Features :
- Compatible with Reference Design GTX295 (BFG, EVGA, XFX, PNY, etc).
- Fitting is threaded directly into the copper.
- Uses a Delrin/Acetal mid plate to port waterflow.
- Uses the Additional RAM Pad mounting point for maximum mounting contact
- Contact pads with the PCB to avoid warping or bending of the video card.
- Cools all heat generating points on the card – GPU, RAM, Voltage Regulators, I/O Chip
Includes:
- Complete Block Assembled with Gaskets
- Fat Boy High Flow G 1/4 – 1/2″, 3/8″ or 1/4″ OD Fittings
- Just one Inlet and Outlet for complete cooling
- Low flow restriction low pressure drop
- Stainless Steel Hold Downs
- Hand Lapped
- Pressure tested before shipment
- Complete Block Assembled with Top, Gaskets, and Fittings. Ships with Hold Down Materials, Thermal Pads, and Ceramique.
- Please leak test 24hrs upon receipt.
- Verify secure mount 48hrs after installation.
- Never reuse Air Heatsink Thermal Pads just use the supplied ceramique on the RAM and GPU
- Removal of the Air Heatsink is an involved process. It is much easier to install the waterblock.
Options:
- Fitting Size
PACKAGING

The box that the water block came in is pretty plain, just a white box with a sticker on it telling us what’s inside of the box.

The front side of the box.

3/4 view of the box again.

Opening the box up, Danger Den used foam to help protect this water block from getting damaged during shipping.

Removing the upper foam rubber we get to see the 295GTX water block ( I am not going to mention anything just yet I will cover the water block later).

Removing the water block and the lower piece of foam rubber, is the mounting hardware.

Everything laid out, the 295GTX water block, a PCI expansion cover, screws, and instruction manual. I do hope Danger Den shows us how to tear apart the 295GTX video card.

What was in the bag: two tubes of thermal paste, the instruction manual (laid out), in a smaller bag of all the screws we will need, and finally a little pad that will be used to help protect those exposed cores on the video card.
OVERVIEW

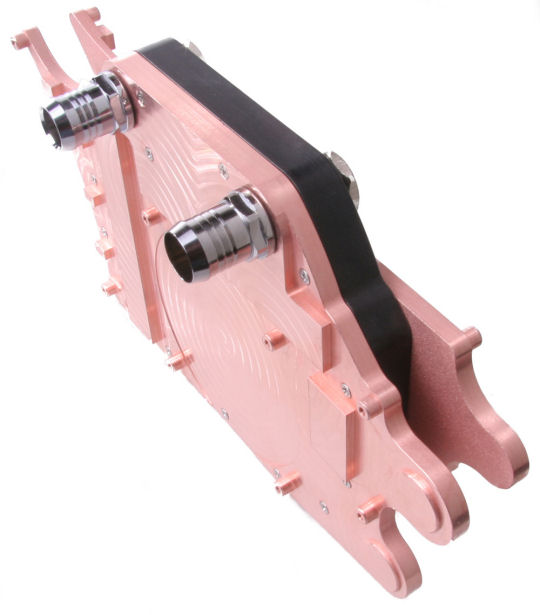
This water block is a beast, not only in size but weight. So you may wanna handle this bad boy with a tight grip. If you drop it, it will break something, toes, floors, feet, and anything else that’s in the way. This is one of the sides this block fits on to the 295GTX video card. Danger Den still left the machining marks, normally they have a nice polished surface.

This is where the core of the 295GTX card gets placed at. This area is nice and flat, also has a smooth texture to it.

Looking at the back end of the water block, this is where two of the memory chips are, and one of the rearward exposed cores that Nvidia uses ( I have no idea what it is, nor do I know its function).

Looking down in between the barbs of the 295GTX water block. The copper that Danger Den used is fairly thick on both sides.

Looking from the front of the water block at its side again. Take notice of the water jacket that Danger Den used. It too is fairly spacious, so this should cool well and also have little to no back pressure in the block itself.

Turning the block over 180° to the other side. Looks exactly the same as the previous side, but with one small difference.

And it is right here. This side has two exposed core things that sit at the rear of the video card (again I have no clue what this is nor its job).

Now I know what these are for. This is for the digital VRM’s to help keep them cool.
 |
 |
|
 |
||
 |
||
 |
||
 |
 |
|
 |
 |
I took various pictures of the Danger Den 295GTX water block to help you get a better idea of the quality and idea how this water block is made.
INSTALLATION PART 1
Before I continue this section I am going to let you know this portion is to give you an idea on how I put the Danger Den 295GTX water block onto my Asus 295GTX video card. This is not a guide (as I am pretty sure I missed a step here and there).
 |
 |
|
 |
 |
 |
 |
 |
 |
 |
 |
 |
 |
 |
We need to start removing the shield that Nvidia/Asus used on the 295GTX video card. If there is a side sticker on your video card, you will have to remove that in order to get to three screws that secure the shield on that side of the video card.
 |
 |
|
 |
 |
|
 |
 |
 |
 |
 |
 |
 |
 |
 |
After we removed the cover, we need to remove all of the screws that hold the video card’s PCB to the heat sink itself. Important: Remember there are two sides on the 295GTX video card.
 |
 |
 |
 |
Next up is the rear IO display port cover. This was bit more difficult. On the inside of the video card are two screws that have to removed. Then you have to remove the extensions on which we hook up our monitors plug to.
 |
 |
 |
 |
 |
 |
 |
 |
 |
 |
Here comes to scary part, separating the PCB from the heatsink. The first side came off fairly easy. The next side was a bit more difficult. I ended up putting a small screw driver in between the video cards retention plate and the heat sink to pry them apart. BE EXTREMELY CAREFUL when doing this as you can mess up a $500 (USD) card. Also, you will have to remove the SLI ribbons that Nvidia used between the two cards, these simply just pop right off. But pay close attention to the white arrow on the PCB and on the ribbon too, and line these up when you put it back together (IDEA: mark one side of the ribbons and that corresponding card to make this easier).
 |
 |
 |
|
 |
 |
 |
 |
Since I have the video card torn apart I figure take some pictures of the video card and the heatsink that Nvidia used.

The exposed core chip that sits at the rear of the video card, just so you know what chip I be talking about. One has one of the these, the other has two.
INSTALLATION PART 2
 |
 |
Just before I continue on with the installation portion, I ended up semi cleaning half of the 295GTX video card.
 |
 |
 |
 |
This is what both sides of the video card looked like after getting them pried off of the GPU cooler. Man, what a mess! Now, for cleaning I would recommend using a soft terry like cloth and some rubbing alcohol to help make this job easier.
 |
& |
 |
 |
 |
 |
After spending roughly 30 minutes on cleaning I was able to finally able to get the video card ready. Nvidia/Asus went a little crazy on the thermal paste IMO for the original cooler.

The NV200 chip that is on one side of the 295GTX video card is the SLI bridge that allows both halves to talk to each other. But this not why I am showing you this picture separately from the others. The reason for this picture all by itself is to show you the two little ports (J2/J3) that are right next to the NV200 chip. These have an arrow marking pin #1. The ribbon that we removed also has an arrow on one side of the ribbon. Make sure you line up the arrows on the PCB with the arrows on the ribbon. Otherwise, this card will not power up and will display a red light.
 |
 |
 |
 |
The little included thermal pad we need to use on the exposed cores to the rear of the video card and the digital VRM’s. This will make sure these don’t get chipped during installation of the water block and also make sure these get good contact with the water block as well. So, use it. I made mine wide enough to handle all of these parts, then cut it to the width I needed (I always add a bit more to the pad. Dad always said its always easier to take away than it is too add.).
 |
 |
Me, placing the little pads on the video card where they needed to be placed. I should mention that the little pads have a plastic covering that has to be removed on both sides.

The machine screws have a stainless steel washer and a rubber washer that need to be put on prior to using them.

Installed one half of the 295GTX video card to the heatsink.
 |
 |

This is where we need to pay attention to things. There are little arrows on both the video cards PCB and on the SLI ribbons. Make sure you line these arrows up. They are really simple to re-assemble. Just plug them in and there ya have it. Long ribbon goes to the inner ports. Short ribbon to the outer ports.

Make sure the PCB of the video card is not warped when installing aftermarket heatsinks. Oh yeah, make sure you use thermal paste on the memory and on the core of the video card.
 |
|
 |
 |
 |
 |
 |
 |
 |
 |
Just making sure everything is in place properly before I finalize the installation.
 |
 |

Well since I took off the rear IO display cover, I had to reinstall it for the finalizing.

Sexy looking 295GTX now.

Now since my palms are sweaty, I have a headache, and my heart is racing (sounds more like high school than assembling a water block. LOL.), it’s time to get on with things and start warming things up a bit. As always with water cooling, it is to your best interest to run the block out side of the system for 24 hours prior to using it on anything. Also, it is best to use a thread tape on the threads of the barbs and or plugs to help control leaks. This step is not necessary but a wise precaution.
 |
 |
 |
 |
 |
 |
This is what the 295GTX looked like sitting in my computer all hooked and rip roarin’ to go. Now, I did have one small issue with this water block. If you look at the back top plug , that is different from what Danger den gave you. The reason why I used a different one (one from my Koolance 487×2 waterblock) because when I flipped the barb on the block, the standard plug that Danger Den used would not go in all of the way. It gets about half way and stops. It felt like the threads were cross threading, but were not. This is normally caused when someone does not tap far enough into the material. Don’t mind the hose clamps on the hose (back hose), because of the sharp turn radius I had, it would kink my hose.
TESTING METHODOLOGY
| Test Setup &Testing Methodology | |
| CPU | Lapped Core i7 920 |
| Motherboard | ASUS Rampage II GENE |
| Case | Coolermaster Cosmos |
| Memory | Gskill Trident 2000MHz |
| Video Card’s | ASUS 295GTX |
| Hard Drives | 2 x Seagate 2.5″ HDD’s Raid-0, 1 160 gig WD HDD Backup. |
| CDRom Drive | Lite On Sata1 DVD Burner |
| Power Supply | SilverStone 1200 watt PSU |
| Type Of Coolers Used | DD MC-TDX, Danger Den 295GTX |
| CPU Speeds Used | 4080MHz 215 x 19 |
| Operating System Used | Microsoft Windows Vista 64 |
| Type of Software Used During Testing | Sacred 2 Fallen Angel for 2+ hours |
| Any Attempt on copying this system specifications will result in assimulation by your computer |
|
For testing purposes, I felt the only true way of testing the water block was by running Sacred 2 Fallen Angel for a couple of hours. This should get the video card warmed up enough. I will include stock clock speeds of both air cooling and water cooling, and maximum clock speeds achieved with air cooling as well as water cooling. The 295GTX water cooling setup is in a dual loop shared reservoir configuration. The video card has a separate dual 120 dual pass radiator. All fans were at their maximum RPM’s. I used RivaTuner to overclock the 295GTX video card as well as control the fan of the video card, if applicable. I also like to try and keep my video cards below 70°C during full load times. Your results will vary greatly from my own. For idle temperatures I allowed the video card to cool down for 30 minutes and took a reading at that point. The ambient temperature was around 19°C. I only measured the hottest GPU core temperature achieved.
TESTING
| CPU Cooler’s | Idle | Load |
| 295GTX Original Cooler 576/1998 | 37°C | 61°C |
| 295GTX Original Cooler 631/2100 | 38°C | 66°C |
| 295GTX Danger Den Water Block 576/1998 |
32°C | 41°C |
| 295GTX Danger Den Water Block 683/2152 | 32°C | 43°C |
As we already knew, the original 295GTX cooler is more than capable of handling the heat output of the 295GTX video card, but the original cooler also dumps part of that heat back into the chassis because of its design. I was unable to go above a 631 core speed and the memory speed of 2100 before this video card would lock up or reboot my computer (most of the time it locked up computer, but I had a couple of instances where it would reboot the computer). Once I threw on the water block my temps drastically changed. I lost 5°C on the idle temperature and an astonishing 20°C on the full load during default GPU speeds. Once I overclocked the video card (I was not expecting any change to the idle temperature because the way Nvidia handles the three separate core speeds), I maintained the same temperature as I had while the card was default GPU speed. Once I brought up the core speed up to 683 I gained another 52MHz, and my temperature only increased by a mere 2°C from default GPU core speed, from 41 to a mere 43°C.
3DMark Vantage Results
Well, normally I do a screen shot of my results but figured lets do an ORB submission instead of both default clock speeds and the overclocked air/water cooled 295GTX. I did overclock the shader of the 295GTX separately to 1567 MHz. By overclocking this particular part of Nvidia cards it helps in all out scoring as well as the PhysX processing capabilities.
Stock overclocked 295GTX with CPU @ 3.99GHz.
631 MHz core speed 2100MHz on the memory while using the default cooler. The shader speed was around 1488 MHz.
The 295GTX on water cooling.
CONCLUSION
Ever since I started messing with water cooling a few years ago, I would always look into alternative cooling products for my CPU, and video cards. Danger Den has allways been one of the top manufacturers I always looked at for my peticular water cooling needs, this company has always provided the necessary performance, looks, and cost needed to help cool my computer components. When a new computer component came out video cards, and CPU’s, water blocks were normally the first ones to come out with specific coolers for these items before air coolers, and lets not forget that water blocks on some items is the only option we have to help keep these peticular items cool. The Nvidia 295GTX video card, is one of them computer components that the only way to use an aftermarket cooling system is by use of an water block.
The 295GTX water block by Danger Den, is a top notch product, that cooled even the biggest of the biggest video cards out on the market today. Through out my assembly and testing of this water block I was not disappointed with Danger Den’s quality, and the performance of this water block. This water block helped me keep the 295GTX cool, it also helped on keeping my chassis temps down by not dumping all of that excess heat the original air cooler did. The only thing that made this water block complicated was the disassembly of the 295GTX video card and the reassembly of this video card with the water block. As you could tell through out this review, this was not the fault of Danger Den, but the maker of the video card itself. Where Danger Den could improve upon in this peticular area, was to include a detailed instruction manual ( or novel)to help aide us in the use of this water block. The only problem I ran into when using this water block was a single barb fitting, Danger Den did not tap the threads deep enough to accommodate the 1/4″ NPT plug to be fully fitted on the cooper side of the water block (for those like myself, that may have to flip one or two barbs around to accommodate our unique systems).
Looking around the world wide web, I found that this water block could be bought at a price of round 185 USD. This price puts this water block into the realm of enthusiast class of people. Also the complexity of disassembly and reassembly of the 295GTX video card.
- Performance 9.5
- Value 8
- Quality 9.5
- Warranty 9
- Features 9
- Innovation 9
Pros:
+ Great cooling capabilities
+ Looks good once assembled
+ All screws and barbs were included
Cons:
– Complexity of disassembly/assembly of the video card with no real guide (A set of instructions could have been included to help aide us on the proper way on mounting this water block)
– The surface of the water block could have been a bit more polished and smoother
Final Score: 9.0 out of 10 and the Bjorn3D Golden Bear Award.


