Cooler Master did a terrific job with the new Stacker 832 as there were no compromises behind the design and usability. The materials used to build the chassis are top notch. Brushed aluminum and nicely finished plastic parts work a treat and give this case a very distinctive look.
INTRODUCTION
Cooler Master has been known for filling the market with top notch enclosures, power supplies and general PC accessories. There isn’t really a trend when it comes down to desktop department. However, it’s safe to say geeks favor a clean type design with a lot of functionality rather than flashy and scary looking “things” up on their desks. If you are into Japanese cars, it’s called JDM style (Japanese Domestic Market). Although used in conjunction with automotive industry, this term describes functionality and unique style (the two have to go together). The original Stacker case became a widely popular full tower chassis amongst PC enthusiasts and custom system builders. The last couple of years brought quite a few changes to the external and internal design as well as overall functionality.
Today, I’m checking out a well-designed, functional and very appealing case from Cooler Master, the Stacker 832 Special Edition. Built with efficiency and compatibility in mind the new Stacker shines with cool and useful features.
FEATURES & SPECS
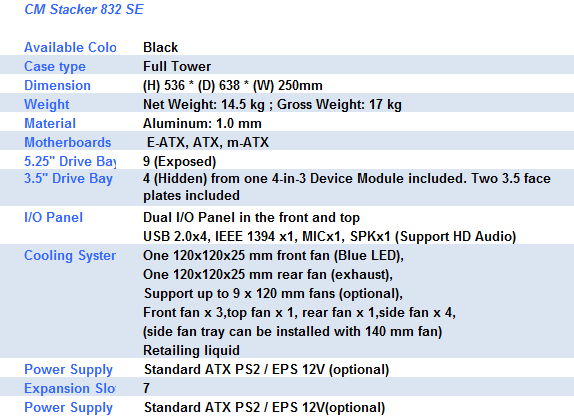
As mentioned earlier, Stacker 832 SE comes with handful of upgraded features and few fresh ones. Here is a list
- Value-added functionality
- Front panel opens to the left or the right for easy access
- Power supply may be installed upwards or downwards for better airflow and neat cable management
- Solid construction and streamlined design
- Support up to nine 5.25” drives
- Multi-positioning for the 4-in-3 device modules, providing maximum flexibility in the use of space
- Screwless slots
- Exclusive fan frame design provides easy screwless assembly- side-opening design to remove 5.25”shield easily
- Accommodates up to 120mm fans
- High ventilation openings on the top and the sides for excellent thermal management
More detailed specifications reveal juicer information about Stacker 832 SE. Although this case can hold up to nine 120 mm fans (side bracket can be filled with 4 x 140 mm) the included two fans isn’t anything special. It’d be much nicer if Cooler Master included a top fan out of the box.
PACKAGE & BUNDLE
Cooler Master Stacker 832 SE came in a well designed package. The box itself gives the user a slew of information regarding the chassis and what’s inside. The thumbnails on the box reveal some extra details and features of the new Stacker.
Click a picture to see a larger view


The case arrived in a well protected form which consists of three levels: cardboard box, Styrofoam blocks and plastic bag. All of these will make sure your case arrives untouched even from a bumpy ride. Once I took off the big foamy blocks I had to fight with the plastic bag that covered the enclosure. The bag isn’t useless as it secures the outer design from scratches and unwanted smudges. The case is big, no doubt about it and all the stuff inside just add to the overall dimensions.
As for the bundle, Cooler Master included the following:
- Steel mouse pad
- Instructions manual
- Screwless bracket set
- 5.25″ to 3.5″ converter shields
- Wheels
- FDD bracket
- A whole bag of screws
If you get lost during the installation procedure, confirm with the instructions manual. It’s very informative and easy to follow.
EXTERNAL DESIGN
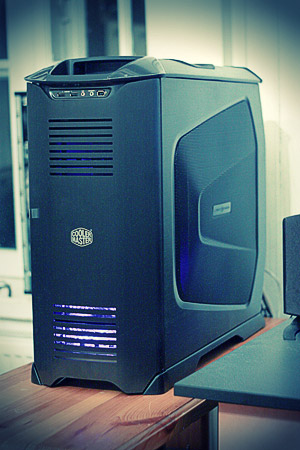
Now the fun starts. Ripping apart all the packaging reveals the massive full tower chassis. From the first looks the case looks extraordinary. As always, Cooler Masters does extremely good job designing the case from an aesthetics point of view.
Click a picture to see a larger view


Although the side panels are bezel-meshed there is plenty of aluminum that goes around the edges. The grill that I’m talking about massively improves cooling. The sides look very “pimpy” and high-tech. Each panel comes with Cooler Master badge to spice up the design. Glancing at the front, the new Stacker 832 SE shows its immensity and coolness with very distinctive front doors. In the middle there is a small Cooler Master logo. Right above the logo you will notice horizontal openings which seem to be for aesthetics rather than improve cooling. None the less it looks very decent. Notice the way Cooler Master embedded the I/O panel.
Speaking of I/O panel, there are two of them – yep, you’ve heard it, TWO. In my opinion it’s an awesome solution and Cooler Master definitely has my approval on that. The front panel comes with 2 USB 2.0 ports, Mic, headset and Firewire (IEEE 1394). Looking at the top panel we are seeing additional two USB 2.0 ports, reset button which can actually be pressed easily, HDD LED and large power button. The top of the case isn’t solid as you might have thought. Again there is additional grill to provide better heat dissipation. Inside it, you can mount a fan to improve cooling.
Click a picture to see a larger view


The back of the case is quite interesting though besides the extra locks, motherboard tray handle, it’s looking rather standard. Both side panels and removable motherboard tray are lockable with a push of a button. Cooler Master also decided it would be good to include pre-drilled water cooling holes for your liquid cooling hoses. Most of the case is made out of aluminum, but the design crew did not forget about proper ventilation. Every possible part of the enclosure comes with holes and openings for better heat dissipation — even the bottom of it features a mesh-type design.
This is something I’ve seen for the first time. The front panel can be actually opened from either way meaning the hinges are on both sides of the case. Whether you like to have your case on the right or left side, the panel will open the way you want it to. It’s a nice addition as most of the enclosures on the market don’t come with such feature. Heck, if you don’t like the panel you can easily take it off and forget about it. Because it’s so slick and cool, I like to keep it on.
INTERNAL DESIGN
Let’s take a look inside Stacker 832 SE — a lot of cool features are waiting for the potential user. Although the new Stacker is advertised as a tool-less chassis, I can’t totally agree with that. There is this one thing that requires a screwdriver, but more on that as you read through.
Click a picture to see a larger view


Taking of the side panel reveals a “wall” of fan brackets, unfortunately no fans. It seems Cooler Master skimped on the coolers a bit. Disregarding that fact let’s move forward and get inside the Stacker. The fan panel needs unlocking before it can be wide open. It’s an easy task though it requires you to look around for hatches and latches. If you’re lost you can always confront with the instructions manual. Being inside, the bottom of the chassis grabbed my attention. Not that it’s something awkward, but it’s a definite plus to make a fully ventilated case from top to bottom.
Stripping the case from its accessories and all the clutter reveals juicier details. The first thing that strikes me is the ventilated motherboard tray. Looking at different cases I couldn’t find many with such feature. It’s so simple, yet it can’t be found on more expensive cases. Even Cooler Master Cosmos didn’t come with ventilated tray. Apart from the obvious holes I’’ve noticed the spacious compartment. Though the case is a full towered chassis, it’s not as big as Cosmos, yet it’s able to hold a fully fledged enthusiasts system.
Click a picture to see a larger view


The front 5.25” brackets can be easily removed by pulling the two side clips inwards. They are covered with mesh mainly for better cooling, but also it looks better. The HDD rack is the only part of Stacker 832 SE that requires a screwdriver for proper mounting of 3.5” device. Notice the anti-vibration pads that reside between the rack and the vertical device shaft. I don’t think I’ve mentioned this yet, but Cooler Master Stacker 832 SE comes with a removable motherboard tray for easier installation.
INSTALLATION
Installing the system inside Cooler Master 832 SE was a blast. The only thing I didn’t enjoy was fighting with the side panels which I couldn’t lock back in. More on that in the conclusion below. Technically, everyone should be able to install a full-fledged system from scratch. There are no abstruse procedures that would require a rocket scientist, just the opposite. It’s plain and simple task.
Click a picture to see a larger view


I’ve mentioned this on the last page, but will do it again. Cooler Master Stacker 832 SE comes with removable motherboard tray to ease the installation process and make it faster. To take it out all you have do is release the locks (top & bottom) and pull the handle. The great thing is tray comes with pre-drilled ventilation holes. I didn’t like the fact that my ASUS motherboard stuck out so much without any support from the spacers. You have to be very cautious when putting the RAM or your IDE devices in place as the motherboard wobbles up and down. Installing a PSU was a piece of cake. You take the included adapter, screw it to your power supply and slide it right in.
The hard drive cage is a bit annoying in my opinion as you need to unscrew it and take it out before putting your device in. It’s not a tool-less job and it becomes irritating if you have to often swap hard drives. The cool thing is, Cooler Master included anti-vibration pads so your drives run a bit more quiet. To my surprise when trying to close the side panel I found out the brackets wouldn’t clear with the cooler. With a big HSF like mine you have to take out the inside adapter in order for the panel to close.
Here is the final look.
CONCLUSIONS
Overall I’m very pleased with the case. Cooler Master did a terrific job with the new Stacker 832 as there were no compromises behind the design and usability. The materials used to build the chassis are top notch. Brushed aluminum and nicely finished plastic parts work a treat and give this case a very distinctive look. There were also no compromises with inner build; very sturdy yet light aluminum frame, specious compartments and no sharp edges
Every feature works like it’s meant to and the ease of installation takes away the pain and trauma for less savvy folks. Dual I/O panel is something most of you will adore. Whether you put your case on the floor or higher up, you’ll be able to use the ports without any additional body movements. The whole cooling system is a thought out solution, both side panels, top and bottom are well ventilated though I wish Cooler Master supplied more fans for the money.
There were a few problems I’ve encountered during the installation and design flaws, but that doesn’t take away from the value of the Stacker 832 SE. The first thing that caught my attention was the side panel locking mechanism — not the locks themselves, but the way you have to position the door in order to close it. That gave me headaches and for the first 5 minutes I’ve struggled with the whole concept of closing the panels. Once you grasp the idea and figure out how to align the panels’ teeth with the case, you’ll be OK. Another thing that I didn’t like was the side panel fan brackets that didn’t allow me to install my Cooler Master Hyper 212 HSF. In order to fit it, I had to remove one of the fan’s bracket. Other than that I can’t complain. Fans are quiet and the case gives me everything I’d ask from it.
Pros:
+ Distinctive design
+ All around aluminum
+ Light, considering the size
+ Front panel opens either way
+ Cable management system
+ Dual I/O panels
+ Fully ventilated
+ Removable motherboard tray
+ Good packaging and bundle
+ Carrying handles
Cons:
– Side panel locking annoyance
– Hard drive cage not tool-less
– Only 2 fans included
– Large HSF might not fit without side fan bracket removal
For its ultra clean design and ease of use, Cooler Master Stacker 832 SE gets the rating of 9.0 (Extremely Good) out of 10 and Bjorn3D Golden Bear Award