In June of 2008 Victor shown you this great cooler on a Intel socket 775 CPU. This time I bring you this CPU cooler on Intels newest CPU socket, 1366.
INTRODUCTION
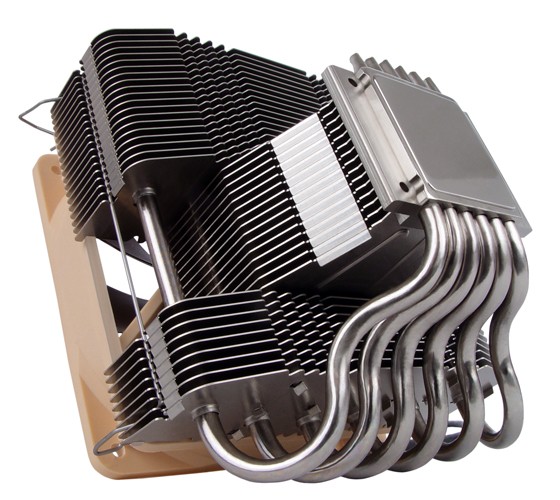
Noctua is one of the newest cooling manufacturers on the market. But don’t let their new face fool you. Noctua means buisness. They’ve already taken the cooling world by storm and they have proven to be a tough competitor when it comes to CPU coolers and fans. Today, Noctua brings us the NH-C12P CPU cooler. By utilizing a C-Type Air Flow Gap design gives this CPU cooler a lower profile. Also, it utilizes six heatpipes to better distirbute the heat across the entire surface of the CPU coolers aluminum fins. To top it off, Noctua placed an already reliable, quiet, yet powerful fan, the NH-P12 120mm fan.
As we say around these parts, “Enough of the small talk,” let’s see how this CPU cooler performed.
About Noctua
Noctua arises from a cooperation between the Austrian Rascom Computerdistribution Ges.m.b.H and the Taiwanese Kolink International Corporation and entertains a development partnership with the Austrian Institute of Heat Transmission and Fan Technology (Österreichisches Institut für Wärmeübertragung und Ventilatorentechnik, ÖIWV). These connections form the key to the achievement of our goal: The partnership with the ÖIWV permits the application of scientific measurement instrumentation, methods of calculation and simulation technology in the R&D process. Rascom’s long, customer-oriented experience in developing and distributing sound-optimised high-end products ensures a clear focus on the users’ needs. The use of Kolink’s advanced manufacturing technology and ultra-modern production plants allows us to efficiently implement our technical edge and provide solutions of the highest standard in quality and performance.
Rascom Computerdistribution Ges.m.b.H. is specialised in the distribution of PC accessories for the highest demands. Business customers and consumers alike benefit from a product range that is selected according to strict quality criteria, a high level of availability and personal, obliging service. The core of the business activities is made up of cooling (with a special focus on silent components), design- and high-end cases and quality power supplies. Furthermore, Rascom offers a broad range of high grade accessories (e.g. external drive enclosures, removable racks, input devices, etc.), whereas direct import from the far east, continuous contact with international manufacturers and the attendance at trade fairs permit a fast and flexible reaction to new trends.
At Noctua, Rascom employees contribute their know-how mainly in the areas of R&D, marketing and support and manage the second level of the Noctua quality assurance program. In addition, the import to Europe and the supply of distributors and resellers is conducted by Rascom.
“In a difficult market, technical advantage, thoroughgoing quality and complete customer orientation are in demand. Our long experience in developing, importing and distributing sound-optimised premium components decisively contribute to Noctua’s compliance with these requirements.”
Mag. Roland Mossig, CEO Rascom Computerdistribution Ges.m.b.H
Kolink International Corporation is a cooling specialist established in 1996 and well known among industry insiders. Throughout the years, Kolink designed and manufactured many top-performing heat-sinks under various brand names that succeeded in international markets. An experienced R&D team and ultra-modern production plants in Taiwan will ensure continuous progress, efficient manufacturing conditions and strict quality standards. Kolink’s retail brand “Coolink” is just about to venture into the European retail market.
At Noctua, Kolink is involved in the R&D process and responsible for the manufacturing and on-site quality control, which is the first level of the Noctua quality assurance program that was framed in coordination with Rascom.
“We’re very confident about the prospect of Noctua. Their advanced and focused R&D department is a pleasure to work with. We always enjoy trustful cooperation at a professional level with people who know their own minds.”
Kuo-Chen Chu, CEO Kolink International Corporation
The development partnership between Noctua and the ÖIWV is made up of a variety of different research projects, surveys and test series, which, combined with the institute’s know how pool, form the crucial technical basis for the development of Noctua products. The use of scientific testbeds and simulation environments shortens development times and accelerates internal evaluation procedures.
“The development partnership between the ÖIWV and Noctua clearly shows how the enormous potential of Austrian research facilities and high-tech companies can be implemented in market leading quality products with economic success.”
Mag. Manfred Stadler MBA
SPECIFICATIONS
Back in June, Victor Wu brought you the Noctua NH-C12P CPU cooler review, which can be found HERE. So there’s no real need to go over packaging again since he did an outstanding job on this CPU cooler back then and because the packaging is the same. This time around though, Noctua has included 1366 socket mounting hardware in a separate box. So, I will show you how this gets mounted on a socket 1366 CPU and give the results of my testing with the Core i7 920. I will re-list the specifications of the NH-C12P CPU cooler for a quick refresher.
|
NH-C12P Heat Sink Specifications |
|
| Socket compatibility | Intel Socket LGA 775, AMD AM2 & AM2+ |
| Height (without fan) | 91 mm |
| Width (without fan) | 126 mm |
| Depth (without fan) | 152 mm |
| Height (with fan) | 114 mm |
| Width (with fan) | 126 mm |
| Depth (with fan) | 152 mm |
| Weight (without fan) | 550 g |
| Weight (with fan) | 730 g |
| Material | Copper (base and heat-pipes), aluminium (cooling fins), soldered joints, nickel plated |
| Application | Intel all frequencies, AMD all frequencies |
| Fan compatibility | 120x120x25mm / 120x120x38mm |
| Scope of Delivery | NF-P12 premium fan, Ultra-Low-Noise-Adaptor (U.L.N.A.), Low-Noise-Adaptor (L.N.A.), NT-H1 high-grade thermal compound, SecuFirm™ mounting kits for LGA & AM2(+) |
| Warranty | 6 Years |
|
NH-C12P Fan Specifications |
|
| Model | Noctua NF-P12 |
| Bearing | SSO-Bearing |
| Rotational Speed (+/- 10%) | 1300 RPM |
| Rotational Speed with L.N.A. (+/- 10%) | 1100 RPM |
| Rotational Speed with U.L.N.A. (+/- 10%) | 900 RPM |
| Airflow | 92,3 m³/h |
| Airflow with L.N.A. | 78,5 m³/h |
| Airflow with U.L.N.A. | 63,4 m³/h |
| Acoustical Noise | 19,8 dB(A) |
| Acoustical Noise with L.N.A. | 16,9 dB(A) |
| Acoustical Noise with U.L.N.A. | 12,6 dB(A) |
| Input Power | 1,08 W |
| Voltage Range | 12 V |
| MTBF | > 150.000 h |
INSTALLATION
I want to remind you, this is a follow up of the NH-C12P CPU cooler, which was first reviewed by Victor Wu, but this time I will be testing this CPU cooler on a socket 1366 Core i7 CPU.
|
|

Now let’s start off with what we need for the socket 1366 mounting hardware. The parts are laid out in the picture above. OMG, now that’s a lot of parts for a simple mounting. I’d better make sure I don’t need an engineering degree to put this CPU cooler together so I looked quickly through the instruction manual. Nope, I don’t. The instruction manual was clear on what goes where and when it goes there. Part A: into slot B: (even I can follow that). Starting from the top and working down, we have the crossover brackets, the retention plate, and to the left we have four plastic spacers and four phillips head nuts.
|
|

Now I wanted to show you a unique feature that Noctua did to the retention plate. Even I, myself, was a tad worried at first about the retention plate not fitting. So ,with a quick email to the good people at Noctua, they assured me that this retention plate will work on a socket 1366 CPU and that it will also fit over the standard Intel retention plate on the back side of the motherboard. This is why, looking at the studs of the retention plate we see a little step toards the base of the retention plate. This will keep the motherboard from warping during installing of the NH-C12P CPU cooler, while at the same time allow the retention plate to fit over the standard retention plate Intel used.
|
|

I flipped over the motherboard on to its back to show you how the retention plate will be mounted in conjunction with Intel’s retention plate.
|
|

Flipping the motherboard back to the other side, I left the retention plate still in its place while doing so. Oops, I should clean off the thermal paste next time before snapping pictures.
|
|

Now we need to locate the four little black plastic stand offs. Once located, we need to put all four of them over the studs protuding through the motherboard.
|
|

After that we need to locate the cross-brace. This will be secured to the retention plate studs and it will secure the NH-C12P CPU cooler.
|
|

Locate the phillip head nuts and tighten these down firmly.
|
|

Here, we’re looking underneath the motherboard, making sure that the motherboard did not get warped during the installation of the retention plate.
|
|

This is what what have so far.
|
|

I am applying thermal paste for the first test fitting in the picture above. Noctua stated in the instructions to use a 4mm drop of thermal paste right in the center of the IHS of the CPU (ok, mine isn’t exactly 4mm but it’s close enough).
|
|

Notice here that the thermal paste did spread out evenly, and that it did not cover the entire CPU IHS like I like to have it.
|
|

Here is the base of the CPU cooler after the first test fitting.
|
|

I decided to use an ordnary thermal paste for the second test fitting because I did not want to keep wasting good thermal paste. Notice that I used a five point pattern, one in the center and four more going from the center to the outter corners.
|
|

Now this is more like it. This is what I prefer to see on my termal paste.
|
|

This picture shows the CPU base of the second test fitting.
|
|

Now using the same five point pattern, I applied the included Noctua thermal paste. It looks a lot better to me than just having a spot in the center.
|
|

The NH-C12P CPU cooler thermal paste coverage.
|
|

For final installation we need to line up the spring loaded screws to the little studs and tighten these down securely. You may want to keep the fan off for now as it will make it eaiser to install the heat sink.
|
|

For installing the fan, Noctua uses a wire clip to secure the fan into place. Pretty easy stuff.
|
|

Looking down at the completely installed CPU cooler, letting you know its size compared to that of the motherboard.
|
|

The photo above shows everything installed on the motherboard.
|
|

And finally, looking at from the side (front) to give you a better view of its hieght. As you can see, the NH-C12P CPU cooler is not that tall.
TESTING METHODOLOGY
| Test Setup &Testing Methodology | |
| CPU | Core i7 920 |
| Motherboard | Intel Smackover X58 |
| Case | Open Bench Testing Case |
| Memory | Mushkin DDR3 1600 |
| Video Card | Sapphire 4870×2 |
| Hard Drives | 3 x 160 Gig Sata2 Western Digital, 2 in raid 0, 1 back up |
| Cdrom Drive | Lite On Sata1 Dvd Burner |
| Power Supply | Coolermaster U.C.P. 900watt 80+ Silver |
| Type Of Coolers Used | Noctua NH-C12P, Stock Intel Cooler |
| CPU Speeds Used | 2.66GHz, 3.1GHz, 3.7GHz |
| Operating System Used | Microsoft Windows Vista 64 bit Ultimate |
| Type of Software Used During Testing | 2 Instances Of Orthos for 45 minutes x 2 runs |
| Tempature Monitor Used During testing | Real Temp Version 2.70 |
I am only going to run two CPU frequencies per CPU cooler, the original CPU speed of 2.66GHz for the Core i7 920, and each CPU coolers maximum capable CPU speed achieved. I could have run a multitude of frequencies, but it still would have ended up which CPU cooler would have overclocked the best. I just streamlined it for you. I ran Orthos x2 to load all four physical cores (0,1,2,3) for 45 minutes x2 runs, making sure no erroneous readings were present. For idle temperatures I allowed the CPU to cool down for 20 minutes after each full load run. I then used the highest temperature obtained and recorded it, from both full load and idle. My ambient temperature is around 19°C (ya gotta love winter time). Also, I performed testing on an Open Bench Test Case. So, your results may vary greatly from my actual testing performed here. I like to try and keep my CPU temperatures around the 60°-65°C range (give or take a few degrees).
TESTING RESULTS
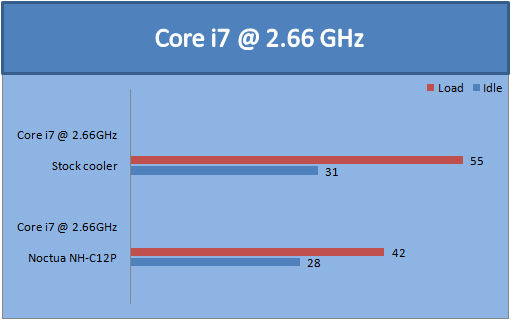
Let’s start off by looking at the Core i7 920 CPU of 2.66GHz (default). The stock cooler that was supplied by Intel just barely keeps the temperature manageable, at 55°C full load. The Noctua NH-C12P CPU cooler handles the default speed of 2.66GHz quite well, giving us a full load temperature of 42°C, giving us a difference of 13°C between the stock Intel CPU cooler and the NH-C12P.
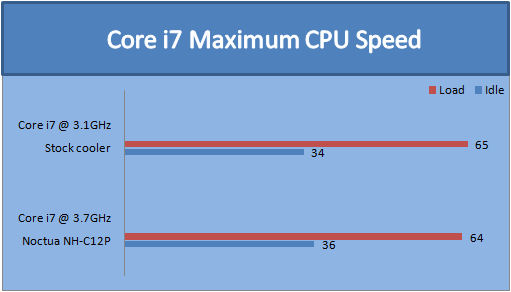
Now the chart above is all about what each CPU cooler reached as far as maxed CPU frequencies and temperatures. While using the stock Intel CPU cooler I was only able to reach a mere 3.1GHz, only gaining a 440MHz overclock on my CPU from a default speed of 2.66GHz. Hitting a temperature of 65°C, ended this test quickly. In my book, it’s just not good enough. When I used the NH-C12P CPU cooler, I was able to increase the CPU frequency to 3.7GHz, giving me a good 1.04GHz increase on my Core i7 920 CPU before topping out at 64°C full load. Now that’s more like it. Keep in mind, here in the “Dungeon”, my ambient temperatures are currently at 19°C, which makes it perfect for overclocking temperatures, but a nightmare in giving a good general idea about how a CPU will react in warmer climates. So to remind you again, your results may vary greatly from mine.
CONCLUSIONS
The NH-C12P CPU cooler maybe the shortest kid on the block, but it definitely packs a mean punch when it comes to cooling the Core i7 CPU. It allowed me to go from a measly 3.1GHz CPU core speed to a more respectable CPU speed of 3.7GHz. Noctua has a winner here for the newer Core i7 CPU’s. The low profile of this little cooler will allow many people to use it in semi-cramped chassis. The fan was not audible during testing at all. There was no whine, no air rushing sounds, nothing absolutly quietness. I could actually hear my family talking upstairs (some things are better left unheard).
The only complaint I had was, what I like to call, the “over engineered” mounting system Noctua used with this CPU cooler. Though the instruction booklet was very clear and precise on what to do and at what time and how to do it, a much simpler mounting system could have been used to make installation a little easier and a little less worry free instead of having the, “Is this going to fit my CPU IHS properly?,” thoughts going through my head. Having a price point of around $70 USD, makes this little heavy hitter a good starting point for such a good little CPU cooler.
Pros:
+ Low profile design
+ Excellent fan noise control
+ Lightweight design
Cons:
– Over engineered mounting system
– Its low profile design may present a problem mounting in certain positions and situations
Final Score: 8.5 out of 10 and the Bjorn3D Seal of Approval


