The HD4870X2 is well known for its shear raw power, but also for it’s high temperatures. Koolance has came up with a solution for the heating problems we are facing with the HD4870X2 video card. Lets take a look at the VID-487X2 water block.
INTRODUCTION
The ATI Radeon HD4870X2 video card has become more and more popular among end users and enthusists alike because of its raw power and its ability to render games with phenominal speed. It is also a very well known to to be an extremely hot running video card. With zero aftermarket air coolers available for users to cool this beast of a video card down, users have had to resort to other measures (and sometimes drastic measures at that) to help cool this video card. By either use a profile “fan trick”, which requires some knowledge of manipulating third party software like RivaTuner to control the fan speed or finally doing a fan adapter modification, thereby keeping the HD4870X2 fan at full throttle (100%). Some have even begun using two different types of air coolers and mounting them on the cores of the HD4870X2. With either of these modifications or tweaks, it leaves us with an exceptionally loud fan, or the inability to use more than two of these video cards for tri fire or the quad fire realm of possiblities.
Koolance is one of the few manufacturers that has come up with an answer to our dire needs for cooling this powerful beast. Koolance is a well known maker of the Exos water cooling all-in-one kits. They have started to expand into component water cooling set-ups now and have proven once again that we can have both “Beauty and the Beast” in our computers. The answer that they bring forth to us for our dire needs in cooling the HD4870X2 video card is the VID-487X2 water block.

About Koolance
Koolance is the recognized leader in complete PC liquid cooling solutions. Providing the most professional products available, we cater to those who desire advanced, silent cooling technology without the hassle of consumer kits.
With research beginning in 1995 and incorporation in 2000, Koolance has become well-known for innovation. From smaller components, such as our patented cooling blocks, to the world’s first professional PC external system, the Exos, Koolance has continued its role as a pioneer in cooling equipment and design.
Exceptional performance, reliability, and significant noise reduction are what make Koolance the thermal management choice for customers worldwide.
SPECIFCATIONS
|
Koolance VID-487X2 |
|
| MODEL | VID-487X2 |
| Compatibility | Reference Designed HD4870X2 |
| Materials | High Density Copper, Nickel Plating, Acrylic, Steel |
| Tubing Size, ID | 3/8″ (10mm), 1/2″ (13mm) and 1/4″ (6mm) available |
| Product Dimensions WxHxD | 8.1″ x 4.9″ x 0.75″ (20.5cm x 12.5cm x 1.9cm) |
| Product Weight | 1.75 pounds (794g) |
| Components Included | Cooling block, thermal paste, mounting hardware, manual |
PACKAGING
|
|

Okay, let’s give a looksee at what Koolance has given us as far as goodies. Here we have the box the VID-487X2 water block came in. It’s nothing fancy, just a plain black box with Koolance written in the center and the product’s model number and name right below it.
|
|

Looking at one the sides. Again, nothing real fancy.
|
|

Turning it over to the end. And once again, just a plain black box with Koolance written on it and the model number of the VGA water block. If anything, the suspense is killing me already.
|
|

Finally, we can see what is on the inside of the “mysterious black box”. Or so I thought. We are greeted with a cardboard insert that covers the VGA water block to help protect it during shipping.
|
|

Removing the cardboard top we are greeted with paper work. Boy, just when we thought it would not end…
|
|

we finally get to see the Koolance VID-487X2 water block upon removing the paper work. Ohhhh, pretty.
|
|

Here are the contents of the box laid out. Top to bottom, we have the VGA water block, a bag of screws, another bag with a pink pad and a grey pad, and to the right of the pad bag, we have the instruction manual.
|
|

The VGA water block itself. Pretty. Looking at the water block we can see that Koolance has their name cut out on the top of this block. Koolance used a peice of lucite on top of the copper block, then overlaid a peice of metal with their name cut out of it and placed it right on top of the lexan.
|
|

Flipping the VGA water block over to expose its back, we see several raised and low spots on this water block, including a few machine nuts all ready mounted for us. Looking up towards the top, we see where we will mount the barbs.
|
|

Koolance did not include the barbs into the kit and these have to be purchased seperatly. But Koolance did provide us with these for the review, but in a separate package. The Koolance VID-487X2 water block has a 1/4 NPT holes into the water block. So it only seems fitting to use their 1/4 NPT 1/2inch compression style barbs for this VGA water block.
|
|

Looking at the VGA water block from the side you can see that it is very slim looking. On this water block you can place the barbs on either side of the block to accommodate your special needs. Also, we can see exactly how Koolance put this water block together. First, a copper base plate, next they used a clear lucite, before finally topping it off with another piece of mirrored plate.
This sums up the Packaging portion so turn the page for installation of this water block on to a HD4870X2.
INSTALLATION
 |
| Here we have, the HD4870X2 in all its glory. It’s a boring, yet fast video card. But it’s still just plain boring looking. |
 |
| Here is the backside of the HD4870X2. We had to remove all of the screws prior to installing the Koolance VID-487X2 water block. |
 |
| Here is a shot with all of the screws removed. |
 |
| Before I moved on any further, I had to locate the chart that I needed to prep the Koolance VID-487X2 water block. |
 |
| Back to the video card. This time I removed the original heatsink, exposing the core’s and digital VRM’s. |
 |
| This is what the bottom side of the original cooler looks like. |
 |
| Here is a picture of both orginal cooler (top) and the naked HD4870X2 (bottom). |
 |
| Here is a comparison between the original cooler and the Koolance VID-487X2 cooler. The Koolance VGA water block is thin compared to the original cooler. |
 |
| Another comparison, but this time I ripped apart the original cooler itself (nothing is sacred with me, if it can be ripped apart it will be). Notice that on the original cooler that ATI used, they are using such small copper heatsinks. Well, it’s no wonder why it didn’t cool right, with heatsinks that small I’d heat up too. |
 |
| Remember the pink and grey pads and the diagram I mentioned earlier? Well, now it is time to tell you what they are and what to do with them. You will cut little peices off both grey and pink pads while using the diagram as a guide for their sizes and where they go. You place them on to the bottom side of the VGA water block. Be careful with the pink pad, you just barely have enough to cover the areas that you need to cover up. |
 |
| Make sure you do some test fittings first. All I did was put two small drops of thermal past on the cores, put the VGA water block on and pressed together, then counted to 30 and removed. Well, at least the cores of the video card are hitting the water block. It’s just not exactly what I was expecting, and after doing the first test fitting I decided to check and make sure that the digital VRM’s (Voltage Regulation Module’s) were making contact as well. The VRM’s are what regulate’s the voltage to the GPU cores of the video card, and they do get rather hot if not properly cooled, if one of these gets damaged say hello to your perfectly good 550 USD brick. |
 |
| Just before doing a full trial install test fit, I wanted to make sure the digital VRMs were getting full contact. I redid the test fitting, held the block and video card together, and again counted to 30 and removed the VGA water block. Looking at these. I see I am getting good contact here. |
 |
| Looking at ther other digital VRMs. |
 |
| Checking the block here and making sure that I was getting the same pattern as I was getting on the video card. |
 |
| Full install test fit shown here. Ok now I am happy at these results. The thermal paste spreaded out evenly on both cores and on the digital VRM’s this time. |
 |
| Here, I’m making sure what I see on the video card is the same exact thing I get on the VGA water block. (I got a saying, “Check, check, check, and recheck. If all else fails, check, check, check, and recheck.”) One cannot be to paranoid when changing parts on his or her computer components. |
 |
| Now, Koolance states that you need to use the original cross mounts for the GPU cores that the original cooler used. Here is what it looks like on the backside. |
 |
| Now, finally here’s the finished look. If that ain’t sexy looking, then I don’t know what is. |
TESTING
Before I continue on with the testing phase of this VGA water block. I want to tell you that pior to installing all of the little pads (pink and grey ones) I ran the block for 24 hour’s making sure it did not leak. Then once verified I then installed the pink and grey pads and did my test fitting’s. Just incase some of you may be confused when you see this portion of the reivew.
 |
| In this picture, I am hooking up my lines and such to the VGA water block for leak testing. Yes, the reservoir is Rubbermaid made. |
 |
| Here’s a different angle. |
 |
| This is the other side. See how shiney the outside plate is? |
 |
| Reflection test is shown here. Notice the raised spots where the VGA cores will be. These are nicely polished and flat. |
 |
| This time the water is being pumped through the block. |
 |
| Here is what the fluid looks like running through the Koolance cut out of the front plate. |
RUNNING
Now, since we did the 24 hour testing phase and installed all of the pink and grey pads, and did a boat load of test fittings, it’s time to show you what it looks like being fully installed and with water running though it while it’s in the computer.
 |
| Here it is, fully installed and running in the computer. |
 |
| This is what it looks like from the CPU side of the VGA water block. |
 |
| Now, this image is what I did to the original VGA cooler fan, I hot wired it to 12 volts so it runs 100% all the time. |
TESTING METHODLOGY
| Test Setup &Testing Methodology | |
| CPU | Core i7 920 |
| Motherboard | Intel Smackover X58 |
| Case | Open Bench Testing Case |
| Memory | Mushkin DDR3 1600 |
| Video Card | Sapphire 4870×2, Watter Cooled Koolance VID-487X2 |
| Hard Drives | 3 x 160 Gig Sata2 Western Digital, 2 in raid 0, 1 back up |
| Cdrom Drive | Lite On Sata1 Dvd Burner |
| Power Supply | Coolermaster U.C.P. 900watt 80+ Silver |
| Type Of Coolers Used | NOCTUA NH-C12P |
| CPU Speeds Used | 2.66GHz, 3.1GHz, 3.7GHz |
| Operating System Used | Microsoft Windows Vista 64 bit Ultimate |
| Type of Software Used During Testing | Far Cry 2 x 20 runs (2 x 10 runs) |
| Tempature Monitor Used During testing | RIva Tuner 2.11 |
I ran Far Cry 2 Long Ranch benchmark 20 times (2 x 10 runs) to ensure optimal heat was obtained and also to ensure that no erroneous readings were taking place. I only ran two sets of clock speeds, Idle and Full load. For idle testing I defaulted RivaTuner’s clock generator to ensure that Power Play was in use, otherwise Riva Tuner will hold the maximum clock speed I set it to and not allow the video card to downclock to 2D speeds. For full testing, the clock speeds I used with the original stock cooler at 100% fan utilization were 836MHz core and 932MHz memory speed, and no auto fan control. There’s not a chance in hell that I would try and run this card on auto fan control, so it is a FAILURE. For the Koolance VID-487X2 water block, the clock speeds I ran it at were 852MHz and 932MHz memory speed. After defaulting the clock speeds with RivaTuner, I allowed the video card to cool for 20 minutes after full load testing. The radiator I used is a Swiftech 320 (tri 120mm fan, dual pass single row). It’s overkill, yes it is, but that’s what water cooling is all about, overkill. An AuqaTech Aquarium 170 GPH power head was used for the pump (submersible), 1/2 Inch ID X 5/8 Inch OD tubing was used, and for the reservoir I used a Rubbermaid 14 cup plastic container that we can all find at Walmart. Ambient temperature of the room was roughly 19°C.
TESTING RESULTS
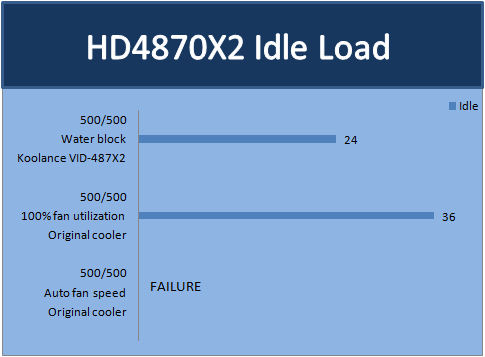
Let’s start off with the HD4870X2 video card at idle speeds. Here we see the Koolance VID487X2 water block decimate the original cooler by 12°C, giving me an idle temperature of 24°C. As for the original cooler, not too bad of a temp for it having the fan ramped up to 100% utilization, but believe me, the original cooler’s fan was loud once it was at 100% utilization. I never let the video card’s BIOS control the fan speed. The minute I got the HD4870X2 I did a quick fan mod to it to ensure the original cooler would not overheat this video card.
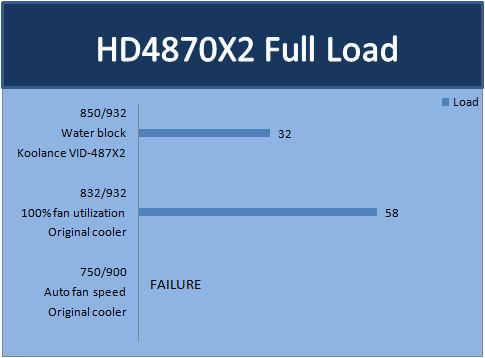
For Load temperatures, we see the Koolance VID-487X2 water block completely annihilate the original cooler. Only gaining a mere 8°C from idle and topping out at 32°C full load. Again, I want to mention that for the HD4870X2 original cooler, once I kept the fan speed at 100% utilization, it did keep the video card cool, but at a cost of noise. It topped out at a temperature of 58°C.
Here are some screen shots of RivaTuner’s monitoring services I used for testing.

Idle temperatures on the HD4870X2 are shown here. I flipped over from one core to the next to check on its temperatures in RivaTuner. That’s why you only see a little bit of monitoring.

Here we have Core 1 at full load. Core 1 is the second core out of the two on the HD4870X2 video card. It also was the hottest core on the HD4870X2.
CONCLUSIONS
Having no other real way of cooling our HD4870x2’s, we needed a solution that allows us, the user, run our computer’s not only cool but also quietly. The Koolance VID487X2 does exactly that. It can be extremely quiet (depending on the fans used on the radiators) and it can cool the HD4870X2 extemly well. At the same time, it adds some serious “bling” to our internal components. The Koolance VID487X2 water block is, in one word, beautiful in both performance and in looks.
The next question we need to ask ourselves is water cooling worth it? As a Water Jocky myself, I will have to say, yes it is. Water cooling isn’t just for the enthusist type of people. It is for those who want a quiet PC, that it is also for those who want to keep their computer cool at the same time. Sometimes, the start up cost will outweigh the headaches we get when dealing with loud fans, overheating components, and having to figure out software modding and fan mods or having to do “old school” heat sink mods to keep our video cards cool that either look ugly or take up way too much space in our computers while eliminating the possibility of using a tri fire or quad fire variants in our computers.
The only real problem I had when installing the VID-487X2 water block was having cutting the pink and grey pads. These weren’t exactly hard and the diagram did provide valuble help. As I quickly found out, with the pink pad, if I made one too many mistakes of cutting the peices, I would’ve been in trouble. I wish Koolance would have used already precut pads, as this would make installing these really simple and quick. Having a price point of $145 USD makes this a worthy cost to pay for such a great cooler.
Pros:
+Looks good
+Performance is unmatched
+Easy to follow instructions
Cons:
–Grey and Pink pads not precut
–Will have a high start up cost
Final Score of 9 out of 10 (Extremely Good) and the Golden Bear Award.


