ICY DOCK introduces a quick and easy way to manage external hard drives with the MB672SKGF-B Internal SATA HDD Enclosure. With an LCD screen, built-in temperature monitoring and a locking door, ICY DOCK brings an affordable and secure hot-swap solution to the table. Join us as we take a closer look to determine if the MB672SKGF-B deserves a spot inside your computer case.
INTRODUCTION
With so many options for data and media storage these days, it’s challenging to filter through all of them and decide what device to use. The cost of USB flash drives has come down so much over the last couple of years that I’ve slowly accumulated a collection of these almost disposable gadgets. Floppy drives are pretty much obsolete, but I have to admit I still have one in my old Pentium 4 computer. (Having said that, I can’t remember the last time I ever loaded a file from or copied a file to a floppy disk. Honestly, I’m not even sure if that drive still works!). CD and DVD writable drives are great, especially for burning music and video files, but they just aren’t the most convenient for everyday usage (at least for me). And external hard drives – great for large files, but can be a little bit of a pain to swap out drives. Personally, in the last few years I’ve somehow ended up with 3 different external drives and more recently, a Network Attached Storage (NAS) device that houses 2 drives. Slowly but surely I’m collecting so many drives that I’m running out of space to stash them!
ABOUT ICY DOCK
ICY DOCK is a privately held company with more than 10 years being devoted in design, manufacturing, branding and distribution of Storage enclosure peripherals. By keep improving its own new product release process from previous toil experiences, ICY DOCK has formed a standard yet efficient new product development procedures to satisfy timely requirement from the market.
At ICY DOCK, we constantly offers state-of-the-art design of hard disk enclosure and removable storage kit with features such as the currently launched a series of removable drive & hot swap capabilities and eSATA / SATA connectivity products. We also specializes in BTO (Built to Order) of branded, OEM-branded and non-branded products for “Tier 1” customers.
Headquartered in City of Industry, California, ICY DOCK becomes a global peripheral enclosure provider with manufacturing facility located in Zhang-Zang, China since 1997. Restrictively followed ISO9001 proved manufacturing process standard, ICY DOCK delivers high quality standard products at competitive price which provides our customers an excellent opportunity to be successful in the competitive US marketplace.
As one of the leading peripheral enclosure solution provider, we will continue to commit ourselves in supplying our customers the best performance per dollar products. “Your demand is our command” is the key to ensure our success in the business world.
FEATURES & SPECIFICATIONS
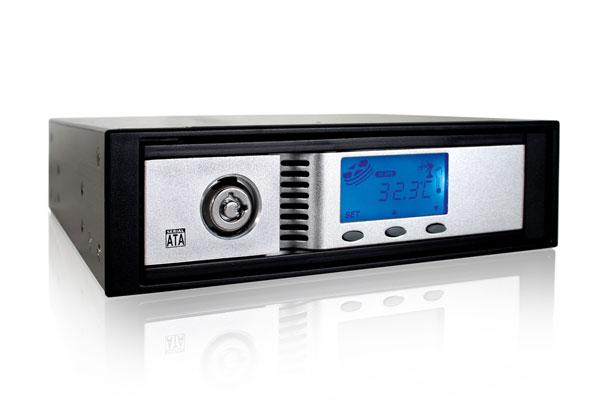
The ICY DOCK MB672SKGF is described as a “SCREWLESS Internal 3.5″ SAS/SATA HDD Enclosure”, but I wanted to clarify this before even getting into the features and specifications. “Screwless” refers to the installation of a hard drive into the enclosure, not the actual installation of the enclosure into a computer case. The unit installs in a 5.25″ external drive bay just like a DVD or CD-ROM drive, which means 4 screws to keep it in place (unless of course your computer case has a screwless drive bay feature). Now that we have that out of the way, let’s take a closer look at the enclosure:
|
Feature/Specification |
|
|
Model
|
MB672SKGF-B (w/LCD)
|
|
Interface
|
Serial ATA (SATA)
|
|
Drive Fit
|
1 x 3.5” SATA I / II
|
|
Drive Bay
|
1 x 5.25″
|
|
Data Transfer Rate
|
Up to 300MB/sec
|
|
Internal Host
|
SATA 7 Pin x 1
|
|
Security
|
2 Segment Key Lock
|
|
Hot Swap Connection
|
7+15 Pin Direct Hard Drive Connection
|
|
Material
|
Steel Body with Aluminum and Plastic Face Panel
|
|
Drive Cooling
|
Aluminum Heat Disperson w/1 x Rear Outtake Fan
|
|
Alarm Indication
|
Audio and Visual
|
|
LCD Indication
|
Real-time drive temp., Drive activity/overheat/MASTER/SLAVE status, Fan working/failure status, Device usage time record
|
|
LCD Display Color
|
Cool Blue
|
|
OS Requirement
|
Windows 98/SE/ME/2000/XP/VISTA ; Mac OS 9.0 or higher
|
|
Dimension (L x W x H)
|
184.4 x 148.4 x 42 mm
|
|
Weight
|
1.82 lbs
|
| Manufacturer Warranty | 3 Years (parts and labor) |
Features:
- Drive Fit: Hot Swappable 1 x 3.5″ SATA I or II Drive
- Drive Bay Installation: Fits in one standard 5.25″ external drive bay
- Screw-less design – drive slides in and locks into place when door is closed
- Drive monitoring system with “Cool Blue” LCD display and visual/audio alarms
- Temperature monitor (Fahrenheit or Celsius) with alarm
- HDD Usage Time Record (HUTR)
- Fan failure alarm
- Rear outtake fan to help cool hard drive
- Key lock to secure drive
- Built-in anti-vibration kit to reduce noise
CLOSER LOOK
Let’s start by taking a closer look at the packaging for the ICY DOCK MB672SKGF. No, there’s only one unit in the box, but ICY DOCK took a cost-efficient (yet potentially confusing) approach to package design by featuring a picture of two different units on the cover. Since the MB671 and MB672 series have so much in common, the choice to showcase both and then highlight which device is actually in the box is certainly understandable and not exactly new to the industry. The little black dot indicates the contents – in this case, the MB672SKGF (the one on top with the blue LCD screen).


TESTING
OK, did you guess the problem with that last picture? Did you notice that the hard drive power/data connectors are facing toward the door and the front of the enclosure? It should be turned around so that these can connect in the back, where the power and data connectors are. At least the picture should give you an idea of how the drive goes in, even if they have it reversed!
Once installed, the drive acts just like a secondary internal hard drive. If it is already formatted, Windows XP will automatically assign it a drive letter and it will show up under “My Computer” as a hard disk drive. If it is not formatted, as was the case with mine, then the setup process is a little more tricky. In fact, this was my biggest challenge in doing the review. The user manual says absolutely nothing about this stage of the setup so it took me a little while to figure out (like a week!). I probably should have known the solution right away, but since the drive just wasn’t visible to my system, I kept thinking I did something wrong. However, it finally hit me that I should be able to see it in Windows XP’s “Computer Management” console. For a new or unformatted drive, right click on “My Computer” and select “Manage”. Look for the section called “Storage” and then under that click on “Disk Management”. Once here, you should be able to see the drive. Just right click on it and select “format”. Once it is formatted, it will show up as a hard disk drive under “My Computer”. From there, you can hot swap the drive in and out of your system as needed. OK, now that you know how to work with a new drive, let’s take a look at performance.

Regarding the ICY DOCK’s ability to keep the drive cool and monitor temperatures, my tests were a little less scientific. Over the course of a week, I documented temperatures throughout each day at various intervals. Consistently the temperatures ranged from a low of about 28 degrees Celsius to a high of about 32 degrees Celsius. Considering the default temperature at which the alarm sounds is 50 degrees Celsius, I think this range is outstanding. I can’t rule out the possibility that the Antec Nine Hundred case in which it resides might have helped at least a little to keep the unit cool, but my feeling is that the ICY DOCK does a more than adequate job on its own and deserves a large amount of credit.
The alarm feature seems to work well and is triggered when the temperature reaches a preset point. A visual indicator on the LCD shows a picture of an alarm bell along with a smoking thermometer while an audible alarm sounds. The alarm is quite loud and can be canceled by simply pressing any button on the front panel. Overall, it works as described. To set the alarm, simply press the “Set” button on the front of the unit. The first screen will allow you to change the view between Celsius and Fahrenheit. Simply press the up or down button to cycle between “C” and “F” . Press “Set” again to confirm. The next screen will display the default alarm temperature, which is 50 degrees Celsius. Again, press the up or down key to increase/decrease the temperature in 0.5 increments. When you reach the desired setting, press the “Set” key again to complete the process. One note: each time you press a button, the unit emits a loud “beep”. Unfortunately this cannot be disabled or even turned down. This got extremely annoying in a very short amount of time, and I wished I could shut it off.
CONCLUSION
To summarize, the ICY DOCK MB672SKGF works very well. It provides an ideal way to hot-swap SATA hard drives in and out of a computer while offering much improved performance over fully external drive enclosures. Performance rivals that of an internal drive connected directly to a motherboard controller. Cooling and temperature monitoring features work well, although the internal fan does make a bit more noise than I had hoped. Prior to installation, my Antec Nine Hundred case was virtually silent. However, with the ICY DOCK installed and with no way to decrease the speed of the fan or shut it off, the unit generates a substantial hum, rather like that of a typical low-quality case fan stuck on full speed. Having become used to a silent PC in recent months, I’m disappointed in the noise and I am considering disabling or removing the fan.
Let’s recap the good and the bad:
Pros:
Cons:
Final score: 8 out of 10


