Coolermaster once again has shown not only there dedication to great looking products , but there prowess to make their products perform quite well . Read on to see how well the V8 did .
INTRODUCTION
In today’s world, as CPU’s get bigger and faster, we are finding out that not only do we want to have the fastest CPU available, but we are also wanting to gain that extra little kick by overclocking our CPU’s. We also want to use an inexpensive cooling solution that will not only run quiet, but also keep our CPU’s running cool without having to spend an enormous amount of money or having to spend a lot of time on setting up watercooling or phase change units. Which really leaves us only one choice left, aircooling. Aircooling is normally inexpensive and requires no real technological knowledge to set it up, while at the same time requiring the least amount of time for setting it up. Well, we may have a good canidate for that task. Today we will be looking at a new CPU cooler from Cooler Master, the V8.
Cooler Master’s Misson
OUR MISSION
Cooler Master was founded with the mission of providing the industry’s best thermal solutions. Since its establishment a decade ago, the company has remained faithful to this mission, emerging as a world leader in products and services for companies dealing with devices where heat issues must be resolved.
In pursuing this mission, Cooler Master is absolutely committed to delivering solutions that precisely meet customer requirements for features, performance, and quality. Moreover, we strive to be a reliable long-term partner for our customers that they can truly depend on. It aims to be the first and foremost name that comes to mind for companies around the world seeking thermal solutions, and seeks to build such a reputation through outstanding technology, sophisticated design, and superior service.
Cooler Master’s current business encompasses a comprehensive lineup of thermal solutions for a full range of applications. Its products range from heat sinks and fans to component housing, chassis, and ducting for computers, industrial machinery, telecommunications equipment, and many other devices.
A critical component of Cooler Master’s ability to successfully pursue its mission is an unstinting commitment to quality, as demonstrated by the ISO 9001 certification granted to its main manufacturing plant in Taiwan. It has also enforced ISO guidelines and is in the process of applying for ISO 9002 certification at its second and third plants, located in China. Cooler Master has also implemented a number of analytical and testing protocols to ensure top quality, including at subcontractors, to further ensure thorough quality control. Moreover, Cooler Master’s dedication to quality extends beyond manufacturing to every aspect of its operation, including service.
SPECIFICATIONS
Here are the specifications of the Cooler Master V8 CPU Cooler.
| V8 Cooler Specification | |
| CPU Socket | Intel Socket LGA775 AMD Socket (Socket 940/AM2/AM2+) |
| CPU Support | Intel: Core 2 Extreme, Core 2 Quad, Core 2 Duo, Pentium Extreme Ed., Pentium Dual-Core, Pentium D, Pentium 4 Extreme Ed., Pentium 4 HT, Pentium 4, Celeron Dual-Core, Celeron D AMD:Phenom, Athlon 64 X2, Athlon X2, Sempron |
| Dimensions | 120 x 128 x 161.1mm |
| Weight | 865g |
| Heat Sink Dimensions | 120 x 120 x 158mm |
| Heat Sink Material | Copper Base / Aluminum Fins / 8 Heat Pipes |
| Heat Pipes Dimensions | 6mm |
| Fan Dimensions | 120mm x 120mm x 25mm |
| Fan Speed’s | 800 rpm’s – 1800 rpm’s |
| Fan Max Air Flow | 69.69 cfm |
| Air pressure (mmH2O) | 2.94mm H2O |
| Bearing Type | Rifle Bearing |
| Fan Life Expectancy | 40,000hrs |
| Fan Noise Level (dB-A | 17 – 21dBA |
| Fan Speed Adjustment | Pci Slot Install |
| Fan Connector | 4 pin Pwm |
| Fan Control | PWM + VR Controller |
| Fan Rated Voltage | 12 Volts |
| Fan Minimum Voltage | 7 Volts |
| Fan Operating Voltage | 10.38 Volts – 13.2 Volts |
| Fan Rated Current | 0.12 Amps |
| Fan Input Power | 1.44 Watts |
Now that we’ve gotten the specifications out of the way, let’s see what comes in the box and how to mount it on our CPU.
PACKAGING & MOUNTING
We are goin’ to spend a lil’ bit of time to show you what comes in the box and we’re also going to show you how it gets mounted to an Intel Socket 775 CPU .
Packaging

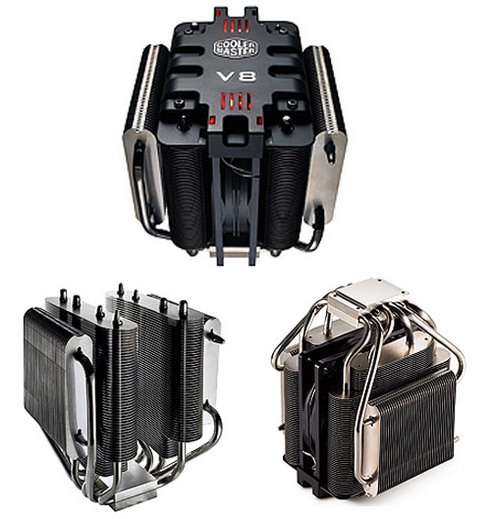
Here we see the front of the Cooler Master V8 Packaging. A simple plain black box with the V8 logo on it, its capabilities of 180 watts of cooling power, and Cooler Master’s website listed.

As we look on top of the box, we see a picture of Cooler Master’s V8 CPU cooler and the current CPU’s it supports on the bottom of the box.

Once we flip the box over to one side we see more images of Cooler Master’s V8 CPU Cooler. To the right of these pictures are the actual specifications of the Cooler Master V8 CPU cooler.

When you open up the packaging you will be greeted with the warranty information and the installation guide. The instruction manual comes in 18 different languages with illustrations on how to properly mount the Cooler Master V8 CPU Cooler. The warranty information has the same 18 different languages printed on it. When I removed the warranty information and instruction manual I noticed a plastic encasement. As I then lifted this plastic encasment out of the box, I began to see the Cooler Master V8 CPU Cooler is inside of this plastic encasement. After removing the Cooler Master V8 CPU cooler, I then looked inside the box in towards the bottom of the box and I noticed a smaller white box containing all of the mounting hardware. The Cooler Master V8 CPU cooler was fairly easy to remove from the plastic encasing; cut two pieces of tape one on top and one on the bottom, then lift one side of the casing .

Here is all the mounting hardware laid out and the Cooler Master V8 CPU Cooler. The instruction manual has an inventory check list. I checked my mounting hardware with the instruction manual, making sure that nothing was missing. I laid out all the mounting hardware to show you what came with the packaging. Starting from the left on the white box you will have 4 plastic washers and right below them are 6 soft rubber washers. Moving to the right we see the Intel Socket 775 retention plate and the Intel Socket 775 mounting hardware. Right below the Intel Socket 775 Mounting hardware we see the AMD Socket AM2+/AM2/939/754 retention plate and the AMD Socket AM2+/AM2/939/754 mounting hardware. I should mention that in the AMD’s Socket AM2+/AM2/939/754 mounting hardware you will notice eight bolt holes near the center of the mount (around the center square hole of the mount). This will allow you freedom to rotate the Cooler Master V8 CPU Cooler to any direction that you see fit. It’s similar to what we can do to the Intel Socket 775 CPU Coolers.
Unfortunately, the Cooler Master V8 CPU cooler will have to be removed and the mount be removed each time before turning this mount. Right below the white box you will see a PCI slot fan controller bracket and a tube of thermal paste. To the right you will see 4 mounting nuts (these will be used in conjunction with the retention plate on the bottom of the Motherboard), 4 mounting screws that will be used with the CPU’s socket mounting hardware (these are reversed threaded, when you put these on the socket mounting hardware remember leftsy tightsy, rightsy loosy), and 4 smaller screws that will be needed to mount the CPU’s socket mounting hardware to the Cooler Master V8 CPU cooler. And finally, the Cooler Masters V8 CPU Cooler to the far right.

Here is a picture of the bottom of the Cooler Master V8 CPU cooler, and the “Warning, remove this plastic cover before using!” label. As we look at the bottom of the Cooler Master V8 CPU Cooler we notice there are eight heat pipes converging on the Cooler Master V8 CPU coolers base.

The little modder in me felt the need to rip apart the Cooler Master V8 CPU Cooler so I can see what makes it tick. What I discovered was, it was not hard to remove the fan from the Cooler Master V8 CPU Cooler itself. With a allen wrench I removed the 4 machine screws on the top of the Cooler Master V8 CPU Cooler’s plastic cover and I then gently pulled upwards on the Cooler Master V8 CPU Cooler’s plastic cover. Then the fan came out with the top. I decided also to remove the fan from the top cover to better show you the fan itself. As you will notice the fan sits in the center of this cooler, drawing air in from one half of the Cooler Master V8 CPU cooler and then blowing it across the other half of the Cooler Master V8 CPU cooler. Looking at the fan you will see 2 sets of wires coming from it, 2 wire leads coming from the fan to a speed controller (yes, it is hardwired right into the fan) and 4 more covered wire leads that go to the 4 pin PWM fan plug.

Heres a better look of the Cooler Master V8 CPU Cooler with out the fan.

I removed the protective plastic cover on the bottom of the Cooler Master V8 CPU Cooler and used the Intel 775 retention plate for a reflection test. You can see it has a somewhat semi polished look and feel to it.
Installation
As CPU Coolers are getting larger and the type of CPU Sockets changing, we find ourselves having to have the motherboard removed for installation. So if you are replacing an existing CPU Cooler, please make sure your motherboard has been removed as this will make install a lot easier.

Installing the Cooler Master V8 CPU Cooler was pretty simple and it wasn’t over complicated. It was a typical Cooler Master install. First, I needed to locate the proper mounts for the socket type I was going to use. Since my CPU is an Intel Socket 775, I used the Intel 775 mounting hardware. I quickly found out that the actual socket mounting plates were reversed threaded when I tried to install the V8 CPU Cooler mounting screws (leftsy tightsy, rights loosey). I then located the smaller machine screws used to mount the socket mounting hardware to the Cooler Master V8 CPU Cooler. I aligned the holes up with the socket mounting hardware to the Cooler Master V8 CPU Cooler’s base, then tightened up the 4 screws that hold the mount. I located 4 of the soft rubber washers and I placed them on the bottom side of the mounts (motherboard side).

Heres how I used the thermal paste on the CPU. I just placed 3 small drops of thermal paste that was included right down the center of the CPU. There is no true method of putting on thermal paste. Use whatever method works best for you.

First test fit. I just wanted to make sure everything was going the way it was meant to go. Also, I wanted check the flatness of the Cooler Master V8 CPU Cooler and the spreading of the thermal paste. You can see that the thermal paste spread out quite evenly on the Cooler Master V8 CPU Cooler and across the IHS of the CPU itself, telling us that the Cooler Master V8 CPU coolers base is nice and flat. Please Note, I did not do a full install yet, all I did was just apply a little bit of thermal paste on the CPU’s IHS. Then I placed my hand underneath the motherboards socket on the bottom side, then put the Cooler Master V8 CPU Cooler on top of the CPU and just applied a little pressure on the Cooler Master V8 CPU Cooler, pushing it towards the CPU, counted to 30, then removed the Cooler Master V8 CPU Cooler.

Oops!!!, I forgot to pull the adhesive covers on the little soft rubber washers before putting them on the Cooler Master V8 CPU cooler’s mounting hardware before test fitting. They ended up falling off. But I made sure they are on now. Shh, don’t tell anyone. 🙂

Here is the Cooler Master V8 CPU cooler fully mounted to the Motherboard with the retention plate installed as well. Installing this portion of the Cooler Master V8 CPU Cooler was pretty simple. I placed the Cooler Master V8 CPU Cooler upside down, lined up the holes of the CPU socket to the Cooler Master V8 CPU Cooler mounting bolts, making sure that the CPU was also facing the Cooler Master V8 CPU cooler (upside down). I then put on the retention plate and put the 4 nuts over the bolts of the Cooler Master V8 CPU cooler as well as over the retention plate; starting from the top right corner, then moving on to the bottom left corner, top left hand corner, and finishing up on the bottom right hand corner until each nut was snug (remembering the nuts now are rightsy tightsy, lefty loosy). I tightened up the nuts to just about when the soft rubber washers were just barely touching the upper portion of the motherboard as well as to the point when the retention plate was lying flatly up against the bottom side of the motherboard. What I ended up having to use was a pair of needle nosed pliers to help aid me in tightening these nuts fully and properly as the screw driver adapter wrench wouldn’t allow me to tighten these completely down.

Here is a side picture of the motherboard and Cooler Master V8 CPU cooler installed from the side. Notice how the motherboard was not bent or flexed with the installation of this Cooler Master V8 CPU cooler and retention plate.

A picture of the Cooler Master V8 CPU cooler installed on to the Motherboard.

Another picture of the Cooler Master V8 CPU cooler with all the components installed to give you an idea of its size in relation to the video card. Also notice, since the fan controller is hard wired to the Cooler Master V8 CPU cooler’s fan, you have to mount it to the PCI slot bracket and have it mounted in an empty PCI slot (the silver bracket right above the video card). As you can see, with the Cooler Master V8 CPU cooler, my 40mm fan no longer fits on the North Bridge cooler properly.
A picture of the Cooler Master V8 CPU cooler looking down at the motherboard from the top gives you an idea of its size, width and length wise.
Since we are all done with the Packaging and Mounting pictures. Lets see how it performs.
TESTING, METHODOLOGY & RESULTS
Testing Methodology
| Test Setup &Testing Methodology | |
| CPU | Lapped Intel Core 2 Quad Q6600 2.4 Gighz G0 @ 1.3 Volts |
| Motherboard | Abit Ix38 Quad GT |
| Case | Open Bench Testing Case |
| Memory | Mushkin DDR2 6400 4 x 1gig |
| Video Card | Sapphire 3870×2 |
| Hard Drives | 3 x 160 Gig Sata2 Western Digital, 2 in raid 0, 1 back up |
| Cdrom Drive | Lite On Sata1 Dvd Burner |
| Power Supply | Coolermaster U.C.P. 900watt 80+ Silver |
| Type Of Coolers Used | Coolermaster V8 Cpu cooler, Swiftech Apogee Gtx (Custom) |
| CPU Speeds Used | 2.4 Gighz , 3.2 Gighz , 3.6 Gighz |
| Operating System Used | Microsoft Windows Vista 64 bit Ultimate |
| Type of Software Used During Testing | 2 Instances Of Orthos for 45 minutes x 2 runs |
| Tempature Monitor Used During testing | Real Temp Version 2.60 |
All the testing was done with two instances of Orthos in an open bench test case. The CPU was lapped with a 1500 grit sand paper, and the ambient temperature of the room was 22°C. For full load testing, I ran Orthos two times per clock speed to verify the temperatures with Real Temp. For idle temperatures, I let the CPU cool down after full load testing for twenty minutes. The hottest core temperature was recorded and let me explain why. If one of the cores reached 60°C and then backed down to 58°C, 60°C was the temperature that was recorded because it was the hottest recorded temperature. The Swiftech Apogee GTX water block was used with a 360 dual pass single row radiator (Tri 120 radiator) with winterized washer fluid and an internal Pump. Also, note that all fans were at maximum throttling during testing. The Cooler Master V8 Cpu cooler fan was barely audible during testing. So please be advised that your temperatures will greatly vary on a case to case basis. So let’s get busy with the testing and see how well this cooler performed.
Results
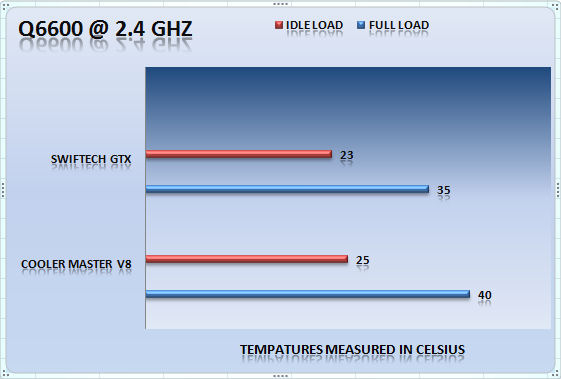
Well I have to start somewhere. Let’s start off at the Q6600 stock clock speeds of 2.4 GHz and a voltage of 1.3v. Here we see the Cooler Master V8 CPU cooler is pretty much able to keep up the Swiftech Apogee GTX watercooling. Only having a difference 2°C idle higher temperature and a 5°C full load temperature variance. But this review isn’t based on stock abilities now is it?
So, lets crank up this Q6600 Cpu to 3.2 GHz and see how it fares.
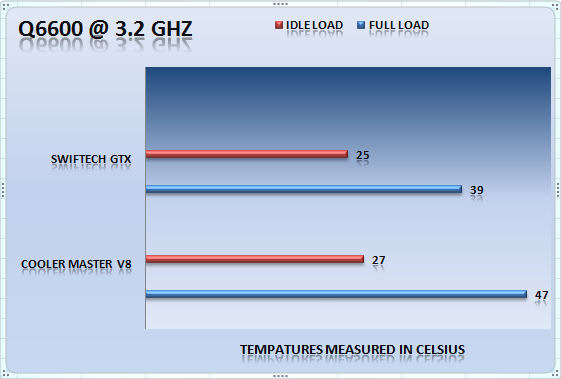
The Q6600 was brought up from a FSB of 266 MHz and a multiplier of 9 to a 400 MHz FSB x 8 multiplier giving us a 3.2 GHz CPU overclock at 1.325 volts. As we can see, the Cooler Master V8 CPU cooler still manages to handle this CPU speed with ease. It gained a +2°C temperature increase from 2.4 GHz and managed only to gain a +7°C full load from 2.4 GHz. Considering the Cooler Master V8 CPU cooler is going up against a water cooling block, it still manages to handle the load quite well. So lets see how the Cooler Master V8 CPU cooler performs at yet another higher clock speed.
I decided to set the speed of the Q6600 to 3.6 GHz. At these speeds the Q6600 CPU will normally bring a CPU Cooler to its knees. Let’s continue to see how things fared.
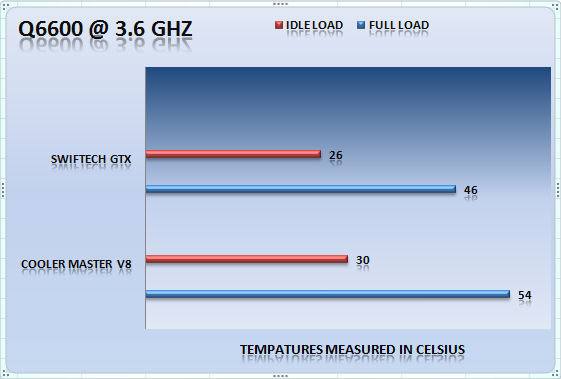
I kept the FSB at 400 MHz and jumped the multiplier to 9 giving us a 3.6 GHz clock speed. I am going to mention that the Swifttech Apogee GTX managed to hold this clock speed with using only 1.45 volts while the Cooler Master V8 CPU cooler needed a voltage of 1.475 to help stabilize the system. As we can see, even with the slight increase of voltage, the Cooler Master V8 CPU cooler managed to keep this CPU fairly cool. At the same time, it is starting to show its limitations. The Cooler Master V8 CPU Cooler managed only to gain +5°C from 2.4 Ghz, +3°C from the 3.2 GHz idle temperature, and a +14°C increase over 2.4 GHz, and +7°C increase from the 3.2 GHz’s full load temperatures. I should mention that the Cooler Master V8 CPU Cooler showed exceptional performance even at these speeds on a Q6600 CPU. I decided that this was a good safe limit to stop testing. I like to try to keep my temperatures at round 60°C full load (give or take a few degrees). The Cooler Master V8 CPU Cooler has proven to do just that; give me a respectable overclock on my CPU and manage to keep the temps below 60°C.
Since all the testing is all done, conclusions are up next.
CONCLUSIONS
The Coolermaster V8 CPU cooler performed very well under testng. It proved that we can have great cooling capacity with quietness as well as having a CPU cooler that was asthetically pleasing for those with window mods on their cases. Also the Cooler Master V8 CPU cooler has a sturdy and solid design and it allowed the use of mounting with either using a retention plate or not using one. It gave AMD CPU users the freedom to be able to turn this unit 90 degrees to custom tailor it to their cooling needs. The retention plates had a solid, sturdy design that did not bend easily nor did they flex. The fan was barely audible even though the fan was at max throttle.
Update: Coolermaster contacted our review editor Methious and informed him that the final retail product will include the mounting brackets for Intels newest socket 1366.
Pros :
+ Retention plate was well thought out and was stiff enough not to allow the board to be bent or flexed after this cooler was installed
+ Removal of the fan was easy, giving users the ability to clean the CPU cooler
+ Instruction Manual was easy to understand on the installation of this unit and was printed in 18 different languages
+ A solid sturdy design
Cons :
– The CPU coolers mounting nuts were a little to large to use with the coolers retention plate forcing me to use a pair of needle nosed pliars to properly tighten the cooler. Smaller nuts could have been used to make install a lil’ easier.
– The speed controller was hard wired into the fan. I would liked to have seen the fan controller as a separate unit.
– Smaller cases may be problematic as well as large NB heatsinks.
Final Score: 8 out of 10 and the Bjorn3D Seal of Approval


