Explore the vibrant world of HDR/DRI photography with this easy-to-follow tutorial. Make your photos sing in Photoshop and keep friends guessing how you did it.
Food for Thoughtful Photos
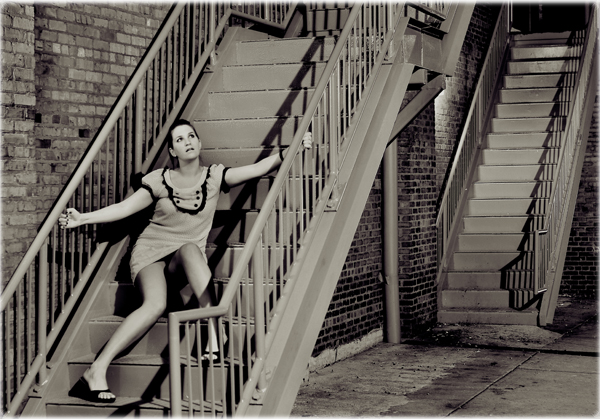
[50mm f/4.5 ISO 100. Six image DRI composite. I don’t carry a flash kit and the available light here was terrible. I asked my model to pose as still as possible for 60 seconds while I shot a wide dynamic range of JPEGs. Later, I combined the necessary details from each image with a DRI technique in CS2, and saved what would have been a wasted night out.]
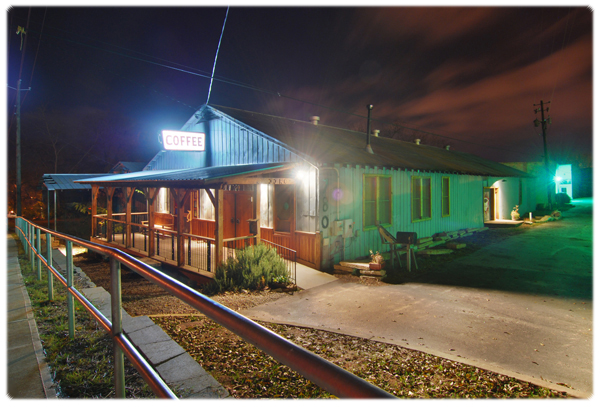
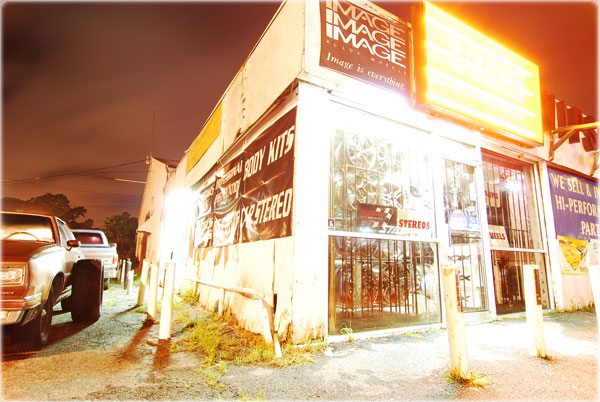
[12mm f/8 ISO 250. Six shot composite. Without creating an HDR image, the “COFFEE” text would have disintegrated into the white sign from the long exposure. Increasing the dynamic range also helped to dull the lens flares and naturalize other lighting flaws.]
HDR
HDR stands for High Dynamic Range.
DRI
Situational Relevance
- All kinds of stationary night photography – especially photos including neon signs or bright light.
- Daytime indoor shooting without a strobe kit.
- Any high-contrast environment where you’re forced to properly expose the subject and blow out the background; or conversely, ignore a poorly-lit subject to keep the background.
- Action photography.
- Fidgety models.
- Shooting non-structural subjects outside on a windy day. Everything capable of movement will appear blurry in your final photo.
Equipment

(AKA: Free Editing vs Editing Freedom)
Say “Quality,” Not “Cheese”
HDR Shooting Guide for Night Scenes
Objective:
Obtain six useful pictures that together represent a wide dynamic range.
Step 1:
Set up your tripod and mount your camera.
Step 2:
Set your camera’s Program Mode to Manual. Modes like Auto, Aperture Priority, Shutter Priority, and any of the predefined specialty modes won’t work. The idea is to use your shutter speed as the only variable, which means you’ll need to manually set your aperture to a constant value.
Step 3:
Step 4:
If AF is occasionally grabbing different areas of interest, you will get unusable images. Switch to manual focus (MF) and find your subject the old fashioned way. The less contrast between your subject and background, the more likely you will need to use MF.
Step 5:
Step 6:
[12mm 30 sec. f/6.3]
Step 7:
[12mm 1/15 sec. f/6.3]
|
Example Shutter Speed |
Desired Look of Picture |
|
12 Seconds |
Very Bright: Shadow depth eliminated or severely reduced. If available, sky and background are very visible. |
|
8 Seconds |
Bright: Shadow depth significantly reduced and lights still blooming. Sky and background potentially fade. |
|
4 Seconds |
Normal: The most balanced compromise. Out of your six pictures this one is the most evenly exposed. |
|
1 Second |
Slightly Dark: Shadows are thick and image details are reduced. Lights no longer bloom, but aren’t yet perfectly exposed. |
| 1/3 Second | Dark: Shadows dominate. All details are scarce, except on objects and structures near a light source. You can clearly read neon text. |
|
1/6 Second |
Very Dark: Image is way underexposed, but the subtlest details of the lights emerge. You can clearly see bulb shapes. |
Step 8:
The Short Answer:
For Realism, Avoid Adobe’s “Merge to HDR”.
Photoshop CS2 has a built-in feature that allows you to merge many files to a single HDR image. It requires very little effort to do and it kinda shows in the end. You also need a black belt in Histogram to use it.
The “Merge to HDR” Guide
Step 1:
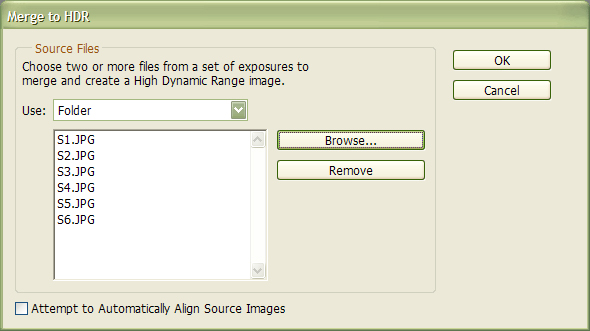
Open CS2 and click to bring up the Merge dialogue box.

Step 2:
Select Folder under Use, and Browse to the PICS folder where you copied your six images. Uncheck the box to Automatically Align Source Images. You used a tripod so your images are already aligned. Click OK and you’re off.
Step 3:
Depending on your computer’s specs and the size of your files, it will take some time for CS2 to run the voodoo down. When it finishes, it will spit out a nasty looking preview image with your source files on the side. Everything is 32 bit and useless to us. To see it properly we need to convert it to 8 bit glory from the Bit Depth pull down. Select 8 bit/Channel and click OK.

Step 4:
Now you’ve got something worse looking than before.

The HDR Conversion dialogue has appeared, and there is a Method pulldown where you can select from several ways to butcher convert your image to 8 bit. Play with all of the options. I dare you to find anything useful that doesn’t leave you with Saturday Morning Cartoons.
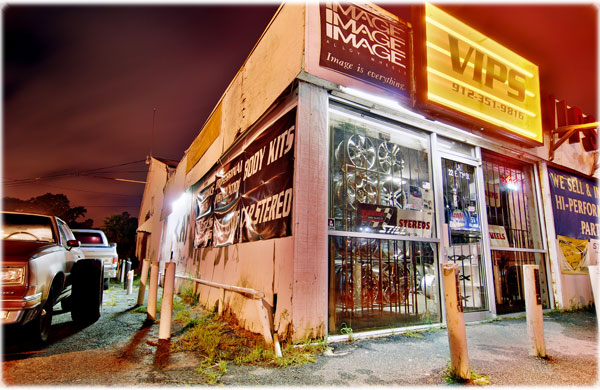
Our Specific Problems:
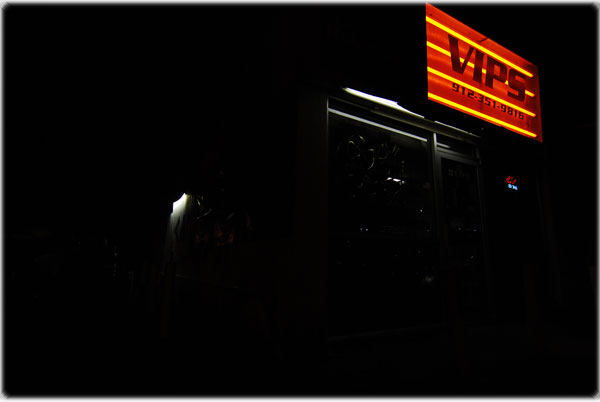
- There’s no natural definition in the neon “VIPS” sign, or in the text under the light on the left side of the building.
- Depending on what method you select, the sky will either look unnatural or turn black.
- All the colors are plasticky and generally horrendous.
Our Non-solutions:
Your first choice of conversion method is based on modifying the Exposure & Gamma values – but so what? You could’ve shot this in RAW instead of JPEG if you wanted to change your natural exposures artificially. Combining the desirable traits from each of your six images is your goal, and that really has nothing to do with this.
The second and third choices are Highlight Compression and Equalize Histogram. These run predetermined conversion formulas that you cannot adjust manually, which makes them both useless and cartoony. You can’t specify any kind of numeric value, and CS2 doesn’t ever ask for one.
If there is a correct answer to the “Merge to HDR” automation riddle, I suspect it lies in the fourth choice: Local Adaptation. Here, you’re given the ability to drag sliders around on a histogram, and if histograms are your forte, you may feel right at home. I use them to confirm captured data (reading extreme highlights/extreme shadows) in my camera, but I don’t try to manipulate them in Photoshop because they rarely yield the results I need.
Step 5:
Ignore the “Merge to HDR” automation feature of CS2 altogether, and try the much-better method of creating HDR images on the next page!
Increasing the Dynamic Range Manually
The DRI Guide
Step 1: Rename to ease workflow.
Locate the PICS folder you created and rename each image with a whole number on a scale of 1-6.
1 = the severely underexposed picture.
6 = the brightest picture.
Please don’t email me saying “Well, I think I’ve got a 2.5 here and 3.7 here and maybe two sixes.” Look at them side by side. If you followed the shooting guide they should all look different, and we need to give them hard values of 1, 2, 3, 4, 5, and 6.
Step 2: Open the three brightest pictures.
- Open CS2 and click to bring up a dialogue box. Navigate to your PICS folder.
- Click on the image marked 6.jpg and then [Shift+Click] on 4.jpg to select images 6.jpg, 5.jpg, and 4.jpg all at once. These should be your brightest images.
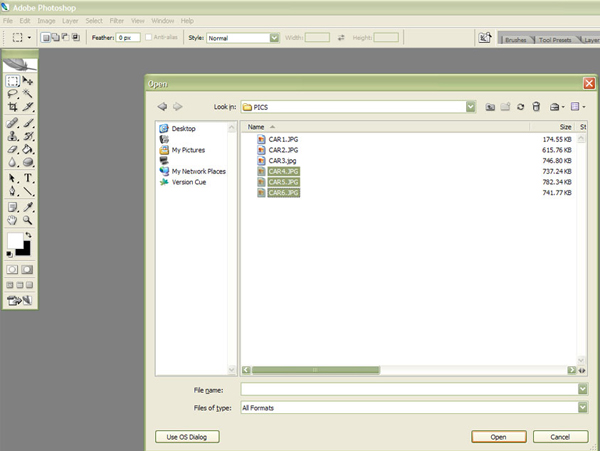
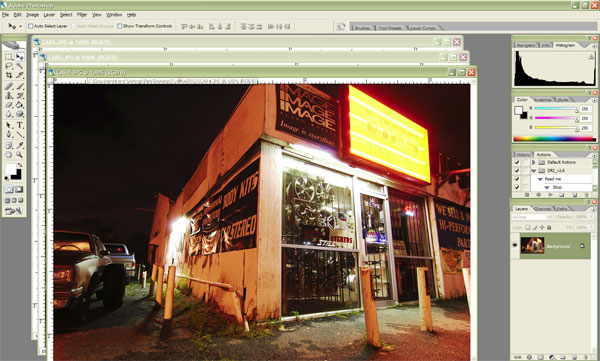
Click Open. Your screen should look similar to the shot below, with three new windows containing your three brightest images.
Step 3: Make the three pictures as layers in one project.
Let’s stack them in a useful way; i.e., your brighest layers on top of the darkest.
- Select the MOVE TOOL (V) from the Tools palate.
- Click on the image anywhere in the 5.jpg window, and drag the entire 5.jpg onto 4.jpg.
- Make sure you line the pictures up perfectly! It helps to turn on the Snap feature using [Shift+Ctrl+;].
- Close the 5.jpg window. You should now have only two open windows, 6.jpg and 4.jpg, and it should look like this:

Step 4: Make the three pictures as layers in one project, continued.
Repeat Step 3, but simply substitute image 6.jpg for 5.jpg.
Now you should have one window open that contains all three pictures with your brightest image on top and the darkest on the bottom.
Look at your Layers Palate in the bottom right corner of CS2. Your darkest layer should be labeled Background in the Layers Palate. It’s locked, so we need to duplicate it so we have something to edit.
- Right Click on the layer text that says Background and click Duplicate Layer.
- In the dialogue that pops up change the As: field to 4 instead of Background Copy, and Click OK.
- While you’re in the Layers Palate, rename Layer 2 to “6“ and Layer 1 to “5“.
You should have something like this:

On the next page we’ll use the Color Range feature to blend these together.
Step 5: Selecting the Color Range
Here’s where the magic happens:
1. Disable/Uncheck the eyeball in layers 6 and 5.
This is important; if you don’t disable the two layers above 4 you won’t be able to see your work.
2. Now select layer 4 in your Layers Palate.
3. Click .
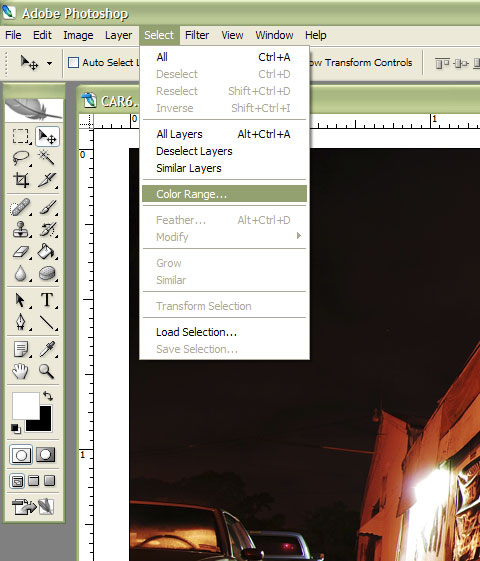
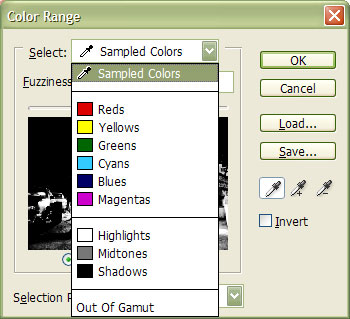
4. In the Color Range dialogue box choose Shadows from the pulldown and Click OK.
You’ll get some dancing lines all over your image. This selected area is the area to be edited, but its default definition is too strict and we need to make it look more natural. To do that, we’ll Feather our selection.
Let’s discuss the Feather Radius number you’ll use. Some clever DRI photographers like Andreas Tofahrn create HDR images in a similar way to this. Andreas uses the function in Photoshop instead of Feather. I Feather my images because I prefer the results. No matter what method you choose, an important concept to consider is his rule of “halving the width for each processed layer” when choosing the Sample Radius or Feather Radius value. I will halve my value when necessary, but I didn’t use that method here because this should be organically reductive.
5. Click [Select ► Feather]. I used a constant Feather Radius value of 100, but you should use what looks good on your pictures. Enter your value and Click OK. You will see the selected area change significantly:

6. Now we need to create a Mask from this selection. Look at the Layers Palate and locate the Add Layer Mask button. There’s a fancy green arrow pointing to it in the above image. Click Add Layer Mask, and your layer 4 will link to a ghostly rendition of itself the Layers Palate; it shows your saved shadows, and it looks like this:

Step 6: Repeat Step 5 using layer “5” instead of layer “4”.
- Select layer 5 and activate its eyeball so you can see what happens.
- Click [Select ► Color Range].
- In the dialogue pulldown choose Shadows and click OK.
- Click , and enter the value you used on layer 4, or use half that value if the results look better. My starting value was 100, and I stayed with it.
- Click the Add Layer Mask button in the Layers Palate.
You should get another ghostly thumbnail, this time linked to layer 5 in the Layers Palate.
Step 7: Repeat Step 6 using layer “6” instead of layer “5”.
Try this one from memory. If everything goes well you will see all your layers linked to masks, with something like this in the Layers Palate:

Notice, too, how the exposure of the sky has brightened and building details are starting to even out.
Step 8: Save your image as a new JPEG.
Click [File ► Save As] and select JPEG from the Format pulldown. Name it “Light”. CS2 will flatten your layers automatically and save your file.
Finishing the Image
Step 1:
Now that you have your Light.jpg, you need to make your Dark.jpg. Use the same DRI method we’ve covered, but instead of combining your three brightest pictures (6,5,4), combine your three darkest (3,2,1). When you finish, choose Save As, and name that result Dark.jpg.
The last step is to combine the two extremes.
Step 2:
- Open your Light.jpg and Dark.jpg.
- Place the Light.jpg on top of the Dark.jpg using the Move Tool (V) just like you’ve done before, and make sure they’re lined up.
- Use the Color Range/Masking DRI method. You don’t need to duplicate the background on this final step.
- Save the finished image as Even.jpg.
- Crop it, tweak the colors to your liking, and tell everyone how Bjorn3D changed your life.

The Inevitable Drawback:
All images are different. I’ve tried to show you a method that will always preserve the readability of your text and give you clean bulb lines.
Here, you’re paying for all this detail with the occasional loss of brightness. I think it’s a fair trade.
Final Thoughts
HDR lighting upped expectations of what video games can look like, but many people still don’t know how practical the concept can be for photographers. The goal is not to make some super k3wL off-the-wall image in Photoshop and unleash it on the denizens of Flickr; they’ve already got that problem ad nauseam. The goal is to make a realistic photo that captures details you could never get in a traditional photograph, and to show it to someone and hear them say, “Great exposure, how did you do it?”
If the “Merge to HDR” or DRI technique interests you, let’s see it. Get out your brainstorming caps and post your best image in the forums. Have fun with this and happy shooting!

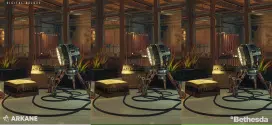
[14mm f/8 ISO 100. Six image DRI composite used to expose the ceiling as well as the neon.]

[50mm f/4 ISO 100. Two image DRI composite. The brightness of the sky was balanced enough with the neon to capture a good single shot; however, the “Savannah Georgia” text was unlit, and required a second longer exposure to make it appear.]