Asus continues to deliver Nvidia and AMD based boards to keep us SLI guys happy. Well, they certainly know how to deliver a nice package.
Introduction
Asus comes at us again with another board for the AMD camp. We all know that Intel’s Core i7 and the X58 platform is where it’s at right now, but if you’re a lowly guy like me you can’t afford the toys for the big boys. Or, if you can, the wife doesn’t want you spending that hard earned money for something to take your attention off her *wink*. Anyways, today we will be evaluating the Asus M4N72-E 750a Motherboard designed for the Phenom II CPU set. There has been controversy over whether or not to make the jump to DDR3 and I will be making a few comparisons to not only our different makers of chipsets but also to DDR3 and DDR2. Is it really worth it? You will just have to take a peek and see!
About ASUS
|
|||||||||||
 |
|||||||||||
Imagine innovations that simplify our lives and enable us to realize our full potential. It is technologies’ responsibility to accommodate us, not the other way around, because all devices should perform and communicate seamlessly anytime, anywhere. ASUS thrives to become an integrated 3C solution provider (Computer, Communications, Consumer electronics). |
|||||||||||
As a major player of the IT industry, ASUS has established its corporate mission: Provide innovative IT solutions that empower people and businesses reaching their full potential. The philosophy of ASUS product development is to do the fundamentals well first before moving forward. Started with computer components such as motherboards, graphic cards, and optical storage devices, ASUS now has now over 16 product lines, including desktop barebone systems, servers, notebooks, handhelds, network devices, broadband communications, LCD monitors, TVs, wireless applications, and CPT (chassis, power supply and thermal) products. |
|||||||||||
|
|||||||||||
|
FEATURES
- OC DDR2 1200
- 8+1 Phase Power Design
- EPU
- TurboV
- Turbo Key
- Asus Anti-Surge Protection
- AMD 140watt CPU Support
- Support 45nm Phenom™ II CPU
SPECIFICATIONS
| MSI AM3 790GX-G65 |
|
|
CPU
|
AMD Socket AM2+ / AM2 Phenom™ X4/Phenom™ X3/Athlon™ /Athlon™ X2/Sempron™ Processors
AMD 140W CPU Support AMD Cool ‘n’ Quiet™ Technology Support AM3 Phenom™ II / Athlon™ X4 / Athlon™ X3 / Athlon™ X2 Processors Support 45nm Phenom™ II CPU |
|
Chipset
|
NVIDIA nForce 750a SLI
|
|
System Bus
|
Up to 5200 MT/s HyperTransport™ 3.0 interface for AM3/AM2+ CPU
2000 / 1600 MT/s for AM2 CPU |
|
Memory
|
4 x DIMM, Max. 16 GB, DDR2 1200(O.C.)/1066*/800/667 ECC,Non-ECC,Un-buffered Memory
Dual Channel memory architecture *Due to AMD CPU limitation, DDR2 1066 is supported by AM3/AM2+ CPU for one DIMM per channel only. Refer to www.asus.com for the memory QVL (Qualified Vendors Lists). **Due to OS limitation, when installing total memory of 4GB capacity or more, Windows® 32-bit operation system may only recognize less than 3GB. Hence, a total installed memory of less than 3GB is recommended. |
|
Expansion Slots
|
2 x PCIe 2.0 x16 (Single x16 or Dual x8) 2 x PCIe x1 2 x PCI 2.2 |
| Multi-GPU Support |
Support NVIDIA® SLI™ Technology at x8 link
|
|
Storage
|
NVIDIA nForce 750a SLI chipset – 1 x Ultra DMA 133 / 100 – 6 x SATA 3Gb/s ports (Legacy IDE operation is only supported on drives 1–4.) – NVIDIA® MediaShield™ RAID supports RAID 0, 1, 0+1, 5, and JBOD |
|
LAN
|
Realtek 8211CL Gigabit/10 LAN controller featuring AI NET 2
|
|
Audio
|
VIA1708S 8 -Channel High Definition Audio CODEC
– Supports Jack-Detection, Multi-Streaming, and Front Panel Jack-Retasking – Optical S/PDIF Out ports at back I/O – ASUS Noise Filtering |
|
IEEE 1394
|
VIA VT6315N controller supports 2 x 1394a ports |
|
USB
|
12 USB 2.0 ports (6 ports at mid-board, 6 ports at back panel)
|
|
Asus Unique Features |
ASUS Power Saving Solutions: – 8+1 Phase Power Design – ASUS Anti-Surge Protection ASUS Green Design: – EPU *ASUS EPU is supported by AM3/AM2+ CPU only – ASUS AI Nap Express Gate ASUS Quiet Thermal Solution: – ASUS Fanless Design:stylish heatsink solution – ASUS Q-Fan2 ASUS EZ DIY: – ASUS Q-Connector – ASUS CrashFree BIOS 2 – ASUS O.C. Profile – ASUS EZ Flash 2 |
|
Overclocking Features
|
Intelligent overclocking tools – AI Overclocking (intelligent CPU frequency tuner) -TurboV -Turbo Key SFS (Stepless Frequency Selection) – FSB tuning from 200MHz up to 600MHz at 1MHz increment – Memory tuning from 533MHz up to 1066MHz Overclocking Protection – ASUS C.P.R.(CPU Parameter Recall) |
| Special Features | 100% All High-quality Conductive Polymer Capacitors! (5000hrs VRM, over 57 years operation lifespan at 65∘C) ASUS MyLogo 2 |
|
Back Panel I/O Ports
|
1 x PS/2 Keyboard
1 x PS/2 Mouse 1 x S/PDIF Out (Optical) 1 x IEEE 1394a 1 x LAN(RJ45) port 6 x USB 2.0/1.1 8 -Channel Audio I/O |
|
Internal I/O Connectors
|
3 x USB connectors (6 ports)
1 x Floppy disk drive connector 1 x IDE connector 6 x SATA connectors 1 x IEEE 1394a connector 1 x CPU Fan connector 1 x Chassis Fan connector 1 x Power Fan connector 1 x S/PDIF Out connector Front panel audio connector Chassis Intrusion connector 1 x COM connector CD audio in 24-pin ATX Power connector 4-pin ATX 12V Power connector System Panel (Q-Connector) |
| Bios | 8 Mb Flash ROM AMI BIOS, PnP, DMI2.0, WfM2.0, SM BIOS 2.5, ACPI 2.0, ASUS EZ Flash 2, CrashFree BIOS 2 |
|
Accessories
|
User’s manual 1 x UltraDMA 133/100/66 cable 4 x SATA cable I/O Shield |
|
Support CD
|
Drivers
ASUS PC Probe II Express Gate ASUS AI Suite Anti-virus software (OEM version) ASUS Update |
|
Form Factor
|
ATX Form Factor
12 inch x 9.6 inch ( 30.5 cm x 24.4 cm ) |
PICTURES & IMPRESSIONS
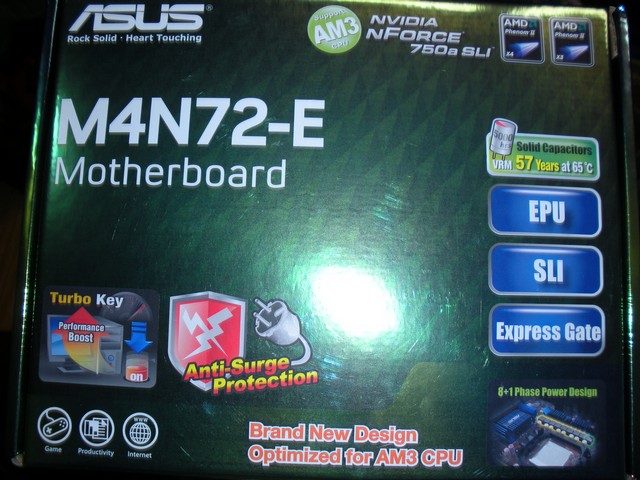
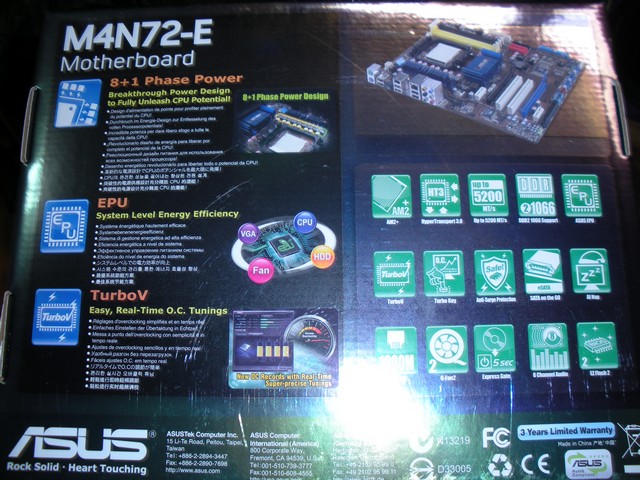
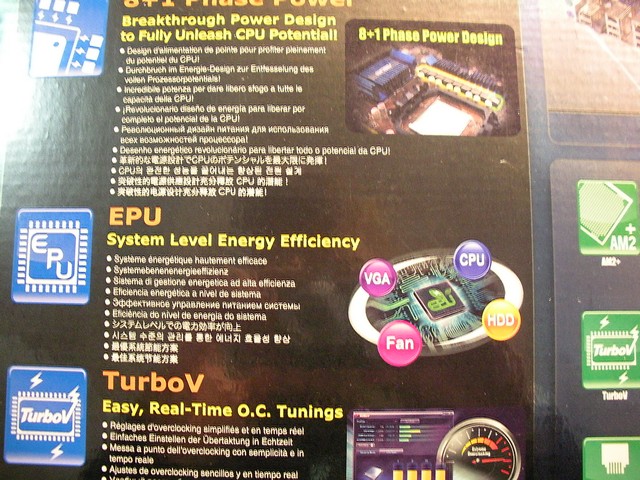
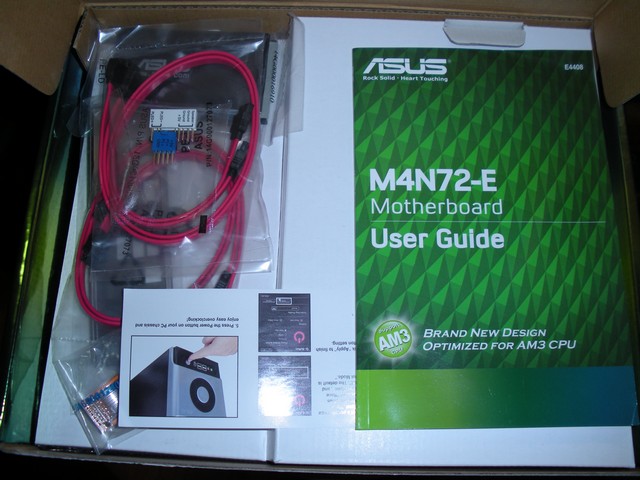
The first thing we have up is the box the motherboard comes in. Asus always manages to squeeze in every little detail they can to fill up the entire box full of information to fully inform you of the board. You can see that they also include the usuals for a bundle. On the back you can see a scaled down picture of the motherboard and all the little details about it. On the front are more details, the name, and some key features of the board. Everything you really need to know before a purchase is expressed in detail on the box.
In case you missed it previously:
- User’s manual
- 1 x UltraDMA 133/100/66 cable
- 4 x SATA cable
- I/O Shield
- SLI Bridge
- Q-Connector
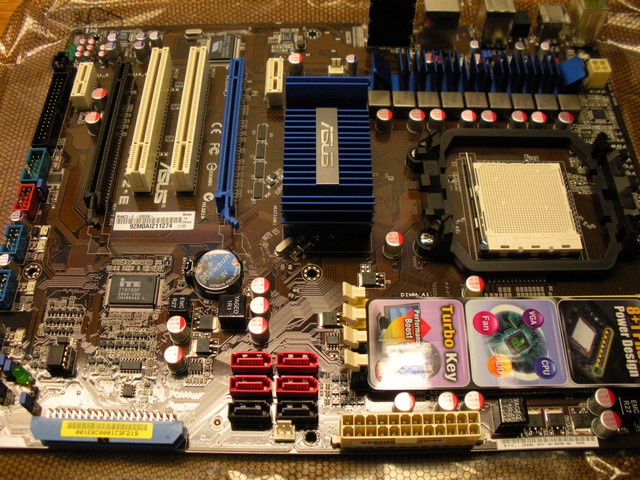
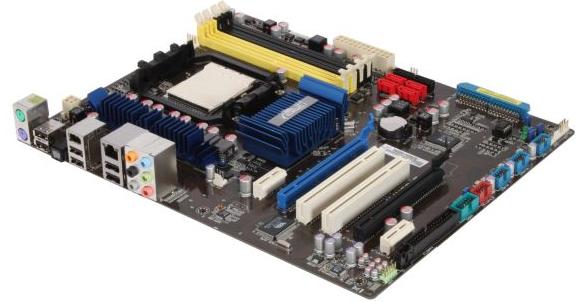
Here is a full shot of the board for you. It’s not plain and simple but it isn’t over articulate either. As a midrange board, it sits right in the middle as we would expect. If you look closely though, Asus doesn’t skimp out on the features.
This is a bottom corner shot that I like to do. You can almost see everything that I like to point out right in this picture. Almost all of your cables go to this corner of the board, making it very easy for cable management. What I find very odd is that the IDE port is angled but the SATA ports are not. I’m sure most of us that would buy such a board are not using the age old tech of IDE, but you never know. Let’s take a gander at these jumpers I’m sure you’re wondering about.
Closest to the IDE port is the Standby Power jumper. You can simply turn this off to turn off Standby Power. Under that and slightly to the left is the Clear CMOS jumper. Use this to clear your BIOS when your overclock causes you not to post. Directly to the left of that is the USB-Wake jumper. You can change this to turn the USB Wake power off. And finally, above that and directly below the green LED is the CPU-OV Jumper. You can turn this on for you hardcore voltage people and go well above 1.9v on your CPU. I myself have not gone above 1.6v so I do not need this jumper. That doesn’t mean it isn’t welcome though.
One thing we’re missing here. Where are the buttons?! Almost all newer boards from our top manufacturers are giving us push buttons to use. At least a Clear CMOS would have been nice here.
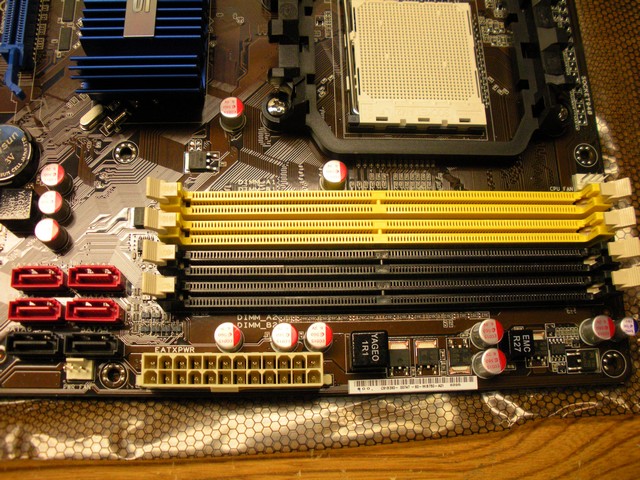
I like to do this shot to show the upper layout of the board. Here lately it has been a trend to put the CPU slot and RAM slots close together so I have been making a point of this. I highly suggest only using two sticks of RAM if you have a big CPU cooler. With two sticks of RAM you can still run in dual-channel mode and retain your massive air cooler. I will mention again how our SATA ports are not at an angle on the side of the board. For those that are OCD about cable management this can make it a pain in the rear to make everything tidy.
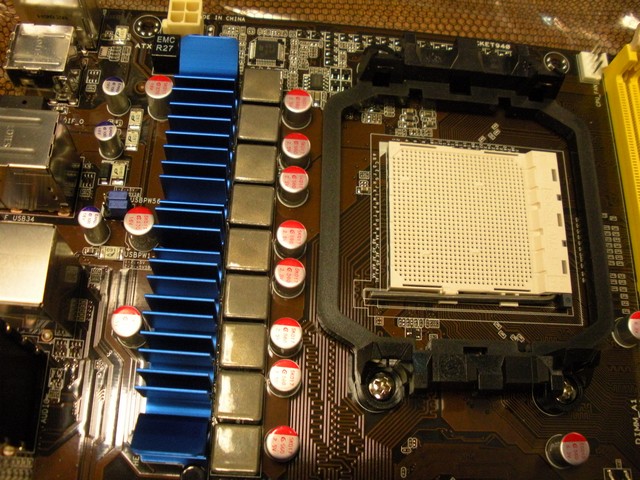
Here I feature the CPU socket and the lovely 8+1 Phase Power. Nothing much really to say besides this will help greatly in overclocking our Phenom II’s.
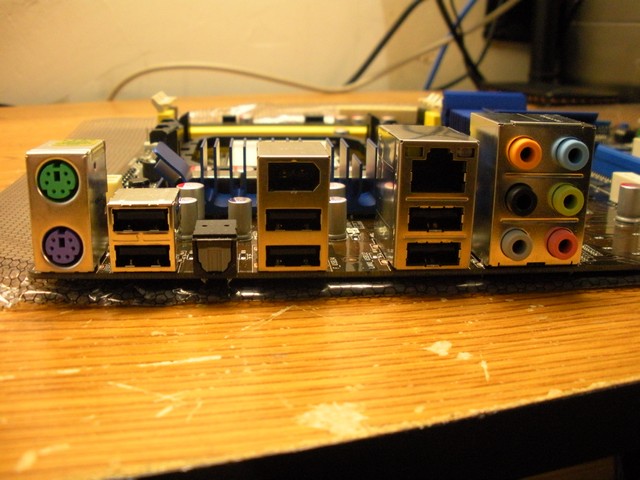
Here I picture the back end. There isn’t much to it, but there is enough to satisfy even me and I love a good rear end. It is sad to see the dual-Ethernet setups taking a leave though from our modern motherboards. In a LAN environment this can become very handy.
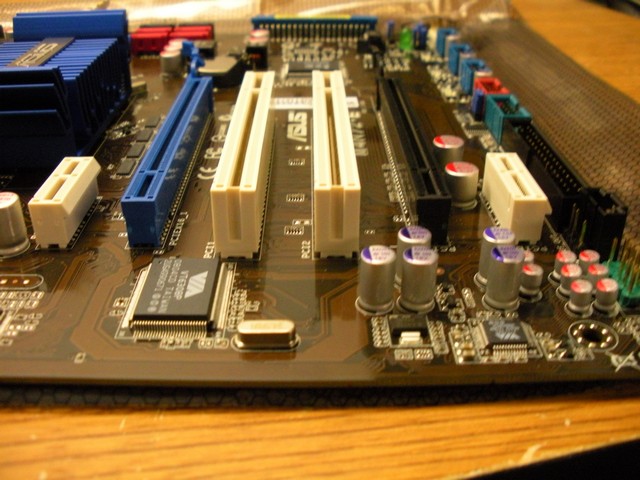
Another favorite shot of mine is the slot layout. Asus and MSI must be taking notes from each other because I now have two very well layed out boards at my disposal. You can have full dual slot cooler SLI and still keep a PCI-E 1x sound card and PCI card in your system for what I like to call a plastic sandwich. You can also easily get to your bottom ports without the need to remove your second video card. That makes it very handy for people who plug in and unplug many things and don’t want to take the time to remove everything.
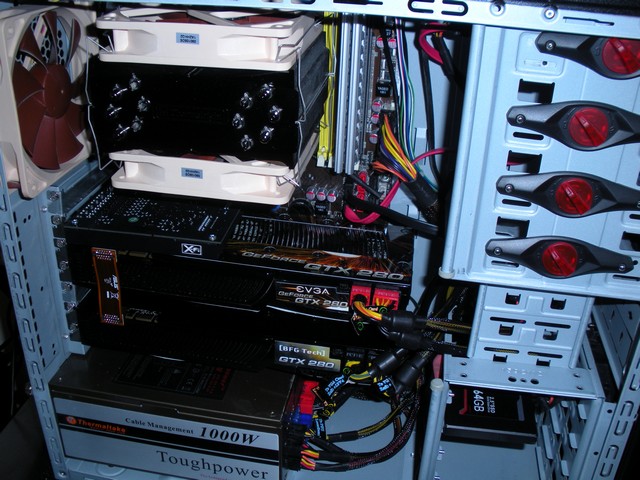
So far we have a very well layed out board and the pictures even impress me and it’s sitting five feet from me. For you people who love pictures and want to see the board setup in a case I will include a picture of my system.
BIOS
Here I will explain some snap shots of the BIOS I took. I didn’t take the time to get every page of the BIOS but instead went straight to the meat that everyone wants to see.
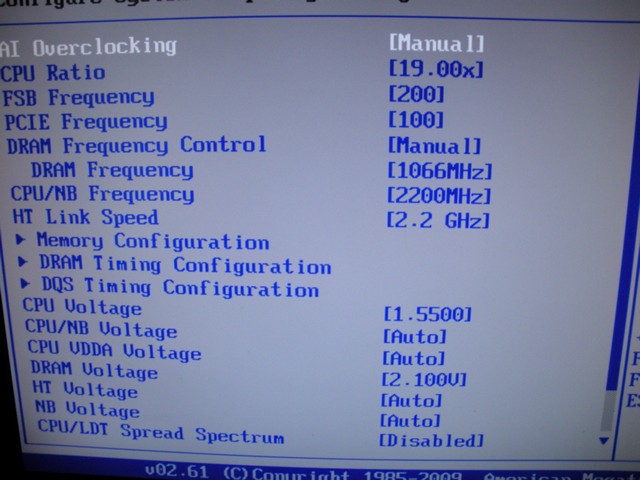
This is probably going to be the page you will use most if you’re into overclocking. As you can see, I went straight through and raised the Multiplier for my 3.7ghz overclock.
The CPU Ratio is essentially the multiplier. You raise this or lower this and it directly controls the core clock of the CPU.
The FSB Frequency kinda controls the whole works. You raise this and not only does your CPU frequency go up, but so does the HT/NB frequency as well as the RAM clock.
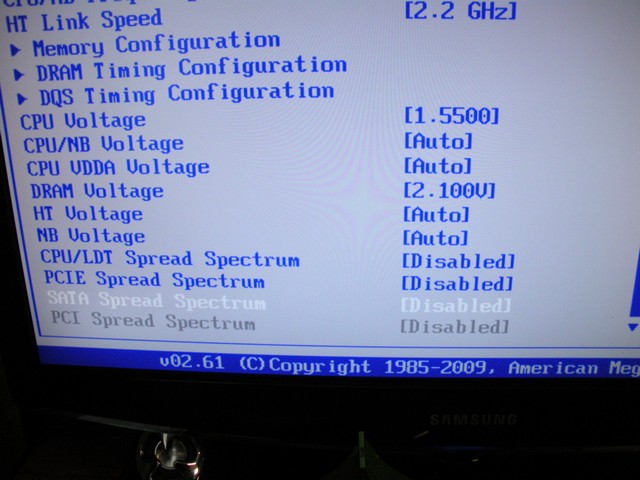
Near the bottom you can see voltages to raise or lower the voltage on your desired part. Increasing usually makes things more stable but can also heat up your PC very quickly.
This is just showing the bottom of the page that wasn’t displayed on the top.
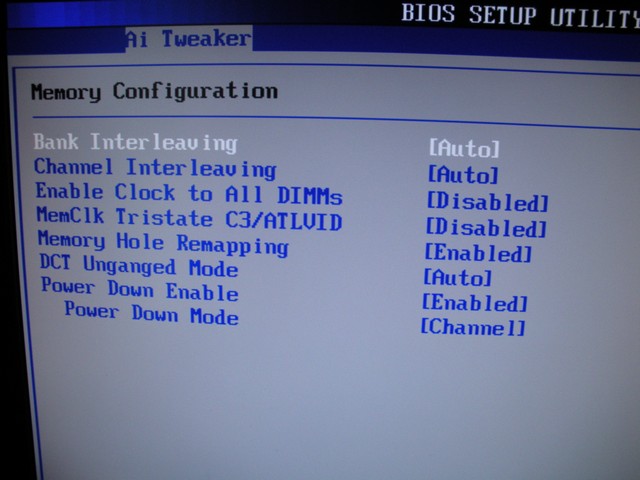
On the first picture where it says Memory Configuration if you hit enter it will take you to this screen. These are some pretty advanced Memory settings that most people do not play with. It’s nice to see some advanced settings on boards that aren’t top of the line.
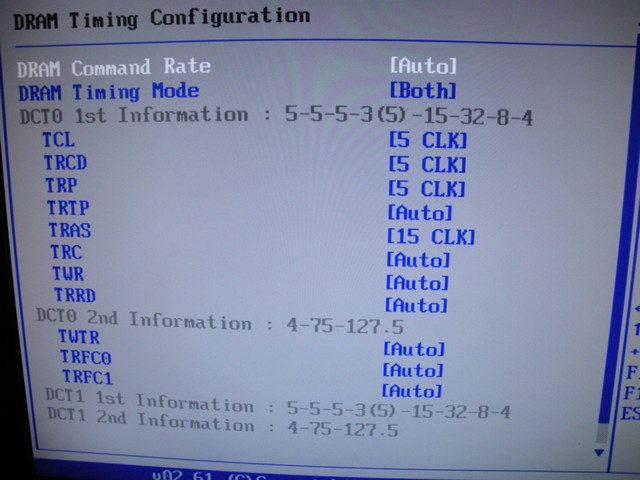
Under DRAM Timing you will find this page. You can directly control your RAM timings from this page. I find the way the newer boards BIOS layouts are it makes it easier to understand what you’re tweaking. Everything pretty much has its own page or they specifically tell you what it is. Not only that, but the help on the right of the screen actually tells you what things mean unlike the old days where you had to search for a manual or guess. I find this very helpful when trying to help a newbie overclocker.
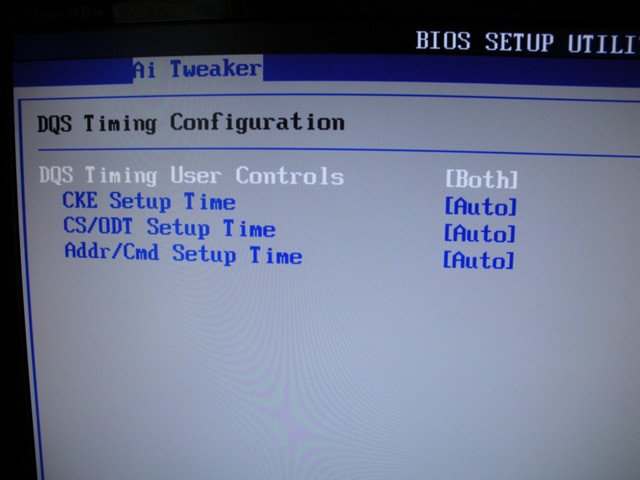
Here are some more advanced memory configuration options you can find under the AI Tweaker page.
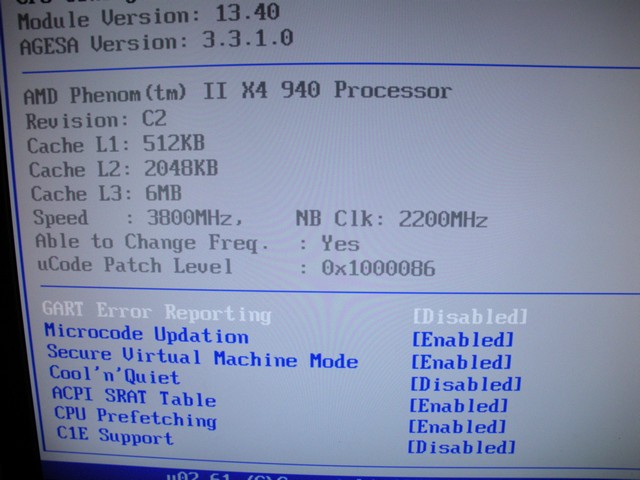
And finally we have the CPU page that allows you to mess with some settings for the CPU as well as show the specifications of your CPU.
TESTING & METHODOLOGY
Heres the part we have all been waiting for. Just one more page until the benches. We use Acronis Clone to copy a fresh install of Vista X64 to each system before running benchmarks to get maximum performance from our drivers and hardware.
Test Rig
| Test Rig “Univac” |
|
| CPU | AMD Phenom II X4 940BE @ 3.7GHz |
| Motherboard | Asus M4N72-E |
| RAM | 2x2gig G.Skill DDR2 1100mhz |
| CPU Cooler | TRUE Black 120 & 2 Noctua Fans 1300RPM |
| Hard Drives |
G.SKill 64GB SSD (System) Western Digital 160gig Scorpio Black SATAII (enclosure) |
| GPU’s |
GTX 280’s SLI |
| PSU | Thermaltake Toughpower 1000 Watt Modular |
| OS |
Windows Vista Ultimate X64 SP1 |
|
This is my sweet little POS =) |
|
Test Suite
|
Synthetic Benchmarks |
|
3DMark Vantage |
|
3DMark06 |
|
SiSoft SANDRA Business 2009 |
|
Everest Ultimate Edition v. 5.0 |
|
Cinebench R10 64 bit |
|
HD Tach |
3DMARK06 V. 1.1.0

3DMark06 developed by Futuremark, is a synthetic benchmark used for universal testing of all graphics solutions. 3DMark06 features HDR rendering, complex HDR post processing, dynamic soft shadows for all objects, water shader with HDR refraction, HDR reflection, depth fog and Gerstner wave functions, realistic sky model with cloud blending, and approximately 5.4 million triangles and 8.8 million vertices; to name just a few. The measurement unit “3DMark” is intended to give a normalized mean for comparing different GPU/VPUs. It has been accepted as both a standard and a mandatory benchmark throughout the gaming world for measuring performance.
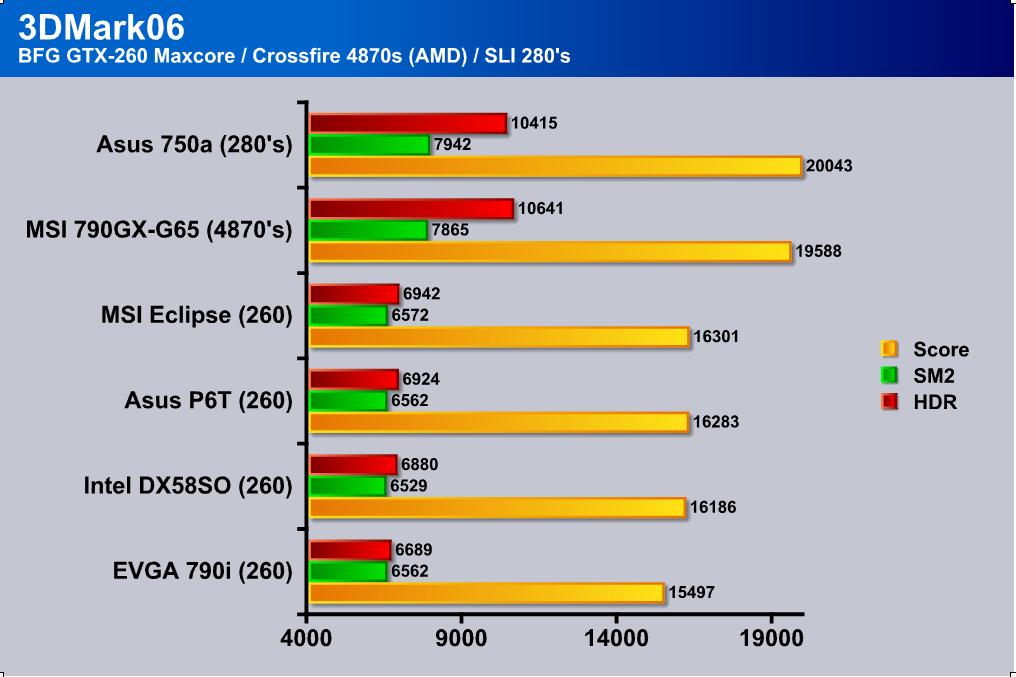
3DMark06 is really starting to show its age as we progress into newer and better hardware. Here we are seeing that SLI 280’s are barely better than some 4870s on a tri-core CPU. The SLI takes the advantage though.
3DMark Vantage
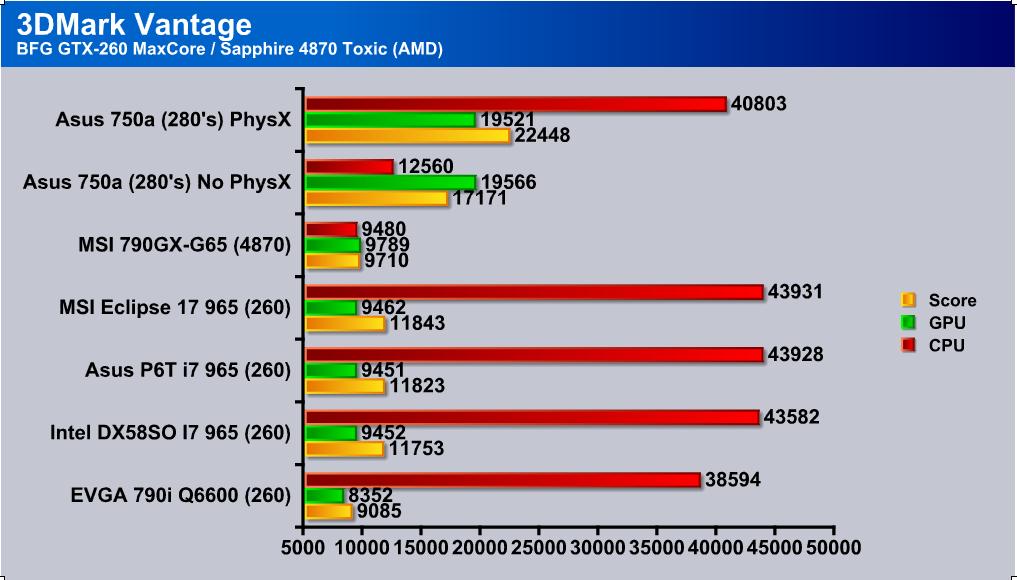
The newest video benchmark from the gang at Futuremark. This utility is still a synthetic benchmark, but one that more closely reflects real world gaming performance. While it is not a perfect replacement for actual game benchmarks, it has its uses. We tested our cards at the ‘Performance’ setting.
Currently, there is a lot of controversy surrounding NVIDIA’s use of a PhysX driver for its 9800 GTX and GTX 200 series cards, thereby putting the ATI brand at a disadvantage. Whereby installing the PyhsX driver, 3DMark Vantage uses the GPU to perform PhysX calculations during a CPU test, and this is where things get a bit gray. If you look at the Driver Approval Policy for 3DMark Vantage it states; “Based on the specification and design of the CPU tests, GPU make, type or driver version may not have a significant effect on the results of either of the CPU tests as indicated in Section 7.3 of the 3DMark Vantage specification and white paper.” Did NVIDIA cheat by having the GPU handle the PhysX calculations or are they perfectly within their right since they own Ageia and all their IP? I think this point will quickly become moot once Futuremark releases an update to the test.
I decided to go ahead and put PhysX and Non-PhysX benches in the same chart for ease of both myself and you. Vantage truly shows the power of multi-core and multi-card setups and as we can see here the Nvidia setup is quite a notch ahead of the AMD/ATI setup. Let’s take into consideration though that the bench used here for the HD 4870 was a single card and the 280’s will obviously have an advantage. This is only 3Mmark though so let’s head on to some other testing.
CINEBENCH
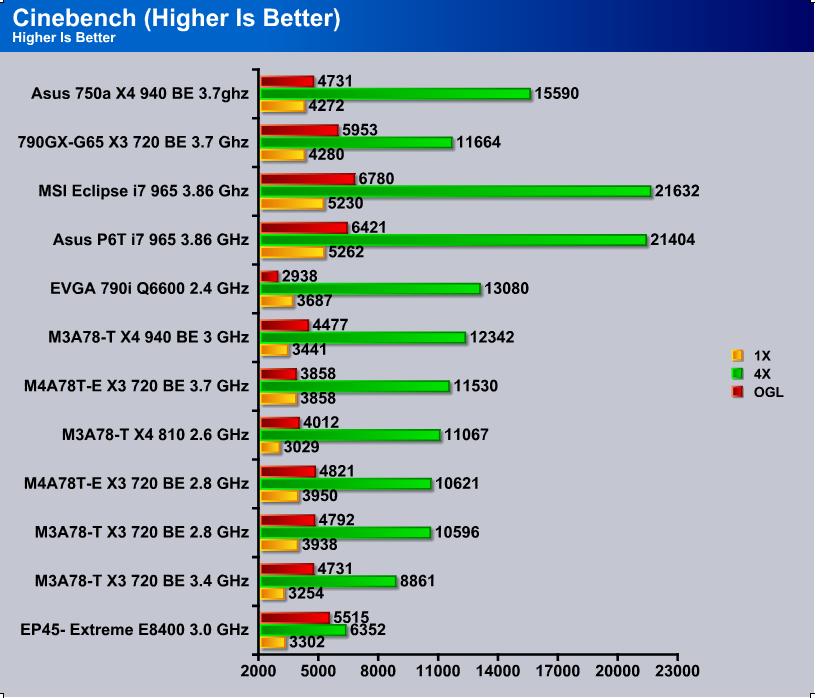
“CINEBENCH is a real-world test suite that assesses your computer’s performance capabilities. MAXON CINEBENCH is based on MAXON’s award-winning animation software, CINEMA 4D, which is used extensively by studios and production houses worldwide for 3D content creation. MAXON software has been used in blockbuster movies such as Spider-Man, Star Wars, The Chronicles of Narnia and many more. MAXON CINEBENCH runs several tests on your computer to measure the performance of the main processor and the graphics card under real world circumstances. The benchmark application makes use of up to 16 CPUs or CPU cores and is available for Windows (32-bit and 64-Bit) and Macintosh (PPC and Intel-based). The resulting values among different operating systems are 100% comparable and therefore very useful with regard to purchasing decision-making. It can also be used as a marketing tool for hardware vendors or simply to compare hardware among colleagues or friends.”
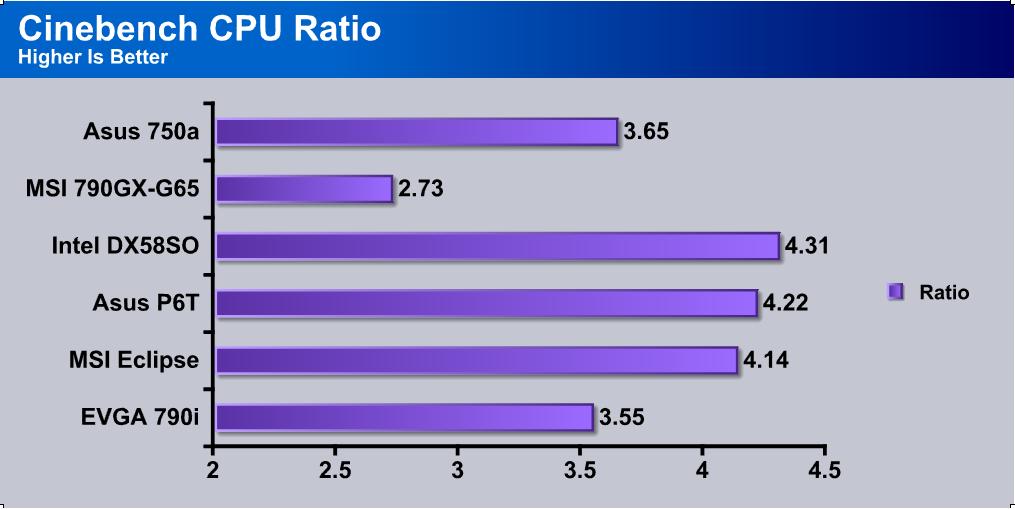
I think here we can see that our quad-core has the upper hand in CPU benchmarks with Intel’s Core i7 at the top. No argument here really.
HD TACH
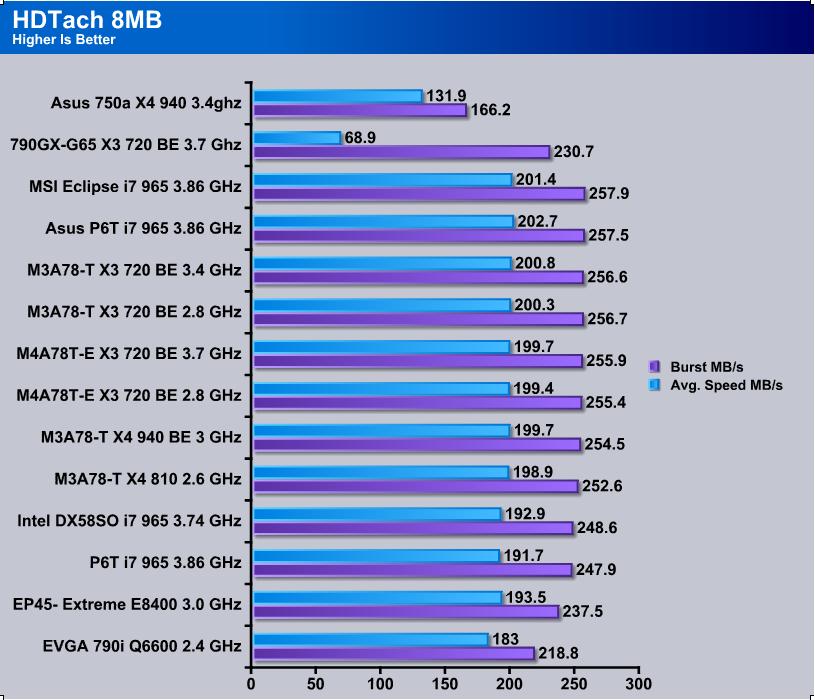
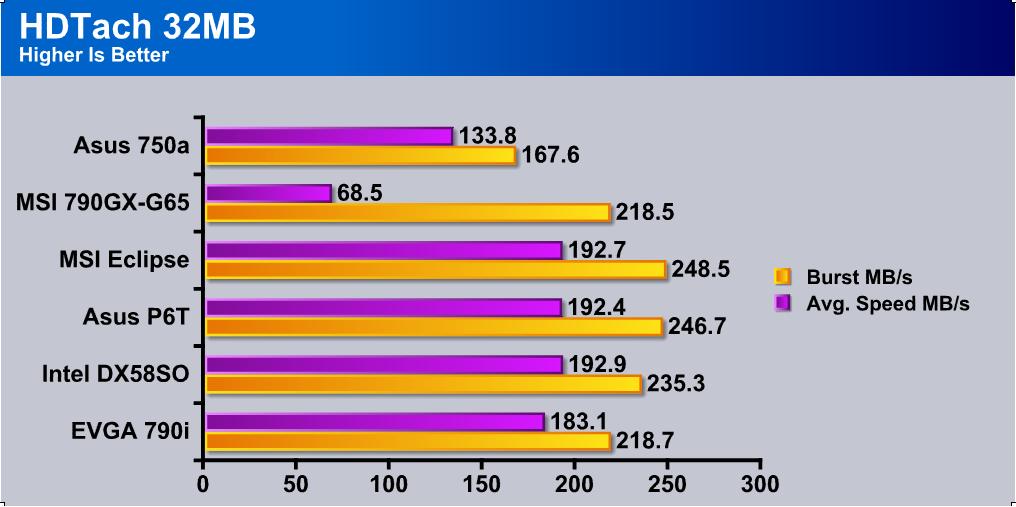
HD TACH performs sequential read and write tests on removable media and fixed disks. HD Tach is also capable of performing the sequential read and write tests on the entire disk instead of the small number of zones in the quick and long test. We opted to use the Short 8 (MB) and Long 32(MB) tests in the sequential read mode only, as sequential writes are covered by other benchmarks.
This time I was able to use my SSD and that is evident. I think any modern motherboard these days shouldn’t have any real trouble with I/O until speeds start really capping the SATA 300 barrier with SSD’s.
EVEREST ULTIMATE
“EVEREST Ultimate Edition is an industry leading system diagnostics and benchmarking solution for enthusiasts PC users, based on the award-winning EVEREST Technology. During system optimizations and tweaking it provides essential system and overclock information, advanced hardware monitoring and diagnostics capabilities to check the effects of the applied settings. CPU, FPU and memory benchmarks are available to measure the actual system performance and compare it to previous states or other systems. Furthermore, complete software, operating system and security information makes EVEREST Ultimate Edition a comprehensive system diagnostics tool that offers a total of 100 pages of information about your PC”
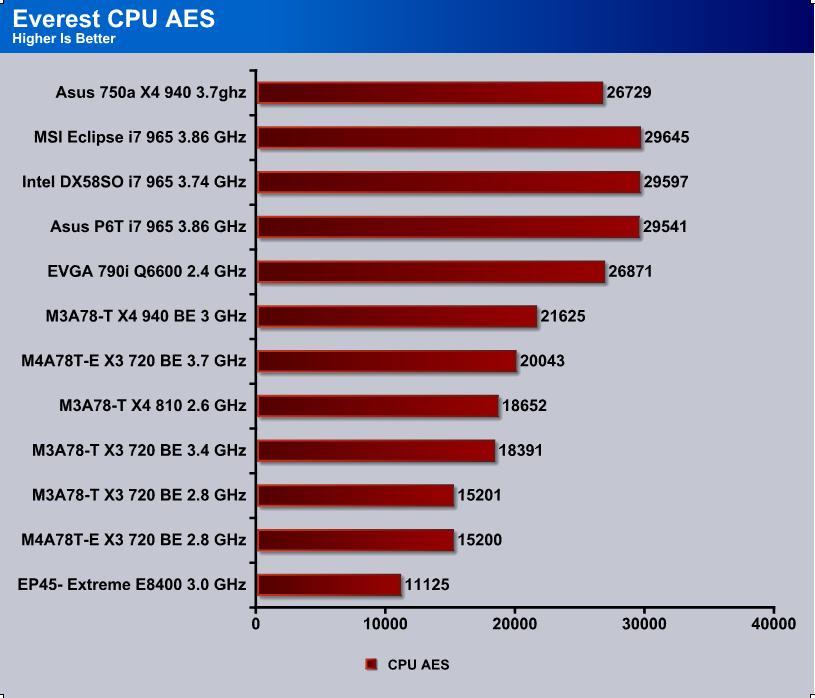
CPU AES
This integer benchmark measures CPU performance using AES (a.k.a. Rijndael) data encryption. It utilizes Vincent Rijmen, Antoon Bosselaers and Paulo Barreto’s public domain C code in ECB mode.
CPU AES test uses only the basic x86 instructions, the test consumes 48 MB memory, and it is Hyper Threading, multi-processor (SMP) and multi-core (CMP) aware.
Hands down my 940 has the advantage with an overclock of 3.7ghz. In synthetic tests a quad is the way to go. Sadly, the same can’t be said for the gaming environment.
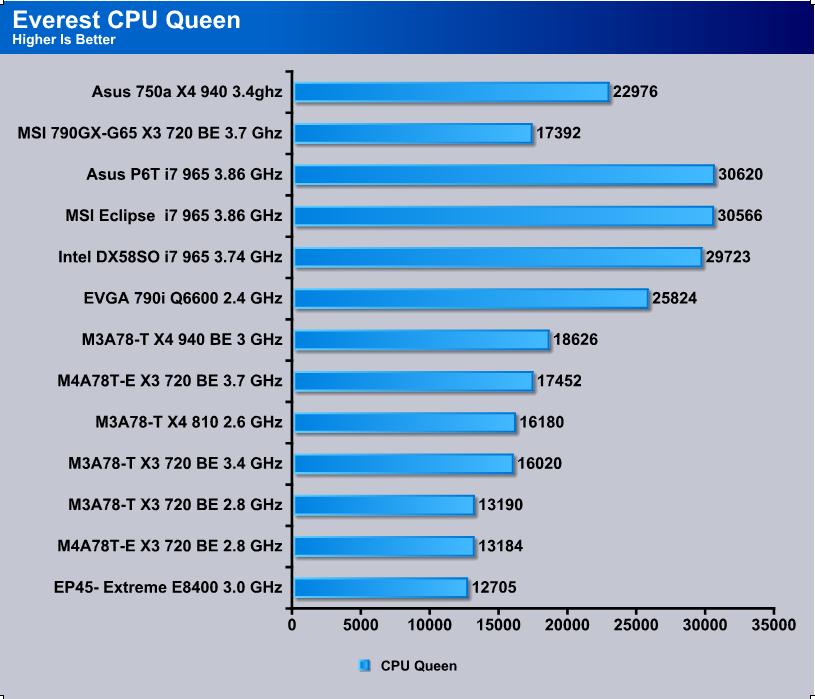
CPU Queen
This simple integer benchmark focuses on the branch prediction capabilities and the misprediction penalties of the CPU. It finds the solutions for the classic “Queens problem” on a 10 by 10 sized chessboard.
CPU Queen test uses integer MMX, SSE2 and SSSE3 optimizations. It consumes less than 1 MB system memory and it is Hyper Threading, multi-processor (SMP) and multi-core (CMP) aware.
For this benchmark I had to drop down the speed a little bit because it wasn’t completely stable. It only happened in two tests though so it’s debatable whether it is software or hardware based. As to the results, it’s sad to see even Intel’s older quads having a gain on AMD’s latest offerings.
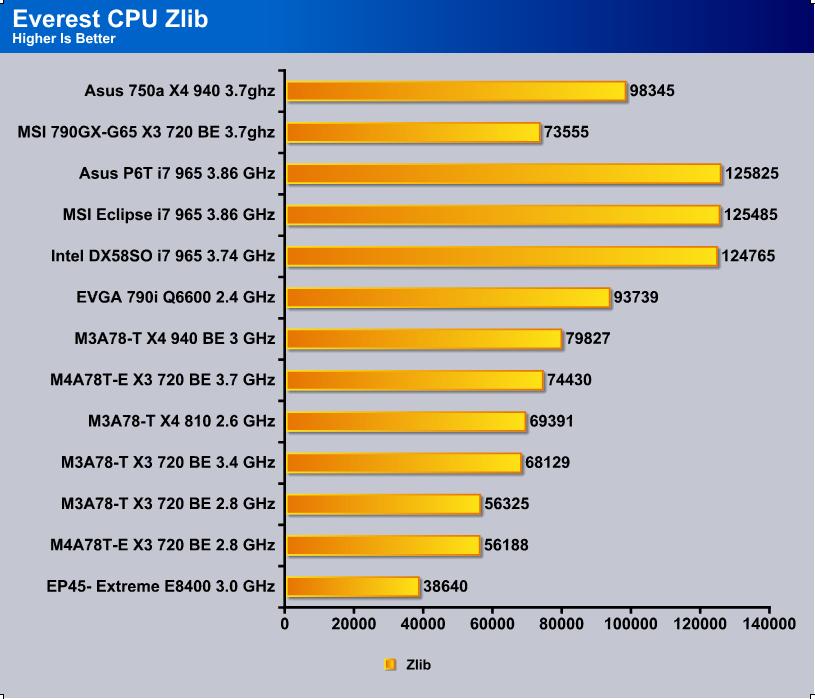
CPU ZLib
This integer benchmark measures combined CPU and memory subsystem performance through the public ZLib compression library Version 1.2.3 (http://www.zlib.net).
CPU ZLib test uses only the basic x86 instructions, and it is Hyper Threading, multi-processor (SMP) and multi-core (CMP) aware.
Were gaining an edge here finally but needed the higher clock to achieve it. Let me tell you though, the 940 at this speed is a tough contender for anything.
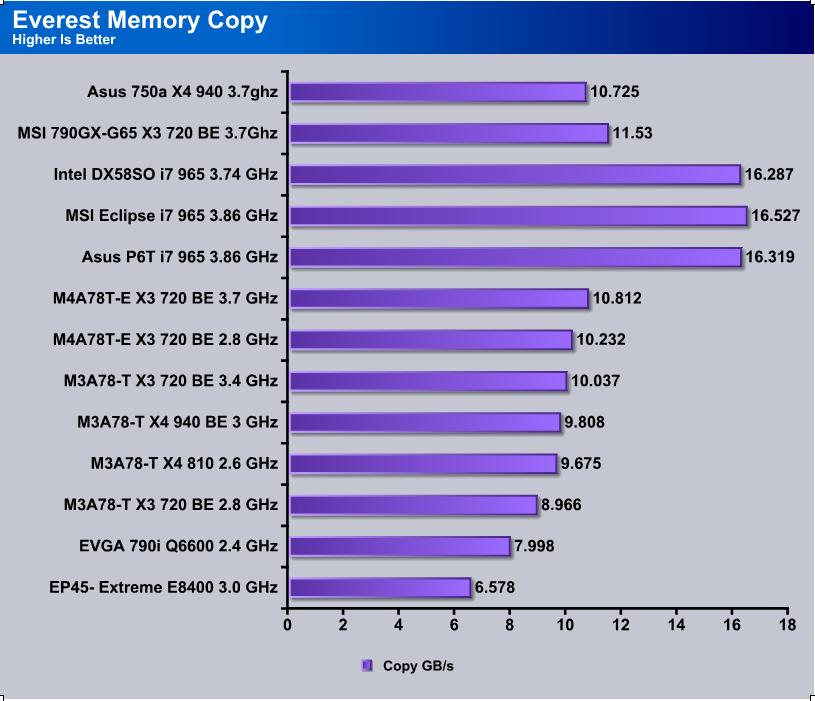
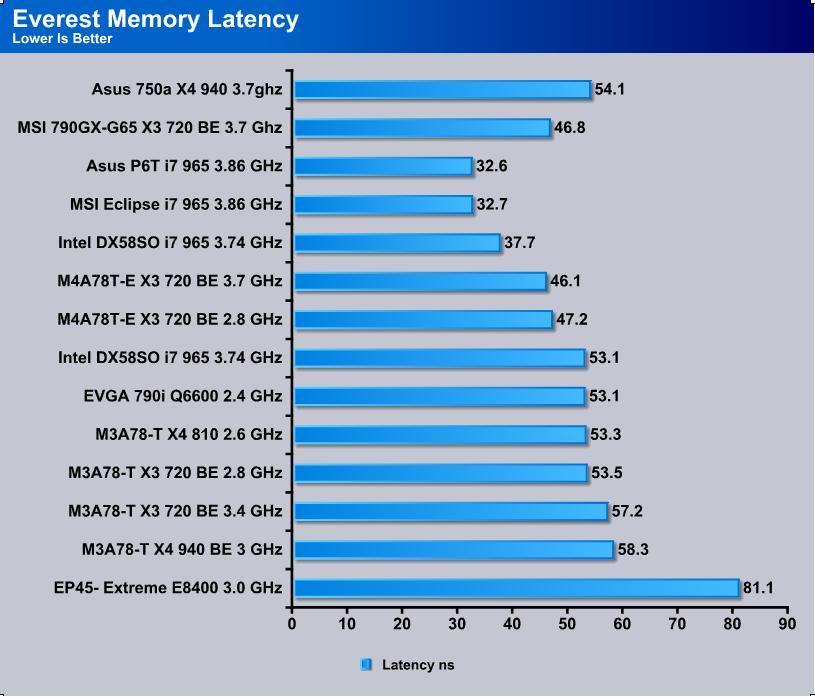
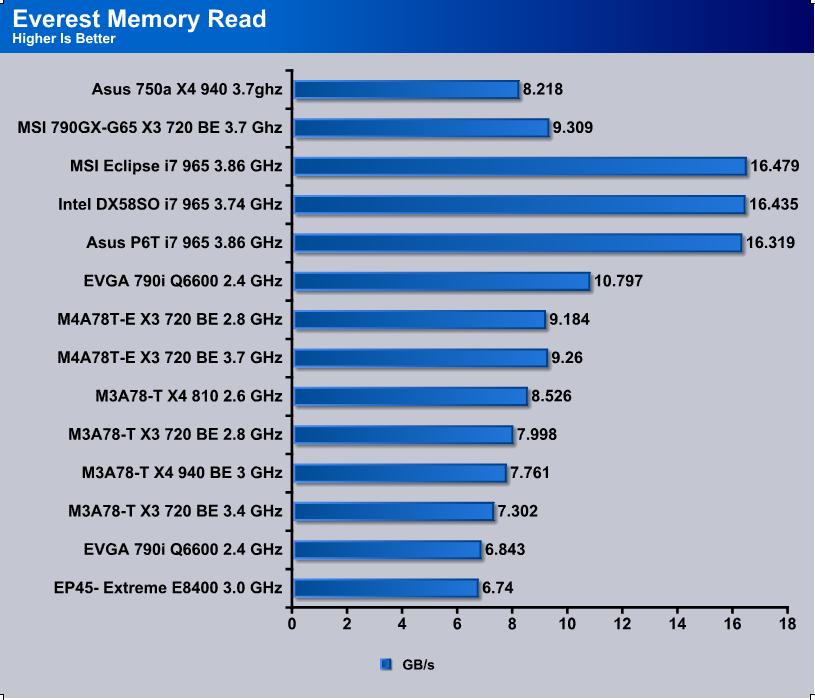
It seems that raw speed of DDR3 doesn’t lead to much gain unless you go triple-channel. The difference is minimal in real world applications as well as most synthetic benchmarks.
Speed difference is there, but as I was saying, it’s minimal compared to what you would see in real world applications.
Yet again very minimal difference. I will say though, that while using DDR3 doing regular things in Windows it seemed a bit snappier but the move to SSD caused that to go away. In terms of games and other things I do, I can’t see a difference at all while having an SSD.
SISOFT
“SiSoftware Sandra (the System ANalyser, Diagnostic and Reporting Assistant) is an information & diagnostic utility. It should provide most of the information (including undocumented) you need to know about your hardware, software and other devices whether hardware or software. It works along the lines of other Windows utilities, however it tries to go beyond them and show you more of what’s really going on. Giving the user the ability to draw comparisons at both a high and low-level. You can get information about the CPU, chipset, video adapter, ports, printers, sound card, memory, network, Windows internals, AGP, PCI, PCI-X, PCIe (PCI Express), database, USB, USB2, 1394/Firewire, etc.”
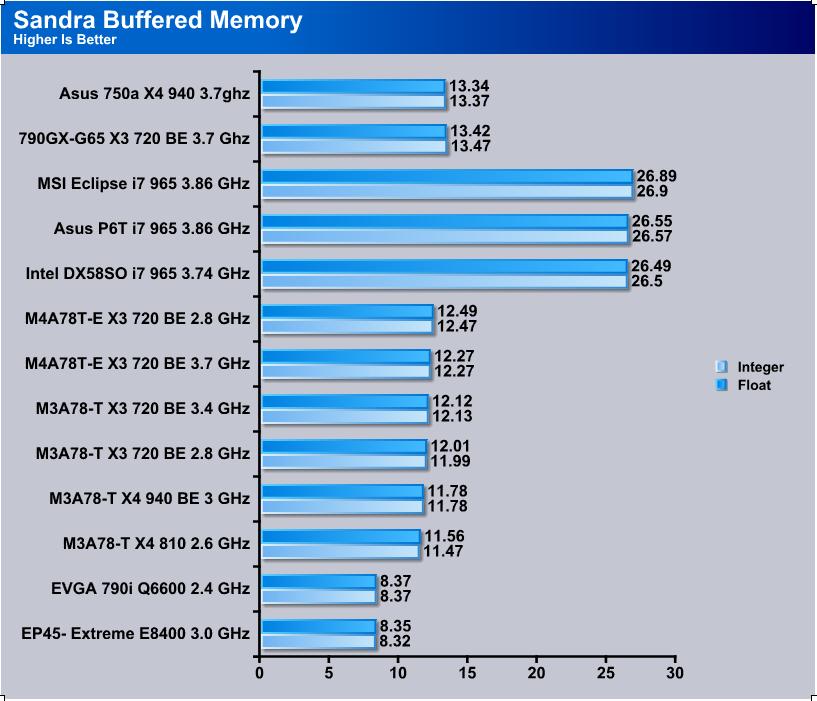
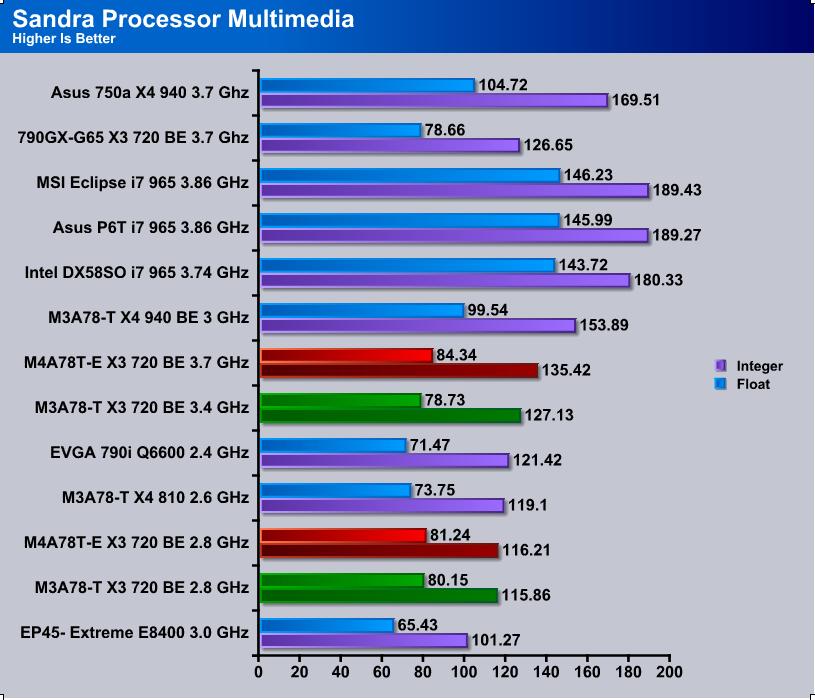
According to Sandra there is barely a difference at all between DDR2 and DDR3. I think that may be because the IMC’s in the chips are the same thing but just tweaked to run DDR2 or DDR3.
An extra core causes our 940 to out-shine the 720. I think the scores would be identical if it wasn’t for the 4th core in the 940. It also doesn’t seem to matter on chipsets either who would be the clear winner. We will see in overclocking capability though.
CPU-Z
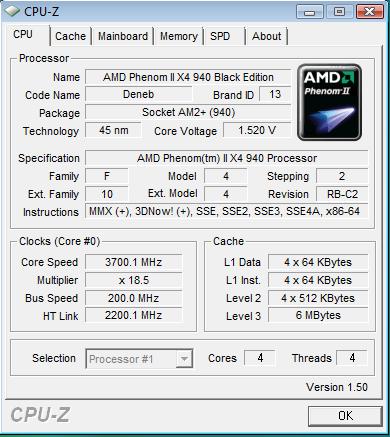
Here I will post some screenshots from CPU-Z and share my overclocking experience with this board.
As you can see, I was easily able to achieve 3.7GHz from raising the multiplier on this motherboard. Sadly though I wasn’t able to get as high as my 790FX Asus counterpart which I had a maximum overclock of 3.8GHz. If I use a little program called K10Stat I can raise the clock within Windows and 3.8GHz seems stable enough for anything else I do.
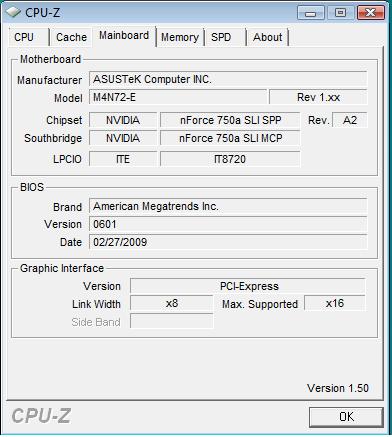
Here’s a shot of the board. Like any other 750 chipset, the PCI-E lanes are limited to 8x in SLI. Some say with PCI-E 2.0 it doesn’t really matter, but I say it does. I’m just a bandwidth hog anyways. As you can see, I am also using the latest BIOS provided by Asus for this review.
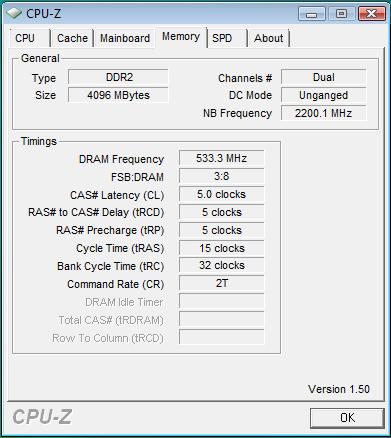
I’m using my trusty G.Skill RAM at the highest stock settings this board is capable of. 5-5-5-15 @ 1066. At these settings I am able to lower the voltage on my RAM which is good so I am really not complaining.
Overclocking
As I stated previously, I was able to achieve a clock of 3.7GHz stable using the unlocked multiplier on the CPU. I went to raise FSB to see the maximum I could push the board with just an FSB overclock because not everyone has a Black Edition processor. Well, let’s just say this didn’t go so well. I was able to achieve an overclock of 280 FSB and everything seemed to be going smoothly until it decided to crash my Windows installation on my SSD. I have found even with previous motherboards that SSD’s don’t tend to like FSB overclocks. This doesn’t seem to be the case with Intel based systems though. It’s something I will definitely look into further. This could either be a user based error or my SSD being trash, so I will not be marking the board off for this. Let’s move onto the conclusion.
Conclusion
Besides the little problem I had right here at the end of things, I would say Asus has made another fine board. There are only a few snags I ran into, yet again, like I did with the MSI 790GX. The main problem being RAM slots on the newer AM2+/AM3 boards are just way too close. If I wanted to use any kind of active cooling I would not be able to. Most newer boards on team Red are switching to strictly 16x/16x in a dual configuration that I’ve seen and this board is 8x/8x. I was trying to run SLI 280’s and I’m a firm believer that even though it’s on the PCI-E 2.0 bus it still bottlenecks a bit. Of course, I believe the processor is a bigger bottleneck but that’s not for discussion here!
Anyways, the Asus M4N72-E 750a goes for $134.99 currently. For Asus this for sure sets it right smack in the mainstream market. For all the features that the Asus M4N72-E 750a mptherboard has, I think it’s a good price for anybody wanting a good solid mid ranged board with enthusiast features. I’d say the only thing I really disliked about this board, and was disappointed not to see was no Power/Reset/Clear CMOS buttons. These are becoming quite standard and come in real good handy.
We are trying out a new addition to our scoring system to provide additional feedback beyond a flat score. Please note that the final score isn’t an aggregate average of the new rating system.
- Performance 10
- Value 9
- Quality 9
- Warranty 9
- Features 7
- Innovation 8
Pros:
+ Solid Performance from Asus name
+ Good Slot Positioning for SLI
+ Price
+ Good Overclocking Ability
Cons:
– RAM slots way to close to CPU Socket
– No Power/Reset/Clear CMOS buttons
– 8x/8x Dual card configuration
Asus proves to be on top of the motherboard market with their performance and quality. For this they receive an 7.5 out of 10 and the Bjorn3D Seal Of Approval.
 Bjorn3D.com Bjorn3d.com – Satisfying Your Daily Tech Cravings Since 1996
