INTRODUCTION
You may be thinking you have gone back in time, but no, you read that correctly. This is in fact a review of the Cooler Master Hyper 212 EVO. Cooler Master sent us the heatsink along with an AM4 mounting kit to review on the new AMD Ryzen platform. While the Hyper 212 EVO was released many years ago, it has stood the test of time, becoming one of the most popular air-coolers of all time. The proven performance record and relatively low cost of the Cooler Master Hyper 212 EVO has it a great choice for any build. Lets see if that tradition can continue when we pair it up with and AMD Ryzen build.
STANDOUT FEATURES
The Hyper 212 EVO has been around for years, so the only new feature with this review is the addition of the AM4 bracket. However, there are still a few standout features that make the Hyper 212 EVO such a great cooler.
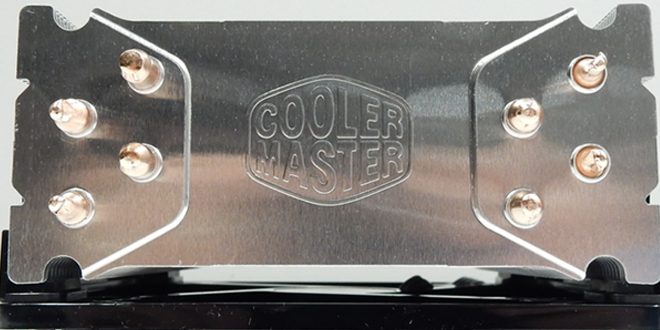
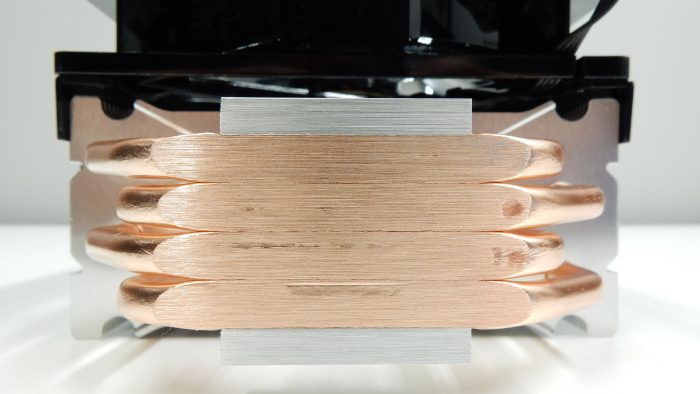
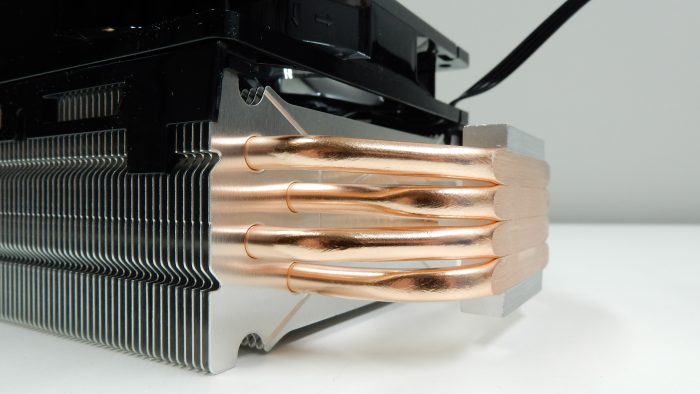
4 Direct Contact Heatpipes – Instead of providing a solid block surface to make contact with the CPU heat spreader, the Hyper 212 EVO places four copper heatpipes side by side, flattens them, and locks them in place with an upper block. Having this direct contact provides excellent heat dissipation from the CPU to the cooler.
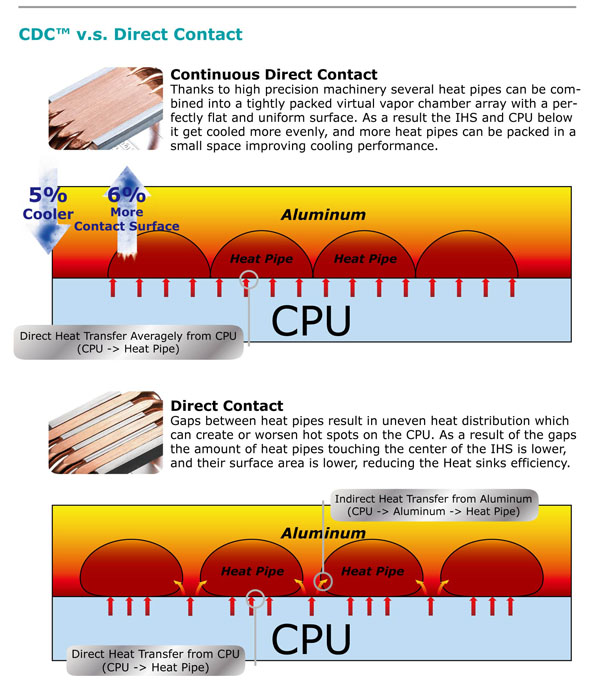
CDC Technology – The Continuous Direct Contact system places the heatpipes side-by-side with no gaps, creating a smooth surface for heat transfer. While some other coolers offer direct contact heatpipes, the Hyper 212 EVO’s CDC implementation offers 6% more contact surface, and 5% better cooling.
The following infographic from Cooler Master shows off the advantages of CDC versus traditional direct contact implementations.
SPECIFICATIONS
Below are the specifications of the Hyper 212 EVO.
| Model | RR-212E-20PK-R1 / RR-212E-20PK-R2 / RR-212E-16PK-R1(EU Version) |
| CPU Socket | Intel® LGA 2011-3** / 2011** / 1366 / 1156 / 1155 / 1151 / 1150 / 775 socket
AMD® AM4* / AM3+ / AM3 / AM2+ / AM2 / FM2+ / FM2 / FM1 socket |
| Dimension | 120 x 80 x 159 mm (4.7 x 3.1 x 6.3 in) |
| Heat Sink Dimensions | 116 x 51 x 159 mm (4.6 x 2.0 x 6.3 in) |
| Heat Sink Material | 4 Direct Contact Heat Pipes / Aluminum Fins |
| Heat Sink Weight | 465g (1.03 lb) |
| Heat Pipes Dimensions | ø6mm |
| Fan Dimension | 120 x 120 x 25 mm (4.7 x 4.7 x 1 in) |
| Fan Speed | 600 – 2,000 RPM (PWM) ± 10% 600 – 1,600 RPM (PWM) ± 10% (EU Version) |
| Fan Airflow | 24.9 – 82.9 CFM ± 10% 24.9 – 66.3 CFM ± 10% (EU Version) |
| Fan Air Pressure | 0.3 – 2.7mm H2O ± 10% 0.3 – 1.7mm H2O ± 10% (EU Version) |
| Fan Life Expectancy | 40,000 hrs |
| Fan Noise Level (dB-A) | 9 – 36 dBA 9 – 31 dBA (EU Version) |
| Bearing Type | Long Life Sleeve Bearing |
| Connector | 4-Pin |
| Fan Rated Voltage | 12 VDC |
| Fan Rated Current | 0.22A 0.19A (EU Version) |
| Power Consumption | 2.64W 2.28W (EU Version) |
| Fan Weight | 104g (0.23 lb) |
| EAN / UPC Code | RR-212E-20PK-R1: 4719512032701 / 884102012921 RR-212E-20PK-R2: 4719512035054 / 884102012921 RR-212E-16PK-R1(EU Version): 4719512032701 / 884102012921 |
| Note | *AMD AM4 upgrade kit needed, please visit: AMD AM4 Ryzen Compatibility **Supplied accessories may differ by country or area. Please check with your local distributor for further details. |
CLOSER LOOK
Packaging
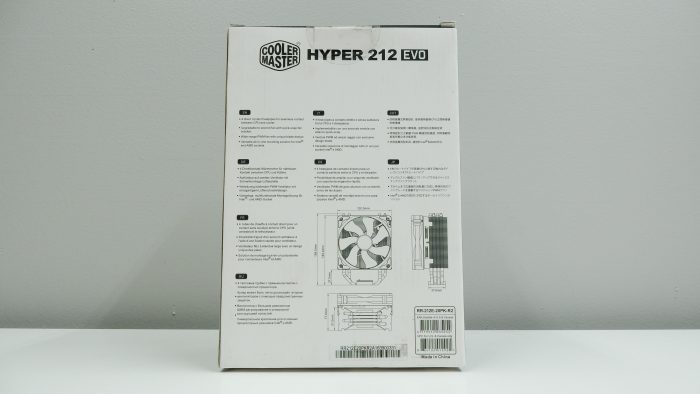
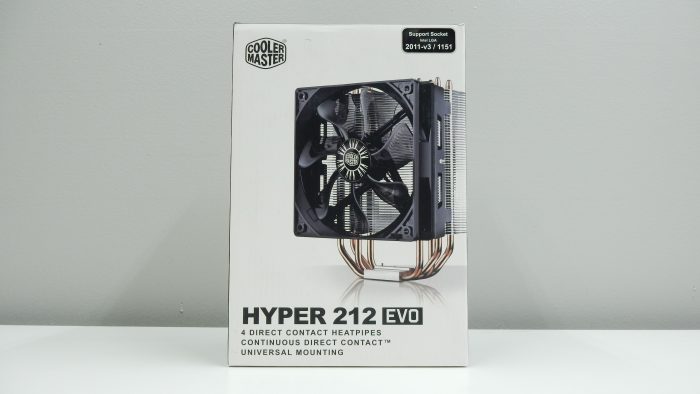
The Hyper 212 EVO comes in a rectangular box with a large image of the cooler on the front. Listed are a few of the features of the cooler, along with the mention of universal mounting capabilities.
Cooler
With the cooler out of the packaging, we see that the 120mm fan comes pre-mounted to the heatsink tower. We appreciate this detail, but installation actually requires the removal of the fan. The semi-transparent fan shroud and blades are a nice diversion from the solid black fan blades often found on coolers. The fan is a standard 120x120x25 form factor, and offers PWM control from 600-2000 RPM.
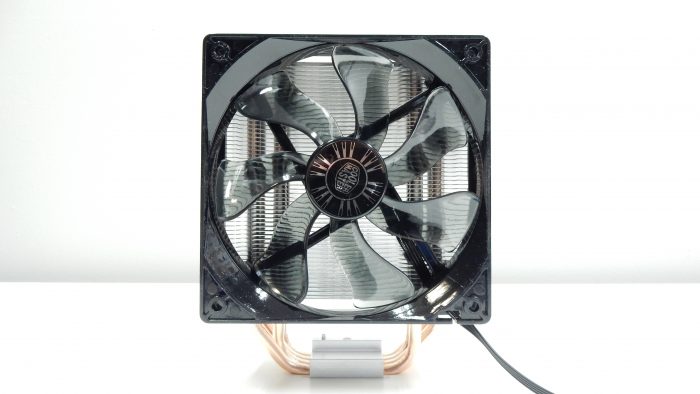
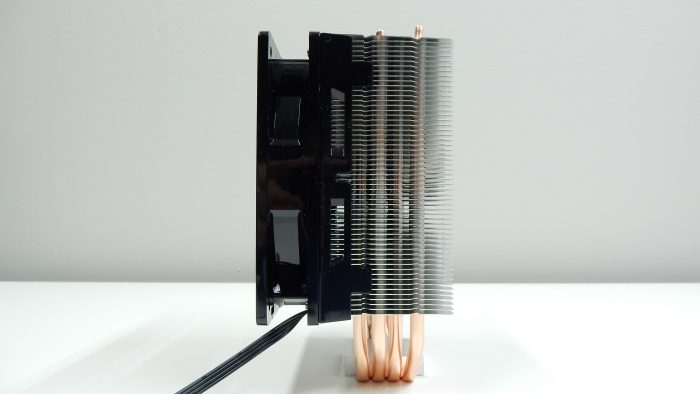
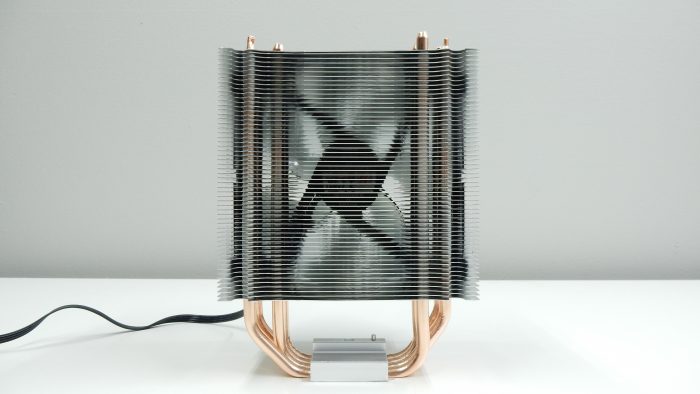
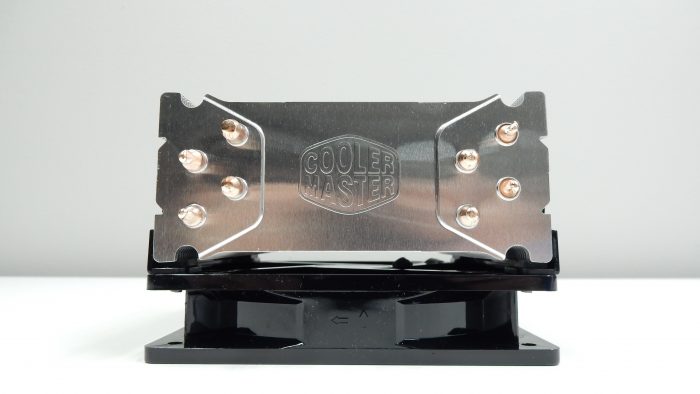
Accessories
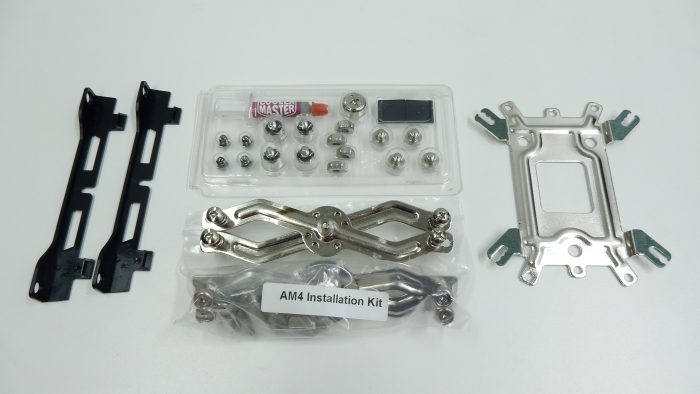
Included along with the heatsink and fan is a nicely organized installation and accessories package. On the left are the two additional fan clips for adding a second 120mm fan. Top-center is the mounting hardware for all non-AM4 systems. We assume that Cooler Master will soon integrate the AM4 hardware into the clamshell package. Along with various screws and nuts is a small tube of Cooler Master thermal paste. Below the clamshell is the standard mounting bracket arms, as well as the AM4 arms and associated screws. On the right is the backplate used in various installation types.
SYSTEM SETUP AND INSTALLATION
| Test Setup | |
| Case | Anidees AI5S Window |
| CPU | AMD Ryzen 7 1800X |
| Motherboard | ASUS Crosshair VI Hero |
| RAM | Kingston HyperX Savage DDR4-2666, 16GB |
| CPU Cooler |
|
| Storage Drives |
|
| GPU | ASUS GTX970-MOC-4GD5 |
| PSU | EVGA SuperNOVA 650 G3 |
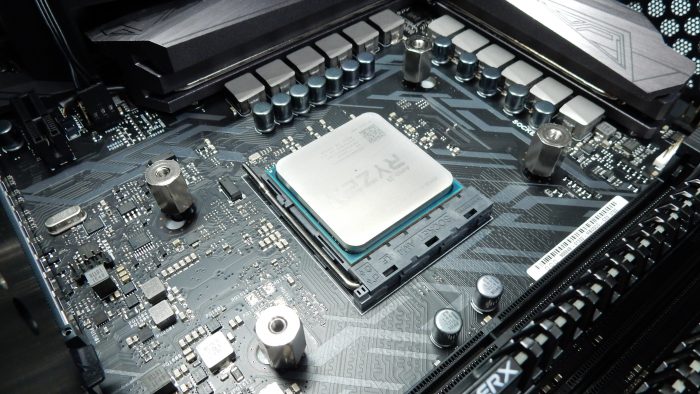
Due to the AM4 specification utilizing a new mounting bracket layout, many coolers that worked with previous AM3+ motherboards are no longer compatible with Ryzen systems. Most manufacturers, including Cooler Master, are offering free or low-cost AM4 mounting kits for users that are moving to an AM4 build but keeping their existing coolers. Thankfully, our ASUS Crosshair VI Hero motherboard features mounting options for both AM3+ and AM4 cooling solutions.
When starting to install the Hyper 212 EVO, we noticed that the included instruction manual did not provide any AM4 instructions. The instructions are also not found on Cooler Master’s website. We were however able to find a step-by-step instruction video on Cooler Master’s YouTube page. The video can be found here: AM4 Mouting Guide. Intersetingly, Cooler Master has two videos listed for AM4 brackets, both listing the same products being supported.
Before working to install the cooler, Cooler Master instructs you to remove the 120mm fan from the cooling fins to aide in installation. Our AM4 installation method relies on using the included motherboard backplate with the plastic mounting brackets removed. With the plastic brackets out of the way, the four included thumbscrews are inserted into the backplate.
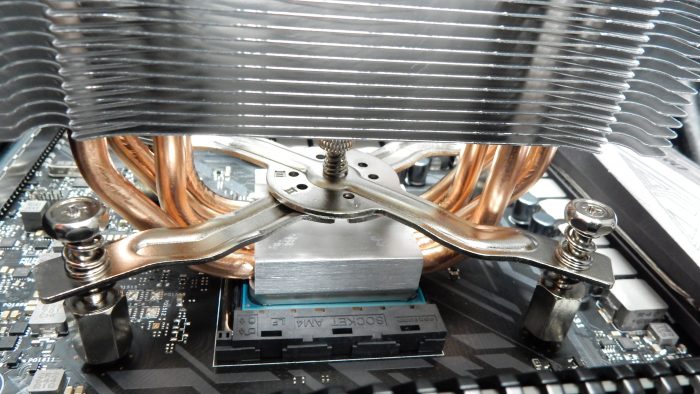
Next, the AM4 arm bracket is situated on top of the cooler base. Lowering the cooler onto the CPU and lining up the mounting bracket arms with the previously installed thumbscrews allows you to thread the spring-tensioned screws to their proper tightness.
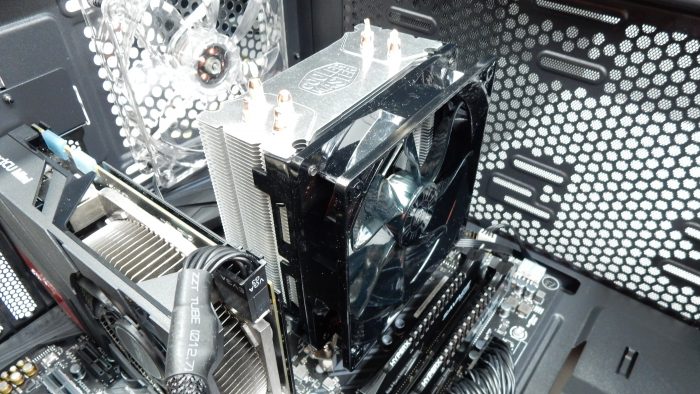
With the heatsink firmly in place, the fan can be clipped back on to the cooling fins, and the 4-pin PWM plug can be connected to the motherboard’s CPU fan header.
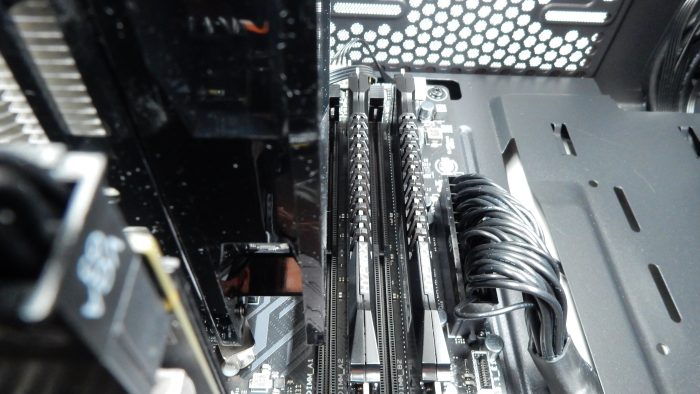
While we are currently only using two RAM sticks and clearances weren’t an issue, it should be noted that some tall RAM sticks may not be compatible with the Hyper 212 EVO’s size. To get around this, mounting the fan on the back-side of the cooler tower is an option, but we prefer a push fan configuration as opposed to pull.
TESTING AND PERFORMANCE
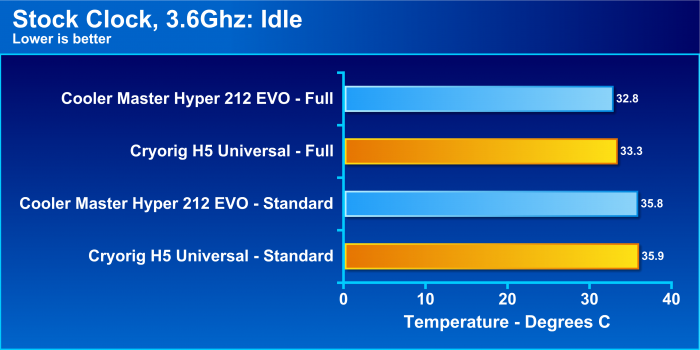
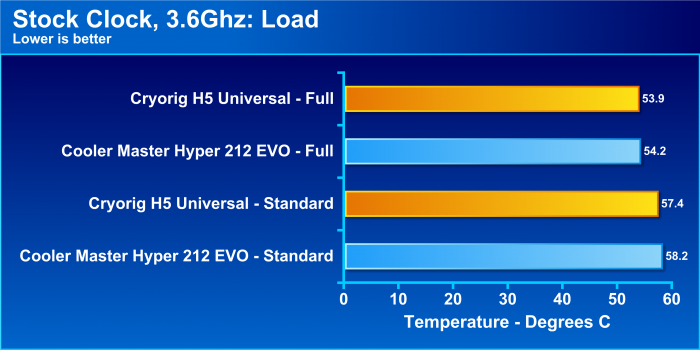
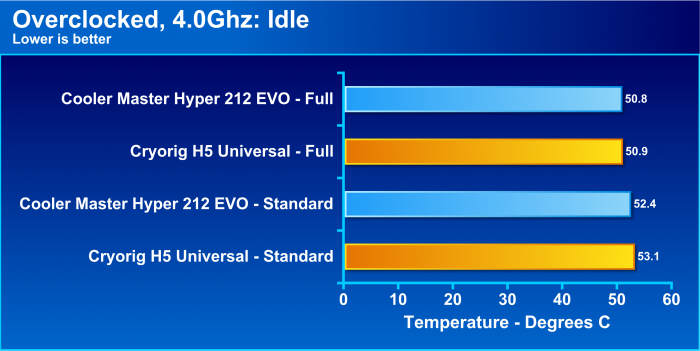
Since we are using an AMD Ryzen 7 system to test the Hyper 212 EVO, we have changed our CPU load application from the Intel Extreme Tuning Utility to the AIDA64 System Stability Test. This test is not platform-specific, so we are not limited to testing only Intel chips, like we were with the Intel Extreme Tuning Utility. With the AIDA64 test, we were able to put the CPU under a load while keeping an eye on the vitals of the processor. Our testing method consists of achieving a steady idle temperature for each cooling method, and then putting a load on the CPU for 30 minutes using the built-in stress test. Each cooler was tested at a standard speed of 800RPM, as well as at full fan speed. For the Hyper 212 EVO, that meant 2000RPM at full speed, and 1500RPM for the Cryorig H5 Universal.
Our stock clock testing was performed with a CPU speed of 3.6Ghz, achieved with a 36X multiplier and a BCLK of 100, while our overclock testing was performed at 4.0Ghz, using a 40X multiplier and a BCLK of 100. We allowed the BIOS to regulate CPU voltage in both scenarios, which showed the stock clock averaging 1.342v, while our overclocked voltage was hovering around 1.439v.
Stock Clock Performance
IDLE
At it’s most basic level, the Hyper 212 EVO was able to keep our AMD Ryzen 7 1800X nice and cool, with an average idle temperature of 35.8C, just barely beating the Cryorig H5 Universal. When we cranked up the fans to full speed, we saw a bit more of a difference between the two coolers, but still well within any margin of error. However, the added noise from both coolers at full speed is not worth the extra few degrees of cooling in our opinion.
LOAD
With a full load placed on the CPU, with all eight cores and 16 threads running at 100%, we saw the Cryorig H5 Universal just barely out-performing the Hyper 212 EVO at both standard and full fan speeds. Full speed and standard speed temperatures differences were again within less than a degree’s difference between coolers.
Overclocked Performance
IDLE
After applying our most stable overclock of 4.0Ghz to the AMD Ryzen 7 1800X, we again tested both idle and load temperatures. At standard fan speeds our idle temperatures were only slightly varied between our two coolers. Once again, at full fan speeds, the temperature differences between the two coolers was negligible. Of note is the quite large jump in temperatures from the stock clock settings. At standard fan speeds, the Hyper 212 EVO experienced an idle temperature increase of 16.6C, and at full speed the difference was 18 degrees. The degree at which you are comfortable with your overclocking performance to temperature ratio is something that can take some consideration, as overclocked hardware tends to result in a shortened lifespan due to increased temperatures and voltages.
LOAD
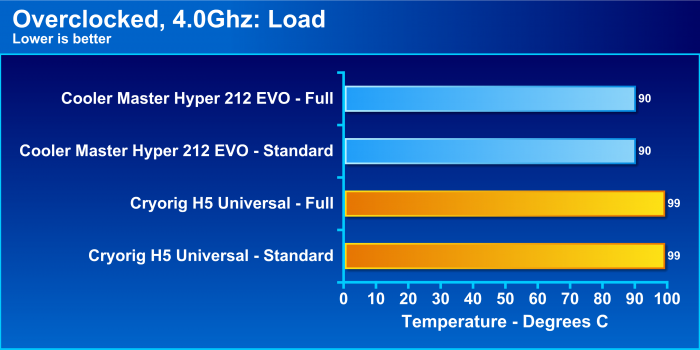
While overclocked and under a load is where we see the first significant differences between our two coolers. At this CPU speed and voltage, the Cryorig H5 Universal was not able to keep our 1800X within a comfortable temperature range, with both full and standard fan speeds reaching 99C. The Cooler Master Hyper 212 EVO was however able to maintain an average temperature of 90C. We will note that our standard fan speed profile allows for the CPU fan to run at full speed after meeting a temperature threshold of 75C. Were this fan profile to allow the fan to continue to spin at 800RPM, we would quickly run into thermal throttling and possible shutdown at the 95C mark, however we did not experience this behavior when the H5 Universal reached 99C.
Noise Output
Our testing of the Cooler Master Hyper 212 EVO resulted in a reading of 40Db from one foot away from our test bed. Cranking the fan up to its full 2000 RPMs, while providing slightly better performance, was simply unbearable at 49Db. We recommend users find a happy medium between cooling performance and sound output when tweaking their systems, as this should provide adequate cooling, while still keeping the noise level in check. As with all situations, each system will vary, so finding the right ratio of performance to noise will be up to users.
CONCLUSION
With various manufacturers working to provide cooling solutions for AMD’s AM4 platform in order to cool the new Ryzen CPUs, the cooling landscape has had a bit of a boost in excitement recently. Most major manufacturers are offering free or low-cost adapters for their existing lineups, and are also making sure that any new products include support for this new layout. And while the Hyper 212 EVO is by no means a new product, Cooler Master was interested in showing how the product performs when put to the task of cooling a top-of-the-line Ryzen 7 CPU.
The continuous direct contact solutions puts four copper heatpipes directly in contact with the CPU’s heatspreader, with virtually zero gap between the heatpipes. This implementation of direct contact is superior to other solutions that often have a small gap between each pipe.
Installation of the Hyper 212 EVO is no more complicated on an AM4 system than it is on any other platform, and the included mounting arms lined right up with the stock motherboard backplate that was found on our ASUS Crosshair VI Hero. The easily removable fan allows for direct access to the screws, and clips right back on once the cooling tower is secured. One thing to keep in mind with the Hyper 212 EVO is RAM height, as the included 120mm fan is a standard 25mm thick, and may interfere with tall RAM sticks.
Performance-wise, the Hyper 212 EVO threw no surprise punches, as we know it is a tried and true product. The Hyper 212 EVO and the Cryorig H5 Universal were back and forth on nearly every test, save for the overclocked, full-load test, where the Cooler Master solution was able to keep within safe operating temperatures, and the Cryorig unit was not. As the AM4 platform ages, we will look to continue to add additional coolers to our testing as they become available.
The value of the Cooler Master Hyper 212 EVO only gets better when you see that the MSRP is $35, but is often on sale for $25. The Hyper 212 EVO wouldn’t be found on numerous new and old builds if it weren’t a tried and true product, and our results confirm that fact. Offering great performance at a budget-build price earn the Cooler Master Hyper 212 EVO the Bjorn3D Best Bang for the Buck Award.
| Cooler Master Hyper 212 EVO Pros | Cooler Master Hyper 212 EVO Cons |
|
|
 Bjorn3D.com Bjorn3d.com – Satisfying Your Daily Tech Cravings Since 1996
