If you’re looking for a chassis that already comes with a built in fan controller, internal LEDs, excellent cooling potential, great cable management and even the possibility to run extreme gaming configurations, you should check out the NZXT Phantom 820.
Introduction
Many believe that computer chassis are only for looks, and that they do not affect the performance of a system. In most cases this is true, as long as the system built does not overpower the cooling capabilities of a chassis. However, there is a lot more to a computer chassis than just cooling performance and aesthetics. These other factors have to do with ease of use when it comes to upgrading, specific hardware support, full control over the internal settings of the chassis, including fans, LEDs, measuring probes, etc., the build quality of the chassis, how easy it is to maintain or clean the dust that gathers inside and outside the system, how quiet the system runs and potential settings to change the audibility of the system, and for most gamers, perhaps even the weight and size of the chassis. There are lot more factors to consider when choosing your next chassis for your system, but most people will stick with their old one just because upgrading their chassis would not necessarily gain them any performance, while a Solid State Drive (SSD), a new Processor, Memory, or a new GPU for example would have a big difference in everyday productivity. While any system that runs super fast is fun to mess around with, it can also become the opposite if you have to deal with lots of fan noise, poor hardware support, poor quality chassis that vibrates, and even unattractive aesthetics.
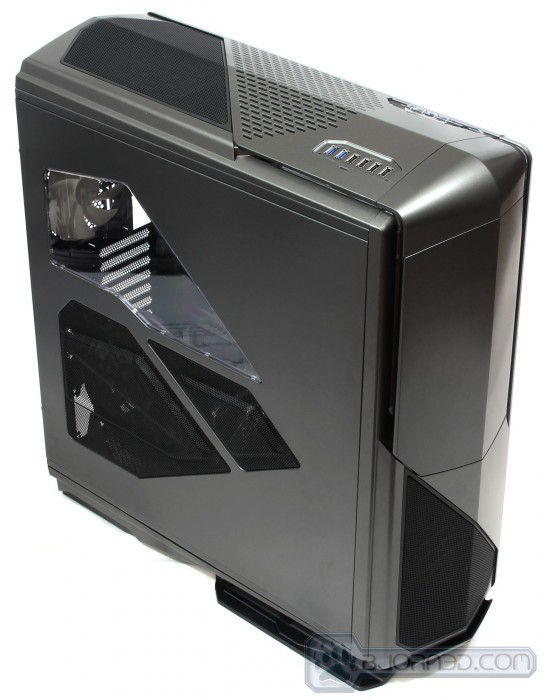
Today, we are taking a look at NZXT’s latest Phantom 820 Full-Tower Gaming Chassis. NZXT went out and completely redesigned their original mid-tower Phantom series cases to a more attractive, better performing chassis, which also comes with additional features that can only be found on high-end gaming chassis on this market at a premium price point. The Phantom 820 takes much of the features of the Switch 810 when it comes to interior design, but with a lot more improvements. While we take a look at the NZXT Phantom 820, we’ll discuss the differences between our previous gaming chassis that we used for the past year, the Cooler Master Storm Trooper, which by all means is a nice chassis, but we’ll also examine how the NZXT Phantom 820 also blows the Cooler Master Storm Trooper out of the water. Sure the price difference is a whooping $50-$100 (depending on stores), but both of these chassis share similar features: both are Full-Tower, both come with a mesh type side, top and come with fan filters, both also support USB 3.0, and come with a fan controller, but the NZXT Phantom 820 also has its own tricks up its sleeve. We’ll take a look at that in this review!
Features & Specifications
• Fully equipped with one 140mm and three 200mm fans for the high airflow and low noise
• Integrated HUE lighting for illuminating the exterior/interior of your enclosure with option to turn on/off and allow you to customize the colors at your heart’s content
• High-end water cooling solutions up to three fans for a push-pull configuration: 90mm of internal top space with top 280/360mm and bottom 240/280mm radiator support for unmatched liquid cooling
• State-of-the-art integrated 4 channel digital fan controller with 15 watts per channel and LED indicators that progressively gets brighter on high speeds and dimmer for low settings
• Easily removable filters located in the top, front, side, and bottom to prevent dust from entering your rig and simple maintenance
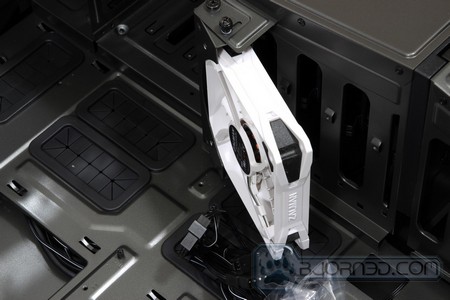
• Adjustable interior pivot 120/140mm fan slot for directional airflow
• Removable HDD cage and large storage capacity for 6 hard drives
• Dual USB 3.0, quad USB 2.0, microphone, and audio jack along with a SD media card reader for high-speed data transfer and quick access to multimedia
• Stylish acrylic window with a view to show off the interior of your rig
• Unrivalled Cooling Capacity to mount up to nine fans for a maximum airflow
• Rear I/O white light for visibility in dark environments with a toggle switch
• Extruded right side panel for an elegant look and achieves 36mm clearance for cable wire management
• Equipped with a stylish pedestal that lifts your enclosure off the ground for increased airflow.
| MODEL | Phantom 820 |
| CASE TYPE | Full Tower |
| FRONT PANEL MATERIAL | Plastic/Steel |
| DIMENSIONS (W x H x D) | 235mm (W) x 650mm (H) x 612mm (D) |
| SPECIAL FEATURES | Integrated HUE LED lighting system, SD Card Reader, 4-channel 15-watt Fan Digital Controller |
| FAN CAPACITY | Top: 2x 200mm (One included) or 2x 140mm or 3x 120mm Front: 1x 200mm (Included) Bottom: 2x 140mm or 2x 120mm Rear: 1x 140mm (included) or 1x 120mm height adjustable Side: 1x 200mm (included) Pivot: 1x 140mm or 1x 120mm internal pivot fan |
| RADIATOR CAPACITY | Top: 2x 140mm or 3x 120mm Rear: 1x 140mm or 1x 120mm Bottom: 2x 140mm or 2x 120mm Pivot: 1x 140mm or 1x 120mm |
| DRIVE BAYS | 4 EXTERNAL 5.25″ DRIVE BAYS 6 INTERNAL 3.5″ DRIVE BAYS Screwless Rail Design |
| MATERIAL(S) | Steel, Plastic |
| EXPANSION SLOTS | 9 |
| WEIGHT | 15kg, 32lbs |
| MOTHERBOARD SUPPORT | E-ATX, XL-ATX, ATX, MICRO-ATX, Mini-ITX |
Closer Look: External
Click Images to Enlarge
The NZXT Phantom 820 is one massive chassis. We realized this the moment we have received the package. To put the size in perspective, the box is larger than a standard table cabinet in height and almost as thick as one as well. The actual chassis is slightly smaller, and perfectly fits under and standard office desk with several inches of clearance between the top of the chassis and the bottom of the table. Do keep in mind though that it’s not just the height that’s big, but also it’s length. If you’re planning on placing this chassis parallel with the table, the chassis will most likely hang out on the side due to its length. If you have a L shaped table, this will not be a problem, as you can put it right in the corner, and it will be nicely out of the way, keeping your working area nice and clean, while also absorbing some of the noise coming from the system.
The box itself comes in a black and white style with the highlights and features of the chassis on the back part of the packaging. Inside the box you’ll find the chassis nicely wrapped in a plastic bag, with plastic transparent strips covering the windows and any of the other parts that could easily get scratched during shipment. The whole chassis is protected by Styrofoam pads on the sides with also another softer foam like padding on the top that also contains the accessories in a neat organized box. The manual can be found right on top of the accessory box.
Click Images to Enlarge
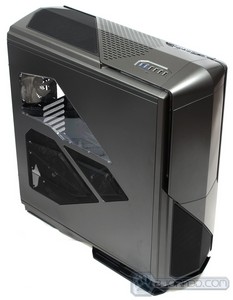
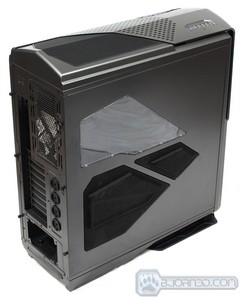
The actual size of the chassis is 235 mm (W) x 650 mm (H) x 612 mm (D). Make sure it fits in your room before ordering this chassis. As we can see the general design of the chassis follows the original Phantom series design NZXT used several years ago, and even today on their mid-tower series Phantom chassis. This particular chassis comes with a gunmetal finish, but you can also get a white or black version of the Phantom 820. What we particularly like about this specific finish, is that it has a nice contrast between the black mesh colors on the front, side and top of the chassis. The design might not suit everyone’s taste, however, once we take a look at the features the Phantom 820 comes with, you might change your mind.
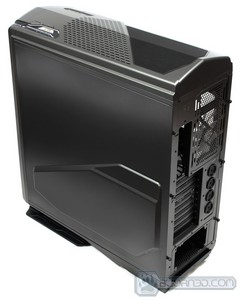
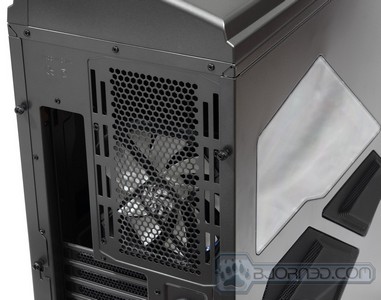
From these first few pictures, we can see that the left side panel comes with a neat window on the side, which will allow you to show off and also check out your hardware while the system is running. The mesh part of the side panel comes with a 200 mm fan, which can be attached to the fan controller on the top of the chassis. We’ll go into more detail about that later. The front of the chassis also has a quiet 200 mm fan, which is automatically already attached to the fan controller. The right side of the side panel is fully closed with no mesh work for ventilation. We can see a slight bulge on the right side panel, which not only adds to the design of the chassis, but also allows for more cables to be tucked away behind the motherboard tray for cable management.
The front panel of the chassis is easily removable for easy fan filter cleaning, although we’ll go into that more later. The front also has a door which goes with the design of the chassis to keep its look nice and clean. Behind the door you can find the 5.25″ drive bays where you can install optical drives, fan controllers (though you’ll most likely won’t need it because one is already included on the top of the chassis), and even other accessories, perhaps for internal water cooling loops.
Click Images to Enlarge
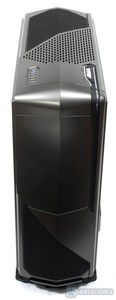
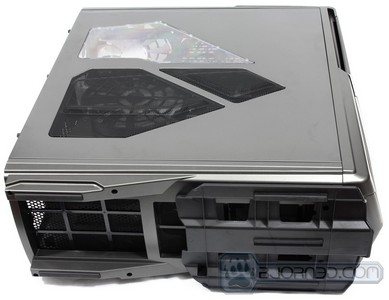
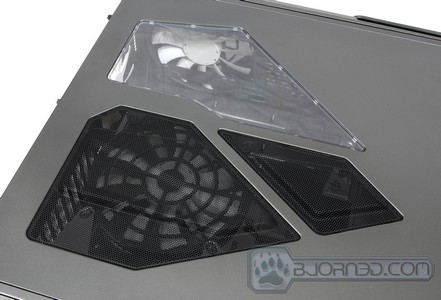
Here we have a few more photos of the exterior of the chassis from other angles. On the top of the chassis we see a division between a black metallic type mesh, while the middle portion of the chassis has a different mesh cutout for air circulation. As we’ll take a closer look at the chassis, you’ll see that while there is a single 200 mm fan already installed on the top of the chassis, you have the possibility to install yet another 200 mm fan if needed. The top bezel of the chassis is also removable, however it takes a bit more force than the front panel. Once the top is removed you also have a fan filter there and you have the possibility to also mess with the hardware already installed there in case you’re going for a different type of configuration, such as an internal water cooling setup.
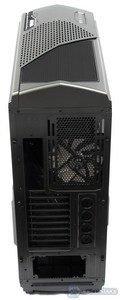
The rear of the chassis sports a 140 mm fan but it can be replaced with a 120 mm fan as well if needed. The fan in the rear is adjustable, meaning that you can slide the fan up or down, depending on what type of hardware configuration you are running. This is perfect for different motherboards and different cooler configurations. You can of course also install a 120 mm or 140 mm radiator in the back for an internal water cooling loop for the CPU or other hardware. Next to the fan we can see the I/O section of the chassis, and below that 9 expansion slots for even XL-ATX or E-ATX motherboards that might be capable of running 4-Way SLI or CrossfireX configurations. The nice part of this case is that it comes with built in LEDs in the rear right under the fan, and right at the top of the I/O Shield plate location. This allows you to have a lit rear when connecting cables to your system. This comes handy especially when there is limited light under a table and you are looking for a port to connect your devices to.
Next to the expansion slots, you will find four water cooling pass-through grommets, and below that the PSU mounting location. The side panels are held in place by three screws, but only the top and the bottom screw needs to be removed. The third screw in the middle can be slightly released and used as a lever to detach the side panel from the chassis, and then click it back into its position once you are ready to place it back.
Click Images to Enlarge
Let’s take a closer look at the exterior features of the Phantom 820. When the front door is opened, there are a few things to notice. First off we can see a LED Mode button. This button allows the user to turn on or off the LEDs built into this chassis. The LED Mode options include:
- Turn ON Both LEDs (Interior lighting, and exterior chassis lighting).
- Turn Only Interior lighting ON.
- Turn Only the Exterior lighting ON.
- Turn OFF all the lighting.
The slot right next to the LED Mode button is a SD card reader to make it easy to download your photos and files from an SD card. It’s always so much trouble to pull out the camera cables and connect the two devices together, so this makes it easy to transfer your files without having to keep a dangling cable around. The Hue Change is a rotating wheel, which allows the user to change the hue or the color of the LEDs on the chassis. This will change both the exterior and the interior LED colors, so you cannot adjust both separately. Finally the I/O LED switch allows you to turn ON or OFF the LEDs at the rear of the system by the I/O ports.
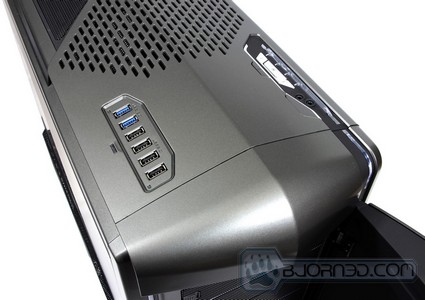
On the right hand side on the top, you’ll find the main Power and Reset switch along with some other buttons. The large gray button right by the black outline is the Power button, while the Reset button is slightly towards the back and is just a bit smaller. Next to the Power Button you will also have the Headphone and Microphone jacks. The hard drive activity is LED is located on the other side of the chassis, but we’ll take a look at that next. Next to the RESET button, you will see three larger metallic looking buttons. These allow you to control the fan speed within your system. This is a built in 4-channel 15W Digital Fan Controller, which gives you the option to change the speed of up to 12 fans total. Each channel has 3 fan leads, meaning that you can change the speed of three fans at once. While changing the speed of each fan separately is not possible, you can hook up the fans in a way that will suit you the most. The middle button allows you to switch between the 4 channels, and the top and bottom button allows you to speed up, or slow down the fans. This fan controller allows you to completely turn the fans off, or have them run at full 100%. The disappointing part on the Cooler Master Storm Trooper was that the fan controller was very limited and you could only attach up to 3 fans to the fan controller. After than you could only adjust all the fans at once with only 3 speed levels. Even the lowest fan settings would keep the fans running at a fairly high speed causing a lot of noise. The NZXT Phantom 820 deals with this problem easily.
Click Images to Enlarge
We’re not yet done with the exterior. There are a lot more to look at. As we said, this chassis is packed with features. The door in the front is held in place with magnets. They are fairly easy to open, because you have a full grip at the door, even when it’s closed, and the magnet is powerful enough to keep the door closed even if have the case on its side. You will notice that there are four 5.25″ drive bays available, however, there is no included 5.25″ to 3.5″ converter, which means that you won’t be able to use anything smaller than 5.25″, unless you get your own adapter. The nice thing about the front covers are that they do come with a fan filter, and they are also easily removable with the latch on the side.
The left side of the chassis has 2 x USB 3.0 ports using internal USB 3.0 connectors, and 4 x USB 2.0 ports. The little LED right next to the USB ports is the Hard Disk Drive activity LED.
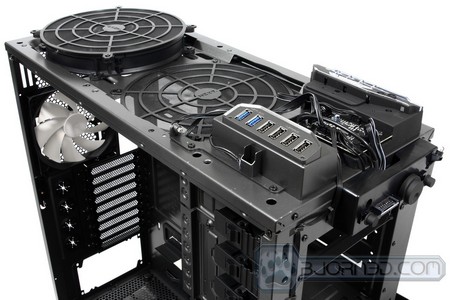
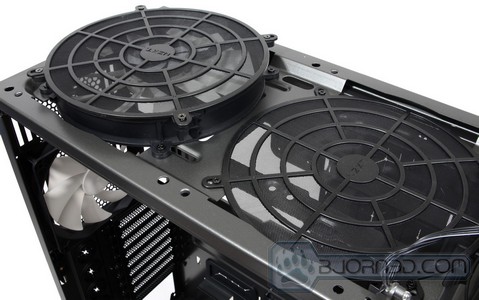
As mentioned earlier, the top of the chassis comes with two different types of meshes, which comes with a 200 mm fan already pre-installed, but you can also add yet another 200 mm fan right next to it. Fan filters are included with both fans, but they are not as easy to take off as other parts of the chassis. This is where the Cooler Master Storm Trooper has its advantage. What Cooler Master did was they added a removable fan filter that slides out from the rear of the chassis.
Click Images to Enlarge
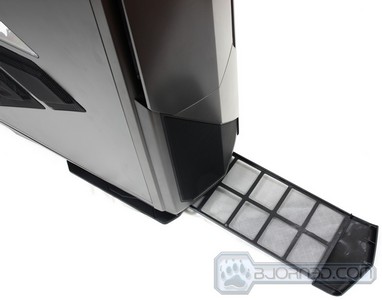
Here we have a closer look at the fan filters that can be easily pulled out from the bottom of the chassis for easy cleaning. They are held in place with a pin that allows you to gently push on the fan filter and it will automatically pop out. The bottom of the chassis comes with a front feet, with plenty of rubber to keep the chassis steady on your floor or table, and to keep it from vibrating during operation. The feet can be removed depending on what you’re going to do with the system.
Click Images to Enlarge
Here we have a closer look at some of the points of the chassis that we have already discussed in more detail at the beginning of our closer look. But the key parts to notice are that adjustable fans, the 9 expansion slots, and the 200 mm side fan which also comes with a fan filter.
Closer Look: Internal
Click Images to Enlarge
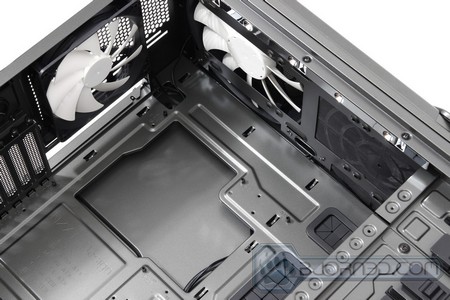
Now that we’ve checked out the exterior of the Phantom 820, lets dive into what the interior has to offer. After removing the side panel, we can see the actual 200 mm fan installed on the side with a fan filter right behind it. The interior of the Phantom 820 looks very much like the interior of the Switch 810, with the exception of the hard drive bays which take on the Phantom series look. There is a large cutout on the motherboard tray, which allows the installations of heavy tower coolers or water cooling units that require a back plate without having to remove the motherboard from the chassis. This makes it very convenient for those that like to upgrade their system often. The motherboard tray is not removable, but this is not necessarily a problem. A lot of older chassis had to have a removable motherboard tray, but with cable management and motherboard cutouts, this is hardly necessary now. There are also plenty of holes all around the motherboard tray with rubber grommets, to keep the looks professional and clean. These holes will allow us to easily pass through cables and hide them behind the motherboard tray for cable management. Cable management helps keep the cables out of the air circulation within the system, providing better temperatures for your hardware installed in the chassis.
Click Images to Enlarge
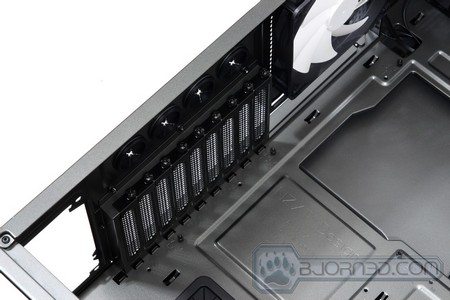
Some of these photos highlight some aspects of the chassis we already discussed on the exterior portion of the Phantom 820, which include the 9 expansion slots, the 140 mm exhaust fan on the rear, and a 200 mm exhaust fan on the top. The 9 expansion slots allow you to use massive motherboards, including the XL-ATX motherboard form factor, with up to 4-way SLI or CrossFireX configuration. The rear 140 mm fan is adjustable in its position, and can be moved up and down.
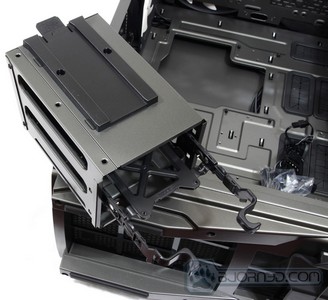
There are 4 x 5.25″ drive bays and up to 6 x 3.5″ drive bays for storage devices. The bottom 3.25″ drive bay compartment can be removed, and the bottom of the chassis can be used to hold a 240 mm radiator, however, it will depend on the user’s needs whether this will be something they can live without or they would like to keep in their system. Its similar to the Cooler Master Storm Trooper which also allows the user to remove the drive bay storage compartments in order to fit additional radiators for internal water cooling solutions. Only difference however is that the Phantom 820 allows for more serious water cooling solutions due to its clearance within the system. You not only can fit a standard radiator in the Phantom 820 with fans on one side, but you could technically fit a thick radiator with fan shrouds on both side and fans in a push pull configurations as well without getting in the way of the motherboard. Of course if you’re planning on building the ultimate interior water cooling setup in the Phantom 820, with a 240 mm radiator on the bottom and a 360 mm radiator on the top, you will have to compromise some options within the chassis, like the bottom two hard drive compartments, and the top 5.25″ drive bay areas.
Click Images to Enlarge
If we take a closer look at the storage compartments, we can see how the bottom compartment easily slides out with the help of the two clips on the drive bay. Once removed, there are two tool-less designed hard drive cages included, which will allow you to snap the hard drive into it and just slide it back into the storage compartment. Do keep in mind that if you’re installing an SSD, you will have to use screws, unless the SSD is already in a 2.5″ to 3.5″ adapter. The holes on the side of the storage compartments allow air to pass through to cool your hard drives and SSDs while the system is running. Unfortunately, none of the storage compartments are hot-swappable, but this is more than likely not an issue on a gaming chassis. On the side of the top 3.5″ drive bay compartment, which is non-removable, and can hold up to 4 devices, you will notice a metallic extrusion. This flap that hangs off the side is an adjustable fan mount, where you can install an optional 120 mm or a 140 mm fan. The fan can be adjusted to blow air either towards the memory and CPU, or towards the graphics cards in the PCI-E lanes.
Click Images to Enlarge
The Phantom 820 comes with tool-less optical drive installation as well. When we say tool-less, we mean it, because many chassis claim they have a tool-less hardware installation, but most still require screws or other parts that require a screwdriver to keep certain hardware in place. The Phantom 820 does not have this problem. The moment you slide in an optical drive, it automatically locks itself into its position, and it will not budge. You will have to unlock the optical drive with the switch on the side of the drive bays.
The top of the chassis comes with built in LEDs. These LEDs as we mentioned earlier can be turned ON or OFF, and can also change between all the colors in the rainbow. A perfect solution for those that love to have interior lighting in their system and like to show off their hardware through the side window. The Cooler Master Storm trooper does not come with this option, making the user have to go out and purchase his own LED kit if he wants to set up some lights within their system.
There are also plenty of cables included with the chassis, including 12 fan leads, two power cables, a USB 3.0 cable, standard USB 2.0 cables, Audio cable, and of course the front panel switch and LED cables. Of course a Molex power cable and a SATA power cable needs to be connected to take advantage of the fan controller, and the internal LEDs on the chassis, otherwise these features will not work. The way the 4-channel fan controller works is by having 3 fan leads on each channel:
- Front (3 x 3-Pin fan header)
- Rear (3 x 3-Pin fan header)
- Top (3 x 3-Pin fan header)
- Side (3 x 3-Pin fan header)
Attach the fans to each of the labeled cables to take advantage of controlling each of those channels separately. We ended up hooking up even our CPU cooler fans to the Top fan headers, which means that when we change the fan speed on the top chassis fan, our CPU cooler fan speed will also change. Once again the CM Storm Trooper is missing an advanced fan controller, though it does have its basic 3 speed fan controller, which most of the time barely makes any difference.
Click Images to Enlarge
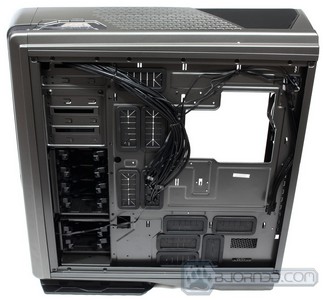
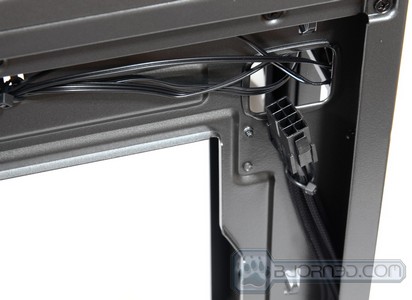
On the back of the chassis, you will see all the cables that come with the chassis. You have to most likely have to untangle these cables and figure out where each will go and hook up. It’s like deactivating a time bomb: so many cables, and so little time before you want to fire up your system. Do keep in mind that the neater the cable management, the easier it will be to upgrade your system in the future, so take your time with the cable management. NZXT also included an 8-Pin CPU extension cable, which can help you extend the length of your 8-Pin power supply CPU cable due to the size of this chassis. Some PSUs might not come with long enough cables. Additional extension cables can be found on NZXT’s official site if you end up needing other cables.
Finally, we can see the hard drive cages, which can also accommodate SSDs for the top 3.5″ drive bay compartment.
Click Images to Enlarge
Both the front and top panels of the Phantom 820 comes off by just pulling on them. They might require a little bit of force to get off, this is just to prevent any accidental detaching while carrying the chassis from one location to another. The front 200 mm fan filter is attached to the front panel, so taking it off from the front panel will be necessary before it can be cleaned. After the top panel is off, we can see the circuitry for the Fan and LED controller, the top exterior USB ports, and much more. We can also finally see how the fan filters are attached to the top 200 mm fan and how an additional 200 mm fan can be installed later. These fans can be taken out as well and replaced with a thick radiator with a push pull design, without having any clearance issues with the motherboard. This is one features that we leaked in the Switch 810, that is also available on the Phantom 820.
Hardware Installation & Cable Management
Click Images to Enlarge
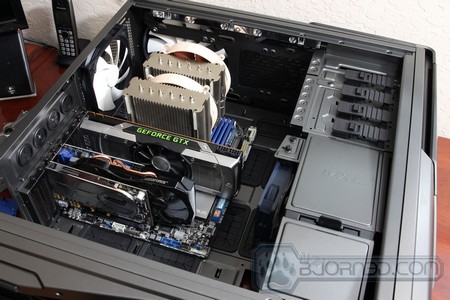
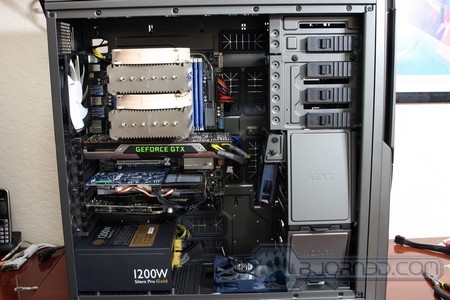
Installing the hardware in the Phantom 820 was a pleasure. The fact that there is so much space within the chassis is great, because you never run into a problem of finding awkward ways to twist your hands and arms to get to certain places or to connect certain cables like say the 8-Pin CPU power connector, once your CPU cooler has already been installed. As you can tell, we’ve installed lots of hardware, including a Nvidia GeForce GTX 690 in the top PCI-E slot, a GIGABYTE GTX 650 Ti 2GB OC video card as a dedicated PhysX card, and also an ASUS Xonar Xense audio card. We’ve used a massive CPU cooler, the Noctua NH-D14, and we’ve positioned it vertically for specific reasons. One, with the two massive 140mm fans, and the design of this specific motherboard, the cooler gets just as close to the other hardware being horizontally as when it is mounted vertically. The other reason is, by having it sideways, we get slightly different positioning of the cooling towers, making it easier to install and remove memory from the memory slots, and finally, this way, we’ve noticed that our temperatures might be slightly higher by one or two degrees Celsius on the CPU, but we’re also taking care of the hot air that gathers between the video cards that would otherwise just linger around the chassis, and possibly even getting trapped if you use multiple GPUs in SLI. As you will see in our testing, this configuration is just fine for even an overclocked system at 4.6GHz while running on low fan settings.
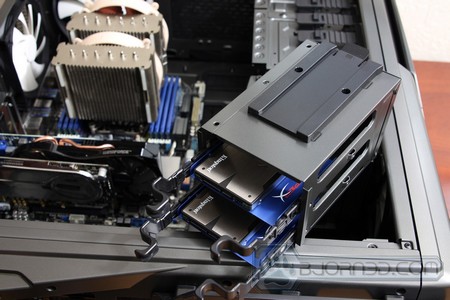
The 2nd picture indicates two SSDs mounted in the lower section of the hard drive bays.
Click Images to Enlarge
The following pictures take a look at more hardware installed, including three hard drives in the upper hard drive bay. Its as simple as popping the hard drives into the provided hard drive cages, and sliding them back in to the hard drive bay. All of this can be done without any tools, so NZXT made it fairly nice that you can upgrade your system tool-less.
The other image shows us the cable management done after installing all the hardware in the system. We spend about 1-2 hours on cable management, making sure that side panel closes without any problems even when we are running so much hardware in our system. If you notice from previous images we looked at on the closer look part of this review, you can see that the chassis cables have been tucked away on the left side of the chassis around the hard drive bays behind the small flap, and routed around the bottom. This helped us get rid of most of the cables and make this system look tidy even with all this hardware. The rest of the cables, like the SATA, and power cables had to be routed through the rubber grommets because they had to be connected all around the motherboard. Thankfully NZXT, provided a lot of available spots where you can route your cables, and they also provided plenty of hooks on the back of the motherboard tray to nicely tie the cables to the motherboard tray.
Click Images to Enlarge
Here we have a closer look at how certain cables can be managed. For those running multiple storage devices, it is a good idea to tie together chunks of cables, especially the SATA data cables. Their nice rectangular strip type design allows us to even tie together 5-6 cables with one zip tie. This can drastically improve looks, and make it easier to later upgrade your system without having to look for cables.
We can see on the other image that all the chassis cables have been routed on the edge of the chassis, just like we have explained in the previous sections.
Click Images to Enlarge
And finally, here we have the finished system with the cable management, and two additional fans installed on the bottom and on the adjustable hard drive bay fan mount. As you can tell, even with so much hardware, it is possible to still keep the system super tidy with the cable management provided in the NZXT Phantom 820 chassis.
Click Images to Enlarge
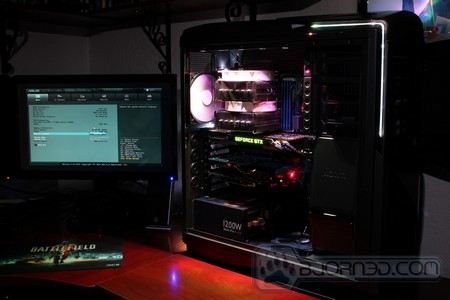
The NZXT Phantom 820 comes with built in LEDs that not only glow in the inside of the chassis, but also at the rear where you have to connect your cables to the system. This is nice because you never have to search for the ports on the back of the system when you’re trying to attach a device while the system is running, especially if you’re in a dark area and you don’t have enough light. The internal LEDs are attached to a LED controller in the front that allows the user to completely shut down the LEDs, or switch between only internal lighting, or just the outline lighting of the chassis. You can of course disable both or leave both of them on as well at the same time. The LED controls also allow you to change the hue of the LEDs, meaning that you can go between any color in the rainbow to select a color that you like. Here we have a few examples of Green, White, and Blue, but you also have the option to go crazy with lime colors, red, pink, purple, cyan, and many more colors.
Click Images to Enlarge
Here is a final look of the system running through the window on the side panel.
Testing methodology
Our testing methodology is rather simple for cases. We let the system idle for 30 minutes and we measure temperatures. Then we turn on OCCT to load the video cards and the processor to 100%. After 20 minutes of 100% load, we measure the overall temperatures. If there are multiple fan settings available, we test the lowest and highest fan settings.
Test Rig
| Test Rig | |
| Case | NZXT Phantom 820 Full-Tower Gaming Chassis |
| CPU | Intel Core i7-3960X Extreme Processor |
| Motherboard | ASUS P9X79 WS LGA2011 |
| Ram |
Kingston HyperX Genesis 32GB (8x4GB) DDR3-12800, 1600 MHz
|
| CPU Cooler | Thermaltake Frio OCK |
| Hard Drives |
|
| Solid State Drives | 2x Kingston HyperX 240GB 3K SSDs |
| Optical | ASUS DVD-Burner |
| GPU |
|
| Audio Card | ASUS Xonar Xense Dedicated Audio Card |
| PSU | Cooler Master Silent Pro Gold 1200W |
| Mouse | Razer Imperator BF3 Edition |
| Keyboard | Razer Blackwidow BF3 Edition Mechanical Keyboard |
Results
Temperatures and Noise
CPU Measured with CoreTemp and averaged all cores. GPU temperature measured with MSI Afterburner and averaged all GPUs. Motherboard temperature measured with Ai Suite II.
Here are the temperatures we got from our testing:
| Temperature (Low Fan Settings – Almost Silent System) | ||||
|---|---|---|---|---|
| Idle | Load (OC 4.6 GHz) | |||
| CPU | 29 C | 71 C | ||
| GPU | 35 C | 72 C | ||
| Motherboard | 31 C | 40 C | ||
| HDD | 28 C | 31 C | ||
| Temperature (Max Fan Settings) | ||||
|---|---|---|---|---|
| Idle | Load (OC 4.6 GHz) | |||
| CPU | 27 C | 66 C | ||
| GPU | 31 C | 69 C | ||
| Motherboard | 29 C | 38 C | ||
| HDD | 26 C | 29 C | ||
The temperatures we have measured during our testing are well within acceptable temperatures for all of these hardware parts. Having an overclocked six-core CPU running at 4.6 GHz and a system that almost puts out no audible fan noise, it is quite impressive to see 71C for full load. The graphics cards and the motherboard also stayed cool, even when pushing each of these parts to their limit.
One of the neatest parts of the Phantom 820 is the fact that it comes with 12 fan connectors, which allow you to fully adjust the fans from 0% to 100% fan speed. Because of this, you can find a sweet spot for each fan where you cannot hear them running, but they are also keeping your system cool. This is where the Phantom 820 really shined compared to the Cooler Master Storm Trooper, because the Storm Trooper only had 3 different fan levels, and you can hear the fans loud and clear even on the lowest levels. With the Phantom 820, the system is so quiet, you can only hear it if you have a very quiet room with the windows closed. The moment you open up your window, the noise from outside, just from the leaves on the tree, or the win, can out power the noise coming from the system. Our location is very quiet, and we like to perform our testing at night, this way there are very limited noises coming from the streets, and we were very excited to see how quietly this system can run on low fan settings while still maintaining a very cool system temperature.
Conclusion
If you’ve read through this review and you’re not too interested in the Phantom 820, or you’re only considering it, you’re nuts! The Phantom 820 should be on anybodies top-3 chassis lists. Most people that look at chassis tend to stay away from expensive ones and instead spend more money on other hardware, but we can assure you that the extra money spent on the Phantom 820 will be well worth it in the long run. Say down the line you’re fed up with your old chassis due to the amount of noise that the system is making, the Phantom 820 has a built-in 4-channel 15W digital fan controller to control up to 12 fans within your system to set the cooling and noise levels to the appropriate levels. Also, the fact that the chassis already has built in LEDs that also have hue adjustment, and external switches that go nicely with the chassis can make a big difference between a clean system look, and a system that has been upgraded over time with several additional accessories that are taking up precious space within the system and creating a huge cable mess that will also obstruct air circulation. There are three massive 200 mm fans already preinstalled in the system on the three most needed locations, so you’ll know you’re already covered on the cooling side, and you also have an additional adjustable 140 mm fan that is already installed on the rear of the chassis as well. The cable management in the Phantom 820 is thought out very well, and this chassis gave us the most pleasure to work with over all the other chassis we have tested in the past, like chassis from Thermaltake, Cooler Master, Silverstone, Bitfenix, and others. You’re also set up with 9 expansion slots, for extreme system configurations, and the Phantom 820 is just a joy to work with if you’re planning on setting up a serious internal water cooling solution.
The only cons we’ve noticed about the Phantom 820 was its size and weight. The size won’t work for everyone, especially not the people that like to go to LAN parties. The paint can also be easily scratched if you accidently lay your chassis on a hard object and you accidently move the chassis. The top cover is fairly difficult to take off and you could accidently damage the plastic on the chassis if you try to pry it off with a screw driver, and finally it is somewhat expensive for an average gamer, but the features, and the quality of the system should seriously have them debating whether they should get this chassis or some other one.
We usually don’t praise computer cases as much as we have in this review, but the Phantom 820 is an exception. At the end of the day, the NZXT Phantom 820 screams beauty, performance, quietness, and pure joy when having to deal with hardware upgrades. If you end up owning one of these chassis, then you’re sure to show your friends that you mean serious business when it comes to building professional high-end gaming systems.
| OUR VERDICT: NZXT Phantom 820 Chassis | ||||||||||||||||||
|
||||||||||||||||||
| Summary: You have to be crazy to not consider the NZXT Phantom 820 as your next gaming chassis. It has put so much joy into our everyday lives, that we consider the Phantom 820 to be a MUST HAVE product for 2012. With an almost perfect score of 9.5 out of 10, the NZXT Phantom 820 deserves Bjorn3D’s Golden Bear Award! |
 Bjorn3D.com Bjorn3d.com – Satisfying Your Daily Tech Cravings Since 1996


