With all the thermal paste solutions out there, exactly who is the best? Step on inside the Dragon Lair and let’s find out.
IN THE BEGINNING
We as computer users, are always on the search for the best thermal paste we can find. The use of good thermal paste has become just as important as the heat sinks and or cooling devices we use to help keep the temperatures of our CPU’s cool. Ever more so, we need to rely on our thermal paste’s performance even more as summer is upon us. Well, at least for us Northern Hemisphere people.
Here at Bjorn3D, and into the dark dank mysterious Dragon’s Lair, are going to look at seven different manufacturers, totalling up to eight different thermal pastes, and find out what thermal pastes meets the grade and which ones fail miserably.
Lights, check,
Computer, Check,
Cooling system, Check,
CPU, screaming,
So let’s begin the Thermal Paste Round Up.
TESTING METHODOLGY
I am going to follow a strict set of rules that I laid down to ensure that each thermal paste is tested as close as possible to the same exact way. I will explain these guidelines in a bit, but before I do, I need to list the “Testing Rig”.
| Test Setup &Testing Methodology | |
| CPU | Lapped Core i7 920 @ 3.8 GHz |
| Motherboard | MSI X58 Platinum |
| Case | Cooler Master Cosmos |
| Memory | GSkill Trident 2000MHz |
| Video Card’s | HIS 4870, XFX 4870X2 |
| Hard Drives | 2 x Seagate 2.5″ HDD’s Raid-0, 1 160 gig WD HDD Backup. |
| CDRom Drive | Lite On Sata1 DVD Burner/ Lite On Blue ray |
| Power Supply | SilverStone 1200 watt PSU |
| CPU Speeds Used | 200 x 19 |
| Operating System Used | Microsoft Windows Seven 7100 |
| Type of Software Used During Testing | Linx x 4 runs per thermal paste |
| Video Card Cooler |
300 GPH Pump Koolance 487, 487×2 water blocks, Loop 2 |
| CPU Cooler |
300 GPH Pump Koolance 340 CPU water block, Loop 1 |
| Radiators | Loop 1, Swiftech 320 Radiator: Loop 2 Danger Den 240 GTX , Danger Den |
|
Any attempt to copy these system specifications will result in assimilation by your computer Assimilation COMPLETE !!!!! |
|
Testing Guidelines
I will only be testing the thermal pastes on my CPU, as this is lot easier to remove and replace than trying to tear apart my video cards 20+ times. The CPU block I will be using for this type of testing is none other than a Koolance 340 CPU water block on its own separate water cooling loop (shared res) with a Swiftech 320 radiator and a 300 GPH Power head (internal) with a 10 cup reservoir. Both the CPU block and the CPU IHS has been lapped with 2000 grit sand paper to ensure that both items were perfectly flat as possible and contained a smooth polished look and feel to them.
I did, however, have to modify the Koolance 340 CPU water block mount a bit. The 1366 mounting system they used is a completely gaggled mess. I ended up adding extensions to the socket 775 mounting system to make removing and installing the 340 CPU water block a lot easier, so as not to worry about stupid little pins coming out during testing. It’s definitetly not one of Koolance’s better mounting systems for the socket 1366 CPU’s.
I will show what the manufacturers used for each one of their products, just not in great detail, so we can keep things as simple as possible. For the thermal paste placement, I used a 5 dot pattern on each and everyone of the thermal pastes for each company and or each one of the thermal pastes they included in this round up. I did try and keep the pattern as close as evenly possible to each thermal paste tested, but as always, there is a margin of error. I will post each thermal paste tested of how I placed the thermal paste on my CPU as well as each one’s thermal paste dispersion. To keep this as organized as possible I will list each manufacturers individual thermal paste used in their own page.
The CPU will remain at 3.8 GHz. No other adjustments were made during this round up. No burn in time was used to test each thermal paste (well technically, I did use one run of Linx upon boot up of the computer per thermal paste to give it a quick settle in time). For actual Testing I used 20 loops of Linx x 3 runs to ensure maximum temperature was achieved with the CPU. I used Real Temp 2.7 as the monitoring to measure my CPU temperatures (Being this CPU was not an official released CPU this program gives me the most consistent results).
I need to add that I used rubbing alcohol to clean up after each thermal paste as well, on both the block and the CPU. The ambient temperature for the room was around 21.5°C. Since I am using a moderate overclock of 3.8 GHz on my Core i7 920 C0 CPU, the temperature limitation I set prior to testing was 60°C (give or take a couple of degrees). If any thermal paste reached higher than this target temperature, it is a FAILURE. Your results will greatly vary from my own.
I think I’ve gotten the guidelines of testing out of the way. It is time to show the pictures and or screen shots of how this testing was performed.
This is my computer that I performed the Thermal Paste Round Up. Yep, it is still a complete mess.
How I modified the mounting system of the Koolance 340 CPU water block. Nothing serious, just a simple mounting modification. Oh, I forgot to mention this. To ensure the CPU was mounting the exact same way during testing, I bottomed out the springs that I used on the CPU block on each thermal paste tested.
Stupid camera and its stupid auto focusing. In this semi blurry picture we can make out the lens of my camera on the base of the CPU water block. I also need to remember not to use such a low lens speed.
I made some minor adjustments to the camera to give you an idea on how polished the Koolance 340 CPU water block’s base is.
Nice and polished CPU block base.
The CPU’s IHS.
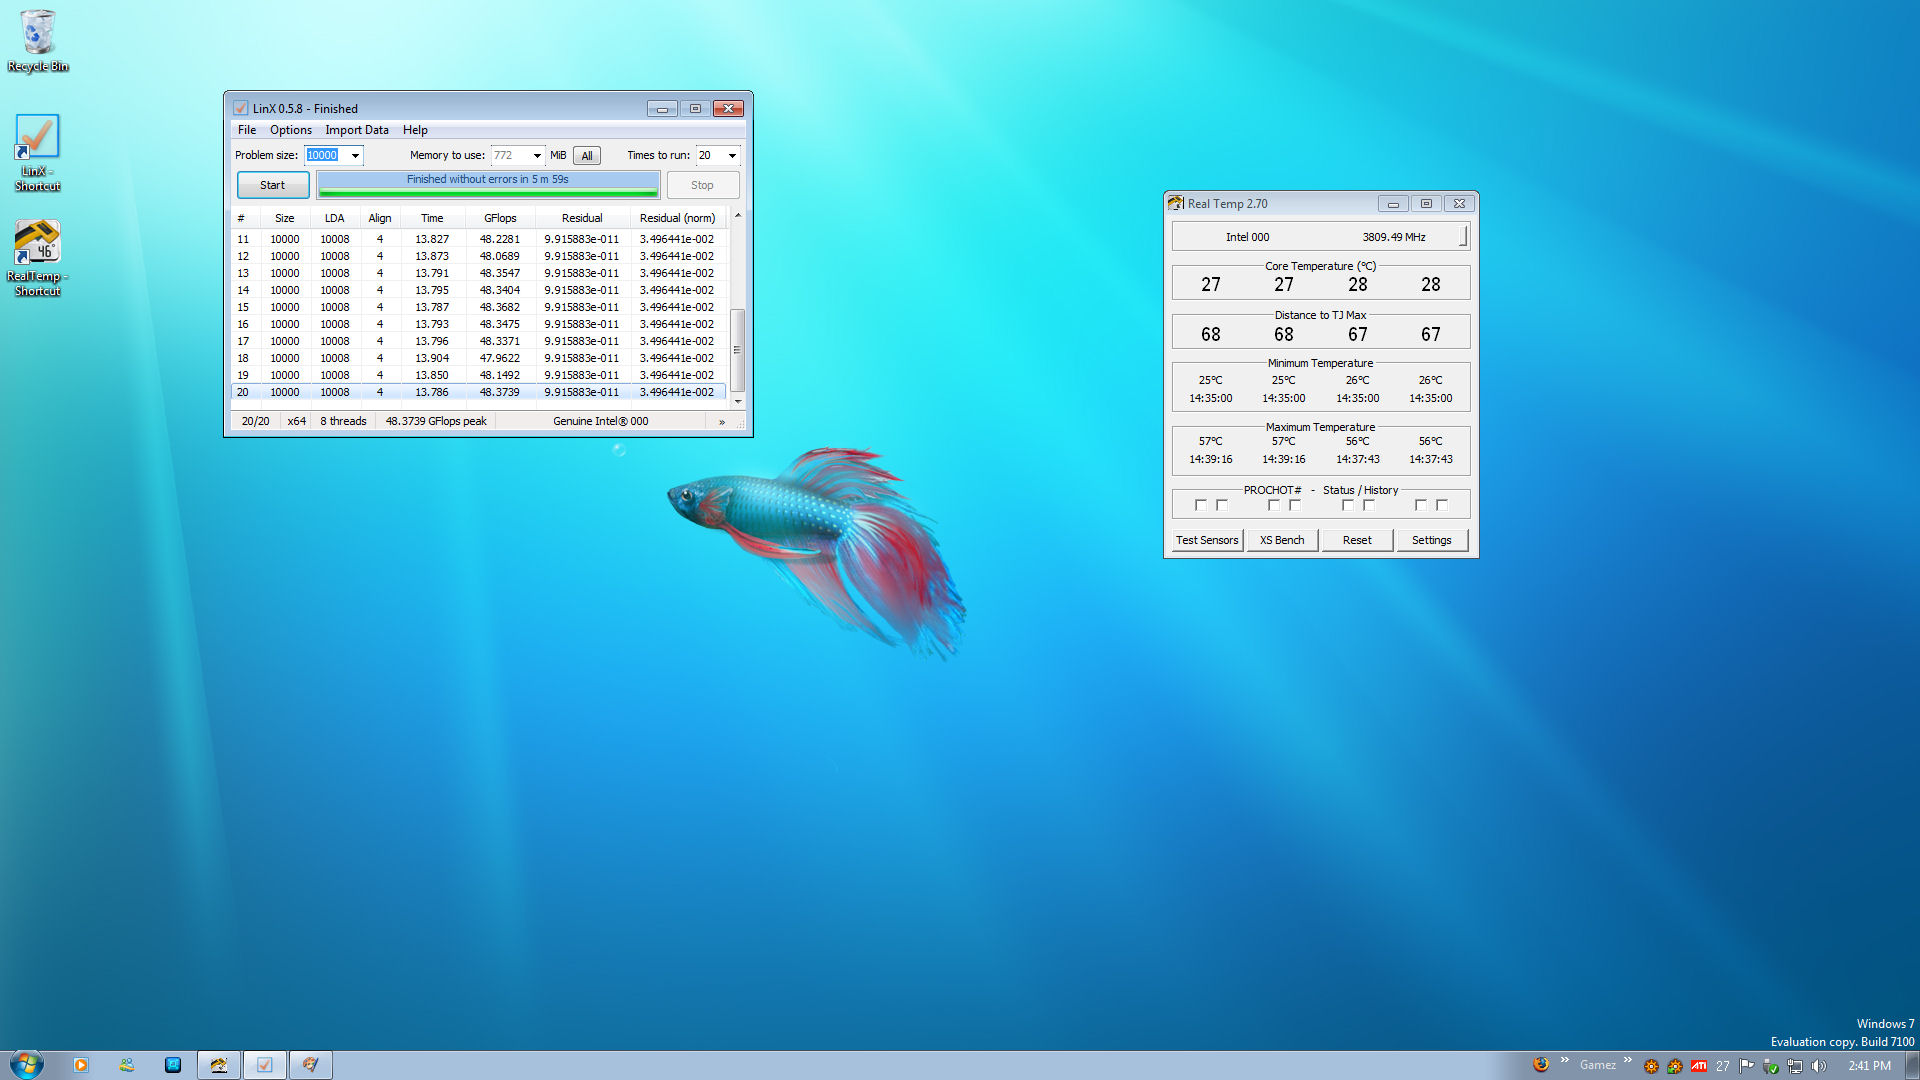
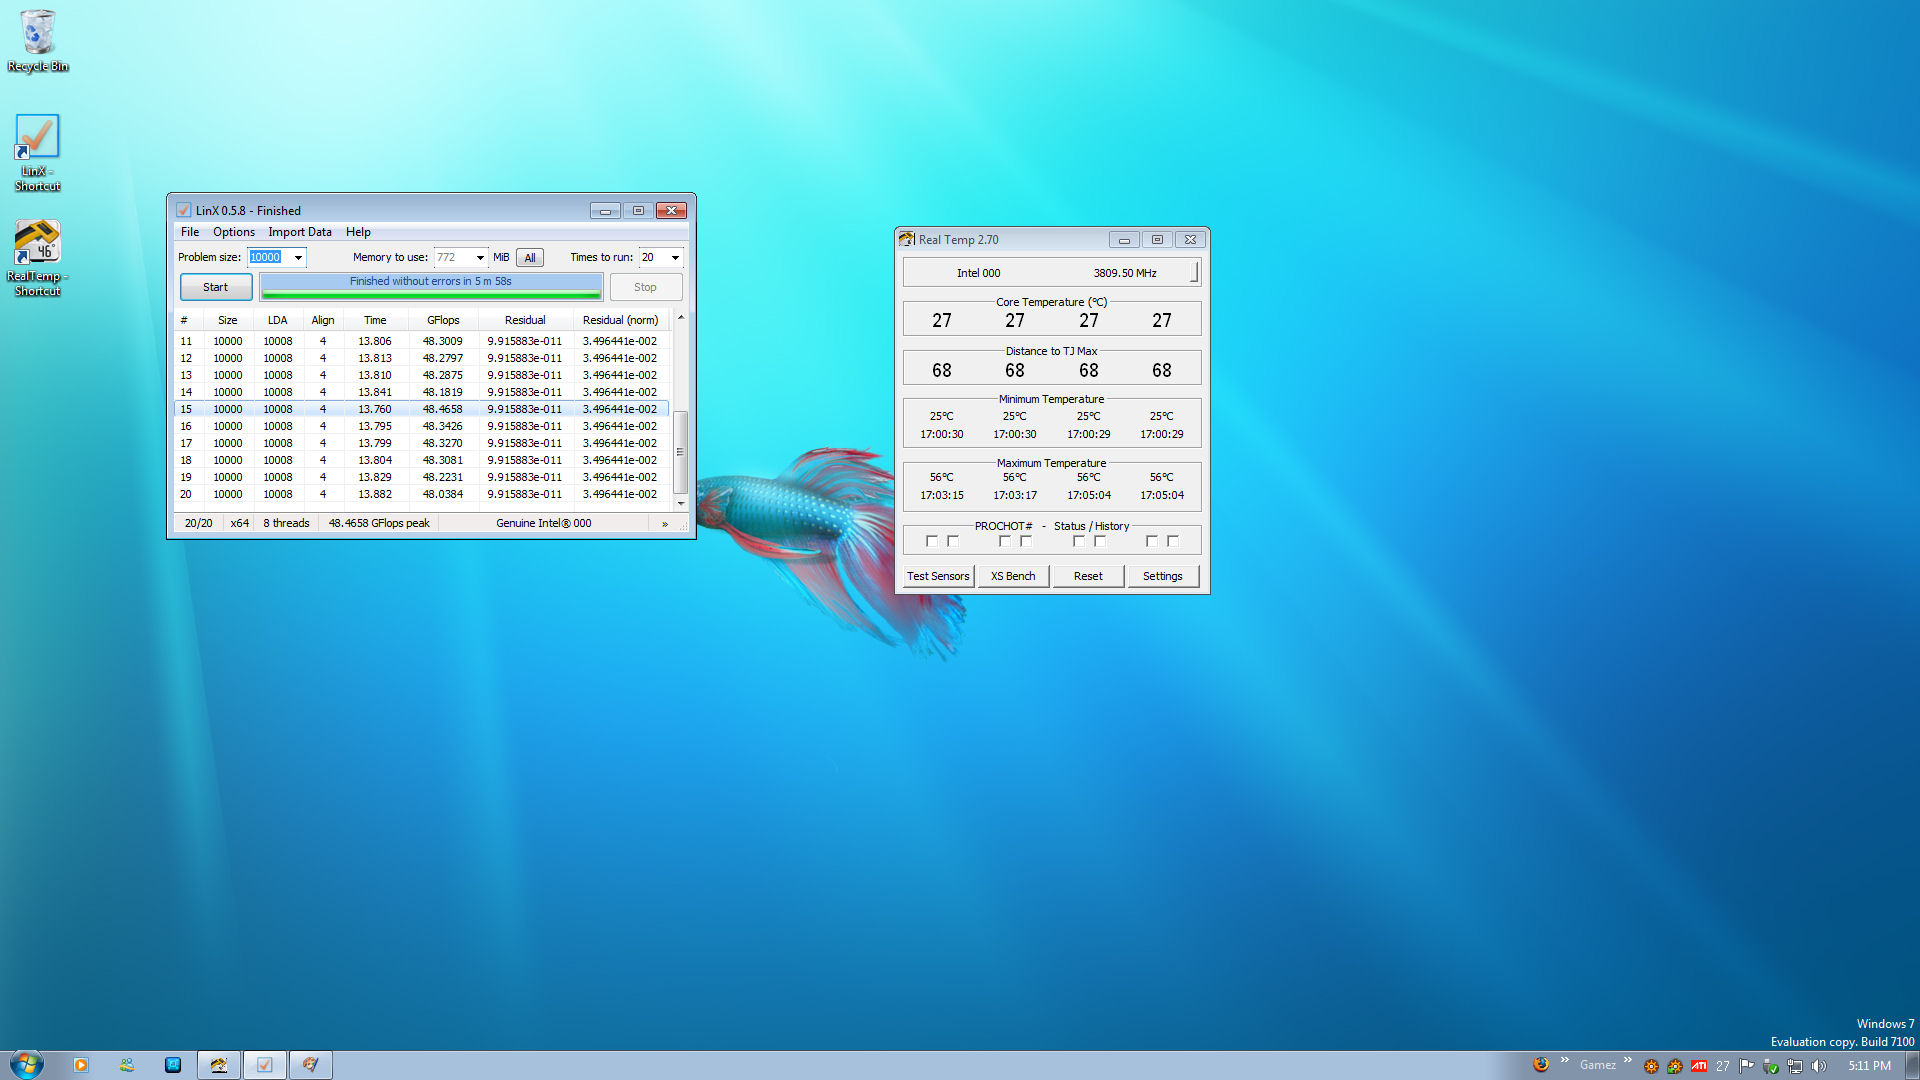
This is the screen shot of a full run of Linx with Real temp monitoring and the CPU-Z screen shot of what the CPU core speed was with voltage setting (REMINDER: No adjustments were made during testing). After I completed the three runs of Linx (official) I would look at Real Temps monitor at the Maximum core temperature achieved, and use that number to give me my numbers. I would then close out Real Temp and Linx, wait 30 minutes, then restart Real Temp and let it settle in for a couple of minutes to get my Idle temperatures. I will only be using the CPU core speed of 3.8 GHz and nothing else. I will post a screen shot of the top three best thermal pastes and their respected temperatures.
THE SMEAR TEST
This is not a official test. It just gives me an idea on how the consistency of the thermal paste is before applying to my CPU.
Before I continue, here is a better shot on a piece of black Plexiglass of each one of the thermal pastes I tested. This is what I will be using to perform my smear test with along with the little thermal paste applicator that came with Noctua’s thermal paste packaging.
I made a small drop of each one of the thermal pastes onto the black Plexiglass. Then used the spreader to smear each one in one direction.
The results of this portion of testing.
How I used the plastic applicator during this test.
COOLINK CHILLA RAMIC
These next few pages are in no particular order.
Starting off on Coolink Chilla Ramic thermal paste. Coolink uses a rather large tube for their thermal paste, and is the largest amount out of all of the thermal pastes tested.
An up close image of the smear test that I performed on each thermal paste. As we can see, the Chilla Ramic is white in color and has a rather long trail telling me the consistency of this thermal paste is even, which is a good way to start things off.
Time for me to put the thermal paste on the CPU and start testing. This is an image to help me keep track of what thermal paste went where.
There’s the five dot pattern I used on each of the thermal pastes.
I performed a full install test fitting to show you how the thermal paste spread out. Here is what it looks like on my CPU water block. Nice and even.
Make sure you have the same dispersion pattern on the cooler as you do with the CPU.
Testing Results
You will have to read the Testing results page to find out, which is 7 pages after this page. Muhahahahahaha.
COOLER MASTER
Cooler Master was the only company that sent me two different thermal pastes, one being their High Performance and the other being their Thermal Fusion.
High Performance
Starting off with the smear testing, (Oops, I forgot the package this stuff came in please forgive me) the High Performance thermal paste has a slight white look to it. Also it has a nice and even spread to it.
Beginning of testing of this thermal paste.
Same five dot pattern I used on the Chilla Ramic.
Boy this thermal paste dispersion also was nice a evenly.
Checking the CPU water block as well. Being the Koolance 340 mounting bracket does not mount to the block (it sits in a groove on the block itself) the block ended up sliding around a couple of times installing it.
Thermal Fusion
Oh no, I forgot the Thermal Fusion packaging as well. Sorry Cooler Master. In the smear testing this thermal paste was not as smooth spreading out as the Chilla Ramic and the High Performance.
A picture of before testing, keeping me on track on what was used and when.
Dang it, I did not get a picture of the five dot pattern I did use. Rest assured I did use that. Despite the somewhat thicker nature of this thermal paste, it does manage to spread out quite evenly.
The CPU water block re-affirms what I have on the CPU.
And you guys actually thought I forgot the packaging of Cooler Masters Thermal Pastes… How dare you, LOL…..
NOCTUA NT-H1
Noctua’s NT-H1 thermal paste packaging.
The smear test results. This thermal paste started off good but teeters off pretty quickly.
The beginning of this testing.
The five dot pattern I used. If anything I am consistent on using the same five dot pattern.
Little thicker then what I was expecting.
Same thing was on the CPU. As they say, if it looks good, RUN IT.
Testing Results
Do you really think I was going to give you the results this quickly? Keep dreaming buddy, LMAO. You still got five more pages to go.
OCZ FREEZE
I get cold just thinking on the name OCZ used for their thermal paste. Brrrrr.
OMG, it is a little itty bitty thingy. Oh, how cute.
Smear testing, well this thermal paste has about the same consistency as the Noctua NT-H1 thermal paste.
My Northbridge cooler is bigger than this tube of thermal paste.
Same way of testing as I did with the previous thermal pastes.
Hmm, well who would have known, this thermal paste dispersed quiet nicely and evenly. With all of this taking on and off the CPU block my fingers are starting to hate me.
Same dispersion pattern we have on the CPU cooler.
Fingers
Hey you think you’re going to finish this soon? because you will not like us when we start to hurt, because if we hurt you will feel it DRAGON……
PROLIMA PK-1
Prolima is a company I never heard of before today, but it does not matter much to me. If it can be tested, it will get tested.
Looking at my smear test, the Prolima thermal paste does have a decent consistency to it. Just a tad thicker than Chilla Ramic.
Prolima prior to testing.
I accidentally squeezed a bit too much at first, I will still throw on the water block to see how it spreads out. Then adjust the amount after that point.
Despite being a tad thicker (my fault) the Prolima did disperse very nicely.
Same thing on the CPU as well.
SPIRE BLUE FROST
Now this is a small tube of thermal paste. I better hope I don’t lose it.
The smear test came out good, nice and even.
I really had to zoom in on the camera to even get a good shot of it. Sorry for the slightly blurry shot.
So far, this is one of my best thermal paste installations yet.
Looking at the base of the CPU water block, the Spire Blue Frost spread out evenly.
Oh no, my CPU is now blue.
THERMALRIGHT CF-2
Here’s how Thermalright presents the thermal paste.
Now during the smear test Thermalright’s CF-2 had one of the strangest results.
Me keeping track on what thermal paste I used during the installation phase. If I go any farther my finger’s are going to choke me.
Now that’s a clean start.
After a few minutes of bickering fingers, I got the CPU water block off of the CPU. Just look at the way the thermal paste spreaded out. That’s just beautiful.
I have to stop and admire how well the Thermalright CF-2 spread across the CPU as well.
Fingers Continued
Ok fingers, we got one more thermal paste to put on, then we are done. Finger’s, “Ok, Dragon you’re definitely not going to like us later.”
I added one more thermal paste as an extra. I did not get any pictures of Gelid’s GC-1 thermal paste.
TESTING RESULTS
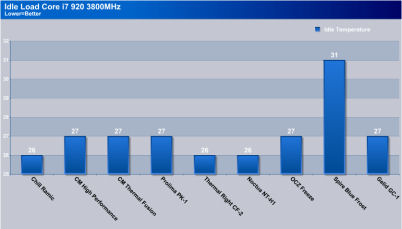
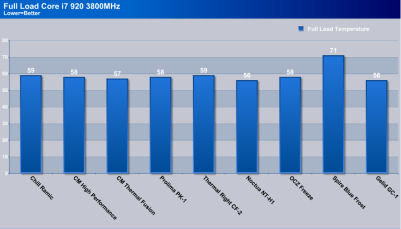
Keep in mind, I am using a custom water cooled computer and I take as many steps as it is necessary to keep my computer cool. The ambient temperatures were around the 21.5°C range. Your results will vary greatly from my own.
Please click on the image for a larger view.
Looking at the idle temperatures, all but one of the thermal pastes tested were with in 1°C of each other. The Spire Blue Frost had a 31°C temperature, now this is odd. But this is not really about idle temperatures, now is it? What we care about is the full load temperatures.
Now this is a close race, Chilla Ramic and Thermalright’s CF-2 came out with the same results of 59°C, which is still good temperature to be at considering this Core i7 920 CPU is cruising at 3.8GHz. Cooler Master’s High Performance, Prolima’s PK-1 and OCZ’s Freeze thermal pastes were able to drop the CPU temperature by another 1°C, topping out at 58°C. Cooler Masters Thermal Fusion surprised me with its result by giving me a 57°C on my CPU. Noctua’s NT-H1 and Gelid’s GC-1 thermal paste came in on the top spot with the lowest temperature of 56°C. Spire’s Thermal Meltdown (thermal paste blue frost) managed not only to come in last, it had a temperature so high I freaked out and ended the test on loop 3 of Lynx, causing me to re-apply this thermal paste four times. I kept getting the same results, loop 3/4 the temperature would spike to 70+ ending this portion of testing. Because Spike’s (I mean Spire) went above and beyond the call of my limitation of 60°C (+/- a couple of degrees) on my CPU, this is a complete failure.
The top three performing thermal pastes screen shot. These results were so close to one another, it is real hard to determine the best of the best.
Coming in third place is, none other than Cooler Master’s Thermal Fusion. This thermal paste held onto a 56°C temperature range all the way up till the end. It was not until the last cycle (20) in Lynx, on the last run to increase the first 2 cores (0,1) to raise to 57°C.
For first place, this was a close run all the way through testing. Both of these thermal pastes performed very well. They performed so well during testing, that these two companies kept bouncing between 55°C and 56°C, Gelid’s GC-1 and Noctua’s NT-H1.
FINAL THOUGHTS
Doing this thermal paste round up was actually fun, as it gave me insight of each one of the companies who produce thermal pastes. As we can agree, thermal paste have grown beyond the stuff that just sits in between our CPU and the cooler we use, to a intrigral part of our cooling systems. As CPU’s get bigger and hotter, not to mention the coolers we use on our CPU’s get bigger, it is a good sign that we can count on numerous thermal paste types and manufacturers to ensure the best thermal conductivity between our CPU’s and CPU coolers. Throughout testing my results did not fluctuate all that much, at most a mere 3°C temperature difference, not including Spire’s thermal paste.
When it comes to applying thermal paste, it is so flexible that there is no right way or wrong way. Really, the only wrong way is having too much on our CPU’s. The best suggestion I can give you for applying the thermal paste is try out different ways and use what works best for you. Because the way I put thermal paste on, Joe Blow down the street or even the manufacturer’s way may or may not work best for you. Another determining factor that will help reduce temperatures of our CPU’s is mounting. If we use too little pressure on the CPU cooler this causes air gaps between the CPU and the cooler we use. Using retention plates helps alleviate this issue by allowing users to add a bit more added pressure to make sure our thermal paste gets spread out evenly and thinly.
Now, since I had my say so, it is time to go on with the scoring of one of the thermal pastes tested here.
Coolink
Chilla Ramic
My experiences when using this thermal paste has always been a good one. I never was disappointed with the temperatures I received when using this thermal paste. The amount of thermal paste that you get with Chilla Ramic is definitely a plus.
Because of the amount you get and the temperatures I received when using this thermal paste, I give it an 8.0 out of 10
Cooler Master
High Performance
The High Performance thermal paste kind of surprised me on its performance. In actuality, I was expecting somewhere in the low 60°C range, not 58°C. Even though it performs well, it is rather a small amount.
Cooler Master’s High Performance deserves 7.5 out of 10
Thermal Fusion
Taking the top 3 spot in my testing puts this one as one of the best thermal pastes I’ve seen to date. The amount we get with this thermal paste is average (I would prefer to have a bit more).
Thermal Fusion rightfully deserves a 9.0 out 10
Prolima
PK-1
I did not even know what to expect from Prolima’s thermal solution, as I never heard of this company until this round up. I was skeptical at first reading that this contained an aluminum base, but the results of the testing proved to make a liar out of me (putting it bluntly).
Prolima’s PK-1 earns a 8.0 out of 10
Thermal Right
CF-2
I had high hopes for Thermal Rights thermal paste. I was not completely disappointed in with the performance of their thermal paste, I just was not floored by it either. It still managed to keep my temperatures below my limitation of 60°C and tying Coolink’s Chilla Ramic. By not offering a larger amount does offset its scoring.
CF-2 gets an 7.0 out of 10
Noctua
NT-H1
This thermal Paste was one that took me completely off guard. After seeing temperatures anywhere from 57-70+°C on my CPU, I was not expecting this thermal paste to do any better than what I was seeing. This thermal Paste not only took first place (shared with Gelid GC1), this thermal paste did this with style.
NT-H1 gets a hard earned 9.5 out of 10

OCZ
Freeze
The only thing I was disappointed with OCZ’s thermal paste was its amount. The performance of this thermal paste was what I have come to expect from a great manufacturer like OCZ. It wasn’t up until loop 19 of Lynx when this thermal jumped to a 58°C and then quickly dropped to 57°C. The only thing holding this thermal paste back is the amount you get.
OCZ’s Freeze has earned it a good solid 8.0 out of 10
Spire
Blue Frost
This thermal paste rather shocked me in its thermal cooling helping capabilities. Even though the Blue Frost performed the worst in this round up, this gives Spire insight on how to improve upon their thermal paste solutions. I hope and look forward to testing any of their improved thermal pastes. Having the absolute smallest amount of all thermal pastes tested, does not help matters any.
Like all things, I have to score this paste a 5.0 out of 10
 Bjorn3D.com Bjorn3d.com – Satisfying Your Daily Tech Cravings Since 1996


Nice article. It helped me on picking a termal solution. Thanks
Well, if you read the official specs for the Spire Bluefrost you will find this: ‘BlueFrost
thermal compound will begin to function at its optimum potential, after
a gradual increase in heat-dissipation, approximately 168 hours
(7days)after initial application’. Therefor i consider your test not so thorough. Wish you best!