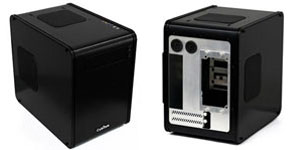
Designed with two pieces of aluminum for a sleek look, the Cubitek Mini ICE is a case for mini ITX boards. Unlike other mini ITX cases, it is aimed for gamers and enthusiasts who plan to watercool and use high-end GPUs.
INTRODUCTION
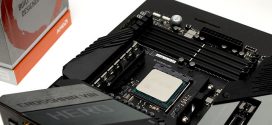
When VIA introduced the mini-ITX form factor back in 2001, it did not get much support because back then, both Intel and AMD based motherboards used a two-chip design. Now, however, motherboards are a single chip design, so it is much easier for motherboard manufacturers to cram enough ports and features onto their boards to fit into the mini-ITX form factor. We have seen many motherboard vendors now launcheing mini-ITX boards along with mATX and ATX when a new chipset is launched. ASUS is probably the most noticeable such vendor; they had mini-ITX boards for the Z68 and the Z77 chipset at launch. Zotac is also another big player in the mini ITX world with its array of boards for both AMD and Intel platform.

As mini-ITX boards are getting more popular, we see more case manufacturers take notice and start to offer cases designed specifically for mini-ITX form factor. Generally speaking, there are two mini ITX case designs. One design often focuses on minimalist approach that is aimed for the smallest footprint possible. These cases often have very limited (if there is any at all) expansion slots and only have room for 1-2 drives. They also often use an external power supply. The other design is often slightly bigger, housing an ATX power supply, and with the ability to accommodate an expansion card and have more storage drive bays. The latest Mini-ICE case from Cubitek falls into the latter category that we have received an unit that we will take a closer look today.

click for larger image
The Mini ICE case is actually just one of the case from the ICE line from Cubitek. The ICE series cases feature all aluminum construction for durability and portability. Two pieces of aluminum wraps around the entire exterior case with a black anodized finish which helps to avoid fingerprints. The aluminum that Cubitek uses is quite thick which gives it more durable feel while keeping the overall weight of the case light. No matter which motherboard form factor your board is, there is an ICE case for you as the product line up ranges all the way from the mini-ITX to the HPTX and anything in between.
| Cubitek Mini ICE Specification | |
|
Material
|
Aluminum
|
|
Dimension
|
230 (W) x 338.5 (H) x 363 (D) mm
|
|
Weight
|
4 Kg
|
|
5.25” Bay
|
1 (up to 5” long)
|
|
3.5” Bay
|
4
|
|
2.5” Bay
|
2
|
|
PCI Slot
|
2 (up to 340 mm in length)
|
|
M/B Type
|
Mini ITX
|
|
Front I/O
|
USB 3.0 X 2 USB 2.0 X 2 HD AUDIO
|
| Cooling | 140 mm fan (blue LED, included))
140 mm fan (optional) |
| PSU | ATX (up to 160 mm) |
| CPU Cooler | Max 90 mm height |
The Mini ICE is larger than your typical mini ITX case. However, the size does have its benefit as we can see that the case is able to accommodate four 3.5” drives or three 3.5” drive and two 2.5” drives (since one of the 3.5” bay is used for the 2.5” drive bay). Additionally, we can see that the case is able to house expansion card up to 330 mm in length, which means it should not have any issue even with the longest video card like the HD 6990.
The front panel comes with two USB 3.0 and two USB 2.0 and the audio jacks. There is no eSATA or firewire port but we think for most people the included ports should be sufficient. The case is shipped with a single 140 mm rear fan attached and there is a space available for the second 140 mm intake fan located on the bottom of the case.
A Closer Look at the Cubitek Mini ICE


The black retail box of the Mini ICE takes a very minimalistic design on the front. All we get is a the Cubitek logo on the corner and an image of a piece that looks like an iceberg since the case is called “ICE”. On the side we get a detailed specification of the case in five different languages.


The case is protected by four pieces of to hold the case in place during shipping. A plastic bag wraps around the case to protect against any scratches during the shipping. The accessories are placed on a separate box and we can see that each parts are placed in its own bag with labels.
Inside, we have the case, bags of screws, motherboard stand-offs, and a one page installation guide.


We were a bit surprised to see the size of the Mini ICE as we expected a smaller case due to the fact that it is designed to only accommodate mini-ITX boards. At 230mm wide, 338.5mm tall, and 363 deep, the Mini ICE is essentially about the same width and height as some micro ATX cases but it is not as deep.
Externally, the Mini ICE has a very nice design. As mentioned earlier, the case is constructed with two pieces of aluminum. One piece is used for the top and the front of the case and the second piece is used for the back and the bottom of the case. The corner of the case is curved so that there is no sharp edge to be found. Even the connection where the two pieces of aluminum meet is smooth. While we can feel a little bump at the joint, it is not sharp.
The surface of the case has been anodized and you can see its matted black finish. While the case does attract fingerprints, it hides them quite well. In fact, we would not mind putting the case in a living room for an HTPC system as the black finish fits well with most home theater setups. On the left and right edge of the case are the grooves that run all around the case. These grooves serve no purpose but to add a little bit of design flair to the case so that it won’t look so boxy and boring.
Overall, we really like the design and the look of the case. However, we do take issue with the side panel screws. As you can see the screws extend out of the case which breaks the overall smoothness and curve of the case. They extend outward a couple mm on either side so it makes the case actually wider than the specification. The design of the case prevents the side panels from being screwed in from the rear, so they had to be affixed from the sides instead. We’re sure Cubitek chose the thumbscrews so that the screws are easy to remove without the need for a screwdriver. However, we really liked the smoothness of the case and we would rather have the screw sitting evenly in the side panel without extending out. It is really not the biggest complaint but we hope it can be improved in future designs.
The front of the case has a very minimalistic design with Cubitek’s logo on the bottom and a single external 3.5’’ drive bay exposed. There is also the power on/off button and the reset button along with the HD and power LED.
The top of the case are the two USB 3.0 ports and two USB 2.0 ports. Above these are the headphone and mic ports. The Mic and Headphone connectors have been reinforced so that they feel sturdier. These ports are not covered unfortunately. Since they are facing upward, they can easily collect dusts and we feel a little cover would have been nice.
The case supports two 140 mm fans. One of the two fans is located on the rear top for exhaust hot air out of the system. The fan is pre-installed from Cubitek and illuminates the room with a blue LED which cannot be turned off. The fan is rated with 49.05 CRFM at 21.35 dBA. It uses the 3 pin header which means that it has not fan control but 21.35 dBA should be pretty quiet that it would probably be hard to detect its noise. Unfortunately, the cable that is attached to the fan is a little bit on the short side so if your fan header is located all the way toward the bottom of the board, you would need an extension which is not included. The second fan can be installed on the bottom front of the case to help to draw cool air into the case. Cubitek did not include this fan.
The case’s all aluminum design will certainly help with heat dissipation. The two fan slots also will aid to streamline the cooling. We would probably recommend adding the second intake fan if you plan to use a large graphics card but if you’re going to use a simple card or onboard GPU, it can be omitted. Additional cooling is provided on the side of the case where we can see ventilation grills on the right side of the case. However, we are not sure how efficient this will be as it sits directly above the power supply. We would prefer to see it being placed a tad lower, next to the GPU.
The rear of the case is where we can see the PSU mounting brackets. Notice that you can install the PSU rather easily by simply unscrew the four screws and mount the bracket to the back of the PSU and insert the unit to the case. Remember that the Mini ICE is not an average mini-ITX case that is designed for taking small footprint. Rather it is designed to give you a small system with plenty of horse-power for your gaming and storage needs. Thus, we find two water-tube holes pre-installed for those who wish to watercool their system. In addition, we see two expansion slots on the rear.


Removing the side panel, we can see along the inside edge of the case that Cubitek placed rubber padding around on both sides to reduce any of the vibration noises. This is important as the case is all aluminum and we all know that metal-to-metal contact makes lots of vibration noise. The rubber padding is a very nice touch.
Inside we can see the interior is quite spacious. The motherboard tray is not removable unfortunately. For storage, the case can accommodate four 3.5’’ drive and two 2.5’’ drive. The hard drive cage is not removable either but Cubitek makes the installation pretty simple. All you have to do is attach the rubber feet to the drive and slide it into the drive bay.
The case is able to accommodate graphic cards up to 340 mm long, which is longer than most ITX cases. You can put the fastest graphics card on the market today, the GTX 690, in the case and still have space left over. The great thing about this case is that there is still plenty of space for a secondary fan even if you install a high-end GPU.
The internal headers are all completely sleeved with black cable, very nice touch. We can see that the PCB for the front connectors are housed in a plastic case. This helps to protect the cable so that if you tug it too hard, it will not break easily. Obviously, this is not invulnerable, so they will still break with enough force. Surprisingly, the cables are rather long for such small case. We think it is way too long for a small case like this and it poses problems for cable management.
INSTALLATION
As the case can only house mini ITX boards, we were a little bit disappointed to see that the motherboard stand-offs were not pre-installed. As mentioned, the motherboard tray is not removable so installation components require a bit of planning ahead or you may end up having to take apart a few components. We had anticipated that the installation maybe slightly more difficult due to the fact mini ITX cases have limited space inside to work with but the Mini ICE turns out to be more challenging than we had planned.


Despite the fact that the Mini ICE looks quite spacious for mini ITX, the installation process turned out to be a slightly troublesome one. Due to the fact the motherboard tray is not removable and the PSU is installed directly above the board, you must install the motherboard before you install the power supply and not the other way around. In fact, since the PSU sits directly above the motherboard, you should install all of the cables to the internal headers before mounting the PSU or else the PSU will end up blocking most of the board which makes it very difficult to gain access to these headers. Luckily, Cubitek’s implementation of the PSU installation makes it rather easy to slide in and out of the case, which we are sure you will do a few time during the installation.
Choosing the right heatsink is also crucial for the Mini ICE. Initially, we thought that with such a big mini ITX case, there should be enough room for larger heatsinks. As it turns out we are completely wrong and the problem again is due to the fact that the PSU sits directly above the board. The PSU completely blocks the ability to use any tall heatsink. In fact, you can only use heatsinks smaller than 90 mm, information that is missing from the box but is listed on Cubitek’s website. The low-profile Noctua NH-L12 we have at hand works if we did not install the upper fan. The Scythe Suriken cooler that is 64mm in height also fits fine without any issue. Thus, you definitely need to use a low profile heatsink and make sure the height is no taller than 90mm.


Picking the right PSU is also essential with the Mini-ICE. Again, the box did not list the 160mm maximum length, so potential buyers need to be careful on choosing the PSU with the right length. With the case designed to be able to accommodate high-end GPUs and watercooling, we expect to be able to use at least 650W or higher PSU. As you can see from the image above, while the OCZ ZT 650W PSU is 160mm long, the modular connector extends the unit to 170mm which prevents us from using the unit. Since quite a few high quality and wattage PSUs are longer than 160mm long so be sure to read the specification of your PSU carefully if you plan to use it on the case.
At time of the review, we did not have any high wattage power supplies that were short enough to fit into the case so we ended up with a 380W Antec power supply.
Hard drive installation is quite easy, partially due to previous experience with Cubitek cases. You simply unscrew thumbscrew holding the metal stopping bar in place. Then install the rubber grommets to the hard drive and slide the hard drive in place. The two 2.5’’ drive bays use plain screws to secure the drive. Since they are designed for SSDs which do not make any noise, there is no rubber anti-vibration grommet.
The 5.25’’ drive installation requires removal of the bay shield first. The bay shield is attached to the tray via two tabs on either side of the case. You would have to press these two tabs to spring the shield away from the case. Unlike the 3.5’’ drive, the 5.25’’ drive is screwed onto the drive bay directly via four screws as oppose to a rail. There is no pre-defined notches for the screws so carefully align the drive is needed. The benefit is that you have more freedom to have the drive perfectly aligned to the front of the case.
The 5.25” drive bay can only accommodate drive up to 5 inches in length and 1.5 inches in thickness. Standard desktop optical drives often are 6.5 inches long so it is almost impossible to use it with the Mini ICE. A slim drive is obviously needed for the case which would require a faceplate which the Cubitek did not include.


With all components installed, we can see that the Mini ICE does not really have much space to hide the cables. There are two places that can be used to organize the cables: below the rear fan or underneath the 3.5’’ drive cage. However, neither place is ideal as they sit next the fan and will block the flow of the air. Additionally, the if you use a longer graphics card, it can be difficult to find enough free area underneath the 3.5’’ drive cage. The overly long front panel cable also makes the matter worse by adding to the mess of cables you have to hide.
TESTING & METHODOLOGY
We did a fresh load of Windows 7 64 bit on the test rig, then once we updated the software and drivers to the latest versions, we made a clone copy of the hard drive because we’re going to run this beast like we stole it. We ran each test a total of three times and the average of each test is reported here.
| Test Rig | |
| Case Type | None |
| CPU | AMD: A8-3850 |
| Motherboard | Zotac A75-ITX WiFi |
| Ram | Kingston HyperX 1600 |
| CPU Cooler | Thermalright SI-128 |
| Hard Drives | Seagate 7200.11 1.5 TB |
| Optical | None |
| GPU | ASUS HD 6870 |
| ase Fans | 120mm Fan cooling the MOSFET area |
| Docking Stations | None |
| Testing PSU | Cooler Master UCP 900W |
| Legacy | None |
| Mouse | Microsoft Intellimouse |
| Keyboard | Logitech Keyboard |
| Speakers | None |
Temperature
We start off by simply running our AMD A8-3850 with the integrated GPU since we envision that there many users out there who would be thinking of using the Mini ICE for HTPCs with an onboard GPU.
| Title of the table | Idle (ºC) | Load with Prime95 for 10 minutes(ºC) | Load with Prime95 and Furmark (ºC) |
| Motherboard | 60 | 52 | 50 |
| CPU | 41 | 72 | 77 |
| Core | 17 | 66 | 68 |
| Aux | 38 | 42 | 40 |
| GPU Diode | 17 | 66 | 68 |
| HD | 38 | 37 | 38 |
Due to space constraints, the mini ITX cases often do not have the best cooling performance. We had high hopes with the Cubitek Mini ICE since it is slightly larger than most mini ITX case but unfortunately, the cooling performance is still not that great. We can see that the CPU temperature reaches to the upper 70 ºC with 10 minutes of running Prime95, a little bit high to our liking. Bear in mind that the cooling performance for the mini ITX case is highly dependant on the heatsink and the PSU used. We believe that if we had paired the case with a power supply that has a fan facing down to draw hot air away from the CPU, it would greatly help with the CPU temperature.
The other components temperature only shows a slight increase in the temperature. The motherboard temperature actually drops 10 ºC when the system is under load.
Let’s see how the system temperature fares with the HD 7770. Since we only have a 380W PSU that will fit into the case, we could not install a high-end video card like the GTX 580 to see how well the case is able to handle the heat produced. Thus, we opted for the HD 7770.
| Title of the table | Idle (ºC) | Load with Prime95 for 10 minutes | Load with Prime95 and Furmark (ºC) |
| Motherboard | 60 | 57 | 48 |
| CPU | 41 | 75 | 76 |
| Core | 16 | 69 | 69 |
| Aux | 43 | 42 | 39 |
| GPU Diode | 35 | 35 | 75 |
| HD | 38 | 37 | 40 |
The HD 7770 runs fairly cool as it is built with a 28nm process and normally under load it hovers at around 65 ºC in an open air environment. With the card installed in the Mini ICE, we get the 10 ºC higher under load. Bear in mind that this is without the secondary fan installed to draw cool air into the system.
CONCLUSION
Taking a slightly different approach, the Cubitek Mini ICE is slightly larger than your typical mini ITX case and it is aimed to provide you with a small system with the ability to run a watercooler, mid to high-end graphic cards and plenty of storage space. The case has a very nice design with its two piece aluminum exterior construction that makes the case very smooth and round. We like the simple and elegant exterior of the case and the rounded corner.
The case certainly has a lot appeal for gamers who attend LAN parties and its elegant look also would make it a good HTPC. Unfortunately, the Mini ICE’s implementation is less than ideal. Picking the right components is critical for the case. Despite its roomy appearance, there are still clearance issues for the PSU, the 5.25’’ drives, and the CPU heatsink.
At the end the Mini ICE feels like a product with a sports car exterior but a terrible interior. While it may look nice, it has limits to its functionality, and does not serve its purpose well. We do think it can still make a decent HTPC or home server as these systems do not require a very high-end power supply and graphics card, as long as you pick the right hardware.
| OUR VERDICT: Cubitek Mini ICE | ||||||||||||||||||
|
||||||||||||||||||
| Summary: The Cubitek Mini ICE has a very sleek and elegant look with its rounded design from two pieces of aluminum. Unfortunately, its interior design has too many clearance issues, and the case is not versatile in terms of hardware configuration. |