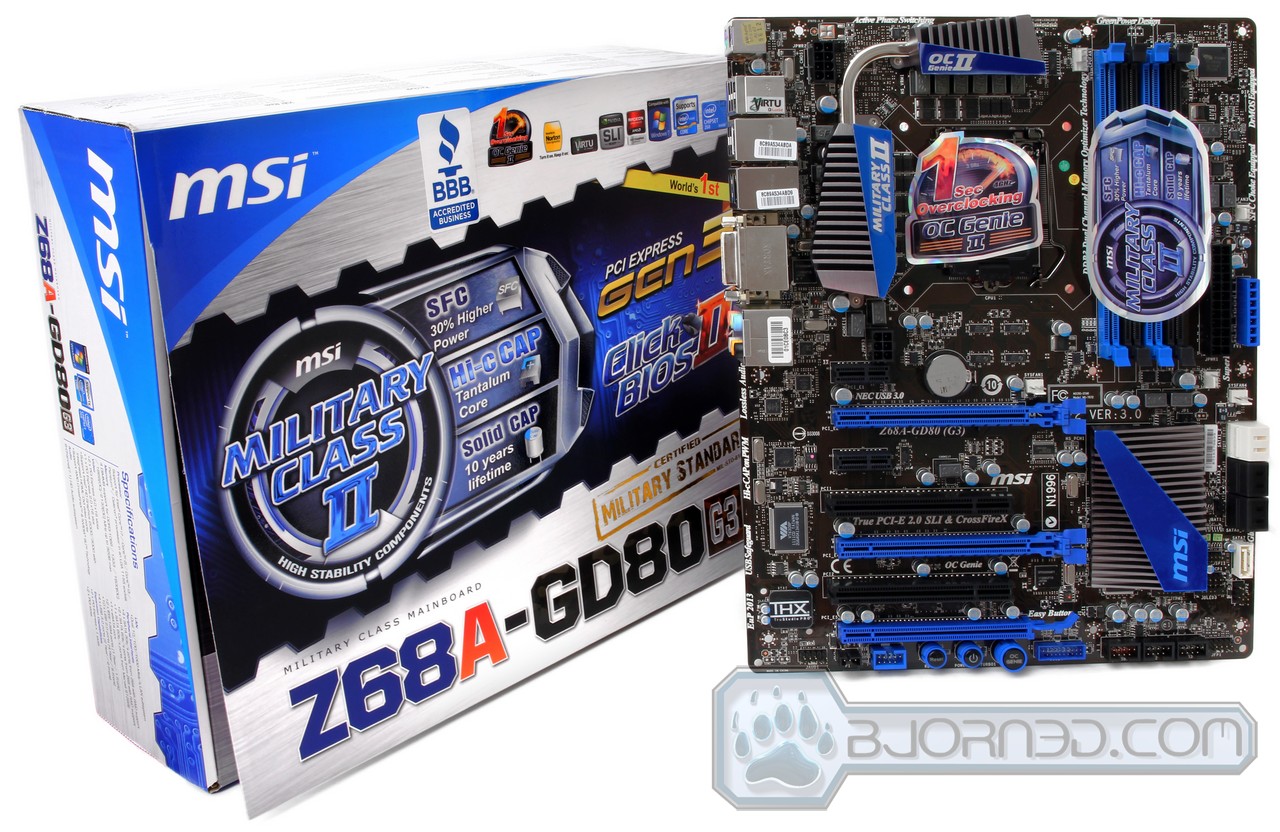
The MSI Z68A-GD80 (G3) comes with PCI-E Gen 3 switches and support for the unreleased PCI-E 3.0 interface video cards and Ivy Bridge Processor.
Introduction
 This year at Computex 2011, MSI showed off their latest PCI-E Gen 3 motherboard. When Z68 launched, motherboard manufacturers continued using the most widely available PCI-Express 2.0 interface. As weeks passed, new PCI-Express 3.0 switches were introduced and MSI was the first to jump on the opportunity to provide their customers with the latest PCI-E Gen 3.0 support for their LGA1155 Z68 boards. ASRock and GIGABYTE followed closely as they also showed off their ASRock Extreme 4 Gen 3 and GIGABYTE G1.Sniper 2 motherboards with PCI-E Gen 3 support. Today we will be looking at the MSI Z68A-GD80 (G3) motherboard. This motherboard is an upgrade from the (B3) revision, which still used PCI-E 2.0 switches. Though while MSI was one of the first to have a PCI-E Gen 3 motherboard, it also looks like they might have one of the first true Gen 3 designs, with GIGABYTE coming in 2nd with their G1.Sniper 2 motherboard.
It is not a coincidence that ASUS, one of the largest motherboard manufacturers, still doesn’t have a true PCI-E Gen 3.0 motherboard. As a matter a fact, ASRock and GIGABYTE only have partially functional PCI-E Gen 3 support for their motherboard, but more on that on our motherboard overview page. We don’t find this ironic, as there are no PCI-Express Gen 3.0 products which could potentially use the new interface. Not only that, but the current Sandy Bridge architecture only supports up to PCI-Express 2.0 specifications and does not have the potential to utilize the extra lanes that become available with the current PCI-E Gen 3 switches. With this said, the current motherboards that are currently sold as PCI-E Gen 3.0 motherboards will not be fully utilized till about early next year, when we see Ivy Bridge used as the next high-end CPU for the LGA 1155 socket. As of yet, we don’t know too much about Ivy Bridge, but it should be a 22nm CPU architecture compatible to fully utilize PCI-Express Gen 3.
The Z68 Chipset is now considered to be the flagship for the latest Sandy Bridge platform. The original P67 was only able to utilize the CPU and not the onboard Intel Integrated Graphics, but the Z68 chipset is able to use both discrete and integrated graphics that Intel offers with LucidLogix Virtu technology. Because of this, Intel is also able to enable Quick Sync technology, which was not functional on the P67 platform. Also, with the introduction of Z68 beginning Q2 2011, Intel added a new feature to the chipset allowing Hard Drives to be mixed with SSDs to gain higher storage performance with the Intel Smart Response Technology. We’ll have more about Virtu, Quick Sync and Intel Smart Response on the following pages.
The Z68 chipset will be compatible with Intel’s Ivy Bridge architecture, however, with X79 just around the corner, enthusiast users might want to wait for that chipset. Note that X79 will most likely also come with a higher price tag as well as the new LGA 2011 Socket which will require new processors.
Features Worth Noting
MSI offers a 5 year warranty for their Z68A-GD65 (G3) motherboard within the United States and Canada. MSI believes that their Military Class II components including Hi-Cap, SFC, Solid Caps, and more deliver not only performance, but also quality and reliability. We’ll try to torture this motherboard as far as we can to see where we can push our hardware. However, do remember to register your board within 30 days of purchase, or else the 5 year warranty will go to waste.
 The new Military Class II components that MSI is advertising on their latest motherboards like the Z68A-GD80 (G3) consist of only component upgrades. Some of the components are really nice while others are just the traditional Solid Capacitors that most of the other high-end motherboard manufacturers also use. Besides the Solid CAPs, the Hi-C CAP is a new nice design for solid capacitors which we have seen on both ASUS’s top-of-the-line ROG boards as well as on GIGABYTE’s GA-X58A-OC overclocking motherboard. Many newer non-reference video cards also use the Hi-C CAPs which come handy for overclockers. The nice thing to know about MSI’s components is that they use the same Military Class II components on the majority of their mid to high-end motherboards (GD55, GD65, GD80, Big Bang Series), unlike other manufacturers which only have these components on their most expensive motherboards in the 300-400 dollar range. MSI’s SFC (Super Ferrite Choke) is a newly improved ferrite choke that is Super-Permeable. This means it will run cooler for better stability. More on the Military Class II components on the next page, and on the motherboard overview page.
Most of us that overclock our processors and video cards have heard of the magical 1 second overclock button that ASUS offers. ASUS’s 1 second overclocking tool works through the BIOS, where a user clicks on the OC Tuner Auto Tune feature and it overclocks the processor to somewhere in the 4GHz range provided the CPU is a K-series Sandy Bridge processor. MSI also has a feature just like this, but they make it even easier by providing a button which can be clicked to enable 1 second overclocking. This feature is called OC Genie II. The feature is accessible as a button on the motherboard or through the ClickBIOS Windows based BIOS application.
What are we testing today?
Today we will be comparing the MSI Z68A-GD80 (G3) motherboard and we’ll compare it to the GIGABYTE GA-Z68X-UD7-B3. We’ll also do a comparison between the MSI motherboard and ASUS’ P8P67 WS Revolution motherboard. This will show us if there is any difference between the Gen 2 and Gen 3 PCI-E switches on a Sandy Bridge based system before PCI-E Gen 3 video cards are out. This way we can test the difference between the switches, without having clockspeed/memory/etc variations in PCI-E 3 video cards that would interfere with the results.
While the MSI Z68A-GD80 (G3) is MSI’s flagship motherboard for the Z68 chipset, it also only costs $234.99 on Newegg.com. This will be interesting considering that the GIGABYTE Z68X-UD7-B3 costs $349.99, and the ASUS P8P67 WS Revolution motherboard costs $259.99. Each motherboard has its own special features, but we’ll determine whether the MSI board is worth buying over the others.
Features
|
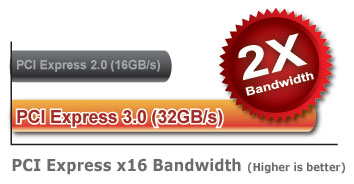
World’s 1st PCI Express Gen 3 mainboard brandWith ultra-high 32GB/s transfer bandwidth, PCI Express Gen 3 provides a 2X faster transfer rate than the previous generation, this delivers amazing capabilities for true next generation extreme gaming. |
|
 |
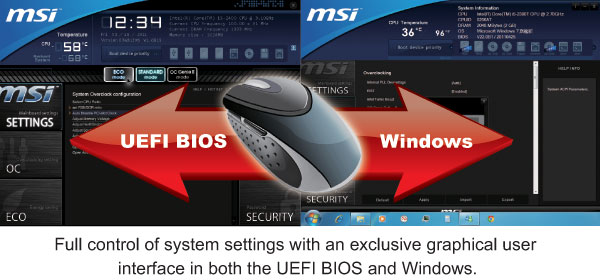
World’s 1st UEFI and software graphical user interfaceMSI ClickBIOS II provides a consistent user interface both in the UEFI BIOS and in Windows, it provides the most convenient way for users to control system settings and supports touchscreen control. Benefits:
|
|
 |
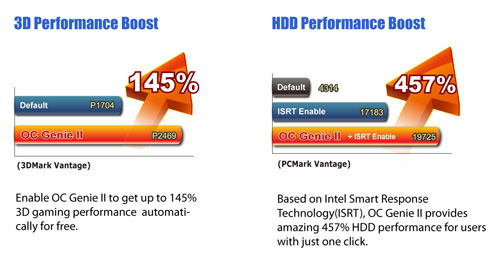
OC Genie II (Z68)Just press the OC Genie button or enable OC Genie II function in BIOS menu, the CPU, memory, iGPU and HDD performance will be highly improved. Whether users want to watch a high bit-rate HD movie or go online gaming, both can be enjoyed with image performance that is smoother and lag-free!
|
|
 |
Virtu Switchable GraphicsBased on LucidLogix Virtu technology, MSI Z68 mainboard series firstly provides the most expectable feature for desktop platform – switchable graphics, which allows users to enjoy both graphics power of integrated GPU and discrete GPU. It will switch to integrated GPU for HD movie playback, video transcoding and general applications to save system energy, or release full power for hardcore 3D gaming by switching to discrete GPU automatically. |
|
|
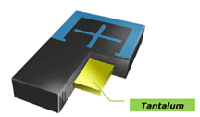
Military Class IIThe perfect trinity of quality, stability and efficiency all exist at one mainboard to meet end user expectations. The MSI Military Class II series products provide the long lifespan, unparalleled quality, extreme performance and ultimate efficiency.
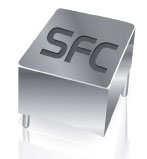
SFC
Solid CAP |
|
 |
THX TruStudio PROTHX is a trade mark of a high-end audio/visual reproduction standard for movies, home theaters, computer speakers and other audio devices. THX Certified Audio products are designed to let users experience movies & videos as live show. The true sound effect can make high definition video more powerful. Features |
|
 |
Super ChargerMobile consumer appliances are getting more and more attention in current day fast moving life style, with smart phones and tablets almost becoming a fashion accessory. However, many ordinary personal computers cannot charge some of these devices, making it difficult to stay connected. The MSI Super Charger is a Windows resident program capable of revising the power supply mode of your USB port to become more powerful. Once your phone or tablet is connected to your USB port, the Super Charger sends a signal to initiate its charging circuit, making it a really smart and convenient charging solution for mobile computing needs. Features |
|
 |
USB 3.0Compared to the 480Mbps provided by traditional USB 2.0, the all-new USB 3.0’s 5Gb/s offers 10 times the transfer bandwidth, so transferring a Blu-ray movie takes less than one minute. MSI also has implemented a front panel USB 3.0 port, making the use of an external USB 3.0 device even more convenient. Features |
|
 |
SATA 6Gb/s
Features |
|
 |
HDMI v1.4HDMI (High-Definition Multimedia Interface) is new generation fully digital video/audio interface which can transfer 1080p High-Definition video and Audio output in single compact connector. Supporting HDCP copy protection such as Blu-ray Discs, HDMI provides you with the highest-quality home theater experience. Features |
|
 |
Winki 3Winki 3 is a free Linux-based O/S which is based on the Linux core. With an ultra-fast booting speed and a multi-language interface, the built-in Winki 3 provides an easy-to-use internet environment that includes the most popular functions such as internet surfing, web mail, instant messaging, picture browsing, and more. It’s the most practical way to be online in the shortest time. Features |
|
 |
APS (Active Phase Switching)
|
|
 |
M-FlashCompared to common mainboard which need extra BIOS chips, MSI’s M-Flash has a double advantage which doesn’t need extra components and secondly, all your BIOS data will be saved in the USB drive. The stored data does not only have backup and upgrade function, moreover it can also be seen as a portable BIOS chip which is actually able to boot up your PC. Features |
|
 |
AMD CrossFireXAMD CrossFireX™ is the ultimate multi-GPU performance gaming platform. Enabling game-dominatig power, AMD CrossFireX technology enables two or more discrete graphics processors to work together to improve graphics performance. AMD CrossFireX technology allows you to expand your system’s graphics capabilities. It allows you the ability to scale your system’s graphics horsepower as you need it, supporting up to four AMD Radeon™ HD graphics cards, making it the most scalable gaming platform ever. With an AMD CrossFireX gaming technology, the traditional graphics limitation exists no more, allowing you to enjoy higher performance as well as visual experience. |
|
 |
Live Update 5
Features |
|
 |
Live Update OnlineMSI Live Update Online is a powerful and useful application for updating latest BIOS and Drivers, which can save your time for searching and lower the risk while updating. Live Update Online is online services exclusively. End-users only have to connect to the download center and enable the Live Update Online function, and the updating will continue via the web pages completely. Live Update Online offers the latest BIOS, drivers and utilities from MSI for automatic updating. Through the user-friendly operation, end-users can update the system easily and increase performance immediately. |
|
 |
NVIDIA SLISLI technology allows using multiple Nvidia graphics cards in a single computer system with a mainboard equipped with an nForce SLI MCP. Users need an a mainboard with two PCI-Express 16x graphics slots and two matching GeForce graphics cards which are “SLI Ready”. Most NVIDIA’s PCI-Express graphics cards starting from the 6600 GPU can enjoy the benefits of SLI. |
|
 |
DrMOSIn order to provide customers stable and high quality products, starting from P45 series mainboards, MSI is leading the industry to introduce the world’s most advanced power supply component, DrMOS (Driver-MOSFET), which integrates Driver IC, Top MOSFET and Bottom MOSFET into one chip. Except for its outstanding performance in power saving, DrMOS possesses switch frequency which is 400% faster than traditional MOSFET and has great improvement in stabilizing power supply and voltage control. Even under heavy loading and overclocking conditions, DrMOS can still provide the most stable and efficient power supply and quality. |
|
 |
Instant OC• Instant MB info monitor |
|
 |
3TB+ Infinity3TB+ Infinity is not only breaking through the limit of traditional BIOS, but also enhancing the utilization of hard drives efficiently. In addition to supporting the latest 3TB hard drives, MSI 3TB+ Infinity technology can use the 3TB hard drive as boot disk when installing a 64-bit operating system. Compared to competitors, MSI 3TB+ Infinity is an industry-leading technology which substantially presents an advantage of development and application in the future. Features |
 SATA 6Gb/s provides double the bandwidth of traditional SATA 3Gb/s, and increases the data transfer rate between your mainboard and internal storage devices, such as 7200RPM HDDs, 10000RPM HDDs and SSDs. It’s also the current trend for upcoming high-speed internal storage devices to to break the existing bottleneck of a PC’s performance.
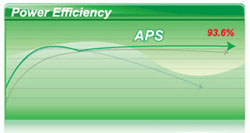 Active Phase Switching, APS, technology is an intelligent design that helps to save energy on MSI’s mainboards. The underlying idea is to switch off the power supply as soon as no electricity is needed, and when the system needs more resources again, APS will automatically adjust electricity supply accordingly. APS will automatically detect your processor’s loading at any given time and save energy accordingly. This is only possible by means of a very advanced power controlling technology. Other than software-based solutions, APS technology stands out from MSI’s own research. The specially developed IC chip can operate automatically depending on the demands of the power supply, which is to reduce the total power usage.
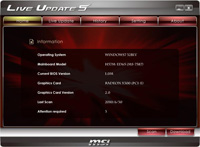 MSI Live Update 5 is a powerful and useful application for updating the latest BIOS and Drivers, saving you time and lowers the risk of updating. End-users can install and run the Live Update 5 software on their computers with the companion CD or downloading the app from the MSI website.
Intel smart response: SSD Caching Performance
One of the most interesting features of the Z68 chipset is the Intel Smart Response, which is essentially SSD caching. The idea is very much like Windows 7 ReadyBoost which uses a flash storage device to cache contents. However, unlike ReadyBoost, where flash drives are used as random disks, the SSD caching system on the Z68 uses SSDs to cache commonly used applications. This will result in faster application launches and system performance.
The SSD caching will not compete against real SSDs in terms of performance but it will greatly enhance the system performance of a mechanical drive by adding a small size SSD. With commonly used data stored on the SSD, the system will be more responsive and applications will launch faster because SSD burst and sequential read speeds are often two to five times faster than those of mechanical drives.
To use SSD Caching, the following requirements must be met:
- 1 x SATA interface SSD drive capable of delivering read/write performance not slower than 100MB/s read and 150MB/s write.
- The minimum storage space needed for the SSD must be 20GB
- 1 x standard 7200RPM or 5400RPM HDD.
- Windows 7 operating system
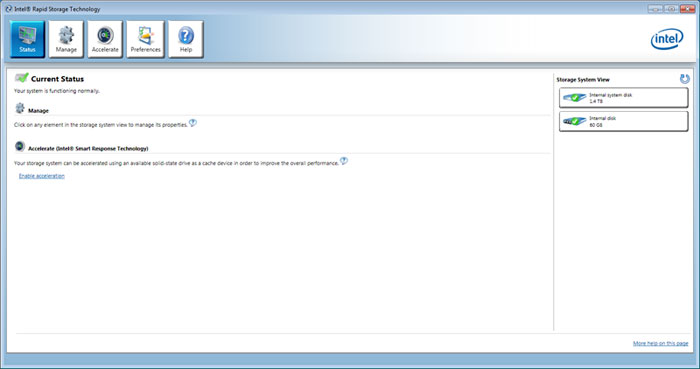
Setting up SSD Caching is also extremely easy thanks to the latest Intel Rapid Storage program. Simply follow the guideline below:
- Perform a full SECURE Erase of the SSD with application from the SSD vendor.
- Format the HDD into NTFS, follow by a full format of the HDD.
- Set the Intel SATA ports to RAID mode.
- Install OS onto the HDD.
- Install Intel RST 10.5, then reboot.
- Enter RST 10.5 control interface, and click on the Accelerate button.
- Select the SSD drive, the amount of space to be used as cache, the HDD volume to accelerate, and the acceleration mode, then click on OK to proceed.
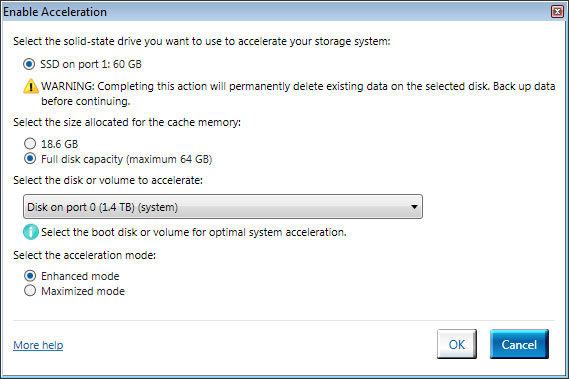
By default a minimum of 18.6 GB of space on the SSD is needed to setup the SSD caching. Up to 64GB of space can be reserved for the cache. This is a good range as it offers enough space for the OS and 2-3 commonly used applications. Also, 64GB is a good number because for those who can afford an SSD larger than 64GB, using the SSD as the primary drive would be much more beneficial for performance. After all, the data is still stored on the mechanical drive.
Intel offers two modes of caching mechanism: Enhanced and Maximized. While the read performance for both modes is roughly equal to the read performance of the SSD, the write performance for the Enhanced Mode is a little slower than the slower of the two drives used (SSD or HDD). The write performance of the Maximized Mode, on the other hand, would be closer to the performance of the SSD. In addition, the Enhanced Mode offers stronger security as it utilizes a write-through strategy where data on the SSD and the hard disk is synchronized. In the event that the SSD is lost or damaged, no data is lost. The Maximized Mode utilizes a write-back caching strategy where data is written to the disk in intervals. The risk here is that if the SSD failed or disconnected before the data was written to the hard disk, the data would be lost.
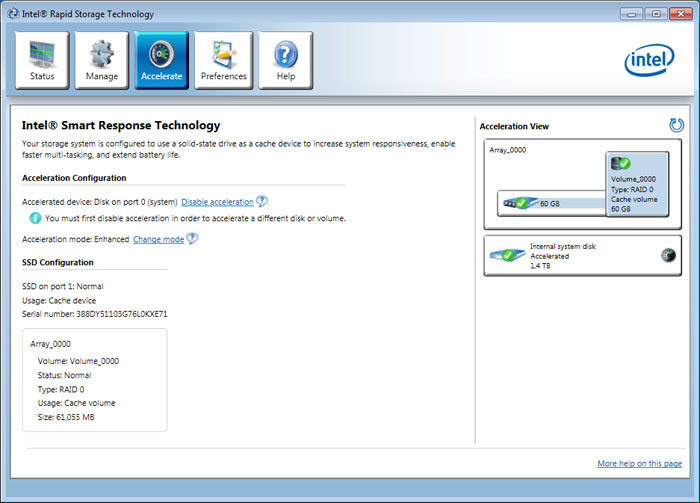
Switching the modes can be as simple as click of a button
As we can see from the image above, once the SSD Caching has been enabled, a partition will be created on the hard drive with the same storage capacity as the SSD (or the size on the SSD reserved for caching). The software shows that the hard drive and the SSD are configured as RAID 0.

Something neat about the way Intel handles the SSD cache is that when an SSD is set up as the cache drive, it will not show up under Windows Computer Management. This will prevent the user from accidentally formatting the SSD.
At the moment, Intel Smart Response Technology (IST) only supports 1 HDD and 1 SSD or 1 RAID Partition + 1 SSD. In addition, the average read and write speed of the SSD must be at least 50% faster than the hard drive in a single HDD+SSD combination, and at least 100% faster for RAID 0, in order to see the performance gain.
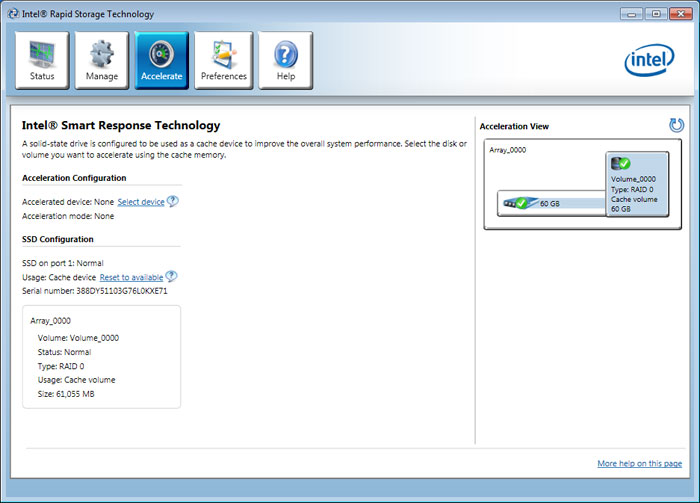
If users ever decide to stop using the SSD Caching, they can simply click on the “Reset to available” and the SSD can be used as a regular drive again.
Windows Boot-up Performance
We went ahead and tested boot-up performance from the Windows loading screen to the Desktop screen of Windows. We closely measured these results and after 5 test runs we ruled out the first run and took the median of the 5 results.
| Microsoft Windows 7 Pro Booting Time | |
| Seagate Constellation ES.2 | 25.3 seconds |
| Seagate Constellation ES.2 + Intel 20GB Larson Creek SSD | 14.4 seconds |
From these two simple tests there is a clear comparison between a system that would be using just a SATA 7200RPM Hard Drive or the same Hard Drive with a 20GB Intel Larson Creek SSD. There is once again a noticeable performance increase making it possible for Windows 7 Pro to boot about 11 seconds faster than a system with just a Hard Drive. This performance increase happens after the system performs the same task twice in a row. This should also be noticed in other applications that might be taking advantage of the SSD Caching.
iMode and dMode Dynamic Switching
The Z68 adds a Flexible Display Interface (FDI) between the processor and the chipset, allowing enthusiasts utilize the integrated graphics. As a result, users can tap into the Quick Sync to speed up the transcoding time. In addition, the new chipset also supports switchable graphics where the integrated graphics can be used in conjunction with a dedicated graphics card. At launch, only Hydra Lucid Virtu will be supported, but we have been told that NVIDIA Synergy will be available later date via BIOS and driver updates. A few months have passed and still no official word about NVIDIA Synergy.
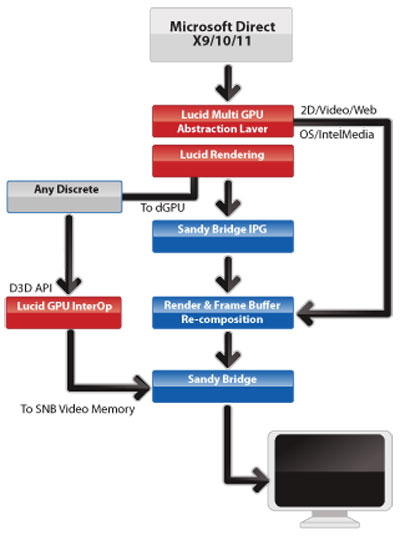
Much like what we have seen with the Hydra, Virtu sits between the GPU and the application/game, intercepting API calls and directing the workload to the dedicated graphics or the integrated graphics depending on the types of the application. Unlike the Hydra, which requires a chip, Virtu is purely software based. The Virtu software contains profiles and assigns the task depending on which GPU serves the system best for the given task. Since no physical switch is needed to direct the workload, both the integrated GPU and the discreet GPU can work simultaneously. Talk about real parallelism.
While the Z68 supports dynamic switching between the built-in graphics and the discreet graphics, how it is implemented depends on the motherboard manufacturer. The MSI Z68A-GD80 (G3) we received has video ports on the motherboard to be used with the integrated graphics, where consumers can set the integrated graphics as primary (iMode) or the discreet graphics as primary (dMode). Some vendors, like the Gigabyte’s Z68X-UD7-B3, may choose to simply supporting one mode or the other only supporting either iMode or the dMode.
In order to use the graphics, the system must meet the following requirements:
- Windows 7 32 or 64bit
- Z68 or H67 Express chipsets
- Sandy Bridge processor
We tested the switchable graphics with our ASUS P8Z68-V Pro board, however the way you set this up on your MSI Z68A-GD80 (G3) should be exactly the same. As mentioned, MSI boards support both modes. MSI’s implementation allows users to choose what works best for them. Those who do more video encoding and want lower system power consumption should choose iMode mode; those who want the best gaming performance should use dMode mode.
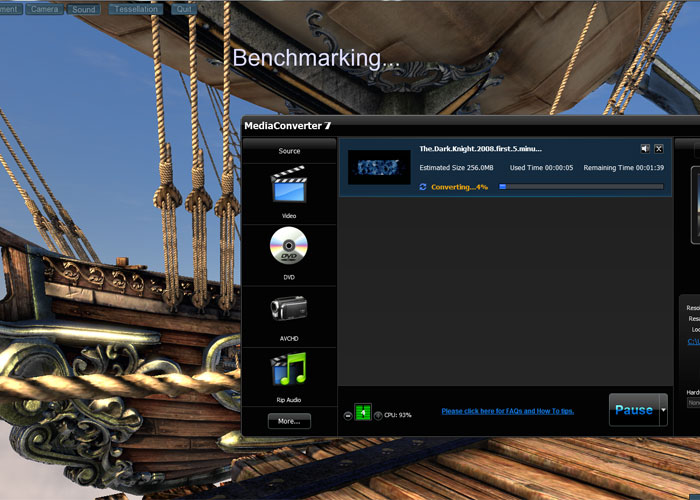
We like how MSI implements the GPU virtualization by offering both modes of operation. We found that if we set the system to dMode mode and Virtu did not have a profile for the particular game, it would always default to the onboard. For example, we ran the Crysis Warhead Benchmark tool, and Virtu failed to recognize it and reverted to the iMode. As a result, the performance was quite dismal. However, if we set up in dMode mode, then the benchmark tool works great because it defaults to the dMode despite lacking of the profile.
It’s nice to be able to play games at high resolution with the dedicated graphics and encode video at the same time with the integrated graphics.
Some may be thinking that’s fine to simply have the discreet graphics as the primary graphics and enjoy the best gaming performance. While this is true for gamers, people who need to tap into the Quick Sync for video encoding would suffer if a particular application lacked the appropriate profile. Thus, with iMode as the primary graphics, even if a particular application profile is not listed under Virtu, the system will still able to utilize Quick Sync.
One inconvenience, however, is that when switching between the modes, users have to physically switch the display port from the iMode to the dMode or vice versa. Also, when switching between the modes, the BIOS screen and the POST screen will not be accessible without physically reconnecting the monitor to the right port. Furthermore, if users set the system as iMode, the discreet graphics settings will not be accessible. The user would not be able to adjust the advanced settings such as AA, AF, and others for a particular game using the discreet graphics setting.
For the most part, the switch works quite well. Games run without any issue and without any noticeable performance hit. We did encounter one problem however: when we set the system in iMode, the 3DMark 11 Physics test would not run. Also, while in dMode, we saw a black screen in the Physics test.
Lucid claims that while there will be some performance lost with the Virtu, it is minimal. We tested a couple games to see how much effect the Virtu has in games:

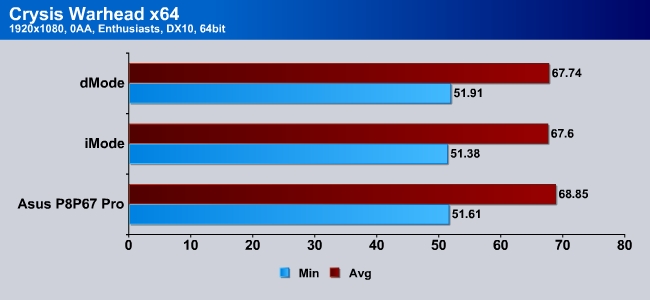

With older games like Crysis Warhead, we see only a minor performance hit. However, with newer and more graphically demanding games, we see 3% to 16% performance drop as shown with in Unigine Heaven 2. While not conclusive, this gives us a good estimate on the range of performance effect that Virtu has.
Intel Quick Sync
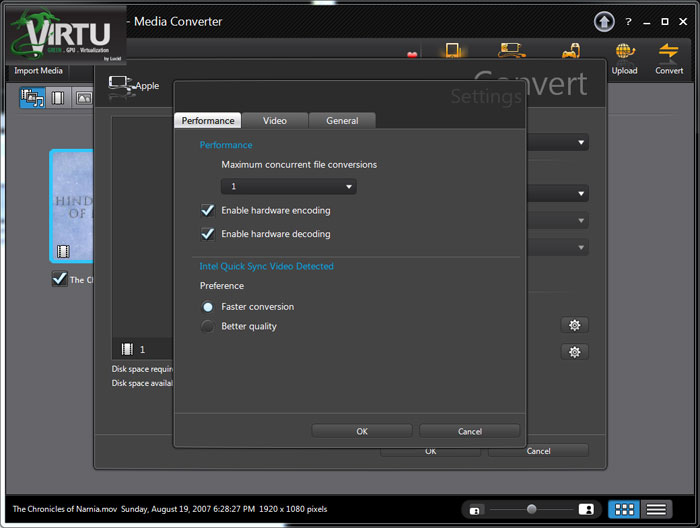
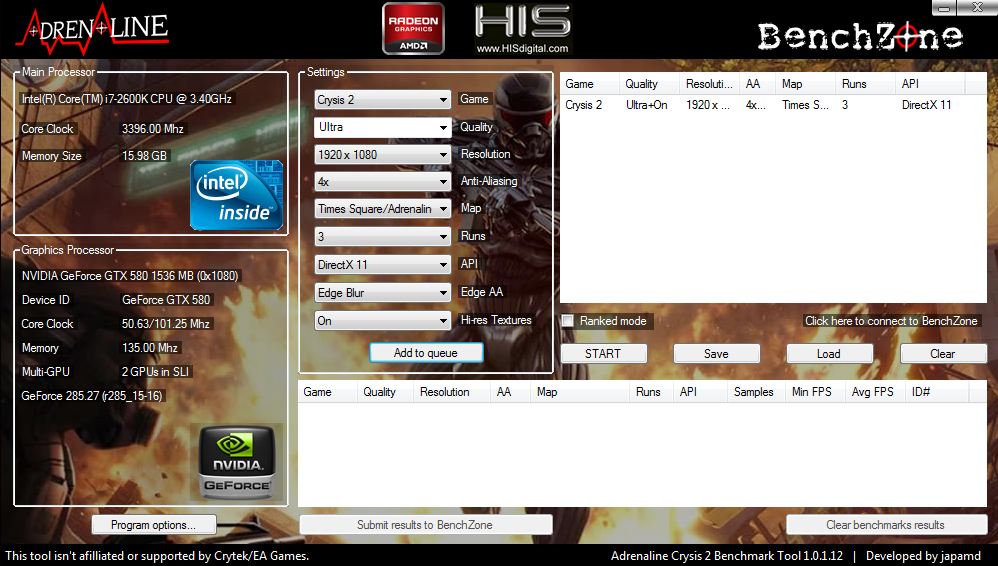
When we reviewed the Sandy Bridge back in January, our H67 board died during the testing period so we could not see how Intel Quick Sync performed. Finally, we are able to put it to the test with the Z68. We transcoded a 2 minutes video clip with 80 Mbps bitrate to iPhone 4 profile with MediaConverter 6.5, which not only supports Quick Sync, but also will work with Virtu.
The latest MediaConverter 6.5 supports two encoding profiles: faster conversion and better quality. We tested both settings and also tested ATI Stream and CPU.
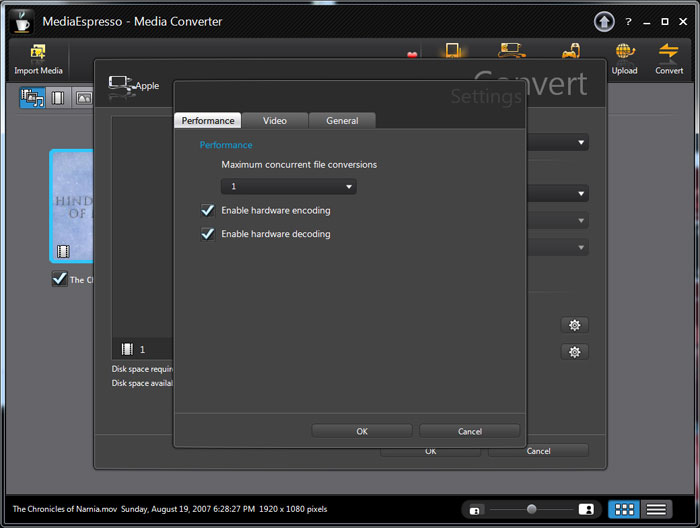
If Virtu is disabled, the software will not detect the presence of the iGPU and thus revert to the ATI Stream.
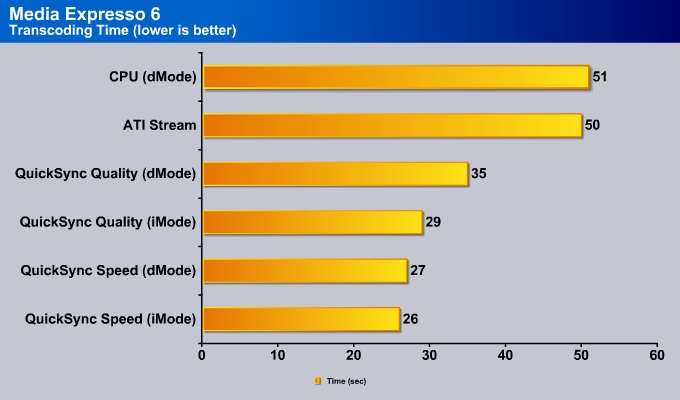
The Quick Sync is impressive! We can see that it cuts the encoding time by almost 50% compared to the CPU or the ATI Stream. In fact, the encoding performance between our Core i5 2500K and the HD 6870 used in the test is about the same.
It can also be seen that there is a slight performance hit with the dMode when it comes to encoding. The encoding time is about 10-15% slower in dMode than in iMode. Still, even with the performance hit, the Quick Sync is still much faster than ATI Stream or the CPU, so it is still worth the overhead.

From left to right: ATI Stream, QuickSync quality, QuickSync Speed, CPU (click for larger image 1.2MB)
In terms of the image quality, we cannot really tell the differences. The color reproduction looks identical for all of the clips. The clip encoded from Quick Sync Quality does seemed slightly sharper, but we cannot definitively say it is better than other methods, and it would be very difficult to distinguish between them.
Software Overview
Installation DVD
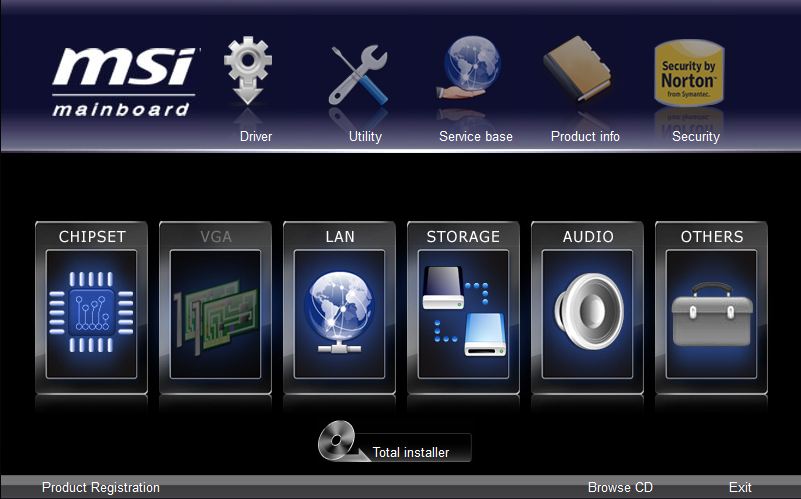
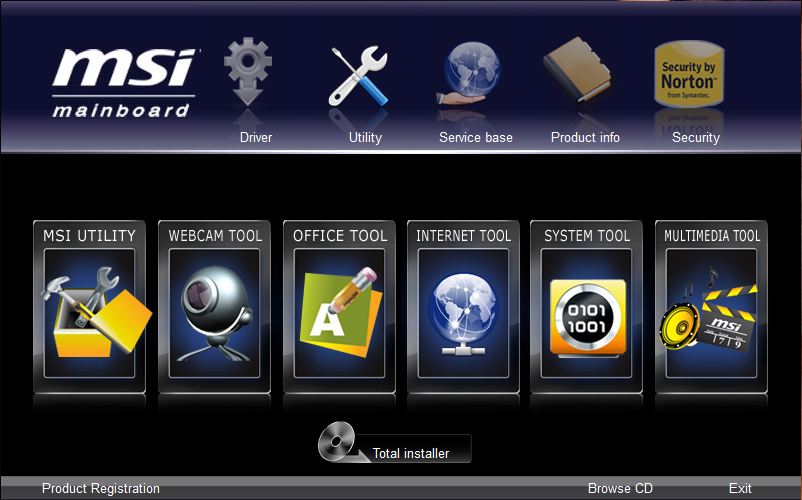
The MSI Z68A-GD80 (G3) motherboard comes with a Driver DVD. This DVD not only has the drivers required for the motherboard chipsets and other hardware, but also additional software for maintenance, hardware status, overclocking, tweaking, hardware settings, and other features. The Driver section has all the necessary hardware to get users started and connected to the internet. The Utility section has Windows based applications like ClickBIOS II, Control Center, and other trial based applications for editing videos and photos, etc.
There are some support page links on the DVD as well, along with 60-Day trial Norton Internet Security software.
Control Center
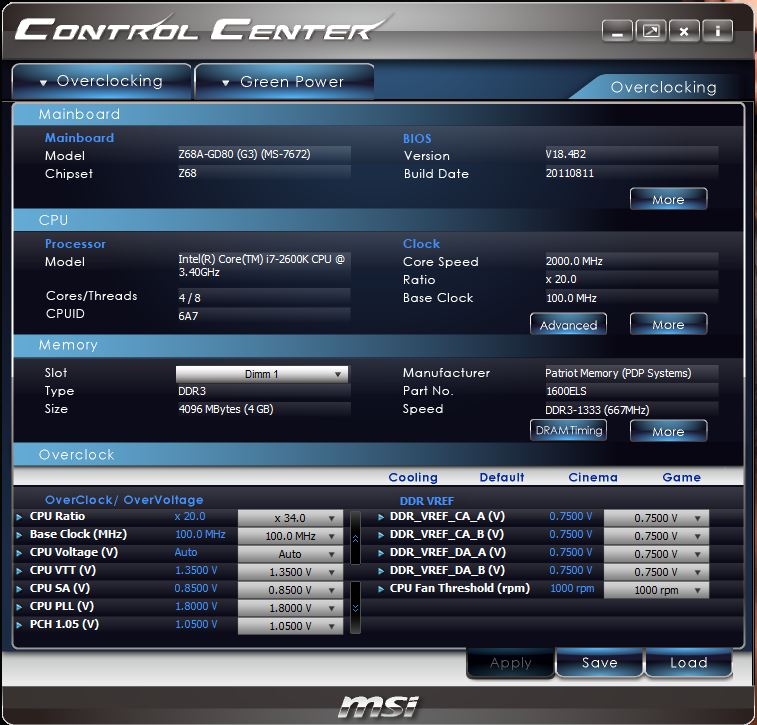

The Control Center is a great tool to change computer hardware voltage and performance settings. This is a simple tool specifically designed for Overclockers. The first two sections are completely related to overclocking. Users that do not understand much about overclocking can take advantage of the OC Genie II option explained on the 2nd part of the Overclocking section. This will take their system to 4.2GHz automatically.
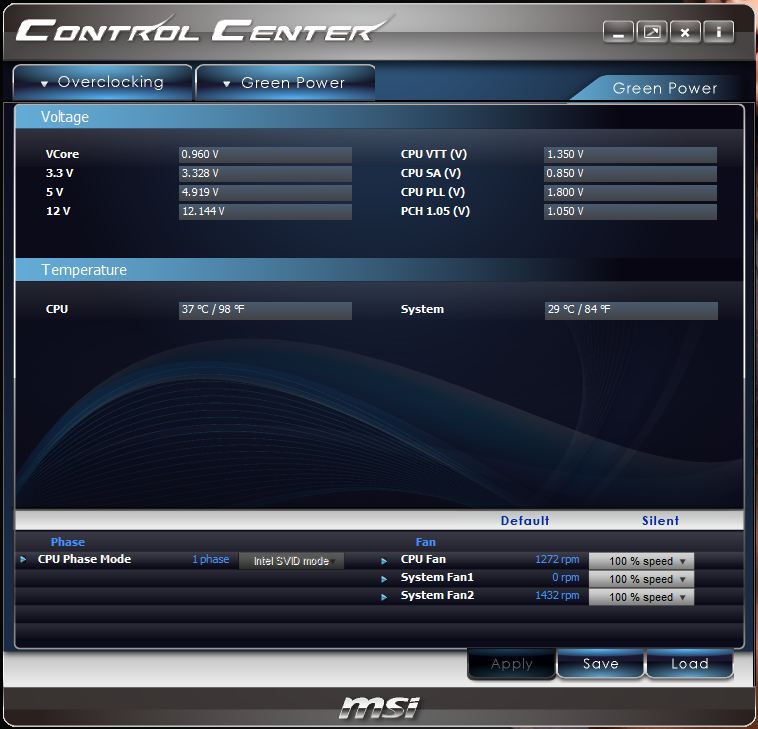
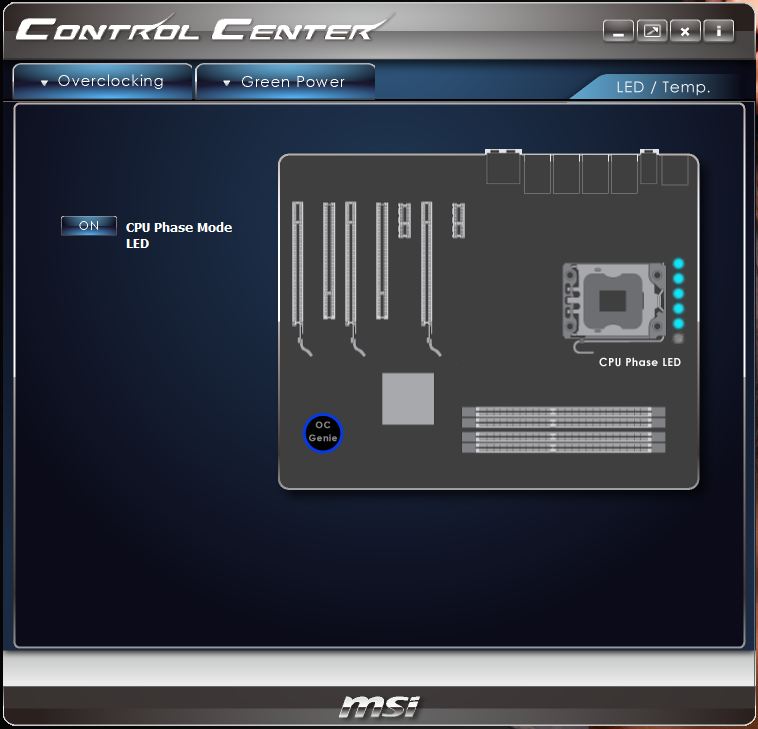
The Green Power section is nothing special, just gives the user a real-time voltage reading of all the main hardware components. The user can also enable the CPU Phase Mode LEDs which show the amount of phase load the user is using.
ClickBIOS II
Here we have the MSI ClickBIOS II. This is a Windows based BIOS application, that allows the user to make changes to the BIOS without having to go right into the BIOS during booting. The ClickBIOS II allows the user to change most of the settings that would not make the system unstable, however, memory frequency settings and such will have to be altered directly in the BIOS. Please take a look at the BIOS section for a clear overview of what can be done in ClickBIOS II.
Audio Manager
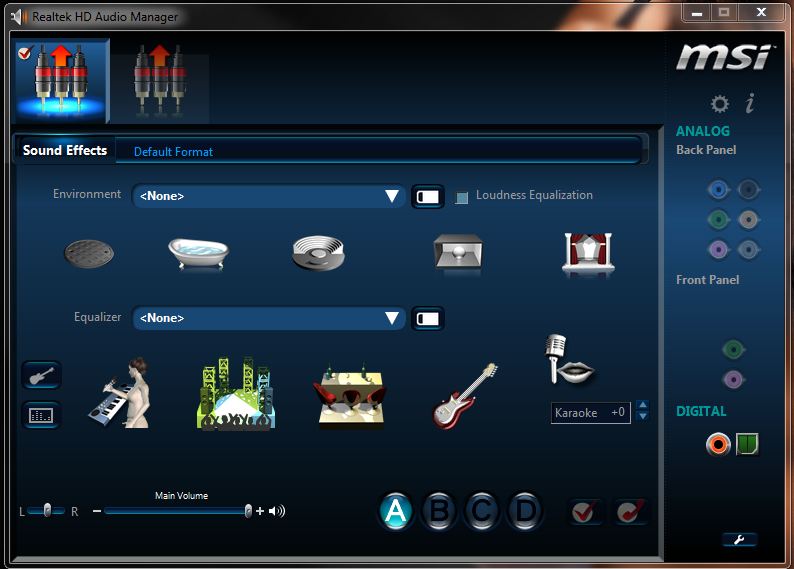
The HD Audio Manger is not necessarily MSI’s product; it’s Realtek’s standard driver software which allows the user to adjust tones, equalizer, environment, volume, and set up speaker settings. MSI just put a blue themed twist to the software layout.
Audio Genie
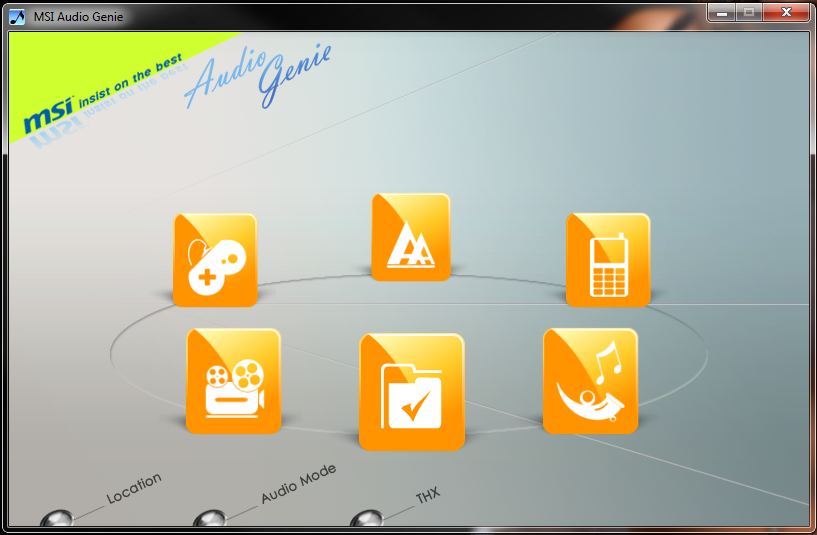
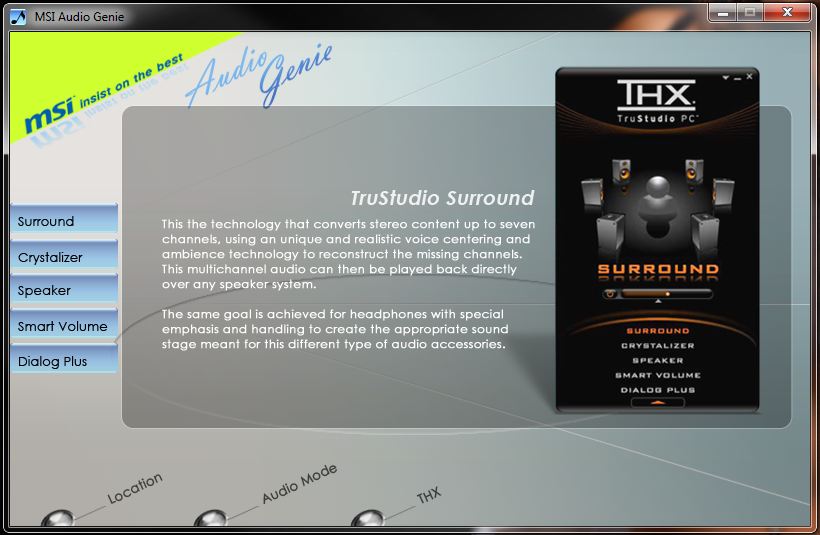
MSI’s Audio Genie is a simple tool to adjust audio to different presets, like theater, gaming, music, etc. As long as all the drivers are correctly installed and the right audio device is connected to the system, the user will be granted to extra settings like surround, crystalizer, and so on.
Super-Charger
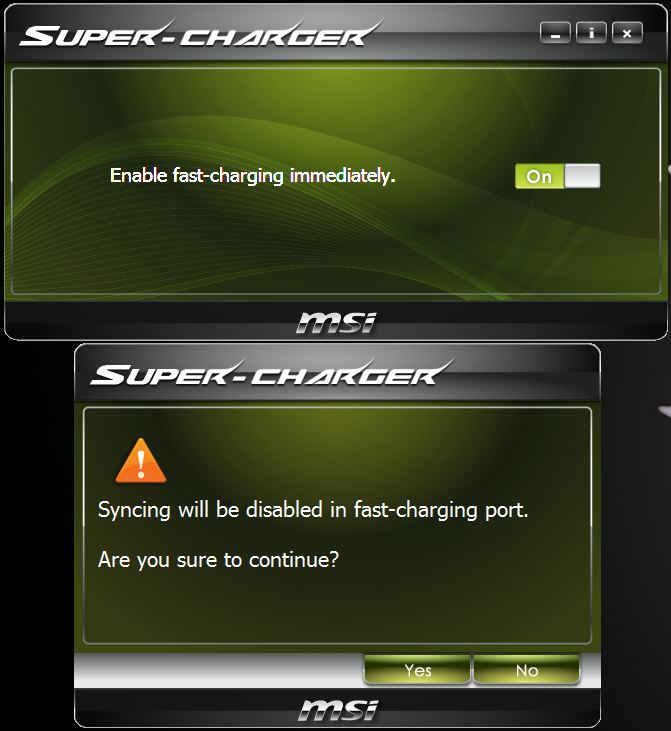
Super-Charger is a simple tool that provides extra power to the designed USB port to charge hand-held devices quicker than before. This is exactly the same feature as GIGABYTE’s ON/OFF Charge. Do note that when this feature is enabled, it is not possible to synchronize devices with data.
Video Genie
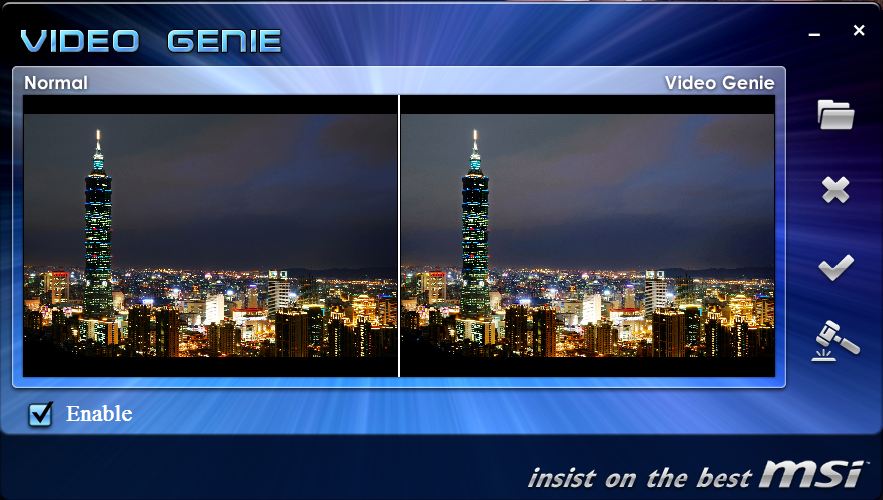
Video Genie is a small application that enhances the color and brightness for videos to have a better video experience.
Unboxing and Accessories


The MSI Z68A-GD80 (G3) comes in nice sturdy packaging, with some eye pleasing graphics. Their main features like their Military Class II components are mentioned on the front in a big Military Class II logo along with their Click BIOS II, 1 sec OC Genie II Overclocking and the PCI-Express Gen 3 switch upgrade. They also have the smaller features also mentioned that many other motherboards also support, including Virtu, SLI, CrossFire, etc.


The motherboard’s box has a flap on the front which allows the user to learn more about the power design for the GD80, the new GUI BIOS interface, and the advantages of PCI-Express Gen 3. Under the flap, there is a clear picture of the motherboard with easy highlights of the key components on the motherboard. This in our opinion is a better way of showing off a motherboard than what we’ve seen with other motherboard manufacturers that use plastic windows to have a clear view of the actual motherboard. For an unexperienced user, that would be useless, because it would not explain anything.


Opening up the box was easy, but we were somewhat dissatisfied with how cluttered the components were inside the box. While this doesn’t matter that much to an experienced computer builder, but a beginner might be overwhelmed with the different accessories. We’ll go into more detail about the accessories below, but before let’s take a look at how the motherboard is placed in the box. We can see that there are two air cushioned flaps from the cardboard to protect the motherboard from any movement during shipment, however there is no layer of foam covering the bottom of the motherboard. While we have never seen any motherboard being damaged without the foam, it just gives us a little more to worry about when a package arrives all smashed up and we see that the motherboard did not actually have any soft protection.


One very nice addition is the extremely high-detail user manual and installation guide. Not only does it explain everything about the installation of the motherboard and the hardware step-by-step, but also the specifications of each connector with clear representations of each connector’s pins. The BIOS and Software overview is also highly detailed. Instead of just having the whole BIOS just shown with the options, MSI explained what each of those options also does and how it will effect the system. This makes setting up a PC very user-friendly. Additional content that comes in DVD or paper documentation include the Driver DVD, the Certification of Quality and Stability paper, the 5-Year Warranty instruction card, and a quick guide.


Lets take a look at the accessories, including connectors, cables, etc. Starting from the left top corner, the first thing we see is the USB 3.0 connector cable which connects to the motherboard at the bottom. We’ll check that out in the following pages, but this will attach to one of the expansion slots at the back of the system, which could potentially already be filled if using several cards, so it’s not as convenient as GIGABYTE or ASUS’s front panel 3.5″ or 5.25″ USB 3.0 drive bay design solution. Some might argue that this solution is better, since most cases will have plenty of front drive bay slots still empty even after several DVD, Blu-Ray players, fan controllers and other gadgets have already been installed.
To the right of the USB 3.0 expansion slot adapter, we have two Molex to SATA converters. This is something that most users will not need unless they are using 6 or more SATA drives. Most system builders that might get a 600W+ power supply will most likely get about 6 or more SATA drive connectors, so we don’t really see the necessity for these accessories, though they are a nice addition. Below that we have a standard flexible 2-way SLI bridge connector and 4 SATA data cables. Then we also get a standard I/O Shield plate, several small cable adapters that will help attach smaller single cables to this adapter that will allow the user to easily plug all the cables in at once onto the motherboard. Finally the right of that we see 4 voltage measuring point extenders for convenience for the overclockers, and a quick guide on how to use them.
Understanding the Board’s Design


So let’s talk about the basic layout of this motherboard. Overall, the component placement seems to be very good, except for the buttons on the bottom of the motherboard that would get covered if a user ends up using even a thicker single slot card in the last PCI-Express slot. Having these buttons right next to the memory slots would have been a better option. A interesting part of this motherboard is the 6-pin PCI-E power connector in the middle of the motherboard. This serves mainly for LN2 overclockers that need the extra power to push the PCI-Express lanes. This connector won’t affect the performance of the system, but it might provide extra stability especially with multiple video cards that might be overclocked on air or water. The placement of this connector is a bit odd as well, though not the worst we’ve seen. The user will have to find a good way to route the cable if they end up using it in a case. In most cases though, extreme overclocking will happen on a test bench where users will not have a problem with this.
PCI-Express Gen 3.0
We can clearly see that even though this is MSI’s flagship Z68 motherboard, it does not support 3-way SLI. While that’s a very niche market, and it would have been a great option on this specific motherboard, it would have added to the cost and would not have made it as affordable as it is currently. The level of features integrated into this motherboard would easily cost $280 for another manufacturer.
Even though this motherboard doesn’t support higher options than 2-way SLI, users could still use two ASUS Mars II’s, or perhaps two NVIDIA GTX 590 or AMD HD6990 dual-GPU video cards. This is equivalent to a 4-Way SLI or CrossFireX setup. Additionally, with the new PCI-E Gen 3 switches, the next generation of graphics cards and Ivy Bridge processors will allow the user to achieve higher numbers in games and applications without having to spend extra money on a newer motherboard.
Besides that the first two PCI-E blue slots should be x16/x16 (PCI-E 3.0), while the third one is a standard x16 (PCI-E 2.0) slot. Then there are two PCI-E x1 sots and and two standard PCI slots.


By now we have heard so much about the different switches being utilized. MSI is using the Pericom PI3PCIE 3412ZHE switches, while GIGABYTE’s G1.Sniper 2 is using the Pericom PI3PCIE 3415ZHE switches. The difference between the two is in the pinout, where the 3415 has a pinout optimized for placement between two PCI-E slots, while the 3412 is a flow-through pinout solution. We also know is that they are both PCI-E 3.0, 2-Lane (4 channel) 3.3V switches and there are slight differences in characteristic specifications, though this should not be anything that would change performance numbers. Now to better understand why we are bringing this up: it is important to know that ASRock is using the NXP L04083B, which do not support multi-card setups for PCI-E Gen 3. Therefore, only one card will be functional at PCI-E Gen 3 specs while the second card won’t be. MSI and GIGABYTE users will be able to get multiple video cards working at PCI-E Gen 3 specifications.


On the rear end of the motherboard are several I/O ports. To be honest, we are not too impressed with what the board has to offer, however, not many users will utilize extra features anyway. We would have liked to see 4 USB 3.0 ports though. Here is what the board comes with:
– 1 x Optical SPDIF port
– 1 x PS/2 Mouse/Keyboard port
– 1 x Clear CMOS button
– 1 x IEEE1394 port
– 2 x RJ45 LAN Jacks
– 4 x USB 2.0 ports
– 1 x eSATA port
– 2 x USB 3.0 ports
– 1 x DVI-I port
– 1 x HDMI port
– 1 x 6 in 1 audio jack
A Closer Look at the Components


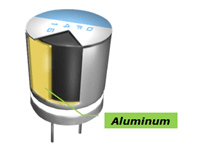
Earlier in the review we discussed MSI’s 5 year warranty and what makes it possible for them to offer this to customers. Let’s take a look at where MSI is using some of the Military Class II components which should be rated for a long lifetime. If we take a peek at the processor socket, right next to it and above it we see several components. The small rectangular components a few millimeters from the socket are the Hi-C CAPs. These capacitors have several advantages over a standard capacitor or a Solid Japanese capacitor. First off, they are expected to come with a 8x longer lifetime than standard solid capacitors. They come with a thin layer of tantalum which has a lower ESR than a standard capacitor, providing for better power efficiency and can higher temperature tolerance. The Hi-C CAPs are a great option for overclockers as they do not have massive components around the CPU socket, making it easier to install larger coolers, and even LN2 pots. This also allows for a much easier filling to isolate the components from condensation for LN2 or phase change overclockers.
Right next to the Hi-C CAPs we see the SFCs (Super Ferrite Chokes). As experienced PC users, we know that Ferrite Chokes can run quite hot especially when the system is overclocked and higher power delivery is needed. Having lots of chokes can divide the power load across all the chokes, however, that also takes up a lot of space that could be used for other valuable components. MSI started using SFCs that not only run much cooler than a traditional choke, but are also Super-Permeable. Having a good choke means that there will be better stability for the system and with SFCs there are less chokes needed and more power can be pushed through the components.


Here we take a look at the onboard audio that comes with the Z68X-GD80 (G3). The THX TruStudio Pro sticker makes this motherboard look special, however, it’s nothing more than just the standard Realtek ALC892 chipset. This is what most motherboard manufacturers use on their motherboards. Some might use the Realtek ALC889 chipset, which has a better signal-to-noise ratio at 108dB. The ALC892 on the other hand has lower DACs (Digital-to-Analog Converter) with 95dB Signal-to-Noise Ratio, ADCs (Analog-to-Digital Converter) with 90dB Signal-to-Noise Ratio. The difference between the two Realtek chips should be minimal, but from what we’ve heard the ALC892 is better for 5.1 and 7.1 audio solutions, while the ALC889 is better for Stereo, though should still support surround audio.


On the two pictures above, there’s nothing too special except for the 6-Pin PCI-E power connector that we talked about on the previous page. It provides additional power and stability for users that will be pushing their video cards to high numbers. Is it really necessary on a motherboard that doesn’t have 3 to 4-way SLI support? It could be. Using a card like the Mars II from ASUS could draw a lot of power which could put stress on the 24-pin connector. With this solution, the power is spread out more evenly, providing for a more stable operation.
The other components on the motherboard are nothing too interesting: controllers for LAN, USB, and other I/O ports. The top of the motherboard has the 8-pin CPU power connector.


Let’s take a look at what we can find right next to and under the motherboard heatsink. The LEDs on the top show the current phase used for the CPU. The higher phase used, more LEDs will light up. This is something more for looks than for actual use, as the user will most likely already know what phase is used when setting up their PC. What actually would have been a better feature would be debugging LEDs. They would help during debugging if there is any problem with any of the hardware used on the motherboard. For example, when there is a memory booting problem, the LED would indicate that it is stuck at the memory diagnosis part of POST. This would help the user find out which hardware is causing the problem without having to spend too much time with trial and error type testing. Right by the memory slots we can see a 4-pin PWM fan header. This is usually the main CPU fan connector. On the other side, there is a standard 3-pin fan connector.


Here we can see a tool that might come handy for overclockers. Though most users will never use this feature, overclockers can benefit from exact voltage measurements in real-time. The 7 pin connector (blue) is a real-time voltage measuring socket. Overclockers can easily plug their multimeters into this measuring point, or they can simply use the provided measuring point extenders that attach to the motherboard.
Just like 99% of motherboards, the 24-pin power connector is located in this general area as well. Right below it, there are two 3-pin fan power connectors. It’s a pity that the fan connectors are not 4-pin PWM connectors, but it’s not a big deal.
Taking a look at the SATA connectors, we can see 6 SATA connectors right next to each other in a group. The two white connectors are 2 x SATA III connectors. The four black connectors are standard SATA II connectors. These connectors are controlled by the Z68 Chipset. Users planning on running a SATA III SSD running the new SandForce controller should connect to the white connectors. The separate white SATA connector is also a SATA III connector, however, this one runs on the Marvell 88SE9128 chipset. From previous testing, while the Marvell 88SE9128 can provide SATA III performance, the Z68 chipset’s performance is still better due to the data being sent straight through the main chipset instead of a third party chip.


On the first picture, there is nothing too special that we have not seen on a Z68 motherboard before. Right by the heatsink there are several connectors for front panel buttons, LEDs, etc. The black rectangular connectors are the standard USB 2.0 front panel connectors. The blue connector is a USB 3.0 front or back panel connector. In this case the blue connector would be used with the MSI back panel expansion slot adapter. On the 2nd picture, we see three buttons. The first two smaller ones are just standard Reset and Power buttons, while the next OC Genie button is the 1 second overclocking button. This should take a standard 3.4Ghz Core i7 2600K processor to 4.2GHz. We’ll try that out on our Overclocking page. Finally there are a few more connectors, like the one for FireWire IEEE 1394a, and for front panel audio.

The motherboard has two sets of heatsinks designed to cool two separate parts. The larger rectangular heatsink is the South Bridge, or the Z68 chipset’s cooler. The other taller heatsink with a heatpipe design is the cooler for the driver MOSFETs. After taking them off, we could see that the thermal pads and thermal compound had clear contact with the hardware. This means that cooling should be quite efficient, and there is nothing to be worried about here.


Here we have a few more pictures showing the extra chips, and components on the motherboard that were previously hidden by the motherboard’s heatsink. As these components run hotter than any other component on the motherboard, heatsinks are provided to cool off these components. Ideally, these components should not get hot enough that passive cooling would not be sufficient enough, however for longer motherboard lifetime, it is still good to have good air circulation inside the system.
The little thin square looking components right by the SFCs are the Driver MOSFETs. Driver MOSFETs get their name from having a Driver Integrated Circuit build right into an enclosure that holds both the MOSFETs and the Driver IC. To understand why this is done, one must understand that a standard traditional Voltage Regulator Module (VRM) consists of a Choke, Capacitors, MOSFETs and Driver ICs. So by combining the Driver ICs with the MOSFETs, mounting space is saved, and users gain higher power transfer and increased efficiency at higher switching frequencies.
The New UEFI Bios


This is the main BIOS page that will come up when the user enters the BIOS. For first looks, it appears to be a very nice BIOS compared to the standard old text BIOS. Sadly enough, GIGABYTE still uses that BIOS, and it doesn’t make sense why they would not make the move. Their BIOS is slow, and they blame other companies for having slower UEFI BIOS’s, even though GIGABYTE’s is the slowest. Speaking of UEFI, there is a slightly faster boot up time over the traditional old BIOS.
Also, do bear in mind that all of this can be controlled by a mouse because this is a GUI interface BIOS. There are real-time information displayed on the top, including the time, date, system specs, and temperatures. The top Boot Drive Priority pictures can be dragged around to adjust boot priority.
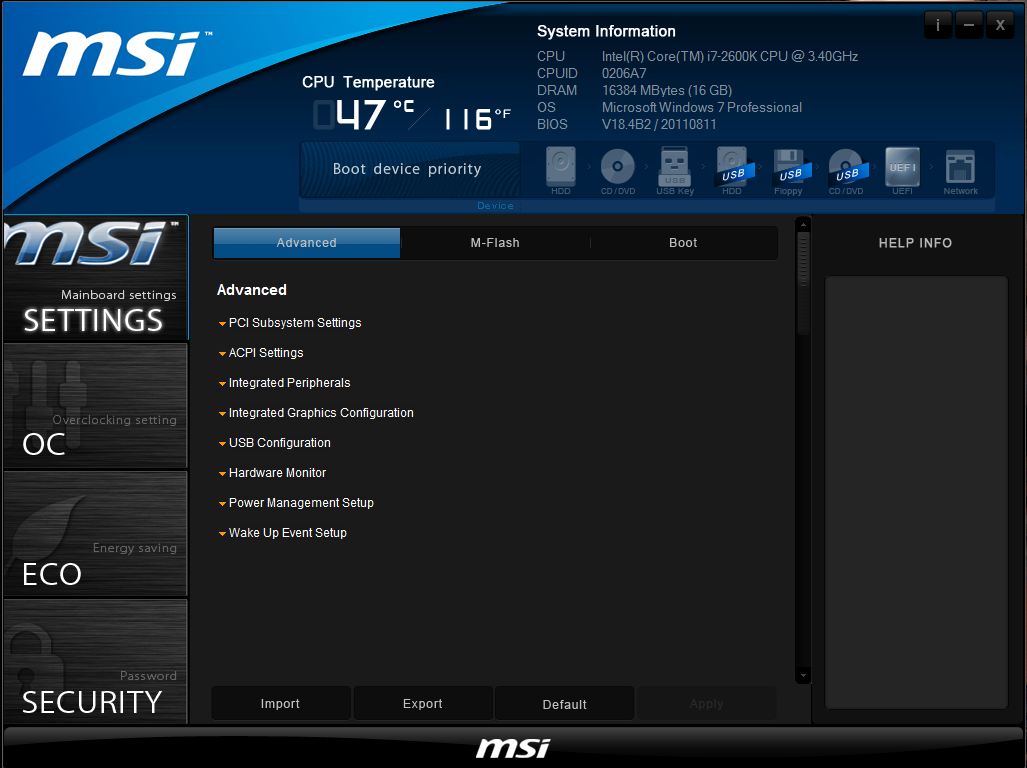
The Mainboard Settings section has four main categories that we’ll take a look at below: System Status, Advanced, Boot, and Save & Exit.


We won’t go into too much detail about everything in the BIOS, but we’ll mention some of the nice features. The rest can be found in the User’s Manual that can also be viewed on MSI’s website in a PDF format.
The System Status will allow the user to adjust the date and time and also see main system devices like hard drives, DVD players, etc. This is a good place to check whether the drives are detected the way they should be. This tab also shows the BIOS version, physical memory available/recognized, and other CPU information about cache size. The Advanced section provides the user with the main BIOS settings for the chipsets, and features for the motherboard. This includes PCI time delay; Hard Drive boot preferences; Integrated Graphics or Discrete Graphics settings depending on whether the user wants to use Virtu; USB 2.0 and 3.0 configurations; Hardware monitoring for fan speed, temperatures, and voltages; and power management settings. The Boot section is nothing but boot device priority setup for Storage Devices, CD/DVD devices, etc. Finally the Save and Exit button will save all the current settings and exit the BIOS. It is optional to save, so the user can quit the BIOS without making any changes.


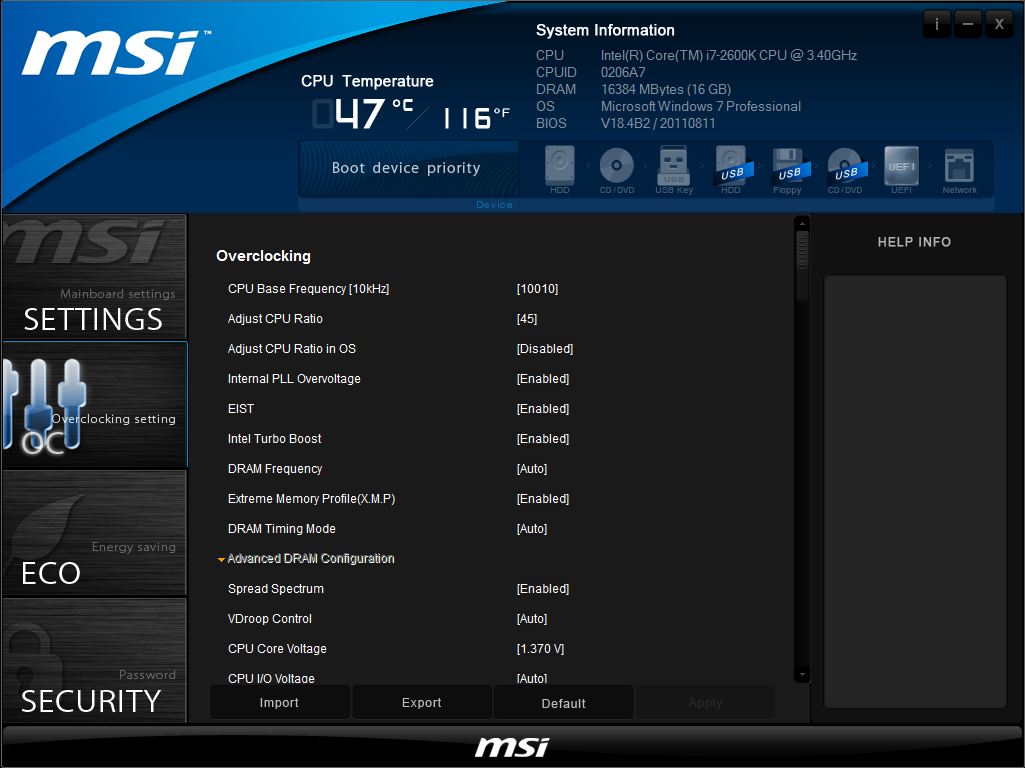
The Overclocking Tab is separate from all the main motherboard features and settings. This is excellent because it will prevent unexperienced users from going here and accidently making changes. However, for overclockers, this will be the favorite place that they will visit. There are clear settings for CPU settings, CPU PLL overvoltage, Spread-Spectrum, VDroop, CPU Voltage, etc. These are some of the major settings that a Z68 overclocker will tweak once they have changed the CPU Base Frequency, and can be adjusted by 10kHz increments. All the overclocking tools that we’ve seen on other major motherboards from GIGABYTE and ASUS are also available on MSI’s board, so there is nothing to be worried about here. It is easy to use, and in 1-2 minutes, we were able to set the system to run at 4.8GHz (previous voltage and settings were tested on other motherboards).


Finally, there are a few more settings that can be adjusted. OC Genie II can be enabled, the ECO saving tab provides power saving features, and there is a browser available with necessary software already installed on the hard drive that will allow users to browse the internet when the main operating system is not available due to a crash or problem. The Live Update, M-Flash Utility is where users can update your BIOS, and the Password Security is nothing more then the standard BIOS password setup area.
Overclocking
OC Genie II
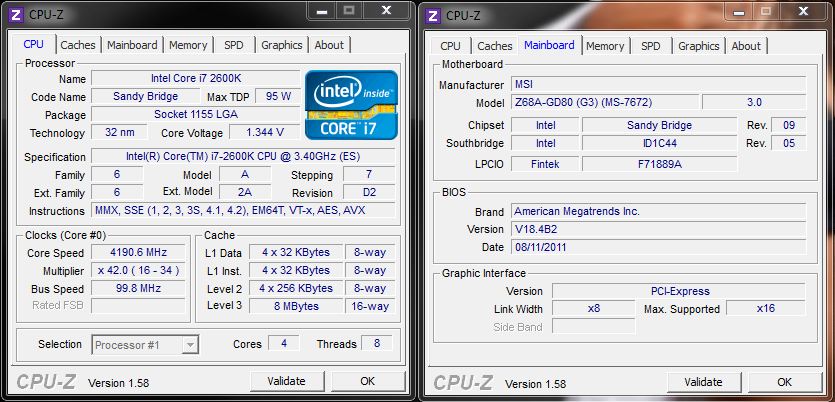
OC Genie II is even simpler than it all sounds. All we need to do is press the button, and the system will run at 4.2GHz. This reminds us of the old Turbo feature on old 90’s PCs. Either way, after pressing the button, here is what the system was running at:
BIOS
BIOS overclocking is exactly the same process as on any other motherboard we have tested since Sandy Bridge has been announced. To get a basic overview of overclocking, please check out our Intel Core i7 2600K processor review. Do keep in mind that the article was written at launch and some info might be outdated, but most of it should still be accurate.

Right off the bat, with 1-2 minutes of tweaking the settings in the BIOS, we set the CPU Ratio to 48x, and raised the voltage to about 1.38V. While this is a bit much, and most likely the CPU can run stable at a lower voltage as we’ve seen in other reviews, we wanted to see how far we could push the system without causing instability. The system still ran stable at 4.8Ghz.

Finally, we took the processor up to 5GHz. Past that point, it was quite difficult to get the system running without putting a lot of time into tweaking the settings, but it is definitely possible. It is also advised to use something better than an air cooler to be 100% stable at full load.
Temperature

The temperatures were recorded with CoreTemp while running LinX for a few hours during stability tests and double checking the results with OCCT for 20 minutes right after LinX finished its stress test. The processor was fully overclocked. The results were recorded carefully. After the results were recorded, we waited for 30 minutes before taking Idle temperature measurements. The results were as follows:
| Motherboard | Temperature (Idle / Load) |
|---|---|
| ASUS P8P67 WS Revolution B3 Rev | 39C/ 40C |
| GIGABYTE Z68X-UD7-B3 | 40C / 43C |
| MSI Z68A-GD80 (G3) | 40C / 42C |
The chipset temperatures are really low compared to what X58 and previous chipsets used to run at, so even with a few degrees difference between the different motherboards, performance and stability should not be affected. The MSI Z68A-GD80 (G3) did perform slightly higher then expected, since this motherboard does not have an extra NF200 chipset, but it’s not a big issue.
Power Consumption

The power consumption was tested while running LinX for a few minutes at stock settings. The results were recorded carefully with a Kill-A-Watt power consumption measuring tool at the wall. After the results were recorded, we waited for yet another few minutes minutes before taking Idle power consumption measurements.
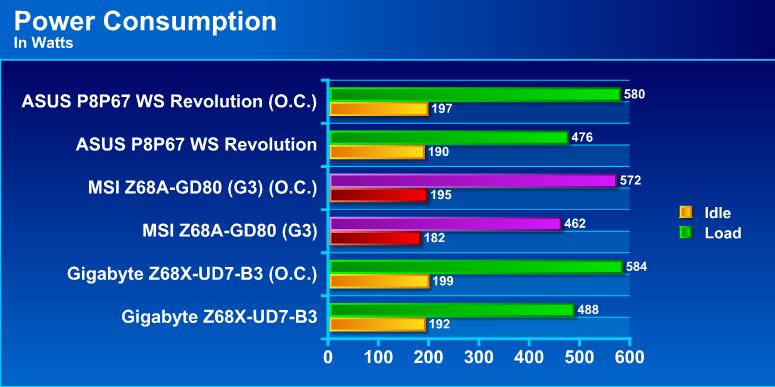
At least we are pleased to see that the MSI Z68A-GD80 (G3) had a slightly lower power consumption at load, and a fairly big difference in power consumption in idle, especially at stock settings. This is most likely due to the lack of the NF200 chipset. Users should be happy that they can save a few watts here and there just by having a system running with the Z68A-GD80 (G3).
Testing & Methodology
 We’ve expanded our testing suite considerably for the Z68 chipset, and will continue to use the same methods for most of the motherboards and CPU’s we test. In the interests of thoroughness and accurate results, we run each test at least three times, and some tests more than that. We average the total of all the tests from each benchmark then report the average here.
The OS we use is Windows 7 Pro 64bit with all patches and updates applied. We also use the latest drivers available for the motherboard and any devices attached to the computer. We do not disable background tasks or tweak the OS or system in any way. We turn off drive indexing and daily defragging. We also turn off Prefetch and Superfetch. This is not an attempt to produce bigger benchmark numbers. Drive indexing and defragging can interfere with testing and produce confusing numbers. If a test were to be run while a drive was being indexed or defragged, and then the same test was later run when these processes were off, the two results would be contradictory and erroneous. As we cannot control when defragging and indexing occur precisely enough to guarantee that they won’t interfere with testing, we opt to disable the features entirely.
Prefetch tries to predict what users will load the next time they boot the machine by caching the relevant files and storing them for later use. We want to learn how the program runs without any of the files being cached, and we disable it so that each test run we do not have to clear pre-fetch to get accurate numbers. Lastly we disable Superfetch. Superfetch loads often-used programs into the memory. It is one of the reasons that Windows occupies so much memory. Vista fills the memory in an attempt to predict what users will load. Having one test run with files cached, and another test run with the files un-cached would result in inaccurate numbers. Again, since we can’t control its timings so precisely, it we turn it off. Because these four features can potentially interfere with benchmarking, and and are out of our control, we disable them. We do not disable anything else.
Test Rig
| Test Rig | |
| Case | Zalman GS1200 Case |
| CPU | Intel Core i7 2600K |
| Motherboard | MSI Z68A-GD80 (G3)GIGABYTE Z68X-UD7-B3 |
| Ram | Patriot Gamer 2 16GB (4x4GB) DDR3-12800 1600MHz 9-9-9-24 Memory |
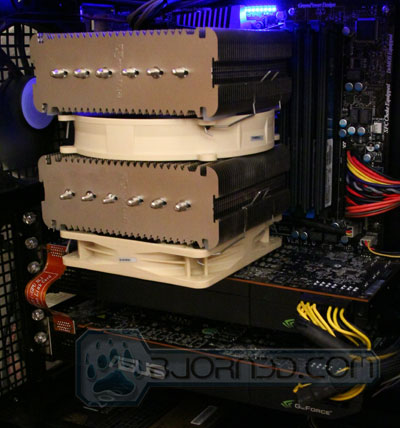
| CPU Cooler | Noctua NH-D14 |
| Hard Drives | 4x Seagate Cheetah 600GB 10K 6Gb/s Hard Drives2x Western Digital RE3 1TB 7200RPM 3Gb/s Hard Drives |
| SSD | 1x Zalman SSD0128N1 128GB SandForce SSD 1x Intel SSD Larson Creek 20GB(Intel Smart Response w/ Seagate Constellation ES.2 3TB SATA Hard Drive) 1x Kingston HyperX 240GB SATA III 6Gb/s SSD |
| Optical | ASUS DVD-Burner |
| GPU | 2x Nvidia GeForce GTX580 Video Cards in 2-way SLI |
| Additional Cards |
LSI 3ware SATA + SAS 9750-8i 6Gb/s RAID Card |
| PSU | Cooler Master Silent Pro Gold 1200W PSU |
| Mouse | Razer Mamba |
| Keyboard | Thermaltake Meka G1 Mechanical Keyboard |
Test Suite
We will use the following applications to test the performance of the Motherboard. Benchmarks
| Benchmarks |
|---|
| PcMark Vantage |
| Windows Boot Time – Page 3 |
| Cinebench R11.5 |
| 3DMark 11 |
| 3DMark Vantage |
| Metro 2033 |
| Lost Planet 2 |
| Crysis 2 – DX11 |
| HD Tune Pro |
Cinebench R11.5
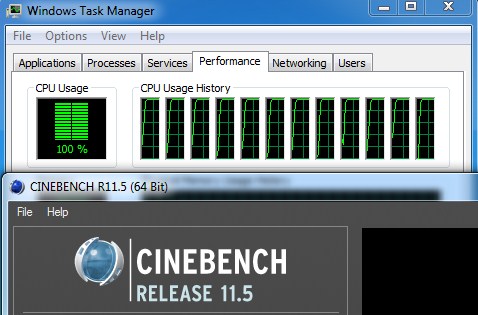
“CINEBENCH is a real-world test suite that assesses your computer’s performance capabilities. MAXON CINEBENCH is based on MAXON’s award-winning animation software, CINEMA 4D, which is used extensively by studios and production houses worldwide for 3D content creation. MAXON software has been used in blockbuster movies such as Spider-Man, Star Wars, The Chronicles of Narnia and many more. MAXON CINEBENCH runs several tests on your computer to measure the performance of the main processor and the graphics card under real world circumstances. The benchmark application makes use of up to 16 CPUs or CPU cores and is available for Windows (32-bit and 64-Bit) and Macintosh (PPC and Intel-based). The resulting values among different operating systems are 100% comparable and therefore very useful with regard to purchasing decision-making. It can also be used as a marketing tool for hardware vendors or simply to compare hardware among colleagues or friends.”
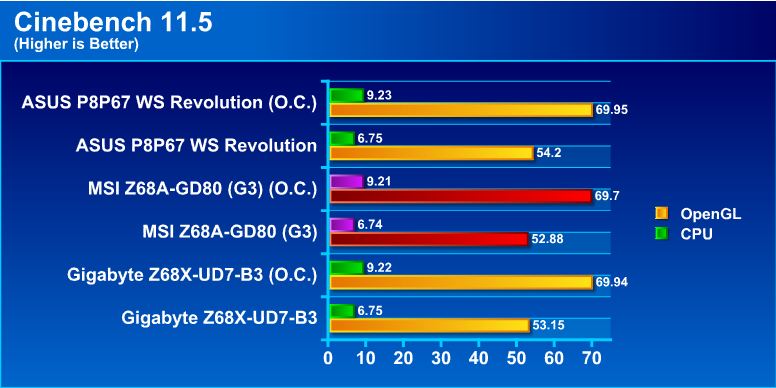
The MSI board had a slightly lower OpenGL score than what we have expected. Both the ASUS and the GIGABYTE boards performed extremely close to each other. We cannot draw clear conclusions from the data, but it is possible that a PCI-E 2.0 motherboard with the NF200 chip might still be at an advantage over a PCI-E Gen 3.0 without NF200. However, it is hard to prove this because technically we are not using any PCI-E 3.0 interface cards or processors that could give us a clear comparison.
The CPU performance was slightly lower than the other two motherboards too, but not too big of a difference.
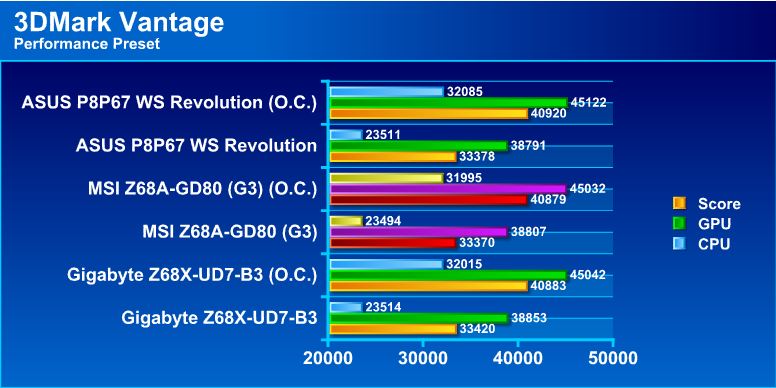
3DMark Vantage

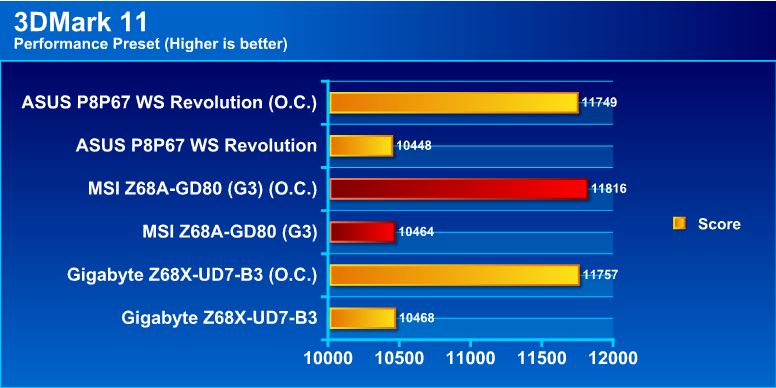
3DMark 11

PCMark Vantage
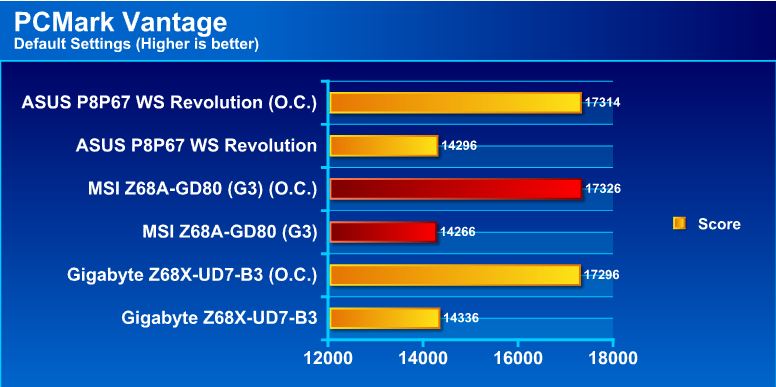
PCMark Vantage is an overall full system benchmark that puts all the hardware to work. With everything averaged over several runs, we’ve got extremely similar results. This just shows that there is no big difference between different types of motherboards with the current hardware running the Z68 chipset.
HD Tune Pro
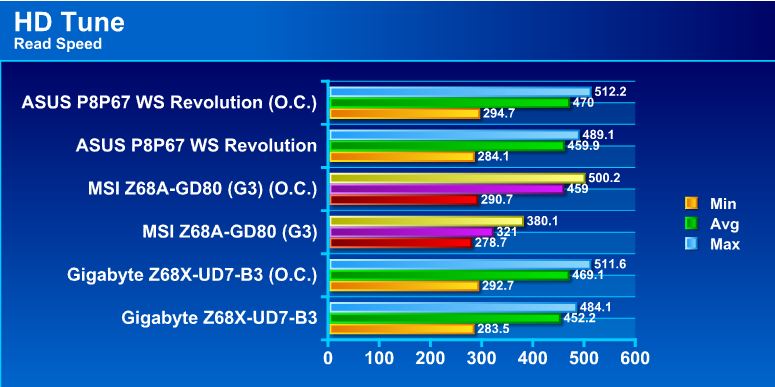
While PCMark Vantage showed us some close numbers, HD Tune pro seems to show us the opposite. We are discussing the issue with MSI, however they have not seen such results before. We reran the tests to make sure we were not getting bad results due to some background task. We also tried updating our BIOS, however that had no change on the stock settings performance. The overclocked system had no problem performing close to the speeds that we’ve gotten with the other motherboards. We also made sure all the chipset drivers were up to date and that we were running the Kingston HyperX 240GB SSD from the main Z68 Chipset SATA III 6Gb/s connectors.
Metro 2033
![]()

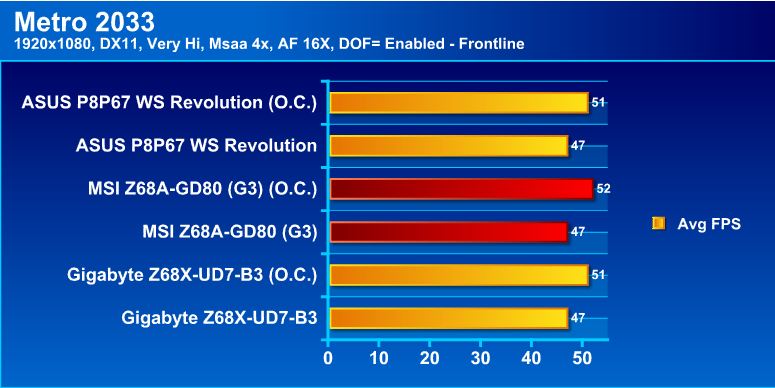
The ASUS P8P67 WS Revolution and the GIGABYTE GA-UD7-B3 tied in Metro 2033. The MSI Z68A-GD80 (G3) was able to push an extra FPS when the system was overclocked. Is this a noticeable difference during gameplay? Not so much, but the performance difference gap between the MSI board and the others might be more apparent when Ivy Bridge and PCI-E 3.0 cards are released.
Lost Planet 2
![]()
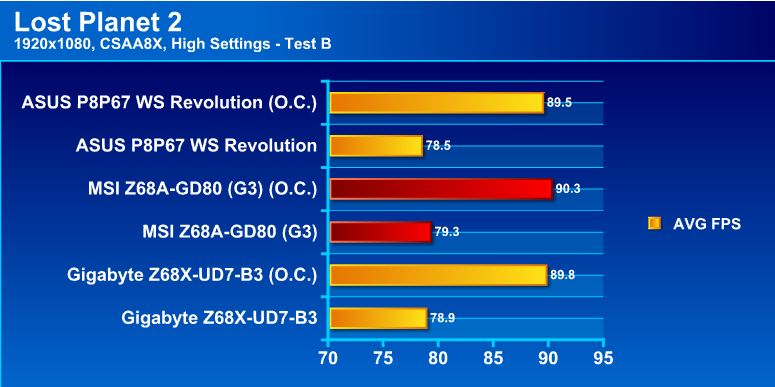
We see the same pattern here. The MSI Z68A-GD80 (G3) comes in first place, while the next highest performer is the GIGABYTE GA-Z68X-UD7-B3, and then the ASUS P8P67 WS Revolution.
Crysis 2
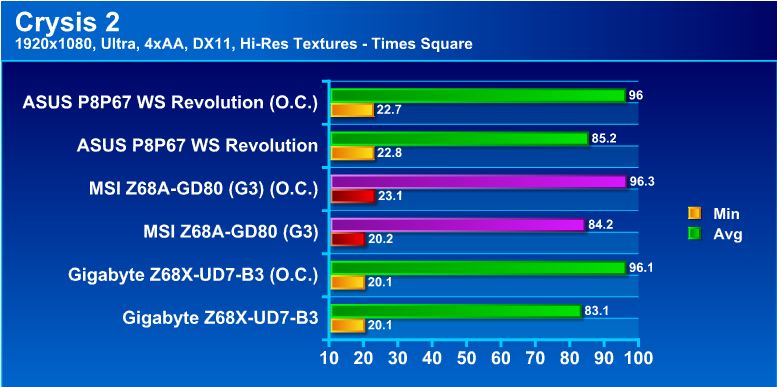
We see the same performance numbers for Crysis 2 as we have seen for Metro 2033, and Lost Planet 2. It looks like the Z68A-GD80 (G3) might be performing slightly faster on DX11 content over the other motherboards. We have seen the same result in 3DMark 11 which is also a DX11 based benchmark.
Conclusion
There are a lot of really nice features that the MSI Z68A-GD80 (G3) comes with: support for the next generation PCI-Express Gen 3.0 slot interface, 5 Year Warranty after registration, fast UEFI BIOS that’s both appealing easy to use, OC Genie II, and the Military Class II components all add value to this motherboard. In addition, it will support the next generation Ivy Bridge processors, and next generation graphics hardware. So is it worth getting the MSI Z68A-GD80 (G3) over the previous (B3) version or compared to other competitors boards? For users who are planning on using the motherboard for 2-3 years, perhaps. However, for users who currently have a strong system that can handle most of the games on the market, then probably not. We do have to remember that at the moment, there is no support for PCI-E Gen 3 because the current Sandy Bridge processors do not support PCI-E Gen 3 slots. Ivy Bridge will provide the performance needed to support PCI-E Gen 3, but even then, we’ll need to wait for PCI-E 3.0 video cards to arrive before the new interface can be fully utilized.
So the bottom line is, if you will be using the motherboard for over a year or two when Ivy Bridge will be available and new graphics cards will support PCI-E Gen 3.0, then it would be a great investment. We cannot actually test the performance of PCI-E 3.0 at the moment due to the universal lack of hardware support, but we’ll test it once it becomes available.
There are a few minor cons that we’ve found during our testing. The first major one was the SATA III performance, which suffered compared to the other motherboards, but only in the HD Tune Pro benchmark. A BIOS update did not help the situation, but overclocking the system helped it gain the extra performance it was missing. Another little issue was was ClickBIOS II. The provided software on the DVD did not work, it reported that the motherboard was not supported for ClickBIOS II. After downloading the latest version from MSI’s website, the problem was gone. And finally the front panel button and LED connectors have a quite messy design and it is not clear at first which cables should go to which part of the included adapters. It takes some time and looking at the manual to figure out the exact positioning of each cable.
Other than that, the MSI Z68A-GD80 (G3) does have a very sexy price of $229.99 which is extremely competitive with ASUS’ P8P67 WS Revolution motherboard which runs for about $249.99 and GIGABYTE’s Z68X-UD7-B3 motherboard which runs for $349.99. Unless you’re going for 3-way SLI, you will not have to look further than the MSI Z68A-GD80 (G3).
| Our Verdict: MSI Z68A-GD80 (G3) | ||||||||||||||||||
|
||||||||||||||||||
| Summary: Considering the price, the MSI Z68A-GD80 (G3) is a heck of a good product. With the addition of multi video card PCI-E Gen 3 switch support, this motherboard should shine. For great performance and outstanding features, the MSI Z68A-GD80 (G3) earns the Bjorn3D Golden Bear Award. |