The 890FXA-GD70 is MSI’s latest AMD enthusiast offering. Sporting many overclocking and unlocking features, we dig into the 890FXA-GD70 to see if it brings high level performance.
Introduction
With plenty of AMD 890FX based boards to chose from, it’s becoming quite the task to pick the right premium 890FX board from the plethora of vendors. ASRock, ASUS, Biostar and Gigabyte all have their own variants of AMD’s latest enthusiast chipset, so making a choice is a bit difficult. In addition to those choices, MSI also has their own option with the 890FXA-GD70.
Heavily influenced by their 790FX based board (790FX-GD70), the 890FXA-GD70 carries over the same traditions with a 4+1 PWM design, Quad CrossFireX support, and easy overclocking options. Along with the normal enthusiast treatment, MSI also included six SATA III ports, two USB 3.0 ports, five x16 PCI-E expansion slots, a new SB850 chipset and out of the box support for AMD’s latest hex core processors.
There is much to like about MSI’s premium 890FX offering but the question is, how does it compare? Is it worth the asking price of $189? Does it meet the price per performance medium? These are all questions any knowledgeable enthusiast would ask. Luckily for you, we have all the answers throughout this review.
Features
The 890FXA-GD70 comes with plenty of very cool features. Aside from the obvious features stated on the box, MSI threw in special little features like touch sensitive on-board power, reset, and “green power” buttons to make using an overclocking station even easier. Along with the buttons, MSI also included voltage metering points for measuring processor, memory, and chipset voltages. This comes in handy if you happen to be an extreme enthusiast, but this feature more than likely would not be used if you’re not into extreme overclocking. Overclocker or not, MSI made sure to add a little bit of everything for each type of user.
|
Military Class series products feature top components that offers users the best experience for its unparalleled quality, ultimate efficiency, and the cool & noiseless and safety for its unbeatable stability. |
|
|
| • Hi-c CAP (Highly-conductive polymerized Capacitor) • High voltage derating / heat resistance → higher over-voltage / overclocking possibility • Best stability & long lifespan → Average life 44800 Hrs @ 85℃ chamber |
|
|
| • Excellent energy-saving capability and offers high-computing performance. • Provide superior energy-saving function and maintain an ultimate low temperature operation. • Comes with three incredible features. |
|
|
| • APS is Active Phase Switching is complete function to Control Power Demand With Switcing Dynamically, it’s for CPU, Memory and Chipset PWM. • Saving Power under Variable Loading. • Power Usage More Efficiency. |
|
|
| • Excellent Air Convection • Avoid Mechanical issue • Average temperature lower than “52℃” in high loading |
|
|
| • Longer lifespan than electrolytic capacitors • Endurable to operation under higher frequency & temperature • Avoid exploding capacitors to cause mainboards failure |
|
|
| The MSI Live Update online is designed to automatically download and update the BIOS and driver when there’s a new version online. It helps reduce the risk of getting the wrong file and minimize the trouble of searching the files from MSI website. |
|
|
| • Best overclocking capability • Auto-BIOS detection offers the best overclocking configuration • OC Genie enabled, CPU performance 26% up • Increase 148% CPU performance by OC Genie + Unlock CPU Core |
|
|
| • Help user to unlock hidden CPU Core quickly • Freely choose lock or unlock CPU Core(s) • Easy to upgrade system performance • Boost CPU performance 104% upe |
|
|
| • Instant Messaging • Web Browser & Photo View • Free Phone Call • Open Office & System Rescue Supported |
|
|
| • Real Time FSB tuning- FSB value change in the BIOS instant! • Unlimited Turning Segments • Easy Use – Just Rotate the knob!!! |
|
|
| • Easy connect to front panel & chassis cable • 2x USB, IEEE 1394, front panel (JFP1/2)& audio(JAUD1) M-connector in the package • Easy to tell the definition of each pin |
|
|
| Live Update 4 is a single utility software that automatically checks BIOS, driver and utility updates and installs for you , which can save your time for searching and lower the risk while updating. |


Specifications
| CPU |
| 64bit AMD® Phenom II X6/X4/X3/X2, Athlon II X4/X3/X2 and Sempron CPU. |
| Hyper Transport Bus |
| HyperTransport 3.0 supporting speed up to 5200MT/s |
| Chipset |
| AMD® 890FX and SB850 Chipset |
| Main Memory |
| Supports four unbuffered DIMM of 1.5 Volt DDR3 800/1066/1333/1600*/1800*/2133* (OC) DRAM, 16GB Max |
| Slots |
|
| On-Board IDE |
| One IDE port by JMicron® JMB363 – Supports Ultra DMA 66/100/133 mode – Supports PIO, Bus Master operation mode – Can connect up to two IDE devices |
| On-Board SATA |
| • 6 SATA III (1~6) ports by AMD® SB850 – Supports storage and data transfers at up to 6Gb/s • 1 SATA II (SATA7) port by JMicron® JMB363 • 1 eSATA II / USB Combo port by JMicron® JMB363 |
| RAID Function |
| – SATA III 1~6 support RAID 0, 1, 5, 10 mode by AMD® SB850 |
| Audio |
| • Chipset integrated by Realtek® ALC889 – True Blu-ray Audio Support – Flexible 8-channel audio with jack sensing – Compliant with Azalia 1.0 Spec |
| LAN |
| • Realtek PCI-E GbLAN controller 8111DL – Integrated Fast Ethernet MAC and PHY in single chip – Supports 10Mb/s, 100Mb/s and 1000Mb/s – Compliance with PCI-Express Bus specification v1.0a |
| IEEE1394 / FireWire |
| • VIA® VT6315N chipset – Supports up to two 1394 ports. (pinheader x2) – Transfer rate is up to 400Mbps. |
| Internal I/O Connectors |
| – 1 x ATX 24-pin power connector – 1 x ATX 8-pin 12V CPU power connector – CPU x 1 / System x 4 FAN connectors – 1 x Front panel audio connector – 1 x Front panel connector – 1 x Chassis intrusion switch connector – 3 x USB 2.0 connectors – 6 x Serial ATA III connectors – 1 x Serial ATA II connector – 2 x IEEE1394 connectors – 1 x ATA133 HD connector – 1 x Serial port connector – 1 x Power button – 1 x Reset button – 1 x OC Dial button – 1 x OC Dial knob – 1 x Green Power button – 1 x Debug LED button – 1 x Clear CMOS jumper – 1 x SPDIF-out connector – 1 x TPM module connector |
| Back Panel I/O Ports |
| – 1 x PS/2 Keyboard port – 1 x PS/2 Mouse port – 1 x Clear CMOS button – 1 x Coaxial SPDIF-out – 1 x Optical SPDIF-out – 5 x USB 2.0 ports – 2 x USB 3.0 ports (blue) – 1 x eSATA / USB 2.0 Combo port – 2 x RJ45 LAN Jacks – 1 x 6 in 1 audio jack 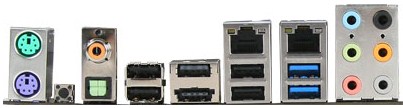 |
| Dimensions |
| 24.5cm(L) x 30.5cm(W) ATX Form Factor |
| Mounting |
| 9 mounting holes. |
| Product Accessories |
|
|
Pictures & Impressions


MSI packaged the 890FXA-GD70 in their typical cardboard packaging. Inside, MSI uses a cardboard separation method to keep the manuals, discs, and accessories apart from the motherboard to ensure no damage is caused during shipment.


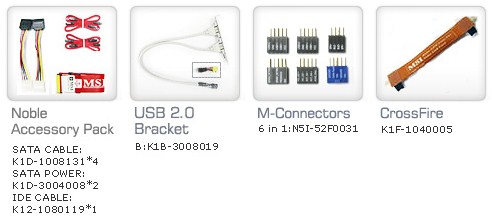
Here you can see exactly how MSI separated everything from the motherboard and also get a better idea of what is bundled with the 890FXA-GD70. From the box images, you can see that the board has a black and blue theme so it’s surprising to see MSI uses red colored SATA cables cause it easily throws the color scheme off. MSI includes two Molex to SATA power adapters, four SATA cables, an IDE ribbon, USB expansion slot, MSI’s M-Connectors for easy setup, an I/O backplate and a CrossFire bridge cable. Aside from aesthetic nit picking, the 890FXA-GD70 does come with a nice bundle of accessories.


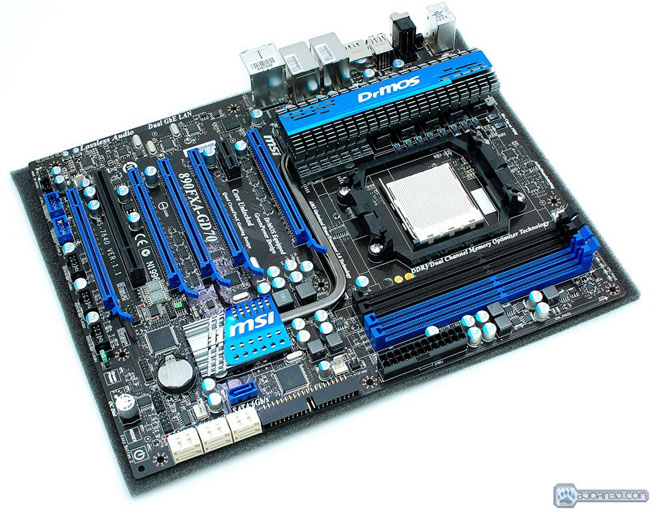
To further protect the board, MSI wrapped it in plenty of anti static plastic and added a thin foam sheet on the bottom for extra protection. Although our review samples UPS box arrived battered and beaten, MSI’s packaging methods kept the board intact and in fantastic condition. After removing the plastic and seeing the 890FXA-GD70 for the first time, we can honestly say its easily one of the better looking 890 series boards that we’ve seen to date.


MSI used two high quality heatsinks to keep both the VRM and SouthBridge areas cool. Both heatsinks have a steel and blue color theme that flows very well with the rest of the board. This is honestly one of the best looking boards I’ve ever seen from MSI.
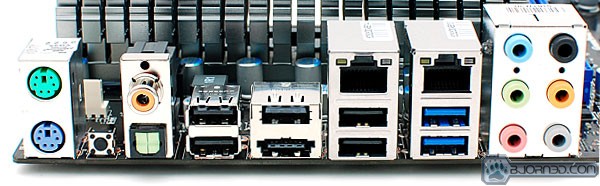
Starting with the I/O area, you can see that MSI gives the 890FXA-GD70 plenty of USB 2.0 ports (5) and two new USB 3.0 ports (blue). Along with the USB ports, MSI added an eSATA port, two gigabit ethernet ports, 7.1 channel audio, two PS/2 ports, Audio SPDIF port, Optical Audio port and the almighty Clear CMOS button.
On the bottom of the board MSI layed everything out in order for your front panel case ports provided that they are long enough to reach. From left to right there is an audio header, two firewire headers, three USB headers, on-board Green Power button, OC Dial button with dial, reset button and finally the power button. It may be hard to spot at first, but right in the middle of this picture are two diagnostic LED’s. These LED’s report active code numbers which can all be viewed within the provided manuals. These diagnostic LED’s come in handy if you encounter issues with the motherboard or installed hardware.
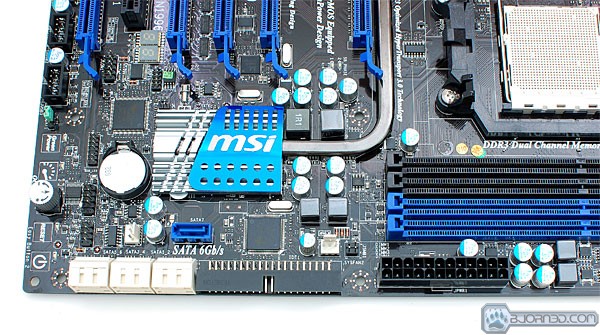
Under the MSI logo-ed SouthBridge heatsink is where you will find the new SATA III port, six SATA II ports, an IDE header, fan headers, front panel button headers, and the 24 power pin header.
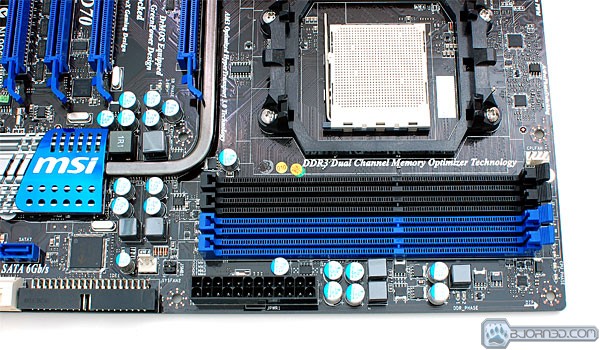
Above the 24 power pin header are four DDR3 dual channel memory slots (2 pairs), fan header, and AMD’s AM3 CPU socket.
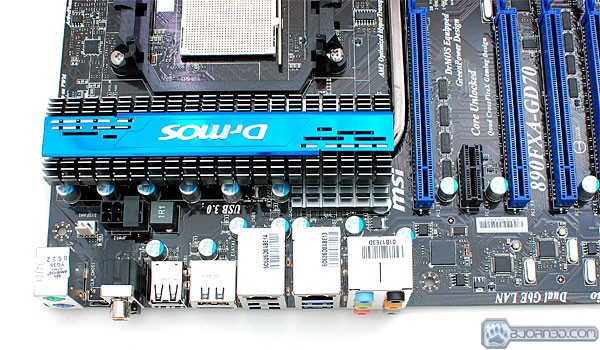
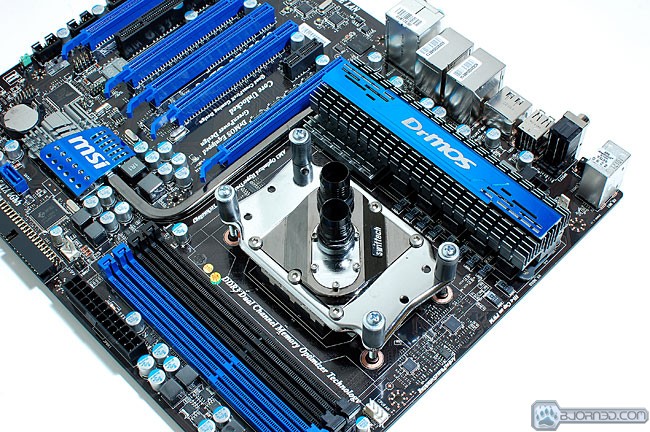
Above the CPU socket are the VRM’s which are cooled by MSI’s DrMos logo-ed heatsink. The heatsink is thick, solid, and certainly able to keep the VRM’s cool. Another thing that we need to point out on the 890FXA-GD70 is the location of the NorthBridge. The NorthBridge is not in its typical location above the first PCI-E expansion slot. MSI decided to pair the NorthBridge with the VRM’s which explains the massive heatsink. A notable result from the NorthBridge placement is the amount of free area around the CPU socket area. Fitting a massive air cooler shouldn’t be a problem thanks to the new location of the NorthBridge. We are assuming this was the method that had to be done to fit five PCI-E expansion slots while keeping a PCI slot for use. To the right of the heatsink is a heatpipe which dissipates heat to the SouthBridge heatsink, and vice versa. This method helps distribute heat efficiently to cool the board as best as possible. Above the heatsink is the CPU power header. Depending on your power supply, you can popular 4 pins or use all 8 by removing the plastic cover.
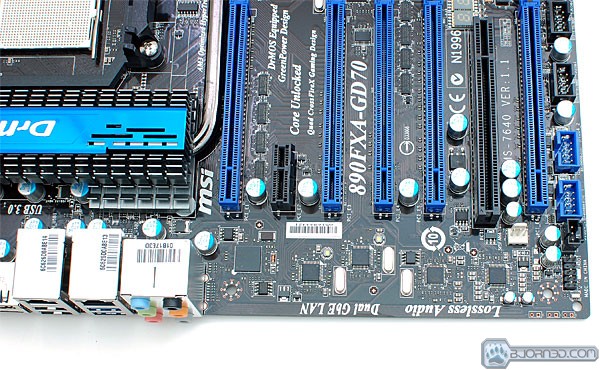
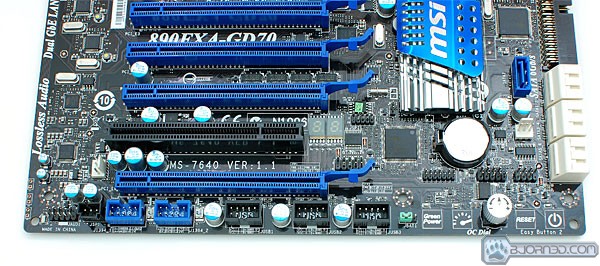
The expansion ports are evenly spaced and for people wanting to run CrossFire, Tri-Fire, or even Quad-Fire, the 890FXA-GD70 will allow it without issue. MSI did a wonderful job spacing the slots and they even managed to fit in a standard PCI slot in case its needed. Running two cards or even three cards (single slot) and still being able to use the PCI slot is actually an option on this board. ATI folding at home users can definitely appreciate the expansion slot spacing and anyone who has run multiple graphics cards would concur.
The 890FXA-GD70 at this point had our attention and we were eager to install the hex core 1090T and get the show on the road. Before moving on to testing, first we must go over what makes this all possible, the BIOS.
BIOS
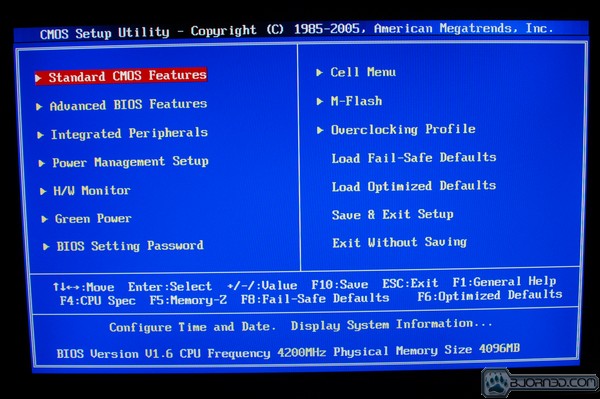
MSI uses the very common American Megatrends BIOS on the 890FXA-GD70. To set itself aside from other manufacturers, MSI added a few features that make overclocking, saving power, and flashing the BIOS very simple.

The Green Power menu is where the APS feature can be configured. Within the Green Power Menu you’re able to set ways in which the phases will respond. You can limit them to save power or you can disable the feature altogether for maximum performance.
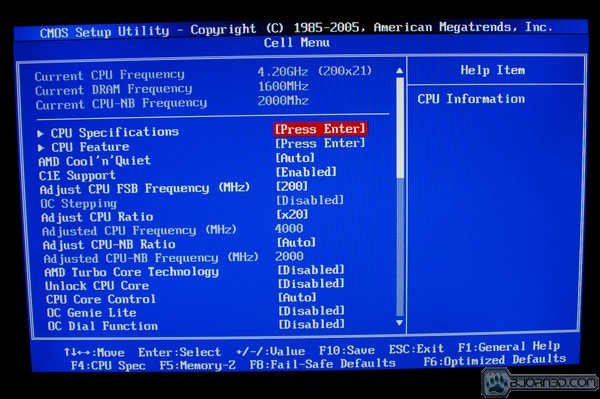
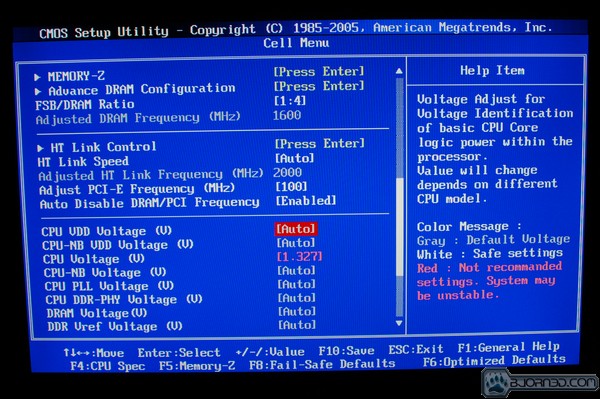
The Cell Menu is where all the overclocking magic takes place. Within the Cell Menu you can adjust CPU features such as AMD Cool’n’Quiet and AMD Turbo. You can also adjust the bus/HT frequency, memory frequency, memory timings, memory ratio, CPU ratio, Hyper Transport ratio, and voltages.
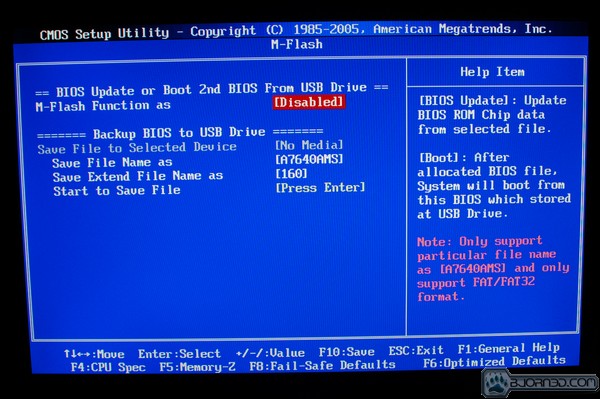
The M-Flash menu allows you to flash the BIOS from a USB drive and also backup a BIOS to a USB drive. This is a very useful feature if you wanted to revert back to an older BIOS for any given reason.
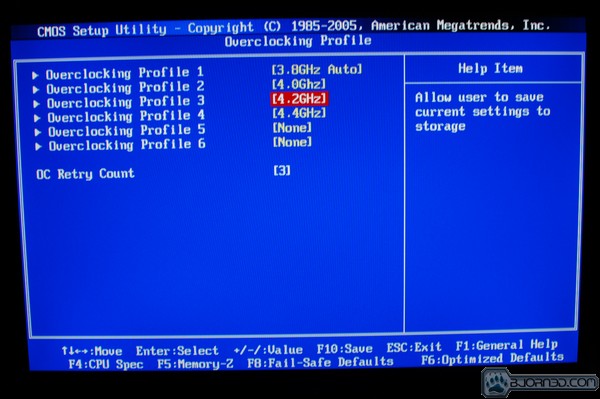
One of the neatest features on the 890FXA-GD70’s BIOS is the Overclocking Profile menu. The Overclocking Profile menu allows you to save overclocked profiles where you can name them, save them, load them and you can also set the OC Retry Count.
MSI CONTROL CENTER
Included with the 890FXA-GD70 is MSI’s very own software sweet, Control Center. Control Center allows you to monitor, overclock, and save power, all within a single application.
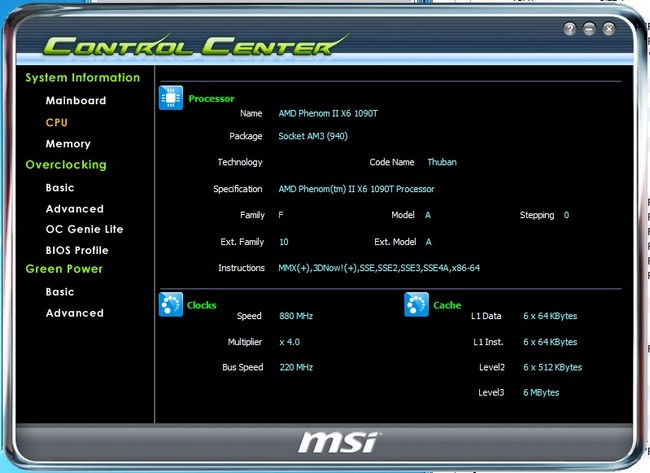
When initially launching Control Center you are greeted by motherboard, CPU, and memory information. Within each category you can view detailed information. The motherboard section shows the motherboard model, make, BIOS version, what series video card is installed, and even network card information. The CPU section shows real time clock frequency, model information, stepping, and cache information. The memory section shows detailed information including the make, bandwidth, serial number, and timings.
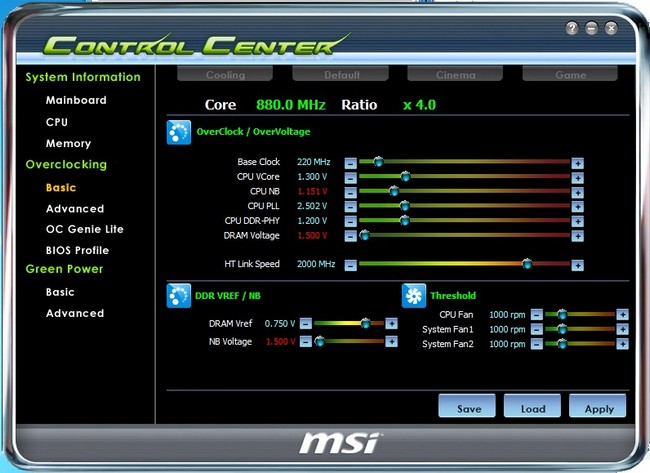
The overclocking section allows you to actually change the frequencies of the processor and related features such as the HT frequency. To add to the ease of this section, MSI also provided preset profiles which are named according to their application. Cooling, Default, Cinema, and Game. Cooling actually underclocks the HT/Bus to 197MHz to lower system operating temperatures. Default uses default settings, Cinema slightly overclocks the HT/Bus to 203MHz to give a little extra speed to deal with movie watching. The Game is the most aggressive, pushing the HT/Bus to 207MHz, 7 over default.
Aside from the preset profiles, you can embark on overclocking the system yourself using the easy to use interface. If you are wary of overclocking in general, using the Control Center to overclock might be the way to become familiar with the overclocking world. Settings are not applied automatically which helps incase of system locks ups, but can be applied on boot if preferred. Overall, the overclocking portion of Control Center is a must see for overclocking beginners.
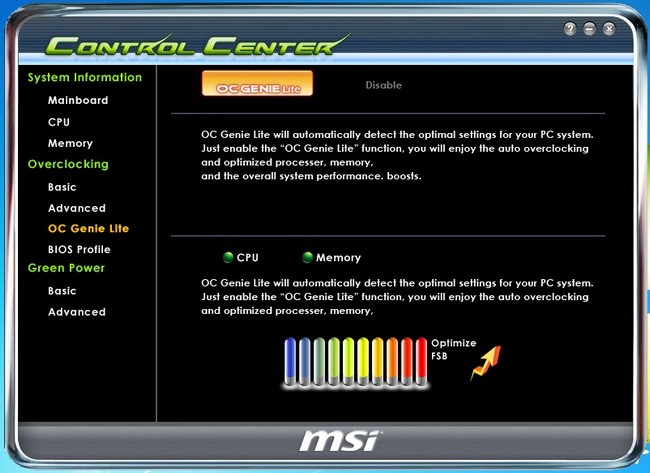
The OC Genie section automatically overclocks your computer by detecting optimal settings . OC Genie must be enabled within the BIOS before it will take effect. Simply enable it, and boot into your operating system. We verified the OC Genie feature worked by checking frequencies, and we were greeted with a 400MHz overclock in a minutes time. OC Genie took our 3.2GHz hex core to 3.6GHz, completely stable. Again, if you’re new to overclocking, this feature is a great one to utilize.
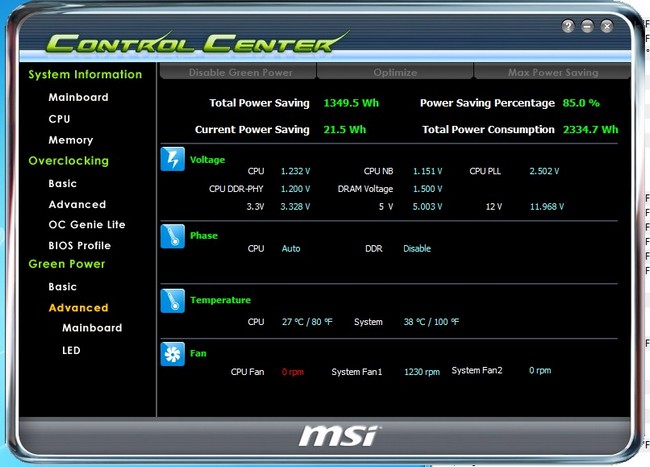
The Green Power section is a simple to use power saving utility. With Green Power you can monitor the amount of power you’re saving and also apply power saving profiles. To take things to a more extreme level, you can also toggle power phases, adjust fan speed percentages, and even turn off LED’s on the motherboard.
Testing & Methodology
|
We’ve expanded our testing suite considerably for Socket AM3, 1156, and 1366 and will continue to use the same tests across most of the motherboards and CPU’s we test. We run each test a total of at least three times minimum, some tests we run more than 3 times. We average the total of all the tests from each benchmark then report the average here. The OS we use is Windows 7 Professional 64bit with all patches and updates applied. We also use the latest drivers available for the motherboard and any devices attached to the computer. We don’t disable a bunch of background tasks or particularly tweak the OS or system for bigger numbers. We do turn off drive indexing and daily defragging. We also turn off Prefetch and Superfetch. This is not an attempt to produce bigger benchmark numbers. Drive indexing and defragging can interfere with testing in that one test might occur without defragging going on and the next test defragging might be active, the same thing goes for drive indexing. We can’t control when defragging and indexing occur precisely enough to guarantee that they won’t interfere with testing, so we turn them off. Prefetch tries to predict what you will load the next time you boot the machine. We disable it because we want to know how the program runs without any of the files being cached, otherwise each test run we’d have to clear pre-fetch to get accurate numbers. Lastly we disable Superfetch, Superfetch loads often used programs into memory and is one of the reasons people consider Vista to be such a memory hog. Vista fills the memory in an attempt to predict what you will load. Having one test run with files cached, and another test run with the files being un-cached would result in skewed numbers. Again since we can’t control it we turn it off. Other than those 4 things which can potentially interfere with benchmarking, and do so out of our control, we leave everything else running. |
Test Configurations Used
AMD Phenom II X4 955 – ASUS M4A78T-E Setup
- AMD Phenom II X4 955 (Quad Core 3.2GHz)
- Noctua NH-C12 cooler
- 4 GB OCZ Black Edition DDR3 @ 1033 MHz
- ASUS M4A78T-E
- Apacer 64 GB SSD
- XFX HD5870 Eyefinity Edition 2 GB
- Cougar 550W PSU
AMD Phenom II X6 1090T – ASUS Crosshair IV Formula Setup
- AMD Phenom II X6 1090T (Hex Core 3.2GHz)
- Noctua NH-C12 cooler
- 4 GB OCZ Black Edition DDR3 @ 1600 MHz
- ASUS Crosshair IV Formula
- Apacer 64 GB SSD
- XFX HD5870 Eyefinity Edition 2 GB
- Cougar 550W PSU
AMD Phenom II X6 1090T – MSI 890FXA-GD70 Setup
- AMD Phenom II X6 1090T (Hex Core 3.2GHz)
- Custom Water Cooling
- 4 GB Kingston HyperX Blu DDR3 @ 1600 MHz
- MSI 890FXA-GD70
- Western Digital 80GB Raptor 10,000RPM
- Sapphire 5850 1 GB
- Corsair 650W HX PSU
Software Used
- Everest Ultimate v5.50
- x264 HD v3.18
- WinRAR v3.93
- TrueCrypt v6.3a
- Intel Burn Test v2.50
- CPU-Z v1.54
- HW Monitor v1.16
- AMD Over Drive v3.2.1
To evenly compare MSI’s premier 890FX offering, we are comparing the 890FXA-GD70 to ASUS’ Crosshair IV Forumla, both of which will be using the same processor. To keep the last AMD offering in the loop, we are throwing in AMD’s Phenom II 955 with an ASUS M4A78T-E motherboard.
CPU-Z & Overclocking
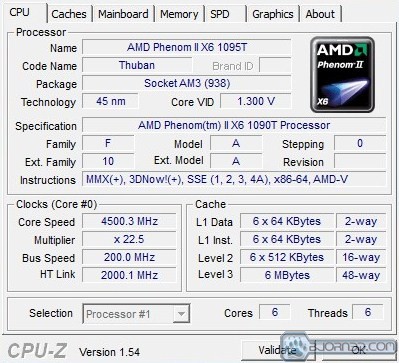
Overclocking is what the 1090T Black Edition (unlocked CPU multiplier) is all about and we were very eager to see how it did with the 890FXA-GD70 as a partner. But before getting too crazy with overclocking, we wanted to see how the 890FXA-GD70 handled things at default settings. After installing all the necessary hardware and making sure our water setup was leak free, we booted up the test rig and were greeted with the 1090T’s 3.2GHz clock speed.

Rated at 3.2GHz by default, AMD’s 1090T is a high clocked hex core right off the bat. To test stability at default settings we used an application called Intel Burn Test. Intel Burn Test is a linpack based stress testing application that can make a processor beg for mercy. Because all six cores were utilized at 100%, AMD’s Turbo Boost was not engaged. However, it was engaged when the 1090T had load balancing to distribute. To sum it up, The 890FXA-GD70 worked perfectly fine at default settings.
4.0GHz and above? No problem.
After verifying the 890FXA-GD70 was happy at default settings, we started abusing it immediately. First left the voltages at default settings and began upping the multiplier. To our surprise, MSI’s board allowed the 1090T to reach 3.85GHz before needing voltages to stay in Windows. With such a great start, we decided to go for 4.0GHz. We upped the multiplier to 20, upped the voltage a tiny bit and we were in Windows at 4.0GHz, took all of 10 minutes.

With 4.0GHz coming so easy, we couldn’t help but push the 1090T even further on the 890FXA-GD70. Within our recommended safe 24/7 voltage of 1.45v, we were able to get the 1090T to 4.2GHz, 100% stable, Intel Burn Test approved. Our success may be due to having a good batched 1090T, but then there is the many features on the 890FXA-GD70 that certainly help stabilize a 4.2GHz clock speed, like the massive VRM heatsink. Although 4.2GHz was a nice feat on the hex core 1090T, we kept on pushing, all the way to 4.5GHz.
Although it looks impressive, 4.5GHz was no where near stable, only stable enough for a screenshot and browsing. Anything taxing, and issues occurred right away. Because we were on water cooling, we ventured into the no mans land and used voltages that I’d rather not mention. Unless you are on water cooling, we recommend keeping your hex core AMD setup around 1.45v unless your brave and feel like pushing your luck. Again, 4.2GHz was achieved but this has much to do with our processor batch combined with the 890FXA-GD70. If you happen to have a nice batch and a 890FXA-GD70, definitely feel free to push it, the 890FXA-GD70 can handle it from what we’ve experienced.
*** CPU-Z was not reporting proper voltages from the motherboard which is why 1.30v is reported in every screenshot. Actual voltage was monitored with both AMD Over Drive and HW Monitor to confirm consistency.
Everest Ultimate

“EVEREST Ultimate Edition is an industry leading system diagnostics and benchmarking solution for enthusiasts PC users, based on the award-winning EVEREST Technology. During system optimizations and tweaking it provides essential system and overclock information, advanced hardware monitoring and diagnostics capabilities to check the effects of the applied settings. CPU, FPU and memory benchmarks are available to measure the actual system performance and compare it to previous states or other systems. Furthermore, complete software, operating system and security information makes EVEREST Ultimate Edition a comprehensive system diagnostics tool that offers a total of 100 pages of information about your PC.”
CPU AES
This integer benchmark measures CPU performance using AES (a.k.a. Rijndael) data encryption. It utilizes Vincent Rijmen, Antoon Bosselaers and Paulo Barreto’s public domain C code in ECB mode.
CPU AES test uses only the basic x86 instructions, the test consumes 48 MB memory, and it is Hyper Threading, multi-processor (SMP) and multi-core (CMP) aware.
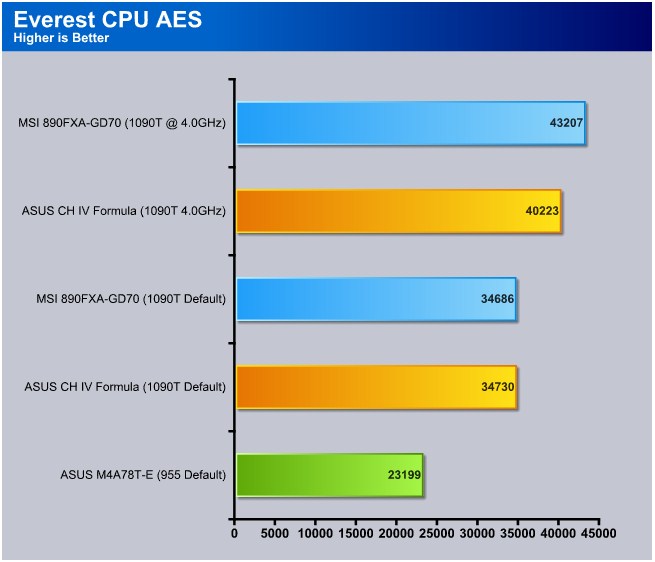
In the AES bench the 890FXA-GD70 shows it can compete with on an even playing field with the Crosshair IV. When the CPU frequency is turned up however, the 890FXA-GD70 takes the lead easily, beating the CH IV by nearly 3,000 points. Although the 955 is still a very capable processor, its definitely showing its lack of oomph in the AES test due to it having only four cores.
CPU PhotoWorxx
This integer benchmark performs different common tasks used during digital photo processing.
It performs the following tasks on a very large RGB image:
• Fill
• Flip
• Rotate90R (rotate 90 degrees CW)
• Rotate90L (rotate 90 degrees CCW)
• Random (fill the image with random colored pixels)
• RGB2BW (color to black & white conversion)
• Difference
• Crop
This benchmark stresses the integer arithmetic and multiplication execution units of the CPU and also the memory subsystem.
CPU PhotoWorxx test uses only the basic x86 instructions, and it is Hyper Threading, multi-processor (SMP) and multi-core (CMP) aware.
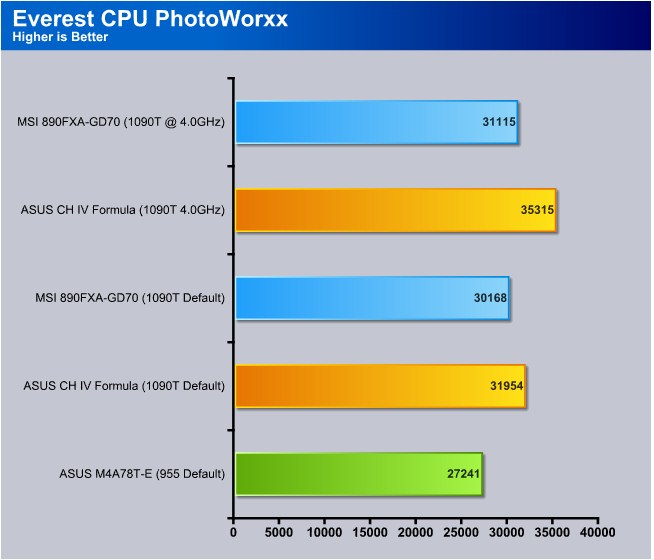
In the PhotoWorxx bench the CH IV manages to beat the 890FXA-GD70 by a fairly large margin. Beating the MSI’s board by 1,786 at default clocks and a massive 4,200 at overclocked clocks, the 890FXA-GD70 was basically pummeled in this bench comparison.
CPU Queen
This simple integer benchmark focuses on the branch prediction capabilities and the misprediction penalties of the CPU. It finds the solutions for the classic “Queens problem” on a 10 by 10 sized chessboard.
CPU Queen test uses integer MMX, SSE2 and SSSE3 optimizations. It consumes less than 1 MB system memory and it is Hyper Threading, multi-processor (SMP) and multi-core (CMP) aware.
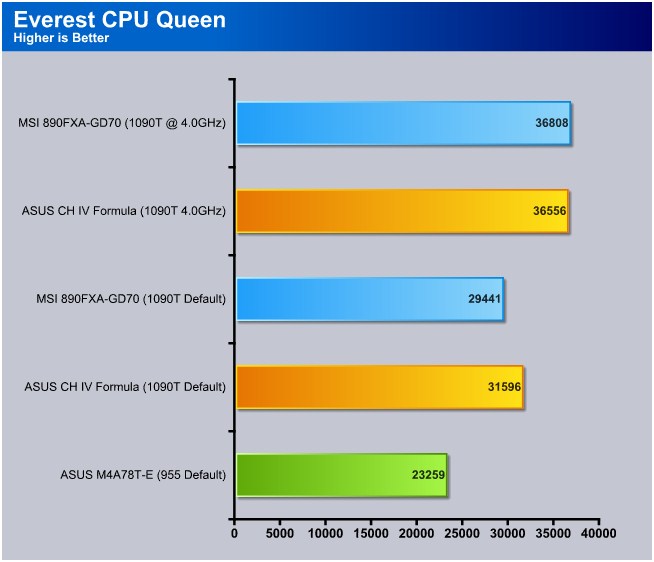
In the CPU Queen bench the 890FXA-GD70 evened the playing field. At default clocks the CH IV easily took the lead by 2,155 points. Once the CPU frequencies were increased, the 890FXA-GD70 showed it potential, squeaking by the CH IV by 252 points.
CPU ZLib
This integer benchmark measures combined CPU and memory subsystem performance through the public ZLib compression library Version 1.2.3 (www.zlib.net).
CPU ZLib test uses only the basic x86 instructions, and it is Hyper Threading, multi-processor (SMP) and multi-core (CMP) aware.
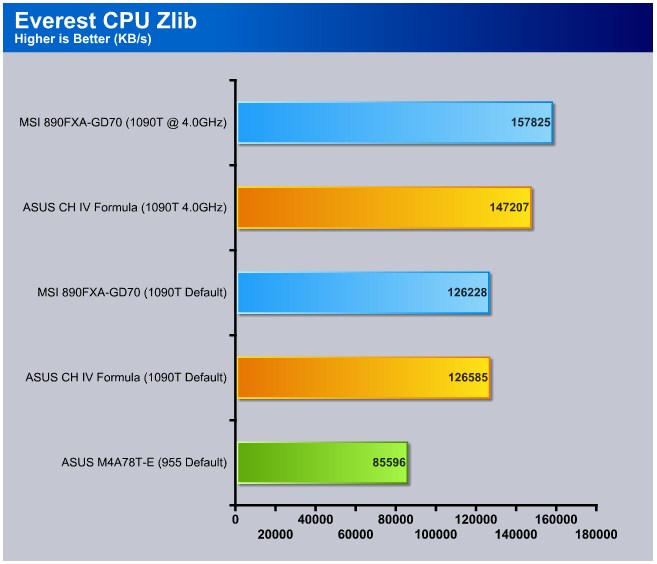
In the Zlib bench, the 890FXA-GD70 really starts to show its true potential. At default clocks the scores are basically even, at overclocked frequencies however, the 890FXA-GD70 beats the CH IV by well over 1,600 points.
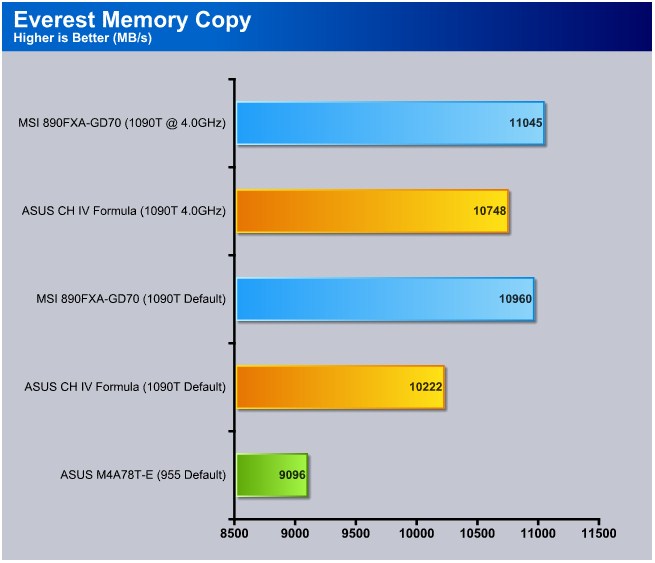
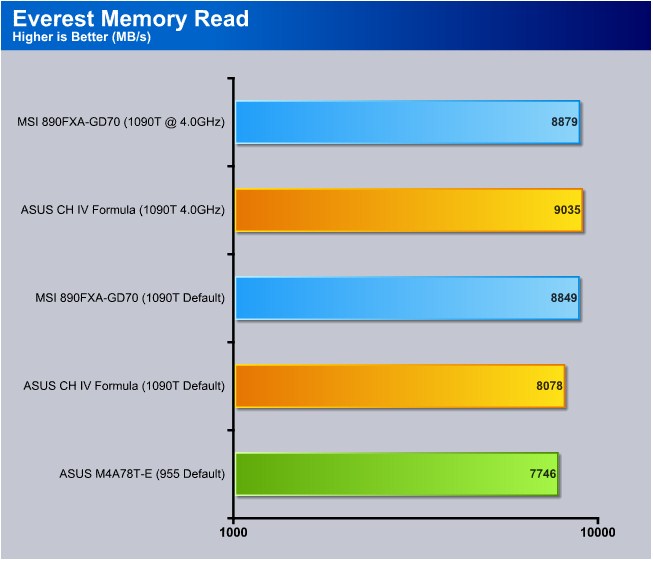
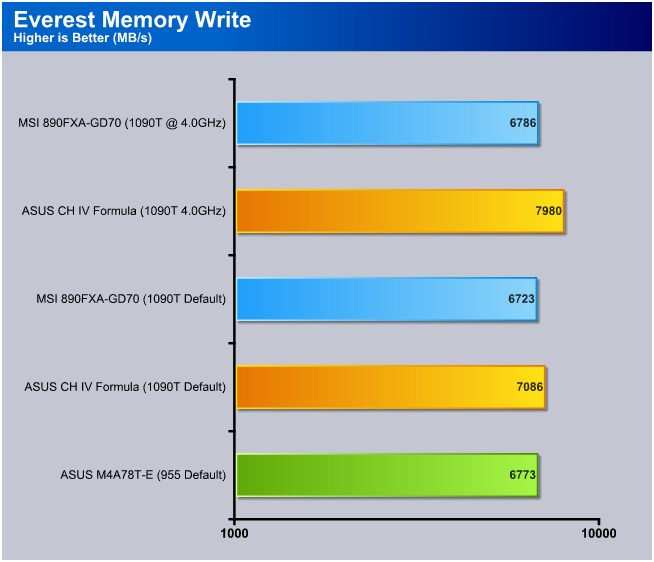
Everest Memory
With 4GB of 1600MHz DDR3 memory, both the CH IV and 890FXA-GD70 exhibit similar results. With differences ranging in the 300-400 MB/s area, its hard to decipher which board is more superior. The way we see it, both boards performed on par with each other in the majority of the memory benches.
X264 HD
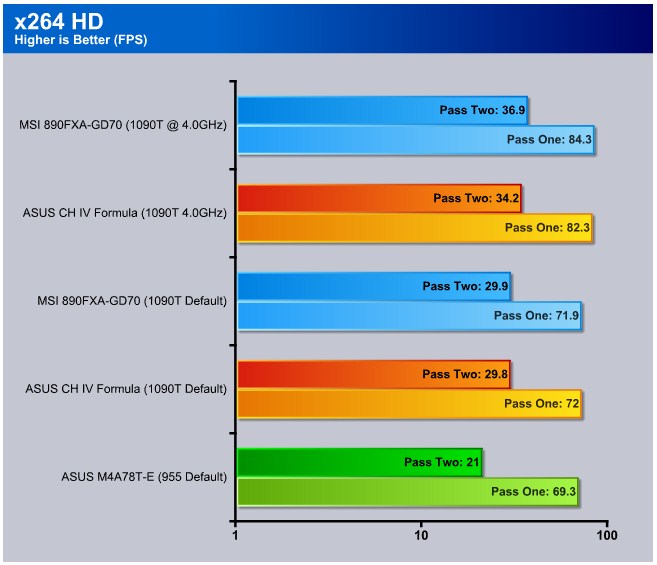
In the x264 HD bench, both the CH IV and 890FXA-GD70 are right on each others heels. With gaps ranging between 2 and 0.1 FPS, both boards basically performed neck and neck in the x264 HD runs. The 955, although having only four cores, shows it can still hang with its hex core big brothers at default clocks.
WinRAR
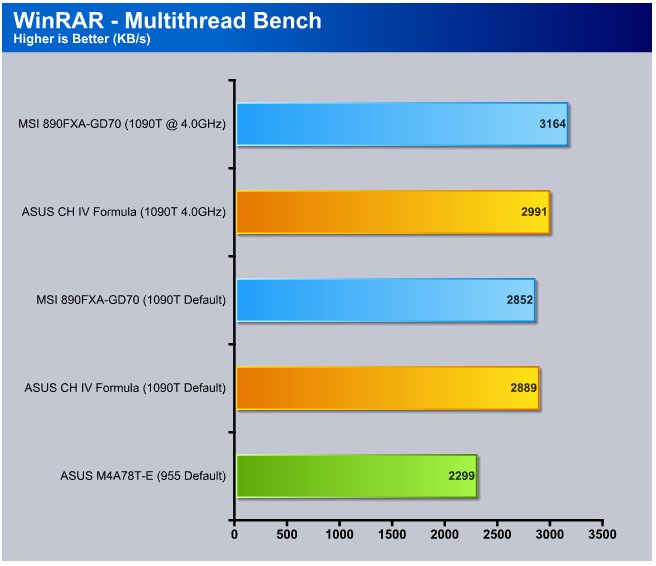
In the WinRAR multithreaded benchmark, the 890FXA-GD70 edges ahead the CH IV by 173 KB/s when overclocked. At default speeds however, the CH IV squeezes in first, but just barely.
TrueCrypt
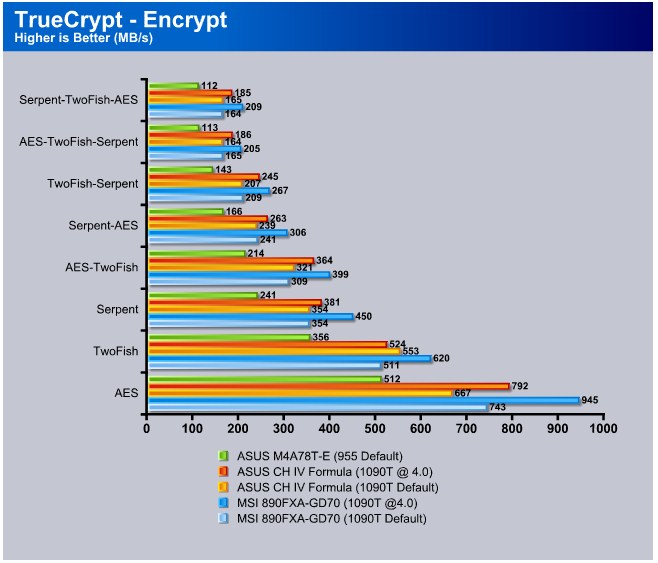
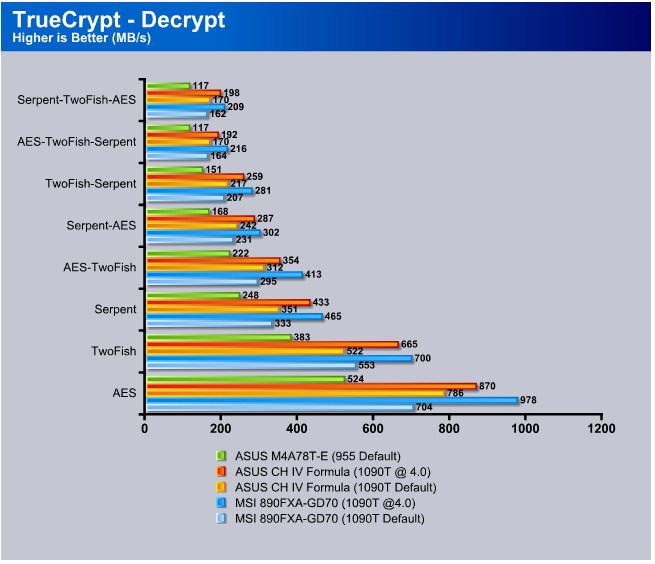
In both TrueCrypt benches, the 890FXA-GD70 out performed the CH IV in every single area at overclocked frequencies. Glancing at the graphs, it’s easy to see which board was the better performer. At default clocks both boards again performed basically dead even with each other. The 890FXA-GD70 seems to love an overclocked processor, which is the general trend that we’ve been seeing throughout our benching sessions.
Conclusion
MSI’s 890FXA-GD70 is a fantastic premium board at a very reasonable price. For $169 USD (w/ $20 rebate) you get Phenom II X6 support out of the box, Quad CrossFireX support, a usable PCI slot when using CrossFire, a Crosshair IV contender, and appealing aesthetics that complete the package.
The only real problems we encountered were minor ones that many boards happen to exude. Those problems were a fairly hot VRM heatsink and a squealing VRM area due to vibrating coils. The hot VRM (DrMos Heatsink area) could be a result of MSI’s decision to move the NorthBridge to the VRM area. After all, that big heatsink isn’t just cooling the VRM’s, it’s also helping cool the NorthBridge. During our load testing and overclocking sessions, we kept an 87 CFM 120mm fan right over the VRM heatsink to keep it as cool as possible. If you decide to go on a hardcore overclock session with the 890FXA-GD70, we recommend you do the same. The heatsink gets fairly hot during load and stressing that area for long periods of time without proper cooling could potentially lead to issues.
Aside from the crispy VRM, we also noticed a squealing noise when under full load (100% CPU utilization). If memory serves me correctly, squealing from the VRM’s is usually the coils vibrating from the heavy amount of electricity traveling through them. This isn’t exactly bad, as in, this doesn’t mean the board is defective or inferior in anyway, this just simply means the coils aren’t as tight as they could be. If anything, your ears will be annoyed but the board will be just fine in most cases.
So, does this board compete with ASUS’ Crosshair IV Formula? Well, yes and no. Overclocking and performance wise, it’s all there. 4.0GHz and above with ease, high HT/bus ability, plenty of voltage options, on-board buttons, overclocking profiles, aesthetically equal, equal performance, the list goes on. However, the 890FXA-GD70 seems to lack sufficient chipset cooling and shows signs of lower quality in comparison to the Crosshair IV. A squealing VRM isn’t a big deal, but it does show a lower level build quality when compared. A very hot VRM displays a lack of proper cooling, but keep in mind, the NorthBridge is dishing out heat as well. The main thing to keep in mind, are the features that the 890FXA-GD70 does have which others don’t have, that will be the deciding factor. In our opinion, this is a fantastic board and shouldn’t be overlooked, especially if you want to save money but still have a very capable board.
| OUR VERDICT: MSI 890FXA-GD70 | ||||||||||||||||||
|
||||||||||||||||||
| Summary: MSI’s 890FXA-GD70 is an affordable premium 890FX based board that doesn’t skimp on performance. You get high grade performance, power saving options, and Quad CrossFireX support, all without paying a top level price. The 890FXA-GD70 should definitely be on your Socket AM3 upgrade list. |


