Need to flash your Motherboard or GPU BIOS but need to do it from USB Drive? This is the place to start, we’ll show you how to create a Windows 98 USB bootable Drive.
USB Boot Drive
Some days you wake up knowing exactly what you are going to do. Some days you wake up intending one thing and end up doing another. Today was one of those days. Often we get motherboards or GPU’s with early BIOS and as testing drones on you get updates. After a while it gets old yanking the one working floppy drive we have left out and booting to it to flash BIOS on GPU’s and motherboards. Well floppy disks haven’t been the greatest quality of late and it’s better to boot to a known good USB Drive than an iffy floppy that may have been on the shelf for years.
Having had to do that today it struck me that other people might want easy access to a “How to make a USB drive windows 98 bootable” for flashing their boards. Hours later here I sit with pictures in hand, bootable USB drive flashing my GPU BIOS and half wondering how I got here.
All that aside lets get started. First we are venturing into making a USB Stick bootable then we’ll do a short how to flash an Nvidia cards BIOS thing (GTX-480 in this case). That’s easiest because that’s what we needed the USB Drive bootable for.
For this to work your computer must support booting to a USB device.
Step 1
First things first, your going to need an easy to use USB utility so we recommend the HP USB Storage Format Tool (Yes that’s a link).
Step 2
You need some Windows 98 boot files so Click This Link
Step 3
Unzip the Windows 98 boot files and make sure you know where you unzipped them to. We unzipped to the desktop.
Unzip and install the HP Utility
Step 4
Insert the USB Stick you want to use into one of your USB ports.
Step 5
Launch the HP USB Utility and you’ll be greeted with this screen

Using the Drop Down List make sure that your USB Drive is selected.
Step 6

UNder the File System Drop Down list select FAT32 (File Allocation Table 32).
Step 7

Click the box next to Create a Dos Startup Disk.
Step 8

The “Using DOS system files located at” balloon will be automatically selected.
Step 9

Navigate to where you unzipped the Windows 98 Boot files and highlight that folder.
Step 10

Once you’ve done that the location of the Windows 98 boot files should now appear in the box below the “using DOS System files located at:” section.
At this point click START. (You may want to verify that your USB drive is highlighted and not your primary boot drive ;-0
Step 11

You get a warning about formatting your drive. Assuming that you have the correct drive selected click YES.
Step 12

Then wait while the dreaded Green line crawls across the screen. On the 1GB Sandisk Micro Cruzer we were using it took about 4 minutes. Larger drives will take longer.
Step 13

Once complete you get this confirmation screen. Click OK and you can close the HP Utility.
Step 14

These are the files on the USB Drive and those are enough to boot your rig with.
Step 15

If, like us, you want extended DOS functionality then copy the rest of the files in the Windows 98 folder to the root of the USB drive you just made bootable. This will give you mouse support, a rudimentary editor, FDISK in case you need to old school a drive, and some other handy DOS warrior type things.
Here’s what we did. On Windows Explorer click EDIT then Select ALL, then hover over COMMAND.COM and CTRL Click it to remove it from the list, then hover over MSDOS.SYS and CTRL click to remove it, then hover over IO.SYS and CTRL Click to remove it. Then just drag the remaining files and folders over to the USB drive and drop them. That should create a DOS Command Line Warriors emergency boot disk suitable for booting to and doing DOS things or flashing your motherboard or GPU BIOS.
Flashing an Nvidia GPU
First of all don’t flash your GPU or motherboard BIOS just because you can. Then only use a BIOS ROM file that you know for 100% sure is written for your specific GPU. Don’t just find a file and think “Oh this is for my GPU”, assuming that you have a correct BIOS and having the wrong BIOS can brick your GPU and force you to a blind Flash which isn’t fun even for a battle hardened Flash veteran.
Here’s a link to a site with a lot of BIOS files but make sure that you know what card you have and download the correct BIOS for your GPU BIOS Files a plenty.
Second of all if you use this guide to Flash your GPU BIOS we assume no responsibility for things going bad. Things happen during BIOS Flashes and we discourage BIOS flashing unless it’s absolutely needed.
Please note that for convenience sake my screen shots are done inside Windows using the Command Prompt Window. You will be in the TRUE DOS environment but the Prompt and commands will look like these. Never attempt to flash your BIOS from inside Windows it will brick the card. Boot from the USB Disk you just created.
Step 1
Download NV Flash from HERE BUT Make sure it’s the latest version.
Step 2
Unzip and copy NVFlash to your bootable USB Drive.
Step 3
Make a backup of your existing GPU BIOS by booting to your Bootable USB Drive then typing:
nvflash.exe -b backup.rom and press ENTER.

That will create a backup of your GPU BIOS on the USB Drive and it will be named backup.rom
Step 4
Copy your GPU BIOS file (the one you downloaded) to the root folder of the USB drive you made bootable.
Verify that the files NVFLASH.exe and CWSDPMI.exe are on the disk along with the xxxxxxxx.rom file (your VBIOS file name).
Step 5
Boot to your bootable USB Drive. You may have to set your machines BIOS to boot to the USB drive to do that.
Step 6
At this point, you’ve created a USB Boot disk with Windows 98 boot files and verified it’s bootable, backed up your existing VBIOS, downloaded the correct BIOS for your model GPU, copied that VBIOS file to your bootable USB Drive and now you’ve booted to it and your looking at the alien landscape of DOS. Your on your own we don’t know what to do now.(Not).
Last Step
Ok it’s time to pull the trigger so make sure that you know that you have the correct VBIOS file or yank the USB stick out and go play Solitaire. If you know you have the correct VBIOS file and NVFlash then you Type:
nvflash -p -u -f xxxxxxxx.rom (Name of your GPU VBIOS file) and hit ENTER

At this point let it run then reboot the rig and if you followed instructions correctly, AND you downloaded the correct VBIOS file you should be greeted with a freshly Flashed GPU and a good boot. If you get a black screen you might want to look up Blind GPU Flash on your neighbors rig.
In the first case (and it just worked for me) feel free to drop me a line telling us B3D rocks. If you failed miserably and are facing a black screen see the disclaimer above and don’t bother sending me one of those “You failed me miserably” e-mails. The procedure is correct if it went bad you ignored the warning, did something wrong, downloaded the incorrect VBIOS or something. We flash GPU BIOS on a regular basis and haven’t bricked a card ever. That doesn’t mean you won’t brick your card. We hope that you enjoy a nice long life on your card and never need to flash it. If you do here’s our humble offering telling you how to make a bootable USB Drive and flash an Nvidia card.
Enjoy!
Simple Blind Flash Method
Ok so the Flash went bad, this is how you make a recovery without having to run down to the Mom and Pop computer shop and buy a PCI video card. You can get a PCI video card and boot the rig to it and use it to flash the now dead GPU with. If that’s not an option you are faced with the dreaded Blind Flash.
What you’ll need:
- The Bootable USB Disk you just made
- A Rig to make an Autoexec.bat file on
- The correct VBIOS ROM file to flash with (Preferably the backup.rom you created earlier)
- A big set of Brass …..
Open up Notepad, not Wordpad, not Office Word, Notepad. If your at this point it behooves you to follow instructions exactly.

Now you have an untitled document but we need it named and saved in a specific location.

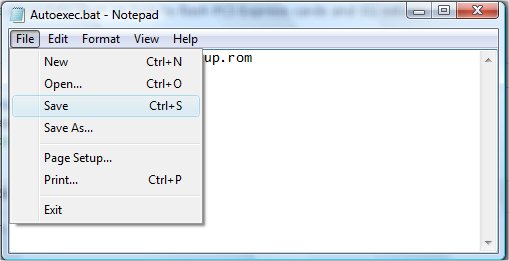
Click File then Save As…

Navigate to your bootable USB Disk, it should already have the backup.rom we created earlier. Hopefully you didn’t skip that vital step. Now name the document Autoexec.bat and make sure you save it on the bootable USB disk we created earlier.

Now you have a blank document saved on the bootable USB disk but we need to edit in a line.

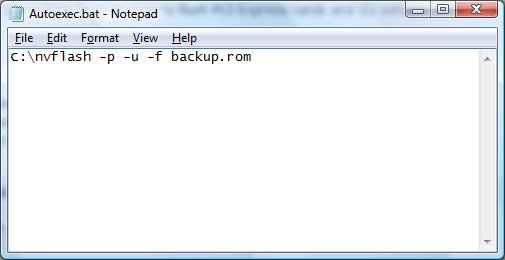
In the document type: C:nvflash -p -u -f backup.rom

Then click save and close the document.
Now you can take the Blind flash USB Disk back to the rig with the VBIOS flash that went bad. Insert the USB Drive and boot to it and the autoexec.bat file will execute (run) automatically and restore the GPU BIOS to the original backup.rom VBIOS we created earlier.
Wipe the sweat off your head and reboot the rig and you should be greeted with a freshly flashed GPU with the original VBIOS flashed back to it.
So we covered how to create a Bootable Windows 98 boot disk, how to backup your VBIOS to that USB disk, where to find GPU BIOS for your GPU, how to Flash the new BIOS to your GPU, and how to recover from a flash gone wrong.
We hope you never need to flash your GPU BIOS but if you do this should help you flash it and if things go wrong how to recover from it.
Enjoy!
 Bjorn3D.com Bjorn3d.com – Satisfying Your Daily Tech Cravings Since 1996


Hi,
Actually My Graphic Card Isn’t Loading Up System Cause I Miss Match VBIOS Is There Is Any Methord To At-Least Boot-Up First.
nvflash does not work in DOS: “Load Error: no dpmi memory”