The Intel 1156 socket CPU’s have been released. With new CPU’s comes new motherboards that support these CPU’s. Lets take a look at the MSI P55-GD65 motherboard and see what it got.
INTRODUCTION
Intel just released the Core i5/i7 1156 socket CPU this month of September, it is only natural for us to see the motherboard manufacturers have a boat load of motherboards for us to choose from. Intel is also promising an affordable socket 1156 CPU for those who are looking to upgrade from the ever ancient socket 775 platform. Today at Bjorn3D we going to look at one of MSI’s offerings of the new improved CPU socket 1156.
Ever since I recieved the Core i5 750 CPU (review can be found HERE), I was impressed at the level of performance. This CPU/motherboard combo rivals the performance levels of the more expensive Core i7 920 (review can be found HERE). These new performance grade motherboards are no longer sporting the 3 chip design we’ve seen in the past. A typical 3 Chip design is a CPU=1, IOH/MCP=2, and South bridge=3. The new 2 chip design consists of Cpu=1, PCH=2. The IOH/MCP have been moved to the CPU for a much lower latency access for the PCI-E lanes and memory. The south bridge has been updated to a much more powerful newer design, named the PCH.
Enough chit chat, lets go see what the MSI P55-GD65 motherboard can do.
Specifications
| Specifications | MSI P55-GD65 |
|---|---|
| Socket |
1156 |
| CPU (Max Support) |
i5/i7 |
| AM3 CPU Ready |
N/A |
| FSB / Hyper Transport Bus |
6.4GT/s |
| Chipset |
Intel® P55 |
| DDR2 Memory |
N/A |
| DDR3 Memory |
DDR3 1066/1333/1600*/2000*/2133* (OC) |
| Memory Channel | Dual |
| DIMM Slots | 4 |
| Max Memory (GB) | 16 |
| PCI-Ex16 | 2 |
| PCI-E Gen | Gen2 (1×16, 1×8) |
| PCI-Ex4 | N/A |
| PCI-Ex1 | 2 |
| PCI | 2 |
| IDE | 1 |
| SATA | 7 |
| RAID | 0/1/5/10/JBOD |
| LAN | 10/100/1000*2 |
| TPM | 1 |
| USB ports (Rear) | 8 |
| Audio ports (Rear) | 6+Coaxial SPDIF/Optical SPDIF |
| Serial ports (Rear) | N/A |
| Parallel ports (Rear) | N/A |
| 1394 ports (Rear) | 1 |
| eSATA | 1 |
| VGA | N/A |
| DVI | N/A |
| HDMI | N/A |
| Display Port | N/A |
| DirectX | N/A |
| VGA Share Memory (MB) | N/A |
| Form Factor | ATX |
| DrMOS | N/A |
| APS | Y |
| Sideport Memory | N/A |
| SLI | Y |
| 3-way SLI | N/A |
| Hybrid SLI | N/A |
| CrossFire | Y |
| Hybrid CrossFire | N/A |
| D-LED2 | N/A |
| Green Power Genie | N/A |
Packaging

Starting off on the packaging that MSI used, This is definetly brighter then other MSI boxes I seen in the past. MSI does give us some the P55-GD65 motherboard features and specifications.

Since there were so much packed into the box I had to split it into two different sets of pictures. Lets give a run down whats shown in this picture.
- Starting off from the top left hand side we have a overclocking guide, and Instructions on how to use th OC Genie
- Moving right, we get a motherboard manual, with two disks that contain our drivers and extra ultilities
- We get four SATA cables, two molex to SATA power adapters, one IDE ribbon, and finally a floppy ribbon
- MSI included one Nvidia SLI ribbon and one ATI Crossfire ribbon
- We get the rear IO back plate cover
- An PCI expansion USB connectors
- General program instruction manuals

For the final set of items that MSI included in with this motherboard.
- We get two more motherboard manuals included in with the P55-GD65
- Then Finally We have the motherboard wrapped in an anti-static bag
MSI went all out on the contents of the P55-GD65 motherboard. SO much in fact it bloated the box itself. This is showing that MSI is going the extra mile for their consumers on what comes with their products.
OVERVIEW

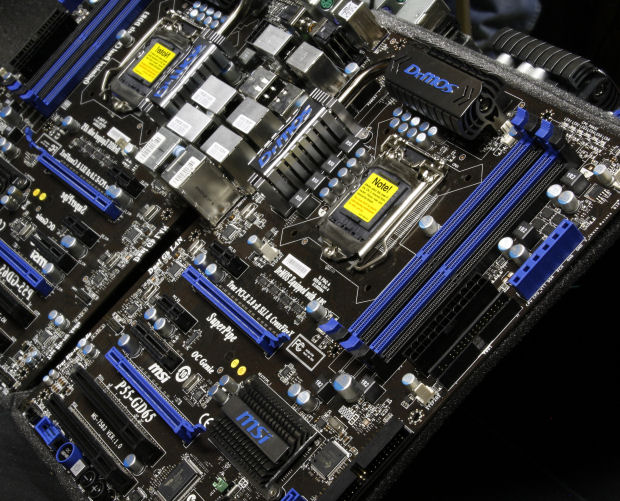
Lets start off on what the MSI P55-GD65 motherboard looks like. As you can see, the P55-GD65 is a full sized ATX motherboard and is fairly spacious. The board’s heatsinks have plenty of room to breathe and take notice that there is no IOH/North Bridge on this motherboard. The new 2 chip design free’s up a ton of room and also allows for cooler operation.

The P55-GD65 motherboard supports NVidia SLI and ATI Crossfire, but you will not have the full bandwidth of 16x16x once a second video card is inserted. Unfortunately both PCI-E video card slots will be reduced to 8x8x, this is one of the notible downsides to socket 1156. We can make out a fan header to the far left side of the picture, this marks fan header one. (calling them as I see them)

Turning our attention over to where the CPU power MOSFETs are, MSI tied these two heatsinks together with a heat pipe. Look at the location of the EPS CPU power plug, once again this is placed in a rather difficult spot.

Since the Core i5/i7 1156 CPU’s only support dual channel memory, MSI included only four memory DIMM’s on this motherboard. There are three more fan headers located near the memory DIMM’s. MSI also includes the ever ancient Floppy port for those who still use a Floppy drive. Right above the Floppy port, you have the main 24 pin power plug, moving to the right, MSI includes what appears to be voltage check points to will allow you to monitor the voltages in real time.

Here is a better close up of the voltage check points. You can monitor the CPU, CPU VTT (which works in conjunction with the QPI), DDR (Memory), and the PCH. There are two grounds as well, I have no idea why there are two. The location of the voltage check is in a good spot so getting access to this shouldn’t be to hard once the board is installed within a case.

Turning our attention over to the PCH, the heatsink used to help cool the PCH is large and has plenty of fins to keep things cool. What’s this right below the PCH, a jumper? Upon closer inspection, I figured out that this jumper is a clear CMOS jumper. Looking down towards the six black SATA 180° connectors, right above these is a 180° IDE port. I wish they would drop the IDE and Floppy connector altogether. On the bottom edge there are three USB front I/O connectors. In front of USB header #1 is the front I/O on/off power connector.

Moving towards the backside of the MSI P55-GD65 motherboard. Right below the last PCI port is a front I/O audio hook up port, a 1394 firewire port, internal audio connector, then we see four strange buttons. Well actually, only three strange buttons because I can tell one of them is an onboard on/off button.

After thumbing my way in the destruction manual (Oops, Instruction manual), the three odd buttoins are for the on the fly BCLK (FSB) adjusting, cool. More buttons for me to start pushing, hehe!

Now lets go check out the CPU socket area. From what I can tell the CPU is being powered by a 7 phase power system, I will start counting up chokes later. The CPU socket area is clear of any major obsticles. The use of large CPU coolers should not be much of an issue.

SInce I changed things up a bit, its time to turn our attention to the rear I/O ports. MSI includes two PS2 ports, onboard audio opticle ports, seven USB ports, one fire wire port, an eSATA port, two gigabit ethernet ports, and the seven channel analog audio ports. No clear CMOS button at all. I wish MSI would have included this on motherboard.

Looking at the native six 180° SATA ports and the 180° IDE connector.

Since this is my first Core i5/i7 1156 CPU motherboard, the mad scientist in me needs to rip things apart and see what’s what.


This is what I like to see, there are no stupid little push pins holding on the precious heatsinks that cool the precious motherboard components. MSI used screws.


It’s time to take off the heatsinks. Looking at the powerfets MSI used for the CPU, followed by a choke per powerfet. These are not your typical powerfets that we’ve seen in the past.

MSI was doing so well on this motherboard only to be stopped by what they used on the PCH heatsink. It is the pink thermal pad we use to see on the older AMD Athlon XP heatsinks.


MSI also used a thermal pad on the powerfets heatsinks. Personally, I would liked to have seen an actual thermal paste used on these heats sinks.

The naked PCH chipset, better known as the P55.
Extra
|
|
|
|
|
|
|
|
|
|
|
|


Just some extra pictures for you to get a better look at the MSI P55-GD65 motherboard.
Installation

To simplify things a bit more, I skipped a few steps I normally do. I went ahead and threw everything into the chassis. This is what the MSI P55-GD65 motherboard looks like when installed in a SilverStone Raven RV-02 chassis. I also ran this motherboard with my Tri-Fired ATI HD4870 video cards. I am also using a NIC card with an Creative X-FI Fatality Pro sound card.

The on the fly BCLK that MSI included with this motherboard. The OC Genie lights up once you enable these buttons. I did test this feature out, but I ended up going to far and I kept locking up the computer, oops! A unique little feature for those who want a quick boost out of their CPU’s.

MSI also included 6 phase power LED lights. This will inform you what phase power you are currently utilizing.

Here is the voltage checker that MSI included.

Found the Multi-meter.

Now lets start poking and prodding around with these.

Before I start poking probes into the voltage checker, I decided it would be easier to put the ground portion of the multi-meter into the ground of a four pin molex plug. This would still give me the results I want all the while making it easier to hold the positive probe on the check points.
|
|
|
|
|
|


These are the readings I recieved on the mutli-meter. In order I measured, CPU, CPU VTT, DDR, PCH.
BIOS PART ONE
We aren’t going to go into great detail of the BIOS. These next couple pages are to give you an idea of how the BIOS is layed out. I will point out certain features that should be mentioned.
|
|
|
|
|
|
|
|
|
|
|
|
|
|
|
|
|
|


The BIOS of the P55-GD65 motherboard is pretty well layed out and is the standard layout that we’ve seen with all MSI motherboards. You can still use a USB flash drive to save and or flash the BIOS of the MSI P55-GD65 motherboard, this is nice to see that MSI has kept this feature.
Overclocking Profiler
|
|
|
|
|
|
|
|
|
|
|
|


You can save up to six overclock/personal settings on this motherboard. This will save everyone of your personal BIOS settings.
BIOS PART TWO
|
|
|
|
|
|
|
|
|
|
|
|
|
|
|
|
|
|
|
|
|
|
|
|
|
|
|


MSI’s Cell Menu portion of the BIOS. This is where you can overclock your CPU and fine tune your computer settings. MSI did a great job on giving users the necessery information needed to make these adjustments. MSI also does a good job giving users plenty of adjustments to fine tune the motherboard. The only problem I had in the BIOS was the voltage settings weren’t as fine tuned as previous MSI motherboards.
TESTING METHODOLOGY
| Test Setup &Testing Methodology | |
| CPU | Intel Core i5 750 @ 2.66GHz, 3.99GHz |
| Motherboard | MSI P55-GD65 |
| Case | SIlverStone Raven RV-02 |
| Memory | GSkill RipJaw |
| Video Card’s | XFX 4870X2, HIS 4870 |
| Hard Drives | Patriot SSD 128 Gig |
| CDRom Drive | Lite On Blue Ray |
| Power Supply | Seasonic 850W |
| CPU Speeds Used | 2660 MHz, 3990Mhz |
| Operating System Used | Microsoft Windows Vista 64 |
| Video Card Cooler |
Stock cooled |
| CPU Cooler |
Prolimatech Mega Shadow |
To test the MSI P55-GD65, I ran the below listed programs three times to ensure that my results were consistent and that the motherboard was stable during testing. I will include both overclocked and default speeds. I will be putting this up against my ever faithful “Mini Me” Core i7 920 computer. Mini Me will be ran at its default CPU speeds of 2.66GHz. I will list the programs I will be using and how they will be ran.
List of programs
- SiSoft Arithmetic, Multi-Media, Multi-Core Efficiency, Memory Bandwdith, Latency
- Everst Memory Read, Write, Copy, Latency, CPU Queen, FPU Julia
- POV Ray Standard Renderings Buiscuit, Wood Box, Animation Renderings GLSNG, Float, Multi Threaded
- Cine Bench Core x1, Core x4/8 (will use amount of threads possible CPU dependant), OpenGl, Multi Threaded
- wPrime 32 Million, 1024 Million Calculations Multi Threaded
- Crystal Disk Bencmark HDD Benchmark
- WinRar Benchmark Compressed up to 500 MBs Wrote time it took and final result, Multi-Threaded
- Bibble 5 Used a 4 GBs SD card Converted 116 Canon RAW 10.1 Mega Pixel images to 10.1 JPG format, Time it took to complete all images plus the time it took per image will be recorded Multi Threaded
- 3DMark Vantage 1280 x 1024 Performance run
- World In Conflict 1920 x 1080 Max Visual Quality 4xAA/16xAF
- Last Remnant 1920 x 1080 Max Visual Quality
- Far Cry 2 1920 x 1080 Max Visual Quality 4xAA
Pretty much the standard runs we seen, with a couple of extras thrown in for good measure.
Overclocking
Overclocking the Core i5 750 CPU on the MSI p55-GD65 motherboard, was so simple I am still flabbergasted at how easy this task was, I hooked everything up got the system up and running at default CPU speeds installed Windows Vista 64 bit onto the Patriot Torqx SSD (Better known as the Eppy drive around these parts). Installed all of the drivers got re-familliar with Windows Vista added some benchmarks to get a feel for the speed for the new CPU, motherboard, & memory. This lasted a hour or so, so I decided it was time to start CRANKING. This motherboard went from a 133 BCLK to a 200 BCLK jump with out even hesitating. All i ended up doing was upping the CPU volts from the default voltages too 1.36 volts, set BCLK to 200 set the CPU multiplier to 19 set memory to a 4 divider and then rebooted. (I also adjusted a few other voltages)
The MSI P55-GD65 not only overclocked extremely well, this motherboard did this task with style. The only Issue I had with this motherboard was the defunct memory divider, when I ran the memory at a 4 divider I would get a 20+ GBs of memory bandwidth, but when I tried to set the memory divider at 10 and run the memory at its default speed of 2000MHz, everytime I set the Memory speed to 2000MHz I would get a 8.8 GBs of memory bandwidth. The memory would reach the full rated speed of 2000MHz, but no matter what timings I used I still get 8.8 GBs.
Overclocked settings used during benchmarking, I settled for a 210 BCLK x 19 Multiplier

Look at SiSoft memory Bandwidth readings I am getting 20+ GBs of memory bandwidth.

Now look at when I set the memory to 2000MHz, I get 8.8GBs, YIKES!
SISOFT
“SiSoftware Sandra (the System Analyser, Diagnostic and Reporting Assistant) is an information & diagnostic utility. It should provide most of the information (including undocumented) you need to know about your hardware, software and other devices whether hardware or software. It works along the lines of other Windows utilities, however it tries to go beyond them and show you more of what’s really going on. Giving the user the ability to draw comparisons at both a high and low-level. You can get information about the CPU, chipset, video adapter, ports, printers, sound card, memory, network, Windows internals, AGP, PCI, PCI-X, PCIe (PCI Express), database, USB, USB2, 1394/Firewire, etc.”

Starting off on SiSoft Arithmetic benchmark, The Core i5 750 does pretty good on holding its own during the Dhrystone testing matching the performance of the Core i7 920 CPU. During the Whetstone testing portion, the Core i7 920 starts show its superiority of its 8 threads vs the 4 threads of the Core i5 750.

Moving over to the MultiMedia testing, the Core i5 750 CPU performance is about where we would expect it to be. Overclocking this CPU gave us a nice little boost in performance.
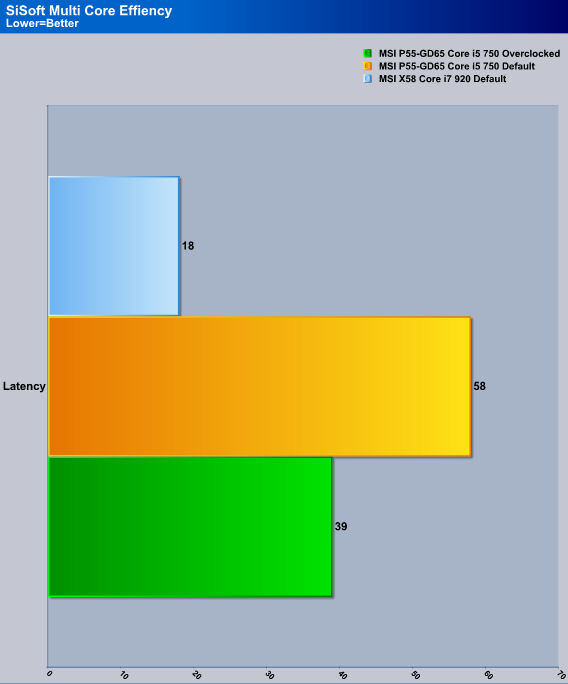
In the MultiCore Efficiency latency testing the Core i7 920 decimates the Core i5 750 CPU.
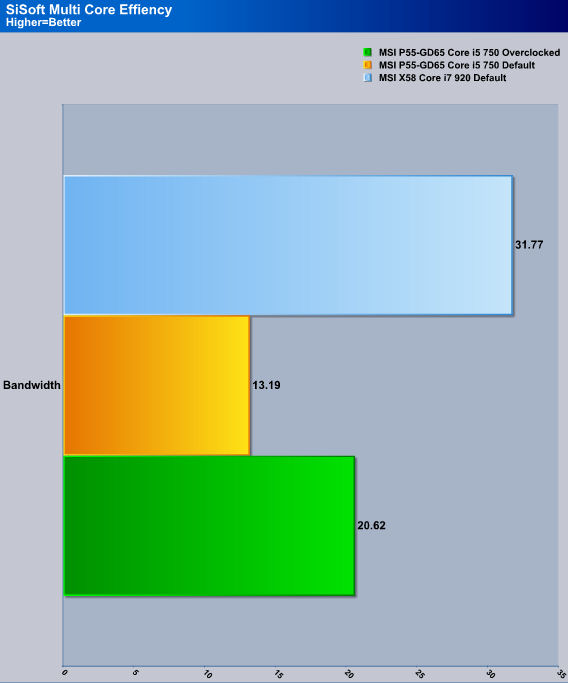
On the overall bandwidth of the Multi Core Efficiency testing the Core i7 920 CPU clearly pulls out ahead, but again we are comparing a high end CPU (920) with a mid range CPU (750).
In the memory bandwidth testing the Core i5 750 fairs pretty well. Overclocking the CPU gave us another 8GBs of memory bandwidth.
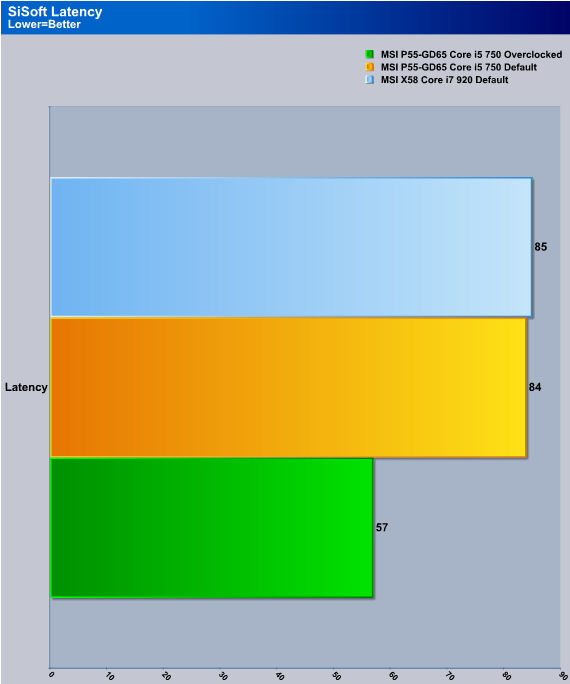
This is where the 1156 socket CPU’s shine, in the latency of the memory.
Everest

“EVEREST Ultimate Edition is an industry leading system diagnostics and benchmarking solution for enthusiasts PC users, based on the award-winning EVEREST Technology. During system optimizations and tweaking it provides essential system and overclock information, advanced hardware monitoring and diagnostics capabilities to check the effects of the applied settings. CPU, FPU and memory benchmarks are available to measure the actual system performance and compare it to previous states or other systems. Furthermore, complete software, operating system and security information makes EVEREST Ultimate Edition a comprehensive system diagnostics tool that offers a total of 100 pages of information about your PC.”
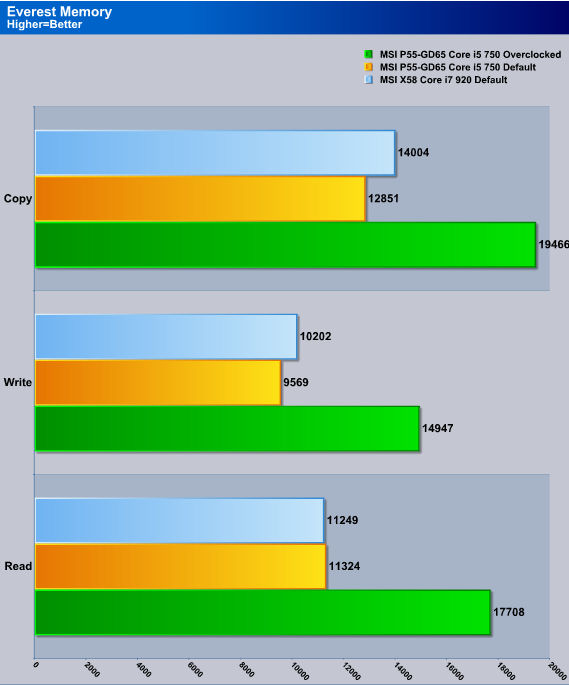
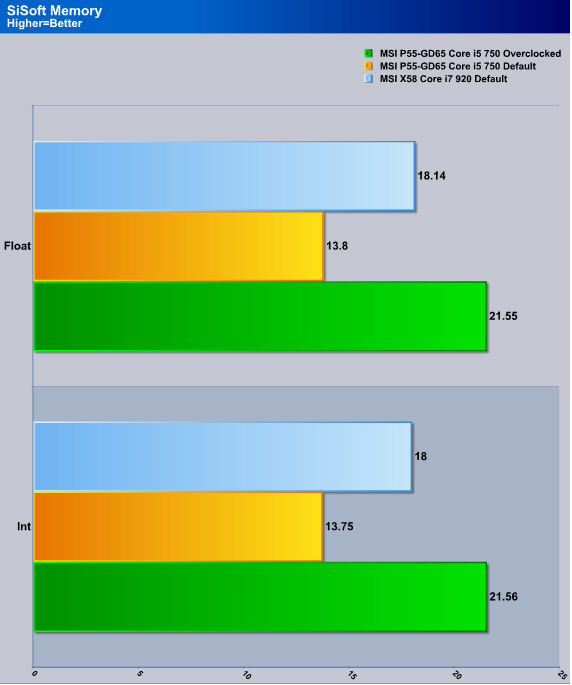
Considering we are still going up against a Core i7 920 CPU, the Core i5 750 does really well during Everest memory testing. Once again, overclocking the CPU gave us a really nice performance boost.
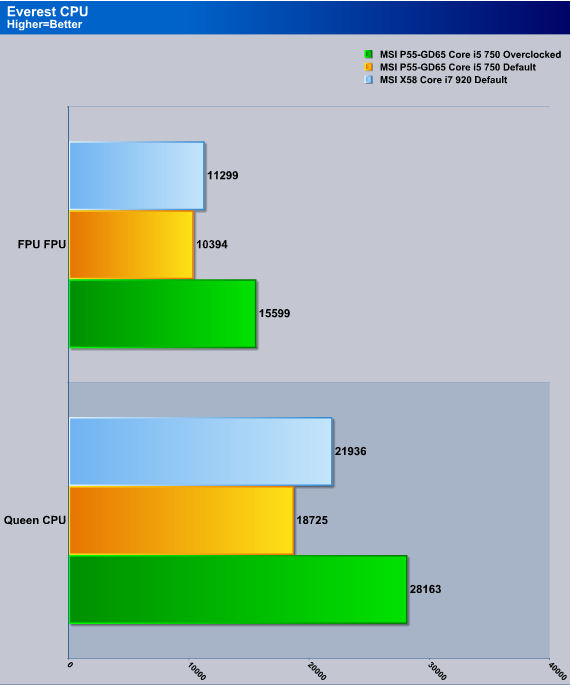
Pretty much the same story as we saw with the memory bandwidth testing, the Core i5 750 CPU does pretty good holding its own.
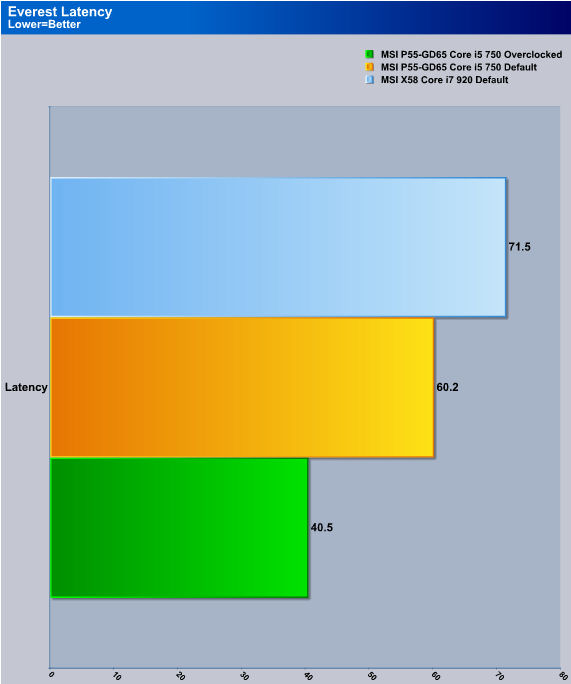
The Core i5 750 memory controller is far superior than the Core i7 920’s.
POV Ray

The Persistence of Vision Ray-Tracer was developed from DKBTrace 2.12 (written by David K. Buck and Aaron A. Collins) by a bunch of people (called the POV-Team) in their spare time. It is a high-quality, totally free tool for creating stunning three-dimensional graphics. It is available in official versions for Windows, Mac OS/Mac OS X and i86 Linux. The POV-Ray package includes detailed instructions on using the ray-tracer and creating scenes. Many stunning scenes are included with POV-Ray so you can start creating images immediately when you get the package. These scenes can be modified so you do not have to start from scratch. In addition to the pre-defined scenes, a large library of pre-defined shapes and materials is provided. You can include these shapes and materials in your own scenes by just including the library file name at the top of your scene file, and by using the shape or material name in your scene. Since this is free software feel free to download this version and try it out on your own.
Some of you might have seen version 3.6 of POV-Ray, the biggest difference between 3.6 and 3.7 Beta 25 is SMP (symmetric multiprocessing) support, which means that POV-Ray can take advantage of as many cores as your CPU has. On Single vs Dual CPU systems the speed almost doubles.
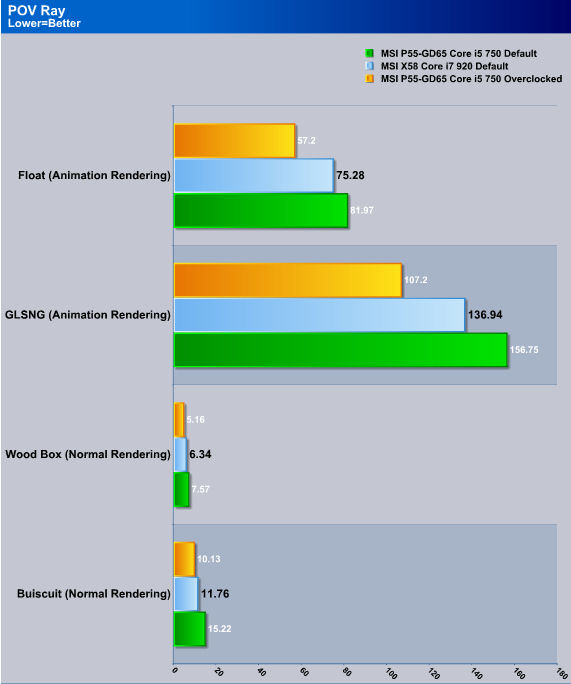
This is a welcomed sight, the seperation between the Core i5 750 and the Core i7 920 at default speeds of 2.66GHz is not all that much. Overclocking the Core i5 750 CPU resulted in an even lower rendering time.
Cinebench

“CINEBENCH is a real-world test suite that assesses your computer’s performance capabilities. MAXON CINEBENCH is based on MAXON’s award-winning animation software, CINEMA 4D, which is used extensively by studios and production houses worldwide for 3D content creation. MAXON software has been used in blockbuster movies such as Spider-Man, Star Wars, The Chronicles of Narnia and many more. MAXON CINEBENCH runs several tests on your computer to measure the performance of the main processor and the graphics card under real world circumstances. The benchmark application makes use of up to 16 CPUs or CPU cores and is available for Windows (32-bit and 64-Bit) and Macintosh (PPC and Intel-based). The resulting values among different operating systems are 100% comparable and therefore very useful with regard to purchasing decision-making. It can also be used as a marketing tool for hardware vendors or simply to compare hardware among colleagues or friends.”
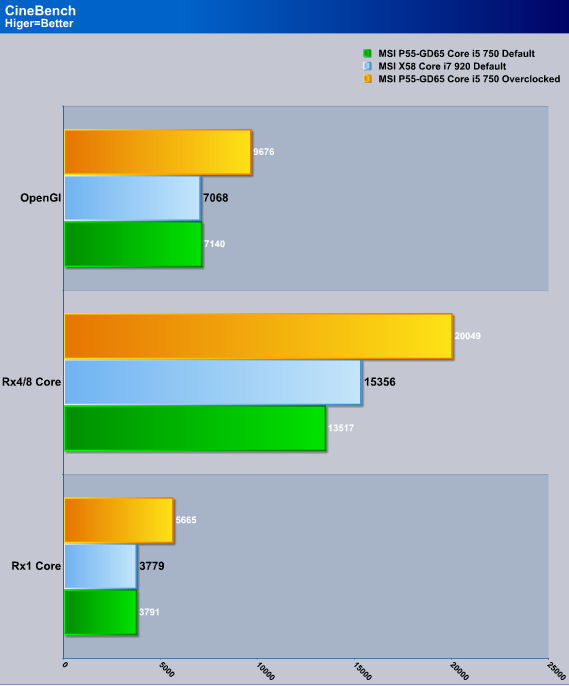
With CineBench testing the Core i5 750 shows some promiss. tieing the Core i7 920 CPU in both the Rx1, and the OpenGl tests. Once overclocked the MSI takes the Core i5 750 CPU to new levels.
wprime
wPrime is a benchmarking application designed to use a highly multithreaded approach to calculating the square-roots of large amounts of numbers (up to 32 billion)
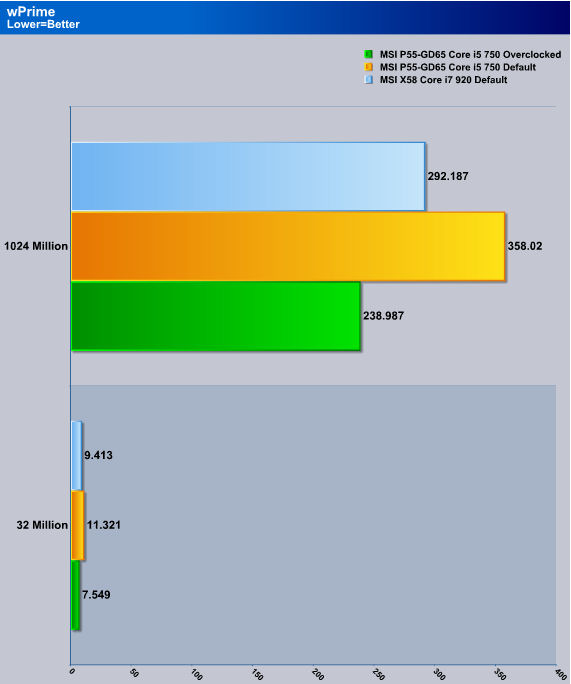
Even in wPrime testing the Core i5 750 does really well holding up against the Core i7 920 CPU.
Bibble 5
Bibble 5 is a real world conversion program that allows us users to convert our RAW image formats to JPG image formats with out sacrificing visual quality. What makes this program stand out from the other RAW image convertors is the fact this program will utilize all available threads for the conversion process. A fast CPU and having a multiple threaded CPU makes this tasking even faster.
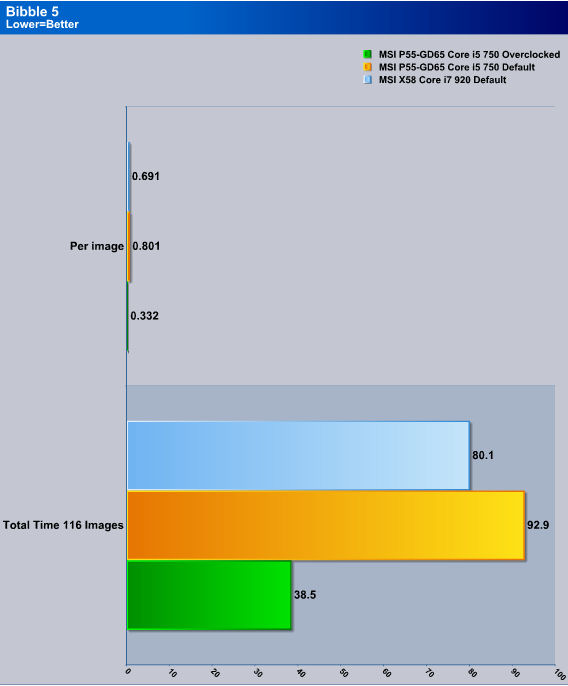
For testing the MSI P55-GD65 motherboard subsystem, I used Bibble 5. I used a USB card reader, took 116 RAW 10.1 Mega Pixel pictures from my Canon Rebel camera, then inserted the SD card in to the card reader and used Bibble 5 to convert all of them at once. As we can see the Core i5 750 CPU is only a few seconds behind the Core i7 920 CPU during default CPU speeds. Overclocking the Core i5 750 CPU seriously reduced our time to convert the images.
WinRAR

This module in WinRar generates random data, which contains specially introduced redundancy, increasing the load to both the processor and memory. Data is then passed through RAR compression and decompression algorithms, and the output of the decompression algorithm is compared to the source data. If any differences are found, WinRar then reports “Errors found – Yes” in the command window. WinRar displays a size of processed data and compression speed, current and resulting, in kilobytes per second.

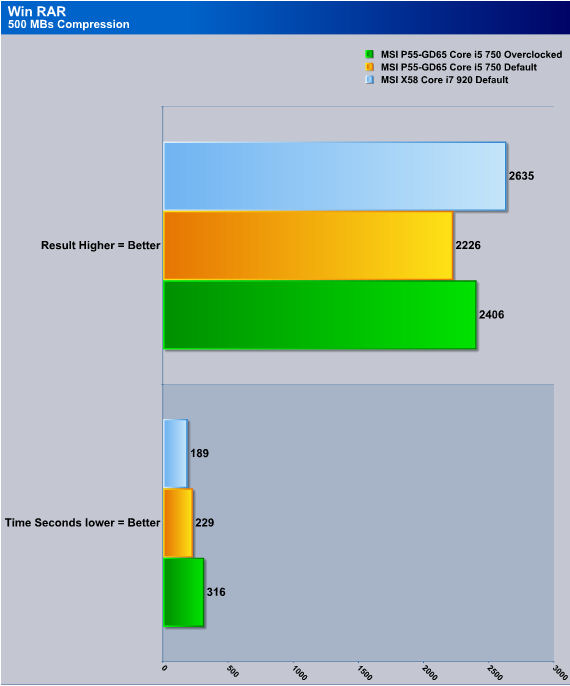
WinRAR still prefers having more threads of the Core i7 920 CPU. Overclocking the Core i5 750 CPU did not really give us a great big boost of performance.
Crystal Disk Benchmark
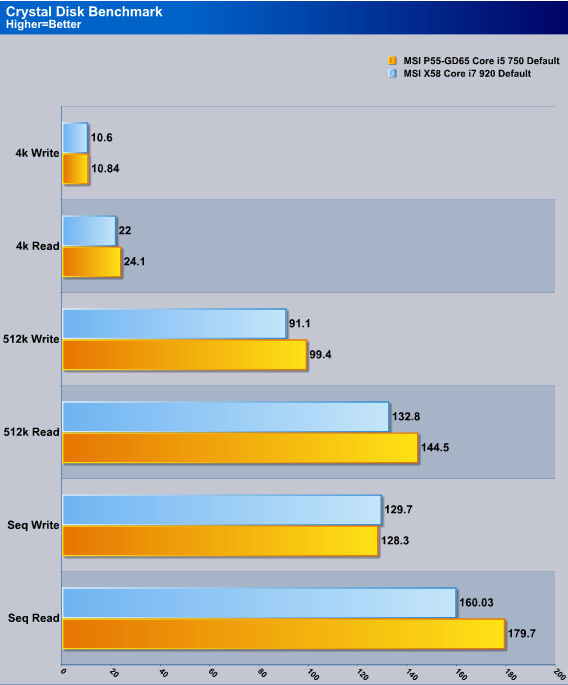
Using the same SSD on both machines it is time to see how the PCH on the MSI P55-GD65 fairs up against the proven south bridge the ICH10R on the MSI X58. As we can see the PCH is far superior on handling the SSD then the ICH10R SB.
3DMark Vantage

Currently, there is a lot of controversy surrounding NVIDIA’s use of a PhysX driver for its 9800 GTX and GTX 200 series cards, thereby putting the ATI brand at a disadvantage. Whereby installing the PhysX driver, 3DMark Vantage uses the GPU to perform PhysX calculations during a CPU test, and this is where things get a bit gray. If you look at the Driver Approval Policy for 3DMark Vantage it states; “Based on the specification and design of the ![]()
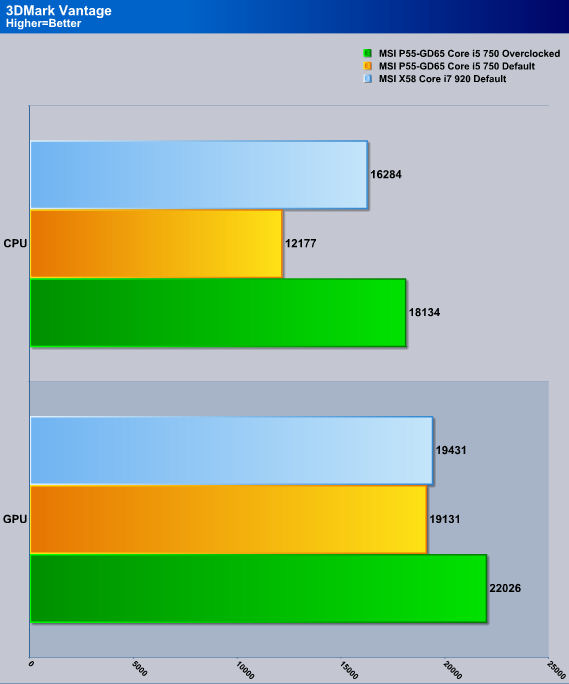
Lets see how the MSI P55-GD65 motherboard and the Core i5 750 cpu fairs against the Core i7 920. Other then the CPU performance testing, there is not real difference between the two motherboards on GPU performance levels.
World in conflict

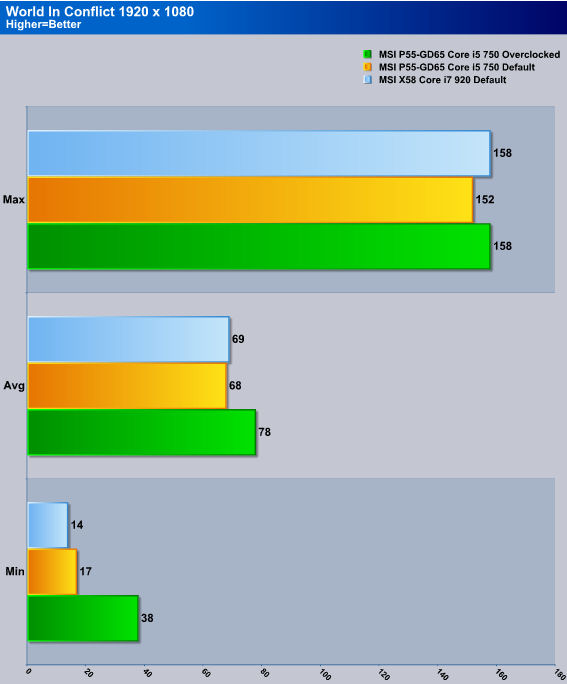
Once again no real difference between the Core i5 750 CPU and the Core i7 920 CPU in gaming.
Last Remnant
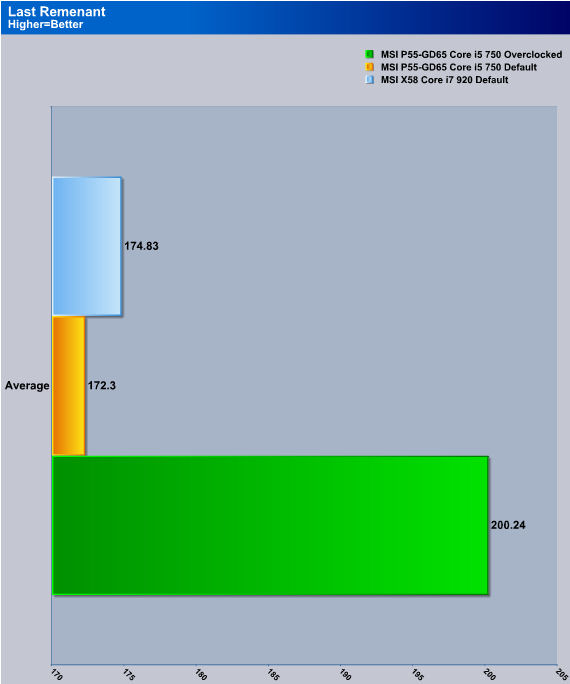
As we seen with 3DMark Vantage, and World In Conflict, Last Remnant we see no difference between the Core i5 750 and the Core i7 920.
Far Cry 2

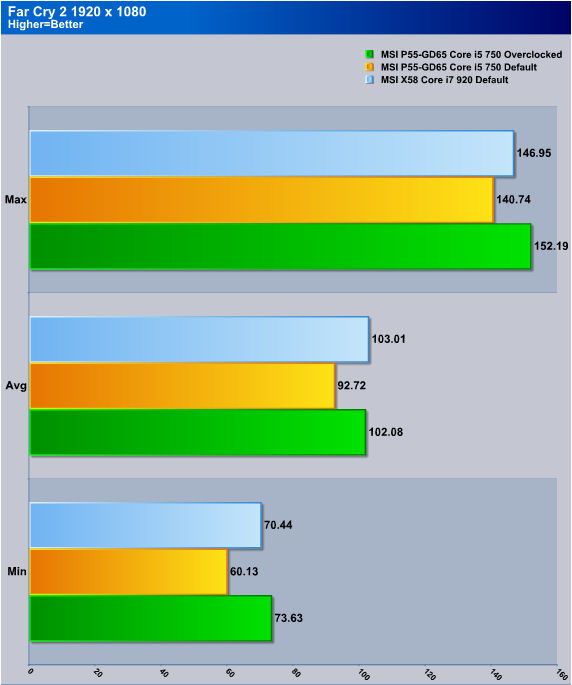
Far Cry 2 starts to show the difference between the two motherboards capabilities. But again the minimum frame rate on the MSI P55-GD65 motherboard with the Core i5 750 CPU is still way above 30 FPS. Of course having essentially 3 HD4870’s (1 HD4870, 1 HD4870X2) strapped together also helps out.
Conclusions
What separates one motherboard manufacturer from the next is features and sometimes overclockability. The MSI P55-GD65 motherboard has a few unique features that mid-ranged motherboards don’t normally get. One of these features is the voltage checking. This feature gives users a real time voltage measurement that is accurate and relieving us from the constraints and unreliable software monitoring. Also giving us a realtime measurement of motherboard components that is never listed, like CPU VTT, PCH, and memory voltages. Another cool unique feature that MSI added was the on the fly BCLK adjustment. This is more geared toward those who don’t fully understand the complexity of the motherboard BIOS, and gives these users an ability to overclock their CPU. In my case, I went to far on the adjusting the BCLK with this feature and I kept locking up the computer. (So tread lightly when using this feature.)
The two major areas that I feel MSI could have done better: One is the exclusion of a rear placed clear CMOS button. I like the idea of not having to open my chassis, remove a video card then jump pin 2/3 with the computer powered down, then count to 30, place the jumper back in pin 1/2, replace video card and then re-power up computer. If I gone to far on an overclock. There was an instance when I did have to clear the CMOS by this jumper. A rear placed clear CMOS button would make this task a lot easier.
The other main problem I had with this motherboard and it is a big one, is the default memory divider of 5 (10). Yes, this motherboard did ramp the memory to 2000MHz, but I lost a serious amount of memory bandwidth by doing so. At first I thought this was a CPU limitaion, but after using a couple other 1156 motherboards I found out this is an MSI issue.
Poking and prodding around the web, I saw this motherboard can be bought for around the $160 mark. Despite the memory divider issue, the price puts this solid performing motherboard in an affordable range.
| OUR VERDICT: MSI P55-GD65 | ||||||||||||||||||
|
||||||||||||||||||
| Summary: The MSI P55-GD65 motherboard is a great affordable motherboard that overclocks extremely well (literally it only took me 10 minutes), and has features that only high end motherboards get. |