Many of you surely don’t need a full ATX motherboard to run the one graphics card you have, so you could save yourself a few bucks with the MSI X58M, and still have all the features of a larger board.
There are many users out there who do not need a full ATX case. Whether it be because you only have one graphics card, or just a lack of case space, a micro ATX board is just what you have been looking for. Currently there is not much selection, with just one more high end oriented micro ATX board. Today we have MSI’s X58M, a micro ATX board for the masses. This happens to be the cheapest X58 board currently, certainly putting it as at least worth a look for many users.
The hard part about being the cheapest board is low expectations. The cheapest generally means that it will not be nearly as good as something more expensive. MSI hopes to rid its users of this thought by providing a top quality board for a basement price point. They certainly have me onboard, but I have doubts as to how well this board will overclock or how it will handle with large amounts of RAM. If MSI has engineered a truly great board, we should see great performance in both of these fields.
features
 |
• Help end-users upgrade CPU FSB directly • Buy an essential CPU but want to reach higher performance • Skip the complicated BIOS OC setting and enjoy the higher level CPU performance |
 |
• APS is Active Phase Switching is complete function to Control Power Demand With Switcing Dynamically, it’s for CPU, Memory and Chipset PWM. • Saving Power under Variable Loading. • Power Usage More Efficiency. |
 |
• Longer lifespan than electrolytic capacitors • Endurable to operation under higher frequency & temperature • Avoid exploding capacitors to cause mainboards failure |
 |
• The loss-less content protection technology with full-rate audio enjoyment from Blue-ray Disc • Support for 24-bit / 192kHz sample rate offers high quality digital decoders and speakers • support 7.1 channels playback, plus 2 channels of independent stereo sound output (multiple streaming) through the front panel stereo outputs |
 |
• Functions designed with button to be easy use. • Help power-users tweaking process in-chasis enviornment • Onboard SATA ports are stacked on the mainboard to avoid mechanical issue with giant graphic cards like 8800 Ultra. |
 |
• Equip with 3 PCIe x16 slots, ATI CrossFire Ready. • The ultimate multi-GPU performance gaming platform. • Provides 2.7x faster performance than single graphic card solution. |
 |
• Equip with 3 PCIe x16 slots, NVIDIA SLI Ready. • The ultimate multi-GPU performance gaming platform. • Provides multiple performance than single graphic card solution. |
 |
The MSI Live Update online is designed to automatically download and update the BIOS and driver when there’s a new version online. It helps reduce the risk of getting the wrong file and minimize the trouble of searching the files from MSI website. |
| Live Update 3 is a single utility software that automatically checks BIOS, driver and utility updates and installs for you , which can save your time for searching and lower the risk while updating. |
This motherboard has some very helpful features. The Easy OC switch is always nice for soemone who wants a little more power, but is easily confused by all of the BIOS options. Quickly becoming a standard, all solid capacitors ensure that your motherboard will have a longer lifespan. Also quickly becoming the norm, SLI is also supported on this board as well as just about every other X58 motherboard.
Specifications
| Feature/Specification | MSI X58M | Intel X58SO |
|---|---|---|
| CPU Support |
i7 CPU’s in 1366 package |
i7 CPU’s in 1366 package |
| Chipset |
Intel X58 |
Intel X58 |
| Memory Slots |
6 DDR3 |
4 DDR3 |
| Audio Channels |
8 | 8 |
| PCI Slots |
1 |
1 |
| PCIE X1 Slots |
0 | 2 |
| PCIE X4 Slots |
0 | 1 |
| PCIE X16 Slots |
2 | 2 |
| Hard Drive Controller |
SATA 1 and 2 | SATA 1 and 2 |
The specifications are very similar to the Intel board, only the Intel board has a couple more lower bandwidth PCIE slots. The MSI board also has support for more RAM, and all of it in triple channel, where on the Intel to run all 4 slots you need to run your RAM in dual channel.
Pictures & impressions

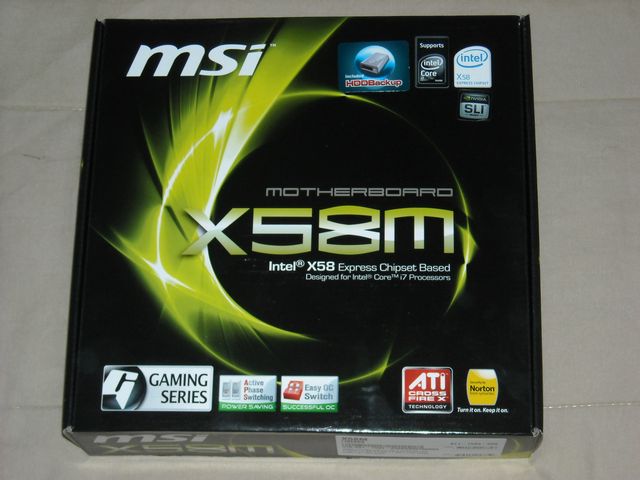
A quick look at the front of the box shows many of the basic features of this motherboard. For one, they make sure that you know that even though this is a lower end motherboard it supports the i7 Extreme Edition. You can also see a Gaming Series sticker in the bottom left hand corner. I wouldn’t think of this board as a gaming board, but when you remember that the X58 is the highest end chipset, it makes sense.

When we open the box, and lift the cardboard cover, we can see the motherboard. As you can see, it fits perfectly in this case. The static bag over the motherboard is always a great idea to ensure that some random discharge wont happen, and fry your board. It would have been nice to see some padding on the side of the box, but overall the packaging is acceptable.

Here is a picture of all of the included accessories. Going from top left to right we have: motherboard manual, quick install guide, I/O shield, Crossfire cable, quick front panel connectors, IDE cable, two SATA cables, a molex to SATA power adapter, user guide, extra programs CD, and a drivers CD. Noticeably absent is a SLI adapter. The crossfire cable makes no sense to me, its about ten times longer than it has to be, and all ATI cards come with the cable anyways. If you want to run SLI you will have to buy a cable elsewhere. This was a bad decision by MSI.

Here we have a beauty shot of the board itself. You can notice the Easy OC Switch sticker, but right below that is another sticker warning of the dangers if you run your RAM voltage over 1.65v. This should be no surprise by now. It can be hard to see, but the PCB is actually brown. Kind of a ugly color in my opinion, but it looks kinda black (like it should be) so its ok.

Here we have a close up of the 24 pin power connector along with some old connectors, better known as the IDE and FDD. I always welcome IDE connectors, since I know some people out there still use IDE disk drives (I did until I got the Intel X58). What I hate is the floppy. I have not used one in forever, and its only real use is to update your BIOS, however a flash drive is much easier to use to do this.

Now lets move onto the expansion slots. As you can see, the PCIE x16 slots are both blue. They also have the tabs that are easy to move, unlike the Intel board, which are a terrible design. We can see one PCIE x4 slot, useful for a hard drive controller card. The end of the slot is actually cut off, so you can insert a x16 card in there, but it would only be good for a PhysX card. I kind of wish they would have put the other PCIE x16 slot down lower, but if you where using a micro ATX case, then you couldn’t run two dual slot graphics cards (not sure why you would do that in such a small case).

Lets zoom in on the things below the expansion slots for a minute. The blue colored pins are for a 1394 port either for an expansion slot, or the front panel. To the right of that is a power switch. This is a really nice feature if you happen to run a bench top system. As we move further right we see the easy OC switch. The manual shows the various position the switches have to be in to achieve a certain speed. Then a surprise here, a COM connector. I don’t use any COM devices, so this is no use for me, however if you still have a use for a serial port then you are in luck.

Now lets move to the back of the board. Starting from the left we have twin PS2 ports. One is for a mouse and the other is for a keyboard. Most of us have moved onto USB mouses and keyboards, but the PS2 keyboard still has its occasional use when drivers are needed for a USB keyboard. As we move right we see two USB ports. Then we have one eSATA port, a must for those who have newer portable hard drive enclosures. Then we have a 1394 port with two more USB below that. Then a Gigabit ethernet connection with two more USB under that making a grand total of 6 USB connectors in the back. Finally we have all of the audio connectors.

Here we have a nice shot of the CPU socket. I have already taken the CPU socket cover off, so don’t worry about there not being one. MSI would have been docked a lot of they had forgotten about this. You can see that this board has the mounting holes for 775 coolers, a nice addition to a budget board. If you look closely to the left you can see the VRM’s. Whats kind of disappointing is that there is an obvious lack of a heat sink, but if you look to the top and bottom of them you can see mounting holes for a heat sink. This is a bit of a disappointment, but it does lower the overall cost of the board. The board itself can function fine without these heat sinks, but it will probably lower the overclocking ability of the board.

Time for the IOH heat sink. I was very disappointed in the Intel board’s heat sink because the fins where just too far apart for how small it was. MSI has don’t a much better job, and the IOH should have lower temperatures. There have been many reports of the IOH heat sink having terrible heat sink paste under, so I decided to pop off my heat sink to see myself. I can definitely verify that. The paste was rock hard, and it took me about a half an hour to get all of it off. I have heard of one user going from 72°C idle temperature to 68°C load temperature, so it is well worth the time to reapply the thermal paste.

Finaly lets take a look at the SATA connectors. It was a awesome move by MSI to include 180° connectors. This makes it much easier if you have longer graphics cards. You can also see the Marvell SATA connector. This is a separate hard drive controller from the black SATA ports. If you look behind the SATA connectors you can see the motherboard speaker. This will beep if you have any issues upon your motherboard booting up. Unfortunately there is no LED poster. This is kind of weird since a lot of cheaper boards include one.
bios

Lets start this section off with the main BIOS screen. As with every other BIOS, there are a multitude of options. I wont bore you with any of the options that have nothing to do with overclocking, because you have probably seen it all before. Lets move onto the Cell Menu, which is what MSI calls its overclocking menu.

Here we have some of the basic overclocking options. These include the clocks for the base clock, which determines how fast your components run. Below that we see the OC Stepping option, with this option you can slowly ramp up the CPU clocks to help you achieve a higher overclock. Under that is the CPU multiplier, something that will be used a lot of you have an Extreme Edition CPU. Then we have some QPI settings. Lets move to the CPU Specs page.

This menu shows all of the individual specifications of the chip including its cache, and its operating frequency. This can be useful to ensure that your CPU is reading correctly. This isn’t much of a problem now, but when the new CPU’s come this could be a issue.

Here we have the QPI Configuration menu. You can choose to set the QPI to Low-Speed Mode. I have never heard of this, but you will probably loose a lot of bandwidth if you do. The QPI Frequency allows you to select how fast you want to set the QPI. If you are running a 920, and want to run the full 6.4 GT speed you will probably have to manually select it.

Here we have the Memory-Z menu. This will give you specific information about your RAM. This is useful to find what settings the manufacturer recommends for the RAM.

Here we have the Advanced DRAM configuration. From here you can set the command rate to either 1T, 2T, or 3T. For some reason MSI decided to put a N instead of the commonly used T. Under that are the very basic memory timing options. These are the ones that the memory manufacturer prints on the RAM itself. If you turn on the Advanced Memory Setting, then you are presented with many more options for the RAM timing. If you are a fan of tweaking with RAM, then you will love these options, personally I don’t see the point with messing with these settings to gain an extra 50 mhz on the RAM.

Here we have some more options in the Cell Menu. You can adjust your PCI and PCIE frequency here. I recommend against this, as you can easily fry any expansion card you have if you play with these settings. You can also choose to turn off DRAM and PCI slots if they are not occupied. According to MSI this can minimize electromagnetic interference.

For the final part of the BIOS lets look at all of the voltage options. As you can see here, there are quite a few, including the option to change a multitude of RAM related voltages. This screen shot includes all of the voltages set to their max. It is highly reccomended that you not use any of the voltages that are in the red zone. Doing so puts your computer at a huge risk.
methodology
All of the tests where run 3 times to ensure accuracy. A base CPU frequency of 3.6 ghz was used. This will ensure that the graphics card is not bottle necked by the CPU. Both systems used this CPU frequency to ensure that the boards where on an equal playing field. I have included a table below that shows the detailed specifications of the whole system.
| Test Rig | |
| Case Type |
Ikonik Ra X10 Liquid |
| CPU | Intel i7 920 @ 3.6 |
| Motherboard | Intel SmackOver X58, MSI X58M |
| Ram | (3×2) Mushkin HP3-12800 |
| CPU Cooler | D-Tek Fuzion |
| Hard Drives | WD SE16 640 GB WD SE16 750 GB |
| Optical | Lite-On DVD R/W |
| GPU |
Leadtek GTX275 |
| Case Fan |
Two Front 120mm Intake |
| PSU |
Corsair HX1000W |
overclocking
To test the overclock I used the Linpack tester named LinX. This stress tester works much faster than Prime 95 because it puts a larger load on the CPU, so you can find stability much faster. To verify the overclock was stable I ran through 20 LinX tests. This will ensure that the CPU is in fact 100% stable. Remember you may not achieve the same results as us, and as always overclocking is dangerous if your not careful. Proceed at your own risk.
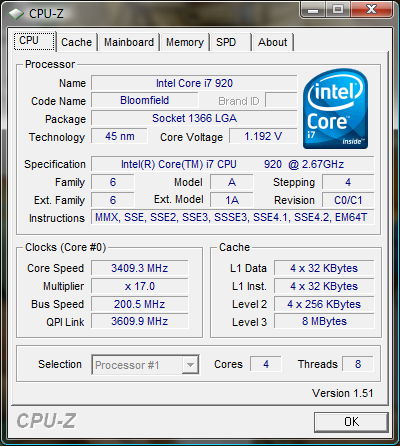
The MSI board really was a dream to overclock, at first I was able to easily achieve a bus of 200 mhz, with a multi of 19, bringing me to 3.8 ghz. The best part about this was I didn’t need nearly as much voltage for 3.8 as I did on the Intel board. There is a screen shot below for you to drool over.
But why stop at just 200 bus? Sure thats enough for many users, but lets try kicking it up some.

Shortly after I was able to get 200 bus, I was able to get 205 bus. This was just a matter of upping the base clock. For haveing 6 sticks of RAM inserted, this board is doing amazing.
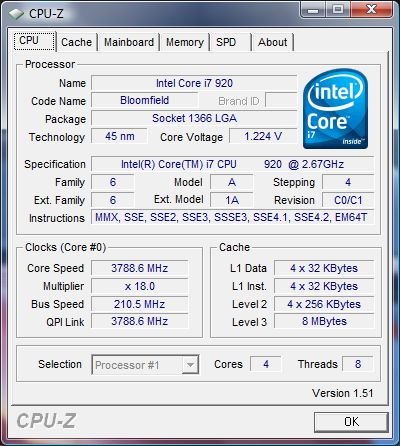
Then we have the max. Well sort of. While I was able to boot into windows at 210 bus, I was not able to stablalize it. You might be able to get this result stable if you play around with it more, but I am on a limited time schedule. This board really was a surpize on overclocking, I was expecting to have to take out 3 sticks of RAM because of poor results, but I was most certainly corrected.
3DMark Vantage

For complete information on 3DMark Vantage Please follow this Link:
www.futuremark.com/benchmarks/3dmarkvantage/features/
The newest video benchmark from the gang at Futuremark. This utility is still a synthetic benchmark, but one that more closely reflects real world gaming performance. While it is not a perfect replacement for actual game benchmarks, it has its uses. We tested our cards at the ‘Performance’ setting.
Currently, there is a lot of controversy surrounding NVIDIA’s use of a PhysX driver for its 9800 GTX and GTX 200 series cards, thereby putting the ATI brand at a disadvantage. Whereby installing the PyhsX driver, 3DMark Vantage uses the GPU to perform PhysX calculations during a CPU test, and this is where things get a bit gray. If you look at the Driver Approval Policy for 3DMark Vantage it states; “Based on the specification and design of the CPU tests, GPU make, type or driver version may not have a significant effect on the results of either of the CPU tests as indicated in Section 7.3 of the 3DMark Vantage specification and white paper.” Did NVIDIA cheat by having the GPU handle the PhysX calculations or are they perfectly within their right since they own Ageia and all their IP? I think this point will quickly become moot once Futuremark releases an update to the test.

In our first test we see that the MSI seems to be lacking a bit. This certianly isnt much of a difference, but a difference non the less. The CPU score on the MSI board happened to be a bit higher though.
Crysis v. 1.21

Crysis is the most highly anticipated game to hit the market in the last several years. Crysis is based on the CryENGINE™ 2 developed by Crytek. The CryENGINE™ 2 offers real time editing, bump mapping, dynamic lights, network system, integrated physics system, shaders, shadows, and a dynamic music system, just to name a few of the state-of-the-art features that are incorporated into Crysis. As one might expect with this number of features, the game is extremely demanding of system resources, especially the GPU. We expect Crysis to be a primary gaming benchmark for many years to come.
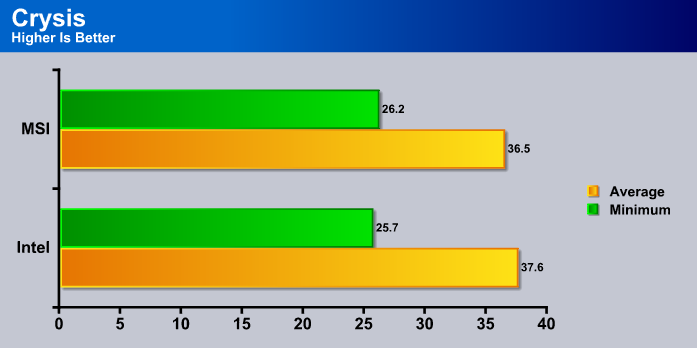
We can actualy see here that both boards perform very similarly. These numbers easily fall into the margin of error. You will never notice a difference in game with either board.
SISOFT
“SiSoftware Sandra (the System ANalyser, Diagnostic and Reporting Assistant) is an information & diagnostic utility. It should provide most of the information (including undocumented) you need to know about your hardware, software and other devices whether hardware or software. It works along the lines of other Windows utilities, however it tries to go beyond them and show you more of what’s really going on. Giving the user the ability to draw comparisons at both a high and low-level. You can get information about the CPU, chipset, video adapter, ports, printers, sound card, memory, network, Windows internals, AGP, PCI, PCI-X, PCIe (PCI Express), database, USB, USB2, 1394/Firewire, etc.”
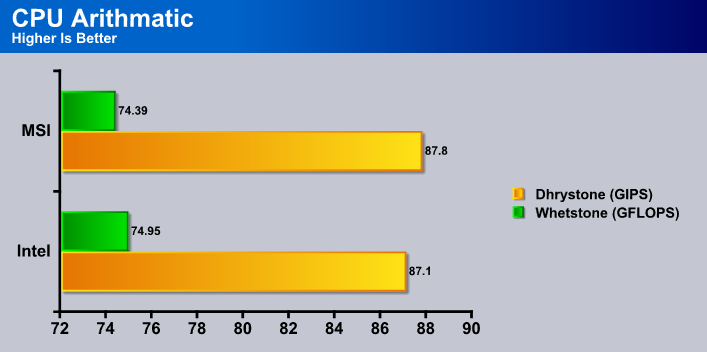
Now as we move to synthetic benchmarks we start to see a bit of a difference between the boards. The MSI board managed to score a decent amount more with the Dhrystone test than the Intel board. However the Intel shot back with a higher score in the Whetstone test.
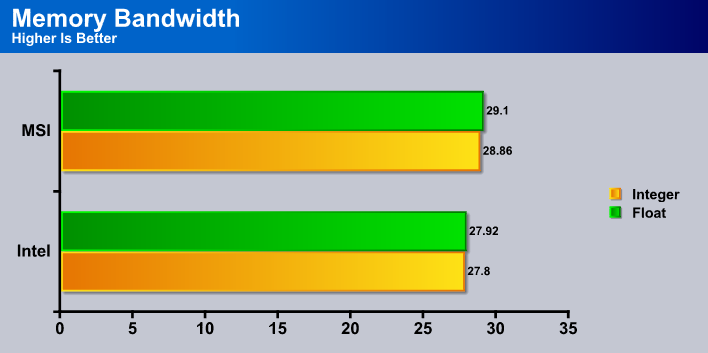
Here is where the MSI board really takes charge. While the MSI’s boards scores where not incredably higher than the Intel boards, they still where clearly higher.
EVEREST
“EVEREST Ultimate Edition is an industry leading system diagnostics and benchmarking solution for enthusiasts PC users, based on the award-winning EVEREST Technology. During system optimizations and tweaking it provides essential system and overclock information, advanced hardware monitoring and diagnostics capabilities to check the effects of the applied settings. CPU, FPU and memory benchmarks are available to measure the actual system performance and compare it to previous states or other systems. Furthermore, complete software, operating system and security information makes EVEREST Ultimate Edition a comprehensive system diagnostics tool that offers a total of 100 pages of information about your PC.”
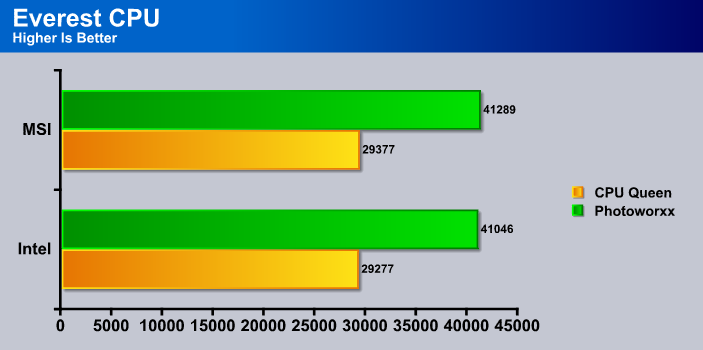
Once again the MSI board manages to best the Intel board, but as before this can easily fall into the margin of error.
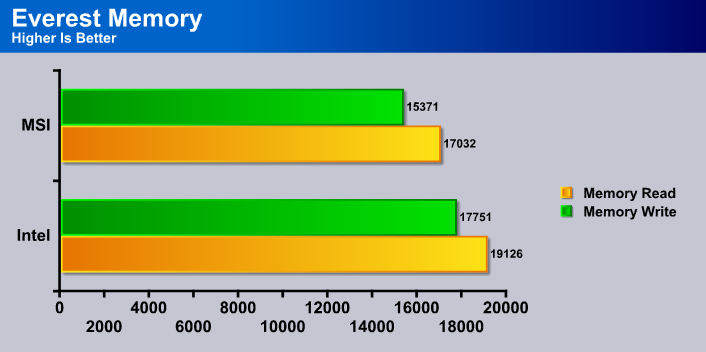
Here we have a strange turn of events. The Intel board is the clear leader here. Not sure how it managed this much more bandwidth, but it did.
WPRIME
wPrime is a benchmarking application designed to use a highly multithreaded approach to calculating the square-roots of large amounts of numbers (up to 32 billion)
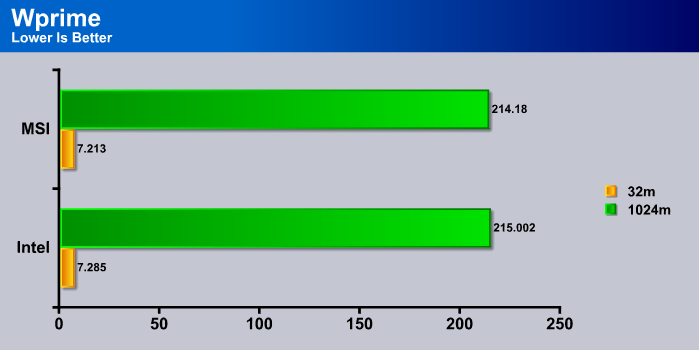
Here we see the MSI regain the lead after its defeat in the memory bandwidth round of Everest. However the MSI board is very closly trailed by the Intel board.
CINEBENCH
CINEBENCH runs several tests on your computer to measure the performance of the main processor and the graphics card under real world circumstances. The benchmark application makes use of up to 16 CPUs

or CPU core.

Now two times in a row the MSI wins out. The differences are very minimal, and you surly wont notice any real difference here.
SUPER PI
Super Pi is a program that calculates pi to a specified number of digits after the decimal point up to a maximum of 32 million. The Gauss-Legendre algorithm which is a windows version of a program used by Yasumasa Kanada in 1995 to compute Pi to 232 digits.
Super Pi is used by many overclockers to test performance and stability of their systems. In this community, Super Pi has become the standard for providing benchmarks to compare pi calculation times and demonstrate their overclocking skills. The program can be used to also test the stability of a particular overclocking speed. If a computer can calculate PI to the 32 millionth place after the decimal without a mistake, it is considered moderately stable in terms of RAM and CPU performance. More intensive CPU and RAM tests include calculations that run for hours instead of minutes and better test system stress levels.
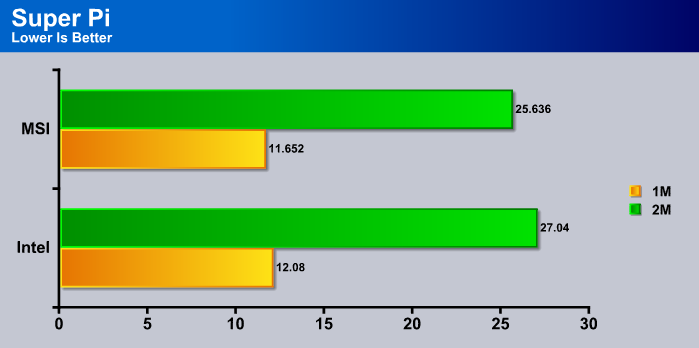
The MSI board manages another close win in Super Pi as well. This test is great for finding the number crunching ability of a CPU.
POV RAY
The Persistence of Vision Raytracer is a high-quality, totally free tool for creating stunning three-dimensional graphics. It is available in official versions for Windows, Mac OS/Mac OS X and i86 Linux. The source code is available for those wanting to do their own ports.
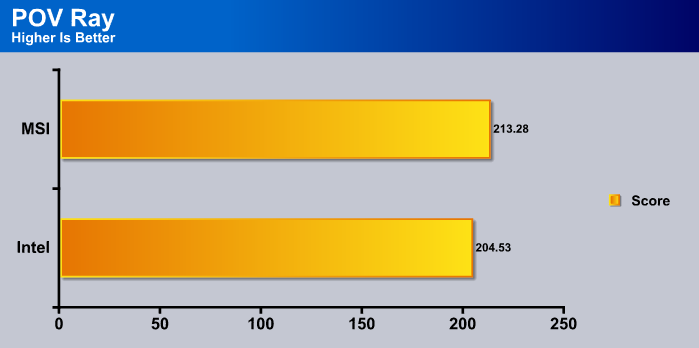
Here we also see the MSI board just inching ahead of the Intel board. Overall throughout the testing, the MSI board has come on top the most times, and thus just beat out the Intel board.
Conclusion
Being the cheapest board does not always mean being the worst. The MSI X58M certainly has proven this today. In the majority of the tests conducted, the MSI board was able to keep up with, and in most cases surpass the performance of the Intel board. This is great news for the end user who is not looking for a large board covered with PCIE x16 slots. This board really is geared towards the lower end and mid range user. This is the kind of user that most likely will run a single graphics card, but may run SLI on lower end cards. In this respect, this board is second to none. The Asus Rampage II Gene may also be a micro ATX board, but its price tag is significantly higher.
Honestly, this board makes the Gene look like a pretty big rip off. It overclocked like a dream, even with all 6 RAM slots occupied with RAM. Not only that, but it had just about every feature from the Gene, only at a huge discount. The board certainly seems like it could do no wrong, but there are a few issues with it. One is the VRM’s not having a heat sink. It may not be needed, but it certainly could have helped get rid of any heating issues, and prolonged the life of the board. Also a potential con depending on your case, is the positioning of the second PCIE x16 slot. If you are running a micro ATX case then this is great because it allows you to run two cards in Crossfire or SLI, but if you have a larger case, then you could really see a temperature difference on the GPU’s if you where able to run them further apart. Aside from these little things, this board was simply excelent for the price.
We are using a new addition to our scoring system to provide additional feedback beyond a flat score. Please note that the final score isn’t an aggregate average of the new rating system.
- Performance 9.5
- Value 10
- Quality 10
- Warranty 8
- Features 9
- Innovation 8
Pros:
+ Awesome Performance
+ Low Price Point
+ Amazing Overclocking
+ SLI & Crossfire
Cons:
– No VRM Cooler
– PCIE x16 Slot Position
Overall the MSI X58M was a amazing overclocking board, packed with features whose price is unmatched by any other X58 board, so it recieves a:
9.5 out of 10, and the Bjorn3D Golden Bear Award


