With all of these full sized ATX motherboards out there, is there room for micro ATX motherboards to get a name?
INTRODUCTION
As they say, it’s not the size that matters, it’s on how well you use it. Well, this pretty much sums up the ASUS Rampage II GENE. Upon hearing that I was gonna review this board, I immedietly did a quick Google search for pictures and also to get an idea of what this motherboard looked like and its layout.
Once I recieved this motherboard, I quickly opened up the package for a quick visual scan of the motherboard to make sure nothing was damaged. I realized that this motherboard again was, in fact, a micro ATX design. Don’t get me wrong. There are good micro ATX motherboards out there, and some even have some overclockability capabilities, but not much. So, this was my mind set, and even though the settings are there, does not mean I am gonna be able to get very far?
Boy, was I ever so wrong.
About ASUS
|
|||||||||||
 |
|||||||||||
Imagine innovations that simplify our lives and enable us to realize our full potential. It is technologies’ responsibility to accommodate us, not the other way around, because all devices should perform and communicate seamlessly anytime, anywhere. ASUS thrives to become an integrated 3C solution provider (Computer, Communications, Consumer electronics). |
|||||||||||
As a major player of the IT industry, ASUS has established its corporate mission: Provide innovative IT solutions that empower people and businesses reaching their full potential. The philosophy of ASUS product development is to do the fundamentals well first before moving forward. Started with computer components such as motherboards, graphic cards, and optical storage devices, ASUS now has now over 16 product lines, including desktop barebone systems, servers, notebooks, handhelds, network devices, broadband communications, LCD monitors, TVs, wireless applications, and CPT (chassis, power supply and thermal) products. |
|||||||||||
|
|||||||||||
|
SPECIFICATIONS
|
CPU
|
Intel® Socket 1366 Core™ i7 Processor Extreme Edition/Core™ i7 Processor Processors
Supports Intel® Dynamic Speed Technology * Refer to www.asus.com for Intel CPU support list |
|
Chipset
|
Intel® X58 /ICH10R
|
|
System Bus
|
Up to 6400 MT/s with QuickPath Interconnection
|
|
Memory
|
6 x DIMM, Max. 24 GB, DDR3 2000(O.C.)/1800(O.C.)/1600(O.C.)/1333/1066 Non-ECC,Un-buffered Memory
Triple channel memory architecture * Supports Intel® Extreme Memory Profile (XMP) **Due to Intel spec definition, DIMMs of DDR3-1333 or above are out of spec. Please refer to www.asus.com or user manual for the Memory QVL(Qualified Vendors List). |
|
Expansion Slots
|
2 x PCIe 2.0 x16 support at dual x16 speed
1 x PCIe 2.0 x4 1 x PCI 2.2 |
|
Multi-GPU Support
|
Support NVIDIA SLI™ / ATI CrossFireX™ Technology
|
|
Storage
|
Intel ICH10R controller
6 xSATA 3 Gb/s ports Intel Matrix Storage Technology Support RAID 0,1,5,10 JMicron® JMB363 PATA and SATA controller 1 xUltraDMA 133/100/66/33 for up to 2 PATA devices 1 xInternal SATA 3.0 Gb/s port 1 xExternal SATA 3.0 Gb/s port (SATA On-the-Go) |
|
LAN
|
Realtek® 8111C PCIe Gigabit LAN controller featuring AI NET2
|
|
Audio
|
SupremeFX X-Fi onboard 8 -Channel High Definition Audio CODEC
EAX® Advanced™ HD 4.0 X-Fi CMSS®-3D X-Fi Crystalizer™ Creative ALchemy Supports Optical S/PDIF out ports on rear |
|
IEEE 1394
|
2 x 1394a ports (1 port at back I/O, 1 port onboard)
|
|
USB
|
12 USB 2.0 ports (6 ports at mid-board, 6 ports at back panel)
|
|
ASUS Unique Features
|
Power Design
– 8-phase CPU power – 2-phase QPI/DRAM power – 2-phase NB power – 2-phase Memory power CPU Level Up Keyboard-TweakIt Memory Level Up iROG Extreme Tweaker Loadline Calibration Intelligent overclocking tools: – ASUS AI Booster Utility – O.C. Profile Overclocking Protection: – COP EX (Component Overheat Protection – EX) – Voltiminder LED – ASUS C.P.R.(CPU Parameter Recall) |
|
Special Features
|
MemOK!
External LCD Poster Q-Fan Plus ASUS EPU-6 Engine ASUS Q-Connector ASUS Fan Xpert ASUS EZ Flash 2 ASUS CrashFree BIOS 3 ASUS MyLogo3 |
|
Back Panel I/O Ports
|
1 x External SATA
1 x IEEE 1394a 1 x LAN(RJ45) port 6 x USB 2.0/1.1 8 -Channel Audio I/O 1 x PS/2 Keyboard port(purple) 1 x S/PDIF (Optical) 1 x Clr CMOS switch |
|
Internal I/O Connectors
|
3 x USB connectors supports additional 6 USB 2.0 ports
1 x IDE connector for two devices 7 x SATA connectors 5 x Fan connectors: 1 x CPU / 2 x Chassis / 2 x Optional 2 x thermal sensor connectors 1 x IEEE1394a connector 1 x LCD Poster connector 1 x Chassis Intrusion connector 24-pin ATX Power connector 8-pin ATX 12V Power connector 1 x En/Dis-able Clr CMOS header 1 x Front panel audio connector 1 x CD audio in System panel connector |
|
BIOS
|
16 Mb Flash ROM
AMI BIOS, PnP, DMI2.0, WfM2.0, SM BIOS 2.4, ACPI2.0a Multi-Language BIOS |
|
Manageability
|
WOL by PME,WOR by PME,Chasis Intrusion,PXE
|
|
Accessories
|
1 x SLI Cable
1 x External LCD Poster 1 x 2-in-1 ASUS Q-Connector Kit 1 x UltraDMA 133/100/66 cable 2 x SATA cables 1 x I/O Shield 1 x Cable Ties 1 x ROG theme label 1 x User’s manual |
|
Support Disc
|
Support DVD:
– Drivers and applications Sound Blaster X-Fi Utility Futuremark® 3DMark®06 Advanced Edition Kaspersky® Anti-Virus ASUS TurboV utility ASUS PC Probe II ASUS Update ASUS AI Suite |
|
Form Factor
|
uATX Form Factor
9.6 inch x 9.6 inch ( 24.4 cm x 24.4 cm ) |
| The product (electrical , electronic equipment, Mercury-containing button cell battery) should not be placed in municipal waste. Check local regulations for disposal of electronic products. |
* PCB color and bundled software versions are subject to change without notice.
* Brand and product names mentioned are trademarks of their respective companies.
PACKAGING

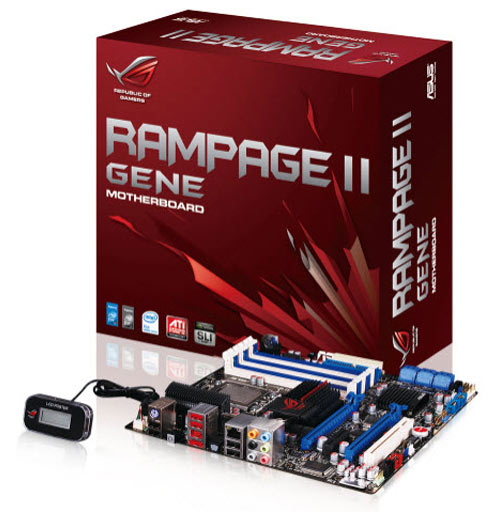
Well, let’s start off on the front side of the box that ASUS uses for the Rampage II GENE. ASUS is good for making their packaging colorful. This motherboard supports both ATI Crossfire and Nvidia’s SLI.


The backside of the packaging is where Asus Gives us general specification information for the Rampage II GENE motherboard. They also gives a quick couple of pictures of the motherboard itself.

The packaging that ASUS used for this motherboard uses a lid style, so there’s even more information on the upper lid once we open the box up.

The lower lid information is shown here. This part and the previous picture both gives us some general features of this motherboard’s capabilities, like memory (if you’re having a compatibility problem with memory you push that button and it will attempt to fix it), CPU leveling up, and a quick easy way of overclocking (I will explain this a bit more in detail in the BIOS Part 2 page). Also this motherboard uses Supreme X-FI sound. Hmmm.

Once we open the bottom part of the inner lid of the packaging we can see the motherboard. So far, all I can say is, it’s cute.


Take out that box and open it up. Here’s where our extra SATA cables, IDE ribbons, rear IO plate, a large sticker, instruction manual, etc. are located

All of the contents laid out. In the upper left hand corner is the Rampage II GENE motherboard. Moving right of the motherboard are the extras. Four SATA cables, IDE ribbon, instruction manual, front IO/ USB standoffs, rear IO plate cover, an SLI ribbon? (looks more like a Crossfire ribbon), and also an LED poster screen.

The LED poster screen is shown here and this is a rather useful little device. Its main purpose is to tell you what part of the posting process your motherboard is doing. You can either view it by what it’s initializing (default) or have it show the actual post codes. Then, once OS is loaded, it tells you the time. This frees up valuable motherboard space and allows the user to visually see what’s going on a lot easier.

The end of the LED poster cable. This will get connected directly to the motherboard through the rear IO plate cover.
OVERVIEW

Let’s start off with an comparison between the MSI X58 Platinum and the ASUS Rampage II GENE. Both of these motherboards are the same size in width. Also, both of these boards have six memory slots.

Turning them around for a length comparison is where the size differentiate. The MSI X58 Platinum is longer by 3 PCI expansion ports than the ASUS Rampage II GENE.


Moving over to the rear IO ports, ASUS did away with one PS2 port. We see one PS2 port and two USB headers right below. Moving right, ASUS still is utilizing the rear clear CMOS button that so many other motherboard manufacturers and to the right is another two more USB headers with a 1394 Firewire port and a E-SATA port. Then, there’s an optical audio port, a 1 gigabit Ethernet port, two more USB headers, then finally the 8 channel audio ports.

Moving to the where the internal SATA ports (bottom right of the motherboard). These are 180° SATA ports. This will make hooking up HDD’s and optical drives a lot easier.

Looking down at where the SATA ports are and the ICH10R South bridge chip is, we have a iROG chip that sits right in between the SB and the SATA ports. To the left of the iROG chip is fan header #1. Also, ASUS has an extra SATA port. This is not native to the ICH10R SB and is controlled by a different controller (Jmicron, I believe). To the far left, on the corner of the motherboard, is where the front IO ports are located, power/reset switches, power/HDD LED’s, and finally the PC speaker. Then right above the front IO ports are USB 7/8 and USB 9/10 header ports.

The six memory slots., Now this is strange. The memory ports only lock on one side. Hmmm. Of course, the IDE (Jmicron) and the main 24-pin power plug is located here. Good placement for these items. Now what’s this towards the other corner of the motherboard? Not the fan header #2. Just right before that, a silver looking thingy.

Well, I guess I get back to that in a minute. Looking at the strange memory slots locking mechanism. Oh, so that is how they lock. There’s a metal spring on the bottom side of the memory slots that locks them.

While at the top end, the memory slots use the standard locking mechanism we are used to seeing. Now, why would ASUS use a new type of locking mechanism? Guess we have to wait and find out why.

Now, it is time to examine this silver looking disc thingy on the upper corner of the motherboard (memory side). Well, it is an upright CMOS battery. On a board that is space limited as micro ATX boards are, some things need to be remounted differently.


The CPU socket. ASUS also included two sets of mounting holes for the socket area. Well, come to find out, this motherboard supports both 775 socket mounting coolers as well as 1366 socket mounting coolers. This will definitely make using a lot of different CPU coolers easier.

Close up view of the mounting holes. Yep, there’s two, one 92mm apart (1366) and one 80mm apart (775).

Moving right above the rear IO ports (far upper corner of the motherboard), we have fan header #3, as well as the EPS CPU power plug here. Ok now, do you guys invent new ways of placing the EPS CPU power plug in the most difficult ways? I personally hate having my CPU power plug located here because it makes hooking this plug a nightmare in most chassis (and the non nightmare ones use an EPS extension cable). And we were doing so well too. To the far left end of the picture is fan header #4. It’s located right behind the audio ports.

Moving along the back end of the motherboard, it is time to see how ASUS placed the PCI expansion ports. PCI-E x16 port #1 is the first blue expansion port, then moving to the left, we have a 4 x PCI-E port #2, then another blue PCI-E x16 port is the third expansion port, then finally a PCI port is the last expansion port. Now, being this is an X58 motherboard, the chipset fully supports a x16 X x16 SLI and or Crossfire multi-GPU configurations. Also, take notice that these expansion ports are rather high on the motherboard, especially the PCI-E x16 video card port. I hope this doesn’t get in the way of the memory slots? Looking at the upper corner of the picture we see the Supreme X-FI sound the Rampage II GENE uses for our audio needs. And on the bottom left corner is fan header #5. Then, just right, above the fan header is another 1394 header.

On the very bottom of this motherboard are the onboard on/off, reset as well the memory OK switch.

Since I have not yet installed this motherboard, I felt I needed to explain how ASUS’s missing lock down for the memory slots work. The upper most PCI-E x16 video port is slightly higher then we are used too, ASUS used a metal clip inside of the memory holder to help lock the memory down. So we would not have to remove the first video card to exchange memory out of this mother board. It is pretty simple thing. line up the slots with the memory, then line up the other side as well. Then push down till it clicks. The trick is to push evenly downwards on both sides of the memory stick.

The actual locking side of the memory slot.

I left out the IOH (Northbridge) out of the main portion of the overview. I felt it would be better to wait to show you this part alone. The ASUS heatsink that they used on the IOH is in two parts. An upper part (which can be removed by un-screwing each one of the two screws) and a lower part, which has a heat pipe that continues to the Power modules for the CPU power distribution. This is a close up of one of the screws that secure the IOH upper heatsink.

Close up of the lower screw that secures the upper IOH heatsink.

Better view of the side of the IOH heatsink. We can make out a separation of the two halves of the IOH heatsink.

Now here is another little thing that ASUS added to this motherboard. We can add temperature probes from the motherboard to monitor whatever we want to monitor and these connect directly to the motherboard. This one is located just below the bottom PCI port and towards the back of the motherboard. It’s right above the fan header in this picture (OPT TEMP2 is listed).

And the last one is located in between the Ethernet/USB rear IO ports and the IOH. The second temperature probe hook up named OPT TEMP1.

That’s not all folks. ASUS adds another cool feature we may want to enjoy. This motherboard also uses LED’s to tell us if we have gone over the edge on our voltages. Each of these light up green (good), amber (High), red (Crazy). The CPU LED lights are located just above the power MOSFETs for the CPU itself.

The IOH (NB) LED’s are located in between the memory slots and the IOH itself.

The LED’s for the memory are located on the bottom edge of the memory ports. Throughout my testing these lights stayed green.

The HDD activity LED’s are located right behind the SATA ports.
|
|
|
|
|
|
|
|
|
|
|
|
|
|
|
|
|
|
|
|
|


Some added pictures for your enjoyment.
INSTALLATION

Let’s start off with memory installation. It’s not much different from what we are used to already. The Rampage II GENE motherboard just requires us to line up the slots with our memory and slide into place. Just one thing to remember, use the blue slots first.

The first PCI-E video card port is right below the memory slots themselves. This is why the bottom end of the memory slots do not have a locking mechanism on them.

Next item up for installation is the rear IO port cover. It’s pretty simple installation again. But notice these letters are written differently from other rear IO ports. This will definitely help us on finding what goes where a lot easier.


I inverted two motherboard standoffs on my chassis. This helps me keep the motherboard in place and aligned during installation.


I made a rear motherboard plate cut out. On the Cosmos chassis, it does not have this feature so I made it have it. The Rampage II GENE also has a small retention plate like all of the other x58 chipset based motherboards.

For the LCD poster there is a small rectangular hole on the upper top of the rear IO plate cover, that we need to insert the connector end of the LCD poster into.

Inside view of the LCD poster cable. You see a small connector near the fan header towards the back of the motherboard? That’s where the LCD poster gets plugged into.

After you get the LCD Poster cable through, we need to tug on it gently to lock it into place.

And there you have it. The LCD Poster is plugged into the motherboard.

I placed another retention plate to the backside of my motherboard. All of the motherboards I use gets one put on it.

Retention plate fully secured with my CPU mounting standoffs. Now it’s time for CPU installation (I removed the memory so I could take better pictures).

CPU installed and I am placing the thermal paste on to the IHS. I went a little low on the thermal paste so a made up for it on an extra dot.

All the other items are installed and ready to go. During my transition from one board to the Rampage II GENE, I somehow managed to messed up one of the barbs on the Koolance water block I used for the 4870×2


Just before I call it a day I needed to show you this little problem. When connecting up the front IO ports If I would have used the included extender or I would have never been able to hook up these cables because they would hit the bottom video card cover.
BIOS PART 1
I am not going to get into great detail of the BIOS as there are a lot of screen shots. And ASUS provides us with a lot of information per screen. I will, however, point out any important information if it is needed.
|
|
|
|
|
|
|
|
|
|
|
|


The Basic run down on the first part of the BIOS. I skipped over the Overclocking BIOS portion and will show you what it is all about on the next page.
LCD POSTER SETTING

This is all about the LCD Poster screen that comes with this motherboard. As we can tell, it has a lot of different settings pertaining to this little device. It can show Post codes or have us view directly on what’s getting activated during posting and tell us the time (once the OS has been loaded). We also have control over the LED’s on the motherboard as well. I left these at default settings.
BIOS CONTINUATION
|
|
|
|
|
|
|
|
|
|
|
|
|
|
|
|
|
|
|
|
|


Again, ASUS still gives us plenty of information on each setting.
TOOLS & PROFILING
|
|
|
|
|
|
|
|
|


Another quick break. This is where we can save all of our overclocking profiles.
BIOS CONTINUATION
|
|
|
|
|
|


The final bit of the Rampage II GENE motherboard’s BIOS.
BIOS PART 2
Once again, no real reason to go in depth with the BIOS screen shots as each one of these gives us plenty of adjustments and how each one gets adjusted, as well as their default settings.
|
|
|
|
|
|
|
|
|
|
|
|
|
|
|
|
|
|
|
|
|
|
|
|
|
|
|
|
|
|
|
|
|
|
|
|
|
|
|
|
|
|
|
|
|
|
|
|
|
|
|


This is where we overclock our motherboard. There are ton of settings in here, so tread lightly. I left a lot of these on AUTO, and only made the necessary adjustments I am familiar with. What’s unique with the Rampge II GENE motherboard is that you can just overclock the CPU by doing a STEP UP. Or even adjust the memory as well. The XMP profiling works a bit differently. When selecting the XMP profiling this motherboard sets the FSB accordingly and readjusts the CPU multiplier down to accommodate the FSB. I.E., if you’re running a 920 Core i7 CPU and have 1600 memory, the Rampage II GENE sets the FSB to 200 and set the multiplier to 14 (that puzzled me a bit a little).
TESTING METHODOLOGY
| Test Setup &Testing Methodology | |
| CPU | Lapped Core i7 920 |
| Motherboard | MSI X58 Platinum, GigaByte EX58-UD4P, ASUS Rampage II GENE |
| Case | Coolermaster Cosmos |
| Memory | Corsair DDR3 1600 |
| Video Card’s | Sapphire 4870×2, HIS 4870 |
| Hard Drives | 3 x 160 Gig Sata2 Western Digital, 2 in raid 0, 1 back up |
| CDRom Drive | Lite On Sata1 DVD Burner |
| Power Supply | Coolermaster U.C.P. 900watt 80+ Silver |
| Type Of Coolers Used | DD MC-TDX , Koolance VID-487X2 (Dual Loop), VID-487 Koolance |
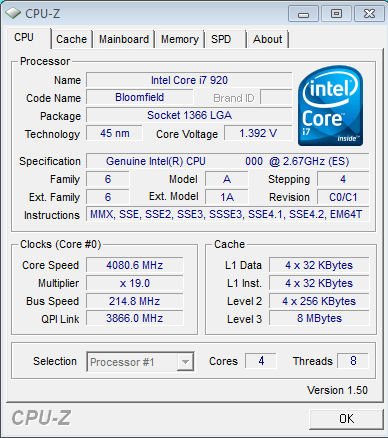
| CPU Speeds Used | 3990Mhz, 210 x 19, 2.66GHz 133 x 20, 4080MHz 215 x 19 |
| Operating System Used | Microsoft Windows Vista 64 bit Ultimate |
| Type of Software Used During Testing | Far Cry 2, Everest, Sisoft, Crystal Disk, ATTO, wPrime, Super PI, POV Ray, Crysis, 3Dmark06, 3DMark Vantage |
For testing purposes I used the fallowing programs and ran each of them a total of three times per program making sure consistency was present. For CPU clock speeds I used 2.66GHz (default 133×20) and also the maximum CPU clock speed the Rampage II GENE and the EX58-UD4P motherboards could reach. The MSI X58 Platinum motherboard is using stock CPU clock speeds and is for a reference only. All testing was done on a fresh Windows Vista 64 bit install.
OVERCLOCKING
Overclocking the ASUS Rampage II GENE was just as simple as any other X58 variant motherboard I have dealt with in the past. As soon as this motherboard posted I started overclocking it. I started off small (a mere 3.8GHz) then allowed Windows Vista to install needed drivers and to reconfigure itself for a new motherboard (I do not do a fresh install of the OS when motherboards get changed out, mainly because this allows me time to make adjustments and if an OS gets hosed its done on an old install and not a fresh one).
After getting Vista reconfigured and rebooted I ran a couple of quick benchmarks for stability (I knew it was but always have to make sure). I adjusted the CPU clock speed from 19×200 to my old time favorite clock speed of 3.99GHz. Again, this motherboard did not disappoint me at all and I re-ran all of my testing again and checked temperatures, making sure there are where they belong (I did notice that my temperatures were lower then usual).
After a few hours of running 3.99GHz, it was time to see what this little micro board could do. If I go down, I am taking (or claiming) a motherboard with me. I set the FSB to 215, left CPU multiplier at 19, made minor adjustments and, low and behold, the ASUS Rampage II GENE held it. 215 x 19 gave me a grand total of 4.08GHz, and not only did it do it with ease, this motherboard held it (not for a few hours either for over a week of non stop action). Well, now I am one happy overclocker, because with the other motherboard manufacturers I tested, I was not able to get above 210 FSB and 19 CPU multiplier. Unfortunatetly, I was not able to go much farther than 4.08GHz, because of heat limitations of the IOH (Northbridge). Well I could have used a higher multiplier on the CPU (20), but I like FSB overclocking. If it is not one thing, it is something else. Sometimes you just gotta love being an overclocker (sarcasm).
The Default (stock) CPU speed used was 2660 MHz. Overclocked settings were used 3.99GHz (EX58-UD4P) & 4.08GHz (Rampage II GENE)
SISOFT
“SiSoftware Sandra (the System ANalyser, Diagnostic and Reporting Assistant) is an information & diagnostic utility. It should provide most of the information (including undocumented) you need to know about your hardware, software and other devices whether hardware or software. It works along the lines of other Windows utilities, however it tries to go beyond them and show you more of what’s really going on. Giving the user the ability to draw comparisons at both a high and low-level. You can get information about the CPU, chipset, video adapter, ports, printers, sound card, memory, network, Windows internals, AGP, PCI, PCI-X, PCIe (PCI Express), database, USB, USB2, 1394/Firewire, etc.”
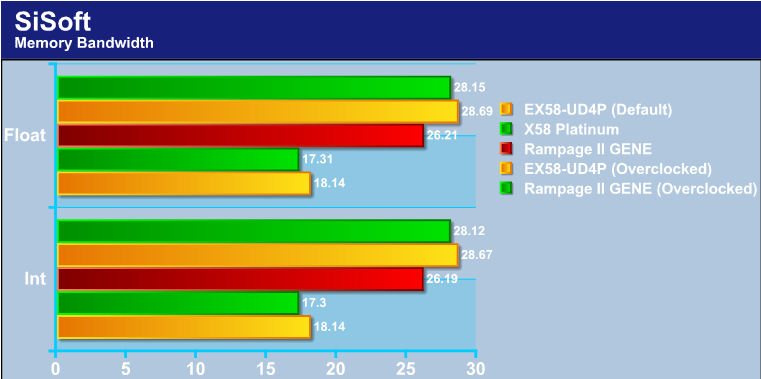
Higher=Better
Now this requires a bit of explaining. During the default CPU speeds the rampage decimates both the EX58-UD4P and the X58 Platinum motherboards. The reason for this is because the Rampage II GENE motherboard automatically used the XMP profiling of the Corsair 1600MHz memory I was using. The X58 Platinum and the EX58-UD4P motherboards both have this feature but I had to manually set them to the profile, so consequently I left that at what those boards automatically picked up the memory as. They defaulted to x8 divider (1066MHZ actual memory speed) with the memory’s standard timing of 8-8-8-24 1T. The Rampage II GENE picked ’em up as 1600 8-8-8-24 2T timings. So, during default settings, the Rampage II GENE takes a commanding lead. Now, once the CPU gets overclocked a bit more (EX58-UD4P 3.99GHz, Rampage II GENE 4.08 GHz) the Gigabyte EX58-UD4P motherboard takes the overall win.
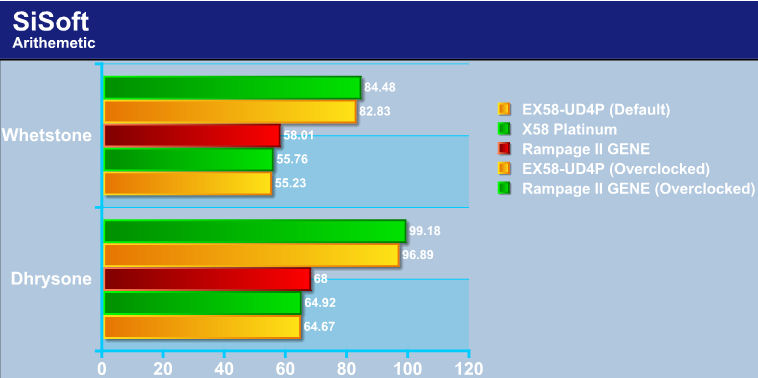
Higher=Better
When dealing with the Arithmetic testing of SiSoft the Rampage II GENE leads. Well, it also helps to have the memory on an XMP profile from the get go as well as being able to out clock the other motherboard during the overclocking portion of the testing.
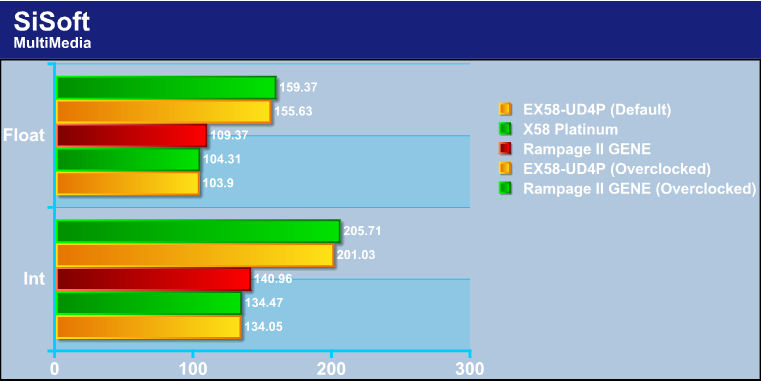
Higher=Better
Multimedia gives us the same story as we saw with the Arithmetic testing, the Rampage II GENE takes the win.
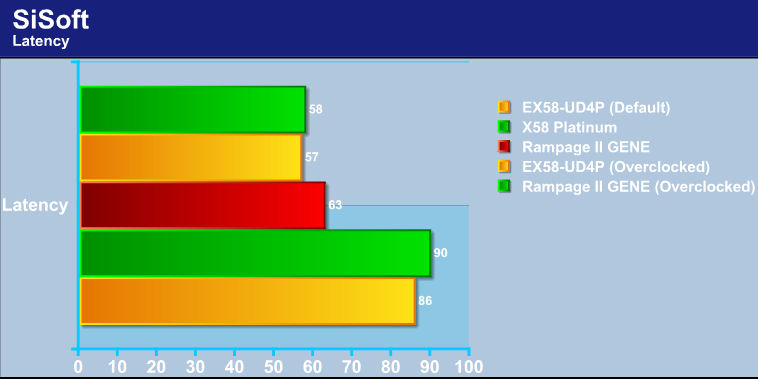
Lower=Better
Now on the Latency testing The Rampage II GENE wins while at a default CPU speed (again the memory is @ 1600 while others are @ 1066 memory speed). But once I overclocked both the Rampage II GENE and the EX58-UD4P, the EX59-UD4P motherboard has the lowest latency.
WPRIME
wPrime is a benchmarking application designed to use a highly multithreaded approach to calculating the square-roots of large amounts of numbers (up to 32 billion)
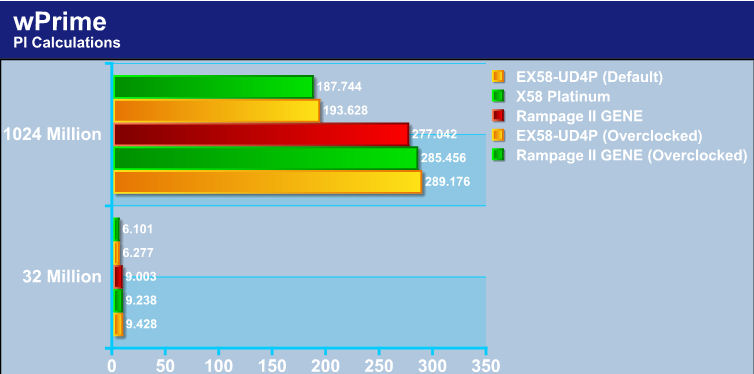
Lower=Better
Once again the Rampage II GENE motherboard takes not only the default CPU testing but also the overclock CPU testing. In both 32 million testing and the 1024 million testing.
The Default (stock) CPU speed used was 2660MHz. Overclocked settings used were 3.99GHz (EX58-UD4P) & 4.08GHz (Rampage II GENE)
EVEREST
“EVEREST Ultimate Edition is an industry leading system diagnostics and benchmarking solution for enthusiasts PC users, based on the award-winning EVEREST Technology. During system optimizations and tweaking it provides essential system and overclock information, advanced hardware monitoring and diagnostics capabilities to check the effects of the applied settings. CPU, FPU and memory benchmarks are available to measure the actual system performance and compare it to previous states or other systems. Furthermore, complete software, operating system and security information makes EVEREST Ultimate Edition a comprehensive system diagnostics tool that offers a total of 100 pages of information about your PC.”
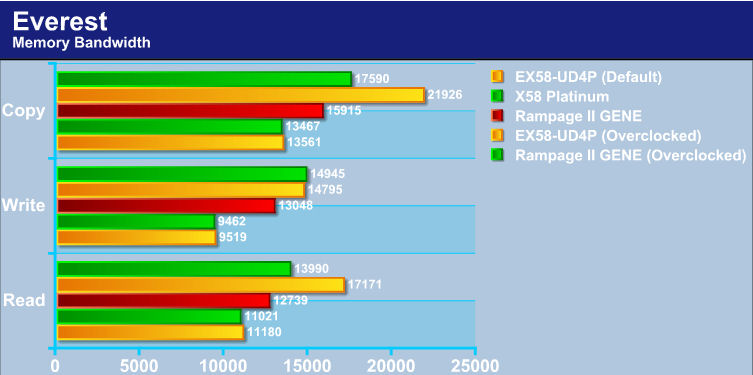
Higher=Better
Not much different from what we saw in SiSoft memory testing. The Rampage II GENE takes a commanding lead during the default CPU speed. But once the CPU became overclocked, the EX58-UD4P has a better overall memory bandwidth.

Higher=Better
The CPU testing the Rampage II GENE motherboard out performs both default and overclocked testing.
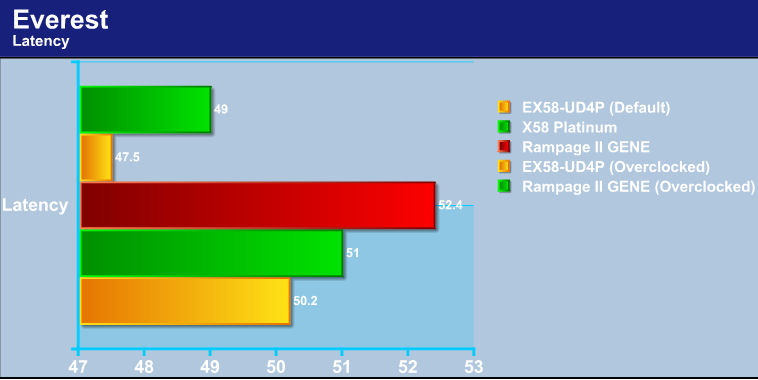
Lower=Better
Now this is strange set of results. The EX58-UD4P motherboard takes the win in both default and overclocked CPU testing.
SUPER PI
Super Pi is a program that calculates pi to a specified number of digits after the decimal point up to a maximum of 32 million. The Gauss-Legendre algorithm which is a windows version of a program used by Yasumasa Kanada in 1995 to compute Pi to 232 digits.
Super Pi is used by many overclockers to test performance and stability of their systems. In this community, Super Pi has become the standard for providing benchmarks to compare pi calculation times and demonstrate their overclocking skills. The program can be used to also test the stability of a particular overclocking speed. If a computer can calculate PI to the 32 millionth place after the decimal without a mistake, it is considered moderately stable in terms of RAM and CPU performance. More intensive CPU and RAM tests include calculations that run for hours instead of minutes and better test system stress levels.

Lower=Better
The Rampage II GENE may not be the fastest in memory testing but it is surely showing its prowess in the CPU testing.
The Default (stock) CPU speed used was 2660MHz. Overclocked settings used were 3.99GHz (EX58-UD4P) & 4.08GHz (Rampage II GENE).
POV RAY
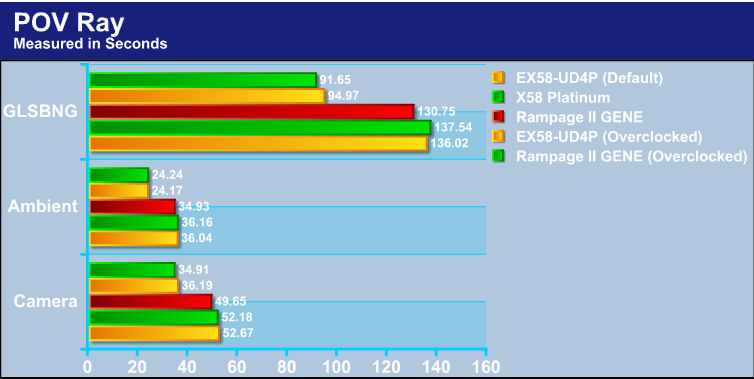
Lower=Better
While rendering images in POV Ray, the Rampage II GENE once again shows its superiority when it comes to the CPU.
CRYSTAL DISK
The Hard Disk drives were tested with 2 x Western Digital Hard Drives in RAID0.
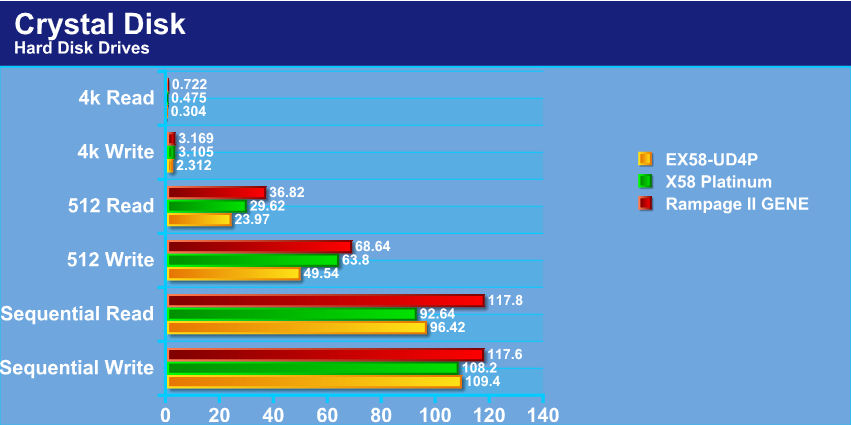
Higher=-Better
Well, the Rampage II GENE motherboard manages to pull out another surprise for us by taking the win in Hard Drive testing.
ATTO
The Hard Disk drives were tested with 2 x Western Digital Hard Drives in RAID0.
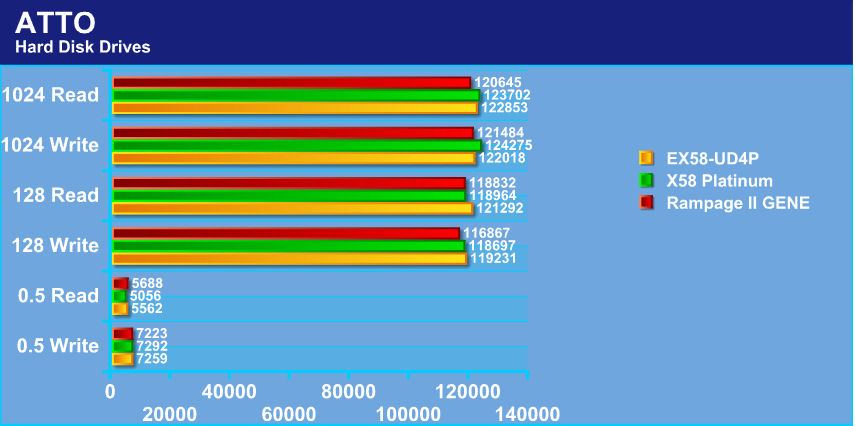
Higher=Better
Now with ATTO, these results become a bit jumbled up. The Rampage II GENE motherboard pretty much comes in last place during all this testing portion.
The Default (stock) CPU speed used was 2660MHz. Overclocked settings used were3.99GHz (EX58-UD4P) & 4.08GHz (Rampage II GENE).
3DMARK VANTAGE

Currently, there is a lot of controversy surrounding NVIDIA’s use of a PhysX driver for its 9800 GTX and GTX 200 series cards, thereby putting the ATI brand at a disadvantage. Whereby installing the PhysX driver, 3DMark Vantage uses the GPU to perform PhysX calculations during a CPU test, and this is where things get a bit gray. If you look at the Driver Approval Policy for 3DMark Vantage it states; “Based on the specification and design of the CPU tests, GPU make, type or driver version may not have a significant effect on the results of either of the CPU tests as indicated in Section 7.3 of the 3DMark Vantage specification and white paper.” Did NVIDIA cheat by having the GPU handle the PhysX calculations or are they perfectly within their right since they own Ageia and all their IP? I think this point will quickly become moot once Futuremark releases an update to the test.
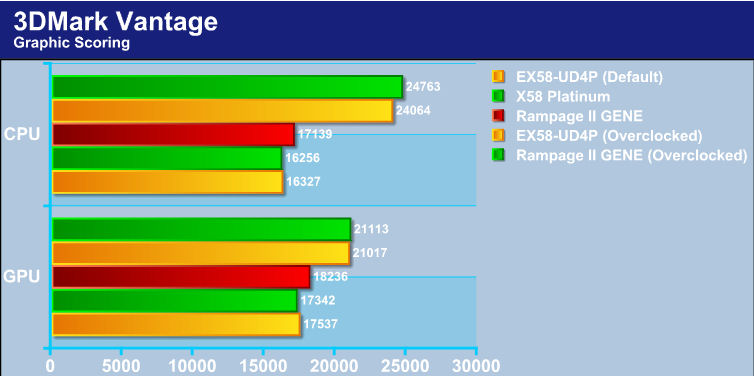
Higher=Better
It’s only natural to see that the GPU performs better once the CPU starts performing better. The Rampage II GENE still has not let up on showing its all out power.
3DMARK06

3DMark06 developed by Futuremark, is a synthetic benchmark used for universal testing of all graphics solutions. 3DMark06 features HDR rendering, complex HDR post processing, dynamic soft shadows for all objects, water shader with HDR refraction, HDR reflection, depth fog and Gerstner wave functions, realistic sky model with cloud blending, and approximately 5.4 million triangles and 8.8 million vertices; to name just a few. The measurement unit “3DMark” is intended to give a normalized mean for comparing different GPU/VPUs. It has been accepted as both a standard and a mandatory benchmark throughout the gaming world for measuring performance.
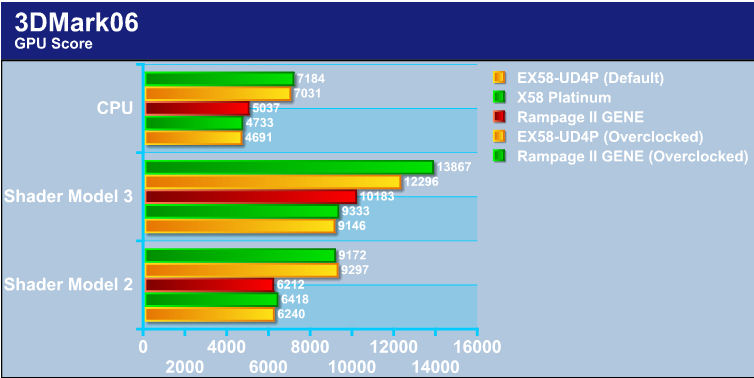
Higher=Better
The X58 Platinum motherboard narrowly takes the win in the default CPU speed in shader mark 2 testing. During overclocked testing, the EX58-UD4P motherboard narrowly wins in the shader model 2 testing. But during both default and overclocked testing on the CPU and shader model 3 testing, the Rampage II GENE wins hands down.
FAR CRY 2


Higher=Better
This is a bit of a mixed bag of numbers. During minimum and maximum testing during default CPU testing, the Rampage II GENE takes a commanding lead. But once we brought up the CPU core speed (still on Minimum and Maximum frames) the EX58-UD4P (man, GigaByte needs a new naming scheme) leads the Rampage II GENE by a small margin. It’s not always about the Minimum and Maximum Frame rates though. Its about the Average frame rates. That’s what we care about. This is where the Rampage II GENE shows absolutely no mercy.
CRYSIS 1.2

Crysis is the most highly anticipated game to hit the market in the last several years. Crysis is based on the CryENGINE™ 2 developed by Crytek. The CryENGINE™ 2 offers real time editing, bump mapping, dynamic lights, network system, integrated physics system, shaders, shadows, and a dynamic music system, just to name a few of the state-of-the-art features that are incorporated into Crysis. As one might expect with this number of features, the game is extremely demanding of system resources, especially the GPU. We expect Crysis to be a primary gaming benchmark for many years to come.
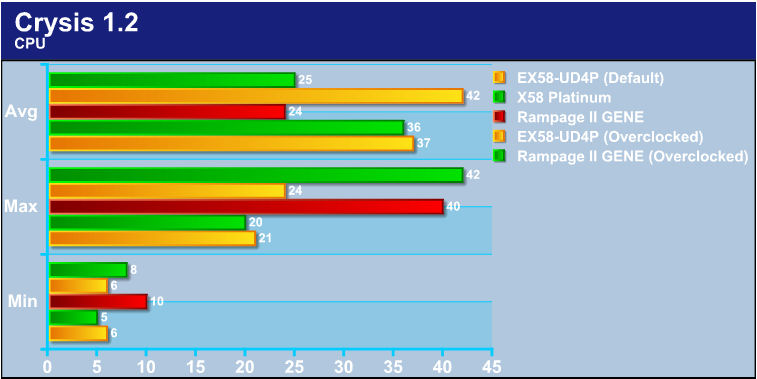
Higher=Better
I ran the CPU testing on all of the motherboards to give me a better idea on how each motherboard does. The Rampage II GENE manages to take the win in both the minimum and maximum frame rates, overclocked as well as default CPU speeds, but the EX58-UD4P flat out dominates the average frame rates while the CPU is overclocked.
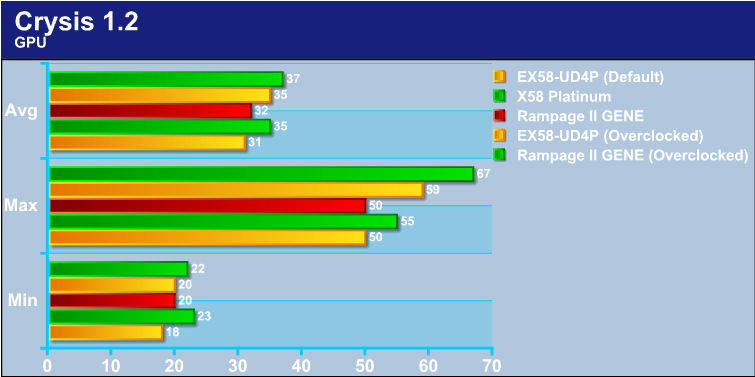
Higher=Better
GPU testing. Well, not going to report too much on this. Crysis still runs like crap no matter what we have in our computers and how far they are overclocked.

CONCLUSIONS
Even I have to admit I am rather surprised at the performance this little ASUS Rampage II GENE motherboard had to offer me, especially considering that this “is” a micro ATX design motherboard. I did not have much hope for this motherboard to perform as well or even as good, for that matter, as the other much larger X58 variants offered. ASUS not only made a great performing motherboard with the ASUS Rampage II GENE, they packed on such a small form factor motherboard features that only the “Bigger Brothers” get.
The concept of an external LCD posting screen is a perfect example of ASUS’s continuation of “thinking out side of the box”. Even though this little screen only offers simple functions of letting us know what’s going on during the posting process, where we would have to open up a side panel (for those who don’t have or use a side panel window mod), to removing one of our video cards (for those with multiple GPU configurations), to trying to figure out what codes mean what with a series of numbers and letters. This external posting screen gives us an better understanding on what is getting powered up in the most simplest form that even my 12 year old daughter could understand. We also have the flexibility of making this little device give us post codes instead.
Another area ASUS stands out from the rest of the pack (manufacturers) is by allowing us (users) to hook up temperature probes directly to the motherboard so we can monitior temperatures on them or other items that are impossible to get a temperature from. That relieves us from having to hook up a fan controller and extra set of wires that would clutter up our chassis even more. Also including LED’s on critical areas of the motherboards components (IOH, CPU, and memory) to give us a visual warning if we have gone too far on our voltages on these areas. Believe me, it takes more then just a bump to turn these from green to amber. Even cranking at 4.080 GHz on my CPU and 215 FSB and having my memory cruising at 1720MHz, these lights stayed green.
Overclocking the ASUS Rampage II GENE was a “dream come true” for an overclocker like myself. After fiddling with three other motherboards I came to the conclusions that my CPU was “FSB and max clock speed limited”. In a few hours, I not only made my average 3.99GHz and 210FSB, I was able to surpass this limitation by another 5 FSB MHz and add another difficult 100Mhz on my CPU. Granted, it’s not much, but in this world of overclocking and extreme clock we take every little bit we can get.
As always I just have to mention areas that manufactures can do better on. Actually there are really only three areas that I noticed. The first one is the PCI expansion ports. ASUS could have moved the PCI-E 4x to the upper point, and move the PCI-E x16 ports down one, instead of PCI-E x16/PCI-E x4/PCI-E x16/PCI to PCI-E x4/PCI-E x16/PCI/PCI-E x16. Being this Motherboard is slightly longer then other Micro-ATX motherboards, the chances of using this in a micro-ATX chassis is very slim. This would allow users the use of a PCI-E sound cards like the ever popular Creative X-FI, while using multi-GPU’s. The IOH heatsink could been made out of pure copper and also be made active. I don’t personally like having my IOH’s get hot, especially during high loads and overclocking. I did place a fan on the IOH, but it still got a tad warm. The last and final area ASUS can make improvements on is the placement of the EPS CPU power plug. As CPU heatsinks are getting larger and more heatsinks are getting placed on the motherboard, gaining access to this simple little power plug is becoming a complete and total headache.
A quick search at Newegg on this motherboard’s pricing, this motherboard has a price range of $249 USD, which puts this motherboard in the perfect price range for this motherboard’s capabilities and features, considering that other comparable motherboards don’t even have half of the features or overclocking capabilities.
- Performance 9.5
- Value 9
- Quality 9.5
- Warranty 9
- Features 9.5
- Innovation 9.5
Pros:
+Excellent performance
+Lot of features
+Easy understanding of this motherboard’s capabilities
+Plenty of information in the BIOS settings per setting
Cons:
–IOH heatsink could be better
–PCI-E layout (more of a suggestion not a con)
–EPS CPU power plug in a difficult spot
Final Score: 9.0 out of 10 and the Bjorn3D Golden Bear Award.


