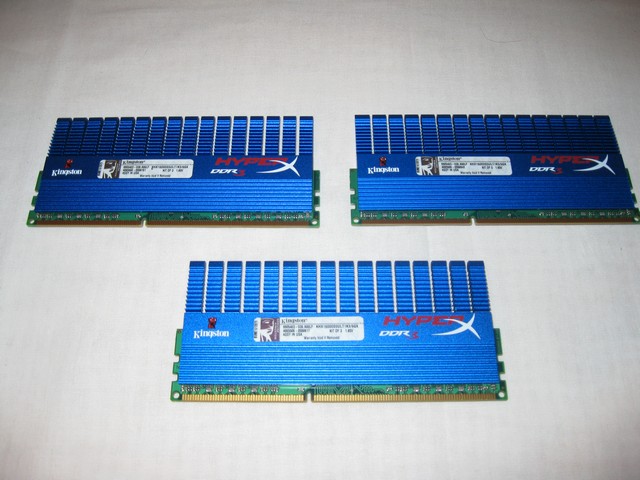
Kingston Technologies has been coming on strong in the Enthusiast memory market with their HyperX line. Now they’ve fielded a HyperX 2 GHz kit with newly designed T1 Heatspreader.
INTRODUCTION
Kingston Technologies has been coming on strong in the enthusiast memory market, producing kits that rival the best kits available. To that end, they have gone back to the drawing board and redesigned the heat spreaders they use on their RAM. Not only have they redesigned the heat spreaders, they fielded the first 2GHz 3GB kit for Core i7, which had the traditional Kingston heat spreader. The original was effective, but now their new T1 heat spreader not only keeps the RAM cool during high speed operation, but adds style and flair.
Memory has been getting faster and faster until DDR3 dual channel hit 2 GHz. Core I7 made the scene with its new lower voltage requirements and memory companies had to rethink designs. Kingston, being a leader in innovation, brought forth the first 2GHz Triple channel 3 GHz kit. We reviewed the first 2 GHz kit of DDR3 TC if you’d like to read that Article, HyperX DDR3 TC Kit Review.
Since the first kit of HyperX running at 2 GHz hit the market Kingston has been raising the bar and fielding kits of Core i7 capable low voltage RAM in every speed, variety, and latency. Now we present you Kingston’s crowning achievement, the 6 GB kit of HyperX DDR3 TC 2GHz low latency with the new T1 heat spreader, They’ve raised the bar again. We have to say, not only do we like the speed, but the heat spreader is just bling. Unlike a lot of bling, it’s highly functional bling.
About Kingston
Kingston Technology Company, Inc. is the world’s independent memory leader.
Founded in 1987 with a single product offering, Kingston® now offers more than 2,000 memory products that support nearly every device that uses memory, from computers, servers and printers to MP3 players, digital cameras and cell phones. In 2007, the company’s sales exceeded $4.5 billion.
With global headquarters in Fountain Valley, California, Kingston employs more than 4,500 people worldwide. Regarded as one of the “Best Companies to Work for in America” by Fortune magazine, Kingston’s tenets of respect, loyalty, flexibility and integrity create an exemplary corporate culture. Kingston believes that investing in its people is essential, and each employee is a vital part of Kingston’s success.
Kingston serves an international network of distributors, resellers, retailers and OEM customers on six continents. The company also provides contract manufacturing and supply chain management services for semiconductor manufacturers and system OEMs.
At the Forefront of Memory: The History of Kingston
Kingston Technology grew out of a severe shortage of surface-mount memory chips in the high-tech marketplace in the 1980s. John Tu and David Sun were determined to find a solution. They put their engineering expertise to work and designed a new Single In-Line Memory Module (SIMM) that used readily available, older technology through-hole components. A new industry standard was born — and, on October 17, 1987, so was Kingston Technology.
SPECIFICATIONS
Memory specifications from the vendor are usually a little sparse, so we’re going to give you the Specs from Kingston, then do something a little different this round. If you like the extended information, please feel free to comment in the product discussion thread so we know how you feel about it.
- Kit Size – 6 GB (3x2GB)
- Cas latency – 8-8-8-24 @ 2GHz
- Voltage – 1.65v
- Type – Non-ECC
- Heat Spreader – Yes: T1 Tall
- Warranty – Lifetime
- Unbuffered – Yes
- Type – DDR3 Triple Channel 240 Pin
CPU-Z Wrong Again
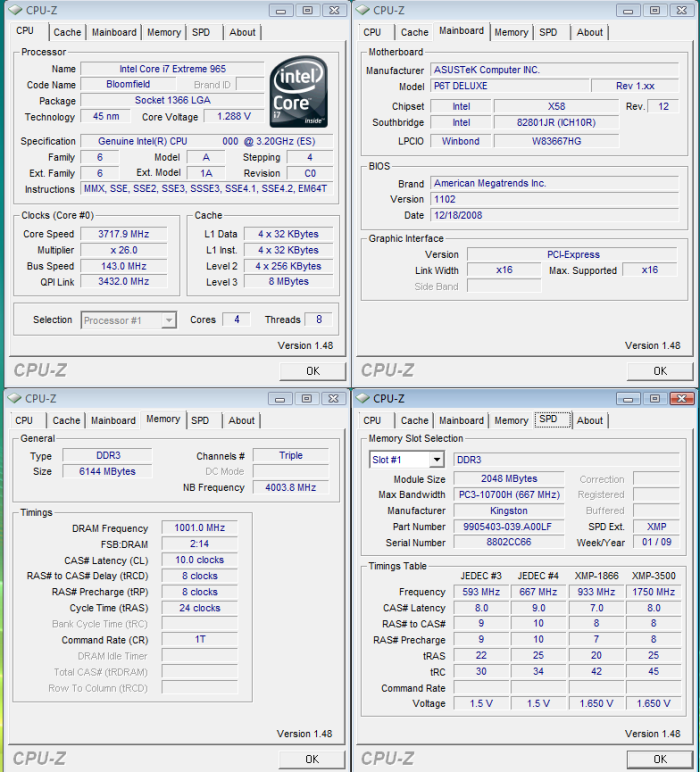
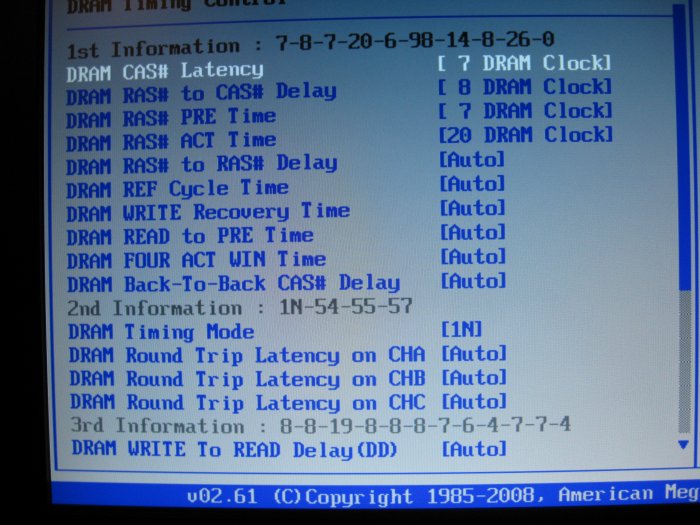
We’re using CPU-Z Version 1.48 and of late we’ve been seeing a lot of errors reading high end memory. Unless Kingston has something planned in the 3500 MHz range we don’t know about, CPU-Z is wrong. BIOS reads and implements the XMP Profile correctly, so we got a shot of that for you.
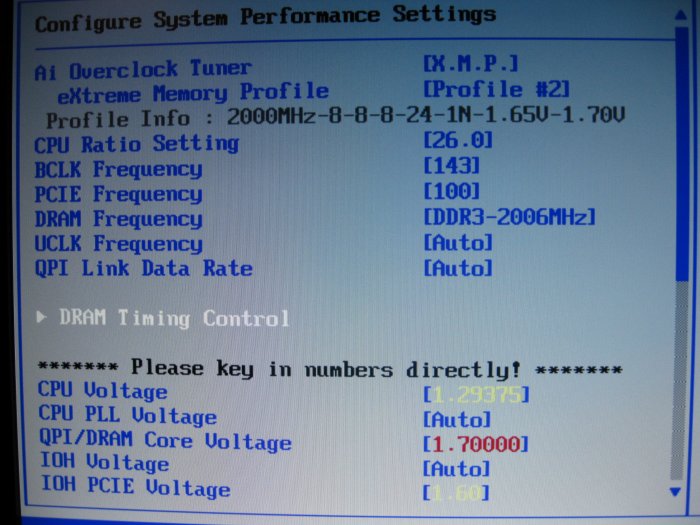
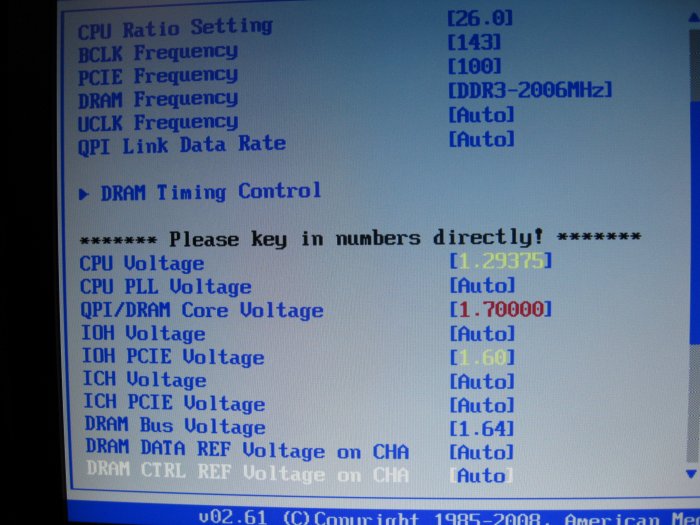
You can see the Asus P6T Deluxe read and implemented the 8-8-8-24 XMP profile correctly. The profile bumped the BCLK (FSB) to 143, set the QPI/DRAM Core Voltage to 1.7v, and the dreaded DRAM Bus Voltage to 1.66. Yes, we lowered it to 1.64 because. We are deadly serious about staying under the 1.65v voltage limit imposed by Core i7 design. The Kingston HyperX TC DDR3 2000 6GB kit ran great at these settings. For those of you savvy to the ways of Core i7 overclocking, you’ll notice we kicked the CPU Ratio (Multiplier) up to 26 to keep our 3.74 GHz overclock that we run 24/7 on QuadZilla. CPU core voltage we bumped up a tad from the BIOS shot to 1.3v because the system seemed to run a little better with the minuscule voltage bump.
The HyperX itself though was plug and play. We let the XMP set everything and booted right into Vista and tested stability and everything was good to go. Then we backed out and redid the OC to our normal 3.74 GHz, booted into Vista reran stability tests. For those of you thinking, “Oh no, redo the OC”, well, the whole thing took about three minutes so it wasn’t a big deal for us. If it gives you any pause, record your CPU speed and voltage, and when you install the memory all you have to do is figure out what multiplier times the new 143 FSB to give you the same speed as before and bump up the voltage to where you had it before and you’re probably good to go.
Everest
Everest had a problem or two with reading the HyperX but yielded a lot of accurate SPD info, so we’re going to toss that in so you know what options you have by programmed SPD and XMP.
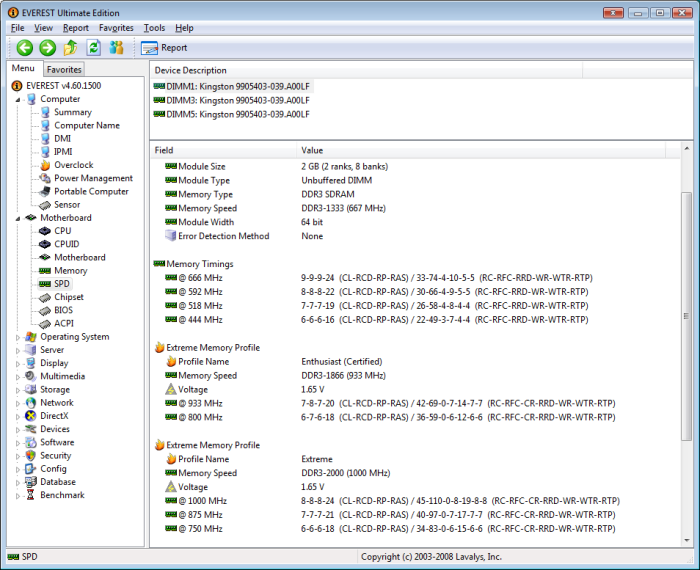
Everest reads the XMP for 2000 MHz at 8-8-8-24 correctly and gives the same extended setting BIOS read on the P6T Deluxe. So for those of you unlucky enough to have a board that doesn’t read correctly, you can refer back to this Everest Shot. Yes, we tried all the SPD settings and they worked without fail. Below 1600 MHz, drop the voltage to 1.5v. It worked for us, so it will probably work for you. The problem with Everest came at reading current speed and timings. So, until the utilities catch up with the technology, expect to see some unconventional multi part Specifications.
We need to get this out of the way, so here is as good a spot as any. We tested at 2 GHz. That’s covered by the shots above. We also tested at 1866 MHz and CPU-Z got the SPD correct, but read the timings wrong when we implemented it. Here’s those shots.
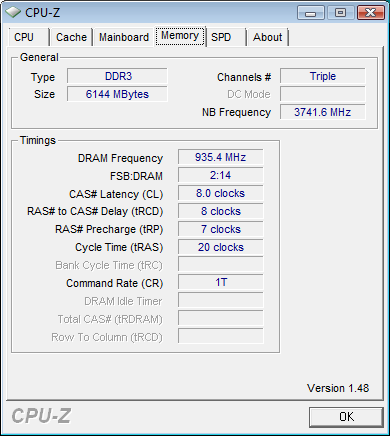
When we boot into Vista and CPU-Z is showing SPD wrong, we go back to BIOS and confirm that the memory is set correctly Then, we go by BIOS settings. Needless to say, as many Kits as we’ve tested in the past weeks, we’ve been in BIOS a lot. The utilities need to catch up, then maybe we can stop the song and dance. In the mean time, we want you to have the most current up-to-date information with a little dose of “Here’s what we did, try this” to make it a little easier on the end users that need a little help.
PICTURES & IMPRESSIONS
We know that you like tons of pictures, so once we get past the ones we want to show you, we’ll put a gallery at the bottom that you can click on to enlarge. The kit we received is an early release kit and didn’t come in Retail packaging, so we’ll save you that confusion and move right on into product shots.
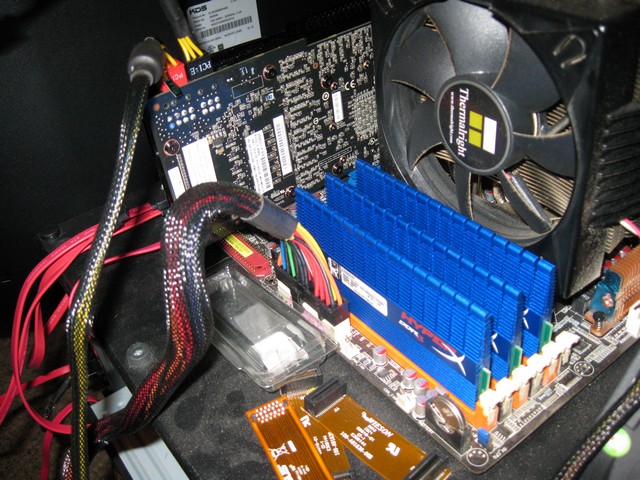
We thought we’d lead out with a couple of shots of the HyperX 6GB 2GHz kit installed on QuadZilla. We, of course, forgot to move the Crossfire and SLI bridges out of the shot, but you get the idea. The RAM looks great and QuadZilla put his stamp of approval on it, so we’re liking it.
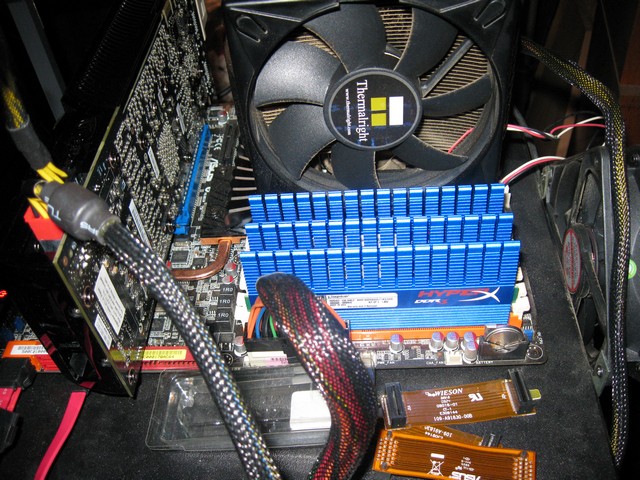
This kind of gives you an idea of how tall the ram actually is, so if you’ve got one of those oppressive over sized overhang the RAM, slots CPU coolers you could kill a home invader with you, might want to check your clearance before snagging any tall kit. We can tell you that the heat spreader is more effective and reduced the RAM’s operating temperature. We tested the 3 GB kit of Kingston we linked you with earlier on the first page and temps were running about 70°C on that kit and on this kit clocked to the same speed they ran about 62°C, so we’re seeing an 8°C improvement. Lower temperatures, longer life. It’s a good thing. Did we mention they look good?
The new T1 heat spreaders are quite tall, almost doubling the height of the RAM. We don’t have a problem with the height ourselves, but check for clearance. If it doesn’t fit take, that up with your research abilities and the CPU cooler companies that seem to think sheer size equates to better cooling. They do the job of keeping the RAM cooler and look good doing it.
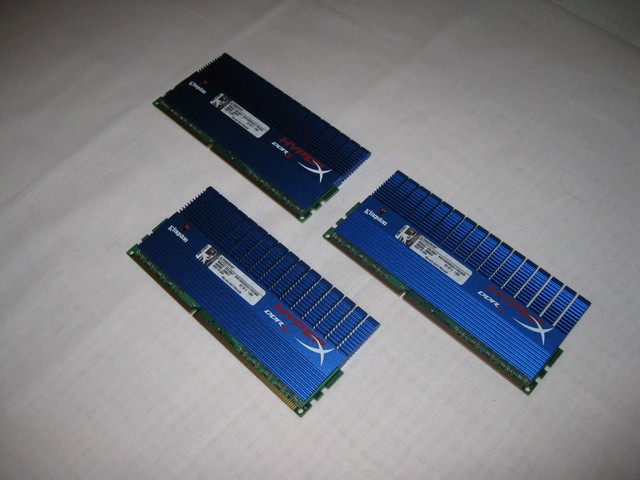
At an angle you get a better idea of the size of the modules. The heat spreader is quite substantial and we didn’t have any qualms about seating the ram with pressure from the top.
We just wanted to throw in this angle for those of you that are left brain oriented. We figured we had the right brain oriented people covered with the last shot, so we’d be politically correct and cover all angles (Yeah, believe that it just looked good).
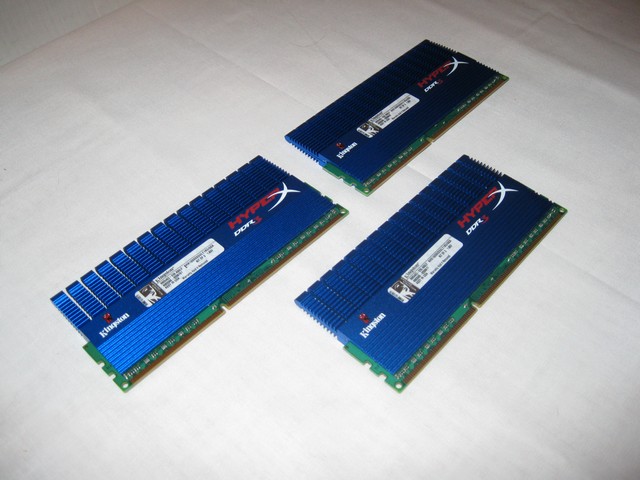
We spent quite some time trying to get an ugly shot of the Kingston HyperX Tri Channel 6GB kit of 2 GHz RAM. We came close once when we caught our own reflection in a mirror. We had no idea that Geek lust for equipment could contort your face like that.
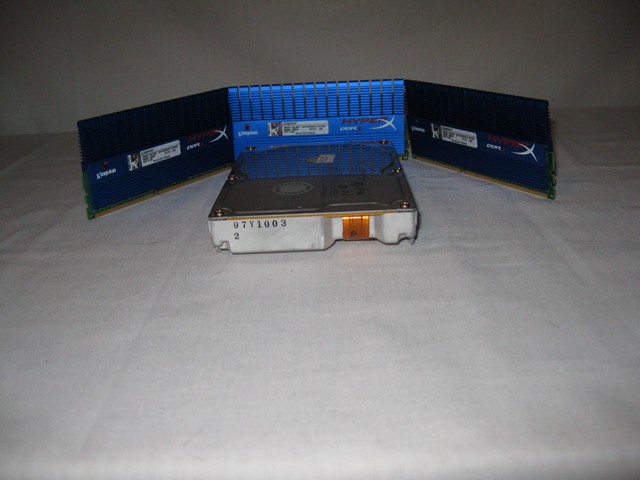
We tossed a standard 3 1/2″ hard drive in front of the ram to give you and idea of just how tall it is. Then we thought there has to be a hundred sticks of RAM within reach so we got one of those out.
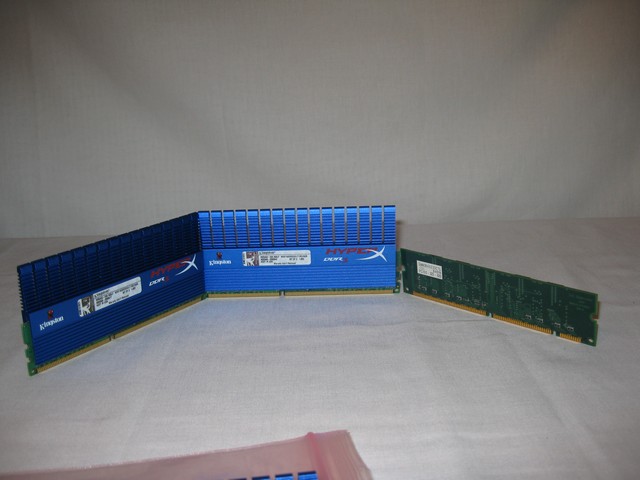
Like we mentioned before, the HyperX kit is about twice as tall as normal no heat spreader RAM, so plan accordingly.
The old vs. the new. While we like the look of the older heat spreader, it’s a no brainer as to which one we like better. The new heat spreader looks really awesome. The old heat spreader by comparison? Well, it does the job, but not quite as well and doesn’t have all the bling or effectiveness of the new T1 heat spreader (Could T1 stand for Terminator 1?). Personally, we think the new 2 GHz kit deserves to be called the HyperX Terminator T1 2GHz kit. While we had no qualms about Kingston quality or speed or durability, it did terminate any doubt we had about BLING.
There’s a one on one shot of the New vs. the Old. If it were a street fight who would you be betting on? Bigger, in some cases, is better.
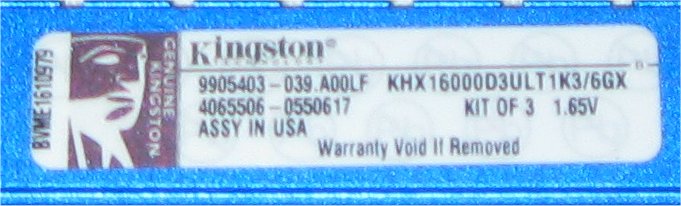
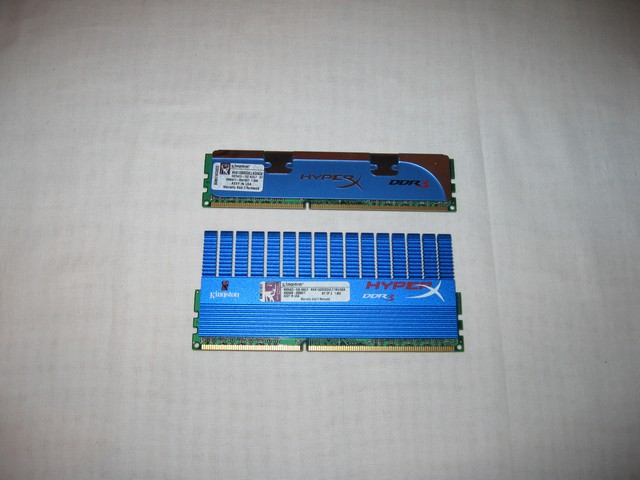
There’s a shot of the sticker for those of you that like to see that tiny thing blown up to proportions that make a pic look horrible.
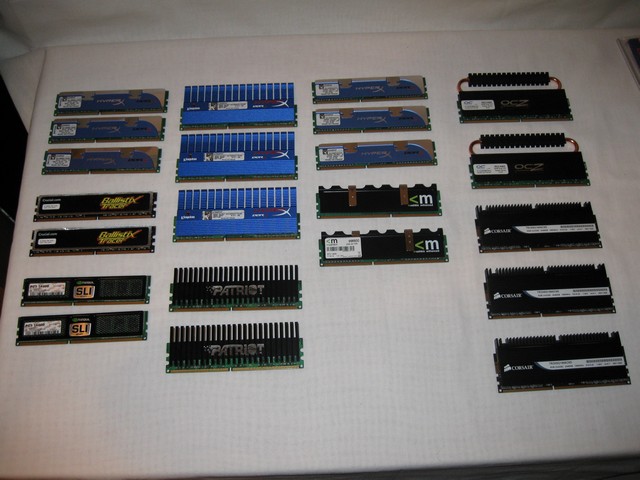
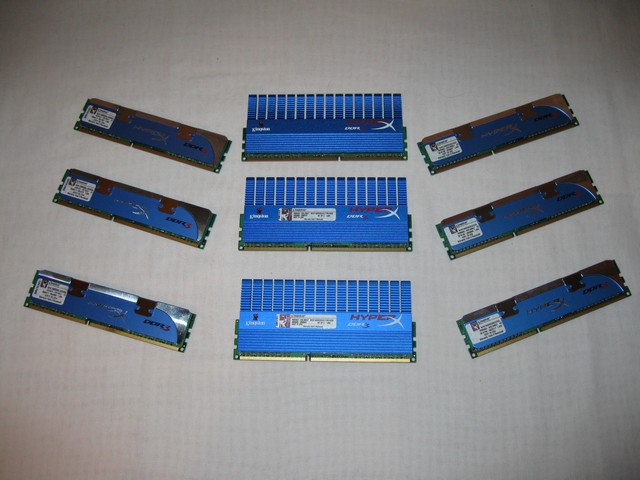
Then we thought we’d toss in a rare glimpse of our growing collection of kits. We didn’t dig all the RAM out of the 10 machines up and running, but we did get a lot of the high end kits that were handy. Yeah, ten machines up and running and parts enough for at least three more. We’re hardware addicts. We like being addicts. Leave us alone. They’re ours. You can’t have them.
Gallery


TESTING & METHODOLOGY
To test the 6GB Kit of Kingston HyperX 2Ghz RAM we did a fresh load of Vista 64, updated all the machines drivers, applied all the Vista patches, and disabled any background tasks not required for the machine to run correctly. Then we cloned the hard drive using Acronis in case we should have any doubt as to driver or OS corruption from overclocking. We ran our normal suite of tests against the RAM. Each test was run three times and the average of the three runs reported here.
We also ran the RAM for about a week to get a little break in time and a general feel for the RAM itself. During that week we tried every SPD setting listed by Everest, played games, surfed the internet, and coded reviews. Normal every day activities for us. Benchmarks are fine but we also need to run the RAM outside benches to help round out how we report on it. And let’s face it, benches are fine and good and we rely on them a lot, but real life usage and a feel for equipment is just as important as benchmarks.
Test Rig
| Test Rig “Quadzilla” |
|
| Case Type | Top Deck Testing Station |
| CPU | Intel 965 Extreme @ 3.74 1.3Vcore |
| Motherboard | Asus P6T Deluxe (SLI and CrossFire on Demand) |
| RAM | Kingston HyperX TC DDR3 2000 (KHX1600D3ULT1K3/6GX) Kingston HyperX TC DDR3 1600 (KHX12800D3LLK3/6GX) Corsair Dominator TC DDR3 1600 (TR3X6G1600C8D) Corsair Dominator TC DDR3 1866 (TR3X6G1866C9DF) G.Skill DDR3 1600 Triple Channel (F3-12800CL9T-6GBNQ) Kingston HyperX Triple Channel DDR3 2000 (KHX16000D3K3/3GX) |
| CPU Cooler | Thermalright Ultra 120 RT (Dual 120mm Fans) |
| Hard Drives | G.Skill Titan 256 GB SSD (FM-25S2S-256GBT1) |
| Optical | Sony DVD R/W |
| GPU(s) |
BFG GTX-295 |
| Case Fans | 120mm Fan cooling the mosfet CPU area |
| Docking Stations | None |
| Testing PSU | Thermaltake Toughpower 1200 Watt |
| Legacy | None |
| Mouse | Razer Lachesis |
| Keyboard | Razer Lycosa |
| Gaming Ear Buds |
Razer Moray |
| Speakers | None |
| Any Attempt Copy This System Configuration May Lead to Bankruptcy | |
Test Suite
|
Synthetic Benchmarks & Games |
|
SANDRA XII Professional |
|
Everest Ultimate Edition v.4.50.1330 |
|
SuperPi Mod 1.5XS |
|
WinRar v.3.71 Compression Benchmark |
SiSoft Sandra 2009 SP1
“SiSoftware Sandra (the System ANalyser, Diagnostic and Reporting Assistant) is an information & diagnostic utility. It should provide most of the information (including undocumented) you need to know about your hardware, software and other devices whether hardware or software. It works along the lines of other Windows utilities, however it tries to go beyond them and show you more of what’s really going on. Giving the user the ability to draw comparisons at both a high and low-level. You can get information about the CPU, chipset, video adapter, ports, printers, sound card, memory, network, Windows internals, AGP, PCI, PCI-X, PCIe (PCI Express), database, USB, USB2, 1394/Firewire, etc.”
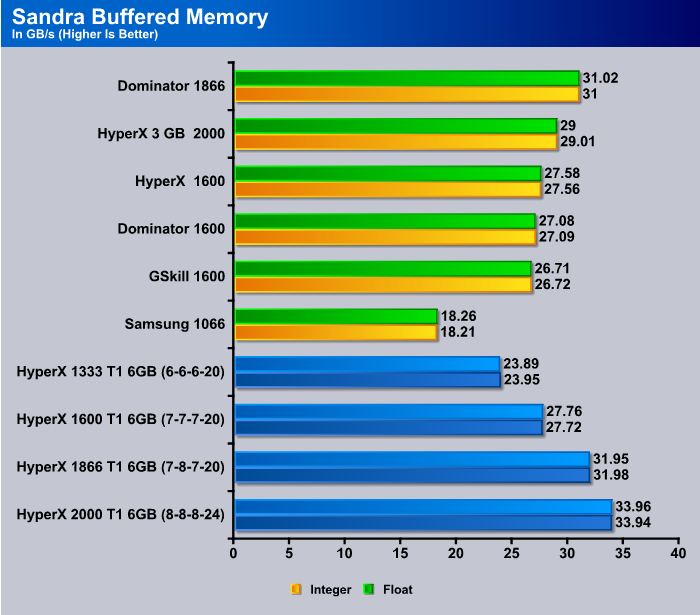
At its rated speed and timings we saw 33.96 GB/s Float and 33.94 GB/s Integer, once again breaking the Bjorn3D bandwidth record. We’ve seen more bandwidth records broken this year than any other year in memory. Even dropping the RAM to 1600 MHz it still tops the other kits we’ve tested. If you’d like to know the exact lineage of the other kits you can refer back to page 3 of this review and the Test Rig table. All the kits are linked back to the review we did on them and you can find plenty of details and the exact part number of each kit.
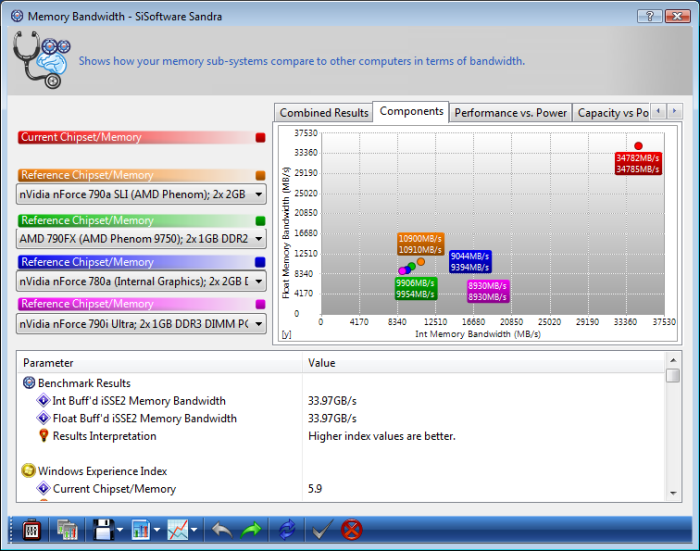
For those of you that prefer to see a screenie of Sandra, we decided to toss one of those in for this review. This is one of the three runs we made in Sandra, and since we use an average of three runs, the numbers won’t match the chart exactly. We use the first two numbers from Sandra, Int Buff’d iSSE2 and Float Buff’d iSSE2, but you can see from the Sandra picture, overall bandwidth is 34.782 MB/s, everything taken into consideration. Pretty impressive bandwidth.
SuperPi
SuperPi is the “Gold Standard” for many when it comes to judging system performance. We ran 1 and 2 MB calculations, again running each test three times and reporting the average of the results.
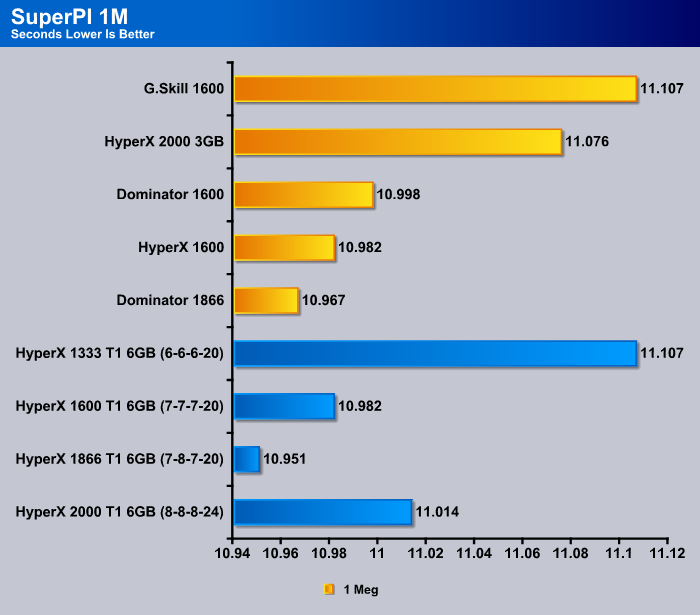
SuperPi is such a touchy benchmark that minor variations in timings, multipliers, and Bus speed can affect the outcome. The best time we got from any of the kits was the Kingston 2GHz kit with the new T1 Heatspreader running it at 1866 enhanced timings. Probably had a better divider. In any case, no matter the speed, the kit is no slouch.
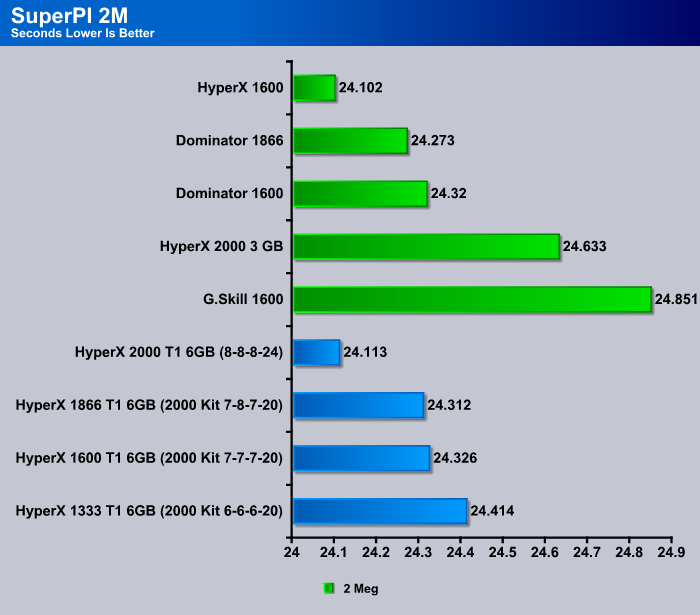
Moving into the 2MB SuperPi test, the Kingston HyperX 2GHz 6GB kit came in second to another kit of HyperX, but only by a few hundredths of a second. Tinkering with the kit for a while would drive the scores down lower but we like to present real life results like you can expect out of the box with minimal effort. If it’s any incentive, yes, with a nice FSB OC ,we have broken the 10 second barrier in the 1M calculations with this kit. Took an entire day, but we did it.
WinRar v. 3.71
This module in WinRar generates random data, which contains specially introduced redundancy, increasing the load to both the processor and memory. Data is the passed through RAR compression and decompression algorithms, and the output of the decompression algorithm is compared to the source data. If any differences are found, WinRAR then reports “Errors found – Yes” in the command window. WinRAR displays a size of processed data and compression speed, current and resulting, in kilobytes per second.
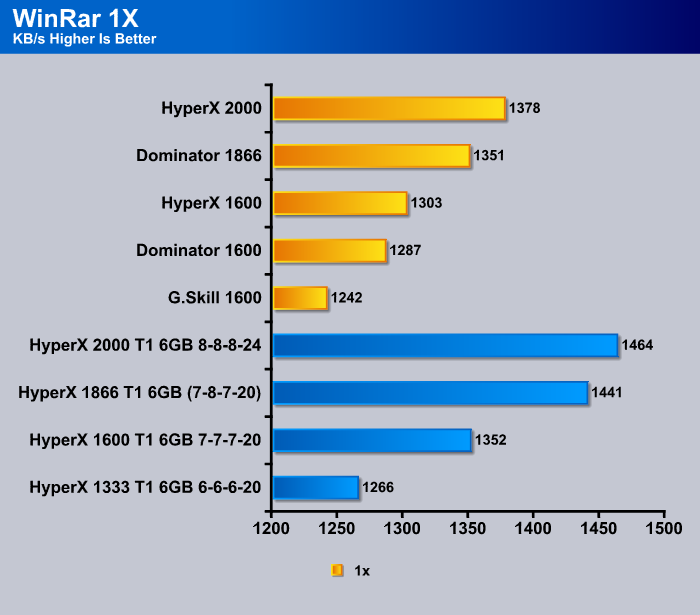
Winrar and the new Kingston HyperX TC DDR3 2GHz kit liked each other really well and turned in some amazing scores. Considering the longevity of the test rig, and all the kits being tested at the same CPU speed on the same board the only thing that changed was the ram so it’s got some get up and go.
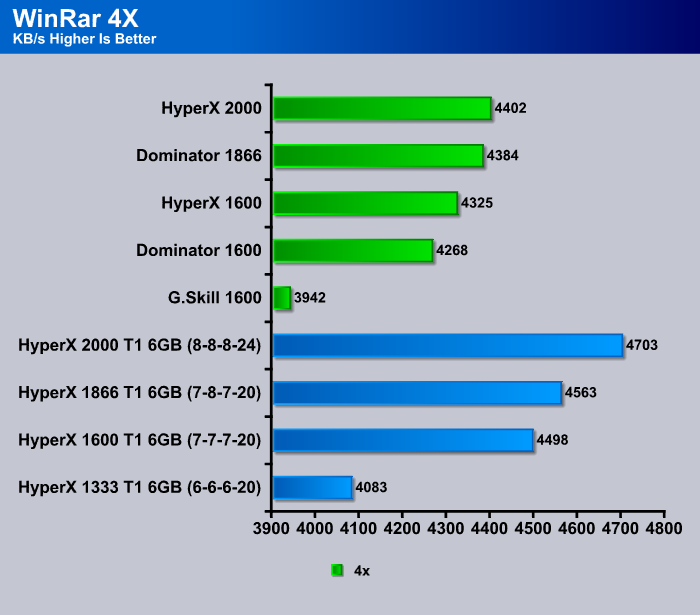
See what we mean? At 1600MHz the kit outdid all the other kits we tested. From 1600 and up it was all HyperX 2GHz. That’s seriously impressing, considering that WinRar is a reliable predictor of RAM performance.
EVEREST ULTIMATE
“EVEREST Ultimate Edition is an industry leading system diagnostics and benchmarking solution for enthusiasts PC users, based on the award-winning EVEREST Technology. During system optimizations and tweaking it provides essential system and overclock information, advanced hardware monitoring and diagnostics capabilities to check the effects of the applied settings. CPU, FPU and memory benchmarks are available to measure the actual system performance and compare it to previous states or other systems. Furthermore, complete software, operating system and security information makes EVEREST Ultimate Edition a comprehensive system diagnostics tool that offers a total of 100 pages of information about your PC.”
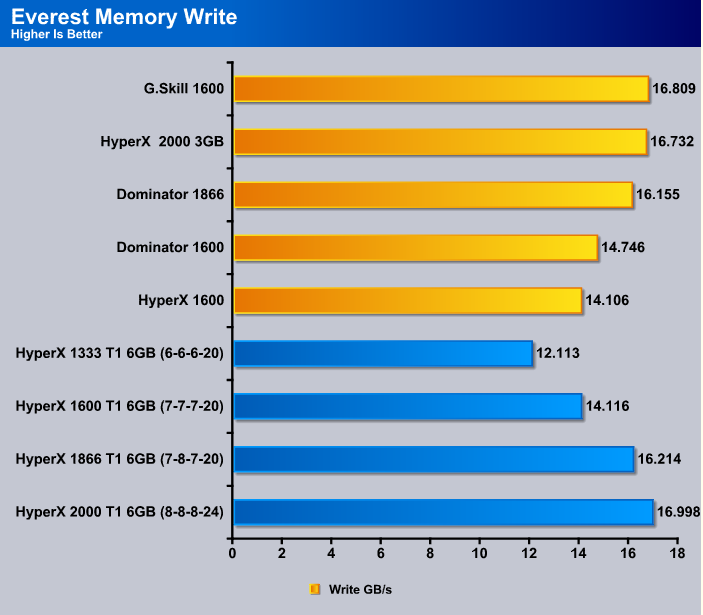
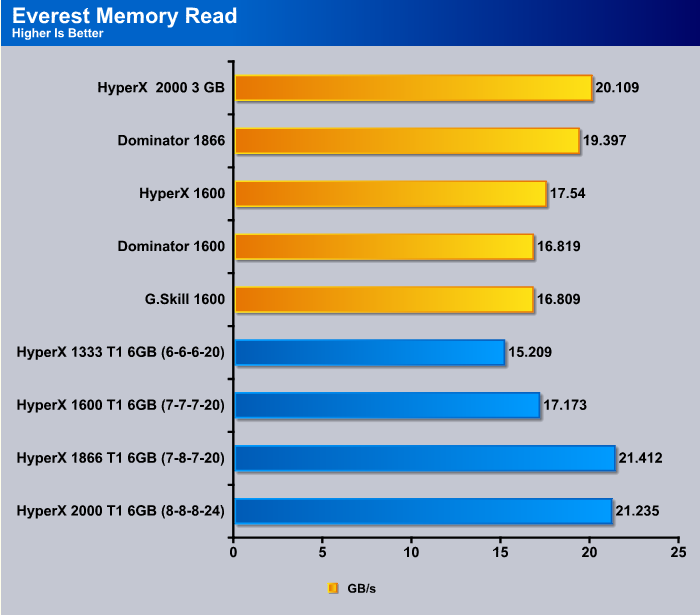
The way we have the results formatted in Everest is in GB’s.

The Latency on the kit looks pretty good, and scales just like it should with the different speeds. Once again, at 2 GHz, it was only bested by its 3GB little brother HyperX kit. Comparing 6 and 3 GB kits is a little apples and oranges because of performance differences, so we try to keep comparisons among same sized kits. Of the 6GB kits, the HyperX 2GHz 6GB kit is the lowest latency kit.
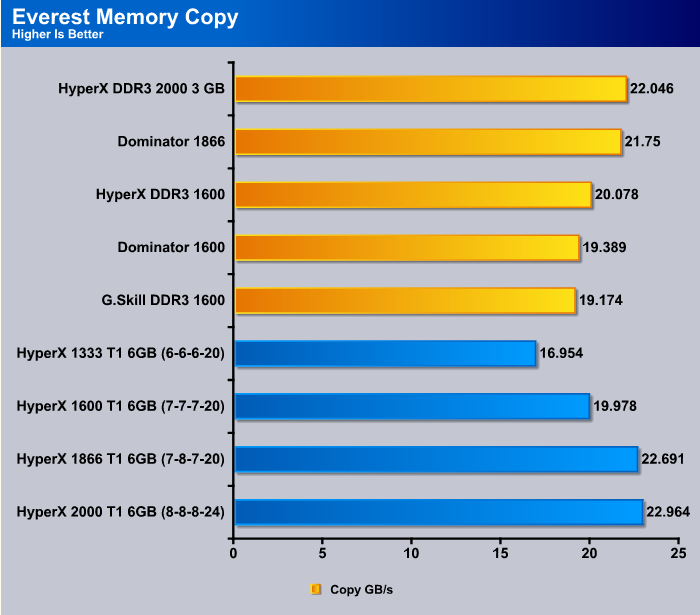
What we’re really concerned with here is the top speed of the kits. We present the lower speeds so that if you have a motherboard that is limited on options you can see the speed of the kit should you want to upgrade RAM and get a better board later. At its top speed of 2GHz, the Kingston kit took the field and got the highest GB/s in the copy test.
You can see that the Kingston HyperX not only held its own in Everest, but topped the field again. Once again, let us tell you, we tweaked on the kit and got better scores, but this is what you can expect off the card plug and play. Put a nice FSB OC on this kit, adjust to a more favorable divider, and it’s a real screamer.
Then, in the last test of the series, the Kingston kit rises to the top once again while Running at 2 GHz with an advantage being a 6GB kit and staying at 1.65v, the highest rated voltage for Core i7. Kingston has done a fine job with all their Triple Channel kits, but this one really shines.
CONCLUSION
We’ve had quite the run with ram kits since Core i7 made it’s debut, it seems like every kit is a little faster, runs a little cooler, and performs a little better. This particular kit is pretty much maxed out at 2GHz using the rated timings. We were able to loosen the timings to Cas 9 and achieve 2133, but we like the kit better at 2GHz with tighter timings. You can’t expect much overhead with a kit that’s this screaming fast anyway. We’re more than happy with it running at 2Ghz.
Bench numbers were record setting, the kit looks great, runs cooler than it’s predecessors, and in general impressed us at every turn. The new T1 heat spreader on the 6 GB kit of Kingston HyperX 2GHz Triple channel ram is a nice edition and a smart move on Kingston’s part. Enthusiasts like the extra bling, and beyond bling it cools better than the other Kingston heat spreaders we’ve seen. The older designed heat spreader did a decent job, but the new T1 heat spreader took it to task and reduced operating temperatures by as much as 8° C.
Providing right at 34GB/s bandwidth, looking good in QuadZilla, running good in day to day operation, plug and play setup with the XMP profile, you can’t ask for much more than that. We’ve waited a long time to say this but Ram has come to a peak in it’s evolution, it might go higher, but it’s at a peak now, and for the kits we’ve tested Kingston’s HyperX TC DDR3 2Ghz kit is right there at the top of that peak looking down on it’s subjects.
We are trying out a new addition to our scoring system to provide additional feedback beyond a flat score. Please note that the final score isn’t an aggregate average of the new rating system.
- Performance 10
- Value 8
- Quality 10
- Warranty 10
- Features 10 (XMP On The Kit Is Excellent)
- Innovation 10
Pros:
+ Great Performance
+ Looks Nice
+ Ran Really Cool
+ Best Performance We’ve Seen To Date
+ Very Stable
+ Plug And Play
+ System Was Snappier
Cons:
– Might Not Fit Under Some CPU Coolers
The Kingston DDR3 2GHz 6GB (3 x 2GB) Triple Channel Kit is the fastest kit we’ve tested to date, It’s screamingfast, looks good and we think should be renamed to the Kingston HyperX Terminator T1 2 GHz kit, it Terminated the competition.
Final Score: 9.5 out of 10 and the Bjorn3D Golden Bear Award.


