Media PCs are no longer just for the geeks. Over the last few years, they have become more useful and simple to use for the common man. While you can buy ready-made Media PCs from most companies, they usually are very expensive and not necessarily using the best components. I’ve spent some time to try to build both a silent and easy-to-use Media PC, and this article will hopefully give you some ideas on what to use in your own Media PC, especially if you want it to be silent.
Introduction
Media PCs are no longer just for the geeks. Over the last few years, they have become more useful and simple to use for the common man. While you can buy ready-made Media PCs from most companies, they usually are very expensive and do not necessarily use the best components.
My first attempt to build a proper Media PC (or HTPC if you like) was a few years ago when I had a small Shuttle computer left over. I thought it would fit in perfectly in our living room running something like Mediaportal or ShowShifter. Microsoft’s Windows XP Media Center Edition hadn’t been released in Sweden then, and even the US-version wasn’t available for purchase so free alternatives were what I had to look at.
I had some important goals with the Media PC that I had to fulfill; otherwise it wouldn’t be any use to us:
- High WAF-score (Wife Acceptance Factor). It has to be easy to use for both me and my wife. She’s no idiot by any means (on the contrary), but she doesn’t see any reason to have to fight the box when all she wants to do is watch TV or a DVD. I tend to agree. Tinkering with software and hardware is fun up to a certain point, but when you just want to watch that important game, the last thing you want to have to do is to have to get the machine working right.
- Silent. I usually don’t care that much if my main computer is noisy, but any machine in the living room has to be as silent as possible.
- Powerful. While I don’t intend to use my Media PC for gaming, I want it to be powerful enough to show HD-quality video.
- Stylish. It has to fit in the living room.
Unfortunately, the first Media PC I built didn’t really live up to many of these goals. The software was buggy and clumsy; the Shuttle was noisy; and it didn’t exactly look like anything other than a small PC.
During the last year or so, I’ve continued to improve my rig, switching cases, hardware and software, and in today’s article, I will describe my current setup, which looks like the first one hitting all my goals.
It is probably not the perfect setup, and I invite everyone to come and discuss your own Media PC setups in our forums.
The case – mCubed hFX
 As I mentioned earlier, I’ve tried a few cases before I came up to this. A few have been pretty okay, like the DigN 5 and the Accent HT-200B HTPC. There, however, always have been some small things wrong with them. The DigN 5 case only had a small 240W power supply and, even after a lot of work, wasn’t completely silent. The Accent case on the other hand had space for a full ATX PSU but once again was hard to make completely silent. I would probably have accepted any of these cases but then I saw mention of a new completely fan-less case from mCubed. Regular visitors might remember that I’ve reviewed one of their products earlier: the mCubed T-Balancer. At a visit at the Swedish distributor for mCubeds products, Magnus Thome at www.tystpc.nu, I got a good look at the hFX system he had built and was instantly sold. Luckily, I got the chance to buy an demo case a bit cheaper from him (first version of the case).
|
Why I chose the hFX for my Media-PC The hFX helps me attain two of the goals I have for my Media PC. It’s virtually noiseless (only the DVD and HD give out any sound), and it looks great in the livingroom. The onlly real negative points of this case is its weight and its price. You also need to be prepared to work hard to get everything installed in it. |
The HFX Media PC case is a completely passively cooled case. This means you can get by using no fans at all. It also fits in a full size ATX-motherboard as well as a normal full sized PSU.
Here’s a quick rundown on the specifications and features:
Specifications
The mCubed HFX® media PC fits perfectly into a HiFi and home cinema surrounding:
|
Material
|
Aluminium
|
|
|
Colour
|
Black/ Silver
|
|
|
Motherboards
|
Standard ATX and Micro ATX
|
|
|
CPU sockets
|
754/939/940/775/478/462
|
|
|
Power Supply
|
Passive or Standard ATX
|
|
|
Drive Bay
|
Exposed
|
5.25″ x 1
|
|
Backside
|
3.5″ x 1
|
|
|
Hidden
|
5.25″ x 3
|
|
|
Cooling System
|
Passive (optional)
|
heatpipes
|
|
Safety (optional)
|
92mm fan
|
|
|
Expansion Slots
|
6 full size
|
|
|
Backside
|
Stereo Cinch input/ output 4×2
|
|
|
Net Weight
|
18 kg
|
|
|
Dimensions
|
430 mm (W) x 145 mm (H) x 450 mm (D)
|
|
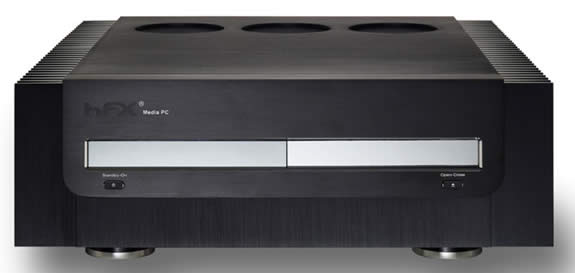
The hFX case in all its glory. Heavy but silent.
External
The HFX-case is a very stylish case. It does fit in pretty good beside other HIFI-equipment. The front has no visible connections. To the left you find a piece of acrylic glass which covers the VFD that you can install. My case came with an iMON-VFD. To the right you find another piece of acrylic glass. This covers the CD/DVD-drive.
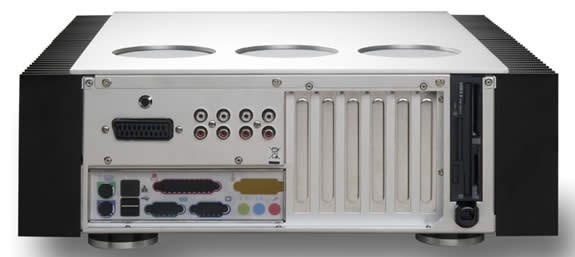
The hFX has support for various type of connections.
In the back of the case you’ll find 4 pairs of audio cinch plugs, an SCART-connector as well as everything else you get from your selected motherboard. There’s also a holder for a floppy in the back. The audio cinch plugs and the SCART-connector of course have to be hooked up inside the case to the hardware there.
Huge aluminium fins make up the sides of the case. These fins have one purpose and that is to get rid of the heat generated inside the case. This means they get quite hot, actually real hot depending on what components you use. Fact is the whole case gets hot so it is important to put it in a well-ventilated spot.
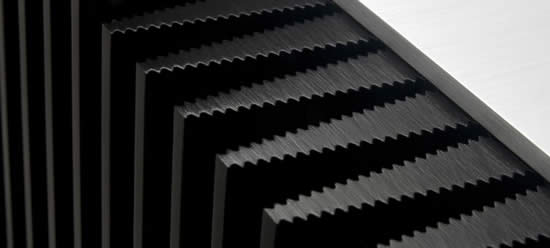
These are the sharp fins that helt dissipate the heat.
If I have to complain about something it is the lack of connections on the front of the case. The only thing you find there is the on/off switch and the DVD-eject-button. If you like me want to hook up a game controller (for those MAME-gaming moments), an MP3-player for the music or a DV-cam for video, you’re out of luck unless you hook them up on the back of the case.
The inside
As this is a full size case there’s pretty much room inside the case. However as you see there’s a lot that have to fit inside the case. The floppy-holder in the back blocks any PCI-slots present and it has been noted that motherboards where the IDE/Floppy connector is placed at the edge of the motherboard angled 90 degrees to the motherboard will have their connectors blocked by the PSU.
The case I bought cheap from tystpc.nu was an earlier version of the case and already had some hardware in it including a fanless Silverstone PSU.
While normal ATX-cases lets air rise enter in the front and exit in the back, the HFX has been built to use the natural air convection. This means the air enters through holes in the bottom, heats up and rises leaving the case through the top.

Click for a larger version
To solve the problem with removing heat, the HFX-case uses heat pipes filled with gas. These are connected to the sides of the case which then dissipate the heat. This means that the fins get quite hot, something that should be thought about when placing the case.
While you can use any PSU as well as normal northbridge, CPU and GPU-coolers, fanless or with fans, the HFX really is built for the various accessories that mCubed sells.
Instead of a normal PSU mCubed recommend this fanless 300W Silverstone PSU, the ST30NF. Unfortunately it is not available for the US and Canada, at least not according to mCubed. The cool (pardon the pun) thing with this PSU is that you place it next to the left heatsink and make sure you got lots of thermal paste between the two. All heat from the PSU is now moved from out of the case to the heatsink. My older version didn’t have any PCI-E powercables but the ones sold now should have that.
To remove heat from the CPU, GPU and northbridge mCubed offers kits with heatpipes.
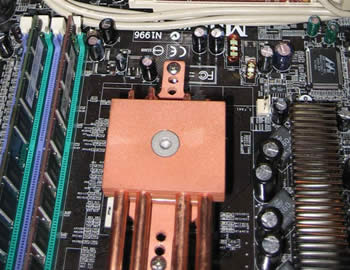
This is how the CPU-kit looks
These kits come with heatsinks and heatpipes and let you hook up any of the components to the big heatsinks on the side of the case. Since there’s no fans inside the case regular fanless solutions might not work as well since they rely on moving air to be cooled. These kits transport the heat to one of the heatsinks on the sides.
What can you run?
Considering that the case “only” have a 300W PSU and is completely fanless you might wonder what you can put in the case. Magnus Thomé from www.tystpc.nu has tested a lot of hardware and when I visited him he had a machine running with a AMD X2 3800+, a GeForce 7800GTX, a Creative X-Fi Elite Pro plus DVD and HD. The machine was running well without any problems. He did have some issues with Intel CPU’s since they put out a lot more heat but I think the new Duo Core should work great inside to. I currently use a X1600XT, X2 4000+, Creative X-Fi Elite Pro, Sony DVDRW as well as a 300 GB 7200 rpm HD and it’s work great so far. I also had a X1800XL inside a while without any problems.
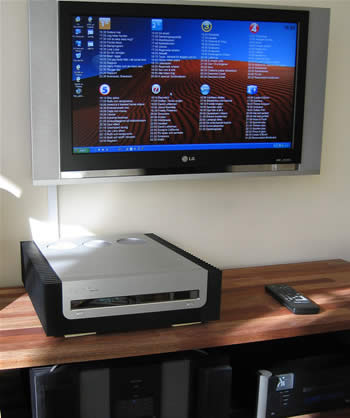
The setup over at www.tystpc.nu
Case Conclusion
The HFX-case is an excellent case if you want to build a completely silent HTPC/Media PC. The only real downside of the case is the price and the fact that it weights a ton. You can purchase the hFX-case and all sorts of assecories at http://www.hifiatx.com/ where you also can find links to distributors and retailers that carry these cases in your country.
 Pro
Pro
+ Possible to make it completely silent
+ Well built
+ Looks very good
Con
– Expensive, especially since you most probably need to buy extra heatpipe-kits for CPU, GPU and chipset.
– Very heavy
– Sharp edges on the heatsinks.
– No ports on the front for USB and Firewire
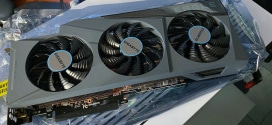
The videocard – HIS X1600XT
When you pick a video card for a Media-PC you usually have different demands than if you build a dedicated gaming-PC. While performance still is pretty important other things like how noisy the card is, how much power it draws and the quality of the video output is just as important or even more important.
Before HDTV came you could get by with a pretty low-end card. In my first attempts to build a Media-PC I used a passively cooled ATI AIW9600XT card which provided me with great video quality. However since we now are moving towards high definition video content the performance of the video card is becoming more important again.
Both ATI and NVIDIA latest series have support for hardware decoding of high definition video content that is encoded in h.264 MPEG4 format.
ATI or NVIDIA then, but which one?
I’ve been going back and forth on this subject for quite some time. Both ATI and NVIDIA now have high-quality video solutions for their cards. ATI has AVIVO while NVIDIA has PureVideo.
AVIVO
ATI’s AVIVO is supported in the X1000-cards and promises to provide users with an excellent quality video performance. Among the features of AVIVO we find:
– Advanced 10-bit-per-color display engine
– Advance 3D comb filtering
– Automatic Gain
– Great video scaling technology
– High quality 12-bit analogue to digital converters (ADC)
– Vector adaptive de-interlacing
AVIVO is present right away in the drivers and have a dedicated tab in the control-panel. It works with front-ends like MCE 2005 and codecs from Intervideo, Cyberlink etc.
PureVideo
NVIDIA’s PureVideo is supported in the GeForce 6 and 7 series of cards although not all features are present on the 6-series. Just as AVIVO the aim with PureVideo is delivering the best possible video quality. Some of the features are:
– Spatial-Temporal De-Interlacing
– High-Quality Scaling
– Inverse Telecine (3:2 & 2:2 Pulldown Correction)
– Bad Edit Correction
– Video Color Correction
– LCD Sharpening
PureVideo is available directly in the drivers. While it works with other codecs it definitely works the best if coupled with NVIDIA’s own PureVideo codec (which cost money). Combining a GF6/7 card and the PureVideo-codec adds adaptive de-interlacing support.
The quality
It is hard to test the video-quality and the best way is simply to sit down and watch a lot of TV and DVD. HQV however has a video-testing program that comes on a DVD and which includes a lot of tests where you have to watch and rate how good the card has completed them. This introduces certain subjectivity in the testing since you have to try to figure out if the result is a 0, a 3 or maybe a 5 or 10. They do however include a fairly detail description of what you have to look for.
ATI earlier proved me with a set of beta Catalyst drivers (v6.4) which included a lot of AVIVO-enhancements. Using those drivers the HIS X1600XT got 128 out of 130 points in the HQV-test.
My next candidate for the Media-PC was an ASUS 7600GT-card. It cost about as much as the X1600XT and supports PureVideo. With the latest NVIDIA-drivers this card “only” got around 100 points in the same test. This both with the PowerDVD 6 and the PureVideo codec. It’s not bad but so far I think ATI has the edge in video quality.
Taking care of the noise
So far the HIS X1600XT has performed very well. The bitrate of the TV-broadcast is pretty low on a lot of channels and the video card does a fine job cleaning up the image. I still have some issues with some channels leaving a shadow image in the background when switching scene but this is something I saw also when using the 7600GT. It also doesn’t appear in all broadcasts and on all channels so I’m not sure why this is happening. Watching DVD’s is equally as good. I’ve been watching a lot of old TV-series lately (Magnum P.I., MacGyver, Battlestar Galactica – yes, I’m on a nostalgia trip) and even though these are old series the image quality is good.
The HIS X1600XT uses the IceQ-cooler which is very silent and thus is perfect for a Media-PC but I choose to remove it and use the vga-heatpipe cooler for the hFX-case.
Conclusion
The HIS X1600XT is a great card for use in a Media-PC. It combines good performance with excellent image quality and even if you choose to keep the cooler it will fit right into a Media-PC.
Even if I think the video quality is slightly worse the NVIDIA cards still offer great video quality. Good alternatives are GeForce 6600GT, 7600GT or 7600GS.
 Pros
Pros
+ Acceptable price
+ Good performance
+ Good silent cooler
+ Excellent video quality
Cons
– A bit more performance for those future 1080i h.264 movies would have been nice
Sound – Soundblaster X-Fi Elite Pro
Just as important as the video quality is the sound quality. I must admit that earlier I didn’t really put much thought into the sound in my Media-PC, mainly because I was pumping it out to the built-in speakers in the TV. Then I went by an HIFI-store in town and somehow came out with a nice 1000$ kit consisting of a Denon 1906-receiver and a set of MicroPod-speakers. Suddenly getting the best sound went high up on my priority list.
Theoretically I could just pump out the sound digitally to the receiver and let it take care of the sound. It does an excellent job with my Xbox 360 and my Denon 1910 DVD-player. However when Scott started to tell me how great the new Creative X-Fi soundcards were and Creative here in Sweden gave me a chance to test the X-Fi Elite Pro I couldn’t resist putting it into my Media-PC.
It’s a revolution, not a evolution
Creative has long been the main player in the soundcard market. In fact, except for a few minor more professional soundcards you could say they have been the only players in the soundcard market. The last few years however they have started to come under fire from a different direction, the integrated sound. Once something you didn’t want to touch with a pole, integrated sound has grown a lot and become much better, in fact good enough for most users.
In addition to the growing threat from the integrated sound, Creative also faced a problem with the fact that each new card that came out felt more like a minor upgrade from the original SB Live! than a new card. I think many Audigy-owners didn’t see a big reason to upgrade when the Audigy 2, the Audigy 2 ZS and then the Audigy 4 arrived.
With the Soundblaster X-FI Creative however have created a brand new chip that is very far from just being a minor upgrade of the Audigy. With 51 millions transistors the Creative X-Fi Xtreme Fidelity audio processor is 24 times more powerful in direct audio terms than its predecessors.
|
|
Raw Data Path MIPs(Note 1)
|
Typical
Processor MIPs (Note 2) |
Internal Audio
Channels Available |
Overall Audio Sample Rate & Effects Processing MIPS vs Live!
|
No. of Simultaneous Real-time Effects
|
No. of Transistors
|
|
Sound Blaster Pro
|
≈1
|
3+
|
–
|
0.0001x
|
–
|
100K
|
|
AWE 32 (EMU8000)
|
67
|
200+
|
–
|
0.2x
|
–
|
500K
|
|
Live! (10k1)
|
335
|
1,000+
|
16
(to Effects Engine) |
1x
|
1
|
2M
|
|
Audigy (10k2)
|
424
|
1,250+
(Note 3) |
64
(to Effects Engine) |
4x
|
4
(Note 3) |
4.6M
|
|
Creative X-Fi
|
10340
|
30,000+
|
4,096
(to all Processing Elements) |
67x
(Note 3) |
8
(Note 4) |
51.1M
|
The Features and specifications
Hardware features:
• Creative X-Fi Processor based solution
• 116dB SNR DAC Quality on all channels
• 136dB SNR Internal Audio Processing Quality
• 64MB X-RAM (Xtreme Fidelity RAM)
• THX Certified Quality
• Extended I/O via Internal Drive-Bay Module
• IR Remote
Connections:
PCI
• FlexiJack (Performing a 3-in-1 function, Digital In / Line In / Microphone) via 3.5mm mini-jack
• Line level out (Front / Rear / Center / Subwoofer / Rear Center) via 3 X 3.5mm mini jacks
• AUX_IN line-level analog input via 4-pin Molex connector
• 26 pin AD_Link connector for linking to the X-Fi I/O Console (upgrade option)
Breakout box
• Two RCA jacks for coaxial SPDIF input and output
• Shared Auxiliary input/Phono input via RCA stereo jacks
• Two optical connectors for optical SPDIF input and output
• Two standard MIDI female connectors for MIDI input and output
• Headphone output and volume control via 6.35 mm (1/4-inch) stereo jack
• Shared line-level analog Line/Microphone input via 6.35 mm (1/4-inch) stereo jack
• Shared line-level analog Line/Hi-Z input via 6.35 mm (1/4-inch) stereo jack
• DIN jack to connect Creative analog speaker systems with the wired remote control or Audio Control Pod that comes with the speakers
• One AD_LINK connector for linking to the audio card
Specifications:
• 24-bit Analog-to-Digital conversion of analog inputs at 96kHz sample rate
• 24-bit Digital-to-Analog conversion of digital sources at 96kHz to analog 7.1 speaker output
• 24-bit Digital-to-Analog conversion of stereo digital sources at 192kHz to stereo output
• 16-bit to 24-bit recording sampling rates: 8, 11.025, 16, 22.05, 24, 32, 44.1, 48 and 96kHz
• Signal-to-Noise Ratio (20kHz Low-pass filter, A-Weighted)
– Stereo Output 116dB
– Front and Rear Channels 116dB
– Center, Subwoofer and Side Channels 116dB
• Total Harmonic Distortion + Noise at 1kHz (20kHz Low-pass fi lter) = 0.004%
• Frequency Response (-3dB, 24-bit/96kHz input ) = <10Hz to 46kHz
• Frequency Response (-3dB, 24-bit/192kHz input) = <10Hz to 88kHz (Stereo only)
• ASIO 2.0 support at 16-bit/44.1kHz, 16-bit/48kHz, 24-bit/44.1kHz 24-bit/48kHz and 24-bit/96kHz with direct monitoring
• Enhanced SoundFont support at up to 24-bit resolution
What you get in the box:
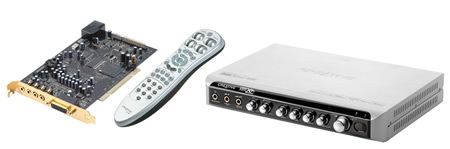
• Sound Blaster X-Fi Elite Pro PCI Card
• X-Fi I/O Console
• Remote Control
• 2x Batteries (AA)
• Rubber Foot (x4)
• Vertical Stands
• 3.50 mm (1/8-inch) to 6.35 mm (1/4-inch) plug adapter
• Power Splitter Cable
• Volume Control Cable (9-pin DIN)
• AD_Link Cable
• X-Fi Music Applications CDs
– Cubase LE
– WaveLab Lite
– Amplitube LE
• Quick Start Leaflet
• Installation and Applications CD containing:
– Drivers for Windows® XP
– Creative Software Suite
– Doom 3 Sound Blaster EAX patch
– User’s Guide
A card with different faces
The X-FI cards use a modular architecture, which allows it to work differently depending on what you use the card for. There are multiple engines in the chip, which dynamically direct resources through this modular architecture to completely change the way audio is managed for any application. This means that when you switch mode from Entertainment to Audio Creation mode the card changes drivers and starts to work in a different way.
Entertainment mode optimizes the processor for Music and Movie playback. This means that any of the resources required for Xtreme Gaming or Xtreme Audio Creation are leveraged to deliver an Xtreme Fidelity Entertainment experience.

Click to see a bigger image
• 24 bit Crystalizer enhances the sound for both movies and music
• CMSS-3D lets you listen to music in surroundsound regardless if yu use headphones or speakers. It also can convert stereo-sound to surroundsound.
• Super Rip lets you rip music to various formats at a high quality thanks to the features of the 24 bit Crystalizer and CMSS-3D.
• DVD-Audio playback up to 24-bit/192kHz in stereo and 24-bit/96kHz in 5.1 surround
• Discrete DTS-ES 6.1 Support
• Certified Dolby Digital EX 6.1 support
Gaming Mode optimizes the processor for the fastest most realistic gaming audio you’ve ever experienced! This means that any of the resources required for Xtreme Music/Movie Entertainment or Audio Creation are leveraged to deliver an Xtreme Fidelity Gaming experience.

Click to see a bigger image
• Rewritten game audio engine delivering more performance that integrated solutions with more features.
• X-Ram (only the Elite Pro and FPS Fata1ity). More high quality stuff can be stored in the on-board ram.
• 24 bit Crystalizer och CMSS-3D.
• EAX Advanced HD 5.0
Audio Creation Mode optimizes the processor for the most flexible, highest performance and quality experience possible in its class! This means that any of the resources required for Xtreme Music/Movie Entertainment or gaming are leveraged to deliver an Xtreme Fidelity Audio Creation experience.

Click to see a bigger image
• A SRC (Sample-Rate Conversion) engine that is 300 times more precise than the previous Sound Blaster solutions and can convert any audio to any resolution at near transparency with 136db THD+N.
• Support for digital-matched recordings in resolutions from 44.1kHz to 96kHz.
• ASIO 2.0 recording with latency as low as one millisecond and zero CPU load.
24 bit Crystalizer
 One of the new features in X-FI is the 24-bit Crystalizer. Basically it takes whatever you input into the card and upmixes it to 24bit/96kHz. The idea behind this is that it tries to make the sound more dynamic (although some actually claim it is compressing it instead). This is done before the sound reaches the mixer or any other effects are applied. The instruments most dramatically affected by 16-bit sound are typically those with the most pronounced transients. In response, common studio engineering practice is to artificially compress the dynamic range of these instrumental tracks to keep them comfortably within the 16-bit dynamic range. The goal of the 24-Bit Crystalizer is to restore some of the natural dynamic range of these instruments (e.g., as experienced in percussive attacks).
So how does it sound? It really depends on the music you are listening to. Both when I visited Creative and got to listen to one of their system and when I set it up home I noticed that when it works, it works very well. The music does indeed sound more dynamic and full. However in some music the effect tends to make the affected instruments too noticeable and I had to turn the effect down. It’s cool though that you can choose a setting between 0 and 100% for the effect since it helps to find the best possible setting for each song. The same goes for movies where it works wonders on some films and doesn’t really make a difference in others.
CMSS-3D
 CMSS stands for Creatives Multi Speaker Surround and is a spatial Audio Enhancement technology. Creative defines these goals for it:
The goal of Spatial Audio Enhancement is to enhance the listener’s experience by attempting to match the audio signal to the playback system, while reproducing the intended audio image as faithfully as possible.
To help them do this they have three different signal processing algorithms which addresses headphones, 2-channel stereo and multi-channel stereo-settings.
Without doubt this is the feature that blew me away the most when visiting Creative. Taking a simple 2-channel stereo sound MP3 and then applying this made it sound much nicer. The sound got a whole new depth that I liked. Even cooler was the fact that it worked flawless in MCE 2005. Suddenly the TV-sound came out in all speakers and older TV-series I bought on DVD sounded better than ever.
CMSS-3D Headphones also does an excellent job of taking multi-channel sound (for instance from a movie) and projecting it in headphones. Simply excellent!
Conclusion
It should be pretty obvious why I choose this card for my Media-PC/HTPC. True, it does cost a lot and the cheaper versions should work fine, but you get what you pay for. So far I’ve been extremely impressed with the sound quality and features, especially compared to the motherboard-audio I used before. My next test will be to take in the sound from my Xbox 360 and my Denon 1910 through the optical Input-connections since the card also supports DD/DTS-encoding from external sources.
Pro
+ Simply stunning sound quality
+ Several very useful features to improve the quality of all sorts of sound
+ Nice break-out box with lots of connections.
Cons
– Expensive
Digital TV – FireDTV
While you can use a Media-PC without any TV-card you would miss out on several cool features like the ability to pause a movie on TV while going to the bathroom or recording your favourite shows on the harddrive.
There are a number of different good TV-cards you could buy. If you want analogue TV Hauppage has a range of nice cards from the PVR-150 up to the Twin-tuner TVR 500. They also have several solutions of digital TV. Another interesting product is the various All In Wonder cards from ATI which saves you an extra video card.
In my case I wanted a card that had support for the CI-interface which combined with a CAM and a smartcard would give me access to pay channels over DVB-T here in Sweden.
Twinhan has a card with CI-interface, which just recently also got support for the CI-interface in MCE 2005. At the time I was building this machine however the only card I could find with both support for the CI-interface and also a driver hack to support the CI-interface in MCE 2005 was the FireDTV/FloppyDTV from Digital Everywhere/FireDTV Solutions.
The FireDTV and the FloppyDTV actually are two versions of the same product. The FloppyDTV is an internal TV-card which is shaped like a floppydrive and thus fits into a 3.5” drivebay. It also fits perfectly in the back of the hFX-case I have.
The FireDTV is the same card, just an external version of it. This is also the one I got for the case.
Both hook up to the computer through Firewire and it is possible to link several Floppy/FireDTV for multi-tuner support.
Specifications:
- Frequency: 49 – 861 MHz
- Bandwidth: 6,7,8 MHz
- Modulation: QPSK, QAM16, QAM64
- FEC: 1/2, 2/3, 3/4, 5/6, 7/8
- Guard Int: 1/4, 1/8, 1/16, 1/32
- FFT: 2K, 8K
- Antenna In, Antenna Out
- Active antennas 5V, 100mA
I know this doesn’t tell you much but something I noticed was that I had a lot easier to get a good clean signal compared to when I briefly tested the TwinHan-card.
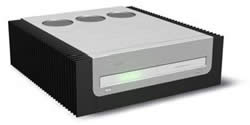
The hardware
I got the FireDTV external box for my machine. The box is black and pretty sleek. In the front you only see a small led indicating if it is turned on and working. On the back you find connectors for antenna In and Out as well as 2 firewire-connectors. A small power-brick is included but is only needed if you are using the antenna-out connector or your firewire-ports do not provide enough juice.
Included in the kit is also a small remote. If you want to save a few dollars you can buy it in a light-kit without any remote or software, just the drivers.
The software
Together with the FloppyDTV and FireDTV you get the HTPC-frontend MyTheather as well as a version of PowerDVD 5. While MyTheather isn’t the prettiest frontend it still works well and even includes a handy display of signal strengh.
The drivers for the FloppyDTV/FireDTV installs a few utilities that are run all the time on the PC. This includes a utility that handles the CI-interface and also can check up the CAM you are using.
As Microsoft in their wisdom decided not to include CI-support in MCE2005 here in Sweden, basically forcing you to only see the free DVT-T channels or take in the signal from an external STB through S-Video, you cannot just hook up the FireDTV/FloppyDTV and think it will work. Digital Everywhere however has worked hard with users to get the support working and regularly release new versions of their drivers which adds the support for pay channels in MCE 2005.
At the time of writing the support works fine with a few bugs. A set of beta-drivers has recently been released that add dual-tuner support (record one show while watching the other). The fact that Digital Everywhere is actively developing drivers and such is great and makes it more promising that they will work on getting it to work also when the networks switch to MPEG4.
The FireDTV/FloppyDTV of course supports other front-ends like Mediaportal so there’s no reason to use MCE 2005 if you don’t fancy it.
Swedish users should visit http://www.tystpc.nu since a support forum has been set up there for the Floppy/FireDTV. Any development in drivers and new features will be released there pretty quickly. Non-Swedes can visit http://www.digital-everywhere.com or http://www.firedtv.com.
Conclusion
Even though it os a bit more expensive than other cards this is a really nice TV-card solution. In situations where the Twinhan-PCI card has issues with the signal the FireDTV manages to still output a good image. The actual image on your TV of course depends on the codec and it’s nice to see that you get one of the better codecs (PowerDVD 5) with the kit. It would of course be nice if it was updated to PowerDVD6 or maybe even switched to WinDVD 7.
MyTheather isn’t the most pleasing front-end but works well. Since the FloppyDTV and FireDTV is supported by most front-ends you also are not locked to MyTheather.
As an MCE 2005-user I really appreciate the work that is done with drivers to get the CI-interface working. There are still some bugs present which stops it from working perfectly but given time I have every confidence that these bugs will be squashed in the future.
Pros
+ Not as sensitive as other cards in low-signal strength situations
+ Easy to add more tuners
+ MCE 2005 support!
Cons
– Expensive
– Still some annoying and potential critical bugs in MCE 2005
SOFTWARE – MCE 2005 and Mediaportal
There is a pretty good selection of front-ends available for Windows these days. When I started my build however things were different. MCE wasn’t available to buy separately, Mediaportal still was very buggy and Meedio didn’t have it’s own TV-plugin. My choice at that time was Showshifter. It was a very good TV-frontend that also included nice features like the ability to record directly in DivX-format. As the other front-ends got better Showshifter kind of stood still in development and not long ago it went into liquidation. It’s possible someone will buy the assets and re-release it again but we will have to see about that.
Mediaportal
Mediaportal has grown a lot since I first read about it. Since it is a free open source software the development of it is pretty rapid and it has grown from a very buggy front-end to a less buggy and much more fully featured front-end.
Mediaportal actually has its root in XBMC (Xbox Media Center).
MediaPortal’s roots lie in the XBox Media Centre (XBMC) project which goal was to build a media centre application for the Microsoft XBox gaming console. The founder of XBMC, Erwin Beckers (also know as Frodo) concluded early in the XMBC project that there were notable limitations to the xbox platform, mainly that it is unable to support TV cards. XBox Platform limitations like these would ultimately hinder the vision of a feature rich media centre application.
In February 2004, Erwin left the Xbox Media Centre project to start a new media centre project, now known as MediaPortal that would run on the Microsoft Windows platform. Initially existing code was re-used from the XBMC project but after several releases and innumerable feature enhancements there has been almost a complete re-design.
Today, MediaPortal continues as an open source project, has a core team of developers and a growing community of over 10,000 registered users.MediaPortal is an Open Source application ideal for turning your PC in a very advanced Multi-Media Center / HTPC. MediaPortal allows you to listen to your favorite music & radio, watch your video’s and DVD’s, view, schedule and record live TV and much more.
As Open Source software licensed under the GNU/GPL agreement, you get MediaPortal for free. This means anyone can contribute to MediaPortal or customize for their own needs!
MediaPortal is built on the Microsoft .NET framework using C# and currently has a growing international community of over 10,000 users.
(From www.team-mediaportal.com)
The things I like about Mediaportal are:
- Very nice user-interface. Can be made to look almost exactly like MCE 2005
- Works with MCE-remote, Hauppage remote, FireDTV-remote
- Lots of plugins for stuff like webinterface, MAME-support etc.
- Supports lots of video-formats
- Simple to get working with filters like ffdshow
- Works with a lot of TV-cards
- Simple to use a EPG-software like xmltv, O2Grabber etc. to get TV-listings
- Can run on both Win XP and Win MCE 2005
- It’s free
Things I do not like about Mediaportal
- Still not completely stable
- Bugs and crashes lowers the WAF-rating
- Since it is still in beta you need to update often forcing you to mess with the Media-PC
Mediaportal will some day become my main front-end. It just needs to get a bit more stable so I don’t need to update it to fix bugs.


One of the skins for Mediaportal looks a lot like MCE 2005
Windows MCE 2005
When Window MCE 2004 was released you couldn’t buy it separately. This was fixed with Windows MCE 2005 and with roll-up 2 they also added support for Digital TV in Sweden.
I’ve been using MCE 2005 for some time now and found it to be a very good and easy to use front-end. It might not have as many plug-ins/external programs as Mediaportal but I actually can get the same functionality that I want in MCE 2005 as in Mediaportal. This includes support for Internet radio and MAME-support.
One added feature that I like is the ability to stream stuff to my Xbox 360. Together with a program that transcodes DivX/xVID-movies on the fly I now can watch stuff on my Xbox 360 with the Media-PC in another room.
Things I like with MCE 2005
- Very simple user-interface
- Stream to Xbox 360
- Enough external programs to get the functionality I want
- Stable
Things I do not like about MCE 2005
- Recordings are huge. Need third party program to convert to a compressed format
- Limited EPG-support for Sweden
- Very hard (even impossible) to get ffdshow to work with the TV or DVD-output (it works with xvid/divx playback though)
- Very picky which codecs you can use
- With lots of music files it can get a bit hard to categorize everything. MCE really wants those id-tags in perfect order.
The main thing MCE 2005 has going for it is that it is stable. I know that if I get it to work as I want I do not need to go in and update it every other month. In the end the purpose with the Media-PC is to let me watch/record TV, watch DVD’s as well as listen to music and MCE 2005 does that very well.
The other options
Since ShowShifter has gone bust I cannot recommend that anymore. It was a pretty good frontend and I hope someone picks it up. Maybe ATI should do it and dump their own frontend on the AIW-cards?
Some other options are MythTV (Linux), Meedio, Sage TV (Linux and Windows) and DVBViewer Pro. Each has their advantages and disadvantages.
The rest of the system
A Media PC of course includes a lot of other components.
Hard drive
Bigger is better. It’s that easy. When you start recording all those shows (especially if you are using MCE) space is at a premium. I would suggest at least a 250 MB or even better a 400 GB or 500 Gb harddrive.
As for the brand Seagate has some very nice silent models. The disk I use in my Media PC is a 250 Gb Maxtor DiamondMax and I’m pretty happy with it.
In addition to a big hard drive I suggest looking for some way to silence it (even a silent drive usually generates some noise). Mcubed has two solutions to help you silence the HD:
Traditional silent solutions for hard disks have to absorb a big bandwidth of vibrations and have to simultaneously ensure that the hard disk will not swing, reducing hdd speed. The innovative mCubed Silent Brackets solve this efficiently by different simple ways:
- The silent rubber blocks, especially designed by mCubed, have a size and a softness that are optimized specifically for this application. A special hardness grade was chosen in order to absorbs rotation vibrations and knocking vibrations.
- The arrangement of the brackets ensures that the hard disk will not move horizontally, thus preventing the misalignment of its reading heads and avoiding any speed reduction.
The mCubed Silent Brackets were created by mCubed and are produced in Austria. The quality of the workmanship and the materials used are optimal: the rubber blocks, which have been specially made for this application, and the laser-cut brackets, give the final product an exceptional quality.
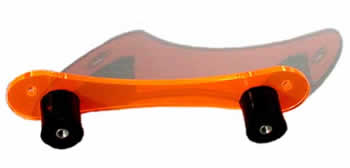
I use these and they work well.
Vertical Silence is a hard disc cooler, which is designed especially for passive cooling. It is the first hard disk cooler with vertical heatsinks, which allows an natural air convection, without an active fan cooler.
Due to the combination of different technologies an optimal cooling and an effective noise reduction can be achieved at the same time.
Vertical heatsinks
Traditional hard disk coolers have horizontical heatsinks, which is optimised for active fan cooling.
The heatsinks of Vertical Silence are vertically. Warm air can easily pass through the heatsink and take away the heat. Cool air can follow (natural convection of air). In addition, the heatsinks have special designed lamellas which enforce the cooling performance.

I do not know how good this solution is in a hFX where you have no fans in helping removing the heat this is putting out but it should work fine in other cases.
DVD
Of course a DVD-burner is a must in a Media-PC. Not only do you want to watch all the DVD’s you are buying but also burn the recorded TV-shows to DVD.
Personally I don’t think there’s much difference these days between brands so I would not overspend on the drive.
To minimise the noise from the drive you should get the CD-speed application from Nero and limit the speed the DVD’s spin with. When watching movies there’s no need for 16x speed, is there?
Conclusion
So there you have it. An almost completely silent Media-PC which also is very WAF-friendly. Let’s take a quick look again:
- Case: mCubed hFX with built in iMON LCD, GPU and CPU heatpipes
- PSU: Fanless 300W Silverstone PSU, the ST30NF
- Video card: X1600XT, modded with GPU-kit for hFX so it’s fanless
- Soundcard: Creative X-Fi Elite Pro
- TV-Card: FireDTV-T
- Front-end: Media Center 2005 and Mediaportal
- The rest: 250 Gb HD, 1 GB memory, DVD-burner
Unfortunately I know that I will be messing with it soon again. As we finally get proper HDTV in MPEG4 format in time for the World Championship in Soccer I will have to make sure the machine can handle it. But that’s the joy with computers, isn’t it?
Please share your own experience with Media PC’s in our forum. Got a front-end to recommend that I didn’t mention? Tried another case that is cool? We want to know!