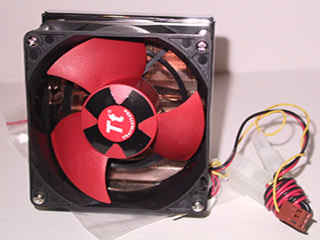
If you are in the market for a new CPU cooler, you are probably considering Thermaltake products. And they recently released a new HSF – the Extreme Volcano 12. We were lucky enough to get our hands on one. Read our review to find out if it should be your next cool purchase (pun intended).
Introduction
A good CPU cooler can go a long way in making a stable PC. The casual PC user or builder usually will be happy with a retail cooler that comes with their processor. But most enthusiasts turn to companies like Thermaltake for their CPU cooler needs. Thermaltake has been providing the enthusiast market with heat sinks for about four years. Thermaltake’s Volcano line of CPU coolers is perhaps their most well-known line of AMD CPU coolers. Their latest addition to the Volcano series is the Extreme Volcano 12. This HSF features support for AMD Athlon XP up to 3400+, an all copper heat sink, and a variety of operation modes. In this review, I will be comparing the Extreme Volcano 12’s performance to a stock HSF that AMD ships with Athlon XPs. Considering that it is all copper and much larger than the stock HSF, I expect the Extreme Volcano 12 to outperform the stock HSF by near two digit margins.
Specifications & Features
Specifications:
- For use with AMD Athlon XP up to 3400+
- Fan Dimension: 80x80x32 mm
- Heatsink Dimension: 82×65.6×49 mm (66 fins)
- Rated Voltage: 12 V
- Fan Speed:
- 1800-2200 RPM @ 20 ºC
- 4950-6050 RPM @ 55 ºC
- Max air flow: 72.92 CFM
- Noise:
- 21 dBA @ 2000 RPM
- 48 dBA @ 5500 RPM
- Bearing Type: 2 ball bearing
- Life Expectation: 80,000 hours
- Connector: 4 pin
- Weight: 708 grams
Features:
- Extreme high density fins with all copper heatsink (66 fins)
- Powerful 80x80x32 mm fan with triple blades
- Three setup options:
- Function 1: Full speed (5500 RPM) always
- Function 2: Temperature control (fan speed automatically adjusts according to temperature detected by included thermal sensor that can be taped to bottom of CPU)
- Function 3: Manual control (2000 – 5500 RPM) using included 3.5″ bay or PCI slot controller
Package Contents:
- Heatsink with fan
- PCI slot fan controller (with necessary screw)
- 3.5″ bay fan controller (with necessary screw)
- Thermal compound
- Thermal sensor
- Thermal tape
- Installation Guide
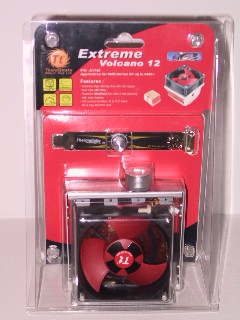 Front of package |
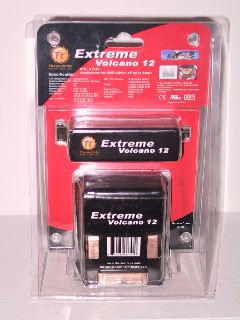 Back of package |
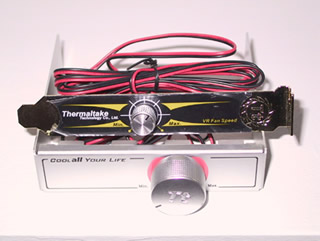 The two fan controllers |
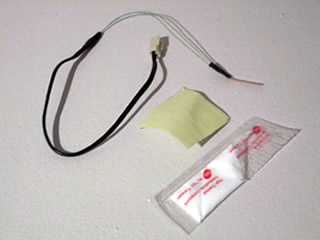 Thermal sensor, tape, and compound |
Installation
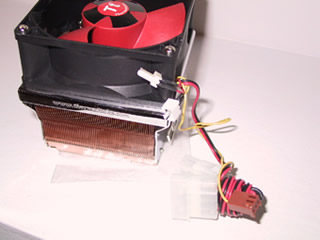
Installation is where Thermaltake really tries to differentiate this HSF from the pack. You have three different options for setting up the fan speed control. Of course, the HSF is installed like normal on the CPU in all three options. Where the options differ is how the fan is hooked up. The simplest option is to let the fan always operate at full speed, which is 5500 RPM. To accomplish this, you simply plug a jumper into the jumper connector on the fans wires (upper connector in pic below). That’s simple enough for those who are not too worried about minimizing noise when their PC is not being used for intensive applications. The other two options are probably the most likely ones to be used because they allow for a little more flexibility. The second option allows the fan speed to be controlled by the thermal sensor. Obviously, the fan speeds up as the temperatures rise. This allows the fan to operate in the range of 2000 to 5500 RPM. In order to utilize this option, the jumper is removed and in its place goes the thermal sensor connector. Of course, the thermal sensor should be applied to the CPU with the included thermal tape. The third and final option is to manually control the fan speed with one of the two fan controllers. Again, this allows for the fan to be operated in the range of 2000 to 5500 RPM, but with complete manual control over it. To use the manual option, you must remove the jumper and attach one of the controllers to the speed control connector (middle connector in pic below) Thermaltake provides a front (3.5″ bay) and back (PCI slot) controller, which is great since different people are likely to prefer different configurations. I chose the manual option for this review since it would easily allow me to test the HSF at its lowest and highest fan speed settings.
The actual installation was not too difficult. I made it more difficult than it should have been. Since I just replaced my motherboard for an upcoming review, I did not want to spend the time to remove everything to gain easy access to the HSF latch on the stock HSF, which made removing it a pain. As you can imagine, this would mean that installing the Extreme Volcano 12, which is nearly twice as big as the stock HSF, would be an even greater challenge. To make a long story short, I eventually got it installed. I’m sure it would have been much easier had I actually removed the motherboard like I should have. I do not fault Thermaltake for any of this, though, since it was my bad decision to take a shortcut on this installation.
Performance
As I stated earlier, I compared the Extreme Volcano 12 to a HSF that AMD ships with Athlon XPs (at least the one AMD shipped with the 2000+ when I bought it). Due to time constraints on this review, I did not attempt any overclocking, but I think you will see by the results that this HSF from Thermaltake should be a great HSF for overclocking Athlons up to 3400+. To stress the CPU, I used SiSoftware Sandra Standard version 2003.7.9.73. I used the Burn-in Wizard feature in Sandra to run the CPU multi-media and arithmetic benchmarks 20 times at nearly constant 100% CPU utilization. I used the temperature readings from Leadtek’s Speed Gear II utility for all tests. The ambient temperature in the room where I performed the benchmarks was around 26 ºC (78.8 ºF — pretty toasty, eh?).
Test System:
Benchmark Results
| CPU and System Temperatures (ºC) |
|||
| AMD Stock HSF (~6000 RPM) |
Tt EV12 (~5500 RPM) |
Tt EV12 (~2000 RPM) |
|
| CPU – idle | 52 | 45 | 52 |
| System – idle | 42 | 40 | 43 |
| CPU – after stress | 57 | 49 | 58 |
| System – after stress | 45 | 42 | 45 |
As you can see, the Thermaltake Extreme Volcano 12 offers a substantial improvement over the stock HSF. It does not quite deliver the double-digit decrease in temps that I was hoping for, but it gets close. The EV12 has to be turned down to around 2000 RPM to reach the same temperatures that the stock HSF was producing. Plus, I can’t hear the EV12 at that level, which is quite nice.
One of the best things about this CPU cooler is that it is noticeably quieter than the stock HSF, even when running at full speed! However, at the highest speed, it could still be too noisy for some people.
Conclusion
With the Extreme Volcano 12, Thermaltake offers a lot of flexibility and great performance in a CPU cooler. For people looking for a good HSF to replace the stock one they got with a retail CPU from AMD, the Extreme Volcano 12 is certainly worth considering. However, for people who already own a good CPU cooler, the decision may not be so easy. I’m sure Thermaltake is hoping the features of the EV12 will make people want to make the switch. Unfortunately, I was not able to find a street price for it, and Thermaltake did not supply us with an MSRP.
Note: I would like to apologize for the lack of numerous pics of the HSF. I was pressed on time for this review and unfortunately that is one thing that got sacrificed. To get a good look at the copper heatsink and other details of this HSF, check out the product site. There are also some other reviews noted on that web site that may also have some good pictures of the product.
Pros:
Cons:
For being a solid performer and providing useful features, I am giving the Thermaltake Extreme Volcano 12 an 8.5 out of 10. And since my experience with this CPU cooler was very positive, and I’d recommend this unit to those looking for a new cooler, I’m awarding the Extreme Volcano 12 the Bjorn3D Seal of Approval.

 Bjorn3D.com Bjorn3d.com – Satisfying Your Daily Tech Cravings Since 1996
