Following in the lineage of ASUS boards before it, the Gene III adds another notch next to the I WIN button. Great build quality, USB3 and Sata6 in a small package.
INTRODUCTION
The ASUS Rampage III Gene packs as many useful features as the ASUS engineers could manage into a much smaller package than its ROG siblings. We will examine this latest micro-ATX motherboard, and compare it to the older ASUS Rampage II Gene to better understand performance differences between the two.

The color scheme for the expansion and memory slots and the SATA ports on this motherboard has changed. Instead of the blue and white seen on the Rampage II Gene, we see reds and blacks.
There is also a slight design change in the NB and SB heat sinks. They are a bit more aggressive than those of the Rampage II Gene. They are still passively cooled so overclockers might want to not rule out an extra fan to aid in cooling.
The board supports up to two PCI-E video cards which can run as a pair, in CrossFireX or SLI configuration.
SATA6 and USB3.0 support has been added to this incarnation of the Gene, leaving the way clear for those that want that extra throughput with newer SATA6 and USB3.0 devices.
For a micro-ATX board, the Rampage III Gene is packed with enough features that will satisfy hardcore users. What’s more is Asus packed the board with a lot of overclocking features that often found on high-end boards so it will satisfy the overclockers as well. Let’s dig in and see what this board has to offer.
Features
The Gene III appears to have kept most of the good things from the Gene II and mixed in some welcome additions. Gone is the PATA interface leaving room on the motherboard for a common location for taking voltage checks. ASUS refers to this as the feature called ‘ProbeIt’. Two USB 3.0 ports have been added to keep current with newer compliant USB 3.0 devices that are coming on the market. SATA gets a bump in performance too with the addition of two SATA 6 Gb/s ports. That’s up to twice the performance of the SATA 3 throughput. One thing that might be missed is the removal of the eSATA port on the back I/O.
Features List
Specifications List
PACKAGED SOFTWARE
The included DVD contains a number of things such as drivers, assorted user manuals or guides, and several software packages. Windows XP, Vista and 7 are the supported Microsoft 32 bit and 64 bit Operating Systems.
| MANUALS |
User manuals for the VIA HD Audio and Intel Matrix Storage Manager are supplied in PDF format and rounding out the PDF manuals is two from ASUS for the Motherboard; the Utility Guide and the Installation Guide. |
| UTILITIES |
Adobe Reader 9 Kaspersky Antivirus KAV2010(v9.0.0.747) ASUS ROG Connect V1.03.11 ASUS ROG GameFirst V1.01.02 Marvell MRU Utility V4.1.0.1610 Sound Blaster X-Fi II Utility Package V1.0 (R04) BUPDATER Flash BIOS tool under DOS (V1.18) Last but not least is the AISuite II ( v1.00.17), a utility suite from ASUS. It has the following modules:
|
|
DRIVERS |
Included from Intel are the chipset, LAN, IMSM and AHCI/RAID drivers. From VIA come audio drivers, from Marvell the SATA 6Gb/s drivers and NEC drivers for the USB3 controller. |
AISuite II
ASUS updated their whole software bundle and put all major applications, including PC Probe, Turbo V Evo, Fan Xpert, and Update software for the BIOS, into the AI Suite II. This makes it very easy to set up everything because there is no need to run several applications at once. This one application has all the features most users will ever need.
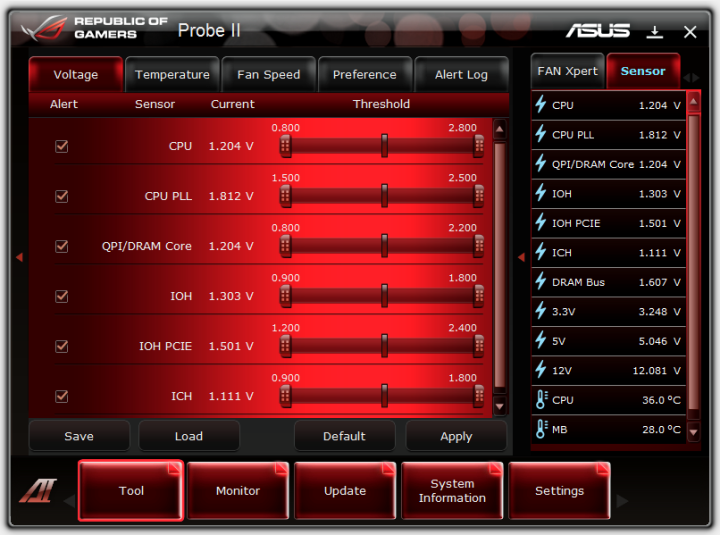
Probe II is an excellent application to monitor computer voltages, fan speeds, temperatures and it also gives users the option to set up alert options in case voltage jumps, or if there is a recent drop in the Power Supply voltage, or even if temperatures get critical or fans die in the system.

The temperature section allows users to set up alerts if certain parts of the system get too hot. Two optional temperatures can be set up for certain hardware parts that users wish to monitor. While users running components at stock speeds may not require temperature monitoring, this is a great feature for overclockers that want to make sure their components run cool enough even during the hot days. Because high temperatures could render the PC unstable, Probe II could warn users when temperatures get too high.
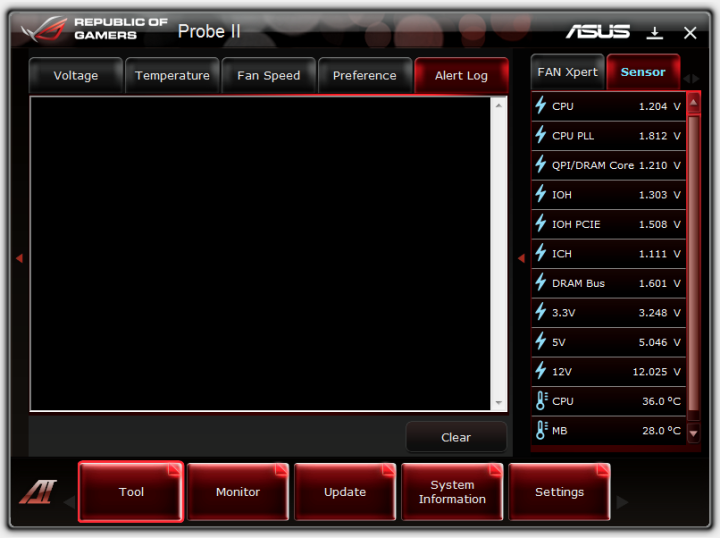
Probe II also includes an alerts log where all the alerts and updates are reported. This feature helps users understand problems that might have occurred while they were away.

Fan Xpert helps users control the fans in their system. Since all the fan headers on the ASUS Rampage III Gene are PWM 4-pin headers, the RPM of each fan can be easily read and controlled by the BIOS and Fan Xpert. Think of it as a fan controller built into the motherboard that can be programmed to change the speed of the fans under different conditions. The drop down menu in the picture shows 7 different settings.

This is the Silent Preset, which is automatically set to run the fans at 20% till the temperatures on the CPU rise to 40C. As the temperature rises from 40C to 70C, the fan percentage rises at a constant slope of about 27% per 10 degrees Celsius. The fan speed can easily be programmable once the setting is changed to the User preset.
The benefit of combining all the applications into one is that in the event there is an incorrect setting in Fan Xpert and the temperatures on the hardware rise too much, users can quickly change the settings and see the temperatures change real-time on the side panel to the right.
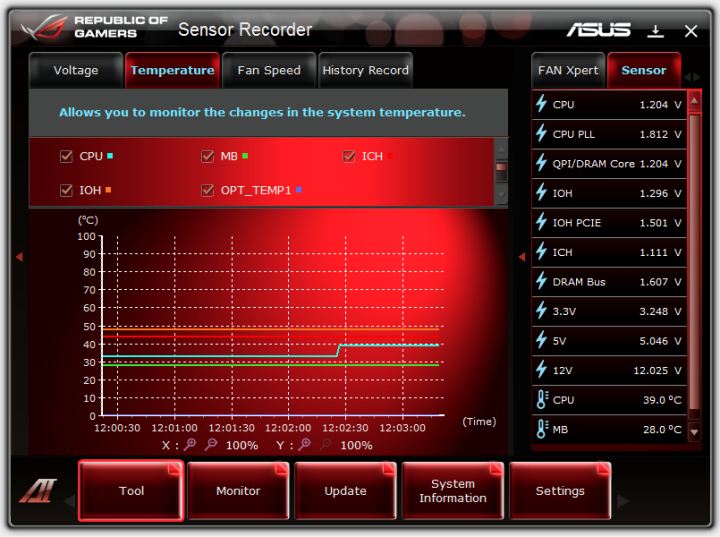

The beauty of Sensor Recorder is that users can record voltage, temperature, and fan speed information real-time and let the application graph everything. This can help in situations when users are benchmarking their system, or playing a video game, but would also like to know if the voltages, temperatures, and fan speeds are within acceptable ranges.
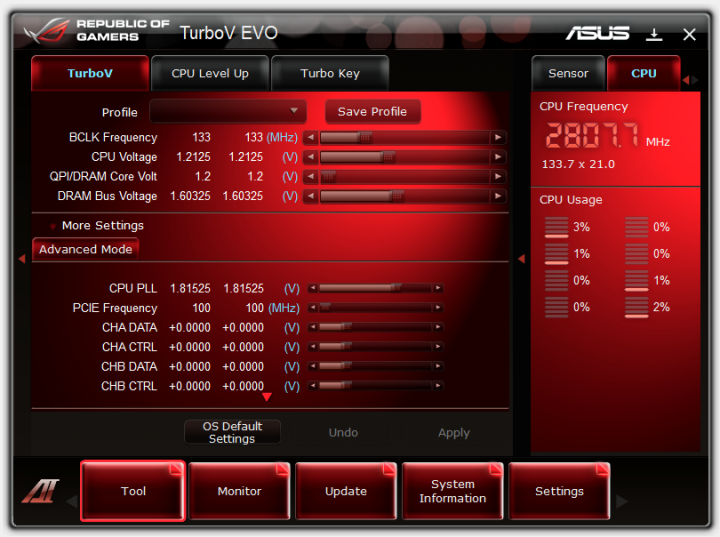
The TurboV EVO software allows the user to manually or automatically overclock their PC within Windows using three configurations: Turbo V, CPU Level Up, and Turbo Key. Before we go into detail, we would like to mention that TurboV EVO is a true hardware based solution that comes with real time BIOS level overclocking via an easy user interface. These settings are not just presets that will only work on certain system configurations. TurboV EVO adjusts everything separately. Note that profiles can be saved here for future recall.
In manual mode (TurboV tab) the software allows users to set the BLCK frequency, and change all voltages including the PLL, CHA DATA, CHB DATA, PCH, CHA CTRL and CHB CTRL voltages. These changes will take effect immediatly after acknowleding that you may cause the system to become unstable.
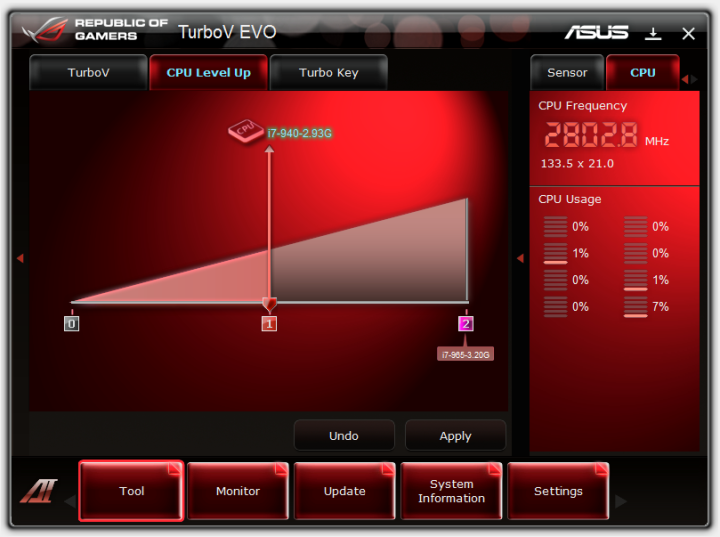
CPU Level Up helps users overclock their systems in an extremely easy way. There are two presets already included. Depending on the processor, the presets will be different, but for our Core i7 920, we have Core i7 940 and Core i7 965 presets ready. This basically allows us to overclock our system to the performance of a Core i7 940 or Core i7 965 with one click. This will require a reboot to take effect.
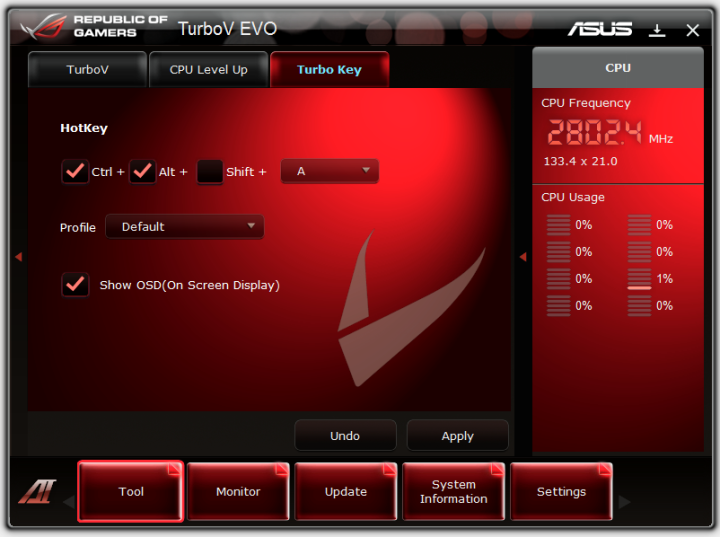
Turbo Key allows one to switch between any saved configurations by using a user defined HotKey sequence.

The ASUS Update allows the user to quickly download and flash the latest BIOS to the BIOS chip. The Rampage III Gene comes with one BIOS chip, however it is designed to be easily swappable for quick replacement. When doing the update procedures, users can also add their own booting image. By default the ASUS Republic of Gamers animated boot screen is played every single time the system turns on. If users wish to change that, they can easily do so through the Update section while updating the BIOS. They do not have to update the BIOS to change the boot image.


Click Image For a Larger One
The system information panel shows users the most recent system specifications and settings. It’s very similar to CPU-Z.


Click Image For a Larger One
Finally, the Settings panel allows users to customize the AI Suite II control panel. Users can change colors, contrast, brightness, saturation, and more. It also lets users enable and disable several applications in AI Suite II.
packaging

The packaging for this motherboard is standard ASUS packaging. The red front cover identifies the motherboard as well as some of the motherboard’s features. Prominently displayed is a graphic showing that the motherboard is Windows 7 ready. Also displayed are graphics showing the chipset and CPU supported, as well as noting support for CrossFire/SLI.

The rear of the box goes into a bit more detail of the specifications of the motherboard. Of note is the three year warranty and the notice (in very small print) that the specifications are subject to change without notice.
- ROG Connect is a feature that allows one to remotely monitor (and change) the status, in real-time, of the motherboard BIOS settings concerning overclocking.
- GameFirst is ASUS’s attempt to packet shape TCP and UDP network traffic in a fashion to optimize the connection for gaming. This essentially reduces latency that could leave users vulnerable in games, a first-person shooter for example.
- SupremeFX X-Fi 2 is the result of the VIA VT2020 HD audio controller hardware being mixed with one of Creative’s CODEX’es. The outcome is 8-channel HD audio and EAX 5.0.

Folding open the top flap reveals a centerfold detailing more information about what is special about this motherboard, along with some of the utilities included.
- ProbeIt is a common area set aside on the motherboard for taking voltage measurement. Useful if you want better resolution on the actual voltages in play.
- CPU Level Up is an option made available for an easy one click boost in CPU performance.
- Kaspersky@ Anti-Virus 2010 (OEM) has been provided by ASUS. The date on the install files are a bit old, so make sure an update is done after installation.
There she is, all comfy in the static resistant container. Click on the image above for a better view of the motherboard by itself.

- A set of labels for the SATA cables.
- One 2-in-1 SATA 6G cable.
- Three 2-in-1 SATA 3 cables.
- The installation DVD.
- A ROG theamed sticker.
- Headers for the chassis connections. (Q-Connector Kit)
- A user’s guide.
- Rear cover plate.
- ROG USB interface cable.
- SLI cable.
a Closer Look


The ASUS Rampage III Gene has 2x PCI-Express x16 slots, 1x PCI-E x4 slot, and 1x PCI slot. Though the proximity of the first PCI-E x16 slot to the North Bridge heatsink worried us at first, when we installed the video card, there was still a visible amount of room (the picture of the full system is below). Users can run two-way SLI/CrossFire at x16/x16 speeds.
The board has 6x SATA 3.0 Gb/s ports (colored gray), and 3x SATA 6.0 Gb/s ports (colored red). The three SATA 6.0 Gb/s ports are controlled by a Marvell 9128 PCI-E SATA 6Gb/s controller, whereas the six SATA 3.0 Gb/s ports are controlled by the the Intel ICH10R Controller. The SATA 3.0 Gb/s have support for RAID 0, 1, 5, and 10 configurations. The LAN Port on the back of the board is also controlled by the Intel controller.


The board supports triple-channel memory. It has 6x DDR 2200MHz slots, supporting a maximum of 24GB of memory. The area around the CPU socket is clear of obstructions. Similar to the Rampage III Formula, the Rampage III Gene’s North Bridge heatsink uses the new thick-fin design. The MOSFET heatsink, also like that of the Formula, uses the old thin-fin design. The heatpipes on the Gene are also considerably sized. The South Bridge heatsink has thick fins and appears to conduct heat well.


The Rampage III Gene has a removable BIOS for an easier fix in the event of a BIOS failure. This is a practice rarely followed, as most BIOS chips are soldered directly to the PCB nowadays. Users can also flash the BIOS in the event of a corrupted BIOS chip.


Here a view of the ASUS Gene III installed and operational. Click on the image for a larger view.
I/O Panel

Left to right and top to bottom:
- PS2 Keyboard, USB 2.0 ports 5 and 6
- CMOS Clear button
- S/PDIF Out
- 1394a Firewire, USB 2.0 ports 3 and 4
- LAN, USB 2.0 ports 1 and 2
- ROG Connect switch
- ROG Connect port
- USB 3.0 ports 1 and 2
- Audio ports
USB 3.0 Support

An NEC controller controls two USB 3.0 ports accessible from the I/O panel at the rear of the motherboard. NEC rates the data transfer speed of up to 5 Gb/s – more than ten times faster than USB 2.0’s peak. The NEC chip is visible at the upper right hand corner in the picture above, while the two USB 3.0 ports are in the lower left.
SATA 6 Gb/s Support

Probelt (That’s Probe-It, not Pro-belt)

For users who a common area to take voltage measurements on the motherboard, ASUS set aside an area on the motherboard for just that. This area is located parallel to the EATXPWR connector. Though the concept of a dedicated area for voltage measurement is a good one, the placement could be better, especially since once the motherboard is installed in a case, the power cables would most likely obstruct measurement probes.
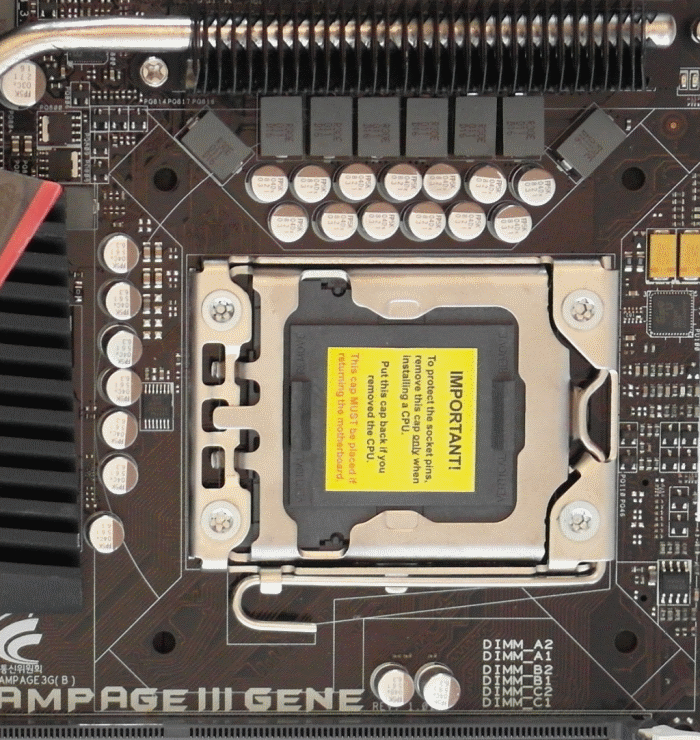
The area around the CPU socket is void of any tall components. This allows for many choices in aftermarket CPU cooling.

Click to enlarge
Looking at the circuit board headers, from left to right and again from top to bottom:
- Seemingly undocumented debug connector
- Audio connector for the front panel of the case
- S/PDIF out audio connector
- 1394a Firewire connector
- PWR fan connector
- CHA fan connector
- USB 7/8 connector
- USB 9/10 connector
- QPI LL switch
- Clear RTC RAM switch
- System panel connector
BIOS
The Rampage III Gene’s BIOS has all the standard features that come with a motherboard’s BIOS, such as the frequency and voltage controllers. It also allows users to control several special features that are built in with this board, such as ROG Connect and Drive Xpert. This BIOS is good for users who want to overclock, underclock, or change hardware settings of their system.


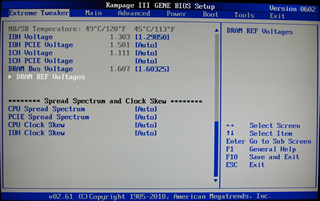
Extreme Tweaker Tab
The Extreme Tweaker tab allows users to control their overclocking settings. The tab has settings for the BCLK Frequency, PCI-E Frequency, DRAM Frequency, and more. It also allows users to control all the voltages, including CPU Voltage, CPU PLL Voltage, QPI/DRAM Voltage, IOH Voltage, and CPU Load-Line Calibration control. This is where users can change essential values for the motherboard.

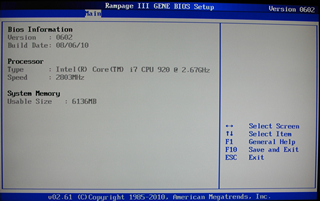
Main Settings Tab
The Main Settings tab allows users to change basic information such as time, date, the order of SATA hard drives, and obtain information about the BIOS and system hardware.
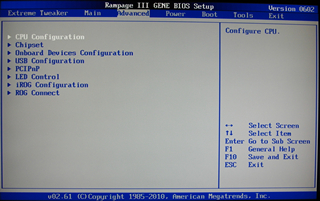


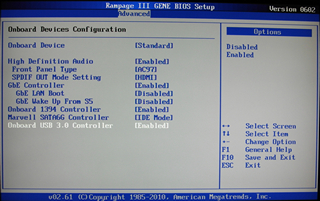

Advanced Settings Tab
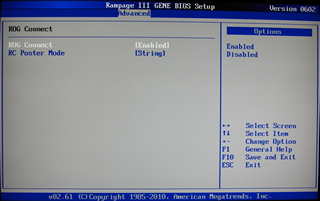
The Advanced tab is where users can adjust advanced settings for their system, such as the CPU Ratio, onboard devices for the motherboard, SATA, USB 2.0, and USB 3.0 controllers, Ethernet controller, and Legacy USB support. This is also where users can enable or disable the ROG Connect feature of the Rampage III Gene. This feature allows users to link two computers together to monitor and control overclocking from the second computer via real-time POST readouts and controls.


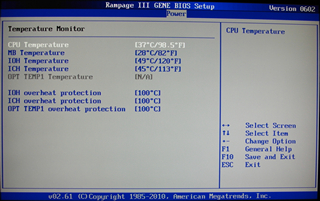
Power Settings Tab
The Power tab once again allows users to monitor power settings on their PC, such as the CPU Voltage, CPU PLL Voltage, QPI/DRAM Voltage, and IOH and Bus voltages. It also allows for Temperature monitoring while overclocking. This is an excellent feature in the BIOS, as it allows users to keep a close eye on their temperature systems while changing voltages and power settings. This helps prevent the danger of overheating the computer due to inattention to temperatures on the motherboard.
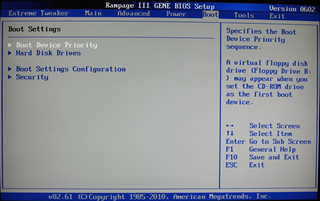
Boot Settings Tab
The Boot tab controls the basic boot settings for the computer, including the boot priority of the hard drives, and which devices are bootable. It also controls security settings such as the boot passwords.


Tools Tab
The Tools tab allows users to select preset overclocking profiles and control features such as Drive Xpert and the Frequency Controller.

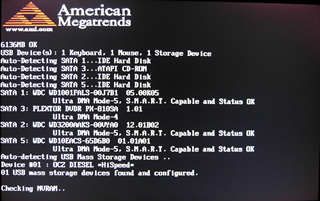
Exit Tab and POST Screen
The Exit tab and POST screen. The POST screen shows boot information as the computer is first starting up. Users running the ROG Connect feature can view real-time readouts from the POST screen on the second computer.
TESTing AND METHODOLOGY
We’ve expanded our testing suite considerably for the X58 chipset, and will continue to use the same methods for most of the motherboards and CPU’s we test. In the interests of thoroughness and accurate results, we run each test at least three times, and some tests more than that. We average the total of all the tests from each benchmark then report the average here.
The OS we use is Windows 7 Pro 64bit with all patches and updates applied. We also use the latest drivers available for the motherboard and any devices attached to the computer. We do not disable background tasks or tweak the OS or system in any way. We turn off drive indexing and daily defragging. We also turn off Prefetch and Superfetch. This is not an attempt to produce bigger benchmark numbers. Drive indexing and defragging can interfere with testing and produce confusing numbers. If a test were to be run while a drive was being indexed or defragged, and then the same test was later run when these processes were off, the two results would be contradictory and erroneous. As we cannot control when defragging and indexing occur precisely enough to guarantee that they won’t interfere with testing, we opt to disable the features entirely.
Prefetch tries to predict what users will load the next time they boot the machine by caching the relevant files and storing them for later use. We want to learn how the program runs without any of the files being cached, and we disable it so that each test run we do not have to clear pre-fetch to get accurate numbers. Lastly we disable Superfetch. Superfetch loads often-used programs into the memory. It is one of the reasons that Windows Vista occupies so much memory. Vista fills the memory in an attempt to predict what users will load. Having one test run with files cached, and another test run with the files un-cached would result in inaccurate numbers. Again, since we can’t control its timings so precisely, it we turn it off. Because these four features can potentially interfere with benchmarking, and and are out of our control, we disable them. We do not disable anything else.
| Test Rig | |
| Case | Cooler Master HAF X |
| CPU |
Intel Core i7 920 @ 2.66GHz |
| Motherboard |
ASUS Rampage III Gene – LGA1366 ASUS Rampage II Gene – LGA1366 |
| Ram | G.Skill DDR3-1600 (8-8-8-12 1.60v) 6GB Kit |
| CPU Cooler | Scythe MUGEN-2 SCMG-2000 |
| Hard Drives |
2x Western Digital Caviar Black 1TB 7200RPM 3Gb/s |
| Optical | Plextor PX-810SA DVD-Burner |
| GPU |
EVGA GTX460 EE 1GB Video Card |
| Case Fans |
Stock |
| Additional Cards | None |
| PSU |
BFG 650W Power Supply |
| Mouse | Logitech G500 |
| Keyboard | Saitek Eclipse II |
Test Suite
We will use the following applications to test the performance of the motherboard.
| Benchmarks |
|---|
| Everest Ultimate Edition |
| Cinebench 64-bit |
| SiSoft SANDRA 2010 |
| POVRay |
| HD Tach |
| 3DMark Vantage |
| Stone Giant |
Please note that this reviewer did not currently have any USB 3.0 devices at hand and the omission of any test results for that interface was not in error.
EVEREST ULTIMATE

“EVEREST Ultimate Edition is an industry leading system diagnostics and benchmarking solution for enthusiasts PC users, based on the award-winning EVEREST Technology. During system optimizations and tweaking it provides essential system and overclock information, advanced hardware monitoring and diagnostics capabilities to check the effects of the applied settings. CPU, FPU and memory benchmarks are available to measure the actual system performance and compare it to previous states or other systems. Furthermore, complete software, operating system and security information makes EVEREST Ultimate Edition a comprehensive system diagnostics tool that offers a total of 100 pages of information about your PC.”
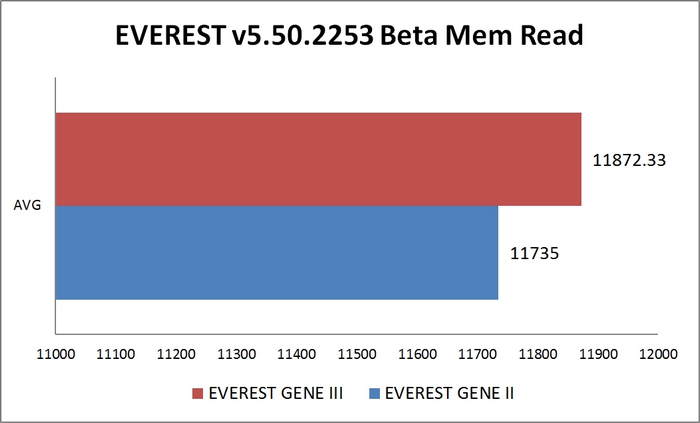
This benchmark measures the maximum achiveable memory read bandwidth. The code behind this benchmark method is written in Assembly and it is extremely optimized for every popular AMD and Intel processor core variants by utilizing the appropriate x86, MMX, 3DNow!, SSE, SSE2 or SSE4.1 instruction set extension. The benchmark reads a 16 MB sized, 1 MB aligned data buffer from system memory into the CPU. Memory is read in forward direction, continuously without breaks.
In order to avoid concurrent threads competing over system memory bandwidth, Memory Read benchmark utilizes only one processor core and one thread.
As we see in this and the following charts, both the Rampage III Gene and Rampage II Gene are quite similar, and often trade places, nudging each other from the top spot from one test to another. Here, the Gene III has a slight lead in memory reads.
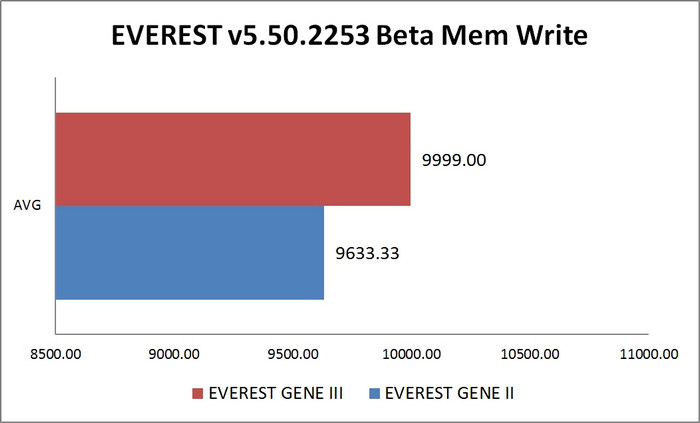
This benchmark measures the maximum achiveable memory write bandwidth. The code behind this benchmark method is written in Assembly and it is extremely optimized for every popular AMD and Intel processor core variants by utilizing the appropriate x86, MMX, 3DNow!, SSE or SSE2 instruction set extension. The benchmark writes a 16 MB sized, 1 MB aligned data buffer from the CPU into the system memory. Memory is written in forward direction, continuously without breaks.
In order to avoid concurrent threads competing over system memory bandwidth, Memory Write benchmark utilizes only one processor core and one thread.
Again, the Gene III beats out last year’s Gene II. Perhaps some additional optimizations were made to the BIOS code.
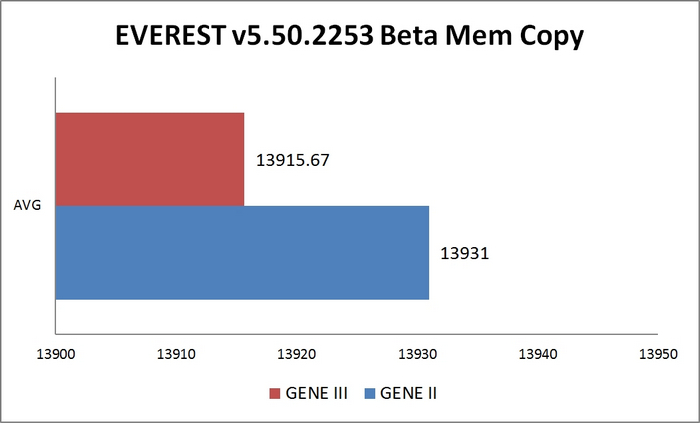
This benchmark measures the maximum achiveable memory copy speed. The code behind this benchmark method is written in Assembly and it is extremely optimized for every popular AMD and Intel processor core variants by utilizing the appropriate x86, MMX, 3DNow!, SSE, SSE2 or SSE4.1 instruction set extension. The benchmark copies a 8 MB sized, 1 MB aligned data buffer into another 8 MB sized, 1 MB aligned data buffer through the CPU. Memory is copied in forward direction, continuously without breaks.
In order to avoid concurrent threads competing over system memory bandwidth, Memory Copy benchmark utilizes only one processor core and one thread.
Although a quick look at the above chart might lead readers to think the Gene II mopped the floor in this test, the results were actually very close, a mere 15 point difference. The difference in the chart is due to the strange scaling mechanism of the charting program.
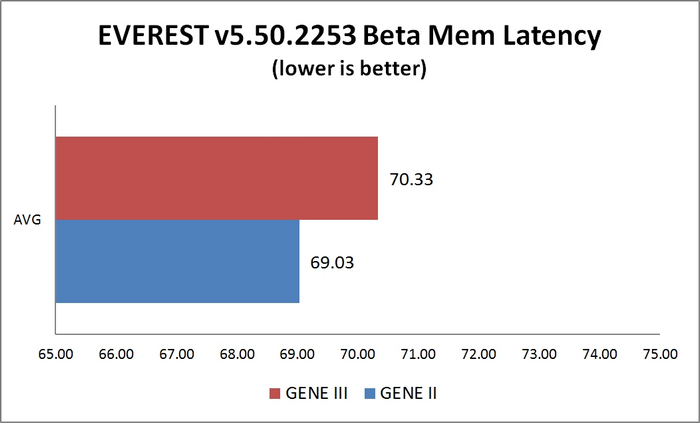
This benchmark measures the typical delay when the CPU reads data from system memory. Memory latency time means the penalty measured from the issuing of the read command until the data arrives to the integer registers of the CPU. The code behind this benchmark method is written in Assembly, and uses 1 MB alignment, 1024-byte stride size. Memory is accessed in forward direction.
Memory Latency benchmark test uses only the basic x86 instructions and utilizes only one processor core and one thread.
Once again, the boards are neck and neck in the memory latency test.
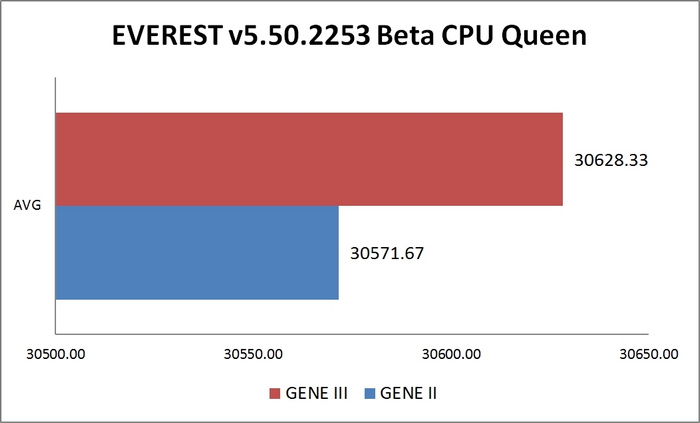
This simple integer benchmark focuses on the branch prediction capabilities and the misprediction penalties of the CPU. It finds the solutions for the classic “Queens problem” on a 10 by 10 sized chessboard (http://mathworld.wolfram.com/QueensProblem.html).
This integer benchmark peforms different common tasks used during digital photo processing.
It performs the following tasks on a very large RGB image:
· Fill
· Flip
· Rotate90R (rotate 90 degrees CW)
· Rotate90L (rotate 90 degrees CCW)
· Random (fill the image with random coloured pixels)
· RGB2BW (colour to black & white conversion)
· Difference
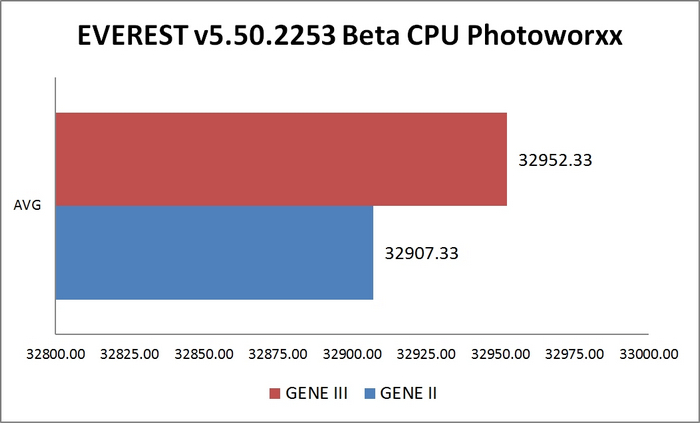
· CropThis benchmark stresses the integer arithmetic and multiplication execution units of the CPU and also the memory subsystem. Due to the fact that this test performs high memory read/write traffic, it cannot effectively scale in situations where more than 2 processing threads used. For example, on a 8-way Pentium III Xeon system the 8 processing threads will be “fighting” over the memory, creating a serious bottleneck that would lead to as low scores as a 2-way or 4-way similar processor based system could achieve.
CPU PhotoWorxx test uses only the basic x86 instructions, and it is HyperThreading, multi-processor (SMP) and multi-core (CMP) aware.
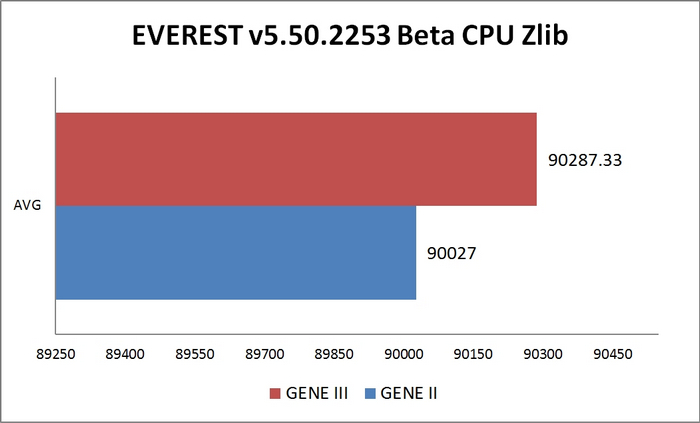
This integer benchmark measures combined CPU and memory subsystem performance through the public ZLib compression library Version 1.2.5 (http://www.zlib.net).
CPU ZLib test uses only the basic x86 instructions, and it is HyperThreading, multi-processor (SMP) and multi-core (CMP) aware.
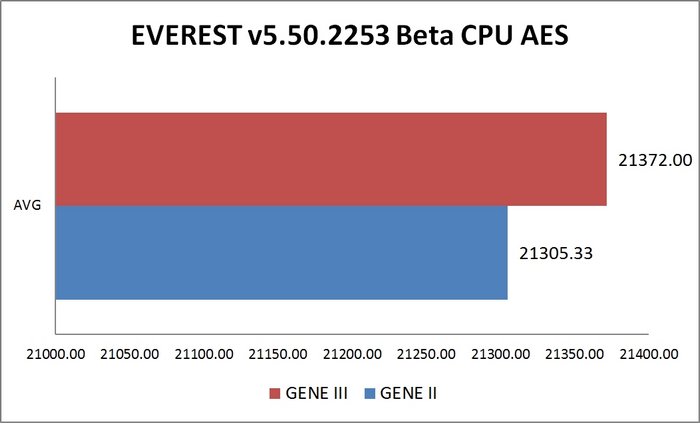
This integer benchmark measures CPU performance using AES (a.k.a. Rijndael) data encryption. It utilizes Vincent Rijmen, Antoon Bosselaers and Paulo Barreto’s public domain C code in ECB mode.
CPU AES test uses only the basic x86 instructions, and it’s hardware accelerated on VIA PadLock Security Engine capable VIA C3, VIA C7 and VIA Nano processors; and on Intel AES-NI instruction set extension capable processors. The test consumes 48 MB memory, and it is HyperThreading, multi-processor (SMP) and multi-core (CMP) aware.
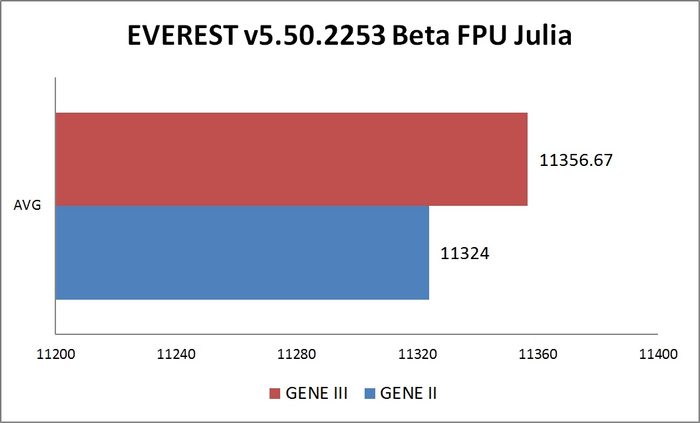
This benchmark measures the single precision (also known as 32-bit) floating-point performance through the computation of several frames of the popular “Julia” fractal. The code behind this benchmark method is written in Assembly, and it is extremely optimized for every popular AMD, Intel and VIA processor core variants by utilizing the appropriate x87, 3DNow!, 3DNow!+ or SSE instruction set extension.
FPU Julia test consumes 4 MB system memory per calculation thread, and it is HyperThreading, multi-processor (SMP) and multi-core (CMP) aware.
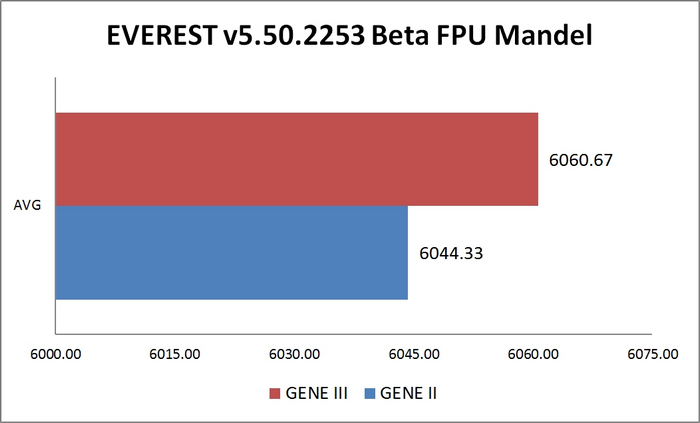
This benchmark measures the double precision (also known as 64-bit) floating-point performance through the computation of several frames of the popular “Mandelbrot” fractal. The code behind this benchmark method is written in Assembly, and it is extremely optimized for every popular AMD, Intel and VIA processor core variants by utilizing the appropriate x87 or SSE2 instruction set extension.
FPU Mandel test consumes 4 MB system memory per calculation thread, and it is HyperThreading, multi-processor (SMP) and multi-core (CMP) aware.
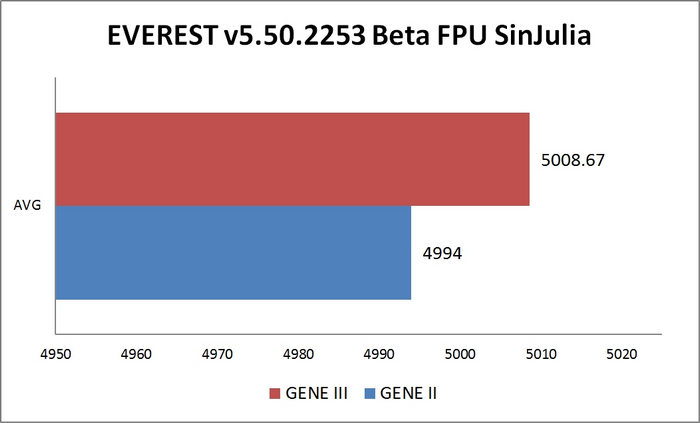
This benchmark measures the extended precision (also known as 80-bit) floating-point performance through the computation of a single frame of a modified “Julia” fractal. The code behind this benchmark method is written in Assembly, and it is extremely optimized for every popular AMD, Intel and VIA processor core variants by utilizing trigonometric and exponential x87 instructions.
FPU SinJulia test consumes 256 KB system memory per calculation thread, and it is HyperThreading, multi-processor (SMP) and multi-core (CMP) aware.
The CPU and FPU tests above all show the Gene III with a slight lead above the Gene II. Both these boards are excellent performers, and the close results showcase that. Each test was run three times on each motherboard.
CINEBENCH X64

“CINEBENCH is a real-world test suite that assesses your computer’s performance capabilities. MAXON CINEBENCH is based on MAXON’s award-winning animation software, CINEMA 4D, which is used extensively by studios and production houses worldwide for 3D content creation. MAXON software has been used in blockbuster movies such as Spider-Man, Star Wars, The Chronicles of Narnia and many more. MAXON CINEBENCH runs several tests on your computer to measure the performance of the main processor and the graphics card under real world circumstances. The benchmark application makes use of up to 16 CPUs or CPU cores and is available for Windows (32-bit and 64-Bit) and Macintosh (PPC and Intel-based). The resulting values among different operating systems are 100% comparable and therefore very useful with regard to purchasing decision-making. It can also be used as a marketing tool for hardware vendors or simply to compare hardware among colleagues or friends.”
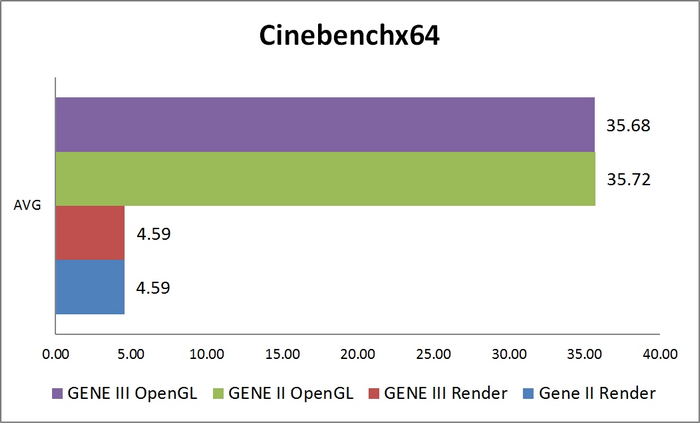
There is no real difference between these results, and really there shouldn’t be as both boards are so similar.
SISOFT SANDRA 2010
“SiSoftware Sandra (the System Analyser, Diagnostic and Reporting Assistant) is an information & diagnostic utility. It should provide most of the information (including undocumented) you need to know about your hardware, software and other devices whether hardware or software. It works along the lines of other Windows utilities, however it tries to go beyond them and show you more of what’s really going on. Giving the user the ability to draw comparisons at both a high and low-level. You can get information about the CPU, chipset, video adapter, ports, printers, sound card, memory, network, Windows internals, AGP, PCI, PCI-X, PCIe (PCI Express), database, USB, USB2, 1394/Firewire, etc.”
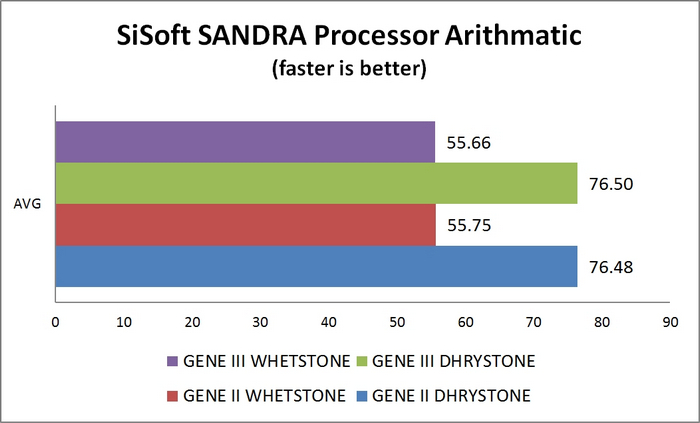
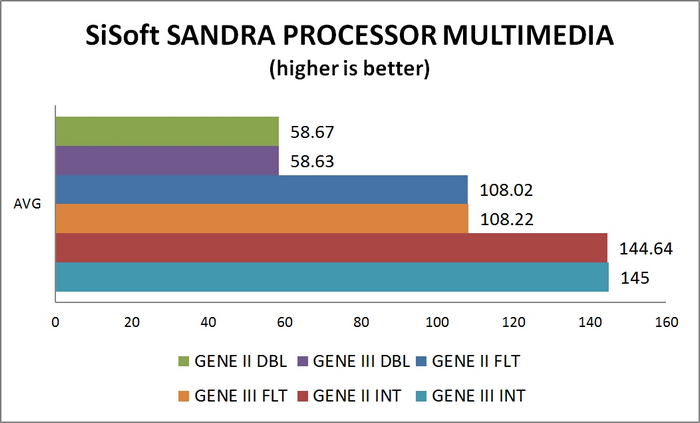
Once again, the tests show that the two boards are closely matched in terms of performance.
HD TACH
HD TACH performs sequential read and write tests on removable media and fixed disks. HD Tach is also capable of performing the sequential read and write tests on the entire disk instead of the small number of zones in the quick and long test. We opted to use the Short 8 (MB) and Long 32 (MB) tests in the sequential read mode only.
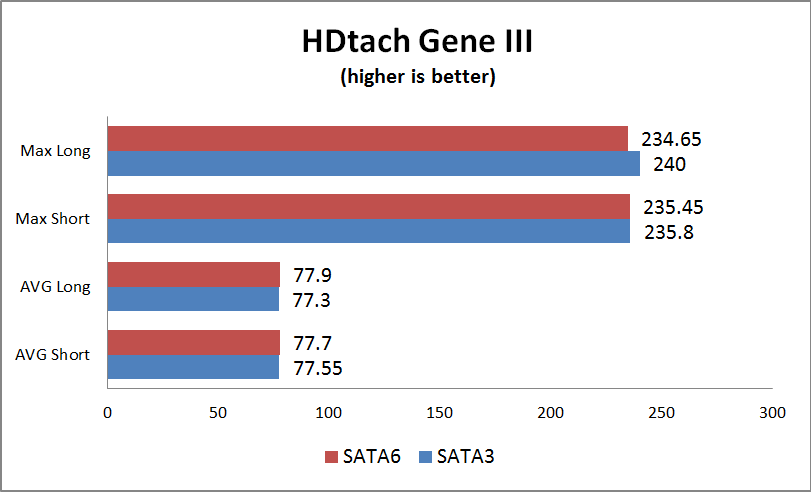
An underperforming hard drive doesn’t stress either the SATA6 or SATA3 controllers. As can be seen in the above chart, both the Quick bench (8MB) and the Long bench (32MB) tests are neck and neck respectively.
3DMark Vantage

For complete information on 3DMark Vantage Please follow this Link:
www.futuremark.com/benchmarks/3dmarkvantage/features/
The newest video benchmark from the gang at Futuremark. This utility is still a synthetic benchmark, but one that more closely reflects real world gaming performance. While it is not a perfect replacement for actual game benchmarks, it has its uses. We tested our cards at the ‘Performance’ setting.
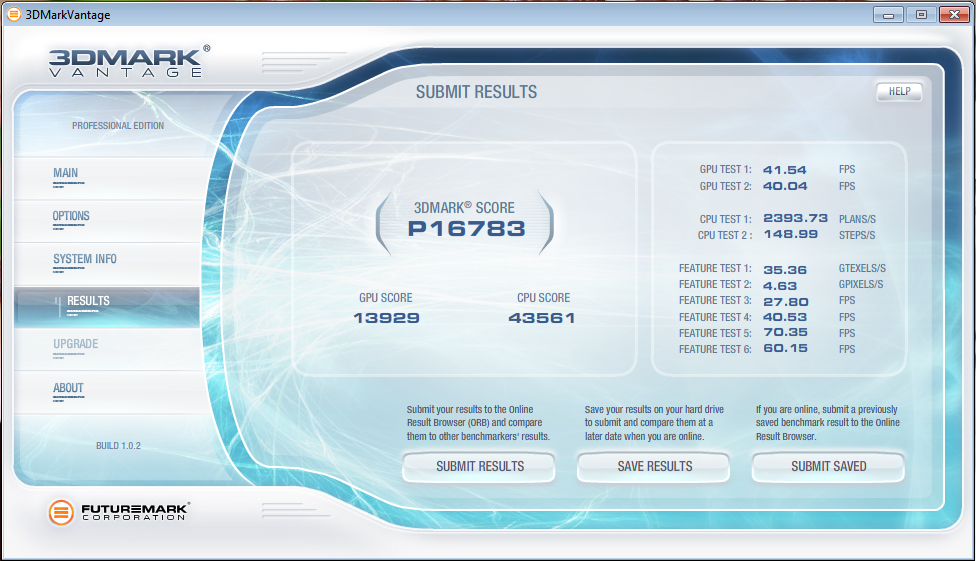
Above are the results of the Gene III and a Core i7 920 running at their default clock speeds of 2.66GHz (20 x 133MHz).
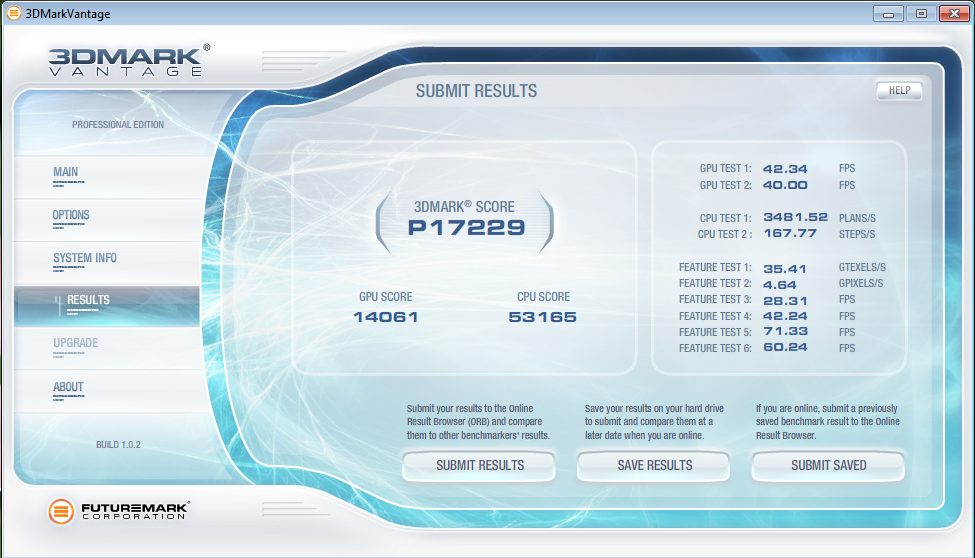
With a little bit of a push, the above results are with the Gene III and the Core i7 920 running at 3.99GHz (21 x 190MHz). The video card is still running at stock clocks, and we are using air to cool the CPU.
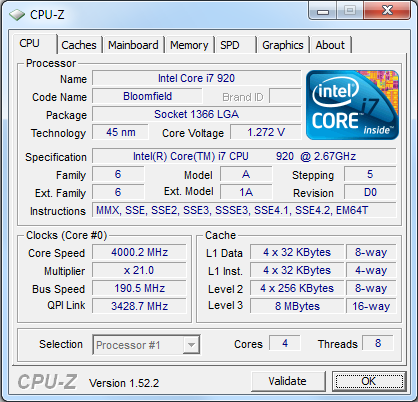
CPU-Z screenshot of the OC’ed 3DMark Vantage run
PovRay

The Persistence of Vision Ray-Tracer was developed from DKBTrace 2.12 (written by David K. Buck and Aaron A. Collins) by a bunch of people (called the POV-Team) in their spare time. It is a high-quality, totally free tool for creating stunning three-dimensional graphics. It is available in official versions for Windows, Mac OS/Mac OS X and i86 Linux. The POV-Ray package includes detailed instructions on using the ray-tracer and creating scenes. Many stunning scenes are included with POV-Ray so you can start creating images immediately when you get the package. These scenes can be modified so you do not have to start from scratch. In addition to the pre-defined scenes, a large library of pre-defined shapes and materials is provided. You can include these shapes and materials in your own scenes by just including the library file name at the top of your scene file, and by using the shape or material name in your scene. Since this is free software feel free to download this version and try it out on your own.
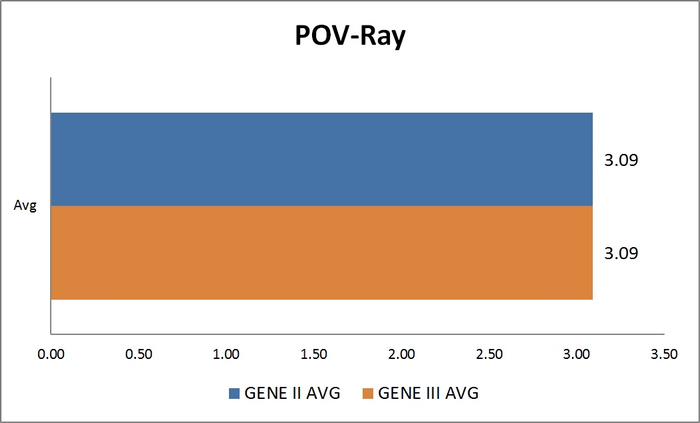
The averages for the Gene II and Gene III are the same, which is unsurprising, considering the close performance of both boards.
STONE GIANT

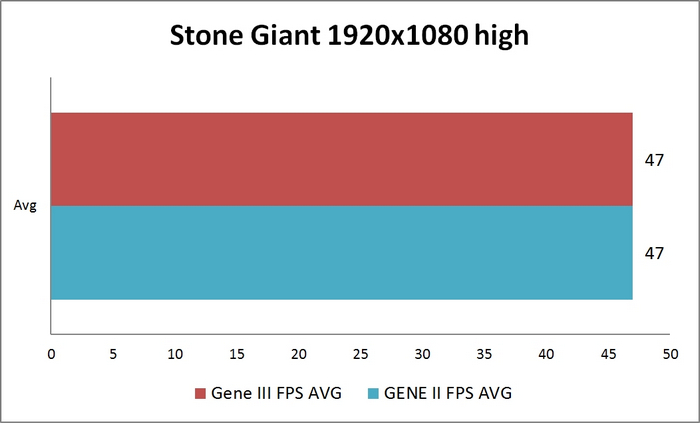
This DX11 benchmark shows the Nvidia graphics card operating the same in either board, with identical drivers.
Power Consumption
Using a Kill A Watt P4460 to track power usage, the system was monitored under stock and OC conditions at both idle and load. We used OCCT to load the system.
| Load | Idle | |
|---|---|---|
| Stock (2.66GHz) |
247W |
164W |
| OC (4GHz) |
374W |
205W |
The Rampage III Gene consumes 164W idle and 247W load. With overclocking the CPU to 4GHz, we get a hefty increase in the power consumption of 205W idle and 374W load, that’s 127W more under load.
Temperatures
We used the ASUS ROG Connect application to remotely monitor the system temperatures under both idle and load conditions. A summary table can be found at the bottom of this page. The temperature of the room was 20°C (68°F) throught the test.

Running at 2.66 Ghz., the above shows an idle IOH peak temperature of 43°C

When the motherboard was loaded at stock speeds, the IOH temperature increased by 1°C

With the system now overclocked to 4GHz (190.5×21) but idling, the IOH remains at 43°C

Here the system is put under load and the IOH temperature reads at 51°C
| Load | Idle | |
|---|---|---|
| Stock (2.66GHz) |
44 |
43 |
| OC (4GHz) |
51 |
43 |
The good news is that the more aggressive heatsink on the board seems to do the job well at keeping the chipset running cool. As we can see, even under our overclocked setting, the board’s temperature only goes up to 51°C.
Conclusion
The original Rampage II Gene was a good micro-ATX board for those looking to build a compact system. Rather than make significant changes to the already successful product, ASUS has simply updated technology with the inclusion of the SATA 6 GB/s and USB 3.0 to create the Rampage III Gene. While it is fairly easy to upgrade older boards with the ASUS U3S6 USB3 & SATA6 add-on card, we prefer to have these slots available for other add-on cards such as dedicated sound cards, since micro-ATX board has a limited number of expansion slots. Thus, we are glad to see that ASUS updated their board with these new technologies and left expansion slots open.
In addition, the Rampage III Gene is also overclock friendly. The included power on/off switch and reset button are something that overclockers would appreciate. The voltage contact points are also handy for the extreme overclocker. Finally, the ROG Connect feature is excellent for those who wishes to monitor their system from another computer.
Overall, this is a very stable board. It functions well and offers loads of opportunity for overclocking. The AI Suite II is a very handy set of applications for those who want to tweak their systems. By this date, the absence of a PATA interface is unlikely to pose a problem, but needs to be mentioned on the odd chance that some people may still require it.
| OUR VERDICT: ASUS Rampage III Gene Motherboard | ||||||||||||||||||||||||||||||||
|
||||||||||||||||||||||||||||||||
| Summary: The ASUS Rampage III Gene lives up to its reputation and is a full featured board in a small size. With the inclusion of the newer versions of SATA6 and USB3.0, it takes the Gene platform and makes it one better. Like its predecessor, the Rampage III Gene receives the Bjorn3D Golden Bear Award. |


