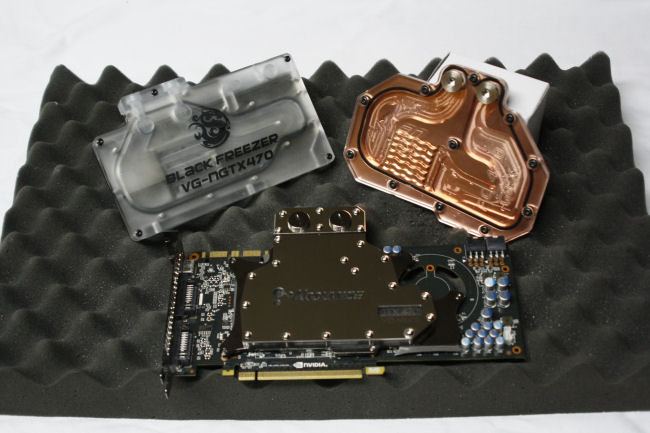
Since we all know the 470GTX runs hot, lets see how things cool down once we throw on some water blocks.
Introduction
When Nvidia introduced the 4xx series of video cards we were all amazed at the power these video cards had. At the same time, we were all shocked at the temperatures these video cards reached to give us that level of performance.
I am not going to lie to you, I also freaked out when I saw the temperatures of my 470GTX reach above the 75°C mark. Even with the fan of this video card running at full speed, and having an 80CFM 120mm fan blowing directly down across the video card, my temperatures were still reaching the 80°C range. This video card quickly became known around here as “Nvidia 470GTX video card, the only way to heat your house.”
Since I absolutely loved this video card’s performance, and its abilities that it was offering me, I did not quite want to give up on it just yet. Since I am a big fan of water cooling, I decided it would be the best choice to grab a few water blocks and then see how this video card cools down.
Now similar to the Battle of the Titan Water Block review I performed earlier (Review can be found HERE), I will be sticking with a rather tight and strict set of rules. One of these rules I will put into play is the Nvidia 470GTX water block will have a no greater than a 70°C temperature limitation. If any water block reached beyond this point this will be considered a failure. Mounting; each manufacturer of water blocks does things a bit different from one another, I feel mounting should be simple and effective. It defeats the point of going to water blocks if it takes us longer to install the water block than it did to tear apart the 470GTX stock air heatsink. Finally I am going to measure the flow rate of each water block tested here today. Unlike the Battle of the Titan Water Blocks I did, I will be grading these water blocks flow rates. Mainly because a lot of different people run their video cards water blocks in series or daisy chained.
Enough chit chatting, let’s get on with this review already.
Testing Methodology
|
Test Setup &Testing Methodology “Mini Me” |
|
| CPU | Intel Core i7 930 D0 |
| Motherboard | ASUS Rampage II Extreme |
| Case | Open Chassis |
| Memory | Crucial 1600 @ 1720MHz |
| Video Card | PNY 470GTX |
| Hard Drives | 4x Seagate 320Gig 2.5″ Momentus HDD’s RAID-0, WD 1TB green drive Backup |
| CDRom Drive | Lite On Blue Ray |
| Power Supply | SilverStone 1200 Watt Zeus |
| CPU Speeds Used | 4.08 GHz |
| Operating System Used | Microsoft Windows 7 |
| Video Card Cooler |
Many different ones, with a Swiftech Tri 120mm Rad. |
| CPU Cooler |
EK Supreme HF CPU with a XSPC Quad 120mm Rad |
For testing purposes only, and since I like to keep my testing methodology as evenly as possible, I will be putting a GPU temperature limitation of 70°C on the PNY 470GTX video card (review can be found HERE). I will be using a separate water cooling loop just for the video card. I will also be using the same exact thermal paste on each video card water block tested. The thermal paste I chose for this task is Noctua’s NT-H1 thermal compound.
I will be putting each water block manufacturers on their own separate page(s); this will include Packaging, Overview, and Installation. I feel this is a fair way to show you how each manufacturer designs their specific water block for this video card. I will have a separate page for disassembly of the 470GTX video card, in case you may need some guidance in this area. I should mention I am using a dual loop shared reservoir as my water cooling set up, My CPU will be using a EK Supreme HF water block with a XSPC Quad 120mm radiator, the GPU water blocks will be paired up with the Swiftech Tri 120mm radiator. This particular set up I used will ensure that both my CPU and GPU(s) get the best possible lowest temperature.
I will be grading each water block tested here today on three key characteristics, these three characteristics are, Installation, Flow rate, and finally Temperature. I will do my best to sum these three scores into one overall score.
I allowed each water block tested here to settle in for 24 hours prior to their official runs. During this settling in time, I ran one of the most grueling benchmarks I can possibly think of. That program I used for my settling in time was none other than Fur Mark. Since Fur Mark is a bit unrealistic in temperatures, I will be running various games/benchmarks, for 1 hour to get my full load temperatures, and allowed each water block to idle for 30 minutes to get my idle temperatures, during the official runs. Ambient temperature of the “Dungeon”, is hovering around the 20°C range +/- a degree.
PNY 470GTX Tear Down

Before we jump right into doing our water block round up, we need to completely disassemble the PNY 470GTX video card. This is what the PNY 470GTX video card looks like prior to me ripping this video card apart.
 |
 |

Now we need to flip the 470GTX over so we can remove all of the screws on the backside of the video card. All screws will have to be removed. There should be 16 screws that need to be removed.

Now you will only see 10 screws here, just make sure you remove all 16 screws on the backside. If you look closely you will see some blue like material on the threads of the screws; that is thread lock. These are not only tight, Nvidia/PNY used thread lock on them to ensure they don’t come out easily. BE CAREFUL.

This is where #16 screw is hiding at. It is helping holding on the bottom portion of the cowling on. Remove this screw as well.
 |
 |
 |
 |
And if you thought, that the back 16 screws were all that were holding the heatsink on, you thought wrong. There are 2 more on the rear IO port that has to be removed as well. Again these also will have thread lock on these screws. Nvidia/PNY went ape on the thread lock.

If you removed all of the screws, you can now try and see if you can “CAREFULLY” separate the heatsink from the PCB of the video card. This particular video card did not want to be separated. Well that be asking too much to have something go easy for us on the first time.
 |
 |

If your video card is being stubborn like mine; then proceed ahead. We need to remove the cowling that Nvidia/PNY uses for the 470GTX video card. It is not hard to remove the cowling, I used a Phillips screw driver and inserted it through the little square cut outs on around the cowling then lifted the upper cowling up.

You should have this. That is one itty bitty heatsink. Look at the cute little fan, aww, isn’t it so cute.

We have to remove these four screws that secure the heatsink directly onto the lower half of the cowling. These do not come out completely. You are going to have to use your best judgment to determine if these are fully out. Now you can try and see if the heatsink can be removed, if so skip these next few pictures. If the heatsink is still being stubborn continue.
 |
 |

Now my 470GTX just did not want to come apart easily. It was fighting me the entire time. DO THESE NEXT FEW STEPS at YOUR OWN RISK. If you slip you can possibly damage your 350USD video card; I had to place a small flat blade screw driver just underneath the heatsink and pry it up.

This is what the 470GTX looks like semi naked. Nvidia/PNY uses a lot of thermal paste on the GPU core, and that is the reason why the heatsink does not come right off easily. Now try and remove the lower cowling up off the PCB of the video card. It should easily lift itself off.
 |
 |
Since my hands are now shaking and getting sweaty, I could not properly grip the video card. I needed to use a bit of assistance in helping me remove the final piece on the 470GTX video card. I carefully pried the lower cowling off the PCB.

A close up image of the GPU core of the 470GTX video card.

Nvidia/PNY uses a Direct Touch Heat Pipe heatsink to help keep this video card cool.
These next GPU water blocks are in no particular order, I just randomly picked each manufacturers water block.
Bitspower 470GTX Part 1
Packaging

Starting off on our 470GTX water block Mayhem, we are going to start with the Bitspower 470GTX water block first. Bitspower chooses to keep their packaging simple and effective. When I first received this water block it appeared the contents were wanting to burst out of the box that contained them.

Like normal, Bitspower does a good job on making sure that this water block will not get harmed during shipping.

A quick glance on how Bitspower packaged their water block.

The contents laid out. We get a 470GTX water block, two 90° barb adapters, a tube of thermal paste, screw in studs with nuts (these are stainless steel), a small Ziploc bag with an extra rubber O-ring with four springs and 6 neoprene washers; forgot to mention the memory/GPU power mosfets thermal pad.

Here is a closer look at the mounting hardware.
Overview

Bitspower includes a protective film cover over the top of their 470GTX water block. This needs to be removed prior to the installation of this water block.

Looking at the base of this water block, Bitspower nickel plates their water blocks to ensure corrosion is kept at a minimal.

Doing a quick reflection test, as we can see the base of the water block is a perfect mirror.

I went ahead and removed the Lexan top of this water block too see how Bitspower designed the working internals. The channels do appear to be large enough to accommodate a good flow rate.

But where the barbs get screwed into this water block have a bit of restriction. I like to use 1/2” barbs to keep my flow at its highest; this will restrict my pump a bit.

Bitspower uses this same design on the 5870 water block. Simple design, not exactly what I was expecting to see but the only way to truly tell, is to hook it up, and see how it performs.
Up next is installation of the Bitspower 470GTX water block. I will be including another water cooling tip we can use to help keep our barbs sealed.
Bitspower 470GTX Part 2
Installation

Before I go right into my water block installation, I like to ensure my barbs are on the water block and sealed properly. I am going to put thread tape (Teflon Tape, or better known as Plumbers Tape) on a small threaded barb, an Enzotech short 1/2” barb.
 |
 |
Now we need to remove the rubber O-ring on the barb before I can start using the thread tape.
 |
 |
Now this where things can be difficult, we need to start the thread tape up on the main shaft of the barb itself. Notice that the head of the barb is in my left hand? When you are using thread tape you have to wrap the tape with the threads, this ensures a tight leak proof seal. If you go against the threads of the barb the thread tape balls up on the outer portion of the barb and will not seal properly.

Wrap the thread tape about 4-5 turns over the threads of the barbs. Then cut off the thread tape after you achieved the 4-5 wraps. This is what you should have right now. Do not freak out just yet, the next few steps will show you how to remove the excess thread tape.
 |
 |
 |
 |
 |
 |
 |
 |

These next few steps are how you can remove the excess thread tape from the barb. You will need a wooden block (or something similar will work too). Take that small block of wood and tap the outer edges of the barb’s threads, till you essentially cut the center of the thread tape off. This is will take some practice to get right, so take your time. After you cut the thread tape off of the end of the barb itself we need to install the rubber O-ring. Install the rubber O-ring back onto the barb, then take your small wooden black and remove the excess thread tape off of the main shaft of the barb itself. Again perfect practice makes perfect, so take your time. It took me a few times to get it right myself.
 |
 |
Then when you are completed go ahead and thread the barb directly into the water block. If you look at the barbs thread, you will see that it is cutting into the water blocks barbs threading. This is what you want to have. If you did not do this step properly the thread tape will ball up at the outer barb end and not seal.
 |
 |
 |
 |
Time for us to get back to the Bitspower water block installation onto the 470GTX video card. Locate the stainless steel screw in studs and the nut and the neoprene washers. Screw the studs in (short side into the block first; then use a small pair of pliers to tighten these into the block.

This next step will require you to take the mosfets/memory pads to be cut to fit the memory and mosfets of the video card. After you get all of the pads onto the water block you should have this.

Like all my water block/air cooler installs I like to do several test fits to ensure a good contact of the cooler to GPU/CPU fit. I will be using the 5 dot pattern on my GPU IHS, I will add more thermal paste if it is needed. But for a test fit this will work.

Installation is pretty straight forward, line up the studs to the video cards holes.

So far everything is looking good.

It appears the water block does make good contact to the GPU IHS. Just as I suspected, I will need to add more thermal paste.
 |
 |
I added the extra thermal paste to get a better coverage over the GPU IHS. This looks so much better than my five dot pattern.

How the Bitspower 470GTX water block looks installed.
EK 470GTX Part 1
Packaging
 |
 |
EK packages up their water block quite colorful. EK also lets us know that this water block is for the 470GTX video card only.

Upon opening the inner box that EK uses, we can see they used a similar design as they did with their Supreme HF CPU water block. This will ensure that your investment stays safe during shipping.

EK also wraps a piece of foam rubber round the entire water block as well to help protect it and to keep it from shifting during transporting.

What we get as far as mounting hardware. Hmm, this is going to be an interesting mounting. We get ten black washers, ten 3/8” long mounting screws, four 1/4″ long retention plate screws; a couple of spacers for them long threaded barbs, two caps, an Allen wrench, a retention plate with isolator, and finally memory/mosfets thermal pads.
Overview

EK includes some rather unique spacers for those water block users that have long threaded barbs. This will ensure we can use those barbs and still get a good seal while using them.

I felt there was no need to rip apart the EK 470GTX water block, because we can already see through the top. The channels are large enough to handle a large flow from our pumps, and the fin array appears to be spaced apart from one another and designed to give us some decent temperatures on our 470GTX video card.

Giving quick glance of the base of the EK 470GTX water block, before we continue on with the review.

Here is our reflection test result, the base of the EK water block is not as polished as I was hoping for. We can make out the Allen wrench in the base, but it is a bit hazy.

You will have to use the include barb cap screws to seal off the unused barb ports. This step is pretty self explanatory to accomplish.
EK 470GTX Part 2
Installation

Time for me to rip apart the PNY 470GTX video card once again, in case you have not checked the review for this powerful video card please visit this review done by our Chief Review Editor Mark (Or better known as Chief or slave driver, determined by the mood he is in. Sorry chief I could not resist, LOL) HERE. Then clean it all up for the EK 470GTX water block.

This installation is going to be a rather interesting one, since I do a few test fits with my water blocks, and the instructions require the black washers to be used between the water block and the video card I am going to need to make sure they stay in place. I tried their thermal paste idea, use thermal paste on the washers then place them on the water block, then install the block onto the video card, but after removing the water block they kept slipping out of place. So it is time for me to come up with a more permanent solution. This solution will require exact alignment to the holes of the water block though. I will use some super glue to hold them pesky washers into place.

Grab one black washer like this one.

Then with the superglue, place a small drop on the edge of the washer (very small amount). Then line up the holes of the washer to the water block exactly. If it is off by a little bit may present an issue on installation of the water block. If you feel uncomfortable doing the installation this way; then by all means use the recommended way of installing these washers.

This is the reason for my tweaked installation of these washers, now they will stay in place no matter what I do.

Now do this eight more times, nine total washers. EK included an extra washer in the mix in case we might have lost one, now where did that other washer go.

Time for us to use the retention plate that EK supplied. First up is the isolator washer to be placed onto the video card. Tip: You may want to cut out a small notch on the isolator washer where that small power cap (it has 2R2 written on it) is at located at the lower portion of the video card.

Now locate the retention plate, and place it directly over the isolator washer leaving the GPU core exposed. Make sure you have what I got as far as the placement of the retention plate is concerned.

Then rotate the 470GTX over to its back side up, and then put two screws into the center of the eight crew holes of the video card. (Follow by example).

Now finish up the installation with the last two screws. Again follow by example above.

The retention plate should be secured fully to the video card.
 |
 |

I so wish water block manufacturers would just manufacture the water block to also touch the memory directly as well, instead of using these thermal pads. It adds to the confusion of the installation, and a direct memory water block contact will help the memory out so much more (EK is not the only one that does the thermal pads). Locate the thermal pads, and cut them to fit over the memory and the mosfets of the video card.
 |
 |
 |
 |
Like always do test fits to ensure your water block is properly hitting the video card. As we can see the EK water block does hit all the major components quite well.

What the EK water block looks like fully installed onto the 470GTX video card.

Here’s what the EK470GTX water block looks like fully installed onto “Mini Me”. Okay this definitely was not one of the easiest water block install I have done.
Time for our last 470GTX water block.
Koolance 470GTX Part 1
Packaging

Koolance, like Bitspower decided to keep the packaging simple and effective.

To remove the water block from the packaging we have to open up the side of the box then slide out a foam rubber encasement. There will be a cardboard insert over the water block encasement.

Once we removed the cardboard insert we can get an idea on how Koolance packed the 470GTX water block. The installation manual and the mounting hardware sits right up on top of the water block. Koolance also makes sure that the water block does not get harmed during shipping.

Remove all that mounting hardware we get a quick glance of the 470GTX water block by Koolance.

Hmm, oops the water block caught a reflection of me when I was taking a picture. Damn, now I am going to have to give some serious therapy to my poor camera now. This is what we get with the Koolance 470GTX water block. The water block (well it makes sense that we get that item), two types of thermal pads (Grey and pink), mounting screws with washers, and instruction manuals.
Overview

I went ahead, and tore apart the Koolance 470GTX water block. This is similar to the Bitspower 470GTX water block, where the upper Lexan top contains the water channels and not the base. It appears that Koolance uses the micro fins that they used on their CPU water block the CPU 360. Looks like I am going to have to investigate this a bit farther.
Yep, Koolance does use the same exact micro fins that they used on their CPU 360 water block. These temperature results should be rather impressive.

Koolance also nickel plates their GPU water blocks to ensure corrosion is at a minimal. The base of the water block is a perfect mirror.


Now unlike previous Koolance water blocks, Koolance uses a separate nozzle plate that the barbs will thread into directly, instead of screwing into the Lexan top and possibly cross threading the barb in the water block and ruining the water block.

A quick look at the top of the Koolance Lexan top, the channels do look large enough to accommodate a high flow water block but one area, that area is right where the micros fins will be located. The top makes a rather abrupt stop (this area is hard to see in the picture, but the area I am talking about is the bottom off right center of the top).
Koolance 470GTX Part 2
Installation
 |
 |
 |
 |
 |
 |
Since my last explanation was kind of hard to show you on how to wrap the barbs with thread tape I will use a bit larger barbs to better demonstrate the thread tape wrapping. This is just to give you better representation on wrapping only. To wrap the threads of the threads of the barbs you need to hold the barb in your left hand, and then wrap the threads in a clock wise direction. I normally start wrapping it from the backside of the barb and go that way. I will not be using these barbs for this block during my testing; I left them on here during the installation phase only.

Here is the Koolance 470GTX water block compared to the stock heatsink that PNY uses for the 470GTX video card.

Here we go once again with our installation. You will need to make sure your video card is clean prior to any installation you may do.

Next up is the thermal pads; Koolance gives you two types of thermal pads. In the instruction it states to use the thermal pad that best suits your video card. I chose the Grey thermal pads. If it does not work out I will use the pink pad next. You will need to cut each portion the thermal pad is going to cover, Koolance does provide a guide on the sizes of thermal pads need to be cut to, use it.

Time for us to start our test fits. I am using a five dot thermal paste pattern to see how things are going to meet up.

Lined up the Koolance 470GTX water block to the 470GTX video card and squeezed the two together for 30 seconds, then separated them.
 |
 |
So far the water block does appear to be hitting the GPU nicely.
 |
 |
Looking at the thermal pads to see if the memory, and the mosfets were hitting the water block properly as well. I can see a slight depression of the video card components on the Grey thermal pads, which is telling me everything is hitting properly.

The Koolance 470GTX water fully secured. No warping of the PCB was present during the installation, which is a good sign.

A quick look at the Koolance 470GTX water block on the PNY video card, before I hook this bad boy to “Mini Me”.

What the Koolance 470GTX looks like all hooked up, rip raring ready to go. At this time I switched out to the Enzotech 1/2” barbs.
Testing Results
Now it is time for us to give out the results of my extensive testing of these water blocks. Reminder: I pump one full gallon of water through each water block a total of three times, I timed how long it took to pump out one gallon of water through the block. I used the average time per water block. I took the amount of seconds there is in a single minute (60) then divided that number by the time it took to pump one gallon of water through the water block. this gave me Gallons per minute, then I multiplied that number by 60 (minutes in one hour) and this gave me GPH.
Flow Rate Time
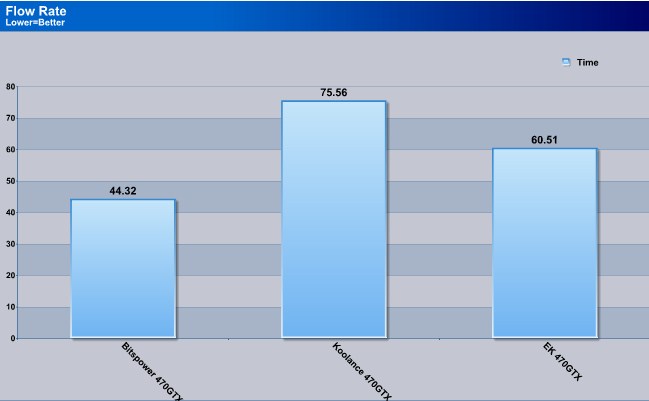
Looking at these results we see that the Bitspower water block has the best overall flow rate. The Koolance water block comes in dead last with having the most restriction; however EK comes in right in the middle of the flow rate testing with 60.51 seconds.
Flow Rate GPM/GPH
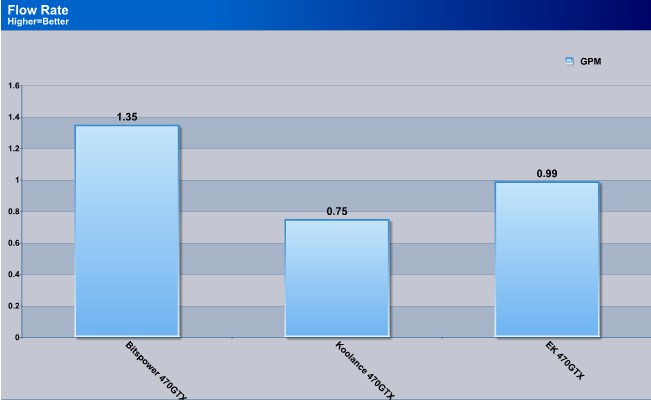
Taking the number 60 (how many seconds in a minute) and then divide that number with the time it took, gives us the Gallons Per Minute rate. The flow rate follows the same scenario as the time it took to pump a gallon of water. Bitspower comes in first followed by EK, then Koolance dragging up the rear.
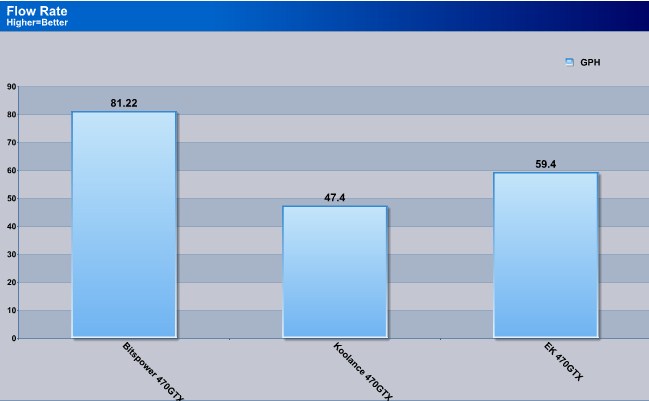
This is here for chits and giggles, I multiplied the GPM by 60 and this is what our flow rate be at 1 hour.
Temperatures Default Clock speeds
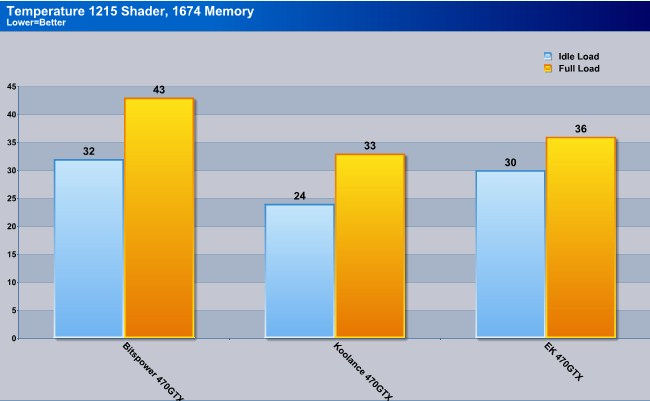
Looking at these numbers, it appears the Koolance comes in first place on being able to achieve the lowest temperature. This time EK comes in trailing behind the Koolance water block but not by much. Bitspower comes in dead last during this testing.
Temperatures Overclocked speeds
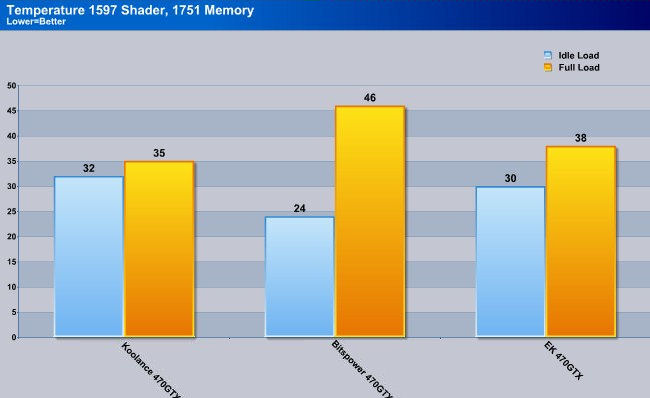
Nvidia uses 3 different clock generation modes with their video cards. So no matter if you are overclocked or default the video cads BIOS runs at a specific 2D speed. Now once I ran the water blocks over an hour or so during my gaming sequence, we can see all three water blocks can handle a serious overclock on the 470GTX water block. Once again the Koolance 470GTX water block comes in first place, followed by EK, and trailing behind Bitspower.
3DMark Vantage Default/Overclocked runs
The 470GTX video card is being accompanied by a 275GTX video card as a dedicated Physx card. So your results will vary gretly from my own. I should also state the CPU i am using is cranking out 4.08 GHz, with some rather interesting voltages and or tweaks applied to the Asus P6X58D-E motherboard.
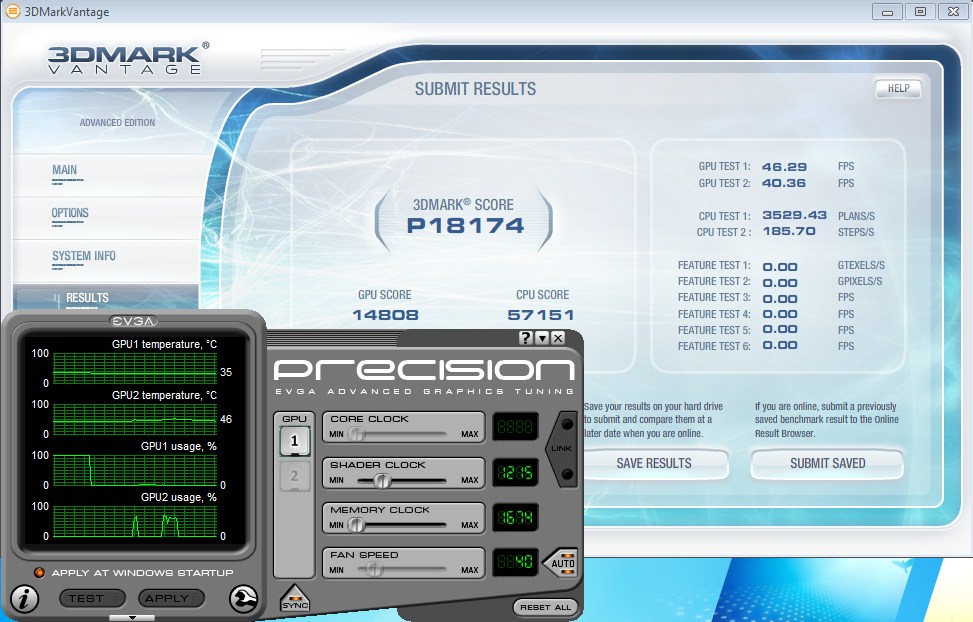
Not too bad of performance while running stock clock speeds. But I got feeling there is so much more performance to be gained if we overclock this video card.
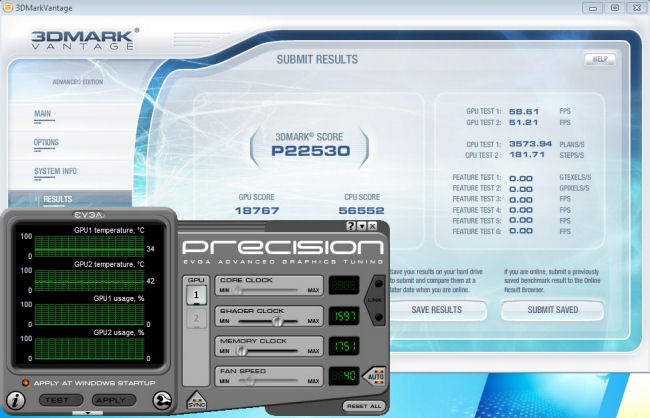
As we can see by upping the clock speeds of the 470GTX this video card literally cuts loose on some rather hidden potential. Makes you wonder if Nvidia purposely reduced the clock speeds down to make this video card run cooler.
Conclusions
When it comes to the Nvidia’s 470GTX video card we can tell that throwing this video card on water gives us a significant boost in not only temperatures but in a whole lot of performance. In my eyes the move to water cooling makes this a definite viable option, especially if someone is going to run two of these video cards in SLI.
Which brings me to this review, what water block do I choose? We at Bjorn3d.com looked at three different manufacturers’ water blocks for the 470GTX video card. And each manufacturer approached their water block design differently from one another. Clearly each one of these water blocks all had a specific ability the others did not have.
So let’s look at the three things I was going to base this review on: Flow Rate, Installation, and finally I was going to look at Cooling Capacity.
For installation I have to say the Bitspower water block was a far easier water block to install. Fallowed by Koolance 470GTX water block next, and trailing behind the pack was EK’s 470GTX water block solution.
The let’s look at flow rate of each water block that was tested here. The Bitspower 470GTX water block had the best flow rate out of all of the water blocks tested here. EK 470GTX water block comes in in between both the Koolance water block and Bitspower’s 470GTX. This time Koolance comes in last place as having the most restriction. Now this could be bad thing if you plan on daisy chaining two of these blocks together, but if you are like myself, and decide to split the video cards into two loops then it does not matter.
To finally the cooling capacity of the water blocks tested here. Koolance takes a commanding lead over the competition in this portion of testing. Being followed by the EK 470GTX water block; then trailing the pack the Bitspower water block.
So how do I choose the best water block? Each water block can do something the others can’t. So I will say this, I will give all water blocks a: 9 out of TEN, and let you the reader decide what 470GTX video card water block is best suited for your personal needs.
| OUR VERDICT: Koolance 470GTX Water Block | ||||||||||||||||||
|
||||||||||||||||||
| Summary: The Koolance 470GTX water block fits anyone who wants a great looking water block with the best cooling capacity. |

| OUR VERDICT: Bitspower 470GTX water block | ||||||||||||||||||
|
||||||||||||||||||
| Summary: The Bitspower water block is for anyone wanting a good high flow water block, with a extremely simple installation, with decent cooling capacity. |
| OUR VERDICT: Ek 470GTX water block | ||||||||||||||||||
|
||||||||||||||||||
| Summary: EK 470GTX water is a mix of good flow rate with good cooling capacity. if you don’t mind the installation, then this water block is right up your alley. |


