Kingston sent in a 12GB kit of 1600MHz HyperX we were dying to try out. Take a look at what 12GB can do for you at a reasonable price.
INTRODUCTION
With RAM kits we’ve known for a long time that more RAM is better than less RAM. By that we mean if you have a choice between 3GB and 6GB or even 12GB get as much RAM as you can afford right out of the gate when building or upgrading a system. We’ve been testing i5 kits with 4 and 8GB and the 8GB kits give you a nice performance edge over 4GB kits. Now we are testing a Kingston HyperX 12GB kit so we are going to run the normal battery of tests on it then split the kit to a 6GB configuration and run some additional tests. So we’ll have the same exact kit running in 6 and 12GB configurations in selected tests to show you that more ram is advantageous.
We believe that having a larger kit is so important that we can say it’s more important to have more ram than it is to have faster ram. By that we mean if you have the choice of an uber expensive 6GB 2GHz kit or a similar priced 12GB kit that runs at a slower speed you are going to be better off buying the larger slower kit.
Larger kits provide more ram for system operations like Sleep, Wake, and loading large programs or tons of images for editing. Some people are thinking yea but the 3GB kit I have does the job. Yes it will do the job but you increase page file hits and the Page File resides on your HD which runs much slower than the RAM does. How much slower? Typical platter drives of modern design run in the neighborhood of 90MB/s under ideal conditions. RAM on the other hand runs in Gigabytes per second. Mid range kits running at 1600MHz can hit speeds of 18 20GB/s. That’s a big speed difference. The larger RAM kits will allow your system to go to the Page File less and increase overall system performance. Here’s the sad part, in synthetic benchmarks the smaller faster kit will come out ahead almost every time because the standard RAM testing utilities only use a small portion of the RAM kit to do testing. Which is why high end high speed kits get so much attention. They produce nice synthetic benchmark numbers. Real life performance the difference between a 1600MHz kit and a 2GHz kit is negligible. That’s right real life performance between a 1600MHz kit and a 2000MHz kit is negligible meaning that you won’t notice a performance difference between the two that the human eye can see. So if you have the choice between that 6GB 2GHz kit you have been lusting after or a 12GB kit go for the 12GB kit. It would be hard to make a better choice than the Kingston HyperX 1600MHz 12GB kit we are looking at today.
Specifications
- Capacity 6 x 2GB (12GB Total)
- Speed DDR3 1600 (PC3 12800)
- XMP Profile
- Model Number KHX1600C9D3K6
- 240-Pin DDR3 SDRAM
- Cas Latency 9
- Voltage 1.65V DRAM 1.4v QPI
- 240-Pin DDR3 SDRAM
- Hexa-Channel Kit
We can see those wheels turning in your heads already. Why not a 3 x 4GB module kit? The answer to that is simply price. A 3 x 4GB kit of HyperX with the exact same specifications currently runs $1299 at reputable E-Tailers, the 6 x 2GB kit runs $359 so it’s more affordable for most end users. We can see situations where the 3 x 4GB kit would be advantageous like dedicated Video Editing but for most of us the $1299 is just to much for a 12GB kit.
Now once again we can see the wheels working. Why a kit with 9-9-9-27 timings and not two kits of 8-8-8-24? Voltages on the chipset get higher as the ram gets faster and the timings get tighter.This kit that runs at 9-9-9-27 will take 1.65v DRAM voltage and 1.4v QPI while a kit of 8-8-8-24 (6 GB) will take the same 1.65v DRAM but take more QPI voltage (in most cases). Ram kits are already pushing the safe limits of QPI voltage. How do we know that kits are pushing the safe limits of QPI voltage, tons of research, the maximum voltage according to Intel for QPI is 1.35v. You can read the Intel Whitepaper on the i7 965 Here pay attention to Page 22, or here’s an excerpt we pulled out for you.
“Voltage for the digital portion of the integrated memory controller, QPI link and Shared Cache with respect to VSS. 1.35v (Max).”
NOTES
- 1. For functional operation, all processor electrical, signal quality, mechanical and thermal specifications must be satisfied.
- 2. Excessive overshoot or undershoot on any signal will likely result in permanent damage to the processor.
- 3. VTTA and VTTD should be derived from the same VR.
So Intel is saying that 1.35v is the maximum safe voltage for QPI and kits often exceed that Intel specification. We haven’t seen any boards or CPU’s die from a slight voltage bump over 1.35v but Intel built it and they are saying 1.35v so rather than landslide us with E-Mail about “OMG my kit runs over 1.35v” please direct those E-Mails to Intel who is a lot more qualified to answer your panic stricken E-Mails than we are. We don’t mind running above the 1.35v ourselves it hasn’t killed any CPU’s yet but that’s what Intel says.
Now back to our Kingston HyperX kit. This kit runs at 1.65v DRAM and 1.4v QPI and we have confidence that it’s safe to run at that voltage. Now take two kits of 6GB ram running at 1.65v Dram and 1.5v QPI designed to run as a standalone kit with 6GB and put in two kits and you might have to run the QPI even higher. A single kit of 12GB designed to run as a 12GB kit is less likely to make you push QPI and will (in the long run) be safer and more likely to function plug and play like our kit did.
That being said we have kits that run at and above 2000MHz that demand 1.6v and even 1.65v QPI and it hasn’t killed our CPU’s (YET). These things tend to work long term so eventually it might damage one but by that time we will have a newer faster shinier CPU. You might want to consider longevity on the i7 platform though it’s a little pricey.
Pictures & Impressions
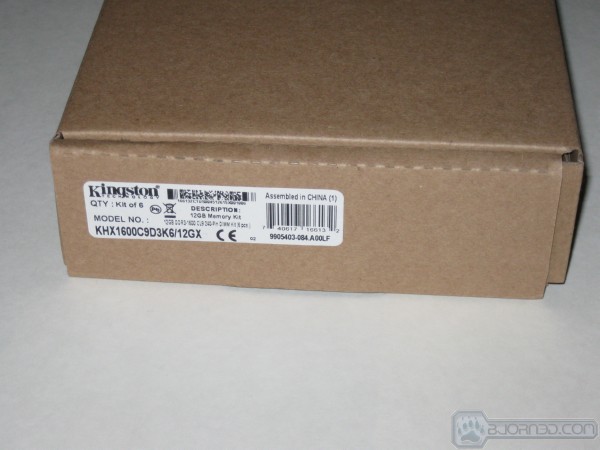
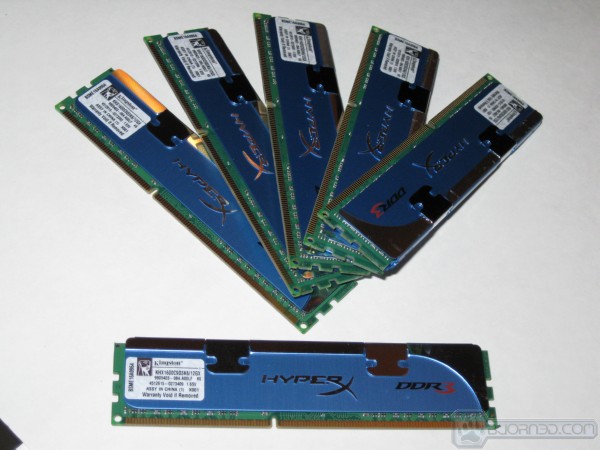
We would suppose that the kit we received wasn’t retail packaging but it might well be. This kit came in a plain brown box with an identification sticker on it and arrived in great condition.

The sticker identifies it as “Kingston KHX1600C9D3K6/12GB” or in other words a Kingston HyperX 12GB kit of 1600MHz memory with 6 sticks in a 6 x 2GB configuration. How do we know? We speak Kingston fluently, for the geeks out there that’s Kingston not Klingon so please hold the Klingon language E-Mails.
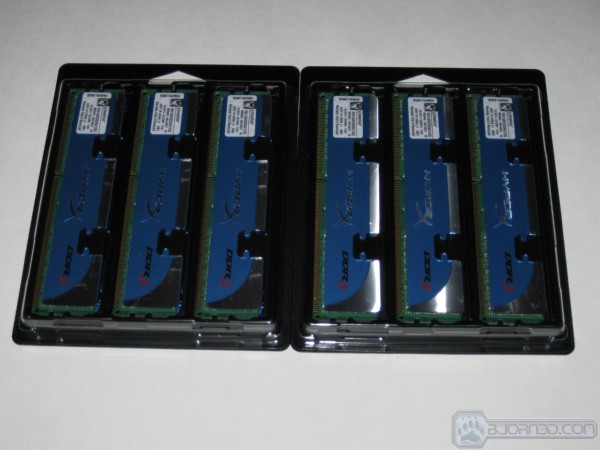
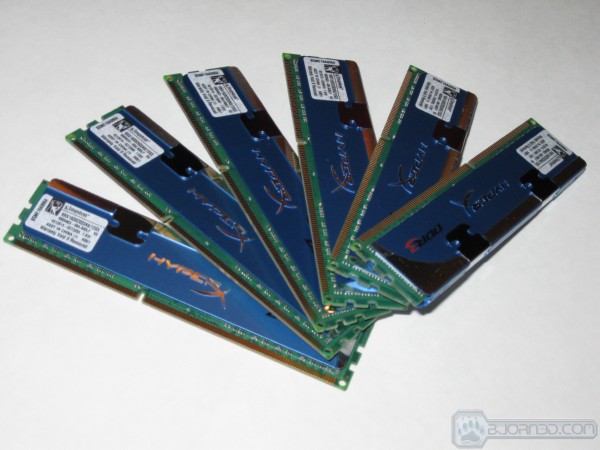
What we found in the well padded box was two packages of three RAM sticks each. We were expecting to see six sticks but the reality didn’t set in until we actually saw the kit. Kingston went with the low heatspreader which was a good choice because with todays large CPU coolers a kit with the tall T1 heatspreaders might not fit. With our P6T6 WS board and the Thermalright Ultra 120 CPU cooler, the kit fit fine but it was a little tight. That’s going to depend on your CPU cooler so check twice, order once.
The laid out reality of six sticks hits home. In the past there have been speculations about six sticks of ram not working on motherboards. Since AM2 and LGA 775 we haven’t seen any boards that wouldn’t accept two ram kits. On previous platforms two ram kits might require tweaking but we’ve always gotten them to work. On the LGA 1156 and 1366 platforms all the large kits with 6 sticks we’ve seen have been plug and play at stock ram speeds and we haven’t had any problems running 4 sticks on LGA 1156 and 6 sticks on LGA 1366.
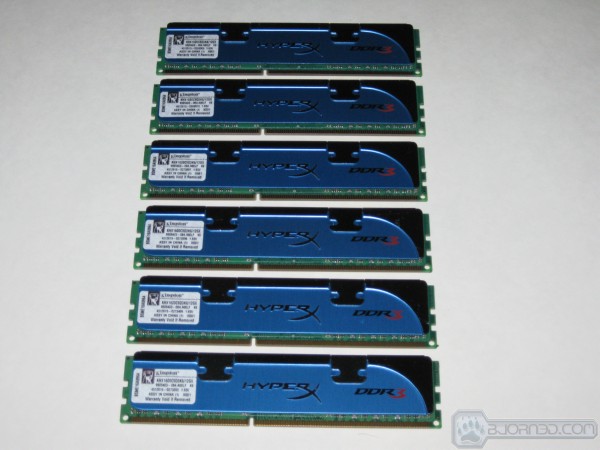
The traditional heatspreader on the six stick kit fits right in with our i7 965 rig and it looks nice enough that you won’t be tempted to put a brown paper bag over it. On that note, in a non-related matter, brown paper bagging your date is considered rude but we digress. Brown bagging the morning after, well, that’s just wrong but it is a good way to prevent having to chew your arm off to get away.
While we like the T1 heatspreader on the tall Kingston kits, the older design fits with most large CPU coolers better. We’ve found that most 1600MHz kits run at reasonable temperatures but if you are concerned you can always get a Ram Fan that matches the kit for about $20. To save those interested in the fan from Googling here’s where you can find those at: HyperX Fan. You should note though that large CPU coolers will fit pretty close to the fan setup and the fan setup might affect airflow to the CPU Cooler. We haven’t seen any increase in CPU temperatures by using a ram fan but the fans do stick up in front of most tower type coolers so it’s an issue you might want to consider.

We always get one guy who E-Mails and asks “Where’s the shot of the sticker on hte RAM?” Here’s the shot of the sticker and if you’re looking for this specific kit on Kingstons site, let us know if you found it because we found the 3 stick kit but not this more affordable 6 stick kit. You will find the kit listed on popular E-Tailers sites in the $359 range *cough*Newegg*cough*.
TESTING & METHODOLOGY
To test the 12GB Kit of HyperX 1600 MHz RAM we did a fresh load of Windows 7 Ultimate, updated all the machines drivers, applied all the Windows 7 patches, and disabled any background tasks not required for the machine to run correctly. Then we cloned the hard drive using Acronis in case we should have any doubt as to driver or OS corruption from overclocking. We ran our normal suite of tests against the RAM. Each test was run three times and the average of the three runs are reported here.
We also ran the RAM for about a week to get a little break in time and a general feel for the RAM itself. During that week we tried every SPD setting listed by Everest and CPU-Z, played games, surfed the internet, and coded reviews. Normal every day activities for us. Benchmarks are fine but we also need to run the RAM outside benches to help round out how we report on it. And let’s face it, benches are fine and good and we rely on them a lot, but real life usage and a feel for equipment is just as important as benchmarks. Some runs we ran more than three times and in that case we averaged all the runs and report that average.
Test Rig
Test Suite
|
Synthetic Benchmarks & Games |
|
SANDRA XII Professional |
|
Everest Ultimate Edition v.4.50.1330 |
|
SuperPi Mod 1.5XS |
|
WinRar v.3.71 Compression Benchmark |
|
Windows 7 Ultimate |
Everest Ultimate

“EVEREST Ultimate Edition is an industry leading system diagnostics and benchmarking solution for enthusiasts PC users, based on the award-winning EVEREST Technology. During system optimizations and tweaking it provides essential system and overclock information, advanced hardware monitoring and diagnostics capabilities to check the effects of the applied settings. CPU, FPU and memory benchmarks are available to measure the actual system performance and compare it to previous states or other systems. Furthermore, complete software, operating system and security information makes EVEREST Ultimate Edition a comprehensive system diagnostics tool that offers a total of 100 pages of information about your PC.”
We ran the HyperX kit 3 different ways.
- HyperX 1600 12GB is Stock CPU Speed Stock Ram Speed
- HyperX 1600 12GB OC/CPU is CPU overclocked to 3.74 Ram Stock Speed
- HyperX 1600 12GB OC/CPU/RAM is both RAM (1702MHz) and CPU (3.84 GHz) overclocked
We ran the kit this way so end users that don’t overclock can see stock performance, overclockers that just OC the CPU and overclockers that OC both the RAM and CPU all can see performance gains. That, and when we run the CPU overclocked we’ve been known to get E-Mail from vendors saying “CPU overclocks will affect ram performance”. Like we didn’t know that already but most people investing $2000 to $3000 in a high end system aren’t going to stay with stock speed with he i7 CPU lineup, most of us will overclock the enthusiast platform, that’s why it’s called an enthusiast platform. If you want to know more about any kit including the kits model number you can refer to the “Testing & Methodology” page where each kit is linked to it’s individual review. The only designation we make on the charts are RAM speed and kit size. Trying to list each model number and timing for each kit would make the charts unreadable so if you have questions about different kits refer to the “Test Rig” table on the previous page.
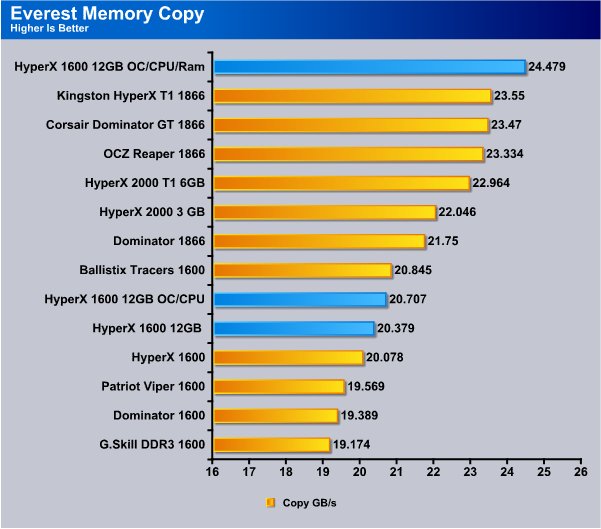
Most of the 1600 MHz kits on the chart are 8-8-8-24 kits ran with a 1t timing setup. The HyperX kit is timed at 9-9-9-27 1t and those looser timings make it run marginally slower than some 1600MHz kits. Looking at the charts though, the BallistX Tracers kit (which had the CPU overclocked to 3.74GHz) barely beat the Kingston HyperX 12GB kit. The 12GB HyperX kit did better than four other kits in this test. You should note that we run Quadzilla at 3.74GHz in all testing and the stock ram speeds here reflect that but since each kit was ran with the CPU at 3.74GHz it is a level playing field.
Now put the OC to the HyperX kit and what do we see? The mild OC we put the kit to 1702MHz has the Kingston HyperX kit topping the chart with 24.479GB/s. Please note that some of the kits when overclocked will exceed that score but none of them have 12GB so more RAM or faster RAM is a question we expect to be argued for a while. We are going with more is better until we see empirical evidence to the contrary.
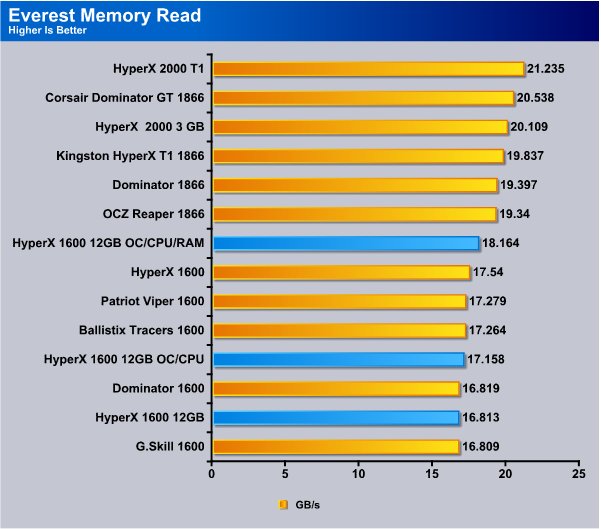
In the Everest Memory Read test the 12GB HyperX kit dropped down in the charts and when overclocked to 1702MHz turned in a respectable 18.164GB/s. The looser timings on the HyperX 12GB kit turned in a 16.813GB/s stock CPU/RAM speed but the other kits on the chart are running with the CPU at 3.74GHz and the kit turned in a 17.158GB/s with the CPU overclocked. The slower timings on the 12GB kit hurt it a little in this test but look at it this way; What happens when you run out of ram on a 6GB kit and the system starts page filing? In that case, the 12GB kit will put the smack on the smaller kits. Then you have to consider that even with looser timings the HyperX kit ran only marginally slower, so marginally that it’s not going to make much, if any difference. Speaking of course about kits rated at 1600MHz, the faster kits are not a fair comparison and show us a 12GB kit of 2GHz RAM and it’s still not comparable. Comparisons are best within the given rated speeds of kits.
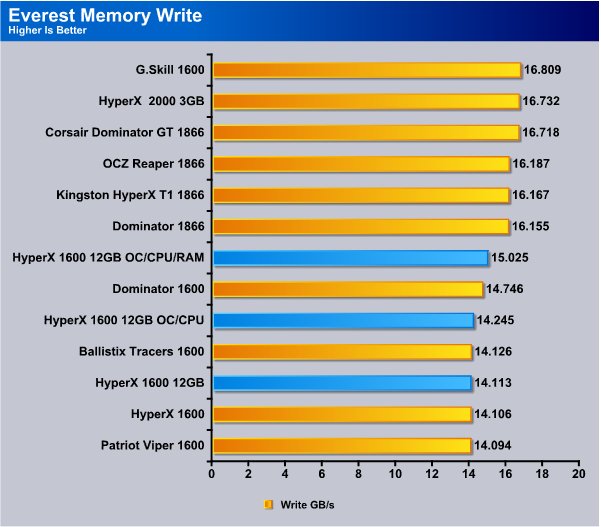
In the Memory Write test we see the OCed HyperX 12GB kit hitting 15.025GB/s and at stock CPU/Ram speed it hits 14.113GB/s. With just the CPU overclocked it hits 14.245GB/s so the overclocking on the CPU by itself did affect RAM bandwidth a whole 0.132GB/s or 132MB/s which in terms of RAM speed is a drop in the bucket.
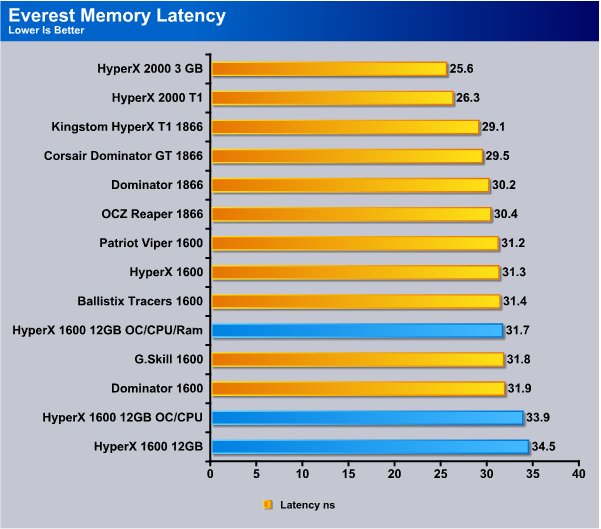
Memory Latency is a tricky thing to report on. Different kits are going to have different Latencies at different timings and different CPU speeds. As you can see the Kingston HyperX kit bottomed out the chart at Stock ram speeds and OC CPU speed with the RAM held at 1600MHz but that wasn’t the case in the performance charts. We report Latencies but our conclusion leans more toward the performance charts than the reported latencies. Most of the other 1600MHz kits are timed to 8-8-8 so we suspect that the 9-9-9 timing on the Kingston kit produced the higher Latency.
WinRar v. 3.71

This module in WinRAR generates random data, which contains specially introduced redundancy, increasing the load to both the processor and memory. Data is then passed through RAR compression and decompression algorithms, and the output of the decompression algorithm is compared to the source data. If any differences are found, WinRar then reports “Errors found – Yes” in the command window. WinRar displays a size of processed data and compression speed, current and resulting, in kilobytes per second.

WinRAR likes fast RAM with tight timings and the HyperX kit with it’s 9-9-9 timings hit 1202KB/s but read the chart carefully. In order to show any difference we had to reset the horizontal axis to 1150 from zero or the whole chart looks like one big block of undifferentiated lines. We are sure we will get chart whiners we always do, but fact of the matter is read the horizontal axis on all charts and don’t assume it’s set to zero and you won’t have a problem.
When we OC the CPU and leave the RAM at 1600MHz we got an increase of 60KB/s and overclocking both the RAM and CPU the score jumped to 1318KB/s. There are faster kits out there but if you need large amounts of RAM it’ll be hard to beat the HyperX 12GB 1600MHz kit. Face it, no matter how fast the RAM runs, when the system eats all of it then it’s forced to go to Virtual Memory/Pagefile and when that happens it doesn’t matter how fast the RAM is.
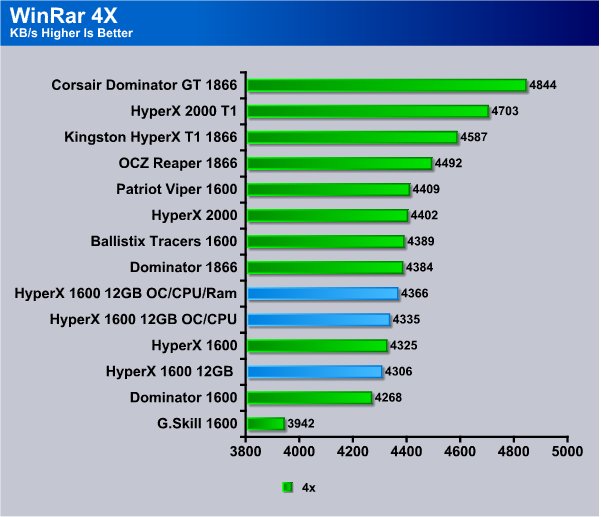
When we move to the WinRAR multi-threaded test the HyperX kit moves up a little in the chart and turns in a 4306KB/s stock speed on CPU/RAM. Overclock the CPU and it turns in a slightly higher score of 4335KB/s and overclock both CPU/RAM and it turns in a 4366KB/s. A couple of the tighter timed kits turn in a better score but once again it’s no replacement for a larger kit when you run out of RAM or sleeping and waking the system. Start into video editing/sound editing and the 12GB kit will look as good as gold.
Super Pi

Super PI is the “Gold standard” for many when it comes to judging system performance. We ran 1 Meg and 2 Meg calculations, again running each test three times and reporting the average of the results.
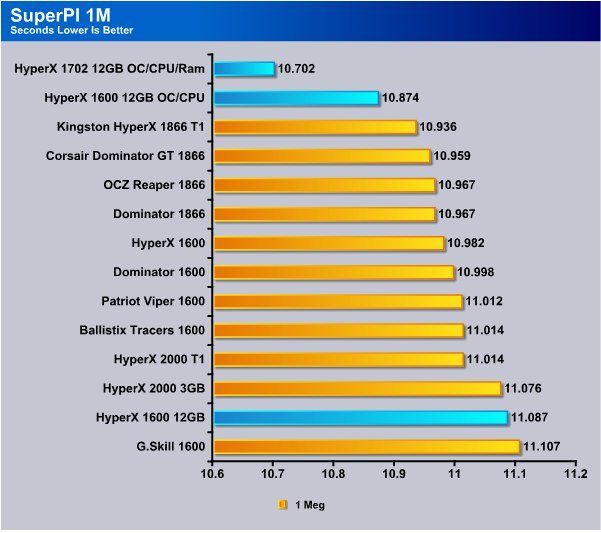
Super Pi is extremely sensitive to changes in system configuration and the stock CPU/RAM combo turns in a 11.087 second time and that reflects the timing on the kit of 9-9-9-27. OC the CPU and leave the RAM at 1600MHz and the time drops to 10.874 Seconds. Overclock both the CPU and RAM and we get a 10.702 second score.
Again, check the horizontal axis. It’s set to 10.6 Seconds because once again, without resetting the axis to 10.6 all you see is a bunch of lines that you can’t notice any differences. We apologize to the chart snobs that feel every chart should be set to Zero on the horizontal axis but it’s just not feasible to highlight minute differences like these. Top to bottom on the chart we have 0.4(ish) seconds variance and to show any visual difference the axis needs reset that’s just the way it is. If it bothers you, feel free to re-chart the data yourself.
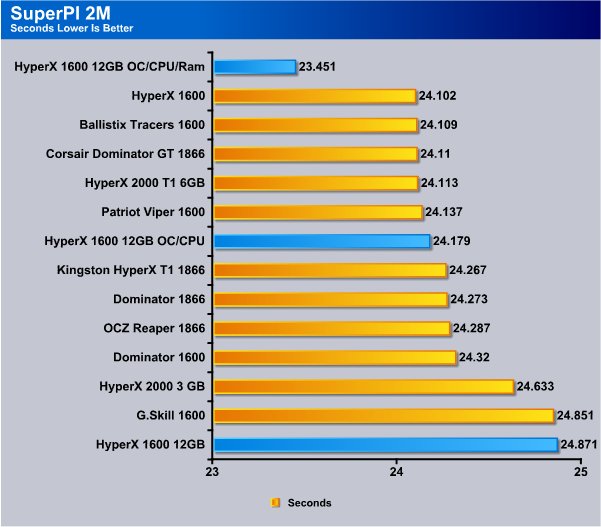
Super PI in the 2M test gives the RAM and CPU a little longer to massage the data and the HyperX kit turned in a 24.871 second time at stock speeds. Overclocking just the CPU results in 24.179 seconds and overclocking the RAM and CPU we get 23.451 seconds.
Sisoft Sandra
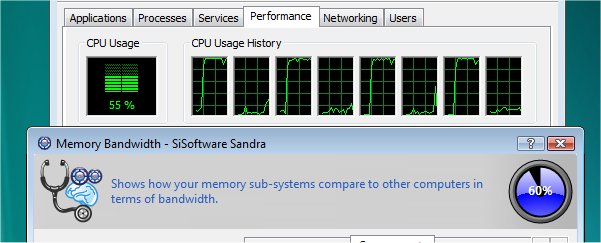
“SiSoftware Sandra (the System Analyser, Diagnostic and Reporting Assistant) is an information & diagnostic utility. It should provide most of the information (including undocumented) you need to know about your hardware, software and other devices whether hardware or software. It works along the lines of other Windows utilities, however it tries to go beyond them and show you more of what’s really going on. Giving the user the ability to draw comparisons at both a high and low-level. You can get information about the CPU, chipset, video adapter, ports, printers, sound card, memory, network, Windows internals, AGP, PCI, PCI-X, PCIe (PCI Express), database, USB, USB2, 1394/Firewire, etc.”
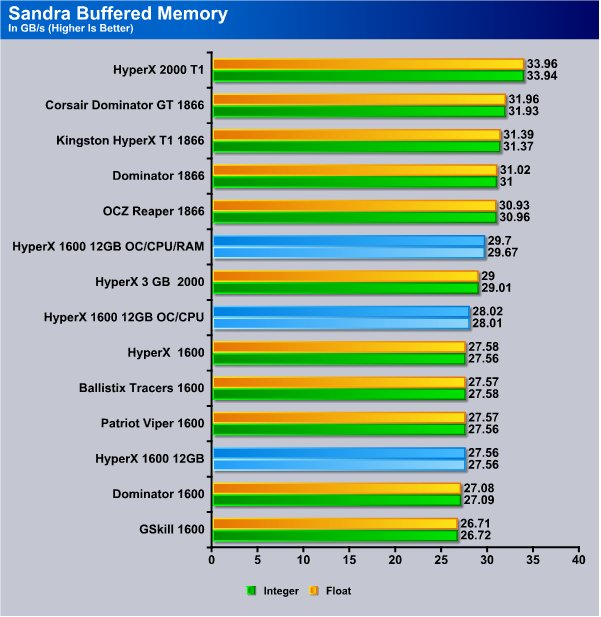
Sandra has always been one of our favorite tests for memory. It produces reliable reproducable results almost every run so you can see why we like it. In Sandra the stock speed CPU/RAM turned in a respectable 27.56GB/s and when we overclocked the CPU by itself the HyperX 12GB kit turned in a 28.03GB/s and it got even sweeter when we overclocked both the RAM and CPU. With both overclocked we got a nice 29.7GB/s which is pretty amazing for a 12GB kit. Think of it this way, how many people have gotten that close to 30GB/s running a 12GB kit?
Photoshop
We ran Photoshop under Windows 7 Ultimate and used a 512MB cluster of 128 photos and opened all the photos at once. We start recording the time from the moment we click open until the time the last photo is opened then record the time it took. We repeat the test 5 times and then toss out the highest and lowest time, then average the remaining 3 runs. We tested with the 12GB kits but we tested with 6GB of the kit then tested with the whole 12GB.

We used a group of 124 Photos totaling 512MB in this test and with the kit split in half we got a 237.4 second load time and with the entire kit it turned in a 210.3 second time. That’s an improvement of 27.1 seconds. Now imagine opening a video with a system overhead that exceeds your RAM capacity and resorting to the pagefile. You would really notice the difference in that case.
Windows 7 Sleep & Resume
Again, this is part of our impromptu Windows 7 testing and what we did was boot into Windows 7 Professional and waited one minute for all the loading processes to complete. Then we checked the Task Manager to make sure everything had settled down. When everything had completed loading we closed Task Manager and put the machine to sleep. We started timing from the time we clicked sleep until the last power indicator or HD light ceased activity. We recorded the time it took to sleep the machine, then we woke the machine and recorded the time from the time we started waking the rig until the desktop had completed loading. We repeated the tests 5 times and tossed out the highest and lowest times then averaged the remaining 3 scores and reported those scores here.
Win 7 Sleep

Keep in mind that depending on your OS, the way you load it and what programs are running, it will take more or less time than it did here. This just shows that larger kits perform the task faster. Faster to the tune of almost 41 seconds.
Win 7 Resume
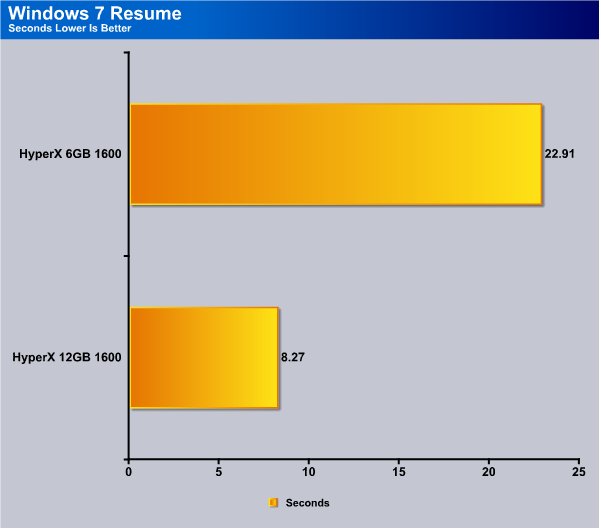
We sleep our rigs a lot because loading the rig 20 times a day gets old. With the 12GB kit it took a mere 8.27 seconds to load Quadzilla, cutting the same kit in half it took 22.91. Start to finish, loading from the ground up probably 1 minute 45 seconds. Again, larger kits provide advantages in RAM intensive operations and prevent you from hitting the page file as often.
Overclocking
We weren’t going for a massive overclock on the 12GB kit to begin with. In fact, we have no idea what the maximum overclock is. What we went for is a good solid overclock that will ensure that the RAM lives a nice long life. Taking a Kingston HyperX 12GB kit that runs in the neighborhood of $359 and cranking it until it screams for mercy probably isn’t a real good idea. HyperX is a hard to kill RAM to begin with but in general the larger the kit the smaller the OC because it’s harder on the motherboard chipset. Kill the chipset and you might lose the whole rig in a puff of magic blue smoke so a little restraint is advised.
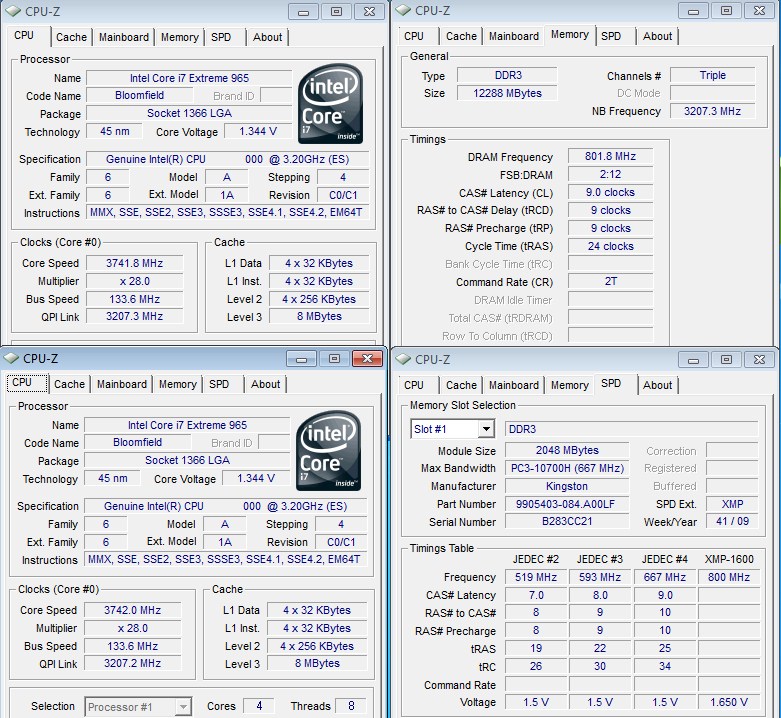
Here’s a look at the CPU-Z shot of the kit when we ran it with the CPU overclocked using strictly the CPU multiplier. The kit fired right up, plug and play. The kit was set to 2t so we went back into the BIOS and changed it to 1t manually and the kit ran fine.

We upped the BCLK to 142 yielding a RAM speed of 1702MHz and kept the 9-9-9-27 1T timings and had no problems with the kit at this setting. “Can you decrease the timings to 8-8-8-24 1T ?” We could on the Asus P6T6 WS board we tested, but it took a QPI voltage bump to achieve that.
Conclusion
We generally like RAM kits with tight timings and good overclocking. At least until we started testing larger kits with looser timings. There is a slight speed trade off with 9-9-9-27 timings but in real life testing and performance we can’t really see much difference at all. When we load a video to edit we see a tremendous difference. We also see a difference in program load times, sleeping and waking the system, and photo load times when we edit review images. There is enough advantage that we prefer using the 12GB kit of HyperX over faster smaller capacity kits. With RAM, speed isn’t everything. Speed is nice but total RAM capacity is just as important, if not more important than speed, especially in Windows Vista and Windows 7.
We like the extra RAM the 12GB Kingston HyperX 1600MHz kit offers. Sometimes there’s just no replacement for great big gobs of RAM hanging around in your system. You might not utilize all of it all the time but when you do need it, you have it available to use.
Performance was inline with the other 1600MHz kits we’ve tested and the kit was plug and play which goes a long way with us. Nothing stinks worse than a kit of RAM you have to spend several days tweaking to get it to run right.
Kingston HyperX hardly ever fails to run plug and play on any system we’ve tested on and that says a lot for the SPD programmers. We’ve also never had a kit of HyperX die on us and if anyone can kill RAM we can. We’ve had other kits die. Right now we’ve got a 6GB kit of major brand RAM that runs at 1866MHz triple channel dead as a doornail. A very expensive kit that was only overclocked for about 2 hours so we appreciate the longevity and reliability of a good kit like the Kingston HyperX 12GB 1600MHz kit.
| OUR VERDICT: Kingston HyperX 12GB 1600MHz Kit | ||||||||||||||||||
|
||||||||||||||||||
| Summary: The Kingston HyperX 12GB 1600MHz kit amazed us when we found out it was plug and play, then impressed us with system performance gains from having a larger kit. There are faster smaller kits out there but if you need large amounts of RAM this is about as fast as it gets. Kingston did an outstanding job with the 12GB kit and considering that 3 stick kits with the same capacity cost more than three times what this kit costs, the price is pretty nice. |


