Cooler Master has always been thinking bout those who need a good cooling solution for their CPU’s, with spending a whole lot of money. Here at Bjorn3d and the Dragon’s Lair we going to look at the Hyper 212+.
INTRODUCTION
When it comes to cooling our CPU’s down, we all want a cooler that not only performs well, that cooler also has to be priced competitively. There are a ton of CPU coolers out there to choose from. While the good ones come in at a hefty price tag of 60 USD or more, the average person may not be able to fork out that much on a CPU cooler. Well there are other alternatives at a much lower price point. The downside with these types of coolers however is that they usually can’t cut it for cooling an overclocked processor.
Cooler Master has a CPU cooler that sits in between these two types of CPU coolers. The question is, does it have what it takes to help keep cool even the most demanding CPU out on the market, or does it just fall short of a stock upgrade?
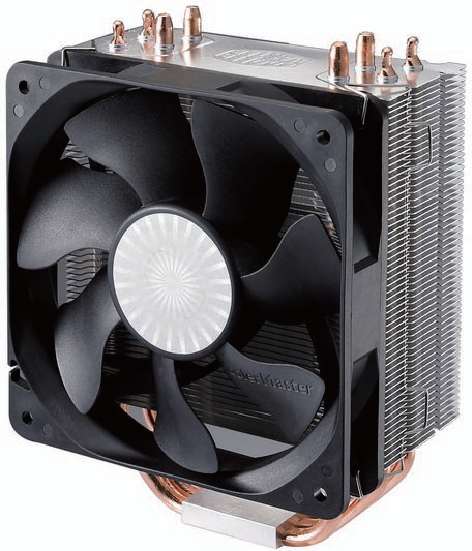
Lets look at the Cooler Master Hyper 212+ CPU cooler, this CPU cooler has been reworked to fit a more variety of CPU types from AMD’s 754/939 to their latest AM3 socket CPU’s as well as Intel’s 775 socket CPU’s to their latest 1366 CPU socket. This CPU cooler is also one of the first CPU coolers to fully support Intel’s newest CPU socket, the 1156 Core i5.
Lets stroll on into the “Dragons Lair”, and give this little CPU cooler a good work out.
SPECIFICATIONS
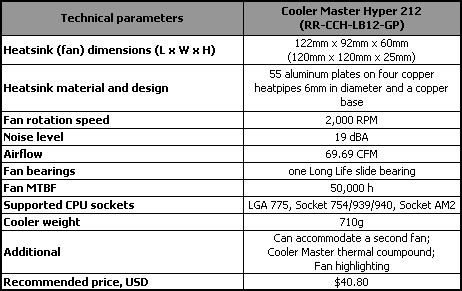
Looking at the specifications of the Hyper 212+ CPU cooler, we see that this cooler, is fairly smaller than most of the bigger CPU coolers out there. Also this cooler can accommodate a second fan for a push pull configuration.
PACKAGING

Cooler Master, always uses packaging that gives us user plenty of information when it comes to their CPU coolers. The Hyper 212+ is no exception.

Cutting right to the chase, this is how Cooler Master packaged the Hyper 212+ inside of the box. Nothing real fancy, just enough to keep this cooler from getting damaged during shipping.

In the package you will get a CPU cooler with four-wire-type fan mounts, a bag of screws, a strange mounting bracket, a 120mm fan, and it pleases me that Cooler Master also included a retention plate. Just looking over the mounting hardware it appears that Cooler Master decided to use a hybrid mounting system not commonly used on their other CPU coolers we seen in the past.
Before I do any installation we need to go over the CPU cooler mounting.
OVERVIEW

Here is a look at the cross breed hybrid upper mount that Cooler Master used. Oh it gets better as we go forward.

Now this upper mounting bracket has three holes on it. They appear to have a push pin style screw in this upper mount. This will allow the Hyper 212+ CPU cooler to fit all of the listed CPU socket types without needing to change different mounts. To move the screw from one hole to the next is simple, just lift it up and slide it to the socket mounting hole you need.

 |
 |
Me just moving the screw to all three of the holes in this mount.

Moving on towards the heat sink itself, Cooler Master does do a good job on making sure that each aluminum fin is evenly spaced through out the CPU cooler.

The top of the Hyper 212+ CPU cooler. We see this CPU cooler uses 8 (4 full length) heat pipes.

Looking at the base of this CPU cooler. Cooler Master uses a direct heatpipe touch design on the Hyper 212+.

Pretty standard sized heatpipes which we see on a lot of CPU coolers.

Before using the Hyper 212+ CPU cooler we need to remove the protective cover on the base of the CPU cooler.

Now for the reflection test. There is still machining marks left on the base of this CPU cooler. This is kinda strange if you ask me. Cooler Master is well known for its fairly polished CPU coolers bases.

Looking at the full length of the Hyper 212+ CPU cooler. Notice in the base of the CPU cooler there is a pin? Hm, I wonder what that is for.

Cooler Master put little notches on the fins of this CPU cooler so we can install a fan or fans onto this CPU cooler.
 |
 |
The retention plate also carries over the three bolt pattern for the Intel socket CPU’s. Inner holes = Socket 775, middle holes are for Intel’s socket 1156, and the outer holes are for the 1366 CPU socket. The center six holes are for AMD’s socket types.
 |
 |
The blades of the 120mm fan that Cooler Master used have a rather strange look to them. I have to say this fan does blow a fair amount of air and is also pretty quiet.
INSTALLATION

Since there is more than 1 part to this CPU cooler we need to start off on the retention plate mounting first. The 1366 motherboards have already back plate to keep the board from warping.
 |
 |
Next up are the bolts, we need to put 4 of these on to fully secure the retention plate on to the motherboard first. Pay close attention to these bolts, there is a flat side on all four of these.

That flat side corresponds to the flat side on the retention plate.
 |
 |
After you get the retention plate on, we need to use the included nuts and screw driver nut adapter to tighten these down fully.

Time to move onto the CPU cooler. There is a small pin that sticks out inside of the base of the CPU cooler.

That pin will line up with the cooresponding notches onto the CPU coolers upper mounting plate.
 |
 |
To install this upper mounting plate you need to squeeze the ends together then put it on the top of the CPU cooler base. You then spread the arms out to your CPU socket mounting holes. Then put the center pin on the mounting plate into the center hole of the CPU cooler. The pin on the inner part of the CPU cooler base should lock into the mounting plate.

Then without the fan attached yet, we need to mount the CPU cooler. I just threaded a little on each corner of the CPU cooler to each of the bolts.

Then I tightened each screw down snugly. This is test fit #1. My motherboard did not flex at all, this is a good sign.

Oops, I don’t think this was supposed to happen. When I was removing the CPU cooler, it backed out one of the retention plate bolts with the screw.

Well so far ok, I guess as far as thermal paste dispersing. I was expecting better results. We can clearly see the gaps between the heat pipes and the aluminum plate.

Always make sure you get the same pattern on the CPU cooler as you did with the CPU.

Test fit #2, I added some thermal paste the fill in the small gaps I had from the first test fit.

That is much better coverage.

The instruction booklet was not exactly clear on how to mount the fans, so I guessed. Well I guessed wrong.

After fiddling with the fan wire mount I finally figured it out. It was just one of those days.
 |
 |
That is so much better. If you notice the wire fan clips have a small rectangle part sticking out. This is so you can remove the fans from the CPU-cooler easier.

Now for the final installation. I used two fans in a push pull configuration, as well as a single fan during my testing.
TESTING METHODOLOGY
| Test Setup &Testing Methodology | |
| CPU | Lapped Core i7 920 |
| Motherboard | MSI X58 Eclipse |
| Case | Cooler Master Elite |
| Memory | 6 gigs Gskill Trident |
| Video Card’s | HIS 4870, XFX 4870X2 |
| Hard Drives | Patriot Torqx 128 SSD, 2 x Seagate 320 Momentus HDDs, and 1 western Digital 160 HDD |
| CDRom Drive | Lite On Sata1 DVD Burner, Lite On Blue Ray Player |
| Power Supply | Silverstone Zues 1200 |
| Type Of Coolers Used | Noctua NH-C12P, Cooler Master Hyper 212+, Cooler Maste V8 |
| CPU Speeds Used | 2.66GHz, 3.2Ghz |
| Operating System Used | Microsoft Windows 7 64bit |
| Type of Software Used During Testing | Linx x4 runs 20 loops per run. 1 run quick burn in, 3 runs offical |
Since I ran out of the Thermal Paste that Cooler Master included, I ended up using Noctua NT-H1 thermal paste to perform testing on all of the CPU coolers listed. The Noctua NH-C12P CPU cooler had a different fan mounted to it, because I broke the original fan that came with the NH-C12P. The fan I used was a 120mm with 72CFM. I used 20 loops of Linx on all 8 cores in 64bit mode times 3 official runs, and 1 break in run per CPU cooler. Real Temp 2.7 was used to monitor my temperatures of each core. The hottest core was then recorded. I let the Hyper 212+ CPU cooler set the maximum CPU core speed, by slowly overclocking until the temperatures rose to my limitations. I like to try and keep my CPU at around 60°C on a full load, +/- a few degrees. I used a single fan on the Hyper 212+ as well as a push-pull configuration. All fans were set to their maximum speed during testing. Ambient temperature was around 21°C. Your results may vary greatly from my own.
RESULTS
Idle
| Core i7 2.66 GHz | Idle | Load |
| Cooler Master Hyper 212+ w/1 fan |
31°C | 40°C |
| Cooler Master Hyper 212+ w/2 fan’s | 27°C | 38°C |
| Cooler Master V8 |
26°C | 36°C |
| Noctua NHC12P |
27°C | 35°C |
Starting off on a default CPU speed of 2.66GHz, the Hyper 212+ CPU cooler is more then capable of handling my Core i7 920. By strapping on a second fan to this CPU cooler resulted in a 2°C temperature drop vs having only 1 fan during full load testing.
Full Load
| Core i7 3.4 GHz |
Idle | Load |
| Cooler Master Hyper 212+ w/1 fan |
33°C | 63°C |
| Cooler Master Hyper 212+ w/2 fan’s | 29°C | 59°C |
| Cooler Master V8 | 30°C | 52°C |
| Noctua NHC12P |
29°C | 51°C |
Once I cranked up the CPU to 3.4 GHz, the Hyper 212+ CPU cooler hit my limitation of 60°C pretty fast. I am not going to worry to much about 3°C over. Adding a second fan on the Hyper 212+ resulted in a 4°C drop in temperatures on full load. Granted this CPU cooler does not run as cool as the others listed here, but keep in mind this, the Hyper 212+ runs around 30 USD vs 60+ USD for the others. So in my book not bad at all.
CONCLUSIONS
The Hyper 212+ CPU cooler performed quite well. Not staggering performance like we have seen with other CPU cooler offerings, but the other offerings run in the 60USD range versus this CPU cooler having a price point of around 30 USD. This CPU cooler fits perfect for those who need a better CPU cooler, but cannot afford the much more expensive CPU coolers out there, or for those who want a quiet CPU cooler for their HTPC computers. Of coarse you will have to use at least a mid sized tower for use with this CPU cooler.
The only thing this CPU cooler disappointed me in was the way it was mounted to the CPU. Mounting CPU coolers need to be hassle free and simple as possible. When companies add more parts to the mounting, it adds more confusion, and also adds more problems that could arise during installing. This is one of my pet peeves when it comes to CPU coolers.
- Performance 7.5
- Value 8
- Quality 6
- Warranty 8
- Features 8
- Innovation 6
Pros:
+Cools well for the price point of this CPU cooler
+Quiet operation
+Has multiple CPU sockets support including Intel’s Core i5
Cons:
–Mounting is way to complicated.
–Instruction not very clear on how to mount fans.
Because of the complicated mounting hardware that Cooler Master used, really hurts the scoring of this great little CPU cooler. I give it a: 7.0 and the Bjorn3D Seal of Approval


