EVGA 790i Ultra Triple SLI an Overclockers dream that’s Multi GPU ready. With the introduction of the Nvidia 790i Chip Set Nvidia has thrown down the gauntlet.
INTRODUCTION
The introduction of the Nvidia 790i chip set gives new meaning to SLI. With scaling running as high as 60-70%, SLI is becoming a more attractive option. With a feature rich board, easy to set up SLI, a really sweet bundle, and easy overclocking, it’s hard to overlook the 790i for true enthusiasts.
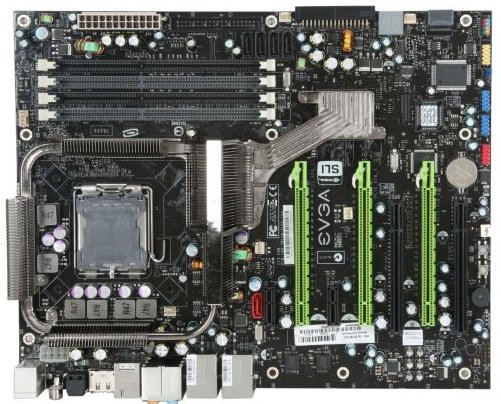
The EVGA 790i Ultra comes on a sexy Black PCB. With it’s 3 PCI-E 16x slots that all run at 16x standing out from the board, it lets you know right out of the box that this is a serious graphics monster. The layout on the board is well thought out and from the moment you open the box it just screams at you, “Feed me GPU’s NOW!”
We are glad to feed it a couple of GTX-260’s running in SLI right out of the box. Slap in some OCZ DDR3 2000 SLI ready RAM and fire it up. We did stay a little back from the case for fear of singed eyebrows but we managed to come through unscathed.
About EVGA
Warranty & Support:
In the US, EVGA offers a 10 year warranty (equivalent to lifetime). You can find full details of the warranty program on the EVGA home page, although it’s important to remember that the 10 year warranty only applies if you register the card within thirty days of purchase. But this is pretty much standard practice amongst the board partners that offer extra extended warranties. In addition, EVGA also has a lively message board where you can ask EVGA representatives about anything you’d like to know before or after purchasing an EVGA product.
One thing that sets EVGA above other NVIDIA partners is its support program. When you purchase an EVGA video card, the company gives you the chance to step up to something better (should Nvidia release a new line of graphics cards) in the first 90 days after the initial purchase. In order to qualify for this, you must purchase your EVGA video card from an authorized reseller – purchasing a card from eBay or another auction site does not qualify you for the Step-Up program.
Providing you meet EVGA’s very reasonable terms and conditions, you will get the full amount you paid knocked off the cost of the card you’re upgrading to. Obviously, you can’t keep stepping up to something faster – EVGA allows you to complete one Step-Up on each video card purchase; the Step-Up doesn’t count as a purchase.
FEATURES AND SPECIFICATIONS
Key Features
- NVIDIA® SLI™ Technology
Dramatically scales performance by allowing two graphics cards to be run in parallel. Only available on select PCI-Express models. - USB 2.0 Support
A standard plug and play interface providing easy-to-use connectivity for USB devices. - NVIDIA Native Gigabit Ethernet
The industry’s fastest Gigabit Ethernet performance, eliminates network bottlenecks and improves overall system efficiency and performance. - Third PCI-Express Expansion Slot
Provides future support for 3 GPU applications
Features
- NVIDIA RAID
- NVIDIA StreamThru Data Transport System
- Unified Driver Architecture (UDA)
- NVIDIA nTune Performance Application
- NVIDIA Firewall Technology
- NVIDIA nForce Networking
- NVIDIA ForceWare Unified Software Environment (USE)
- Standard Serial ATA
Specifications
Performance
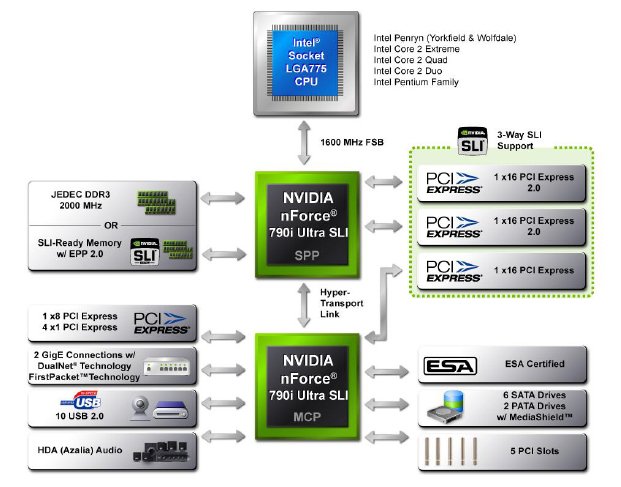
Based on NVIDIA 790i Chipset
Supports Intel Core 2 Extreme, Core 2 Quad, Core 2 Duo, Pentium and 45nm CPUs
1066/1333/1600 Mhz Front Side Bus
Chipset
North bridge: NVIDIA 790i Ultra SPP
South bridge: NVIDIA 790i Ultra MCP
Memory
Up to 8GB of DDR3 2000/1600/1333MHz memory
Dual Channel architecture
Expansion Slots
3 x PCIe x16
2 x PCIe x1
2 x PCI 2.2
Storage I/O
- 1 x Floppy disk drive connector
- 7 x SATA 3Gb/s
- RAID 0, 1, 5, 0+1
- 1 x UltraDMA 133/100/66 for up to 2 PATA devices
Audio
- 7.1-channel Realtek ALC889A
Coaxial, Optical S/PDIF out at back I/O
LAN
- Dual Gigabit LAN
- Realtek RTL8111B
- Realtek RTL8110SC
Multi I/O
1 x PS2 Keyboard
1 x PS2 Mouse
1 x S/PDIF Out Coaxial
1 x S/PDIF Out Fiber
1 x IEEE 1394 Ports
1 x eSATA
2 x RJ-45 Port
6 x Audio connector (Center speaker/Subwoofer Out, Rear speaker out, Side speaker out, Line-in, Line-out, MIC)
10 x USB 2.0 ports (6 rear + 4 internal headers)
Form Factor
ATX Form Factor
Length: 12.0in – 305mm
Width: 9.6in – 244mm
PACKAGING & CONTENTS


The EVGA 790i comes in an exciting black box promising triple SLI and has plenty of information and specifications to help inform the consumer about its purchase.

- Owner’s manual
- Driver CD
- Quick install guide
- Rear I/O shield
- IDE & FDD cables
- Six SATA cables
- USB expansion plate with four connections
- Firewire expansion plate
- Tri-SLI connector
- SLI connector
- Three molex-sata power adapters
- Case Badge
EVGA has included everything that a person will need to install this Triple SLI monster and then some. Containing both dual and triple SLI connectors, 6 nice black Sata cables, a quad USB back plate, and a rear Firewire bracket they’ve been quite generous with the bundle. It’s a trend we’d like to see other manufacturers follow.
Even though we are going to be showing the EVGA 790i again in the Pictures and Impressions section we couldn’t get past not showing it here. It’s just too sexy for it’s own good.
LAYOUT
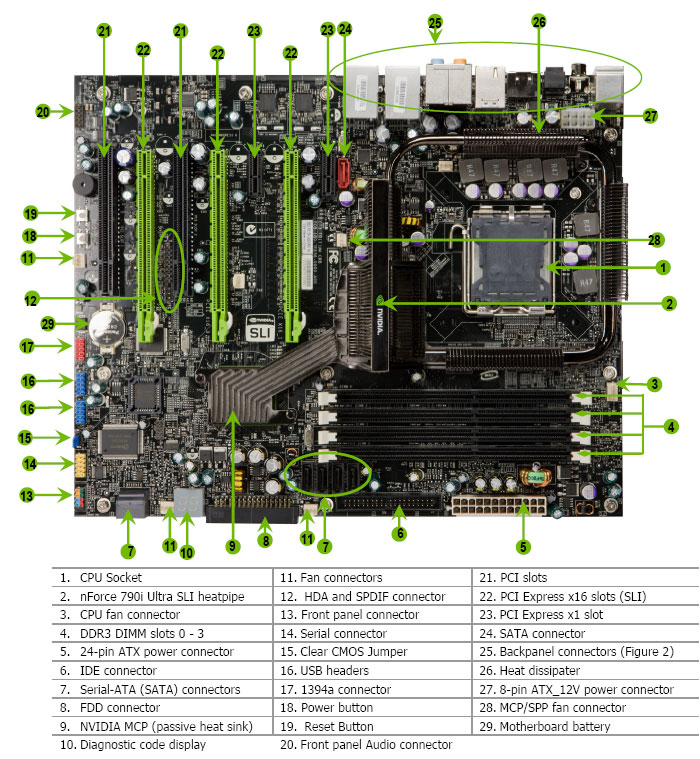
This board has the best layout we’ve seen to date. Even with dual GTX-260’s in SLI we could get to every component on the board we needed for setup. Every Sata port was available for use, nothing was blocked, and at the very worst we had to squeeze in to get reach the onboard Power and Reset buttons. Needless to say, we are ecstatic about the layout as many boards we’ve seen recently have blocked Sata ports, have hard to reach onboard buttons, and require a contortionist to get to vital components. This is a really refreshing change from what we’ve seen and Nvidia and EVGA deserve rich praise for the layout.
The one thing that you should take note of is the Red Sata port labeled #24. This is for e-Sata and comes off the JMicron JMB362. The red indicates that it can’t be combined with the other Sata ports and is for e-Sata only.
Labled #1, the CPU socket area that at first glance looks a little cramped actually has plenty of room for a Swiftech Apogee GTX or a large tower cooler. Tower coolers with a really large bottom might have a problem, but the Thermalright Ultra 120 and Silenex tower we tried on the board fit quite nicely.
The Sata ports labeled #7 are a little too close to the ram slots but we had no problems plugging in cables with ram installed and two large GPU’s hanging out in the area so we don’t have any complaints about the location. As we mentioned earlier, most of the boards we’ve seen recently have the Sata ports moved to the left of that position and are somewhat obscured by full length GPU’s but EVGA and Nvidia have found a viable solution for that and we remain impressed.
One of the things we did find disturbing is the mixed use of Solid Capacitors and older electrolyte capacitors. On a board of this caliber we’d expect and appreciate all solid caps. In all reality though we’ve seldom seen electrolyte capacitors go bad before a piece of equipment is obsolete so it’s not much of an issue.
Click a picture to see a larger view
 |
 |
 |
| CPU socket | Tight but workable | Pesky Electrolyte Caps |
 |
 |
|
| Connector Area | Triple SLI Sweet! |
Almost everything about the EVGA 790i screams sexy doesn’t it? It’s hard to not like a board that gets you excited before you even get it installed.

Getting a look at the I/O Plate you can see the standard PS2 ports, 6 USB, two Teamable Gigabit Ethernet ports, Firewire port, e-Sata port, and all the common connectors specific to modern boards today. Noticably absent is a clear CMOS button which we like to see on high end boards.
Moving on. Who are we kidding? We can’t get past having an installed shot of this beauty with the dual GTX-260’s onboard.
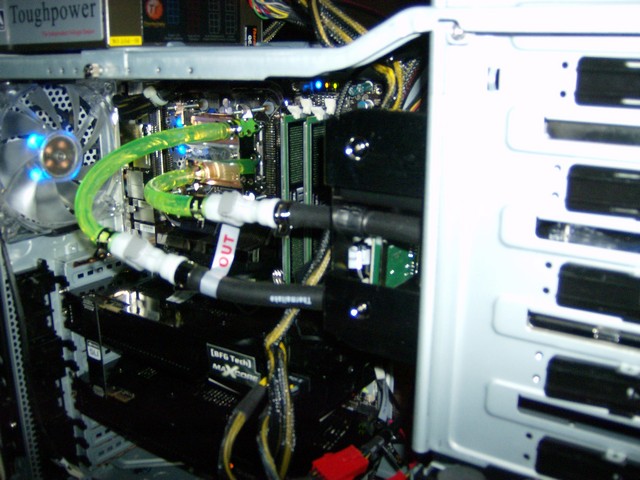
Looks pretty sweet setting there in the Thermaltake Armor+ ESA Chassis with Dual GTX-260’s, the water cooling kit, and Toughpower 850 ESA that we used for testing. The Thermaltake Bigwater kit held up pretty good in testing but later on we had to go to a component water cooling setup to convince ourselves that the system wouldn’t throttle during testing.
ESA
Enthusiast System Architecture (ESA) is a blending of hardware and software that allows you to monitor and control aspects of ESA supported hardware in an easily customizable 3D interface. Giving you system information and control of individual components like you’ve never had. Currently, it’s specific to Nvidia based chipsets and in order to use it fully you’ll need an ESA capable chassis and ESA capable components.
Fortunately, our friends over at Thermaltake kicked in a Thermaltake Armor ESA Chassis and a Toughpower 850 ESA for us to take a look at in conjunction with the EVGA 790i Nvidia based chipset motherboard.
For now, we are going to deal with the ESA related software and what it can do for you. Once you’ve downloaded the ESA software from Nvidia and installed it, you’ll find new entries in the Nvidia Control Panel.
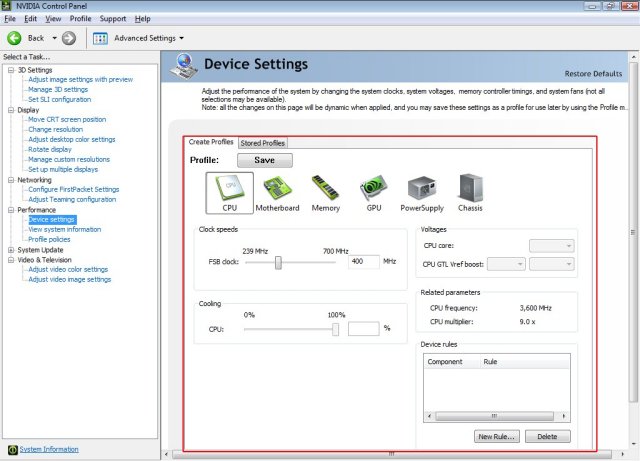
Highlighted there on the left you’ll see the new entry, “System Settings”. It’s a little hard to read, but that’s where it’s at. If we went much larger on the image it would run off the screen. This screen is the CPU screen of the ESA capable software. From here you can change the FSB within the software and, if we weren’t using a water cooling kit, we could also adjust the fan speed.
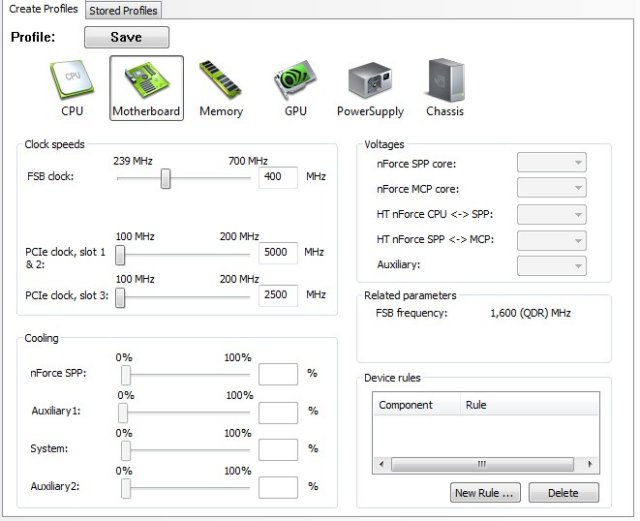
From the Motherboard screen you can adjust the FSB speed, PCI-E clocks, and the fans attached to the motherboard. In this chassis our fans aren’t connected to the motherboard so they are greyed out. The Voltages section was also greyed out but we weren’t much concerned with that. You’ll see why later. At its current infant stage, we’re looking at the ESA software more for informational purposes than actual adjustments inside the OS. We tried the FSB adjustment and most of the other settings inside the panel and they all worked without error, but still we prefer handling things in BIOS.
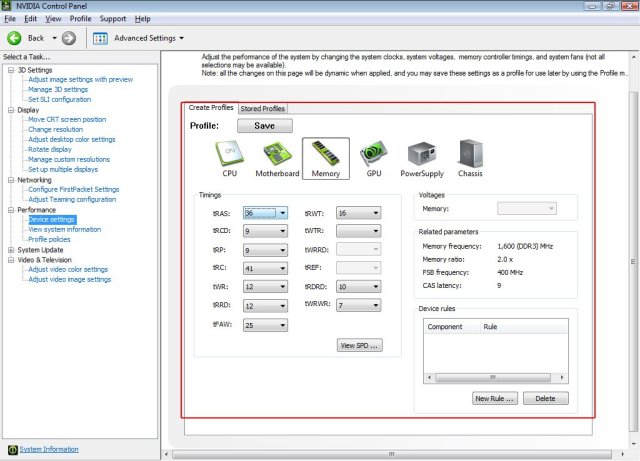
On the Memory screen you can change the memory settings and test them inside the OS without rebooting and going into BIOS. It also shows you the current settings for the memory over on the right.

On the GPU screen you can adjust the speed of Nvidia GPU’s. We are running in SLI mode and you let the drivers handle the speed of the GPU’s in SLI (we tried adjusting the speed of one GPU and it didn’t work). If you’re running a single card it’ll adjust the speed for you. We took one card out and adjusted one of the GTX-260’s we were running in the 790i from 576 to 655 with no ill effects.
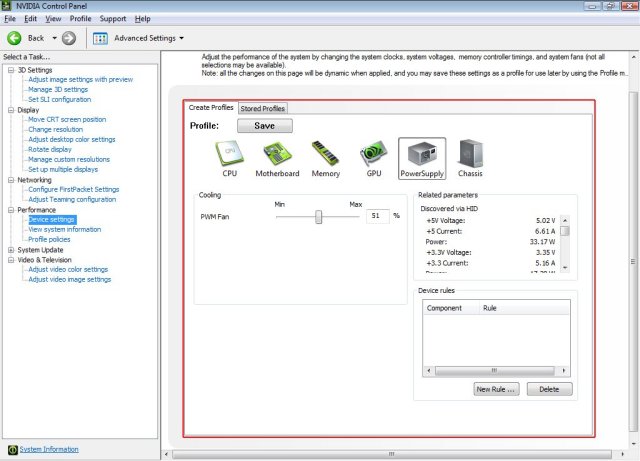
On the PSU screen the only adjustment is fan speed and that’s for ESA capable PSU’s like the Toughpower 850 Watt ESA we’re using. It also shows you the voltages it’s reading from all the various rails. A little later on you’ll see that the voltages we read with a multimeter and a PSU tester were a little different, but in most cases within .10 Volts. One tenth of a volt is pretty good for software reporting.
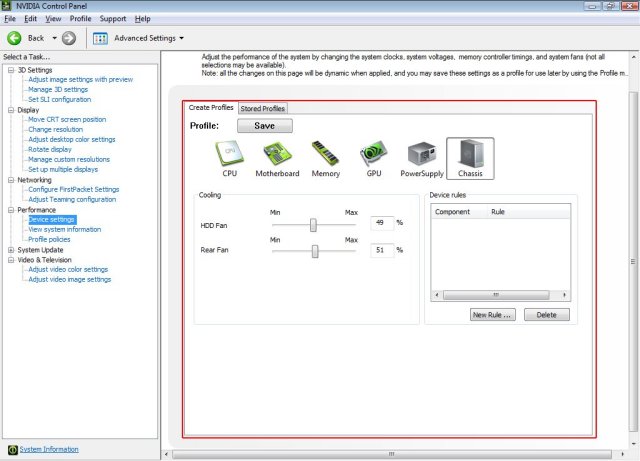
On the Chassis page you can adjust the fan speed of the front and rear fans. If you look back at the Motherboard screen section you can see that any fans that are on motherboard headers can be controlled from the motherboard screen. You have complete control of the system fans without having to wire in a fan controller. In the ESA chassis we’re using, the fans wire through the ESA panel in the chassis itself, so it’s a little different.
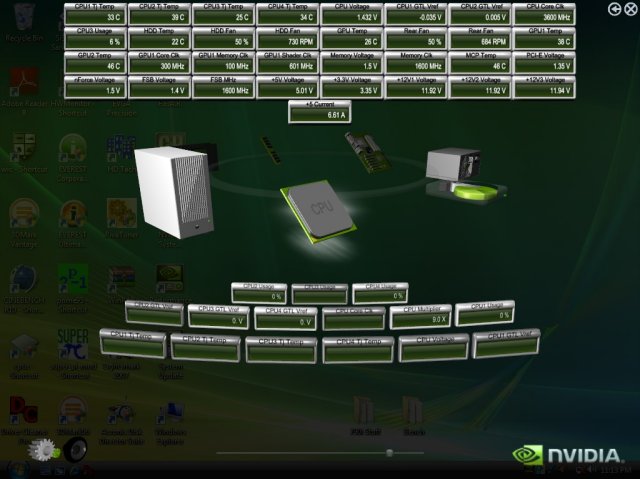
From the Nvidia Monitoring software you can select the monitors you want to see, and if you want them to be displayed on top at all times or not (you probably don’t want them on top at all times it’s kind of annoying). We selected a bunch of sensors to display and got a shot of what it looks like from the desktop.

When you’ve got all your sensors selected they will display on your desktop, giving you access to more information in one spot than you’ve ever had access to from a single piece of hardware.
On a side note, that’s what a freshly loaded machines desktop looks like when it’s ready for testing. In total, there’s about 76-100 GB loaded, depending on if Demo or full games are loaded for testing.
In all, we found the ESA software and Monitoring component to be easy to use and had no problems with the system settings we changed with it, but believe that it could use a little maturity before it’s completely reliable. The monitoring portion was our favorite because instead of using four or five pieces of software to accomplish monitoring we can get it all in one place. Since we were testing the ESA software, we used both 3rd party software and hardware to check it and eliminate any chance of bias on the part of the software itself. With extended testing we’ve come to the conclusion that it reports accurately in most cases but we can’t account for the discrepancy between hardware reported voltages and software reported voltages, other than to say that software reported voltages are notoriously incorrect.
BIOS
Fair warning, the EVGA has a feature rich BIOS that is going to take some space to cover, so if you’re not in a scrolling mood you might want to move on to the next page.
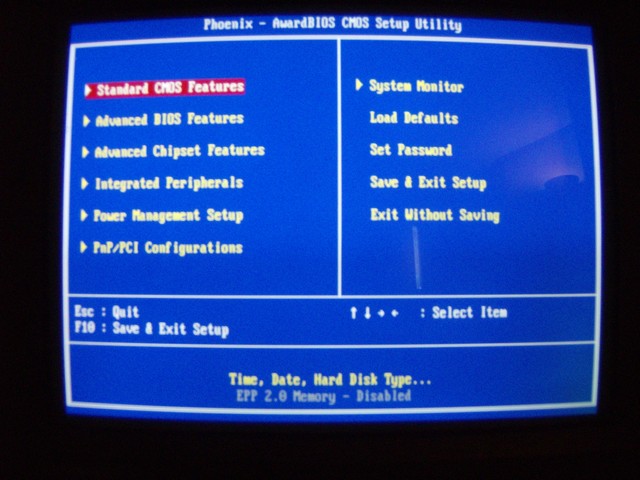
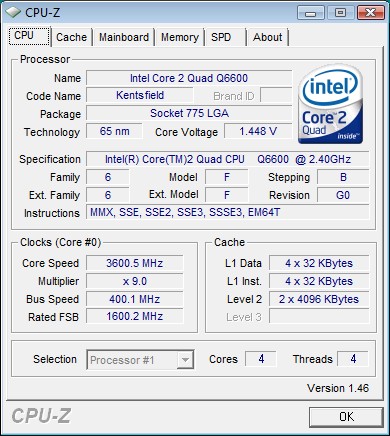
Noticeably absent from the initial BIOS screen is the ability to save BIOS to CMOS and load BIOS from CMOS profile capability that we like to see on high end boards. We jumped the FSB to 1600 (400 for Non-Nvidia Boards) and pumped up the voltage on the Q6600 to 1.4750 and the EVGA 790i booted right into Windows Prime95 stable right out of the gate at 3.6 GHz. That was the easiest CPU overclock we’ve done in a while.
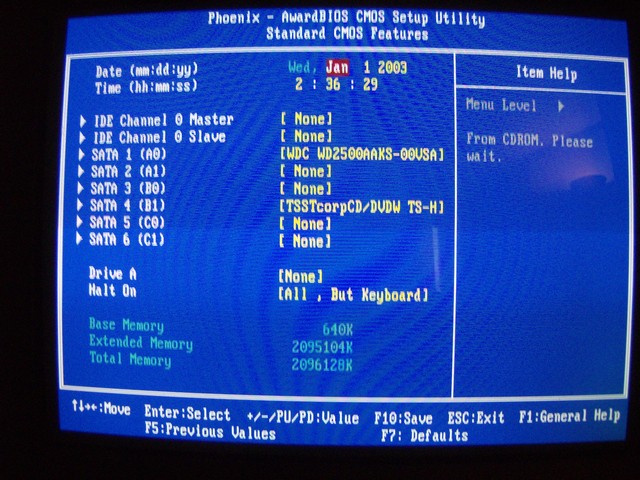
Pretty much the same thing you see in every Standard CMOS Features screen out there. The ability to have eight total drives if you have a couple of old IDE drives laying around is nice.
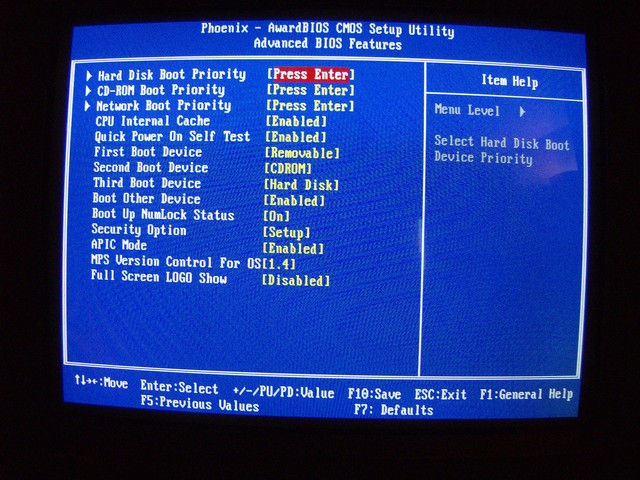
Again pretty standard Advanced BIOS screen, set boot priorities, security features, Full Screen Logo Bling that type of thing.
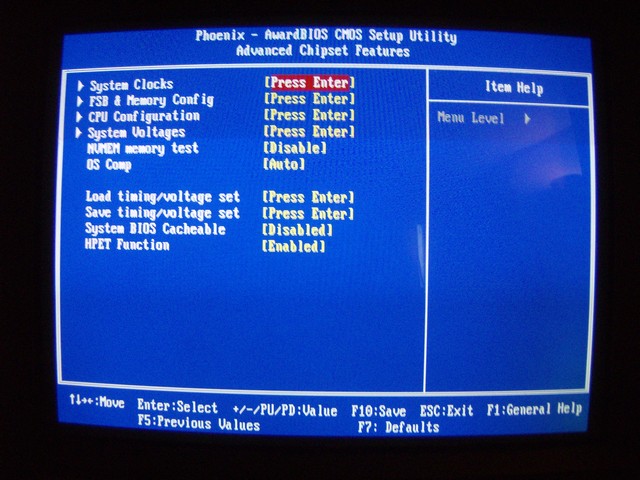
Advanced Chipset Features is where things get interesting in the EVGA 790i BIOS screen. Notice the four sub-screens there? Because that’s where you’ll be spending most of your time for overclocking.
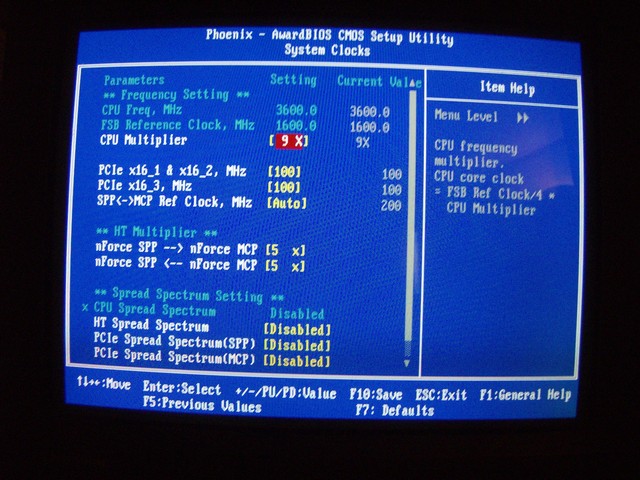
System Clocks is where you can set the multipliers if you want to use half multipliers. And don’t forget to lock the PCI-E express frequencies down to a hundred. We set the PCI-E to Auto after overclocking and had a few problems so we locked it back down to 100 and the system was nice and stable.
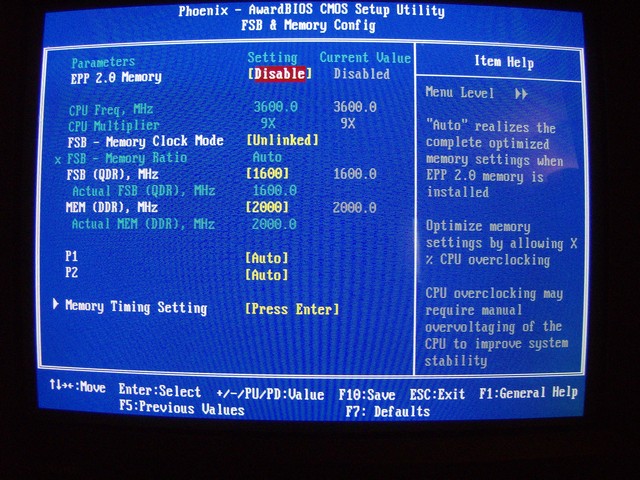
Nvidia chipsets are known throughout the overclocking world for their ability to link and unlink memory for overclocking. Running unlinked you can clock the CPU any way you want and still have the memory run at the frequency you want it at. We unlinked the memory and had no problems with overclocking the Q6600 running unlinked, then linked and synched it at 1600 FSB and had no problems there. Easy to use, stable in both modes, it’s a real improvement over previous SLI chipsets. You’ll also find the Advanced Timings sub-screen here which we found useful in tuning the OCZ DDR3 2000 SLI ready memory we’re running in this rig.
The P1 and P2 settings there need to be left at Auto because they’re for future use.
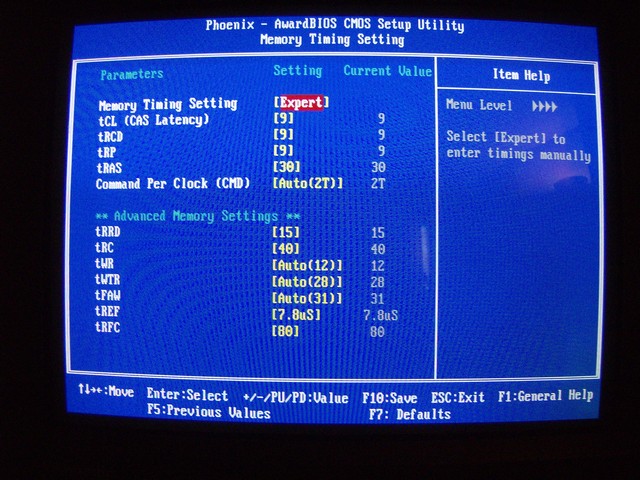
The Advanced Timings Screen has enough settings that we had no problems tuning the OCZ DDR3 2000 SLI ready ram. We got it to run at full speed with complete stability in less than a half hour.
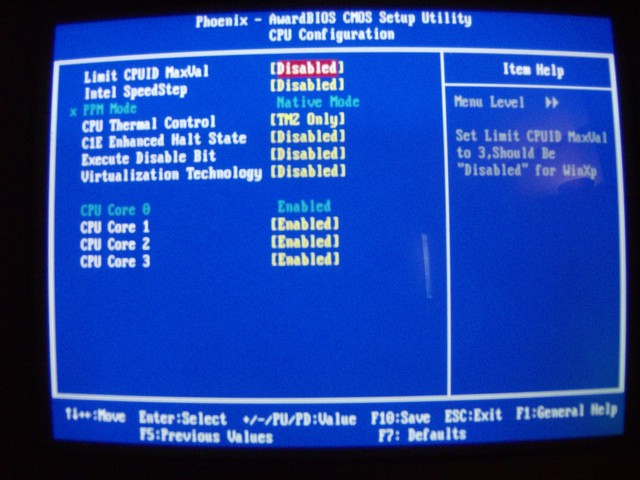
CPU Configuration is where you can disable all that Pesky thermal control stuff that helps keep your CPU alive but hinders overclocking.
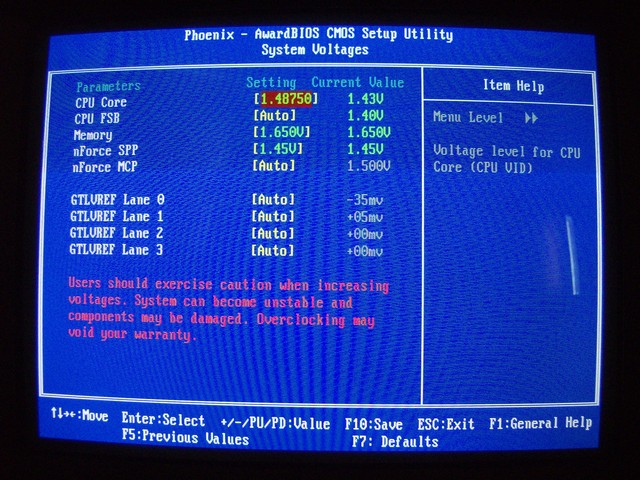
System Voltages is, of course, where you can set the voltages for the various devices in your system.
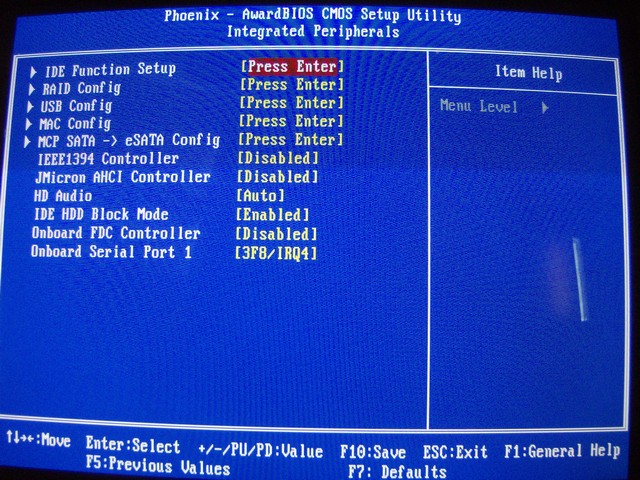
Pretty standard stuff in Integrated Peripherals, the nuts and bolts settings for Raid, USB, and IDE ports.
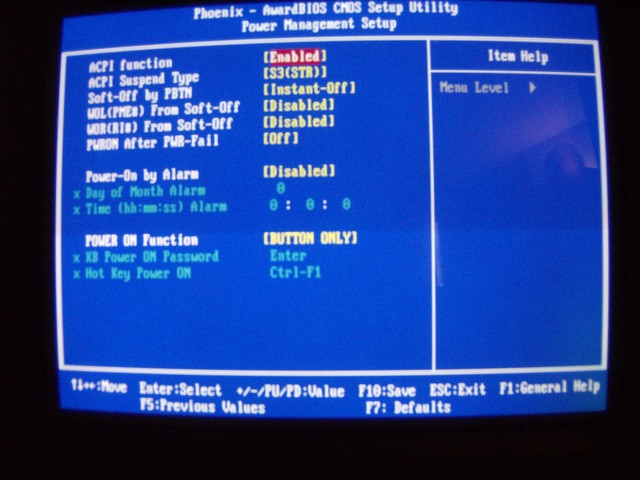
In the Power Management Setup screen you control how the rig acts after an interruption in power, and if you want power on by keyboard or mouse.
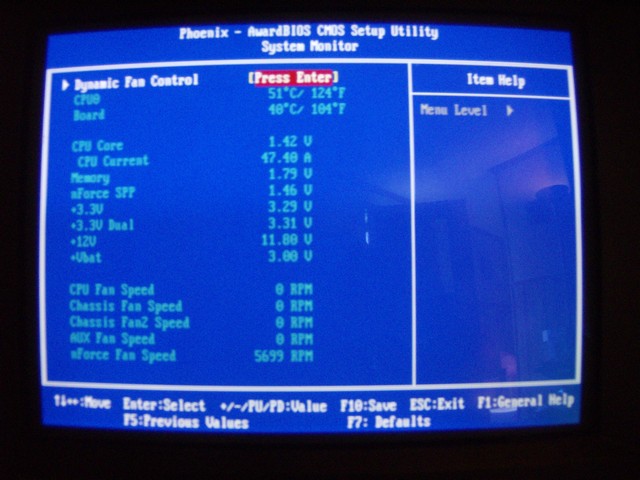
The System Monitor Screen is where you can get information about the current status of the hardware in your rig. Voltages, fan speeds, and that type of thing are available on this screen.
We passed over a couple of sub-screens that are less interesting like IDE setup, and Raid Setup. They’re pretty standard stuff and we didn’t want to make the BIOS Screens page 32 feet long.
TESTING & METHODOLOGY
We did a fresh load of Vista 64 on the EVGA 790i. No non-essential programs are running during testing. Each test was run a minimum of three times and the results averaged and reported here. To obtain the maximum FSB we had to switch our Q6600 (which has a know FSB limitation of 438MHz) for an E6750 we have laying around that eats FSB for lunch. No testing other than Maximum FSB was done with the E6750. All the tests were run on the Q6600 running at 3.6GHz vcore 1.4875. The two games we chose for testing were tested in DX10.
Test Rig
| Test Rig “Quadzilla” |
|
| Case Type | Thermaltake Armor ESA |
| CPU | Intel Q6600 @ 3.6 Voltage 1.4875 vcore E6750 Max FSB testing only |
| Motherboard | EVGA 790i |
| Ram | OCZ DDR3 2000 MHz |
| CPU Cooler | Swiftech DIY Watercooling |
| Hard Drives | WD 250 Gig Sata 2 Two Maxtor 160 Gig Sata2 |
| Optical | Sony DVD R/W |
| GPU | Leadtek GTX-260 BFG GTX-260 OCX MaxCore In SLI |
| Case Fans | Two 120mm Thermaltake Front/Rear Push/Pull 250mm Side fan 90mm Rear Exhaust 90mm Top Exhaus |
| Docking Stations | Tagan IB290 W/Deskstar 2 1/2 Inch 80 Gig Sata 2 Tagan IB390 W/Maxtor 160 Gig Sata 2 Thermaltake BlackX USB W/Seagate 80 Gig Sata 2 |
| Testing PSU | Thermaltake Toughpower 850 ESA Modular |
| Legacy | Floppy Drive |
| Mouse | Razer Lachesis |
| Keyboard | Razer Lycosa |
| Gaming Headset | Razer Piranha |
| Speakers | Logitec Dolby 5.1 |
| Any Attempt Copy This System Configuration May Lead to Bankrupcy | |
Test Suite
|
Synthetic Benchmarks |
|
3DMark Vantage |
|
3DMark Vantage v. 1.01 |
|
3DMark06 v. 1.1.0 |
|
SiSoft SANDRA XII Professional SP2 |
|
Everst Ultimate Edition v. 4.50.1330 |
|
SuperPi Mod 1.5XS |
|
HD Tach RW 3.0.1.0 |
|
Cinebench R10 64 bit |
|
WinRar v. 3.71 |
|
Games |
|
Crysis v. 1.02 |
|
Company of Heroes v.1.07 |
3DMARK06
3DMARK06 V. 1.1.0

3DMark06 developed by Futuremark, is a synthetic benchmark used for universal testing of all graphics solutions. 3DMark06 features HDR rendering, complex HDR post processing, dynamic soft shadows for all objects, water shader with HDR refraction, HDR reflection, depth fog and Gerstner wave functions, realistic sky model with cloud blending, and approximately 5.4 million triangles and 8.8 million vertices; to name just a few. The measurement unit “3DMark” is intended to give a normalized mean for comparing different GPU/VPUs. It has been accepted as both a standard and a mandatory benchmark throughout the gaming world for measuring performance.
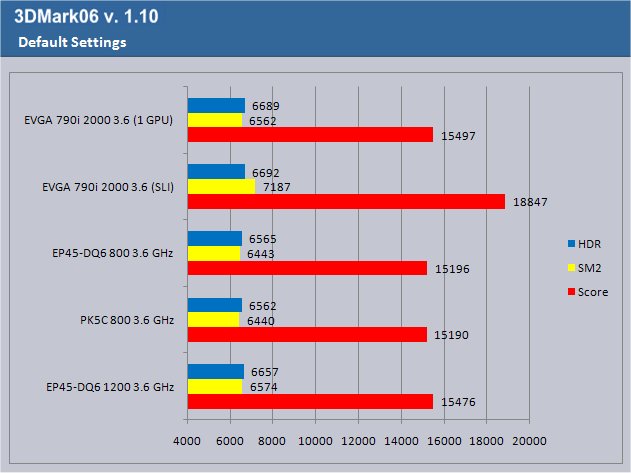
In an attempt to give you a little more information, right behind each boards name in this graph is the ram speed at which the test was run. Some boards we have won’t handle the higher speed ram, or DDR3. Behind the Ram Speed is the processor frequency which we had at 3.6 GHz in all the tests.
As you can see, even with a single GPU running, the 790i came out ahead in testing. With both GPU’s running it gained further advantage. You should be aware there’s more to get out of the SLI setup but we wanted to present it in a manner we felt most of our readers could reproduce. Drive the CPU frequency up and scores increase dramatically.
EVEREST, SUPERPI, & WINRAR
Everest Ultimate
“EVEREST Ultimate Edition is an industry leading system diagnostics and benchmarking solution for enthusiasts PC users, based on the award-winning EVEREST Technology. During system optimizations and tweaking it provides essential system and overclock information, advanced hardware monitoring and diagnostics capabilities to check the effects of the applied settings. CPU, FPU and memory benchmarks are available to measure the actual system performance and compare it to previous states or other systems. Furthermore, complete software, operating system and security information makes EVEREST Ultimate Edition a comprehensive system diagnostics tool that offers a total of 100 pages of information about your PC.”
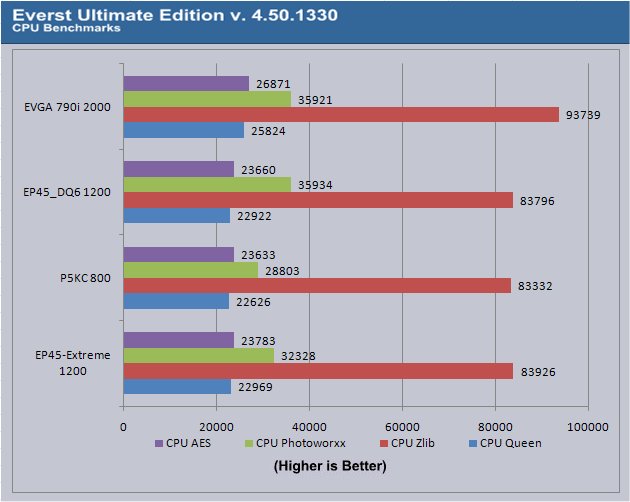
The EVGA 790 led in every test in Everest except Photoworxx and even then it was barely edged out by the EP45T-Extreme by no more than 13 points. Having taken the win in 3 out of 4 tests, the EVGA is starting to prove itself to be more than just a repository for your GPU(s).
SuperPI
SuperPi is the “Gold standard” for many when it comes to judging system performance. We ran 1 and 2 Meg calculations, again running each test three times and reporting the average of the results.
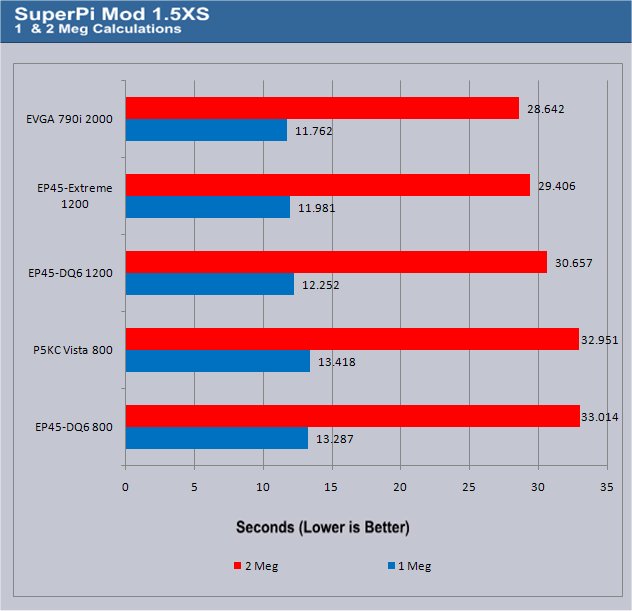
SuperPi is known to like raw ram speed and the EVGA 790i was showing the advantage it has with OCZ DDR3 2000 Nvidia Edition SLI ready ram. Just for fun we backed the ram down to 1600MHz and tightened the timings and even at that speed it still did better than its closest competitor (the EP45-Extreme running Patriot DDR2 at 1200 Mhz). We would have to say the EVGA 790i is more than just a high powered graphics board. While it’s known for it’s blazing fast Triple SLI capabilities, it’s out performing the other boards in non-graphics related areas.
WinRar v. 3.71
This module in WinRar generates random data, which contains specially introduced redundancy, increasing the load to both the processor and memory. Data is then passed through RAR compression and decompression algorithms, and the output of the decompression algorithm is compared to the source data. If any differences are found, WinRAR then reports “Errors found – Yes” in the command window. WinRAR displays a size of processed data and compression speed, current and resulting, in kilobytes per second.
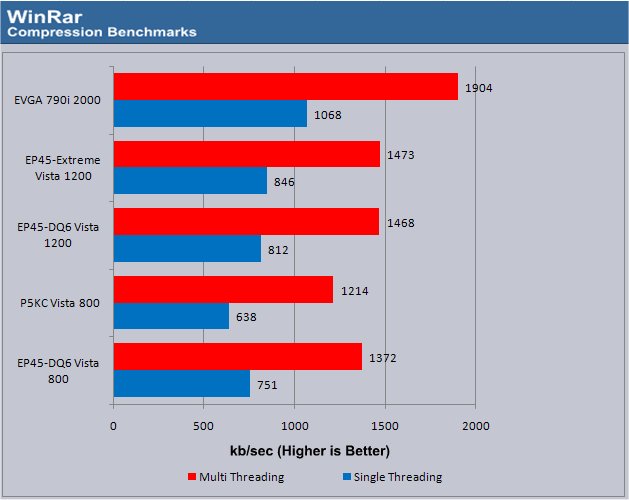
WinRar really liked the EVGA 790i and its ram at that blazing speed of 2000 MHz. It jumped out to a demanding lead and no matter how many times we ran the calculations the results stayed the same. It really is looking like Nvidia made some serious improvements in the 790i chipset.
CINEBENCH & SANDRA
Cinebench
“CINEBENCH is a real-world test suite that assesses your computer’s performace capabilities. MAXON CINEBENCH is based on MAXON’s award-winning animation software, CINEMA 4D, which is used extensively by studios and production houses worldwide for 3D content creation. MAXON software has been used in blockbuster movies such as Spider-Man, Star Wars, The Chronicles of Narnia and many more. MAXON CINEBENCH runs several tests on your computer to measure the performance of the main processor and the graphics card under real world circumstances. The benchmark application makes use of up to 16 CPUs or CPU cores and is available for Windows (32-bit and 64-Bit) and Macintosh (PPC and Intel-based). The resulting values among different operating systems are 100% comparable and therefore very useful with regard to purchasing decision-making. It can also be used as a marketing tool for hardware vendors or simply to compare hardware among colleagues or friends.”
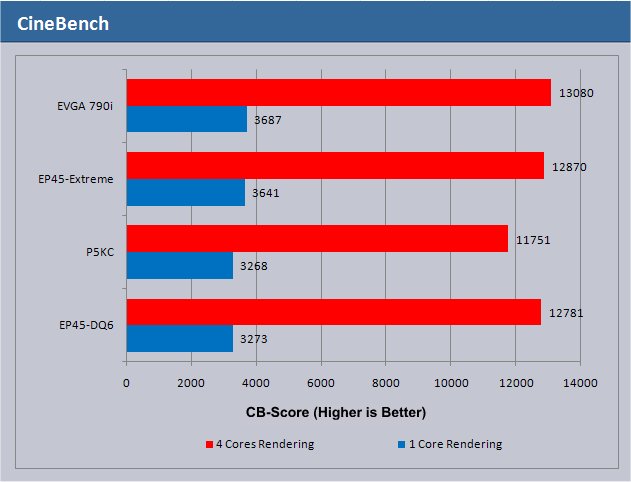
Cinebench liked the EVGA 790i pretty well. The 790i chipset and high speed DDR3 combined to churn out another win for this amazing board.
Sisoft SANDRA 12 Professional SP2a
“SiSoftware Sandra (the System ANalyser, Diagnostic and Reporting Assistant) is an information & diagnostic utility. It should provide most of the information (including undocumented) you need to know about your hardware, software and other devices whether hardware or software. It works along the lines of other Windows utilities, however it tries to go beyond them and show you more of what’s really going on. Giving the user the ability to draw comparisons at both a high and low-level. You can get information about the CPU, chipset, video adapter, ports, printers, sound card, memory, network, Windows internals, AGP, PCI, PCI-X, PCIe (PCI Express), database, USB, USB2, 1394/Firewire, etc.”
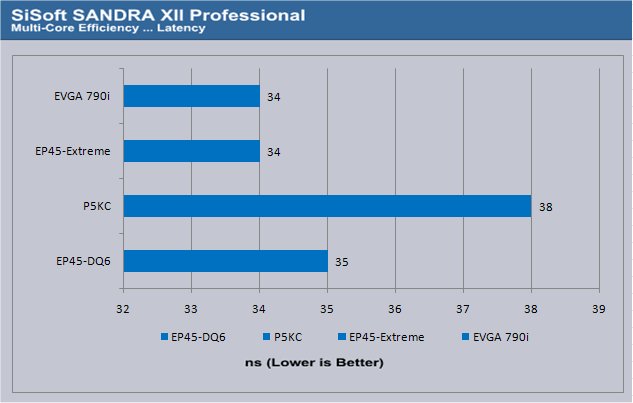
The Multicore Efficiency Latency test saw the EVGA 790i tied with the EP45-Extreme. We’re talking Nano-Seconds here, so front to back on the same CPU we’re seeing only 4ns difference in this chart. Gotta be careful to check the scaling before jumping to conclusions.
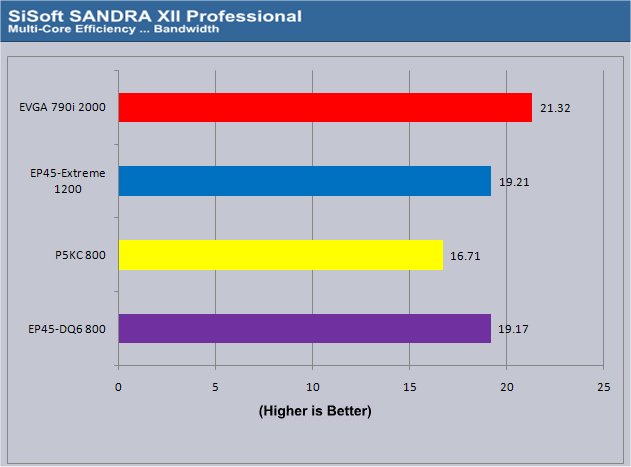
With 21.32 GB/s bandwidth in the Multi-Core Efficiency Bandwidth test the EVGA 790i came out in the lead yet again. With this many tests under our belt we’re seeing a pattern here.
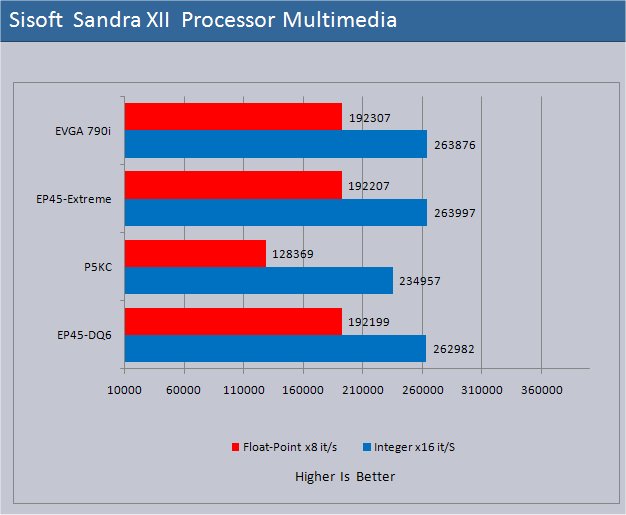
The Processor MultiMedia test was a mixed bag and really too close to tell. Differences like that can be attributed to no more than small discrepancies in the test runs.

Showing it’s memory muscle, the EVGA 790i churned out 8.32GB/s memory bandwidth which was significantly ahead of it’s closest competitor, the EP45-Extreme running the Patriot ram at 1200 MHz.
CRYSIS, COH & HDTACH
Crysis v. 1.2

Crysis is the most highly anticipated game to hit the market in the last several years. Crysis is based on the CryENGINE™ 2 developed by Crytek. The CryENGINE™ 2 offers real time editing, bump mapping, dynamic lights, network system, integrated physics system, shaders, shadows, and a dynamic music system, just to name a few of the state-of-the-art features that are incorporated into Crysis. As one might expect with this number of features, the game is extremely demanding of system resources, especially the GPU. We expect Crysis to be a primary gaming benchmark for many years to come.
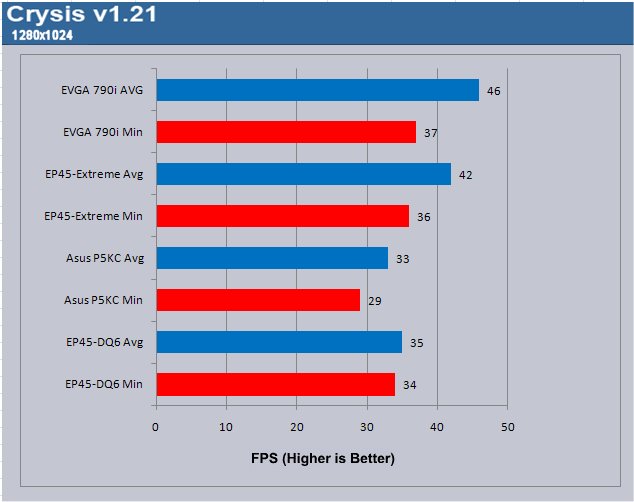
Crysis isn’t known to scale very well with Crossfire or SLI but the EVGA 790i still came out ahead in the test runs we did. It’s Crysis. There’s not much you can say about it except that it eats GPU’s for breakfast.
Company Of Heroes v. 1.71

Company of Heroes(COH) is a Real Time Strategy(RTS) game for the PC, announced on April, 2005. It is developed by the Canadian based company Relic Entertainment and published by THQ. COH is an excellent game that is incredibly demanding on system resources thus making it an excellent benchmark. Like F.E.A.R., the game contains an integrated performance test that can be run to determine your system’s performance based on the graphical options you have chosen. It uses the same multi-staged performance ratings as does the F.E.A.R. test. Letting the games benchmark handle the chore takes the human factor out of the equation and ensures that each run of the test is exactly the same producing more reliable results.
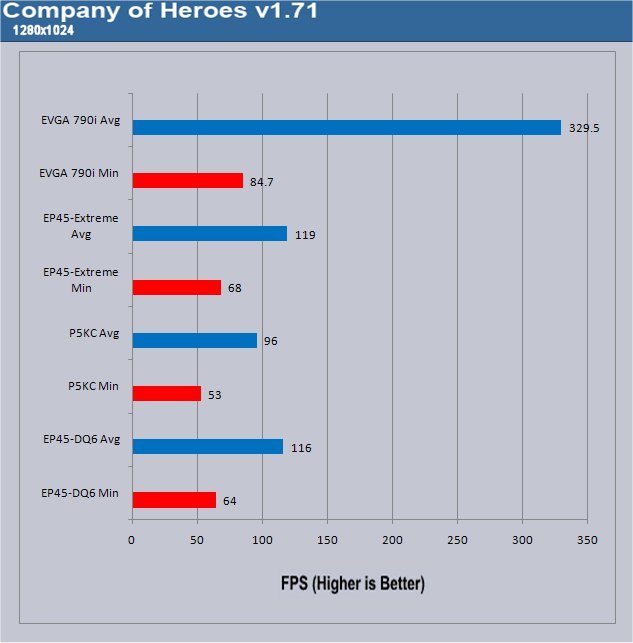
Minimum frames running SLI in Company of Heroes, the 790i didn’t pull out too far in the lead. Average frames were high and we repeated the test numerous times but the SLI setup jumped way up there to 329.5 FPS and stayed in that range. In all, we ran the test six times, checking each time before running the test that the settings were correct. SLI was just eating it for lunch.
HDTach v. 3.0.4.0
HD TACH performs sequential read and write tests on removable media and fixed disks. HD Tach is also capable of performing the sequential read and write tests on the entire disk instead of the small number of zones in the quick and long test. We opted to use the Short 8 (MB) and Long 32(MB) tests in the sequential read mode only, as sequential writes are covered by other benchmarks.
|
Hard Drive Tach |
||||||
| EP45-Extreme | EP45-DQ6 | P5KC | EVGA 790i | |||
| Random Access Time* (ms) | 12.1 | 12.0 | 11.7 | 11.9 | ||
| Average Read (MB/sec) | 126.6 | 114.6 | 116.2 | 125.7 | ||
| CPU Utilization* | 2% | 2% | 2% | 2% | ||
| Burst Speed (MB/sec) | 233.7 | 229.1 | 230.5 | 231.2 | ||
|
*Lower is Better … Otherwise Higher is Better |
||||||
The 790i did pretty good in the HD Tach test. It didn’t run away from the pack but the numbers are close enough between it and the EP45-Extreme that you would call it a photo finish. The Ep45-Extreme came in a little faster but again, differences of that ( or lack thereof) magnitude can be attributed to minute differences in the test runs.
POWER CONSUMPTION & OVERCLOCKING
Power Consumption
| Power Consumption In Watts |
|||||
| Idle | Load | ||||
| Gigabyte EP45-Extreme | 173 | 295 | |||
| Gigabyte EP45-DQ6 | 167 | 283 | |||
| Asus P5KC | 160 | 281 | |||
| EVGA 790i (SLI Running) | 215 | 451 | |||
| EVGA 790i (Single GPU) | 172 | 307 | |||
Overclocking
How far did we get with the Q6600 on the EVGA 790i Ultra?
There’s definately more to get from the EVGA 790i, but we hit 1.4875v vcore but raising it to 1.5v on the core wouldn’t give us any increase in speed so we had hit the point of diminishing returns. Some time back we discovered a FSB wall on our Q6600 so we swapped out the Quad for an E6750 that we’ve tested above 500 FSB on a couple of occasions.
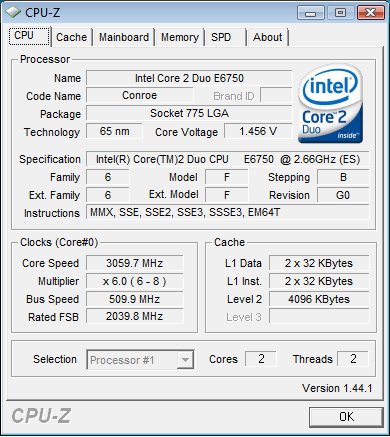
It took some time to achieve it but we were able to hit 509 FSB with our E6750. It took a little extra active cooling and fiddling with voltages to hit that speed. That’s a pretty sweet FSB to hit on air.
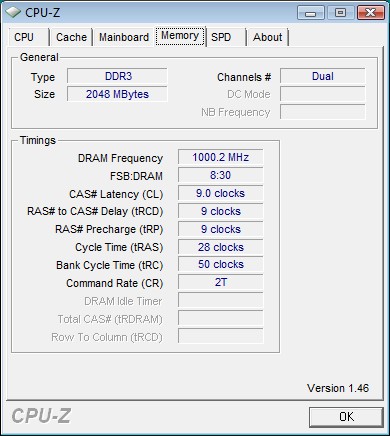
We were able to run the OCZ DDR2 2000 MHz kit at full speed with complete stability but it wasn’t a matter of just selecting a profile and letting it run. It took a couple of hours to understand what the ram wanted. Then we were able to run it at different speeds with no difficulties.
Most good overclockers know that the rated speed and timings on some kits aren’t necessarily the best settings to run at. We played with the memory for a while and discovered that we got better bandwidth it at 1600 MHz running 8-8-8-24 and 7-7-7-20 than we did running it at 2000 MHz 9-9-9-28. It wasn’t an eye popping increase, but the system did feel more responsive and somewhat snappier. So you might want to play with lower speeds and tighter timings.
CONCLUSION
After living with and playing with the EVGA 790i for several weeks we are quite impressed with its performance. It not only churns out graphics at blazing speeds while running SLI, but directly competes with, and in most cases out performs, one of our favorite boards, the EP45-Extreme in both graphics and non-graphics tests. Setup was a snap and we had the board up and running in SLI configuration in no time at all.
We didn’t experience any instability or lockups after initial overclocking though you can expect a few lockups and reboots during any intensive overclocking session. On the EVGA 790i Ultra we jumped the FSB to 1600 (400 on non-Nvidia boards), bumped the voltage up on the CPU to 1.4875v, unlinked the memory, ran it at 1333MHz and booted into Windows Prime95 stable (tested four hours) on the first try. That’s something you have to love; out of the gate first shot stablity. It did take some fiddling with the memory to get it up to 2000 MHz, but we’d attribute that to the memory more than the motherboard. When we set the EPP profile on the board, it correctly read it and set the memory and timings to the correct voltages, but we had to modify it from there to get the memory to run correctly.
During gaming sessions the frames were flying by so fast that it was hard to believe. SLI scaled into some games better than others but that’s to be expected. There’s just a coolness factor to running SLI that’s hard to quantify. We had several people come by to check out the system and all of them were amazed and in awe of the blazing graphics performance and overall speed of the platform.
We were a little disappointed that the board had solid and electrolytic capacitors mixed. The solid caps were clustered around the CPU and the electrolytic were sprinkled around the board. With a price tag above $300 we’d really like to see all solid caps to increase the longevity and dependability of the motherboard. That being said, we’ve never blown a capacitor on a motherboard, so we’re not sure how much of an issue that is. Weighed against the performance we saw, ease of setup, sharp good looks, and coolness factor of running SLI,we’re not very concerned with the lack of all solid caps.
The ESA components of the system pleased and surprised us with the amount of information about the different components we had running. Testing with other software and hardware to confirm the readings, we were impressed with the accuracy of the readings that consistently came close to or matched our other testing methods.
EVGA made the deal even sweeter with a bundle that most manufacturers wouldn’t even consider including with their motherboards. Unlike some models of the 790i, the EVGA 790i had the Northbridge fan already mounted for us. It’s always nice to take a product out of the box and have it ready to install without having to second guess installing additional parts.
We have a lot of boards available to us and four or five machines of megalomaniac proportions running at any given time. Yet we find ourselves seated at the test rig with the EVGA 790i Ultra SLI motherboard more often than not. We like it so much that we went mobile with it and put it on a cart so that it can follow us around during our daily testing. That alone speaks volumes about how much we like it.
Pros:
+ Great performance
+ Overclocks Well
+ 30+ FPS In Crysis Minimum
+ Sexy
+ Coolness Factor
+ Stability
+ Ease Of Setup
+ Sweet Bundle
+ Quiet Operation
+ Triple SLI Ready
+ Did we mention Sexy?
Cons:
– Not All Solid Caps
– A Little Expensive For Some
The EVGA 790i Ultra SLI awed and amazed us with it’s blazing speed, both in SLI and non-Graphics performance. This is the stuff computing legends are made of.
With the performance EVGA 790i Ultra SLI offers we have to give it:
Final Score of 9.5 out of 10 and the Golden Bear Award.


